background image

imagine the possibilities

Thank you for purchasing this Samsung 

product. To receive more complete service, 

please register your product at

www.samsung.com/register

Model                         Serial No.                       

LED TV

Installation manual 

[HG890_ZA]Install_Guide-00ENG.indd   1

2013-04-12     5:30:34

Summary of Contents for HG46NB890

Page 1: ...magine the possibilities Thank you for purchasing this Samsung product To receive more complete service please register your product at www samsung com register Model Serial No LED TV Installation manual ...

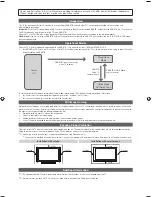
Page 2: ...ges such as jpeg picture files or still image elements such as TV channel logos panorama or 4 3 format images stock or news bars or crawls on the screen Displaying still pictures continually can cause uneven screen wear which will affect image quality To reduce the chance that this effect will occur please follow the recommendations below Avoid displaying the same TV channel for long periods Alway...

Page 3: ...lling the LED TV Stand 5 y y Using the TV s Controller 6 y y The Connection Panel 7 y y The Remote Control 9 y y Using the Smart Touch Control 11 y y Using the touch pad 14 y y Connecting to the Network 16 y y Connecting the TV to an SBB or STB 18 y y Connecting the Bathroom Speakers 20 y y Connecting the MediaHub HD 21 y y Connecting the RJP Remote Jack Pack 22 y y Setting the Hotel Option Data 2...

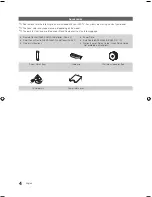
Page 4: ...he stand are listed under Stand Components on the following page y y Remote Control AA59 00817A Batteries AAA x 2 y y Smart Touch Control AA59 00830A Batteries AAA x 2 y y Owner s Instructions y y Power Cord y y Data Cable BN39 00865B BN39 01011C y y Warranty card Safety Guide Quick Setup Guide Not available in all locations Screw Cover 2ea Cable clip Wall mount adapter 2ea TV holder kit Power inl...

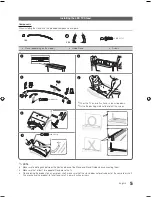
Page 5: ...ont and back of the Stand and Stand Guide when connecting them y y Make sure that at least two people lift and move the TV y y When placing the product on a console or shelf make sure that the stand does not protrude out of the console or shelf This may cause the product to fall off and result in a malfunction or injury 1 2 3 4 5 6 x4 M4 X L12 C x4 M4 X L12 C Lay the TV on a soft surface screen si...

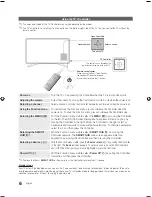
Page 6: ... select SMART HUB by moving the Controller upwards The SMART HUB main screen appears Select an application by moving the Controller and then pressing the Controller Selecting a Source s With the Function menu visible open the Source screen s by pushing the Controller to the right The Source screen appears To select a source move the Controller back and forth When the source you want is highlighted...

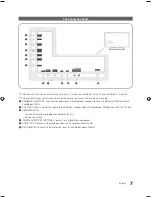
Page 7: ...port RCA 2 VOL CTRL Used to control the volume of the Bathroom speaker Connect the Bathroom Wall Box and the VOLCTRL port 3 USB HDD 5V 1A Connector for software upgrades and Media Play etc Service connection 4 DIGITAL AUDIO OUT OPTICAL Connects to a Digital Audio component 5 AUDIO OUT Connects to the audio input jacks on an Amplifier Home Theater 6 DVI AUDIO IN Connects to the audio input jacks on...

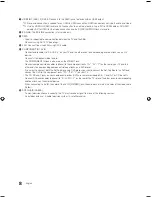
Page 8: ...udio The COMPONENT IN jack is also used as the VIDEO 1 jack Connect component video cables optional to the component jacks PR PB Y on the rear of your TV and the other ends to corresponding component video out jacks on a DVD player If you want to connect both the Set Top Box and a DVD player you should connect the Set Top Box to the DVD and connect the DVD to the component jacks PR PB Y on your TV...

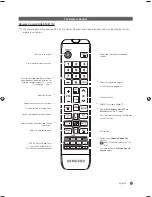
Page 9: ...P Sets the Sleep Timer X Turns the 3D image on or off CC Controls the caption decoder Cut off the sound temporarily Press to directly access channels Adjust the volume Display the channel list on the screen Display the main on screen menu HOME Only used in Widget TV Quickly select frequently used functions Return to the previous menu Use these buttons in the Media Play and Anynet modes Select on s...

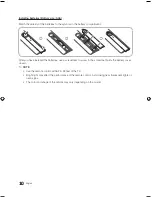
Page 10: ...ou have installed the batteries use a screwdriver to screw in the screw that holds the battery cover closed NOTE Use the remote control within 23 33 feet of the TV Bright light may affect the performance of the remote control Avoid using near fluorescent lights or neon signs The color and shape of the remote may vary depending on the model ...

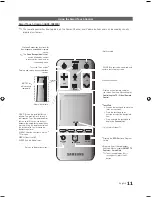
Page 11: ...the e Manual chapter SMART TV Features Smart Hub To exit an application that is running easily press the button Not Available Turns the TV on and off Displays and selects the available video sources Returns to the previous menu TV MIC STB SOURCE VOICE MORE VOL CH ALARM LIGHT MENU SLEEP SMART HUB GUIDE RETURN EXIT HOME MUTE MUTE Cuts off the sound temporarily Adjusts the volume Use Voice Recognitio...

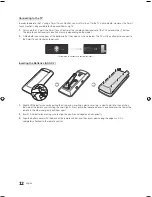
Page 12: ... The TV will then attempt to connect to the Smart Touch Control automatically Attempting to connect and completion icons Inserting the Batteries AAA X 2 1 Slightly lift the battery cover by pulling the strap or by inserting a plastic card e g a credit card into the notch on the side of the remote and twisting the card slightly Next grasp the loosened cover in one hand and the top of the remote in ...

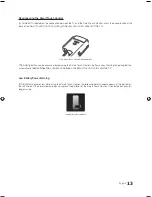
Page 13: ...iring button can be accessed by removing the Smart Touch Control s battery cover Pressing the pairing button automatically reestablishes the connection between the Smart Touch Control and the TV Low Battery Power Warning If the battery becomes low while using the Smart Touch Control the following alarm window appears at the bottom of the left screen If the alarm window pops up replace the batterie...

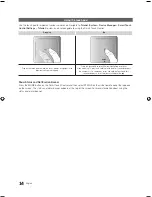
Page 14: ... is dragging Press the touch pad to select the item highlighted or in focus When watching TV press and hold the touch pad for 2 seconds displays the channel list On some apps press and hold the touch pad for 2 seconds displays a list of functions available for the app Show Status and Notification Banner Press the MORE button on the Smart Touch Control and then select STATUS on the virtual remote p...

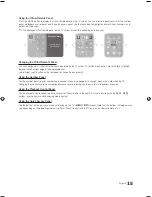
Page 15: ...etween panels move the focus highlight beyond the left or right edge of the displayed panel Use left right scroll function on the touchpad to change the panel easily Using the Number Panel Use the number panel to enter numbers on a keypad screen or webpage or to change the channel while watching TV Changing the channel using the number pad leaves a record allowing you to easily return to previous ...

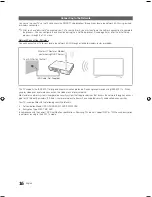
Page 16: ... b g and n communication protocols Samsung recommends using IEEE 802 11n When you play video over a network connection the video may not play smoothly Most wireless network systems incorporate a security system that requires devices that access the network through an access point or AP typically a wireless IP Sharer router or modem to transmit an encrypted security code called an access key Your T...

Page 17: ...t 6 or CAT 7 STP Type cable for the connection Shielded Twisted Pair The Modem Port on the Wall TV Rear Panel LAN Cable Not Supplied Modem Cable Not Supplied External Modem ADSL VDSL Cable TV The LAN Port on the Wall TV Rear Panel LAN Cable Not Supplied The Modem Port on the Wall TV Rear Panel LAN Cable Not Supplied Modem Cable Not Supplied LAN Cable Not Supplied External Modem ADSL VDSL Cable TV ...

Page 18: ...ata communication Connecting the Audio Output to an Audio Amplifier 1 Connect the AUDIO OUT port of the TV to the Audio In port of an audio amplifier with a stereo cable AUDIO IN AUDIO OUT DVI AUDIOIN HDMIIN3 AUDIO OUT DVI AUDIOIN HDMIIN3 AUDIO OUT TV Rear Panel Audio Amplifier 1 Stereo cable ETH MODEM DATA DATA DATA TV Rear Panel Data Cable ...

Page 19: ...19 English List of Vendors and Compatible Data Cables Supplied with the TV y y Confirm that you are using the correct data cable for your vendor Refer to the code label on the data cables ...

Page 20: ...rt supports MONO sound out only y y Installing the Volume Control If you configure the Volume Control Box as shown in the figure you can control the volume of the bathroom speakers The jack that connects the Volume Control Box to the TV is a 3 5mm normal Phone jack Volume Control Box switch is a Tact switch Setting the Sub AMP Mode 0 Turns the Sub AMP function off PWM off 1 Determines the Sub volu...

Page 21: ...ARC 2 DVI or 3 port of the TV and the HDMI port of the MediaHub HD y y MediaHub HD The MediaHub HD is a hardware module that has different Audio Video inputs A V Audio PC HDMI and USB and corresponding outputs The corresponding output sources connect from MediaHub to the TV MediaHub communicates with the TV via RS232 Hot Plug Play is a function that allows hotel guests to connect an external sourc...

Page 22: ...JP 3 Connect the EX LINK port of the TV and the RS 232 port of the RJP The RJP Remote Jack Pack compatible with this Samsung TV is TeleAdapt TA 7610 TA 7650 HD and TA 7660 HD Plus RJP VARIABLE AUDIOOUT AUDIO OUT DVI AUDIOIN VOL CTRL HDMIIN3 RJP DATA HDMIIN1 ARC AIR CABLE HDD5V1A VARIABLE AUDIOOUT AUDIO OUT DVI AUDIOIN VOL CTRL HDMIIN3 RJP DATA HDMIIN1 ARC AIR CABLE HDD5V1A USB HDMI S VIDEO RCA RS ...

Page 23: ...y pressing the A V and HDMI buttons simultaneously for 10 seconds All LEDs blink 5 times acknowledging that this has been finished y y The RJP will automatically turn off any LEDs after 5 minutes to avoid unnecessary light pollution in the hotel room The LEDs that were turned off will turn on again if the guest touches any of the buttons and the 5 minute timer will restart If the guest then touche...

Page 24: ...or Down arrow button to display the next or previous menu item Press the Return button to exit a menu item and return to the Main menu To exit a Hotel mode menu turn off the TV and then turn it on again Any changes you made are saved except changes to SI Vendor For changes to SI Vendor you must turn the TV off wait until the Standby light glows steadily then unplug the TV wait for the Standby ligh...

Page 25: ... Select the input source the TV displays when it is turned on Power On Option Last Option Determines the TV s state when power returns after a power failure or after you have unplugged the TV and then plugged it in again y y Last Option Returns to its last Power state If it was in Stand by it returns to Stand by If it was on it turns on y y Power ON When the power returns the TV turns on y y Stand...

Page 26: ...e HDMI1 DVI HDMI2 HDMI3 HDMI4 HDMI Music Mode OFF Allows music output from an mp3 audio player connected to an HDMI Input Source When on you can hear sound from the player through an HDMI input of the RJP whether there is a video signal or not This option is only compatible with the Guest link RJP Sound Bar Out OFF Turn Sound Bar Out on or off Refer to Page 38 External Source USB Media Mode Defalu...

Page 27: ... you set in REACH Server Update Time y y 1hour Every 1 hours y y 2hour Every 2 hours y y 12 00 am Every 12 00 am y y 2 00 am Every 2 00 am y y 12 00 pm Every 12 00 pm y y 2 00 pm Every 2 00 pm REACH Update Immediate OFF y y ON Whenever the TV enters standby mode the power cord is plugged in and the power is off the REACH data is updated on the TV y y OFF The REACH data is only updated on the TV at...

Page 28: ...f Pro Idiom DTV Channel Key Loss appears to have failed and the Pro Idim encryption channel has failed to play content first check the broadcasting systems related to Pro Idiom encryption If your broadcasting system does not have a problem contact Samsung Service If STB SI Vendor Setting appears to have failed and communication with the SI STB or SBB has failed first check your SI STB or SBB If yo...

Page 29: ...ation color and Enter buttons in the Edit Welcome Message OSD See the illustration below Move Enter Return a b Move to Left Move to Right Leave Black Done A B C D E F G H I J K L M N O P Q R S T U V W X Y Z W E L C O M E T O O U R H O T E L _ Edit Welcome Message Below are the general directions for navigating and changing letters on the Edit Welcome Message screen Press the A button on the remote...

Page 30: ...enu items become accessible y y Logo Download This option lets you download the logo image to the TV s memory from a USB device A wait message appears while the image is being copied to the TV A completed message appears when the copy operation finishes successfully The word failed appears if the copy operation was unsuccessful No USB appears if no USB device is connected No File appears if there ...

Page 31: ...V1A AUDIO OUT HDD5V1A HDD5V1A Clone TV to USB Clone USB to TV Setting Auto Initialize OFF Cloning from USB to TV Copies menu settings in a USB device to a TV Shortcut Turn the TV off insert the USB device turn the TV on and then press the ENTER button for 5 seconds To clone data to the TV using the Hotel menu follow these steps 1 Turn the TV off 2 Insert the USB drive into the USB port on the rear...

Page 32: ...ll Channel Menu Display Yes ASIA Models only Panel Button Lock Yes All Mute On CC Yes US Hsopital Only Subtitle Auto On Yes EU and EU Hospital SW Clock Yes EU and EU Hospital Local Time Yes EU and EU Hospital Time Format Yes EU and EU Hospital CLOCK Normal Dim Yes EU CLOCK Standby Dim Yes EU Music Mode AV Yes All Music Mode PC Yes All Music Mode Comp Yes All Music Mode Backlight Yes All 7610 Prior...

Page 33: ...A All except Brazil ASIA_READY REACH Server Channel Yes All except Brazil ASIA_READY REACH Server Version N A All except Brazil ASIA_READY REACH Server Group ID No US REACH Server Yes All except Brazil ASIA_READY IPG Room Type No Guestek CAS Yes US and US Hsopital PI AES Data N A US and US Hsopital Self Diagnosis N A All PI AES Log Yes US and US Hsopital View PI AES Log N A US and US Hsopital Upgr...

Page 34: ...ou want to change the Remote control code enter the digit you want to change 2 Press the number on the remote you want to assign to the TV The TV displays the following words Remote control code is changed to x The TV will display the OSD until you press the Exit button See the example below Remote control code is set to 0 If you want to change the Remote control code enter chosen digit Example Af...

Page 35: ... on Menu Menu Item Picture Picture Mode Backlight Contrast Brightness Sharpness Color Tint G R Picture Size Picture Size Position 3D 3D Mode 3D Persoective Depth L R Change 3D 2D PIP Advanced Settings Dynamic Contrast Black Tone Flesh Tone RGB Only Mode Colour Space White Balance 10p White Balance Gamma Expert Pattern Motion Lighting Picture Opitons Colour Tone Digital Clean View MPEG Noise Filter...

Page 36: ...ct Samsung_00 WPS PBC Refresh c 1 1 q w e r t y u i o p a ENG x z c v b n m com Cancel Done Clear Caps 123 s d f g h j k l 2 3 4 5 6 7 8 9 0 Configure your TV Select tour information in the categories below Enter security key Show Password Auto Program To get channels set the options below then select Scan Antenna Both Digital Cable System STD Analog Cable System STD Scan Select current connected ...

Page 37: ...p Menu OSD Press power off to exit y y Auto Search Mode OSD If you select the Skip option the TV displays the Clock Mode OSD If you press the Enter key the TV auto searches for channels The OSD Display time which starts at the time that Auto Store is completed and goes to the time Auto Sort starts is 30 seconds y y Set Clock Mode DST Daylight saving time and Time Zone OSD Initially highlighted Clo...

Page 38: ...ound Bar to the HDMI3 port supporting ARC on the hospitality TV 3 After the Sound Bar is connected to the hospitality TV when the TV turns on the Sound Bar automatically detects the TV and then automatically switches to Hotel Mode Sound Bar Hotel mode functional characteristics y y Power On Off is synchronized with the TV y y HDMI_CEC defaults to On y y Functions through the HDMI OUT port only y y...

Page 39: ...nding on model and region some menu items may not exist 5 Edit the Channel Bank An example is below a Bank1 Free channel Select the channels that will be accessible when a remote doesn t have a card b Bank2 Family Card Green Select the channels that will be accessible when a remote has a GREEN CARD c Bank3 Adult Card Red Select the channels that will be accessible when a remote has a RED CARD Info...

Page 40: ...s and names and sort the channels in your desired channel number order Apply the video mute to channels you select The vido mute blanks out the video from a channel and outputs only the sound while displaying a speaker icon on the screen The Channel Editor also lets you view information about each channel easily without your having to display each channel directly r Channel Editor Depending on mod...

Page 41: ...ep 1 and then press the red button on the remote 3 Press the green button on the remote to select all channels 4 To apply the video mute press the yellow button on the remote To apply the video mute to two or more channels simultaneously selecte multiple channels in Step 1 and then press the yellow button on the remote 5 To view information about a channel including video mute set up press the INF...

Page 42: ...annel number the channel information is not updated automatically Rename Channel Use Rename Channel to change the name of a channel you select To change the name of a channel follow these steps 1 Select a channel on the Channel Edit screen 2 Press the Tools button on your remote 3 Select Rename Channel in the Tools menu 4 Use the on screen keyboard that appears to enter the new name for the channe...

Page 43: ...I1 HDMI2 DVI HDMI3 AV All Channel Delete b Select All U Page E Select T Tools R Return 628 MLS Soccer 629 CNN NEWS 812 American Idol 840 90210 841 LOST 997 AV Euro Football HDMI1 HDMI2 DVI HDMI3 All Installing the Wall Mount Wall or Ceiling Mounting If you mount this product on a wall it should be mounted only as recommended by the manufacturer Unless it is correctly mounted the product may slide ...

Page 44: ...longer than the standard dimension or do not comply with the VESA standard screw specifications Screws that are too long may cause damage to the inside of the TV set x x For wall mounts that do not comply with the VESA standard screw specifications the length of the screws may differ depending on the wall mount specifications x x Do not fasten the screws too firmly This may damage the product or c...

Page 45: ...45 English Assembling the Cable clip Assembling the Screw Cover Assembling the Power inlet Cover ...

Page 46: ...ovided in the Safety Flyer included with your TV For added stability and safety you can purchase and install the anti fall device as described below Installing the TV Holder Kit TV Holder BN96 15753A Holder Screw M8 X L28 2ea 1 Screw the provided wall mount adapters on the back of the TV 2 Insert the screw into the center of the TV holder as shown by the illustration 3 Tighten the TV holders on th...

Page 47: ...cured Periodically check the connections for any sign of fatigue or failure If you have any doubt about the security of your connections contact a professional installer IMPORTANT INFORMATION If a television is not positioned in a sufficiently stable location it can be potentially hazardous due to falling Many injuries particularly to children can be avoided by taking simple precautions such as y ...

Page 48: ...cing the table below The optimal resolution is 1920 x 1080 60Hz Choosing an output signal not included in the table can result in a blank screen or just the power indicator being turned on Refer to the user manual of the graphics card and configure the resolution as indicated below Mode Resolution Horizontal Frequency KHz Vertical Frequency Hz Pixel Clock Frequency MHz Sync Polarity H V IBM 720 x ...

Page 49: ...ches 1032 7 x 257 7 x 634 3 mm 48 1 x 1 3 x 27 8 inches 1224 2 x 34 9 x 707 2 mm 48 1 x 12 2 x 29 2 inches 1224 2 x 310 3 x 741 9 mm Weight Without Stand With Stand 28 2 lbs 12 8 kg 30 8 lbs 14 0 kg 37 0 lbs 16 8 kg 40 3 lbs 18 3 kg Model Name HG65NB890 Screen Size Diagonal 65 Class 64 5 measured diagonally Sound Output 40W 10W x 2 Woofer 10W x 2 Dimensions WxDxH Body With stand 56 9 x 1 5 x 32 9 ...

Page 50: ...1 HG55NB890 48 1 27 8 29 2 1 3 12 2 HG65NB890 56 98 32 98 34 49 1 51 13 00 Jack panel detail Rear view 1 2 3 5 4 RJP VARIABLE AUDIOOUT AUDIO OUT DVI AUDIOIN VOL CTRL HDMIIN3 EX LINK DATA HDMIIN1 ARC AIR CABLE HDD5V1A unit Inches 1 2 3 4 5 HG46NB890 7 8 7 8 16 3 5 6 10 7 HG55NB890 15 7 15 7 16 2 5 6 10 6 HG65NB890 15 7 15 7 20 6 5 6 12 7 ...

Page 51: ...Purchase must be presented to the Service Center Transportation to and from the Service Center is the responsibility of the purchaser Conditions covered are limited only to manufacturing defects in material or workmanship and only those encountered in normal use of the product Excluded but not limited to are any originally specified provisions for in home or on site services minimum or maximum rep...

Page 52: ...ORLDWIDE If you have any questions or comments relating to Samsung products please contact the SAMSUNG customer care center Samsung Hospitality Hotline 866 894 0524 Web site http www samsung com us business HG890 ZA 00 ...

Reviews: