background image

English - 5

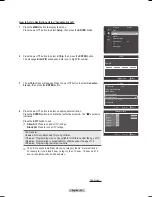
Setting the On/Off Timer
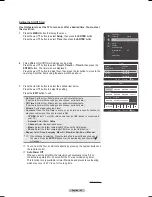
Use this feature to set the TV to turn on or off at a desired time. You must set 

the clock first.

Press the 

MENU

 button to display the menu. 

Press the ▲ or ▼ button to select 

Setup

, then press the 

ENTER

 button. 

Press the ▲ or ▼ button to select 

Time

, then press the 

ENTER

 button.


Three different On/Off Timer Settings can be made.  

Press the ▲ or ▼ button to select 

Timer1

Timer

, or 

Timer

, then press the 

ENTER

 button. The timer menu is displayed. 

Press the ▲ or ▼ button to adjust hour, then press the ► button to move to the 

next step. Set other items using the same method as above.


Press the ◄ or ► button to select the desired item below.


Press the ▲ or ▼ button to adjust the setting.

  Press the 

EXIT

 button to exit.

On Time

: Set the Hour, Minute, am/pm, and Activate/Inactivate.  

(To activate timer with the setting you've chosen, set to Activate.)

Off Time

: Set the Hour, Minute, am/pm, and Activate/Inactivate.  

(To activate timer with the setting you've chosen, set to Activate.)

Volume

: Set the required volume level.

Contents

: When the 

On Time

 is active, you can turn on a specific channel or 

play back contents such as photo or audio files.

TV/USB

: Select TV or USB. (Make sure that an USB device is connected to 

your TV.)

Antenna

: Select 

Air

 or 

Cable

.

Channel

: Select the desired channel.

Music

: Select the folder containing MP3 files on the USB device.

Photo

: Select the folder containing JPEG files on the USB device.

Repeat

: Select 

Once

Everyday

Mon~Fri

Mon~Sat

Sat~Sun

, or 

Manual

➢   

When Manual is selected, Press the ► button to select the desired day of 

the week. Press the 

ENTER 

button over the desired day and the mark   

will appear.

   You can set the hour, and minute directly by pressing the number buttons on 

the remote control.


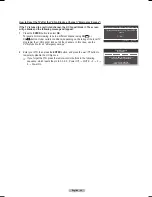
Auto Power Off

  When you set the timer 

On

, the television will eventually turn off, if no 

controls are operated for 3 hours after the TV was turned on by timer. 

This function is only available in timer 

On

 mode and prevents overheating, 

which may occur if a TV is on for too long time.

Continued...

Setup

Plug & Play 


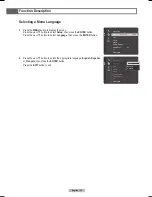
Language 

: English

Time 


V-Chip
Caption
External Settings
Entertainment 

: Off

PIP

SW Upgrade

Time

Clock 

: 12:00 am

Sleep Timer 

: Off

Timer 1 

: Inactivated 

Timer 2 

: Inactivated

Timer 3 

: Inactivated

Return

Enter

Move

Timer 1

Return

Enter

Adjust

Move

12

00

am

Inactivate

On Time

12

00

am

Inactivate

Off Time

10

TV

Volume          Contents         

Cable

3

Once

Repeat         

Sun         Mon         Tue         

Wed

         The         Fri         Sat         

BP68-00658A_Eng.indb   54

2008-02-12   오후 11:10:06

Summary of Contents for HL-61A750

Page 1: ...64 www samsung com ca Samsung Electronics Canada Inc Customer Service 55 Standish Court Mississauga Ontario L5R 4B2 Canada Samsung Electronique Canada Inc Service à la Clientèle 55 Standish Court Mississauga Ontario L5R 4B2 Canada U S A 1 800 SAMSUNG 7267864 www samsung com Samsung Electronics America Inc 105 Challenger Road Ridgefield Park NJ 07660 0511 Thank you for purchasing this Samsung produ...

Page 2: ...functions that do not conform to the ISO IEC 11172 3 or ISO IEC 13818 3 U S A Only Other countries The product unit accompanying this user manual is licensed under certain intellectual property rights of certain third parties This license is limited to private non commercial use by end user consumers for licensed contents No rights are granted for commercial use The license does not cover any prod...

Page 3: ... it was originally encoded for broadcast This is a big advantage for DTV over analog TV there is no noise ghosting static or scratchy audio 3 How can I connect an antenna in my townhouse co operative apartment condominium or apartment The Federal Communications Commission s OTARD Rule part of the Telecommunications Act of 1996 allows residents of condominiums townhouse or members of neighborhood a...

Page 4: ...ng Automatic Sound Settings 36 Customizing the Sound 36 Setting the TruSurround XT 37 Choosing Preferred Language 38 Choosing a Multi Channel Sound MTS Track Analog 38 Automatic Volume Control 39 Setting the TV Speakers On Off 39 Listening to the Sound of the Sub PIP Picture 40 Resetting the Sound Settings to the Factory Defaults 40 Channel Control Managing Channels 41 Clearing Scrambled Channels ...

Page 5: ... the side panel or remote control Automatic timer to turn the TV on and off at any time you choose Adjustable picture and sound settings and the ability to memorize your favorite settings Automatic channel tuning for up to 181 channels A special filter to reduce or eliminate reception problems Fine tuning control for the sharpest picture possible A built in multi channel sound decoder for stereo a...

Page 6: ...s Owner s Instructions Remote Control BN59 00673A AAA Batteries Warranty Card Registration Card Safety Guide Manual Quick Guide Manual Not available in all locations Power Cord 3903 000144 Cloth Clean The product color and shape may vary depending on the model Continued Sold Separately S Video Cable Video Cable Antenna Cable Component Cables Audio Cables D Sub Cable PC Audio Cable HDMI DVI Cable H...

Page 7: ...ntrol Sensor Aim the remote control towards this spot on the TV Indicator Light Key On Blinking Off STAND BY TEMP TIMER LED Indication Standby state The picture will automatically appear in about 15 seconds Auto Timer ON OFF has been set and the set will automatically be turned on in about 15 seconds A cooling fan inside the set is not operating normally LED may be defective Please contact a certi...

Page 8: ...optional HDMI DVI cable will be necessary to make this connection When using an optional HDMI DVI adapter the DVI analog audio inputs on your TV allow you to receive left and right audio from your DVI device 5 DVI IN AUDIO L R Connect to the DVI audio output jack of an external device 6 DIGITAL AUDIO OUT OPTICAL Connect to a Digital Audio component 7 RS232C Connector for service only 8 S VIDEO Vid...

Page 9: ...et display and sound modes for sports cinema and games Use these buttons in the DMA W LINK and Anynet modes This remote can be used to control recording on Samsung recorders with the Anynet feature ON OFF Press to backlight the buttons on the remote This function is convenient for using at night or when the room is dark Using the remote control with the light button set to On will reduce the batte...

Page 10: ... sign nearby Connections Connecting VHF and UHF Antennas If your antenna has a set of leads that look like this see Antennas with 300 Ω Flat Twin Leads below If your antenna has one lead that looks like this see Antennas with 75 Ω Round Leads If you have two antennas see Separate VHF and UHF Antennas Antennas with 300 Ω Flat Twin Leads If you are using an off air antenna such as a roof antenna or ...

Page 11: ...he ANT IN terminal on your cable box This terminal might be labeled ANT IN VHF IN or simply IN 2 Connect this cable to a two way splitter 3 Connect an Antenna cable between an OUTPUT terminal on the splitter and the IN terminal on the cable box 4 Connect an Antenna cable between the ANT OUT terminal on the cable box and the B IN terminal on the RF A B switch 5 Connect another cable between the oth...

Page 12: ...r Cable Box Satellite receiver Set Top Box What is HDMI HDMI or high definition multimedia interface is an interface that enables the transmission of digital audio and video signals using a single cable The difference between HDMI and DVI is that the HDMI device is smaller in size and has the HDCP High Bandwidth Digital Copy Protection coding feature installed Each DVD Player or Cable Box Satellit...

Page 13: ...e receiver Set Top Box to your TV 1 Connect Component Cables between the COMPONENT IN 1 or 2 Y PB PR jacks on the TV and the COMPONENT Y PB PR jacks on the DVD Player or Cable Box Satellite receiver Set Top Box Connect Audio Cables between the COMPONENT IN 1 or 2 R AUDIO L jacks on the TV and the AUDIO OUT jacks on the DVD Player or Cable Box Satellite receiver Set Top Box Component video separate...

Page 14: ...s 1 3 in the previous section to connect the antenna or cable to your VCR and your TV Connect an S Video Cable between the S VIDEO OUT jack on the VCR and the AV IN 1 S VIDEO jack on the TV Connect Audio Cables between the AUDIO OUT jacks on the VCR and the AV IN 1 or 2 R AUDIO L jacks on the TV An S Video may be included with your VCR If not check your local electronics store Each VCR has a diffe...

Page 15: ...tem When a Digital Audio System is connected to the DIGITAL AUDIO OUT OPTICAL jack Decrease the volume of the TV and adjust the volume level with the system s volume control Digital Audio System TV Side Panel Optical Cable Not supplied What is OPTICAL An optical cable converts an electric signal into an optical light signal and transmits it through glass fibers S PDIF is a transmission system of d...

Page 16: ...VI IN R AUDIO L jack on the TV and the Audio Out jack of the sound card on your computer Each PC has a different back panel configuration When connecting a PC match the color of the connection terminal to the cable When using an HDMI DVI cable connection you must use the HDMI3 DVI IN terminal Connecting a PC PC TV Side Panel PC Audio Cable Not supplied D Sub Cable Not supplied 1 Using the D Sub Ca...

Page 17: ...f the unit is accidentally set to Store Demo mode and you want to return to Home Use Standard Press the Volume button on the TV When the volume OSD is displayed press and hold the MENU button on the TV for 5 seconds 4 Press the or button to memorize the channels of the selected connection then press the ENTER button Air Air antenna signal Cable Cable antenna signal Auto Air and Cable antenna signa...

Page 18: ...ting the Clock Automatically 9 Press the ENTER button Press the or button to select Off or On then the ENTER button The message Select the time zone in which you live is displayed 10 Press the or button to highlight the time zone for your local area and to move the highlight to the appropriate time zone on the map of the United States Press the ENTER button If clock is not automatically set see pa...

Page 19: ...hannel change press the number buttons then press the ENTER button You can press number buttons on Remote control for direct channel access press the same Number button again to switch between digital and analog TV channels broadcast by the same station Using the Button The button is used to select stations that broadcast a digital signal 1 For example for Channel 7 1 press 7 then then 1 HD indica...

Page 20: ...es the current channel and the status of certain audio video settings 1 Press the INFO button on the remote control The TV will display the channel the type of sound and the status of certain picture and sound settings Press the INFO button once more or wait approximately 10 seconds and it disappears automatically TV 1 Wed Jan 2 12 28am M Spillane s Mike Hammer Bonocrunch DTVAir 13 1 Dolby Digital...

Page 21: ...on to exit Continued Memorizing the Channels Your TV can memorize and store all of the available channels for both air and cable channels After the available channels are memorized use the CH W LINK CH LIST or CH W LINK CH LIST button to scan through the channels This eliminates the need to change channels by entering the channel digits There are three steps for memorizing channels selecting a bro...

Page 22: ...mpany to identify the type of cable system that exists in your particular area At this point the signal source has been selected 5 The TV begins memorizing all available stations After all the available channels are stored it starts to remove scrambled channels see page 47 The Auto program menu then reappears If you want to stop Auto Programming press the ENTER button The Stop Auto Program message...

Page 23: ...ce connected to the input jacks to make your input source selection easier 1 Press the MENU button to display the menu Press the or button to select Input then press the ENTER button Press the or button to select Edit Name then press the ENTER button 2 Press the or button to select AV1 AV2 S Video Component1 Component2 PC HDMI1 HDMI2 or HDMI3 DVI input jack then press the ENTER button 3 Press the ...

Page 24: ...u make changes to Contrast Brightness Sharpness Color or Tint G R the OSD will be adjusted accordingly When in PC mode Tint Sharpness and Color are not available Each adjusted setting will be stored separately according to its input mode Contrast Adjusts the contrast level of the picture Brightness Adjusts the brightness level of the picture Sharpness Adjusts the edge definition of the picture Col...

Page 25: ...the screen contrast so that the optimal contrast is provided 6 Press the or button to select Dynamic Contrast then press the ENTER button 7 Press the or button to select Off Low Medium or High Press the ENTER button Off Turns off the dynamic contrast adjustment function Low Sets the dynamic contrast to low Medium Sets the dynamic contrast to medium High Sets the dynamic contrast to high Activating...

Page 26: ...on 14 Press the or button to decrease or increase the value of a particular item 10 10 Press the ENTER button Changing the adjustment value will refresh the adjusted screen Activating Gamma You can adjust the Primary Color Red Green Blue Intensity 3 3 10 Press the or button to select Gamma then press the ENTER button 11 Press the or button to decrease or increase the value Press the ENTER button F...

Page 27: ...press the ENTER button In PC mode you can only make changes to the Color Tone Position Size and Color Gamut from among the items in Picture Options Adjusting the Color Tone 1 Follow the Activating Picture Options instructions numbers 1 and 2 2 Press the or button to select Color Tone then press the ENTER button 3 Press the or button to select Cool2 Cool1 Normal Warm1 or Warm2 Press the ENTER butto...

Page 28: ...080i 1080p signals are input When Double mode has been set in PIP the Picture Size cannot be set Temporary image retention may occur when viewing a static image on the set for more than two hours After selecting Zoom1 Zoom2 or Wide Fit Press the or button to select Position then press the ENTER button Press the or button to move the picture up and down Reset Press the or button to select Reset the...

Page 29: ...ect Off Low Medium High or Auto Press the ENTER button Off Turns the screen noise reduction function off Low Reduces screen noise at a low level Medium Reduces screen noise at a medium level High Reduces screen noise at a high level Auto Automatically recognizes and reduces screen noise Press the EXIT button to exit Continued Adjusting the Screen Position You can adjust the horizontal and vertical...

Page 30: ...HDMI mode 1 Follow the Activating Picture Options instructions numbers 1 and 2 Refer to page 27 2 Press the or button to select HDMI Black Level then press the ENTER button 3 Press the or button to select Normal or Low then press the ENTER button Normal The screen gets brighter Low The screen gets darker This function is active only when an external device is connected to via HDMI HDMI Black Level...

Page 31: ...t to preferred values appropri ate to the signal level of each video device using the Red Green Blue Cyan Ma genta Yellow Color Bar Patterns without using an additional Blue Filter 1 Follow the Activating Picture Options instructions numbers 1 and 2 Refer to page 27 2 Press the or button to select Blue Only Mode then press the ENTER button 3 Press the or button to select Off or On then press the E...

Page 32: ...ffect is turned on or off regardless of the Picture Mode When 3D Effect is on only the Contrast Brightness 3D Effect Position and Reset picture menus are activated To use the 3D Effect function a graphics card supporting 3D or 3D software is required Continued Setting the Color Gamut You can choose your favorite color gamut Color gamut means a color matrix made up with the basic colors of Red Gree...

Page 33: ...nd vice versa left right sync 1 Connect the TV PC and 3D IR Emitter as shown in the figure 2 Press the SOURCE button to select HDMI3 DVI 3 Press the MENU button to display the menu Press the or button to select Picture then press the ENTER button 4 Press the or button to select Picture Options then press the ENTER button Press the or button to select 3D Effect then press the ENTER button 5 Presss ...

Page 34: ...de and turn it on again the PIP window will disappear You can view Analog TV broadcasts on the PIP screen sub picture when the main picture is from an external device connected to HDMI IN 1 HDMI IN 2 HDMI3 DVI Component1 2 or PC When 3D Effect is set to on PIP mode is changed to off PIP Settings Main picture Sub picture Component 1 2 HDMI IN 1 HDMI IN 2 HDMI3 DVI PC Analog TV broadcasts only Enter...

Page 35: ... ENTER button 3 Press the or button to select a particular item 4 Press the or button to select the required option 5 Press the EXIT or TOOLS button to exit Changing the Position of the PIP Window 4 Press the or button to select Position then press the ENTER button Press the or button to select the desired PIP window position then press the ENTER button In Double Window and Double Wide modes Posit...

Page 36: ...rease the level of the particular frequency Mode Selects the sound mode among the predefined settings Balance L R Adjusts the balance between the right and left speaker Bandwidth Adjustment 100Hz 300Hz 1kHz 3kHz 10kHz To adjust the level of different bandwidth frequencies Continued Sound Control Easy Setting 1 Press the TOOLS button on the remote control 2 Press the or button to select Sound Mode ...

Page 37: ...or button to select Sound then press the ENTER button 2 Press the or button to select SRS TruSurround XT then press the ENTER button 3 Press the or button to select Off or On then press the ENTER button Press the EXIT button to exit TruSurround XT SRS and Symbol are trademarks of SRS Labs Inc TruSurround XT technology is incorporated under license from SRS Labs Inc Custom mode returns to default s...

Page 38: ...n Press the EXIT button to exit Mono Choose for channels that are broadcasting in mono or if you are having difficulty receiving a stereo signal Stereo Choose for channels that are broadcasting in stereo SAP Choose to listen to the Separate Audio Program which is usually a foreignlanguage translation Multi Track Sound is available only in Analog TV mode Depending on the particular program being br...

Page 39: ...IP mode and Sound Reset in Sound menu The VOL W LINK CH LIST VOL W LINK CH LIST and MUTE buttons do not operate when the TV Speaker is set to Off Setting the TV Speakers On Off Sound output from the TV speakers is muted TV Speaker Off TV Speaker On Video No Signal TV Mute Speaker Output Mute AV S Video Mute Speaker Output Mute Component PC HDMI Mute Speaker Output Mute TV Sound Output Sound Output...

Page 40: ...ss the or button to select Sound then press the ENTER button Press the or button to select Sound Reset then press the ENTER button 2 Press the or button to select Reset All Reset Sound Mode or Cancel then press the ENTER button Reset All All the sound values return to default settings Reset Sound Mode Currently set values return to default settings Cancel Select the sound reset options Resetting t...

Page 41: ... the Remote with the Channel List Red Antenna Switches to DTV air or DTV cable Green Zoom Enlarges or shrinks a channel number Yellow Select Selects multiple channel lists TOOLS Option Displays the Add or Delete Add to Favorite or Delete from Favorite Timer Viewing and Channel Name Edit menus A gray colored channel indicates the channel has been deleted The Add menu only appears for deleted channe...

Page 42: ...to the Added Channels menu in the same manner A channel must be deleted before it can be added back to the Added Channels list To Add Restore a channel back to the Added Channel List follow steps 1 3 above press the or button to select a channel to add the press the Tools button Press the ENTER button to select Add Channel Auto Program Clear Scrambled Channel Channel List Fine Tune Signal Strength...

Page 43: ...orite channels will be shown on Favorite menu Press the CH LIST button on the remote control to bring up the channel lists To select the favorite channels you have set up press the FAV CH button on the remote control Easy Setting 1 Press the TOOLS button on the remote control 2 Press the or button to select Add to Favorite or Delete from Favorite then press the ENTER button The current channel is ...

Page 44: ...efer to page 45 Only memorized channels can be reserved channels You can set the channel month day year hour and minute directly by pressing the number buttons on the remote control Press the CH LIST button on the remote control to bring up the channel lists Digital Program Guide and Viewing Reservation When a digital channel is selected and you press the button the Program Guide for the channel a...

Page 45: ... Press the or button to select OK then press the ENTER button The viewing reservation has been canceled Press the EXIT button to exit Programmed Menu Numeric buttons You can enter numbers Change Info Select to change a viewing reservation Cancel Schedules Select to cancel a viewing reservation Information Select to view a viewing reservation Continued Press the CH LIST button on the remote control...

Page 46: ...elled Storing Channels in Memory Auto Program Channels can labeled so that their call letters appear whenever the channel is selected 1 Press the MENU button Press the or button to select Channel then press the ENTER button Press the or button to select Channel List then press the ENTER button 2 Press the or button to select the channel to be assigned a new name then press the TOOLS button 3 Press...

Page 47: ...he or button to select Fine Tune then press the ENTER button 3 Press the or button to adjust the fine tuning To store the fine tuning setting in the TV s memory press the ENTER button If you do not store the fine tuned channel in memory adjustments are not saved 4 To reset the fine tuning setting press the button to select Reset then press the ENTER button Press the EXIT button to exit Only analog...

Page 48: ...tion of available digital channels 1 Press the MENU button to display the menu Press the or button to select Channel then press the ENTER button 2 Press the or button to select Signal Strength then press the ENTER button If the signal strength meter indicates that the signal is weak physically adjust your antenna to increase the signal strength Continue to adjust the antenna until you find the bes...

Page 49: ...s the standard signal mode the screen is adjusted automatically If the signal from the system doesn t equal the standard signal mode adjust the mode by referring to your videocard user guide otherwise there may be no video For the display modes listed below the screen image has been optimized during manufacturing D Sub Input Mode Resolution Horizontal Frequency kHz Vertical Frequency Hz Pixel Cloc...

Page 50: ...picture quality adjustment is to remove or reduce picture noise If the noise is not removed by fine tuning alone then make the vertical frequency adjustments and fine tune again After the noise has been reduced re adjust the picture so that it is aligned in the center of the screen Preset Press the SOURCE button to select PC mode 1 Press the MENU button to display the menu Press the or button to s...

Page 51: ...E button to select PC mode 1 Press the MENU button to display the menu Press the or button to select Picture then press the ENTER button Press the or button to select Screen then press the ENTER button 2 Press the or button to select Image Reset then press the ENTER button The message Image Reset is completed appears on the screen Press the EXIT button to exit Easy Setting 1 Press the TOOLS button...

Page 52: ...utton 5 Press the or button to move to Month Day Year Hour Minute or am pm Set the date and time you want by pressing the or button then press the ENTER button Press the EXIT button to exit The current time will appear every time you press the INFO button You can set the Month Day Year Hour Minute and am pm directly by pressing the number buttons on the remote control Continued Setup Plug Play Lan...

Page 53: ...ht Saving Time then press the ENTER button Press the or button to select On or Off then press the ENTER button Press the EXIT button to exit Depending on the broadcast station and signal the auto time may not be set correctly If this occurs set the time manually Antenna or Cable must be connected in order to set the time automatically Continued Setup Plug Play Language English Time V Chip Caption ...

Page 54: ...ay back contents such as photo or audio files TV USB Select TV or USB Make sure that an USB device is connected to your TV Antenna Select Air or Cable Channel Select the desired channel Music Select the folder containing MP3 files on the USB device Photo Select the folder containing JPEG files on the USB device Repeat Select Once Everyday Mon Fri Mon Sat Sat Sun or Manual When Manual is selected P...

Page 55: ...er Press the or button to select Off then press the ENTER button Press the EXIT button to exit Easy Setting 1 Press the TOOLS button on the remote control 2 Press the or button to select Sleep Timer then press the ENTER button 3 Press the or button to select the minute then press the ENTER button 4 Press the EXIT or TOOLS button to exit Setup Plug Play Language English Time V Chip Caption External...

Page 56: ...R button 2 Press the or button to select the appropriate language English Español or Français then press the ENTER button Press the EXIT button to exit Function Description Plug Play Language English Time V Chip Caption External Settings Entertainment Off PIP SW Upgrade Setup Plug Play Language English Time V Chip Caption External Settings Entertainment Off PIP SW Upgrade Setup English Español Fra...

Page 57: ... default PIN number of a new TV set is 0 0 0 0 3 The V Chip screen will appear Press the or button to select Change PIN then press the ENTER button The Change PIN screen will appear Choose any 4 digits for your PIN and enter them Re enter the same 4 digits When the message PIN is changed successfully is displayed your PIN has been memorized Press the EXIT button to exit If you forget the PIN press...

Page 58: ...et up using either of two methods The TV guidelines or the MPAA rating 1 Press the MENU button to display the menu Press the or button to select Setup then press the ENTER button 2 Press the or button to select V Chip then press the ENTER button The message Enter PIN will appear Enter your 4 digit PIN number 3 The V Chip screen will appear Press the or button to select TV Parental Guidelines then ...

Page 59: ...Press to lock all TV ratings The TV Y TV Y7 TV G TV PG TV 14 and TV MA have additional options See the next step to change any of the following sub ratings ALL Lock all TV ratings L Adult language FV Fantasy violence S Sexual situation D Sexually suggestive dialog V Violence The V Chip will automatically block certain categories that are more restrictive For example if you block TV Y category then...

Page 60: ...ss the ENTER button to block or unblock the category Press the EXIT button to exit G General audience no restriction PG Parental guidance suggested PG 13 Parents strongly cautioned R Restricted Children under 17 should be accompanied by an adult NC 17 No children under age 17 X Adults only NR Not rated Allow All Press to unlock all TV ratings Block All Press to lock all TV ratings The V Chip will ...

Page 61: ... TV ratings C Programming intended for children under age 8 C8 Programming generally considered acceptable for children 8 years and over to watch on their own G General programming suitable for all audiences PG Parental guidance 14 Programming contains themes or content which may not be suitable for viewers under the age of 14 18 Adult programming The V Chip will automatically block any category t...

Page 62: ...ck all TV ratings Block All Press to lock all TV ratings G General 8 ans Not recommended for young children 13 ans Programming may not be suitable for children under the age of 13 16 ans Programming is not suitable for children under the age of 16 18 ans Programming restricted to adults The V Chip will automatically block any category that is more restrictive For example if you block 8 ans categor...

Page 63: ...ction Press the ENTER button to activate the restriction selected The symbol is indicated Press the EXIT button to exit Allow All Press to unlock all TV ratings Block All Press to lock all TV ratings Parental restriction levels differ depending on the broadcasting station The default menu name and downloadable US rating changes depending on the downloaded information Even if you set the on screen ...

Page 64: ... the V Chip might lock out all the channels In this case use the V Chip function for an emergency escape 2 Enter your PIN then press the ENTER button and press the or button to temporarily disable the V Chip Lock If you forget the PIN press the remote control buttons in the following sequence which resets the pin to 0 0 0 0 Power Off MUTE 8 2 4 Power On Received Rating TV G MPAAX Canadian English ...

Page 65: ...s option consists of Default Style0 Style7 You can change the font you want The default is Default Foreground Color This option consists of Default White Black Red Green Blue Yellow Magenta and Cyan You can change the color of the letter The default is Default Background Color This option consists of Default White Black Red Green Blue Yellow Magenta and Cyan You can change the background color of ...

Page 66: ... specific frame CC2 The Special Non Synchronous Use Captions This channel carries data that is intended to augment information carried in the program CC3 Secondary Synchronous Caption Service Alternate program related caption data typically second language captions CC4 Special Non Synchronous Use Captions Similar to CC2 Text1 First Text Service This may be various non program related data Text2 Se...

Page 67: ... the ENTER button 3 Press the ENTER button to select Melody Press the or button to select Off Low Medium or High then press the ENTER button Manufactured under license from Dolby Laboratories Dolby and the double D symbol are trademarks of Dolby Laboratories Off Turns off the melody function Low Sets the melody volume to low Medium Sets the melody volume to medium High Sets the melody volume to hi...

Page 68: ...for movie watching You can experience a richer picture and enhanced sound Game Provides the optimal picture and sound quality for games This mode accelerates the playing speed when using an external game console connected to the TV Press the EXIT button to exit If you set any of the three Entertainment modes to On the settings will be locked and can not be adjusted If you want to make Picture and ...

Page 69: ... take up to 30 seconds is displayed 5 If the firmware on the USB is properly recognized the message Upgrade version xxxx to version xxxx The system would be reset after upgrade is displayed Press the or button to select OK then press the ENTER button The upgrade starts Please be careful not to disconnect the power or remove the USB drive while upgrades are being applied The TV will shut off and tu...

Page 70: ... responsible for any data file damage or data loss Do not disconnect the USB device while it is loading MSC supports MP3 and JPEG files and the PTP device supports JPEG files only If you try to play a corrupted or unsupported file the File Format Not Supported message will be displayed Only sequential jpeg format is supported Photo and audio files must be named in English French or Spanish If not ...

Page 71: ... repeatedly to select USB then press the ENTER button Press the Red button then press the or button to select the corresponding USB Memory Device Press the ENTER button This function differs depending on the USB Memory Device connected to TV The selected USB device name appears at the bottom left of the screen Press the or buttonto select an icon Photo Music Setup then press the ENTER button To ex...

Page 72: ...ill not be displayed Photo files are displayed Press the ENTER button over a photo icon to show the currently selected photo in full screen Press the W LINK CH LIST Play button to start the Slide Show When moving to a photo loading may take a few seconds At this point the loading icon will appear at the screen Certain types of USB Digital camera and audio devices may not be compatible with this TV...

Page 73: ...e It sorts by year and month from the earliest photo Color Sorts photos by color You can change the photo color information Composition Sorts photos by composition You can change the compositional information of photos Folder Sorts photos by folder If there are many folders in USB the photos files are shown in order in each folder The photo file in the Root folder is shown first and the others are...

Page 74: ... FavoritesSetting Select Jump TOOLS Option image_1 jpg Month Jan Date Jan 01 2008 Color Gray Composition Folder P other Favorite Preference Monthly Timeline Jan Nov Slide Show Play Current Group Delete Information Photo USB Device FavoritesSetting Select Jump TOOLS Option image_1 jpg Month Jan Date Jan 01 2008 Color Gray Composition Folder P other Favorite Monthly Timeline Color Jan Nov Photo USB ...

Page 75: ...Slide Show Continued Changing the color information 1 Select Color as the sorting standard in the Photo List and press the or button to select a photo Changing the information of multiple files Press the or button to select the desired photo in the Photo list Then press the yellow button Repeat the above operation to select multiple photos The mark appears to the left of the selected photo 2 Press...

Page 76: ...es 1 Press the or button to select the desired photo in the Photo list 2 Press the TOOLS button 3 Press the or button to select Delete then press the ENTER button The Selected File s IMG_0 1 File s Delete this file message appear s When a read only file is deleted the This is read only file Delete this file message appear 4 Press the or button to select OK then press the ENTER button The photo is ...

Page 77: ...ill be used for the Slide Show If you have selected a file only the selected file will be used for the Slide Show Play Current Group Only the photos in the sorting group including the selected file will be used for the Slide Show While a photo list is displayed press the W LINK CH LIST Play button on the remote control to start slide show Slide show function information icon Displayed at the top l...

Page 78: ...photo by the desired amount Whenever you press the button it rotates by 270 180 90 and 0 Whenever you press the button it rotates by 90 180 270 and 0 If you have select Zoom the Rotate function is deactivate The rotated file is not saved The Rotating function information icon is displayed at the top right of the screen Icon Current OSD Function 0 Rotating 0 This rotates a photo to its original pos...

Page 79: ...ed in photo Slide Show Speed You can select the slide show speed Press the or button to select Slide Show Speed Press the or button to select the desired option Fast Slow Normal You can select the SlideShow speed only during a slide show Background Music If you set Background Music to On the background music will be played when viewing photos one by one or in a Slide Show Press the or button to se...

Page 80: ... the ENTER button Wiselink identifies the mood of the music files and groups them accordingly be analyzing the music files on the USB device BGM mode option Energetic Rhythmical Sad Exciting Calm Picture Mode You can set the Picture mode Refer to page 24 Sound Mode You can set the Sound mode Refer to page 36 Information The photo file information including the order of the file in the current dire...

Page 81: ...H LIST W LINK CH LIST Jump Jumps to the previous sorting group Jumps to the next sorting group TOOLS Option button Displays the Play Current Group Delete Change Group info in Mood group Information or Safe Remove menus Continued 1 Press the W LINK button on the remote control to display the WISELINK menu 2 Press the or button to select Music then press the ENTER button Music files are displayed To...

Page 82: ... displayed as blank Sorting music files by the title 1 Select Title as the sorting standard in the Music List 2 Press the or buttons to select from the sublist of files grouped in alphabetical order 3 Press the TOOLS button 4 Press the or buttons to highlight Play Current Group 5 Press ENTER button to play the selected group of music files from the sublist Sorting music files by artist 1 Select Ar...

Page 83: ...ss the or buttons to highlight Play Current Group 5 Press ENTER button to play the selected group of music files from the sublist Sorting music files by folder 1 Select Folder as the sorting standard in the Music List 2 Press the or button to select from the sublist of files grouped by folder 3 Press the TOOLS button 4 Press the or buttons to highlight Play Current Group 5 Press ENTER button to pl...

Page 84: ...K mode press the W LINK button on the remote control You cannot remove the read only files from the selected ones You cannot restore the deleted music files Viewing the Information The music file information including the order of the file in the current directory the name the size the date modified and the path is displayed 1 Press the or button to select the desired music in the music list 2 Pre...

Page 85: ...d as 00 00 00 if its playing time information is not found at the start of the file 4 To exit WISELINK mode press the W LINK button on the remote control Playing the music group 1 Press the W LINK button on the remote control to display the WISELINK menu 2 Press the or button to select Music then press the ENTER button 3 Press the or button to select the desired music file 4 Press the TOOLS button...

Page 86: ...dly Off Doesn t play back repeatedly To exit WISELINK mode press the W LINK button on the remote control Continued Music function information icon Displayed at the top left of the screen Icon Current OSD Function Music Repeat When all music files in the folder or the selected file are repeated Music Repeat Mode is On Music One When all music files in the folder or the selected file are played once...

Page 87: ...me before the screen saver appears Press the or button to select Screen Saver Run Time Press the or button to select 1 min 3 min or 5 min Information Select to viewing the information of the connected device Press the or button to select Information then press the ENTER button Safe Remove You can remove the device safely from the TV Refer to page 80 To exit WISELINK mode press the W LINK button on...

Page 88: ... between the Digital Audio Out Optical jack on your TV and the Digital Audio Input on the Home Theater Connect only one Home Theater When following the connection above the Optical jack only outputs 2 channel audio You will only hear sound from the Home Theater s Front Left and Right speakers and the subwoofer If you want to hear 5 1 channel audio connect the DIGITAL AUDIO OUT OPTICAL jack on the ...

Page 89: ...u cannot find a device you want press the or button to select Searching Connections then press the ENTER button The message Configuring Anynet connection is displayed When searching devices complete the connected devices are listed in the Anynet menu The active source on the TV remote must be set to TV to use the Anynet function If you set Auto Turn Off to Yes sconnected external devices are also ...

Page 90: ...button Audio Device When a Receiver is activated VOL W LINK CH LIST W LINK CH LIST button MUTE button The Anynet function only works when the active source on the TV remote control is set to TV The REC button works only while in the recordable state You cannot control Anynet devices using the buttons on the side of the TV You can control Anynet devices only using the TV remote control The TV remot...

Page 91: ...mode Check whether it is Anynet exclusive remote control Anynet doesn t work in certain situations Searching channels Operating WISELINK When connecting or removing the HDMI 1 3 cable please make sure to search devices again or your TV off and on again Check if the Anynet Function of Anynet device is set on I want to start Anynet Check if the Anynet device is properly connected to the TV and check...

Page 92: ...igital If the original production method is digital High visual quality If the original production method is analog The digital program displayed on the screen is originally an analog program which has been converted to digital The visual quality is of an SD Standard Definition grade Screen is black and power indicator light blinks steadily On your computer check the Power and Signal Cable The TV ...

Page 93: ...ean dry cloth Never use water cleaning fluids wax or chemicals Do not put heavy objects on top of the cabinet This DLP TV projects the image onto a large screen by applying an optical system If you place the TV set face down it might cause a problem because dirt or some other contaminant may become attached to the inside of the TV set Temperature If your TV is suddenly moved from a cold to a warm ...

Page 94: ...re Storage Humidity 50 F to 104 F 10 C to 40 C 10 to 80 non condensing 4 F to 113 F 20 C to 45 C 5 to 95 non condensing 50 F to 104 F 10 C to 40 C 10 to 80 non condensing 4 F to 113 F 20 C to 45 C 5 to 95 non condensing This device is a Class B digital apparatus Design and specifications are subject to change without prior notice For the power supply and Power Consumption refer to the label attach...

Page 95: ...istributed under the terms of this General Public License The Program below refers to any such program or work and a work based on the Program means either the Program or any derivative work under copyright law that is to say a work containing the Program or a portion of it either verbatim or with modifications and or translated into another language Hereinafter translation is included without lim...

Page 96: ...se since you have not signed it However nothing else grants you permission to modify or distribute the Program or its derivative works These actions are prohibited by law if you do not accept this License Therefore by modifying or distributing the Program or any work based on the Program you indicate your acceptance of this License to do so and all its terms and conditions for copying distributing...

Page 97: ...ost effectively convey the exclusion of warranty and each file should have at least the copyright line and a pointer to where the full notice is found One line to give the program s name and a brief idea of what it does Copyright C year name of author This program is free software you can redistribute it and or modify it under the terms of the GNU General Public License as published by the Free So...

Page 98: ...GNU General Public License This license the GNU Lesser General Public License applies to certain designated libraries and is quite different from the ordinary General Public License We use this license for certain libraries in order to permit linking those libraries into non free programs When a program is linked with a library whether statically or using a shared library the combination of the tw...

Page 99: ...very part regardless of who wrote it Thus it is not the intent of this section to claim rights or contest your rights to work written entirely by you rather the intent is to exercise the right to control the distribution of derivative or collective works based on the Library In addition mere aggregation of another work not based on the Library with the Library or with a work based on the Library o...

Page 100: ...e in a single library together with other library facilities not covered by this License and distribute such a combined library provided that the separate distribution of the work based on the Library and of the other library facilities is otherwise permitted and provided that you do these two things a Accompany the combined library with a copy of the same work based on the Library uncombined with...

Page 101: ...ERVICING REPAIR OR CORRECTION 16 IN NO EVENT UNLESS REQUIRED BY APPLICABLE LAW OR AGREED TO IN WRITING WILL ANY COPYRIGHT HOLDER OR ANY OTHER PARTY WHO MAY MODIFY AND OR REDISTRIBUTE THE LIBRARY AS PERMITTED ABOVE BE LIABLE TO YOU FOR DAMAGES INCLUDING ANY GENERAL SPECIAL INCIDENTAL OR CONSEQUENTIAL DAMAGES ARISING OUT OF THE USE OR INABILITY TO USE THE LIBRARY INCLUDING BUT NOT LIMITED TO LOSS OF...

Page 102: ...396 5 539 829 5 606 618 5 530 655 5 777 992 6 289 308 5 610 985 5 481 643 5 544 247 5 960 037 6 023 490 5 878 080 y bajo el número de aplicación de patentes publicadas de EE UU 2001 44713 A1 Esta licencia está limitada al uso no comercial privado de consumidores que sean usuarios finales para contenido con licencia No se otorga ningún derecho para uso comercial La licencia no cubre a ninguna unida...

Page 103: ... DTV sobre TV analógica no hay interferencias imágenes duplicadas estáticas o audio rayado 3 Cómo puedo conectar una antena en mi comunidad apartamento o piso La norma OTARD de la Comisión Federal de Comunicaciones parte de la Ley de Telecomunicaciones de 1996 permite a los residentes de pisos apartamentos comunidades o miembros de una asociación de vecinos colocar antenas exteriores para la recep...

Page 104: ...sonido 36 Ajuste de TruSurround XT 37 Elección del idioma preferido 38 Selección de una pista de sonido multicanal MTS Analógico 38 Control automático de volumen 39 Encendido apagado del altavoz del televisor 39 Audición del sonido de la imagen secundaria PIP 40 Reajuste de los valores del sonido a los valores predefinidos de fábrica 40 Gestión de los canales 41 Supresión de los canales codificado...

Page 105: ...frontal el panel lateral derecho o el mando a distancia Temporizador automático que enciende y apaga el televisor a la hora que usted desee Valores de sonido e imagen ajustables y posibilidad de memorizar los ajustes favoritos Sintonización automática de hasta 181 canales Filtro especial para reducir o eliminar los problemas de recepción Control de ajuste fino para conseguir la mejor imagen posibl...

Page 106: ...e instrucciones Mando a distancia BN59 00673A pilas AAA Tarjeta de garantía Tarjeta de registro Manual de seguridad Manual de referencia rápida no esta disponible en todas laslocalidades Cable de alimentación 3903 000144 Paño de limpieza El color y la forma del producto pueden variar según el modelo Continúa Sold Separately Cable de S Vídeo Cable de vídeo Cable de la antena Cables de componentes C...

Page 107: ...to del televisor Leyenda para las luces indicadoras Encendido Parpadeo Apagado STAND BY TEMP TIMER LED Indicación Televisor en modo de espera La imagen aparecerá automáticamente en unos 15 segundos El temporizador automático de conexión desconexión está programado y el televisor se encenderá automáticamente en unos 15 segundos Uno de los ventiladores de refrigeración del interior del aparato no fu...

Page 108: ...lizar esta conexión se requiere un cable opcional HDMI DVI Cuando se usa un adaptador HDMI DVI las entradas de señales de audio analógicas DVI del televisor permiten recibir señales de audio por las entradas derecha e izquierda desde un dispositivo DVI 5 DVI IN AUDIO L R Conéctelas con la toma de salida de audio DVI de un dispositivo externo 6 DIGITAL AUDIO OUT OPTICAL Se conecta a un componente d...

Page 109: ...btítulos E MODE Pulse este botón para seleccionar los modos de visualización y de sonido preconfigurados para los deportes las películas y los juegos Use estos botones en los modos DMA W LINK y Anynet Este mando remoto se puede usar para controlar la grabación en las grabadoras de Samsung con la función Anynet ON OFF Pulse este botón para activar la luz de fondo de los botones del mando a distanci...

Page 110: ... neón Conexiones Conexión de las antenas de VHF y UHF Si su antena tiene un juego de cables con este aspecto consulte Antenas con cables planos dobles de 300 ohmios a continuación Si la antena tiene un cable con este aspecto consulte Antenas con cables coaxiales de 75 ohmios Si tiene dos antenas consulte Antenas VHF y UHF independientes Antenas con cables planos dobles de 300 ohmios Si utiliza una...

Page 111: ...ecodificador de cable Este terminal puede estar marcado con la inscripción ANT IN VHF IN o sencillamente IN 2 Conecte este cable al separador de señales 3 Conecte un cable de antena entre un terminal OUTPUT del separador y el terminal IN del decodificador 4 Conecte un cable de antena entre el terminal ANT OUT del decodificador y el terminal B IN del conmutador RF A B 5 Conecte un cable coaxial ent...

Page 112: ...del receptor de televisión por cable satélite decodificador Qué es HDMI HDMI o interfaz multimedia de alta definición es una interfaz que permite la transmisión de señales digitales de audio y de vídeo mediante un solo cable La diferencia entre los dispositivos HDMI y DVI es que el HDMI es más pequeño y tiene instalada la función de codificación HDCP protección alta de la copia digital del ancho d...

Page 113: ...satélite decodificador 1 Conecte los cables de los componentes entre los terminales COMPONENT IN 1 o 2 Y PB PR del televisor y los terminales COMPONENT Y PB PR del reproductor de DVD o receptor de televisión por cable satélite decodificador Conecte cables de audio entre los terminales COMPONENT IN 1 o 2 R AUDIO L del televisor y los el terminales AUDIO OUT del reproductor de DVD o receptor de tele...

Page 114: ... 3 del apartado anterior para conectar la antena o el sistema de cable al vídeo y al TV Conecte el cable de S Vídeo entre el terminal VIDEO OUT del aparato de vídeo y el terminal AV IN 1 S VIDEO del televisor Conecte los cables de audio entre los terminales AUDIO OUT del aparato de vídeo y los terminales AV IN 1 o 2 R AUDIO L del televisor Con el aparato de vídeo se puede incluir una conexión S Ví...

Page 115: ...n sistema de audio digital al terminal DIGITAL AUDIO OUT OPTICAL Baje el volumen del televisor y ajuste el nivel de volumen con el control del volumen del sistema de audio Qué quiere decir OPTICAL Un cable óptico convierte una señal eléctrica en una señal de luz óptica que se transmite a través de fibra óptica S PDIF es un sistema de transmisión de audio digital en el formato de una onda de luz qu...

Page 116: ...el terminal de salida PC del ordenador Conecte un cable estéreo miniclavija 2 RCA de 3 5 mm entre el terminal DVI IN L AUDIO R del televisor y el terminal de salida de audio de la tarjeta de sonido del ordenador Cada ordenador tiene una configuración diferente del panel posterior Cuando conecte un ordenador debe hacer coincidir los colores del terminal de conexión y del cable Para una conexión de ...

Page 117: ...en los establecimientos comercia les Si la unidad accidentalmente se configura en el modo Demo comercio Store Demo y se desea volver a Uso domiciliario Home Use estándar Pulse el botón Volume Mientras se muestra la OSD del volumen mantenga pulsado el botón MENU durante 5 segundos 4 Pulse los botones o para memorizar los canales de la conexión seleccionada y pulse el botón ENTER Aire Señal de anten...

Page 118: ...eccionar Apagado o Encendido a continuación pulse el botón ENTER Se muestra el mensaje Seleccione la zona horaria en la que vive 10 Pulse los botones o para resaltar la zona horaria del área local y para mover la selección a la zona horaria apropiada en el mapa de Estados Unidos Pulse el botón ENTER Si el reloj no se configura automáticamente consulte las páginas 50 y 51 para ajustar el reloj 11 S...

Page 119: ...pués el botón ENTER para cambiar rápidamente de canal Puede pulsar los botones numéricos del mando a distancia para acceder directamente al canal vuelva a pulsar el mismo botón numérico para cambiar entre el canal digital y el canal analógico Uso del botón El botón se utiliza para seleccionar emisoras que emitan con señal digital 1 Por ejemplo para seleccionar el canal 7 1 pulse 7 y 1 HD indica qu...

Page 120: ...ntrada Aplicaciones 2 Pulse losbotones o para seleccionar uno de los iconos A continuación pulse el botón ENTER para acceder al menú secundario de los iconos 3 Pulse el botón EXIT para salir El menú en pantalla tarda alrededor de un minuto en desaparecer Visualización de la pantalla La pantalla identifica el canal actual y el estado de algunos ajustes de audio vídeo 1 Pulse el botón INFO del mando...

Page 121: ...s pasos seleccionar una emisora de origen memorizar los canales automático y añadir o suprimir canales Channel Lists Selección del origen de la señal de vídeo Antes de empezar a memorizar los canales disponibles debe indicar el tipo de origen de la señal conectada al televisor es decir antena o sistema de cable 1 Pulse el botón MENU para mostrar el menú Pulse los botones o para seleccionar Canal a...

Page 122: ... de cable para saber el tipo de sistema de cable existente en su zona En este momento ya se ha seleccionado el origen de la señal 5 El televisor empieza a memorizar todas las emisoras disponibles Una vez guardados todos los canales disponibles se inicia la eliminación de los canales codificados ver página 47 Vuelve a mostrarse el menú Prog Auto Auto Program Si desea detener la programación automát...

Page 123: ... conectado en las tomas de entrada de esta manera será más fácil seleccionar el dispositivo de entrada 1 Pulse el botón MENU para ver el menú Pulse los botones o para seleccionar Entrada y a continuación pulse el botón ENTER Pulse los botones o para seleccionar Editar Nombre y a continuación pulse el botón ENTER 2 Pulse los botones o para seleccionar los terminales de entrada AV1 AV2 S Video Compo...

Page 124: ...eccionar Contraste Brillo Definición Color o Tinte V R a continuación pulse el botón ENTER 3 Pulse los botones o para aumentar o reducir el valor de una opción concreta Pulse el botón ENTER Pulse el botón EXIT para salir Cuando se cambian Contraste Brillo Definición Color o Tinte V R la presentación en pantalla OSD se ajusta consecuentemente En el modo PC Tinte V R Definición y Color no están disp...

Page 125: ... dinámico Se puede ajustar el contraste de la pantalla para conseguir un contraste óptimo 6 Pulse los botones o para seleccionar Contraste Dinám y a continuación pulse el botón ENTER 7 Pulse los botones o para seleccionar Apagado Bajo Medio o Alto Pulse el botón ENTER Apagado Desactiva la función de contraste dinámico Bajo Establece el contraste dinámico en un nivel bajo Medio Establece el contras...

Page 126: ...colores más naturales 12 Pulse los botones o para seleccionar Balanceo de blanco y a continuación pulse el botón ENTER 13 Seleccione la opción adecuada pulsando los botones o y a continuación pulse el botón ENTER 14 Pulse los botones o para aumentar o reducir el valor de una opción concreta Pulse el botón ENTER El cambio del valor de ajuste renovará la pantalla ajustada Gamma 1 Ingresar Regresar A...

Page 127: ...es pulse el botón ENTER En el modo PC sólo se pueden hacer cambios en los elementos Tono Color Tamaño y Protección de Pantalla del menú Opciones de ima gen Ajuste del tono de color 1 Siga las instrucciones 1 y 2 de Activación de las opciones de la imagen 2 Pulse los botones o para seleccionar Tono Color a continuación pulse el botón ENTER 3 Pulse los botones o para seleccionar Frío 2 Frío 1 Normal...

Page 128: ...V 1080i HDMI 720p 1080i 1080p o Component 1080i 1080p Si se ha seleccionado el modo Doble en PIP el tamaño de la imagen no se puede definir Puede producirse una retención temporal de imagen cuando se ve una imagen estática durante más de dos horas Después de seleccionar Zoom1 Zoom2 o Ajuste ancho Pulse los botones o para seleccionar Posición y a continuación pulse el botón ENTER Utilice los botone...

Page 129: ...es superpuestas que pueden aparecer en la pantalla 1 Siga las instrucciones 1 y 2 de Activación de las opciones de la imagen Consulte la página 27 2 Pulse los botones o para seleccionar Digital NR y pulse el botón ENTER 3 Pulse los botones o para seleccionar Apagado Bajo Medio Alto o Auto Pulse el botón ENTER Apagado Apaga la función de la reducción del ruido de la pantalla Bajo Reduce el ruido de...

Page 130: ... las opciones de la imagen Consulte la página 27 Esta función sólo está activa cuando un dispositivo externo está conectado a través de HDMI 2 Pulse los botones o para seleccionar N neg HDMI y pulse el botón ENTER 3 Pulse los botones o para seleccionar Normal o Bajo y pulse el botón ENTER Normal La pantalla adquiere más brillo Bajo La pantalla se oscurece Esta función sólo está activa cuando un di...

Page 131: ...matiz de acuerdo con los valores preferidos adecuados al nivel de la señal de cada dispositivo de vídeo mediante los patrones de barras de colores rojo verde azul cián magenta amarillo sin usar un filtro azul adicional 1 Siga las instrucciones 1 y 2 de Activación de las opciones de la imagen consulte la página 27 2 Pulse los botones o para seleccionar Sólo modo azul y pulse el botón ENTER 3 Pulse ...

Page 132: ...1024x768 60Hz 1024x720 60Hz 1280x1024 60Hz 1360x768 60Hz o 1920x1080p 60Hz El emisor de infrarrojos 3D se comunica con las gafas 3D Por consiguiente el emisor de infrarrojos 3D debe estar situado cerca de las gafas 3D Se activa cuando la señal de entrada HDMI o DVI es RGB y admite el sonido DVI Cuando se enciende o se apaga el modo cambia a predeterminado Apagado y Formato se guarda El Efecto 3D s...

Page 133: ...iones de imagen y pulse el botón ENTER Pulse los botones o para seleccionar Efecto 3D y pulse el botón ENTER 5 Pulse los botones o para seleccionar Apagado Modo1 o Modo2 y pulse el botón ENTER Pulse el botón EXIT para salir Apagado Desactiva la función de efecto 3D Modo1 En primer lugar actúa la sincronización derecha Modo2 En primer lugar actúa la sincronización izquierda Si el efecto 3D no funci...

Page 134: ... vuelve a encenderlo la ventana PIP desaparecerá Puede ver emisiones de televisión analógicas en la pantalla PIP imagen secundaria cuando la imagen principal proviene de un dispositivo externo conectado a los modos HDMI 1 HDMI 2 HDMI DVI 3 Componente 1 2 o PC Cuando se activa el efecto 3D el modo PIP se desactiva Configuración de PIP Imagen principal Imagen secundaria Component 1 2 HDMI IN 1 HDMI ...

Page 135: ...na PIP y pulse el botón ENTER Pulse el botón EXIT para salir Se pueden seleccionar sólo emisoras de televisión analógicas en la pantalla PIP imagen secundaria Configuración sencilla 1 Pulse el botón TOOLS del mando a distancia 2 Pulse los botones o para seleccionar PIP y a continuación pulse el botón ENTER 3 Pulse los botones o para seleccionar un elemento en concreto 4 Pulse los botones o para se...

Page 136: ...eleccionar Modo Pulse los botones o para seleccionar un elemento concreto Normal Música Cine Diálogo Favorito y a continuación pulse el botón ENTER 4 Pulse los botones o para elegir la frecuencia que desee ajustar Pulse los botones o para aumentar o reducir el nivel de una frecuencia concreta Modo Selecciona el modo de sonido entre los valores predefinidos Balance I D Ajusta el balance entre los a...

Page 137: ...del televisor Es totalmente compatible con todos los formatos multicanal 1 Pulse el botón MENU para mostrar el menú Pulse los botones o para seleccionar Sonido a continuación pulse el botón ENTER 2 Pulse los botones o para seleccionar Trusurround SRS XT pulse el botón ENTER 3 Pulse los botones o para seleccionar Apagado o Encendido y a continuación pulse el botón ENTER Pulse el botón EXIT para sal...

Page 138: ...no Elija para canales que emiten en monoaural o si tiene dificultades con la recepción de señales estéreo Estéreo Elija para canales que emiten en estéreo SAP Elija SAP para escuchar el Programa de audio independiente que normalmente es una traducción de otro idioma Sonido Multi track está disponible sólo en el modo de televisión analógica Según el programa concreto emitido puede escuchar en modo ...

Page 139: ...nes VOL W LINK CH LIST VOL W LINK CH LIST y MUTE no están operativos cuando Altavoz TV se ajusta en Apagado Encendido apagado del altavoz del televisor Se silencia la salida de sonido de los altavoces del televisor Altavoces internos del televisor Audio Out Optical R L Out para el sistema de sonido TV AV S Video Componente PC HDMI TV AV S Vídeo Componente PC HDMI Altavoz del televisor apagado Sile...

Page 140: ... o para seleccionar Reinicio del sonido y a continuación pulse el botón ENTER 2 Pulse los botones o para seleccionar Reiniciar todo Reinic modo sonido o Cancelar y a continuación pulse el botón ENTER Reiniciar todo Todos los valores del sonido vuelven a la configuración predeterminada Reinic modo sonido Los valores actualmente configurados se restablecen con la configuración predeterminada Cancela...

Page 141: ...T del mando a distancia para mostrar las listas de canales Uso de los botones de colores del mando a distancia con la lista de canales Rojo antena Cambia a DTV aérea o DTV por cable Verde ampliar Amplía o disminuye el número del canal Amarillo seleccione Selecciona varias listas de canales TOOLS opción Muestra los menús Añadir o Borrar Añadir a favoritos o Borrar de favoritos Visualización con tem...

Page 142: ...ir de nuevo un canal a la lista Canales agregados primero hay que borrarlo Para volver a añadir restablecer un canal a la lista de canales agregados siga los pasos 1 3 anteriores pulse los botones o para seleccionar el canal y pulse el botón TOOLS Pulse el botón ENTER para seleccionar Agregar Pulse el botón CH LIST del mando a distancia para mostrar las listas de canales Canal Prog Auto Borrar can...

Page 143: ...odos los canales favoritos se mostrarán en el menú Favoritos Pulse el botón CH LIST del mando a distancia para mostrar las listas de canales Si desea seleccionar los canales favoritos que ha configurado pulse el botón FAV CH en el mando a distancia Configuración sencilla 1 Pulse el botón TOOLS del mando a distancia 2 Pulse los botones para seleccionar Añadir a favoritos o Borrar de favoritos y pul...

Page 144: ...e cómo confirmar una reserva de visualización consulte la página 43 Sólo se pueden reservar los canales memorizados Puede ajustar el canal el mes el día el año la hora y el minuto directamente pulsando los botones numéricos del mando a distancia Pulse el botón CH LIST del mando a distancia para mostrar las listas de canales Guía de programas digitales y reserva de visualización Si se ha selecciona...

Page 145: ...lse el botón ENTER 6 Pulse los botones o para seleccionar Aceptar y pulse el botón ENTER Se cancela la reserva de visualización Pulse el botón EXIT para salir Menú Programados Botones numéricos Permiten introducir números Cambiar información Selecciónelo para cambiar la reserva de visualización Cancelar programaciones Selecciónelo para cancelar la reserva de visualización Información Selecciónelo ...

Page 146: ...namiento de los canales en la memoria programa automático Los canales se pueden etiquetar con el propósito de que cuando éstos se seleccionan se pueda ver su nombre 1 Pulse el botón MENU Pulse los botones o para seleccionar Canal y a continuación pulse el botón ENTER Pulse los botones o para seleccionar Lista de canales y pulse el botón ENTER 2 Pulse los botones o para seleccionar el canal al que ...

Page 147: ...al a continuación pulse el botón ENTER 2 Pulse los botones o para seleccionar Sintonia Fina y a continuación pulse el botón ENTER 3 Pulse los botones o para ajustar la sintonización Para guardar la sintonización fina en la memoria del televisor pulse el botón ENTER Si no almacena en la memoria el canal que ha ajustado de manera precisa los ajustes no se guardan 4 Para reiniciar la sintonización fi...

Page 148: ...n de los canales digitales disponibles 1 Pulse el botón MENU para mostrar el menú Pulse los botones o para seleccionar Canal a continuación pulse el botón ENTER 2 Pulse los botones o para seleccionar Intensidad señal y a continuación pulse el botón ENTER Si el medidor de potencia de señal indica que la señal es débil ajuste físicamente su antena para incrementar la potencia de la señal Continúe aj...

Page 149: ...ro de diálogo Modos de visualización Si la señal desde el sistema es igual al modo de señal estándar la pantalla se ajustará automáticamente Si la señal del sistema no es igual al modo de señal estándar ajuste el modo consultando la guía del usuario de la tarjeta de vídeo de lo contrario puede no haber señal de vídeo La imagen de pantalla se ha optimizado durante la fabricación para los siguientes...

Page 150: ...uste de la calidad de imagen es eliminar o reducir las interferencias Si no se eliminan mediante la sintonización fina ajuste la frecuencia vertical y vuelva a realizar la sintonización fina Cuando se hayan reducido las interferencias vuelva a ajustar la imagen de forma que esté centrada en la pantalla Preselección Pulse el botón ENTER para seleccionar el modo PC 1 Pulse el botón MENU para ver el ...

Page 151: ...gen predeterminados de fábrica Preselección Pulse el botón ENTER para seleccionar el modo PC 1 Pulse el botón MENU para ver el menú Pulse los botones o para seleccionar Imagen y a continuación pulse el botón ENTER Pulse los botones o para seleccionar Pantalla y a continuación pulse el botón ENTER 2 Pulse los botones o para seleccionar Reiniciar imagen y a continuación pulse el botón ENTER El mensa...

Page 152: ...ER 5 Pulse los botones o para ir a Mes Dia Año Hora Minuto o am pm Seleccione la fecha y la hora que desee pulsando los botones o pulse después el botón ENTER Pulse el botón EXIT para salir La hora actual aparecerá siempre que se pulse el botón INFO Puede ajustar directamente Mes Dia Año Hora Minuto y am pm con los botones numéricos del mando a distancia Continúa Configuración Plug Play Idioma Esp...

Page 153: ...ionar Encendido o Apagado y después pulse el botón ENTER Pulse el botón EXIT para salir Según la estación emisora y la señal puede que el ajuste automático de la hora no se realice correctamente En este caso ajuste la hora manualmente La recepción mediante antena o cable debe estar conectada para poder ajustar la hora automáticamente Continúa Configuración Plug Play Idioma Español Tiempo V Chip Su...

Page 154: ...se puede encender un canal determinado o reproducir contenidos como archivos de fotos o de audio TV USB Permite seleccionar TV o USB Compruebe que haya un dispositivo USB conectado al televisor Antena Permite seleccionar Aire o Cable Canal Permite seleccionar el canal deseado Música Permite seleccionar la carpeta del dispositivo USB con archivos MP3 Fotos Permite seleccionar la carpeta del disposi...

Page 155: ...botones o para seleccionar Apagado y a continuación pulse el botón ENTER Pulse el botón EXIT para salir Configuración sencilla 1 Pulse el botón TOOLS del mando a distancia 2 Pulse los botones o para seleccionar Temporizador y a continuación pulse el botón ENTER 3 Pulse los botones o para seleccionar los minutos y pulse el botón ENTER 4 Pulse los botones EXIT o TOOLS para salir Configuración Plug P...

Page 156: ...lse el botón ENTER 2Pulse los botones o para seleccionar el idioma English Español o Français y a continuación pulse el botón ENTER Pulse el botón EXIT para salir Plug Play Idioma Español Tiempo V Chip Subtítulo Configuración externa Entretenimiento Apagado PIP Actualización del software Configuración Plug Play Idioma English Tiempo V Chip Subtítulo Configuración externa Entretenimiento Apagado PI...

Page 157: ...a el mensaje Ingresar Código Escriba su código PIN de 4 dígitos El número PIN predeterminado de un televisor nuevo es 0 0 0 0 3 Aparece la pantalla V Chip Pulse los botones o para seleccionar Cambiar Código y a continuación pulse el botón ENTER Aparecerá la pantalla para cambiar el código Escriba un nuevo código PIN de 4 dígitos Vuelva a escribir los 4 dígitos Cuando se muestra el mensaje El PIN s...

Page 158: ... formas Guía de programas o Clasificación MPAA 1 Pulse el botón MENU para mostrar el menú Pulse los botones o para seleccionar Configuración y a continuación pulse el botón ENTER 2 Pulse los botones o para seleccionar V Chip y a continuación pulse el botón ENTER Se muestra el mensaje Ingresar Código Escriba su código PIN de 4 dígitos 3 Aparecerá la pantalla V Chip V Chip Pulse los botones o para s...

Page 159: ...para bloquear todos los programas de televisión Las categorías TV Y TV Y7 TV G TV PG TV 14 y TV MA disponen de opciones adicionales Consulte el siguiente paso para cambiar cualquiera de las subclasificaciones TODOS Bloquea todas las clasificaciones de TV L Lenguaje adulto FV Fantasía y violencia S Situación sexual D Diálogo de contenido sexual V Violencia El V Chip bloqueará automáticamente cierta...

Page 160: ...el botón ENTER para bloquear o desbloquear la categoría Pulse el botón EXIT para salir G Audiencia general sin restricciones PG Se sugiere supervisión paterna PG 13 Menores acompañados de un adulto R Restringidos Menores de 17 acompañados por un adulto NC 17 Mayores de 17 años X Sólo adultos NR Sin clasificar Permitir todo Se pulsa para desbloquear todos los programas de televisión Bloquear Todo S...

Page 161: ...quear todos los programas de televisión C Programación para niños menores de 8 años C8 Programación generalmente considerada aceptable para niños mayores de 8 años sin acompañamiento de adultos G Programación general ideal para todas las audiencias PG Supervisión paterna 14 La programación contiene temas y contenidos que puede que no sean adecuados para menores de 14 años 18 Programación para adul...

Page 162: ...televisión Bloquear todo Se pulsa para bloquear todos los programas de televisión G General 8 ans No recomendada para niños pequeños 13 ans Es posible que la programación no sea adecuada para niños menores de 13 años 16 ans Es posible que la programación no sea adecuada para niños menores de 16 años 18 ans Programación restringida para adultos El V Chip bloqueará automáticamente cualquier categorí...

Page 163: ...estricción seleccionada Se indica el símbolo Pulse el botón EXIT para salir Permitir todo Se pulsa para desbloquear todos los programas de televisión Bloquear todo Se pulsa para bloquear todos los programas de televisión Los niveles de restricción de bloqueo difieren según la emisora El nombre de menú predeterminado y la clasificación EE UU descargable cambian según la información descargada Aunqu...

Page 164: ...ión V Chip puede bloquear todos los canales En este caso utilice la función V Chip como salida de emergencia 2 Escriba su código PIN pulse el botón ENTER y a continuación los botones o para desactivar temporalmente la función Bloqueo V Chip Si olvida el PIN pulse los botones del mando a distancia en la siguiente secuencia para reiniciar el código a 0 0 0 0 Apagar MUTE 8 2 4 Encender Canal bloquead...

Page 165: ... mismo color Las opciones Opacidad de primer plano y Opacidad de fondo no pueden ajustarse a la vez en Transparente Tamaño Esta opción consta de Programado Pequeño Normal y Grande El valor predeterminado es Programado Tipo de Letra Esta opción consta de Programado Estilo0 Estilo7 Puede cambiar el tipo de letra que desee El valor predeterminado es Programado Color de primer plano Esta opción consta...

Page 166: ... especiales de uso no sincronizado Este canal transporta datos que están destinados a ampliar la información del programa CC3 Servicio de subtítulos secundarios sincronizados Datos alternativos de subtítulos relacionados con el programa generalmente subtítulos del segundo idioma CC4 Subtítulos especiales de uso no sincronizado Similar a CC2 Texto 1 Primer servicio de texto Se puede tratar de vario...

Page 167: ...W LINK CH LIST Cuando la función de temporizador ha apagado el televisor 1 Pulse el botón MENU para mostrar el menú Pulse los botones o para seleccionar Configuración y a continuación pulse el botón ENTER 2 Pulse los botones o para seleccionar Configuración externa y a continuación pulse el botón ENTER 3 Pulse los botones o para seleccionar Efecto de luz y a continuación pulse el botón ENTER Pulse...

Page 168: ...lidad óptima de imagen para los juegos Este modo acelera la velocidad de reproducción de los juegos cuando se usa una consola de juegos externa conectada al televisor Pulse el botón EXIT para salir Si configura cualquiera de los tres modos de Entretenimiento como Encendido la configuración se bloquea y no se puede ajustar Si desea configurar los modos Imagen y Sonido debe desactivar el modo Entret...

Page 169: ... mensaje Explorando USB Puede tardar hasta 0 segundos Si el firmware se reconoce adecuadamente en el USB aparece el mensaje El sistema se reiniciará después de la actualización Actualizar la versión xxxx a la versión xxxx Pulse los botones o para seleccionar Aceptar y a continuación pulse el botón ENTER Se inicia la actualización No desconecte la alimentación ni retire la unidad USB mientras se ap...

Page 170: ...r daños o pérdidas de datos SAMSUNG no se hace responsable por cualquier daño en los archivos o pérdida de datos No desconecte el dispositivo USB mientras se esté cargando MSC admite archivos MP3 y JPEG y el dispositivo PTP sólo admite archivos JPEG Si trata de reproducir un archivo dañado o no compatible se muestra el mensaje File Format Not Supported Formato de archivo no admitido Sólo se admite...

Page 171: ...lse el botón ENTER Pulse el botón rojo a continuación pulse los botones o para seleccionar el dispositivo de memoria USB correspondiente Pulse el botón ENTER Esta función puede variar según el dispositivo de memoria USB conectado al televisor El nombre del dispositivo USB seleccionado aparece en la parte inferior izquierda de la pantalla 4 Pulse los botones o para seleccionar un icono Foto Música ...

Page 172: ...ble que las fotos sin información EXIF no se muestren como imágenes en miniatura en la lista de fotos Pantalla de visualización 1 Foto actualmente seleccionada Muestra la foto actualmente seleccionada 2 Ventana de información de la foto Muestra información sobre la foto actualmente seleccionada Se puede cambiar Color Composición y Favoritos 3 Norma de clasificación actual Pulse los botones o para ...

Page 173: ... por fecha Ordena por años y meses empezando por las más antiguas Color Ordena las fotos por color Se puede cambiar la información del color de la foto Composición Ordena las fotos por composición Se puede cambiar la información de la composición de la foto Carpeta Ordena las fotos por carpetas Si hay varias carpetas en USB los archivos de fotos se muestran ordenados en cada carpeta El archivo de ...

Page 174: ...aria Continúa Photo USB Dispositivo Conffav Selección Saltar TOOLS Opción Imagen_1 jpg Mes Jan Fecha Jan 01 2008 Color Gris Composición Carpeta P other Favoritos Preferencias Mensual Fecha Jan Nov Photo USB Dispositivo Conffav Selección Saltar TOOLS Opción Imagen_1 jpg Mes Jan Fecha Jan 01 2008 Color Gris Composición Carpeta P other Favoritos Mensual Fecha Color Jan Nov Photo USB Dispositivo Conff...

Page 175: ...tos 3 Pulse Enter para Inic vis aut Continúa Cambio de la información del color 1 Selección Color como norma de clasificación en la lista de fotos y pulse los botones o para seleccionar una foto Cambio de la información de varios archivos Pulse los botones o para seleccionar la foto que desee de la lista A continuación pulse el botón amarillo Repita el proceso anterior para seleccionar varias foto...

Page 176: ... foto que desee de la lista 2 Pulse el botón TOOLS 3 Pulse los botones o para seleccionar Borrar y a continuación pulse el botón ENTER Aparece el mensaje Seleccionados IMG jpg 1 Archivos Borrar arch sel Cuando se borra un archivo de sólo lectura aparece el mensaje Es un archivo de sólo lectura Borrar este archivo 4 Pulse los botones o para seleccionar Aceptar y pulse el botón ENTER La foto se borr...

Page 177: ...ión que incluye el archivo seleccionado se usan en la presentación Mientras se muestra la lista de fotos pulse el botón W LINK CH LIST reproducir del mando a distancia para iniciarla Icono de información de la función de presentación aparece en la parte superior izquierda de la pantalla Icono Presentación en pantalla Función W LINK CH LIST Foto Presentación Presentación de fotos en curso W LINK CH...

Page 178: ...nuación pulse el botón ENTER Pulse los botones o varias veces para girar la foto los grados deseados Con cada pulsación del botón la imagen gira 270 180 90 y 0 Con cada pulsación del botón la imagen gira 90 180 270 y 0 Si ha seleccionado Zoom la función de giro no está activa El archivo girado no se guarda El icono de información de la función de giro aparece en la parte superior derecha de la pan...

Page 179: ...re hacia la izquierda para ver la parte izquierda de una foto ampliada Velocidad de la presentación Se puede seleccionar la velocidad de la presentación Pulse los botones o para seleccionar Veloc vis aut Pulse los botones o para seleccionar la opción deseada Rápida Lenta Normal Sólo se puede seleccionar la velocidad de Presentación durante una presentación Música de fondo Si configura Música de fo...

Page 180: ...ara seleccionar Estado animico BGM Pulse el botón ENTER Wiselink identifica el estado de ánimo de los archivos de música y los agrupa en consecuencia analizando los archivos de música del dispositivo USB Opciones de Modo BGM Diámico Rítmico Triste Estimulante Tranquilo Imagen Modo Se puede configurar el modo de imagen Consulte la página 24 Sonido Modo Se puede configurar el modo de sonido Consulte...

Page 181: ... hasta que se muestre el valor que desee Consulte la página 79 Botón amarillo Selección Selecciona archivos de música de la lista Los archivos de música seleccionados se marcan con el símbolo situado a su izquierda W LINK CH LIST W LINK CH LIST Saltar Salta al grupo de clasificación anterior Salta al grupo de clasificación siguiente Botón TOOLS Opción Muestra los menús Reproducir grupo actual Borr...

Page 182: ...nformación de favorito Los archivos de música cuya información no se puede mostrar se establecen como Sin clasificar Si no hay información del título de un archivo de música se muestra el nombre del archivo Si la información de Género Artista Álbum o Año no está disponible el elemento correspondiente se muestra vacío Orden de las música por título 1 Seleccione Título como orden estándar de la list...

Page 183: ... o para resaltar Repr grupo actual 5 Pulse el botón ENTER para reproducir el grupo seleccionado de los archivos de música de la lista secundaria Orden de las fotos por carpeta 1 Seleccione Carpeta como orden estándar de la lista de música 2 Pulse los botones o para seleccionar en la lista secundaria de archivos agrupados por carpeta 3 Pulse el botón TOOLS 4 Pulse los botones o para resaltar Repr g...

Page 184: ...cionados Si selecciona Cancelar se cancela la operación de borrar 5 Para salir del modo WISELINK pulse el botón W LINK en el mando a distancia No se pueden borrar los archivos de sólo lectura No se pueden restaurar los archivos de música eliminados Visualización de la información Se muestra la información del archivo de música incluidos el orden del archivo en el directorio actual el nombre el tam...

Page 185: ...mando a distancia La duración de la reproducción de un archivo mp3 puede visualizarse como 00 00 00 si la información del tiempo de reproducción no se encuentra en el inicio del archivo 4 Para salir del modo WISELINK pulse el botón W LINK del mando a distancia Reproducción de un grupo de música 1 Pulse el botón W LINK del mando a distancia para mostrar el menú WISELINK 2 Pulse los botones o para s...

Page 186: ...INK del mando a distancia Continúa Icono de información de la función de la música aparece en la parte superior izquierda de la pantalla Icono Presentación en pantalla Función Musica Repetir Cuando todos los archivos de música de la carpeta o el archivo seleccionado se repiten Música Modo de repetición está establecido como Encendido Música Una vez Cuando todos los archivos de música de la carpeta...

Page 187: ...para que se ejecute el salvapantallas Pulse los botones o para seleccionar Tiempo de ejecución del salvapantallas Pulse los botones o para seleccionar 1 min 3 min o 5 min Información Puede configurar que se muestre la información del dispositivo conectado Pulse los botones o para seleccionar Información y a continuación pulse el botón ENTER Extracción segura Se puede quitar el dispositivo del tele...

Page 188: ...roduce la salida de 2 canales de audio Sólo oirá sonido de los altavoces frontales izquierdo y derecho y del subwoofer del sistema Home Cinema Para escuchar el canal de audio 5 1 conecte el terminal DIGITAL AUDIO OUT OPTICAL del reproductor de DVD o del decodificador de cable satélite dispositivo Anynet 1 o 2 directamente al amplificador o al sistema Home Cinema no al televisor Consulte el manual ...

Page 189: ...spositivo que desea pulse los botones o para seleccionar Buscando conexiones y pulse el botón ENTER Se muestra el mensaje Configurando la conexión Anynet Cuando finaliza la búsqueda de dispositivos los dispositivos conectados aparecen en el menú Anynet La fuente activa del mando a distancia del televisor se debe configurar para que éste utilice la función Anynet Si establece Desact auto como Sí lo...

Page 190: ...LIST Dispositivo de audio Cuando la opción Receptor está activada Botones VOL W LINK CH LIST W LINK CH LIST Botón MUTE La función Anynet sólo funciona cuando la fuente activa del mando a distancia del televisor está ajustada en TV El botón REC funciona sólo cuando la grabación es posible Los dispositivos Anynet no se pueden controlar con los botones del lateral del TV Los dispositivos Anynet sólo ...

Page 191: ...si el dispositivo admite las funciones Anynet Compruebe si el cable HDMI 1 3 está debidamente conectado Compruebe si Anynet HDMI CEC Anynet HDMI CEC está establecido en On Encendido en el menú de configuración de Anynet Vuelva a efectuar una búsqueda de dispositivos Anynet Sólo puede conectar un dispositivo Anynet mediante el cable HDMI 1 3 Algunos cables HDMI pueden no admitir las funciones Anyne...

Page 192: ...todo original de producción analógico o digital Si el método de producción original es digital Calidad visual alta Si el método de producción original es analógico el programa digital mostrado en la pantalla es originalmente un programa analógico que se ha convertido a digital La calidad visual es de grado SD definición estándar La pantalla está en blanco y el indicador de encendido parpadea const...

Page 193: ...seco Nunca utilice agua líquidos limpiadores cera ni productos químicos No ponga objetos pesados encima de la pantalla Este televisor DLP proyecta la imagen en una pantalla de gran tamaño aplicando un sistema óptico Si coloca el televisor boca abajo podrían producirse problemas porque puede pegarse suciedad u otras partículas contaminantes en el interior del televisor Temperatura Si el TV se trasl...

Page 194: ...a de almacenamiento Humedad en almacenamiento 50 F a 104 F 10 C a 40 C 10 a 80 sin condensación 4 F a 113 F 20 C a 45 C 5 al 95 sin condensación 50 F a 104 F 10 C a 40 C 10 a 80 sin condensación 4 F a 113 F 20 C a 45 C 5 al 95 sin condensación Este dispositivo es un aparato digital de la Clase B El diseño y las especificaciones pueden cambiar sin previo aviso Para conocer la fuente de alimentación...

Page 195: ...Esta página se ha dejado en blanco expresamente ...

Reviews: