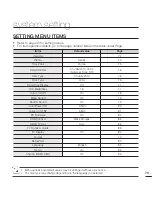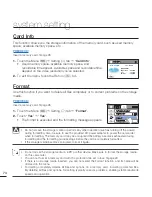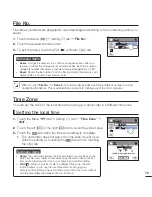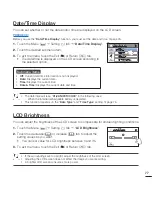
background image

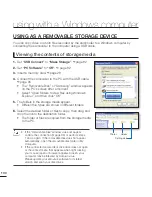
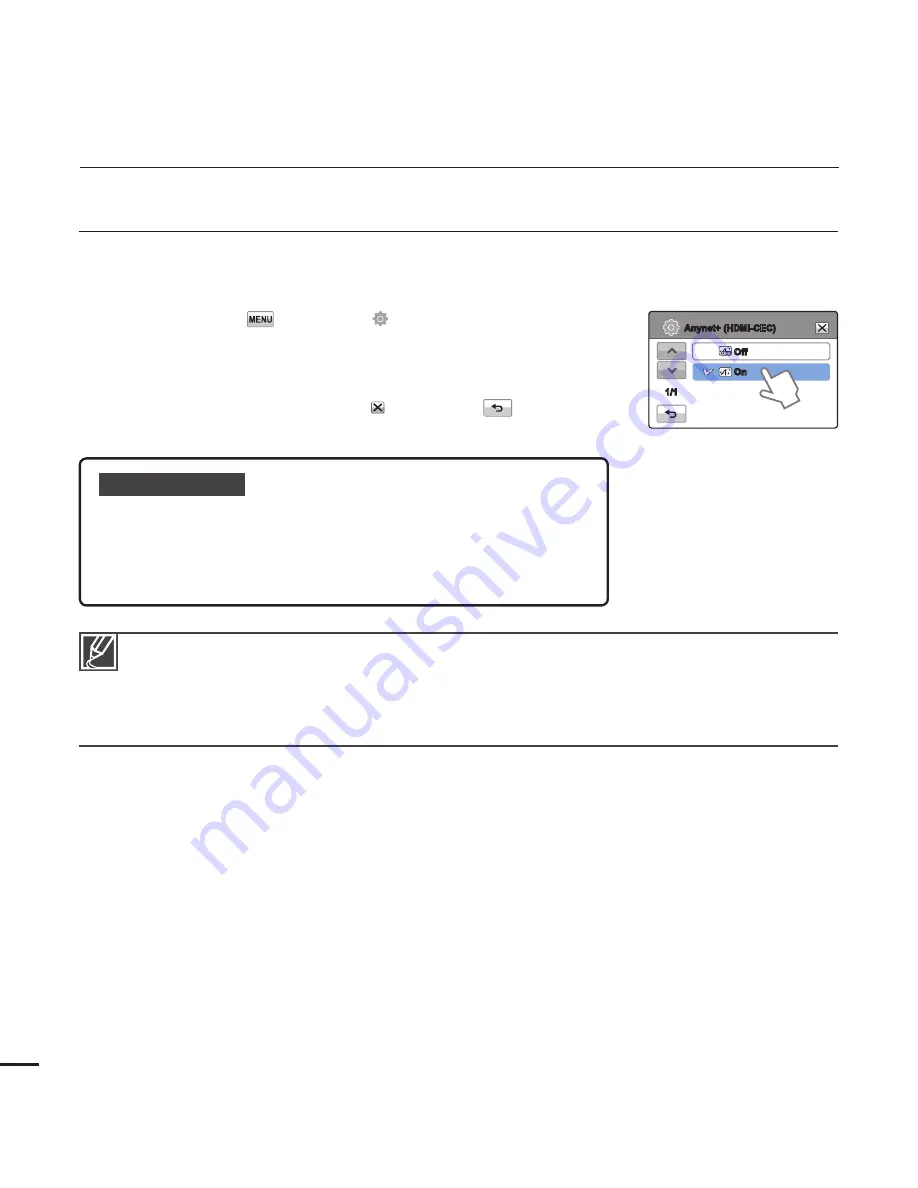
(HDMI-CEC)

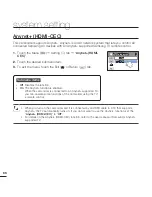
This camcorder supports . is an AV network system that lets you control all 

connected Samsung AV devices with an supported Samsung TV remote control.

1. 

Touch the Menu (

 Setting ( ) tab 

 “

(HDMI-

CEC)

”.

2. 

Touch the desired submenu item.

3. 

To exit the menu, touch the Exit ( ) or Return (

) tab.

Submenu items

Off

: Disables the function.

On

:  The function is enabled. 

When the camcorder is connected to an supported TV, 

you can operate some functions of the camcorder using the TV’

s remote control.

When you turn on the camcorder and it is connected by an HDMI cable to a TV that supports 

, the TV automatically turns on. If you do not want to use the function, set the 

(HDMI-CEC)

” to “

Off

”.

For details on the (HDMI-CEC) function, refer to the user manual of Samsung’s  

supported TV.

system setting

86

Off

On

(HDMI-CEC)

1/1

Summary of Contents for HMX-T10WP

Page 1: ...P HMX T10BP HMX T10OP HMX T11WP HMX T11BP HMX T11OP High Definition Digital Camcorder www samsung com register For video recording use a memory card that supports faster write speeds Memory Card A Class 6 SDHC card or above ...

Page 2: ...ing signs are here to prevent injury to you and others Please follow them explicitly After reading this section keep it in a safe place for future reference PRECAUTIONS Warning When using the AC power adapter with your camcorder connect the adapter to an outlet with protective grounding Do not expose the camcorder battery to direct sunlight heaters radiators fire or any other source of excessive h...

Page 3: ...ndard Definition Video SD VIDEO You can play back and edit the video recorded by the camcorder on a personal computer using the internal software of this camcorder Please note that this camcorder is not compatible with other digital video formats Before recording important video make a trial recording Play back your trial recording to make sure the video and audio have been recorded properly Recor...

Page 4: ...efore reading this user manual Correct disposal of batteries in this product Applicable in the European Union and other European countries with separate battery return systems This marking on the battery manual or packaging indicates that the batteries in this product should not be disposed of with other household waste at the end of their working life Where marked the chemical symbols Hg Cd or Pb...

Page 5: ...cts L I O Do not disconnect the AC adaptor by pulling on its power cord as this could damage the power cord Do not allow water or metal and inflammable matter to enter the camcorder or AC power adaptor Doing so may pose a fire hazard W 4 4 W Do not overload outlets or extension cords as this may result in abnormal heat or fire Using the camcorder at temperatures over 60 140 may result in fire Keep...

Page 6: ...alfunction or electric shock W 4 4 W If the camcorder malfunctions immediately detach the AC adaptor or battery from the camcorder There is a risk of fire or injury W 4 4 W Keep the power cord unplugged when not in use or during lightning storms There is a risk of fire Do not plug or unplug the power cord with wet hands There is a risk of electric shock When cleaning the AC adaptor unplug the powe...

Page 7: ... before using insecticide E D I C I T C E S N I Do not use the camcorder near dense exhaust gas generated by gasoline or diesel engines or near a corrosive gas such as hydrogen sulphide Doing so may corrode the external or internal terminals disabling normal operation Do not leave the camcorder in a closed vehicle for a long time where the temperature is very high Do not expose the camcorder to so...

Page 8: ...injuries caused by abnormal operation w T T w Place the camcorder on a stable surface that is well ventilated W 4 4 W Keep important data separately Samsung is not responsible for data loss Do not use the camcorder near sources of strong radio waves or magnetism such as speakers or large motors Noise from these sources could distort the video or audio you are recording W 4 4 W Do not use the camco...

Page 9: ...g ejecting the battery 18 Charging the battery 19 Checking the battery state 22 Turning your camcorder on off 23 Switching to the power saving mode 24 Setting the operation modes 24 Using the Display button 25 Using the touch panel 26 Setting the time zone and date time for the first time 27 Selecting the languages 28 Inserting ejecting a memory card not supplied 29 Selecting a suitable memory car...

Page 10: ...u items 48 Quick menu items 49 SCENE 50 Video Resolution 50 Video Quality 51 Photo Resolution 51 Photo Sharpness 52 White Balance 53 Aperture 54 Shutter 55 EV 55 Super C Nite 56 Back Light 57 Focus 58 Anti Shake OIS Optical Image Stabiliser 59 Digital Effect 60 Fader 61 Tele Macro 62 Cont Shot 62 Wind Cut 63 Digital Zoom 63 Self Timer 64 Quick View 65 Guideline contents BASIC RECORDING 34 BASIC PL...

Page 11: ...nfo 74 Format 75 File No 75 Time Zone 76 Date Time Set 76 Date Type 76 Time Type 77 Date Time Display 77 LCD Brightness 78 Auto LCD Off 79 Beep Sound 79 Shutter Sound 80 Auto Power Off 81 Quick On STBY 82 PC Software 82 USB Connect 83 HDMI TV Out 83 TV Connect Guide 84 TV Display 84 Default Set 85 Language 85 Demo 86 Anynet HDMI CEC ADVANCED PLAYBACK 66 EDITING FILES 69 SYSTEM SETTING 73 ...

Page 12: ...TV with HDMI 89 Connecting to a regular TV 90 Viewing on a TV screen 91 Dubbing to a VCR or DVD HDD recorder 92 Direct printing with a PictBridge printer 94 What you can do with a windows computer 95 Using the Intelli studio programme 100 Using as a removable storage device 102 Warning indicators and messages 107 Symptoms and solutions 113 Maintenance 114 Using your camcorder abroad 115 Specificat...

Page 13: ...e camcorder page 17 Make sure that the SAMSUNG logo is facing up and the battery is placed as shown in the figure 2 Charge the battery fully page 18 The battery is fully charged when the CHG charging indicator light turns green 3 Insert a memory card page 28 You can use commercially available SDHC SD High Capacity or SD memory cards with this camcorder STEP 2 Record with your camcorder LCD screen ...

Page 14: ...ect is in focus quick start guide Recording videos Recording photos The default video resolution setting is 1080 50i You can also record in SD standard definition video quality You can also take photos while recording videos page 36 When you close the LCD screen during standby your camcorder goes to Quick On STBY mode power saving mode You can start recording quickly when you open the LCD screen p...

Page 15: ...uch the thumbnail HD SD tab then touch the desired image Viewing on a high definition TV You can enjoy HD high definition videos on an HDTV page 87 Simple and fun Enjoy the various features of the internal Intelli studio programme on your Windows computer Using the Intelli studio programme built into your camcorder you can import videos photos into your computer and edit or share the videos photos...

Page 16: ...ould like to playback Sharing videos photos on YouTube Flickr FaceBook Share your contents with the world by uploading videos and photos directly to a web site with one click Click Share Upload tab on the browser page 99 If the storage media is full you cannot record new videos or photos Delete videos or photos that you have saved to a computer from the camcorder s storage media Then you can recor...

Page 17: ...Video cable USB cable Hand strap User manual CD Quick start guide The exact appearance of each item may vary by model The contents may vary depending on the sales region Parts and accessories can be purchased after consulting with your local Samsung dealer SAMSUNG is not responsible for reduced battery life time or malfunctions caused by any unauthorised use of accessories such as the AC power ada...

Page 18: ...reful not to block the internal microphone and lens getting to know the camcorder TFT LCD screen Touch screen Q MENU button Zoom W T button Recording start stop button Power button Display button SMART AUTO button Internal speaker Lens Internal microphone 12 ...

Page 19: ...de Video Photo Play mode Zoom W T lever PHOTO button Hand strap hook Jack cover USB HDMI AV USB HDMI AV Audio Video jack Jack cover DC IN Charging CHG indicator DC IN jack Tripod receptacle Battery Memory card cover Memory card slot Battery slot Battery release switch OPEN CLOSE switch 1 ...

Page 20: ... 999 This camcorder provides one record mode which combines the video and photo record modes You can easily record videos or photos in the same mode without having to change it Left of the LCD screen Indicator Meaning Record mode Video Photo STBY Operating status standby recording Self Timer SCENE Smart Auto Digital Effect White Balance Fader Manual focus Touch Point F2 S 1 50 OFF OFF SUPER SUPER ...

Page 21: ... 102 106 Top of the LCD screen Indicator Meaning Video play mode Operating status play pause 00 00 05 00 00 50 Playback time recorded time Storage media Memory card Battery info remaining charge level Play Option 100_0001 File name file number Video Quality Video Resolution Protect 01 JAN 2010 00 00 Date Time Bottom of the LCD screen Indicator Meaning 10 Volume control Volume tab Play related func...

Page 22: ...play mode X1 1 Slide show Playback zoom X1 1 X8 0 100_0001 File name file number 1 10 Photo image counter current image total number of recorded images Storage media memory card Battery info Erase protection Photo resolution 01 JAN 2010 00 00 Date Time Bottom of the LCD screen Indicator Meaning Volume tab when activating slide show Return tab Previous image Next image tab Slide show start tab Menu...

Page 23: ... cover by sliding the OPEN CLOSE switch toward OPEN 2 Insert the battery into the battery slot until it locks Make sure that the SAMSUNG logo is facing up and the battery is placed as shown in the figure 3 Close the battery cover by sliding the OPEN CLOSE switch toward CLOSE 1 Open the battery cover by sliding the OPEN CLOSE switch toward OPEN 2 Slide the Battery release switch in the direction as...

Page 24: ...battery into the camcorder page 17 To charge use the supplied AC power adaptor or the USB cable Charge the battery using the AC power adaptor or the USB cable The charging CHG indicator lights up and charging starts After the battery is fully charged the charging CHG indicator turns green Please make sure that there are no foreign substances in the plug and socket when you connect the AC power sup...

Page 25: ...e will be forced to turn off after 3 seconds Low Battery CHECKING THE BATTERY STATE You can check the charging state and remaining battery capacity To check the charging state Battery level display The colour of the LED indicates the power or charging state Orange Charging Green Fully charged Off Error The figures above are based on a fully charged battery at a normal temperature Low ambient tempe...

Page 26: ...Your times may differ depending on your usage and conditions The recording and playback times will be shorter when you use your camcorder in low temperatures Continuous Recording without zoom The continuous recording time above shows the available recording time when you record without using any other function after recording starts The battery may discharge 2 3 times faster than this reference if...

Page 27: ...ery may be completely discharged if it has been installed and left in the camcorder for a long period of time If this occurs the battery may not fully operate even if you charge it If the battery is not used for a long time fully charge the battery and then using your camcorder drain the charge completely once every 3 months to keep the battery functioning properly To store the battery remove it f...

Page 28: ...n open basic operation of the camcorder TURNING YOUR CAMCORDER ON OFF 1 Open the LCD screen to turn on the camcorder Your camcorder turns on automatically when you open the LCD screen 2 To turn off the camcorder press the Power button for about one second When you use your camcorder for the first time or reset it the time zone screen appears at start up Select your geographical location and then s...

Page 29: ... Min is set the camcorder turns off in 5 minutes If you open the LCD screen or connect a cable to the camcorder when the camcorder is in sleep mode the camcorder returns to the last active operation mode The power saving mode does not work in the following situations When the camcorder has a cable connection Audio Video cable Mini HDMI or USB etc While recording playing back or while running a sli...

Page 30: ...des Warning indicators and messages may appear depending on the recording conditions The Display button does not work when the menu or quick menu screen is being displayed Press the Display button The full and minimum display modes alternate Switching the information display mode basic operation of the camcorder MODE button Mode indicators Record mode To record videos or photos Play mode To play v...

Page 31: ...d indicators that appear on the LCD screen depend on the current recording playback status of your camcorder The camcorder does not recognise touches if you touch more than two points on the screen at the same time Touch one point at a time Touch Slightly touch items with your finger to select them or to execute functions 25 The touch panel lets you playback and record with a simple touch of your ...

Page 32: ...r Your camcorder includes a internal rechargeable battery that retains the date and time settings even after the power is turned off If the battery is depleted the current date time values are reset to the default values If this occurs you need to recharge the internal rechargeable battery see below and then re set the current date and time The internal battery is always recharged while your camco...

Page 33: ...s the menus and messages in the language you selected Language options may be changed without a prior notice The camcorder retains the language you select even when not connected to the battery or AC power The date and time format may change depending on the language you selected Supported languages English Português Polski Ελληνικά 日本語 한국어 Nederlands Čeština Srpski ไทย Français Svenska Slovensky ...

Page 34: ...witch toward OPEN 2 Gently push the memory card to eject it 3 Close the memory card cover by sliding the OPEN CLOSE switch toward CLOSE INSERTING EJECTING A MEMORY CARD NOT SUPPLIED To avoid data loss turn off the camcorder by pressing the Power button for one second before inserting or ejecting the memory card Be careful not to push the memory card too hard The memory card may suddenly pop out Yo...

Page 35: ...rite protection switch Setting the switch prevents accidental erasure of files recorded on the card To enable writing move the switch up in the direction of the terminals To set write protection move the switch down SDHC Secure Digital High Capacity cards An SDHC card is a higher version Ver 2 00 of the SD card and supports capacities above 2GB SDHC cards cannot be used with current SD enabled hos...

Page 36: ...emory card out of the reach of children who might swallow it The camcorder supports SD and SDHC memory cards giving you a wider choice of cards to choose from The data storage speed may differ depending on the manufacturer and production system SLC single level cell system faster write speed enabled MLC multi level cell system only lower write speed is supported For best results we recommend using...

Page 37: ...solution the more memory is used Lower resolution and quality increases the recording time but the image quality may suffer The bit rate automatically adjusts to the recording image Accordingly the recording time may vary Memory cards bigger than 32GB may not operate normally When a video file exceeds 1 8GB a new video file is created automatically The maximum number of recordable photo and video ...

Page 38: ...r offers high quality image viewing Excessive rotation may damage the connective hinge between the screen and the camcorder Clean fingerprints or dust on the screen with a soft cloth 1 Open the LCD screen with your finger The screen opens up to 90 2 With the LCD screen open 90 rotate it forwards towards the lens or backwards You can rotate it up to 180 towards the lens and up to 90 backward To vie...

Page 39: ... comfortable position with a clear view of your subjects while you record Make sure the camcorder lens is angled for proper shooting We recommend you keep the sun behind you while shooting Aim the camcorder as shown in the illustration 1 Loop the hand strap around your wrist 2 Hold the camcorder with both your hands 3 Make sure your footing is stable and there is no danger of colliding with anothe...

Page 40: ...ng start stop button The recording indicator appears and recording starts 3 To stop recording press the Recording start stop button again 4 Touch the Quick View icon to view the most recently recorded video After the Quick View is complete your camcorder returns to the standby mode basic recording This camcorder features two Recording start stop buttons One is on the rear side of the camcorder the...

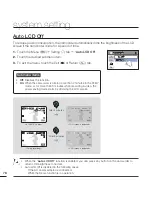
Page 41: ...nd is recorded by the internal stereo microphone located on the front of the camcorder Make sure that the microphone is not blocked Before recording an important video make sure to test the recording function to see if there are any problems with the audio or video recording For various functions available during recording see pages 49 65 If the power cable battery is disconnected or recording is ...

Page 42: ... to photograph and then press the PHOTO button When the indicator disappears the camcorder has recorded the photo image without a shutter sound Video keeps recording even while you take photos 3 To stop recording press the Recording start stop button again Photos are captured in 1920x1080 resolution regardless of the resolution of the video recording When the HDMI cable is connected to the camcord...

Page 43: ...eturn to the standby mode touch the Return tab The recordable number of photos varies depending on the recording conditions and the photo resolution page 31 The camcorder does not record audio when you take photos If focusing is difficult use the manual focus function page 57 For the on screen display information see page 14 Adjust the brightness of the LCD screen using menu items Adjusting the br...

Page 44: ...pages 34 37 4 To cancel Smart Auto mode press the SMART AUTO button again Buttons unavailable during Smart Auto operation Menu tab Q MENU button etc Most settings are automatically adjusted in Smart Auto mode To set or adjust functions on your own release the Smart Auto mode first You can not access Smart Auto mode while recording You must set this function before recording When the camcorder fail...

Page 45: ... the zoom function consumes more power The camcorder can record the sound of the zoom mechanism ZOOMING This camcorder allows you to record using optical 10x power zoom and digital zoom by sliding the Zoom lever or pressing the Zoom button on the LCD panel When using the zoom function you can decrease zoom speed by slowly moving the Zoom W T lever Moving it faster increases the zoom speed However ...

Page 46: ... that was last used However you can choose the video HD or SD or photo thumbnail view display options by touching the HD HD SD SD or photo tab on the LCD screen Understanding how to change the operation modes You can easily change the operation modes by touching the LCD screen or using the buttons as shown in the following figures You can choose from these thumbnail display options 3x2 4x3 and Dat...

Page 47: ...h anywhere on the screen To stop playback and return to the thumbnails touch the Return tab It may take some time to start playback depending on the size and quality of the selected video The camcorder may not play the following video files A video recorded on another device A video whose file format is not supported by the camcorder You can use various play options during the video playback page ...

Page 48: ...ly When you lift off your finger the camcorder plays the video you selected Slow playback When playback is paused touching the Reverse slow Forward slow tab reduces the playback speed Reverse forward playback slow rate x1 2 x1 4 x1 8 x1 2 Frame by frame playback When playback is paused touch the Reverse frame advance Forward frame advance to make the video go in reverse or forward one frame at a t...

Page 49: ...ar briefly They reappear when you touch anywhere on the screen 3 To return to the thumbnails touch the Return tab Loading time may vary depending on the size and quality of the photo you selected Your camcorder may not play back the following photo files normally A photo recorded on another device A photo with a file format not supported by this camcorder One that does not conform to DCF standards...

Page 50: ...s from the centre of the photo You can zoom in from x1 1 to x8 0 3 Touch the up down left right tab to view the area you want on the magnified photo 4 To cancel touch the Return tab Photos recorded on other devices or those edited on a PC cannot be magnified While the playback zoom is in use other images cannot be selected Zooming during photo playback All photos are played back depending on the s...

Page 51: ...the desired menu with one touch 1 Press the Q MENU button on your camcorder to see the available menu options The quick menu screen appears 2 Touch Focus The Focus function is used here as an example 3 Touch the desired option Adjust the setting values accordingly To exit the menu touch the Exit or Return tab Using the Q MENU button When using Menu or Quick menu items some menu items can not be us...

Page 52: ...eo Resolution 1080 50i 50 Video Quality Fine 50 Photo Resolution 2880x1620 51 Photo Sharpness Normal 51 White Balance Auto 52 Aperture Auto 53 Shutter Auto 54 EV 0 55 Super C Nite Normal 55 Back Light Off 56 Focus Auto 57 Anti Shake OIS On 58 Digital Effect Off 59 Fader Off 60 Tele Macro Off 61 Cont Shot Off 62 Wind Cut Off 62 Digital Zoom Off 63 Self Timer Off 63 Quick View On 64 Guideline Off 65...

Page 53: ...light X X 67 Delete 69 Protect Off Single 70 Edit Divide X X 71 Combine X X X 72 File Info 68 Slide Show Start X X 44 Slide Show Option X X 68 available X not available Playback menu items Menu options and default values may be changed without prior notice Some grey coloured menu options cannot be selected page 112 47 ...

Page 54: ...deo Resolution 1080 50i 50 Photo Resolution 2880x1620 51 WB Auto 52 EV 0 55 Focus Auto 57 Operation mode Item Video Photo Page Thumbnail Single Thumbnail Single Highlight X X 67 Delete 69 Protect 70 Edit Divide X X 71 Combine X X X 72 File Info 68 available x not available Recording menu items Playback menu items Menu options and default values may be changed without a prior notice using the menu ...

Page 55: ...doors with artificial light SCENE Using the iScene function you can select a setting that matches the scene you are shooting Sports Portrait etc Based on your selection the camcorder sets the appropriate shutter speed and aperture automatically for optimal recording PRECHECK Select the record mode by pressing the MODE button page 24 1 Touch the Menu tab SCENE 2 Touch the desired submenu item To ch...

Page 56: ...videos in normal image quality 50i indicates the camcorder will record in interlaced scan mode at 50 fields per second 50p indicates the camcorder will record in progressive scan mode at 50 frames per second Recorded files are encoded using Variable Bit Rate VBR VBR is an encoding system that automatically adjusts the bit rate in response to the image being recorded The available video recording t...

Page 57: ...oto PRECHECK Select the record mode by pressing the MODE button page 24 1 Touch the Menu tab Photo Sharpness 2 Touch the desired submenu item 3 To exit the menu touch the Exit or Return tab Submenu items Soft Smooths the edges of photo images Makes image softer Normal The photo images appear with sharp edges and are suitable for printing Sharp Sharpens the edges in photo images further The number ...

Page 58: ...removes unrealistic colour casts so that white objects are rendered white in your image and all other colours look natural Proper white balance has to take into account the colour temperature of a light source which refers to the relative warmth or coolness of white light Understanding White Balance 1 Touch the Menu tab White Balance Custom WB The Set White Balance indicator appears 2 Fill the scr...

Page 59: ... Aperture Manual the SCENE mode is cancelled Super C Nite is set to Off and Shutter is set to Auto automatically If the aperture is set to manual the aperture value changes depending on the zoom level you change You can adjust the aperture value to control the amount of light reaching the image sensor The smaller the aperture value the greater the amount of light For example F1 8 lets in more ligh...

Page 60: ... harmed by too much light When you specify Shutter Manual the SCENE mode is cancelled Super C Nite is set to Off and Aperture is set to Auto automatically Even if the shutter speed is set to 1 10000 the camcorder supports only up to 1 2000 while recording photos Shutter The camcorder automatically sets the shutter speed depending on the scene s brightness User high shutter speeds to record fast mo...

Page 61: ...Value Super C Nite Use to get better images of slowly moving subjects or subjects in dark places When you turn the Super C Nite function on the camcorder adjusts the shutter speed so that the images are brighter without compromising colour PRECHECK Select the record mode by pressing the MODE button page 24 1 Touch the Menu tab Super C Nite 2 Touch the desired submenu item 3 To exit the menu touch ...

Page 62: ... items Off Disables the function On Backlight compensation brightens the subject It typically occurs when The subject is in front of a window The person you want to record is wearing white or shiny clothes and is placed against a bright background The person s face is too dark to distinguish his her features The subject is outdoors and the background is overcast The light sources are too bright Th...

Page 63: ...ches the end The camcorder applies the adjusted value right after you touch the or tab Focusing manually during recording Submenu items Auto In most situations it is better to use the automatic focus feature as it lets you concentrate on the creative side of your recording Manual You may need to focus manually under conditions in which automatic focusing is difficult or unreliable Touch or tab to ...

Page 64: ...mcorder focus on a small section of the picture You get the camcorder to focus on a particular point by touching the desired point on the LCD screen To activate the touch point with a long touch You can activate touch point by lightly pressing a particular point on the LCD screen for about 2 seconds Using the touch point function The Auto Focus AF setting is useful when you operate the zoom functi...

Page 65: ...rt This mode helps adjust for facial imperfections Sepia This mode gives the image an old time reddish brown look When you turn on Smart Auto mode it automatically sets Anti shake OIS to On The Anti Shake OIS function may not correct gross camcorder shake entirely To decrease shake hold the camcorder firmly with both hands When this function is On the actual movement of the subject and the movemen...

Page 66: ...urns the Fader function off after it has been used once You must reset it each time you want to use it Fade in With Fader set to In press the Recording start stop button The recording starts with a dark screen and then the image and sound fade in Fade out With Fader set to Out press the Recording start stop button to stop recording The image and sound fade out the screen goes black and then the re...

Page 67: ...r Return tab Submenu items Off Disables the function On You can focus on a small portion of a large object at a wide angle When recording in Tele Macro mode the focus speed may be lowered Use a tripod not supplied to prevent camcorder shake in the Tele Macro mode Avoid shadows when recording in the Tele Macro mode As the distance to the subject decreases focusing area narrows If you can not get pr...

Page 68: ...s PRECHECK Select the record mode by pressing the MODE button page 24 1 Touch the Menu tab Cont Shot 2 Touch the desired submenu item 3 To exit the menu touch the Exit or Return tab Wind Cut Using the Wind Cut function you can reduce wind noise when recording sound using the internal microphone PRECHECK Select the record mode by pressing the MODE button page 24 1 Touch the Menu tab Wind Cut 2 Touc...

Page 69: ...r When you enable the self timer there is a time delay of 10 seconds before recording starts You can record videos or take photos of yourself PRECHECK Select the record mode by pressing the MODE button page 24 1 Touch the Menu tab Self Timer 2 Touch the desired submenu item 3 To exit the menu touch the Exit or Return tab Submenu items Off Disables the Self Timer 10 Sec There is a time delay of 10 ...

Page 70: ... finish the recording Touch the Quick View icon to view the most recent video or photo you have recorded After the Quick View is completed your camcorder switches back to the standby mode The Quick View function is not available under the following conditions If the mode has been changed after the recording If the USB cable is connected to the camcorder If the camcorder has been restarted after th...

Page 71: ...on the screen 3 To exit the menu touch the Exit or Return tab Submenu items Off Disables the function Placing the subject at the centre cross point puts the subject in the middle of the frame Positioning subjects within the Safety Zone rectangle ensures they will be recorded For recording multiple subjects Putting subjects at or near the grid cross points creates a balanced composition Positioning...

Page 72: ...eturn tab Submenu items Play All Plays video clips in succession starting from a video you select and ending at the last video you recorded then returns to the thumbnail index view Play One Plays the selected video once and then returns to the thumbnail view Repeat All Plays all the video clips repeatedly until you touch the Return tab Repeat One Plays one selected video repeatedly until you touch...

Page 73: ...set In the Highlight play mode you can adjust the volume by touching the screen You can also cancel the playback Submenu items Recent Plays a portion of all videos created within the last 24 hours All Plays a portion of all video files Video Duration Highlight playback time Less than 5 sec Full playback 5 to 30 sec Plays 5 seconds at random 30 sec to 5 min Plays 5 seconds of each 30 second section...

Page 74: ...nd melodies stored in the boot up flash memory When music is On starting a slide show starts the play back of the 7 melodies in shuffle mode Effect Continuously plays back photos using the fade in out effect to transition between images File Info You can see the image information for all images PRECHECK Select the Play tab on the LCD screen to select the Video play HD SD or Photo play mode page 40...

Page 75: ...u selected All Files the camcorder deletes all the files in the storage media except for those that are protected If you selected Select Files the camcorder deletes the files you selected You can also operate this function in the full and single image display modes To protect important images from accidental erasure activate the image protection function in advance page 70 You can not delete prote...

Page 76: ...Files you will see the message that corresponds to that option Go to Step 4 3 Touch the files you want to protect After you have selected all the files you want to protect touch the tab Go to Step 4 See Submenu items below for additional details 4 Touch Yes If you selected All On the indicator appears on all files If you selected All Off the indicator disappears from all protected files If you sel...

Page 77: ...layed as the last thumbnail After the division you can partially delete an unnecessary section or combine it with other videos You can also operate this function in the full and single image display modes You can not divide files that are protected Cancel the protect function first page 70 The divided video may drift before or after the division point by approximately 2 seconds The Divide function...

Page 78: ...e camcorder combines the video files you selected in the order you designated and then stores the combined videos as a single video file You can not combine files that are protected Cancel the protect function first page 70 The original videos are not preserved The Combine function is not available under the following conditions If the Videos are in different resolution formats For example videos ...

Page 79: ...ault value Page Card Info 74 File No Series 75 Time Zone Home 75 Date Time Set 01 JAN 2010 00 00 Summer Time Off 76 Date Type 01 JAN 2010 76 Time Type 24 Hr 76 Date Time Display Off 77 LCD Brightness 18 77 Auto LCD Off On 78 Beep Sound On 79 Shutter Sound On 79 Auto Power Off 5 Min 80 Quick On STBY 5 Min 81 PC Software On 82 USB Connect Mass Storage 82 HDMI TV Out Auto 83 TV Connect Guide 83 TV Di...

Page 80: ... camcorder You can not format a memory card with the protection tab set to lock page 29 If there is no storage media inserted you can not select the Format function and its name will be dimmed on the menu Formatting completely deletes all files and options on a memory card including protected files By deleting all files and options formatting typically corrects problems enabling stable read write ...

Page 81: ...visited area 3 Touch the tab when the time zone setting is complete The camcorder does not apply the time zone you set if you finish the setting by touching the tab without touching the tab Submenu items Home The camcorder displays the time according to your settings on the Date Time Set menu Select Home when using the camcorder for the first time or when returning the clock to your hometown date ...

Page 82: ...et By setting the date and time you can display the date and time of the recording during playback page 26 This function depends on the Date Time Display setting page 77 Time Type You can set the display format for the time 1 Touch the Menu Setting tab Time Type 2 Touch the desired display option 3 To exit the menu touch the Exit or Return tab Submenu items 12Hr Displays the time information in 12...

Page 83: ... The date time will read 01 JAN 2010 00 00 in the following case When the internal rechargeable battery is depleted This function depends on the Date Type and Time Type setting page 76 If the surroundings are too bright adjust the brightness of the LCD screen Adjusting the LCD screen does not affect the image you are recording A brighter LCD screen consumes more power LCD Brightness You can adjust...

Page 84: ...BY 00 02 00 307Min 9999 OFF OFF SUPER SUPER STBY 00 02 00 307Min STBY 00 02 00 307Min STBY 00 02 00 307Min STBY 00 02 00 307Min STBY 00 02 00 307Min STBY 00 02 00 307Min STBY 00 02 00 307Min STBY 00 02 00 307Min STBY 00 02 00 307Min STBY 00 02 00 307Min STBY 00 02 00 307Min STBY 00 02 00 307Min STBY 00 02 00 307Min STBY 00 02 00 307Min STBY 00 02 00 307Min STBY 00 02 00 307Min STBY 00 02 00 307Min...

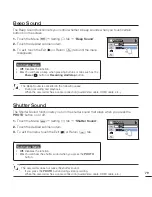
Page 85: ...e menu touch the Exit or Return tab Submenu items Off Disables the function On You will hear a beep when pressing buttons or tabs such as the Power button or Recording start stop button The Beep Sound is cancelled in the following cases During recording and playback When the camcorder has a cable connection Audio Video cable HDMI cable etc Submenu items Off Disables the function On You will hear t...

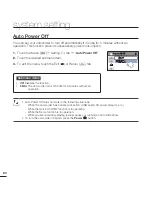
Page 86: ...eturn tab Submenu items Off Disables the function 5 Min The camcorder turns off if idle for 5 minutes without an operation Auto Power Off does not work in the following situations When the camcorder has a cable connection USB cable AC power adaptor etc While the Quick On STBY function is in operation While the Demo function is in operation While you are recording playing except pause or running a ...

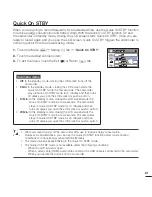
Page 87: ...ick On STBY mode is not available under the following conditions When the LCD screen is open When a video cable HDMI Audio Video cable or the USB cable is connected to the camcorder When you operate the buttons on the camcorder Submenu items Off In the standby mode closing the LCD screen turns off the camcorder 5 Min In the standby mode closing the LCD screen starts the Quick On STBY mode in a few...

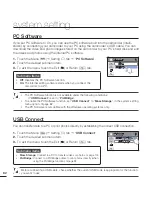
Page 88: ...nder the following conditions If USB Connect is set to PictBridge To enable the PC Software function set USB Connect to Mass Storage in the system setting menu option page 82 The PC Software is compatible with the Windows operating systems only USB Connect You can transfer data to a PC or print photos directly by establishing the correct USB connection 1 Touch the Menu Setting tab USB Connect 2 To...

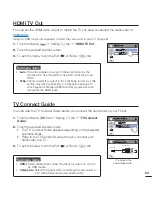
Page 89: ...ect Guide when you connect your camcorder to a TV 3 To exit the menu touch the Exit or Return tab To connect the Audio Video cable Submenu items Auto The video signals are output in the same format as the recorded file Use this setting only when connecting to an HDTV 576p The recorded file is output in the 720x576p format Use this setting only when connecting to a standard analogue TV which suppor...

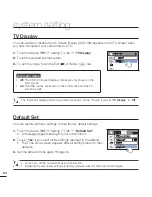
Page 90: ...ail display and Demo screens are shown on the TV even if you set TV Display to Off Default Set You can restore all menu settings to their factory default settings 1 Touch the Menu Setting tab Default Set A message appears asking for your confirmation 2 Touch Yes if you want all the settings returned to the default The Time Zone screen appears after all settings return to their defaults 3 Set the d...

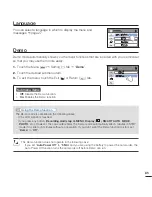
Page 91: ...y 1 Touch the Menu Setting tab Demo 2 Touch the desired submenu item 3 To exit the menu touch the Exit or Return tab Submenu items Off Disable the Demo function On Enables the Demo function The Demo mode is cancelled in the following cases If the LCD screen is touched If you press any button Recording start stop Q MENU Display SMART AUTO MODE PHOTO etc However the camcorder enters the Demo mode au...

Page 92: ...es the function On The Anynet function is enabled When the camcorder is connected to an Anynet supported TV you can operate some functions of the camcorder using the TV s remote control When you turn on the camcorder and it is connected by an HDMI cable to a TV that supports Anynet the TV automatically turns on If you do not want to use the Anynet function set the Anynet HDMI CEC to Off For detail...

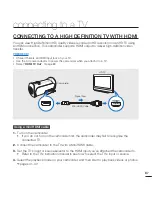
Page 93: ...attach it to a TV Select HDMI TV Out page 83 Using a mini HDMI cable 1 Turn on the camcorder If you do not turn on the camcorder first the camcorder may fail to recognise the connected TV 2 Connect the camcorder to the TV with a Mini HDMI cable 3 Set the TV s input or source selector to the HDMI input you ve attached the camcorder to Refer to the TV s instruction manual to see how to select the TV...

Page 94: ...on the camcorder may turn the TV s power on an Anynet function If you don t want this to occur set Anynet HDMI CEC to Off page 86 Use only HDMI 1 3 cable when connecting to the HDMI jack of this camcorder If you use another type of HDMI cable the screen display may not work HDMI High Definition Multimedia Interface is a compact audio video interface for transmitting uncompressed digital data The A...

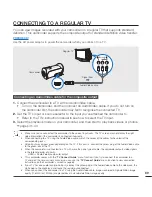
Page 95: ... the camcorder is connected incorrectly When connecting to a TV using the Audio Video cable match the colour of the cables to the colour of the corresponding jacks Video input may appear green depending on the TV If this occurs connect the yellow plug of the Audio Video cable to the green jack of the TV When the camcorder is connected to a TV with more than one type of cable the camcorder outputs ...

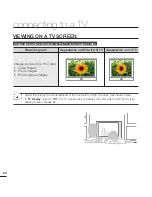
Page 96: ...ppearance on 4 3 TV Images recorded in a 16 9 ratio Video images Photo images Photo capture images Adjust the volume to a moderate level If the volume is too high the video may include noise If TV Display is set to Off the TV screen does not display the camcorder s OSD On Screen Display menus page 84 connecting to a TV 90 ...

Page 97: ...d in this camcorder can be dubbed to a VCR or DVD HDD recorders PRECHECK Videos are dubbed to the other recording device via analogue data transfer composite connection Use the supplied Audio Video cable Use the AC power adaptor to power the camcorder when you dub to a VCR or DVD HDD recorder 1 Connect your camcorder to the recording device VCR or DVD HDD recorder with the Audio Video cable Connec...

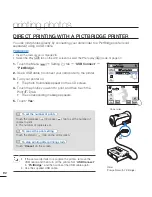
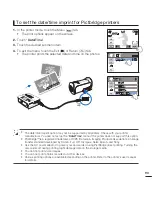
Page 98: ... Touch the Menu Setting tab USB Connect PictBridge 2 Use a USB cable to connect your camcorder to the printer 3 Turn your printer on The photo thumbnails appear on the LCD screen 4 Touch the photos you want to print and then touch the Print tab The corresponding message appears 5 Touch Yes printing photos Touch the decrease increase tab to set the number of copies to print The number of copies is ...

Page 99: ...ed on other devices Various printing options are available depending on the printer Refer to the printer s user manual for details 93 01 JAN 2010 00 00 01 JAN 2010 00 00 01 JAN 2010 00 00 01 JAN 2010 00 00 01 JAN 2010 00 00 01 JAN 2010 00 00 01 JAN 2010 00 00 01 JAN 2010 00 00 01 JAN 2010 00 00 01 JAN 2010 00 00 01 JAN 2010 00 00 01 JAN 2010 00 00 01 JAN 2010 00 00 01 JAN 2010 00 00 01 JAN 2010 00...

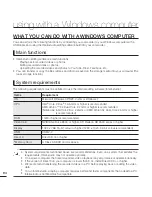
Page 100: ...ore 2 2 GHz or higher is recommended Notebook Intel Core2 Duo 2 2GHz or AMD Athlon X2 Dual Core 2 6GHz or higher is recommended RAM 1GB or higher is recommended Video Card NVIDIA GeForce 8500 or higher ATI Radeon HD 2600 series or higher Display 1024 x 768 16 bit colour or higher 1280 x 1024 32 bit colour recommended USB USB 2 0 Direct X DirectX 9 0c or higher Memory Card A Class 6 SDHC card or ab...

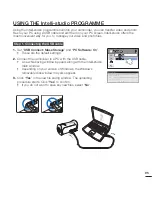
Page 101: ... 1 Connecting the USB cable 1 Set USB Connect Mass Storage and PC Software On These are the default settings 2 Connect the camcorder to a PC with the USB cable A new file saving window appears along with the Intelli studio main window Depending on your version of Windows the Windows removable disk window may also appear 3 Click Yes in the new file saving window The uploading procedure starts Click...

Page 102: ...o a PC via a USB HUB or simultaneously connect the camcorder along with other USB devices the camcorder may not work properly If this occurs remove all USB devices from the PC and then reconnect the camcorder Intelli studio may not automatically run If this occurs access My Computer or Windows Explorer open the drive that corresponds to your camcorder find Intelli studio and then run iStudio exe T...

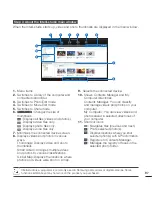
Page 103: ...multiple videos and photos by various classifications Global Map Displays the locations where photos and videos were shot on a map 9 Selects the connected device 10 Shows Contents Manager and My Computer directories Contents Manager You can classify and manage videos and photos on your computer My Computer You can view videos and photos saved in selected directories of your computer 11 Shortcut ic...

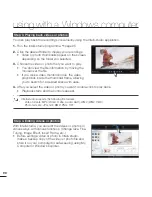
Page 104: ... back inside the thumbnail frame allowing you to search for a desired scene with ease 4 After you select the video or photo you want double click to play back Playback starts and the controls appear Step 4 Editing videos or photos With Intelli studio you can edit the videos or photos in various ways with various functions Change Size Fine Tuning Image Effect Insert Frame etc Before editing a video...

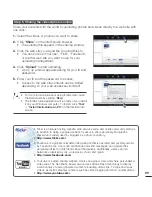
Page 105: ...password to access Access to the web site contents can be limited depending on your web access environment Flickr is an image hosting website web services suite and online community platform In addition to being a popular website for users to share personal photographs theservice is widely used by bloggers as a photo repository http www flickr com Facebook is a global social networking website that...

Page 106: ... The folders in the storage media appear Different file types are stored in different folders 6 Select the desired folder or files to copy then drag and drop them into the destination folder The folder or files are copied from the storage media to the PC If the Removable Disk window does not appear confirm the connection page 95 or perform steps 1 and 4 again If the removable disk does not appear ...

Page 107: ...amcorder requires that files have their original folder and file names Video file H 264 HD quality videos have an HDV_ MP4 name format SD quality videos have a SDV_ MP4 name format The file number used in the file name automatically increases when you create a new video file A new folder is created when the file number has reached 999 1 000 The folder names are given in the following order 100VIDE...

Page 108: ...authentic If not change to an authentic Samsung battery We recommend you use only genuine Samsung batteries in this camcorder Storage media Message Icon Informs that Action Insert card There is no memory card inserted in the memory card slot Insert a memory card Card Full There is not enough space to record on the memory card Delete unnecessary files from the memory card Back up files to a PC or a...

Page 109: ...n The memory card is not fast enough to record at this resolution Record video at a lower resolution and quality Replace memory card with a faster card Recording Message Icon Informs that Action Write Error A problem has occurred while the camcorder was writing data to storage media Turn the camcorder s power off and on for data recovery If a file is not recovered use the camcorder to format the s...

Page 110: ...o Reset Format the storage media File number is full Cannot record video Folder and file number have reached the maximum number and you can not record Set File No to Reset and format the storage media Remember to back up important files before formatting File number is full Cannot take a photo Folder and file number have reached the maximum number and you can not record Set File No to Reset and fo...

Page 111: ...deleting unnecessary files Select 2 files for combine Only two files can be combined Combine two files first and then combine the resulting file with an additional file Note that you can not combine files if the total size of the combined files exceeds 1 8GB Total file size is over than 1 8GB The files whose total size is likely to exceed 1 8GB cannot be combined Perform a divide or partial delete...

Page 112: ... to Mass Storage Ink Error There is a problem with an ink cartridge Check the ink cartridge Put a new ink cartridge into the printer Paper Error There is a problem with the paper Check the paper in the printer If there is no paper insert paper File Error There is a problem with the file Your camcorder does not support this file format Try another file recorded on your camcorder Printer Error There...

Page 113: ... connect the power supply to the camcorder again before turning it on The battery discharges quickly The temperature is too low The battery is not fully charged Charge the battery again The battery has reached the end of its lifespan and cannot be recharged Use another battery Display Symptom Explanation Solution The TV screen or LCD display has distorted images or has stripes at the top bottom or...

Page 114: ...r black for an instant This is not a malfunction During recording the date time does not display Date Time Display is set to Off Set the Date Time Display to On page 77 You cannot record a photo image Set your camcorder to the record mode page 24 Release the lock on the write protection tab of the memory card if any The storage media is full Use a new memory card or format the storage media page 7...

Page 115: ...if the directory structure complies with the international standard Adjusting the image during recording Symptom Explanation Solution Focus does not adjust automatically Set Focus to Auto page 57 The recording conditions are not suitable for auto focus Adjust the focus manually page 57 The lens is dusty on the surface Clean the lens and check the focus Recording is being made in a dark location Us...

Page 116: ...oper jack The image appears distorted on a TV This phenomenon is caused by connecting to a TV with 4 3 aspect ratio You cannot view the image on or hear the sound from a TV connected using the HDMI cable The camcorder can not output Images from the HDMI jack if the material is copyright protected Connecting Dubbing with other devices Recorder PC Printer etc Symptom Explanation Solution You cannot ...

Page 117: ...on properly Exit the Intelli studio application and restart the Windows computer Intelli studio does not start Set PC Software to On in the Settings menu or install Intelli studio on the computer pages 82 99 Your computer is not playing videos images or sound located on your camcorder properly Video playback or sound may stop temporarily depending on your computer The video or sound copied to your...

Page 118: ...n above shows examples of unworkable combinations of functions and menu items Menu and quick menu cannot be used in Smart Auto mode The following functions cannot be used during video recording Video Resolution Video Quality Photo Resolution Photo Sharpness Fader Cont Shot Digital Zoom Self Timer The following functions are automatically set to Off or Auto mode in the Smart Auto mode SCENE Shutter...

Page 119: ...e camcorder turn off the camcorder Remove the battery and AC power adaptor Remove the memory card Cleaning the camcorder Before cleaning turn off the camcorder and remove the battery and AC power adaptor To clean the exterior Wipe gently with a soft dry cloth Do not apply excessive force when cleaning Gently rub the surface Do not use benzene or thinner to clean the camcorder The exterior coating ...

Page 120: ...e an PAL system based TV or external device and have the appropriate Audio Video jacks Otherwise you may need to use a separate video format transcoder For example an PAL NTSC format converter PAL compatible countries regions Australia Austria Belgium Bulgaria China CIS Czech Republic Denmark Egypt Finland France Germany Greece Great Britain Holland Hong Kong Hungary India Iran Iraq Kuwait Libya M...

Page 121: ... p 75 Ω terminated C type connector 7 5 dBs 600 Ω terminated mini USB B type USB2 0 High Speed General Power source Power source type Power consumption Recording Operating temperature Storage temperature Storage media External dimensions WxHxD Weight Internal MIC DC 5 V Lithium Ion battery pack 3 7 V Lithium Ion battery pack Power supply 100 V 240 V 50 60 Hz 2 5W LCD on 0 C 40 C 32 F 104 F 20 C 60...

Page 122: ...ng com PORTUGAL 80820 SAMSUNG 726 7864 www samsung com SLOVAKIA 0800 SAMSUNG 726 7864 www samsung com SPAIN 902 1 SAMSUNG 902 172 678 www samsung com SWEDEN 0771 726 7864 SAMSUNG www samsung com U K 0845 SAMSUNG 7267864 www samsung com IRELAND 0818 717100 www samsung com Switzerland 0848 SAMSUNG 7267864 CHF 0 08 min www samsung com ch www samsung com ch_fr French LITHUANIA 8 800 77777 www samsung ...

Page 123: ...the use of certain Hazardous Substances in electrical and electronic equipment and we do not use the 6 hazardous materials Cadmium Cd Lead Pb Mercury Hg Hexavalent Chromium Cr 6 Poly Brominated Biphenyls PBBs Poly Brominated Diphenyl Ethers PBDEs in our products ...

Reviews: