background image

English


43

06

Other Information

Symptom

Check/Remedy

•  The product is not working. 

(Example: The power goes out or 
the front panel key doesn't work 
or a strange noise is heard.)

•  The product is not working 

normally.

•  Press and hold the 

STOP

 (

) button on the remote control for longer than 

5 seconds with no disc (reset function).

Using the RESET function will erase all stored settings. 
Do not use this unless necessary.

The rating level password has been 
forgotten.

•  While “NO DISC” message appears on the display of the product, press and hold the 

remote control's 

STOP

 (

) button for longer than 5 seconds. “

INIT

” appears on the 

display and all settings will return to the default values.
And then press the 

POWER

 button.

Using the RESET function will erase all stored settings. 
Do not use this unless necessary.

Can't receive radio broadcast.

• Is the antenna connected properly?
•  If the antenna's input signal is weak, install an external antenna in an area with good 

reception.

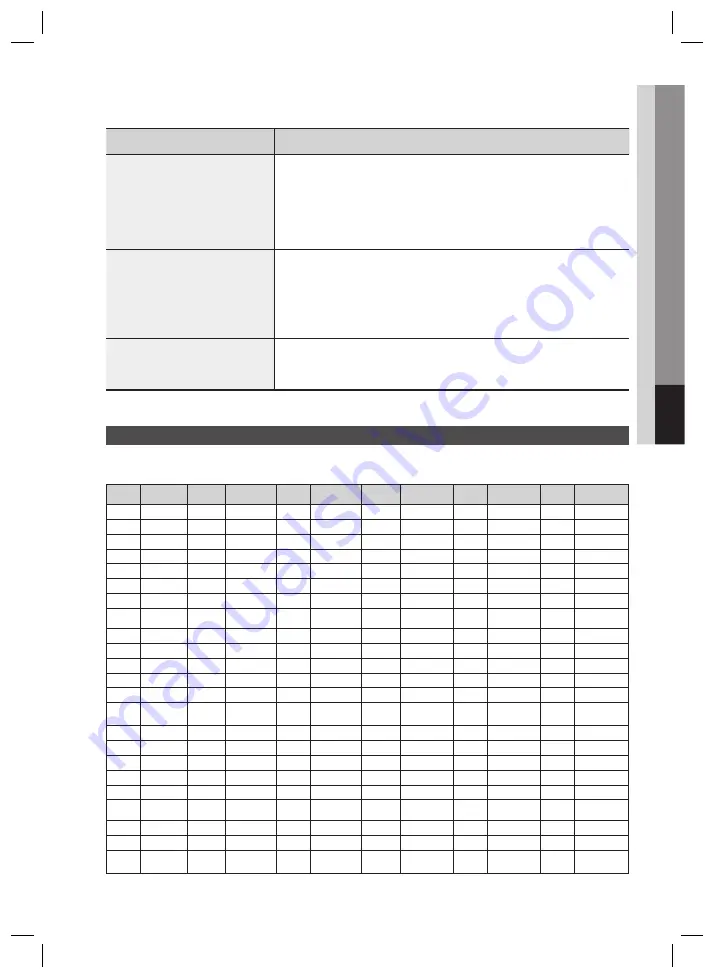
Country code list

Enter the appropriate code number for Others of Disc Menu, Audio and Subtitle. (See page 30).

Code

Language

Code

Language

Code

Language

Code

Language

Code

Language

Code

Language

1027

Afar

1142

Greek

1239

Interlingue

1345

Malagasy

1482

Kirundi

1527

Tajik

1028

Abkhazian

1144

English

1245

Inupiak

1347

Maori

1483

Romanian

1528

Thai

1032

Afrikaans

1145

Esperanto

1248

Indonesian

1349

Macedonian

1489

Russian

1529

Tigrinya

1039

Amharic

1149

Spanish

1253

Icelandic

1350

Malayalam

1491

Kinyarwanda

1531

Turkmen

1044

Arabic

1150

Estonian

1254

Italian

1352

Mongolian

1495

Sanskrit

1532

Tagalog

1045

Assamese

1151

Basque

1257

Hebrew

1353

Moldavian

1498

Sindhi

1534

Setswana

1051

Aymara

1157

Persian

1261

Japanese

1356

Marathi

1501

Sangro

1535

Tonga

1052

Azerbaijani

1165

Finnish

1269

Yiddish

1357

Malay

1502

Serbo-Croatian

1538

Turkish

1053

Bashkir

1166

Fiji

1283

Javanese

1358

Maltese

1503

Singhalese

1539

Tsonga

1057

Byelorussian

1171

Faeroese

1287

Georgian

1363

Burmese

1505

Slovak

1540

Tatar

1059

Bulgarian

1174

French

1297

Kazakh

1365

Nauru

1506

Slovenian

1543

Twi

1060

Bihari

1181

Frisian

1298

Greenlandic

1369

Nepali

1507

Samoan

1557

Ukrainian

1069

Bislama

1183

Irish

1299

Cambodian

1376

Dutch

1508

Shona

1564

Urdu

1066

Bengali; 

Bangla

1186

Scots Gaelic

1300

Canada

1379

Norwegian

1509

Somali

1572

Uzbek

1067

Tibetan

1194

Galician

1301

Korean

1393

Occitan

1511

Albanian

1581

Vietnamese

1070

Breton

1196

Guarani

1305

Kashmiri

1403

(Afan) Oromo

1512

Serbian

1587

Volapuk

1079

Catalan

1203

Gujarati

1307

Kurdish

1408

Oriya

1513

Siswati

1613

Wolof

1093

Corsican

1209

Hausa

1311

Kirghiz

1417

Punjabi

1514

Sesotho

1632

Xhosa

1097

Czech

1217

Hindi

1313

Latin

1428

Polish

1515

Sundanese

1665

Yoruba

1103

Welsh

1226

Croatian

1326

Lingala

1435

Pashto, Pushto

1516

Swedish

1684

Chinese

1105

Danish

1229

Hungarian

1327

Laothian

1436

Portuguese

1517

Swahili

1697

Zulu

1109

German

1233

Armenian

1332

Lithuanian

1463

Quechua

1521

Tamil

1130

Bhutani

1235

Interlingua

1334

Latvian, 

Lettish

1481

Rhaeto-

Romance

1525

Tegulu

HT-C750W-NO EUR_ENG-0420.indd   43

HT-C750W-NO EUR_ENG-0420.indd   43

2010-04-20     6:24:13

2010-04-20     6:24:13

Summary of Contents for HT-C750W

Page 1: ... Thank you for purchasing this Samsung product To receive more complete service please register your product at www samsung com register HT C750W HT C755W HT C750W NO EUR_ENG 0420 indd Sec1 1 HT C750W NO EUR_ENG 0420 indd Sec1 1 2010 04 20 6 23 12 2010 04 20 6 23 12 ...

Page 2: ...iquids such as vases shall be placed on the apparatus The Mains plug is used as a disconnect device and shall stay readily operable at any time This apparatus shall always be connected to a AC outlet with a protective grounding connection To disconnect the apparatus from the mains the plug must be pulled out from the mains socket therefore the mains plug shall be readily operable CLASS 1 LASER PRO...

Page 3: ...t the product completely from the power supply remove the AC plug from the wall outlet especially when left unused for a long period of time During thunderstorms disconnect the AC plug from the wall outlet Voltage peaks due to lightning could damage the product Do not expose the product to direct sunlight or other heat sources This could lead to overheating and malfunction of the product Protect t...

Page 4: ...r more information and software tools to convert your files into DivX video ABOUT DIVX VIDEO ON DEMAND This DivX Certified device must be registered in order to play DivX Video on Demand VOD content To generate the registration code locate the DivX VOD section in the device setup menu Go to vod divx com with this code to complete the registration process and learn more about DivX VOD DivX Certified t...

Page 5: ...nnecting the Video Out to your TV 23 Connecting the FM Antenna 23 Connecting Audio from External Components SETUP 25 25 Before Starting Initial Setting 25 Setting the Setup menu 26 Display 26 TV Aspect 26 BD Wise 26 Resolution 26 HDMI Format 27 Audio 27 Speaker Setting 28 ASC Auto Sound Calibration Setting 29 DRC Dynamic Range Compression 29 AV SYNC 29 HDMI AUDIO 29 EQ Optimizer 30 System 30 Initi...

Page 6: ...one ADVANCED FUNCTIONS 39 39 USB Function 39 Using an iPod Option 41 CD Ripping OTHER INFORMATION 42 42 Troubleshooting 43 Country code list 44 Specifications Contents Figures and illustrations in this User Manual are provided for reference only and may differ from actual product appearance HT C750W NO EUR_ENG 0420 indd 6 HT C750W NO EUR_ENG 0420 indd 6 2010 04 20 6 23 31 2010 04 20 6 23 31 ...

Page 7: ...cancelled NOTE This involves tips or instructions on the page that help each function operate Shortcut Key This function provides direct and easy access pressing the button on the remote control Disc Types and Characteristics Region Code The product and the discs are coded by region These regional codes must match in order for the disc to play If the codes do not match the disc will not play Disc ...

Page 8: ...cters Use discs recorded with a compression decompression data rate greater than 128Kbps Only files with the mp3 and MP3 extensions can be played Only a consecutively written multisession disc can be played If there is a blank segment in the Multisession disc the disc can be played only up to the blank segment If the disc is not closed it will take longer to begin playback and not all of the record...

Page 9: ...p to 720x480 pixels TV screen resolutions higher than 800 will not be supported When you play a disc whose sampling frequency is higher than 48khz or 320kbps you may experience shaking on the screen during playback Sections with a high frame rate might not be played while playing a DivX file Since this product only provides encoding formats authorized by DivX Networks Inc a DivX file created by the ...

Page 10: ...ncy 44 1kHz 44 1kHz 44 1KHz 48KHz CBI Control Bulk Interrupt is not supported Digital Cameras that use PTP protocol or require additional program installation when connected to a PC are not supported A device using NTFS file system is not supported The system supports only the FAT file system and will not play a movie larger than 1 GB in USB mode Some MP3 players when connected to this product may n...

Page 11: ...ns the product on and off 9 MIC 1 2 JACK Connect up to two microphones 10 AUX IN 1 ASC IN CONNECTOR Connect external components such as an MP3 player Connect to use the ASC Auto Sound Calibration function 11 USB PORT Connect here and play files from external USB storage devices such as MP3 players USB flash memory etc 12 iPod JACK Option Connect the iPod dock connector here Some models do not have t...

Page 12: ...of an external device such as a VCR 5 EXTERNAL DIGITAL OPTICAL IN JACK OPTICAL Use this to connect external equipment capable of digital output 6 SPEAKER OUTPUT CONNECTORS Connect the front centre subwoofer speakers 7 TX CARD CONNECTION WIRELESS The TX card enables communication between the product and the wireless receiver module 8 FM ANTENNA JACK Connect the FM antenna 9 COOLING FAN The cooling ...

Page 13: ...ove to the home menu Select on screen menu items and change menu value Return to the previous menu Allow access to common functions of the product such as the Photo List or GREEN B Press to preset radio stations Select the desired Dolby Pro Logic II audio mode SLEEP Set the time to shut off the product itself ECHO Adjust the echo level of the microphone Allows you to repeat a title chapter track o...

Page 14: ...Nikei 03 AOC 01 18 40 48 Onking 03 Bell Howell M Wards 57 58 81 Onwa 03 Brocsonic 59 60 Panasonic 06 07 08 09 54 66 67 73 74 Candle 18 Penney 18 Cetronic 03 Philco 03 15 17 18 48 54 59 62 69 90 Citizen 03 18 25 Philips 15 17 18 40 48 54 62 72 Cinema 97 Pioneer 63 66 80 91 Classic 03 Portland 15 18 59 Concerto 18 Proton 40 Contec 46 Quasar 06 66 67 Coronado 15 Radio Shack 17 48 56 60 61 75 Craig 03...

Page 15: ...ear speakers are used to handle mainly sound effects and sound will not come from them all the time Subwoofer g The position of the subwoofer is not so critical Place it anywhere you like Position of the product Place it on a stand or cabinet shelf or under the TV stand Selecting the Listening Position The listening position should be located about 2 5 to 3 times the distance of the TV s screen si...

Page 16: ...aker Cable 2EA HT C750W Speaker Components FRONT L R STAND BASE SPEAKER CABLE Assembled Speakers FRONT REAR SPEAKER CENTRE SPEAKER SUBWOOFER CENTRE SUBWOOFER SCREW Large 24EA SCREW Small 8EA STAND POLE STAND NECK REAR L R STAND BRACKET L R L R FRONT REAR CENTRE SUBWOOFER SPEAKER CABLE HT C755W HT C750W NO EUR_ENG 0420 indd 16 HT C750W NO EUR_ENG 0420 indd 16 2010 04 20 6 23 34 2010 04 20 6 23 34 ...

Page 17: ...xcessive force when removing it Otherwise it can be damaged This is the appearance after the stand is removed 1 2 How to install the speaker Connect the stand in the arrow direction so that it fits the corresponding holes x4 on the speaker Fully insert the stand in the arrow direction as shown This is the appearance after the speaker unit is installed 1 2 3 1 2 1 2 3 HT C750W NO EUR_ENG 0420 indd 1...

Page 18: ...the Speakers Installing the Speakers on the Tallboy Stand HT C755W Front Rear Speakers only Insert and tighten three large screws into the three holes on the bottom side of the stand base as shown in the illustration Connect the speaker wire to the speaker jack 5 6 Fully insert the Stand Bracket into the speaker s clasp to stand speaker Insert and tighten two small screws into the two holes to con...

Page 19: ... product Hold the TX card so that the label WIRELESS faces upward and insert the card into the port The TX card enables communication between the product and the wireless receiver module Connect the left and right rear speakers to the wireless Receiver module Plug the power cord of the wireless Receiver module in the wall outlet 1 2 3 4 5 6 Black Red TX card Rear Speaker L Subwoofer Centre Speaker...

Page 20: ...provided TX card If a different TX card is used the product may be damaged or the card may not be removed easily Do not insert the TX card upside down or in the reverse direction Insert the TX card when the product is turned off Inserting the card when it is turned on may cause a problem If the TX Card is inserted and wireless receiver module setting is complete sound is not output from the rear S...

Page 21: ... TV METHOD 2 Component Video If your television is equipped with Component Video inputs connect a Component video cable not supplied from the COMPONENT OUT Pr Pb and Y jacks on the back of the product to the Component Video Input jacks on your TV METHOD 3 Composite Video Connect the supplied Video cable from the VIDEO OUT jack on the back of the product to the VIDEO IN jack on your TV HT C750W NO ...

Page 22: ...tion HDMI outputs only a pure digital signal to the TV If your TV does not support HDCP High bandwidth Digital Content Protection random noise appears on the screen What is the HDCP HDCP High band width Digital Content Protection is a system for protecting DVD content outputted via HDMI from being copied It provides a secure digital link between a video source PC DVD etc and a display device TV pr...

Page 23: ...ecting Audio from External Components MIC 2 MIC 1 AUX IN1 ASC IN Audio Cable not supplied Audio Out AUX1 Connecting an External Component MP3 player Components such as an MP3 Player Connect AUX IN1 ASC IN Audio on the side of the product to the Audio Out of the external component MP3 player Press the FUNCTION button to select AUX1 input The mode switches as follows DVD CD D IN AUX 1 AUX 2 USB IPOD...

Page 24: ...ION button to select AUX 2 input The mode switches as follows DVD CD D IN AUX 1 AUX 2 USB IPOD Option FM NOTE You can connect the Video Output jack of your VCR to the TV and connect the Audio Output jacks of the VCR to this product OPTICAL Connecting an External Digital Component Digital signal components such as a Cable Box Satellite receiver Set Top Box Connect the DIGITAL AUDIO IN OPTICAL on th...

Page 25: ...e Number 7 button on the remote control for over 5 seconds while the product is turned off NTSC or PAL will appear on the display At this time press the Number 7 button to select either NTSC or PAL The video format of the disc must be the same as he video format of your TV 1 2 3 4 5 6 Setting the Setup menu The access step may differ depending on the selected menu The GUI Graphical User Interface ...

Page 26: ... be output to the TV direct Off The output resolution will be fixed according to the Resolution previously set regardless of the resolution of the disc NOTE This will optimize the picture quality according to the content In the disc DVD etc that you want to play and the product or your BD Wise compliant Samsung TV If you want to change the resolution in BD Wise mode you must set BD mode to Off in a...

Page 27: ...ve closer to 6 Adjusting Centre Rear Subwoofer Speaker Level The volume level can be adjusted in steps from 6dB to 6dB The sound gets louder as you move closer to 6dB and quieter as you get closer to 6dB Delay Time If the speakers cannot be placed at equal distances from the listening position you can adjust the delay time of the audio signals from the Centre and Rear speakers You can also set Tes...

Page 28: ...erent for each mode With AC 3 and DTS the delay time can be set between 00 and 15mSEC The Centre channel is only adjustable on 5 1 channel discs Test Tone Settings Move Select Return Speaker Setting Speaker Size Sound Edit Delay Time Test Tone On Select Return Use the Test Tone feature to check the speaker connections Press the buttons to select On The test tone will be sent to Front Left Center F...

Page 29: ...ng When the message REMOVE MIC appears on the display unplug the ASC microphone 1 2 NOTE Setting the Auto Sound Calibration function takes about 3 minutes DRC Dynamic Range Compression This feature balances the range between the loudest and quietest sounds You can use this function to enjoy Dolby Digital sound when watching movies at low volume at night You can select either off 2 8 4 8 6 8 Full A...

Page 30: ...works in conjunction with DVDs that have been assigned a rating which helps you control the types of DVDs that your family watches There are up to 8 rating levels on a disc Parental Rating Select the rating level you want to set A larger number indicates that the program is intended for adult use only For example if you select up to Level 6 discs that contain Level 7 8 will not play Enter the pass...

Page 31: ...ft in the stop mode more than 5 minutes without any user interface a screen saver will appear on your TV If the product is left in the screen saver mode for more than 20 minutes the power will automatically turn off Audio CD CD DA MP3 WMA Playback BA Track01 1 17 0 15 3 59 Function DVD CD Repeat Play Mode Insert an Audio CD CD DA or an MP3 Disc into the disc slot For an Audio CD the first track wil...

Page 32: ...E mode GREEN B Button Rotate 90 Counterclock wise YELLOW C Button Rotate 90 Clockwise NOTE The maximum resolutions supported by this product are 5120 x 3480 or 19 0 MPixel for standard JPEG files and 2048 x 1536 or 3 0 MPixel for progressive image files 1 2 3 4 Using the Playback Function Forward Reverse Search BDA Press the buttons for Search Function 1 2 3 4 1 2 3 4 NOTE During the fast playback o...

Page 33: ...ubtitle language profile etc During playback press the DISC MENU button on the remote control Press the buttons to make the desired selection then press the ENTER button NOTE Depending on the disc menu setup items may vary and this menu may not be available 1 2 Using the Title Menu For DVDs containing multiple titles you can view the title of each movie During playback press the TITLE MENU button o...

Page 34: ...Section A B A Normal Repeat Track Repeat Dir Directory Repeat All Random 1 2 3 1 A B Repeat Playback B You can repeatedly play back a designated section of a DVD or CD During the DVD disc or CD playback press the REPEAT button on the remote control For DVD press the buttons to select A For CD press the REPEAT button repeatedly until appears Press the ENTER button at the point where you want repeat...

Page 35: ...er Most DVD discs are recorded in chapters so that you can quickly find a specific chapter Playing time Allows playback of the film from a desired time You must enter the starting time as a reference The time search function does not operate on some discs 1 2 3 4 Audio Refers to the film s soundtrack language A DVD Disc can contain up to 8 audio languages Subtitle Refers to the subtitle languages avai...

Page 36: ...are smi sub srt over 148 kbyte is not supported 1 2 3 Angle Function This function allows you to view the same scene in different angles Press the TOOLS button Press the buttons to select ANGLE display Press the buttons or numeric buttons to select the desired angle NOTE The Angle function works only with discs on which multiple angles have been recorded Sound Mode P BASS The P BASS function provi...

Page 37: ...tion Press the S VOL button Each time the button is pressed the selection changes as follows SVOL ON SVOL OFF Dolby Pro Logic II Mode You can select the desired Dolby Pro Logic II audio mode Press the PL II button MUSIC When listening to music you can experience sound effects as if you are listening to the actual performance CINEMA Adds realism to the movie soundtrack PROLOG You will experience a ...

Page 38: ...on area select MONO for a clear interference free broadcast 1 2 1 2 Presetting Stations Example Presetting FM 89 10 in the memory Press the FUNCTION button to select FM Press the TUNING CH button to select 89 10 Press the TUNER MEMORY button Number flashes on the display Press the buttons to select preset number You can select between 1 and 15 presets Press the TUNER MEMORY button again Press the T...

Page 39: ...music files with 5 1 channel sound you must set the Dolby Pro Logic II mode to Matrix See page 37 Remove the USB cable from the USB port slowly Otherwise it may cause damage to the USB port 1 2 3 Using an iPod Option Some models do not support this function You can enjoy music video files from an iPod through the product MIC 2 MIC 1 AUX IN1 ASC IN Listening to Music You can play music files stored in...

Page 40: ...utton to select IPOD Connect the iPod dock connector to the iPod Jack on the side of the product In the iPod screen move to Settings Videos then set the TV Out option and the TV signal Place the iPod in the Dock iPod appears on the TV screen Press the buttons to select Videos Select the video file to play You can use the remote control or product to control simple playback functions such as the PLA...

Page 41: ...damage to the data To stop CD ripping press the STOP button and disconnect the USB device after the system stops playing the CD completely If you disconnect the USB connection during the CD ripping the system will turn off and you will not be able to delete the ripped file If you connect the USB device to the system while it is playing a CD the system stops temporarily and will play again DTS CDs c...

Page 42: ...rly Adjust the volume When listening to a CD radio or TV sound is output to the front speakers only Select PROLOG by pressing PL II Dolby Pro Logic II on the remote control to use all six speakers Dolby Digital 5 1 CH Surround Sound is not produced Is there Dolby Digital 5 1 CH mark on the disc Dolby Digital 5 1 CH Surround Sound is produced only if the disc is recorded with 5 1 channel sound Is t...

Page 43: ...am 1491 Kinyarwanda 1531 Turkmen 1044 Arabic 1150 Estonian 1254 Italian 1352 Mongolian 1495 Sanskrit 1532 Tagalog 1045 Assamese 1151 Basque 1257 Hebrew 1353 Moldavian 1498 Sindhi 1534 Setswana 1051 Aymara 1157 Persian 1261 Japanese 1356 Marathi 1501 Sangro 1535 Tonga 1052 Azerbaijani 1165 Finnish 1269 Yiddish 1357 Malay 1502 Serbo Croatian 1538 Turkish 1053 Bashkir 1166 Fiji 1283 Javanese 1358 Mal...

Page 44: ...Vp p 75 Ω load Component Video 480i 576i Y 1 0 Vp p 75 Ω load Pr 0 70 Vp p 75 Ω load Pb 0 70 Vp p 75 Ω load Video Audio HDMI 1080p 1080i 720p 480p 576p Amplifier Front speaker output 133W x 2 3Ω Centre speaker output 133W 3Ω Rear speaker output 133W x 2 3Ω Subwoofer output 135W 3Ω Frequency range 20Hz 20KHz S N Ratio 70dB Channel separation 60dB Input sensitivity AUX 400mV Nominal specification Sam...

Page 45: ...52 4mm Operating Temperature Range 5 C to 35 C Operating Humidity Range 10 75 Output 133W x 2 CH Frequency range 20Hz 20KHz S N Ratio 65dB SWA 5000 Rear 3 140Hz 20KHz 86dB W M 133W 266W HT C750W Speaker Speaker system 5 1ch speaker system Impedance Frequency range Output sound pressure level Rated input Maximum input Dimensions W x H x D Front Rear 94 x 1300 x 90 mm stand base Ø308 mm Centre 360 x...

Page 46: ... 726 7864 www samsung com Slovakia 0800 SAMSUNG 726 7864 www samsung com Spain 902 1 SAMSUNG 902 172 678 www samsung com Sweden 0771 726 7864 SAMSUNG www samsung com U K 0845 SAMSUNG 7267864 www samsung com Eire 0818 717100 www samsung com Area Contact Center Web Site Switzerland 0848 SAMSUNG 7267864 CHF 0 08 min www samsung com ch www samsung com ch_fr French Lithuania 8 800 77777 www samsung com...

Page 47: ...HT C750W NO EUR_ENG 0420 indd 47 HT C750W NO EUR_ENG 0420 indd 47 2010 04 20 6 24 13 2010 04 20 6 24 13 Code No AH68 02267K ...

Reviews: