background image

imagine 

the possibilities

Thank you for purchasing this Samsung product.
To receive more complete service,
please register your product at

www.samsung.com/register

5.1CH Blu-ray™

Home Entertainment System

user manual

HT-F5502K

HT-F5530K

HT-F5550K

HT-F5550HK

HT-F5502K_30K_50K_50HK-XL_0528.indd   1

HT-F5502K_30K_50K_50HK-XL_0528.indd   1

2013-05-28   오후 2:08:09

2013-05-28   오후 2:08:09

Summary of Contents for HT-F5550HK

Page 1: ...e complete service please register your product at www samsung com register 5 1CH Blu ray Home Entertainment System user manual HT F5502K HT F5530K HT F5550K HT F5550HK HT F5502K_30K_50K_50HK XL_0528 indd 1 HT F5502K_30K_50K_50HK XL_0528 indd 1 2013 05 28 오후 2 08 09 2013 05 28 오후 2 08 09 ...

Page 2: ...E INSIDE REFER SERVICING TO QUALIFIED SERVICE PERSONNEL CAUTION RISK OF ELECTRIC SHOCK DO NOT OPEN This symbol indicates dangerous voltage inside the product that presents a risk of electric shock or personal injury CAUTION TO PREVENT ELECTRIC SHOCK MATCH WIDE BLADE OF PLUG TO WIDE SLOT FULLY INSERT This symbol indicates important instructions accompanying the product CLASS 1 LASER PRODUCT KLASSE ...

Page 3: ...back again If the product makes an abnormal noise or produces a burning smell or smoke turn off the power switch immediately and disconnect the power plug from the wall outlet Then contact the nearest customer service centre for technical assistance Do not use the product Using the product as it is may cause a fire or an electric shock Licence Manufactured under licence from Dolby Laboratories Dol...

Page 4: ... before using the 3D function Some viewers may experience discomfort while viewing 3D TV such as dizziness nausea and headaches If you experience any such symptom stop viewing 3D TV remove the 3D Active Glasses and rest Watching 3D images for an extended period of time may cause eye strain If you feel eye strain stop viewing 3D TV remove your 3D Active Glasses and rest A responsible adult should f...

Page 5: ...AllShare Network Function 32 Controlling Video Playback 35 Controlling Music Playback 40 Playing Photo Contents 41 Listening to Radio 41 Using the Special Effects Remote Control Buttons NETWORK SERVICES 43 Logging In to Your Samsung Account 43 Before Using Movies TV Shows or Apps 44 Using Movies TV Shows 44 Using Apps 48 Using the Web Browser 51 Linking your Internet Service Accounts to the Produc...

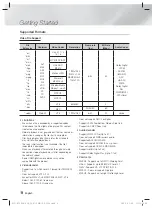
Page 6: ...tio adjustment Information about the discs is written in detail on the disc box Please refer to this if necessary When you play a BD J title loading may take longer than a normal title or some functions may perform slowly Disc Types your Product cannot Play HD DVD DVD ROM PD MV Disc etc DVD RAM Super Audio CD except CD layer DVD RW VR mode CVD CD ROM CDV CD G CD I LD CD Gs play audio only not grap...

Page 7: ... and South Asia DVD VIDEO 1 The U S U S territories and Canada 2 Europe Japan the Middle East Egypt Africa Greenland 3 Taiwan Korea the Philippines Indonesia Hong Kong 4 Mexico South America Central America Australia New Zealand Pacific Islands Caribbean 5 Russia Eastern Europe India North Korea Mongolia 6 China NOTES If the Region number of a Blu ray Disc DVDs does not correspond to the Region nu...

Page 8: ...ly Audio decoder Supports WMA 10 Pro Up to 5 1 Does not support WMA lossless audio Supported ADPCM IMA MS Does not support ADPCM A Law μ Low Does not support QCELP AMR NB WB Supports vorbis Up to 2ch Supports Dolby Digital Plus Up to 7 1ch Comments MPEG4 Supports up to GMC 1 Warping Point H 264 Supports up to BP MP HP Level 4 1 WMV Supports V9 VC1 SP MP AP L3 MPEG1 Does not support D picture MPEG2...

Page 9: ...e USB digital camera devices may not be compatible with the product Your product supports the FAT 16 FAT 32 and NTFS file systems Connect USB devices directly to the product s USB port Connecting through a USB cable may cause compatibility problems Inserting more than one memory device into a multi card reader may cause the reader to operate improperly The product does not support the PTP protocol...

Page 10: ...tion AVCHD and the AVCHD logo are trademarks of Matsushita Electronic Industrial Co Ltd and Sony Corporation NOTES Some AVCHD format discs may not play depending on the recording conditions AVCHD format discs need to be finalised x v Colour offers a wider colour range than normal DVD camcorder discs Some DivX MKV and MP4 format discs may not play depending on their video resolution and frame rate ...

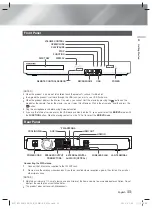
Page 11: ...UNCTION button Stop the playing contents on the TV first to select the BD DVD mode Rear Panel LAN POWER SPEAKERS OUT CENTER SUBWOOFER FRONT L FRONT R IMPEDANCE 3 SURROUND R SURROUND L AUX IN FM ANT OPTICAL DIGITAL AUDIO IN L R WIRELESS LAN 5V 350mA HDMI OUT HDMI IN COOLING FAN AUX IN HDMI OUT FM ANTENNA HDMI IN SPEAKER OUTPUT CONNECTORS POWER CORD WIRELESS LAN LAN TERMINAL EXTERNAL DIGITAL AUDIO I...

Page 12: ...the disc Audio language To change to Television mode and control the TV press the TV button Press to stop play a disc Press to search contents Press to select MANUAL PRESET in the Tuner function Press to use the karaoke function Mic Volume Echo Key Control or Set a Sleep time to shut off the product Press to select the home cinema s mode HDMI AUX BD DVD etc or Press to select TV s video mode Selec...

Page 13: ...03 04 05 06 07 08 09 10 11 12 13 14 AOC 01 18 40 48 Bell Howell M Wards 57 58 81 Brocsonic 59 60 Candle 18 Cetronic 03 Citizen 03 18 25 Cinema 97 Classic 03 Concerto 18 Contec 46 Coronado 15 Craig 03 05 61 82 83 84 Croslex 62 Crown 03 Curtis Mates 59 61 63 CXC 03 Daewoo 02 03 04 15 16 17 18 19 20 21 22 23 24 25 26 27 28 29 30 32 34 35 36 48 59 90 Daytron 40 Dynasty 03 Emerson 03 15 40 46 59 61 64 ...

Page 14: ...eir tweeters will be at the same height as your ear Align the front face of the front speakers with the front face of the centre speaker or place them slightly in front of the centre speakers Centre Speaker It is best to install the Centre Speaker at the same height as the front speakers You can also install it directly over or under the TV Surround Speakers Place these speakers to the side of you...

Page 15: ...fer Speaker Cable x 6 Centre Screw 5X20 X 12 Front Surround x 4 Stand Base x 4 Installing the Speakers on the Tallboy Stand HT F5530K only Front Speakers HT F5550K only Front Surround Speakers 1 Turn the Stand Base upside down and connect it to the Stand 2 Use the driver to combine the screws on the 3 marked holes Stand Base Stand 2 1 HT F5502K_30K_50K_50HK XL_0528 indd 15 HT F5502K_30K_50K_50HK X...

Page 16: ...combine the screws on the 3 marked holes Installing a speaker is finished Follow the same steps to install other speakers 3 If you want to adjust the height of the speaker loosen a screw on the rear of the speaker base first 4 Pull up the speaker in the arrow direction Be careful as an excessive force may result in a physical damage 5 Fit the speaker in a height adjusting a hole and then use a scr...

Page 17: ...5 for the speakers of HT F5502K HT F5550K HT F5550HK CAUTION If you want to install the product on the wall fasten the screws or nails on the wall firmly and use the holes on the rear of speaker to install However when you install it accessories nails or screws and installation is not provided by the company Do not let children play with or near the speakers They could get hurt if a speaker falls ...

Page 18: ...oduct to the AUDIO Out jack on the external analogue component Select the AUX mode Be sure to match the colours on the cable plugs to the colours on the input and output jacks Method 2 OPTICAL Connecting an External Digital Audio Component To connect the digital audio output of digital signal components such as Cable Boxes and Satellite Receivers Set Top Boxes Using a digital optical cable not sup...

Page 19: ...AKERS OUT CENTER SUBWOOFER FRONT L FRONT R 03 1 SURROUND R SURROUND L AUX IN FM ANT OPTICAL DIGITAL AUDIO IN L R WIRELESS LAN 5V 350mA HDMI IN HDMI OUT Broadband service Wireless IP sharer NOTES This product is compatible with only Samsung s Wireless LAN Adapter not supplied Model name WIS 12ABGNX The Samsung Wireless LAN Adapter is sold separately Contact a Samsung Electronics retailer for purcha...

Page 20: ...rnet using the Web Browser application 4 Apps Download Access various for pay or free of charge applications 5 Photos Videos Music Play photos videos or music content from Disc USB PC or mobile devices 6 Settings Set various functions to suit your personal preferences 7 RED A Press the RED A button on your remote to create and or log in to your personal Samsung account Selecting an Option on the H...

Page 21: ...Samsung s latest inter connectivity feature When you connect a Samsung product and a Samsung TV with BD Wise to each other via HDMI and BD Wise is on in both the product and TV the product outputs video at the video resolution and frame rate of the Blu ray DVD Disc Resolution Lets you set the output resolution of the HDMI video signal to BD Wise Auto 1080p 1080i 720p 576p 480p The number indicates...

Page 22: ...so that the volume remains stable when a scene change occurs or when you change the channel Speaker Selection Lets you select which speakers you want active either the TV s speakers or the Home cinema s speakers Audio Return Channel Lets you direct the sound from the TV to the Home Cinema speakers Requires a HDMI connection and an Audio Return Channel ARC compatible TV If Audio Return Channel is s...

Page 23: ... Live Internet Connection Lets you fully allow partly allow or prohibit a BD Live Internet connection BD Data Management Manage BD data downloaded from a BD Live service or Blu ray Disc Smart Features Apps Settings Lets you configure App notification settings and view basic info about your Apps Push Notification Settings Receive notifications from selected services Properties See basic info about ...

Page 24: ...ge device 2 Press and hold the 5 button on the front panel for 5 seconds or more All settings will revert to the factory default settings NOTES When the factory default settings are restored all the user stored BD data will be deleted General You can specify the display brightness and time zone Front Display Lets you change the brightness of the front panel Time Zone You can specify the time zone ...

Page 25: ...ng a LAN cable before you start the configuration procedure To begin configuring your network connection follow these steps 1 In the Home screen select Settings and then press the E button 2 Select Network and then press the E button 3 Select Network Settings and then press the E button 4 Go to the instructions for Wired networks starting below or the instructions for Wireless networks starting on...

Page 26: ...OWER TIAS Refresh WPS PBC 2 Select the desired network and then press the E button 3 On the Security screen enter your network s security code or pass phrase Enter numbers directly using the number buttons on your remote control Enter letters by selecting a letter with buttons and then pressing E button 4 When finished select the Done and then press the E button The product verifies the network co...

Page 27: ...NOTES You can also begin the Manual Network setting by going to Settings Network Network Status WPS PBC One of the easiest ways to set up the wireless network connection is using the WPS PBC function If your wireless router has a WPS PBC button follow these steps After following Steps 1 to 3 in Configuring Your Network Connection on page 25 1 In the Network Settings screen change Network type to W...

Page 28: ...ice you want to connect 4 The Connecting pop up appears followed by the Connected pop up When it closes you should see the device listed on the Wi Fi Direct screen as connected NOTES The current wired or wireless network connection will be disconnected when you use the Wi Fi Direct function Text files such as files with a TXT or DOC extension will not display when you are using the Wi Fi Direct fu...

Page 29: ... ask you if you want to install it when you turn the product on NOTES To use the Auto update function your product must be connected to the Internet Update by USB 1 Visit www samsung com 2 Click SUPPORT on the top right of the page 3 Enter the product s model number into the search field As you enter the model number a drop down will display products that match the model number 4 Left click your p...

Page 30: ... on 2 Connect the USB device to the USB port on the front panel of the product The New Device Connected pop up appears Movies TV Shows Apps Photos Videos Music Apps Phot Vide Mus Apps Phot o i Photos Videos Music All Content New device connected USB Flash Disk Add App Add App Add App Web Browser Settings NOTES If the pop up does not appear go to Method 2 3 Use the buttons to select Photos Videos M...

Page 31: ...os or Music and then press the E button NOTES Even though the product will display folders for all content types it will only display files of the Content Type you selected in Step 2 For example if you selected music you will only be able to see music files You can change this selection by returning to the Home screen and repeating Step 2 3 A screen appears listing the contents of the disc Dependi...

Page 32: ...ng phones supporting AllShare functionality 1 Connect the product your PC and your DLNA compatible cellular phone to the same wireless network 2 Follow the directions in the AllShare software Installation Instruction manual to set up devices and files for playing or viewing 3 On your computer using the AllShare software confirm your phone is connected 4 On the phone select the file you want to vie...

Page 33: ...The screen may not display Chapter or Title immediately Continue to press the buttons until your choice is inside the applicable field To return to normal play press the REPEAT button again press the buttons to select Off and then press the E button The screen may not display Repeat A B immediately Continue to press the buttons until Repeat A B is inside the applicable field You must set point B a...

Page 34: ...B and then press the E button 2 Press the E button at the point where you want repeat play to start A Let the movie play 3 Press the E button at the point where you want repeat play to stop B NOTES You must set point B at least 5 seconds of playing time after point A Picture Mode Select to set the picture mode Dynamic Increases sharpness and brightness Standard Choose this setting for most viewing...

Page 35: ...ally the same way for all media See Creating a Playlist from a CD on page 37 Send Select Send to upload selected files to apps Picasa Facebook etc or devices To use Send you need to establish an account with the on line site and then log in using the Log In function NOTES Depending on the disc or storage device the Options View menus may differ All options may not be displayed The View and Options...

Page 36: ...iew or Options in the upper right and then press the E button Music View Track Displays all the music tracks on the media or storage device Album Displays all the music on the media or storage by album Artist Displays all the music files on the media or storage device by artist Genre Displays all music on the media or storage by genre Folder Displays all the folders on the media or storage device ...

Page 37: ...ton The Music Playback screen reappears listing only the tracks you checked The selected tracks play automatically NOTES You can create a playlist with up to 99 tracks from Audio CDs CD DA If you have created a playlist Play Selected is replaced by Edit playlist on the Options menu On the Play Selected screen you can also choose Select All Deselect All and Cancel Use Select All to select all track...

Page 38: ...s Music If you hear strange noises squealing or howling while using the Karaoke feature move the microphone away from the speakers Turning down the microphone s volume or the speaker volume is also effective The microphone does not operate in the D IN AUX HDMI FM and BT mode The karaoke scoring displays the score automatically when the Karaoke scoring is set to On and a microphone is connected Dis...

Page 39: ... If the Bluetooth device is turned off not in place or malfunctions Note that such devices as microwave ovens wireless LAN adapters fluorescent lights and gas stoves use the same frequency range as the Bluetooth device and can cause electric interference To disconnect the Bluetooth device from the Home Cinema You can disconnect the Bluetooth device from the Home Cinema For instructions refer to th...

Page 40: ...e the background music function the photo file must be in the same storage media as the music file However the sound quality can be affected by the bit rate of the MP3 file the size of the photo and the encoding method You can t enlarge the subtitle and PG graphic in the full screen mode Using the View and Options Menus When you See the Photo File List Photos View Date Groups all the photo files o...

Page 41: ...tation press the MANUAL PRESET button to select Preset and then press the TUNING CH button to select the preset station Using the Special Effects Remote Control Buttons SOUND EFFECT Function SOUND EFFECT Lets you select a mode that optimizes the sound 1 Press the SOUND EFFECT button 2 Press the button to select the desired mode DSP Dolby Pro Logic II or SFE Mode 3 Press the buttons to select the d...

Page 42: ...n listen via Home theatre speakers or TV Speaker with TV SOUND button 1 Connect the HDMI cable to TV and Home cinema See page 18 2 Set the connected Home cinema and TV to Anynet HDMI CEC On 3 Press the TV SOUND button on the remote control 4 Each time you press the TV SOUND button TV SOUND ON OFF flashes shortly on the Display part on the Front panel then change to D IN TV SOUND ON Output to Home ...

Page 43: ...My Account pop up appears On the pop up you can select Logout Change Account Information Link Service Accounts Remove Accounts from the Device and Deactivate Account To rent movies and purchase for pay apps you must have a credit card registered in your account If you haven t registered a card select Change Account Information On the Change Account information page select Register Card press the E...

Page 44: ...ions on the screen to start the movie NOTES If you haven t logged into your Samsung account the Log in screen will appear after Step 3 and you will need to log in If you don t have a credit card associated with your Samsung account after you log in the Register Card screen will appear Follow the directions on the screen You must have a credit card registered to your account to rent movies and to p...

Page 45: ...ime you move the highlight to another category a different set of applications appears on the right 6 Use the button to move to the applications and the buttons to move from app to app 7 To see more information about an app select it and then press the E button 8 To download the app follow the directions in Steps 2 and 3 Starting an Application 1 Select Apps on the Home screen and then press the E...

Page 46: ...pps screen use the buttons to go to Options at the top of the screen and then press the E button 2 Select Edit My Apps and then press the E button The Edit My Apps screen appears 3 Select the app you want to delete from My Apps press the E button and then press the buttons in the direction of the The Remove from My Apps pop up appears 4 Select Yes and then press the E button 5 When you return to t...

Page 47: ...r When finished select Done on the right side and then press the E button The Rename popup reappears displaying the new name 6 Select OK and then press the E button The folder is renamed 7 Select Close on the right side of the screen and then press the E button Delete Delete lets you delete apps and folders from the My Apps screen If there are apps in a folder both the folder and the apps are dele...

Page 48: ...types of browsing Pointer Browsing and Link Browsing When you launch the browser for the first time Pointer Browsing is active If you are using a mouse to navigate in the Web Browser we recommend leaving Pointer Browsing active If you are using your remote to navigate in the Web Browser we recommend that you replace Pointer Browsing with Link Browsing Link Browsing moves a highlight from one link ...

Page 49: ...r number into the entry field 3 To access capital letters move the highlight to the Caps key on the top left and then press the E button Press the E button again with the Caps key highlighted to access small letters again 4 To access symbols and additional punctuation marks highlight the 123 button on the left and then press the E button 5 To delete a character you entered move the highlight to th...

Page 50: ...the Approved Sites list If you turn Approved Sites on and have not added any sites to the Approved Sites list you will not be able to access any Internet sites Private Browsing On off Enable or disable the Privacy mode When the Privacy mode is enabled the browser does not retain the URLs of sites you visit If you want to enable Privacy mode select OK If the Privacy mode is running the Stop icon ap...

Page 51: ...process for the password When finished select Done and then press the E button 8 Select OK and then press the E button BD LIVE Once the product is connected to your network you can enjoy various movie related service contents available on BD LIVE compliant discs 1 Attach a USB flash drive to the USB jack on the front of the product and then check its remaining memory The memory device must have at...

Page 52: ...utput or you will hear no sound or just loud noise If the HDMI device AV receiver TV is not compatible with compressed formats Dolby Digital DTS the audio signal outputs as PCM Regular DVDs do not have BONUSVIEW audio and Navigation Sound Effects Some Blu ray Discs do not have BONUSVIEW audio and Navigation Sound Effects This Digital Output setup does not affect the analogue L R audio or HDMI audi...

Page 53: ...ish Selecting the Subtitle Language Depending on the Blu ray Disc DVD you may be able to change the subtitle language in the Disc Menu Press the DISC MENU button This function depends on the selection of subtitles that are encoded on the disc and may not be available on all Blu ray Discs DVDs Information about the main feature BONUSVIEW mode will also appear if the Blu ray Disc has a BONUSVIEW sec...

Page 54: ...codes the main feature audio and BONUSVIEW audio stream together into PCM audio and adds Navigation Sound Effects Outputs only the main feature audio stream so that your AV receiver can decode the audio bitstream You will not hear BONUSVIEW audio or Navigation Sound Effects Decodes the main feature audio and BONUSVIEW audio stream together into PCM audio and adds Navigation Sound Effects then re e...

Page 55: ...f the power and then turn it back on Playback does not start Check the region number of the Blu ray DVD disc Blu ray DVD disc purchased from abroad may not be playable CD ROMs and DVD ROMs cannot be played on this product Make sure that the rating level is correct Playback does not start immediately when the Play Pause button is pressed Are you using a deformed disc or a disc with scratches on the...

Page 56: ...propriate function The product is not working Example The power goes out or a strange noise is heard The Product is not working normally Press and hold the remote control s 5 button for 5 seconds in STANDBY mode Using the RESET function will erase all stored settings Do not use this unless necessary You have forgotten the rating level password With no disc in the product press and hold the product...

Page 57: ... product is unstable Check the connection The AllShare connection between the product and PC is unstable IP address under the same subnetwork should be unique otherwise IP collision can results in such a phenomenon Check if you have a firewall enabled If so disable the firewall function BD LIVE I cannot connect to the BD LIVE server Test whether the network connection is active by using the Networ...

Page 58: ...6p 480p Audio PCM multichannel audio Bitstream audio PCM audio Amplifier Front speaker output 165W x 2 3 Centre speaker output 170W 3 Surround speaker output 165W x 2 3 Subwoofer speaker output 170W 3 Frequency response Analogue input 20Hz 20kHz 3dB Digital input 20Hz 40kHz 4dB S N Ratio 70dB Channel separation 60dB Input sensitivity AUX 500mV Specifications HT F5502K_30K_50K_50HK XL_0528 indd 58 ...

Page 59: ... Stand base 276 0 x 189 0 227 0 x 95 0 x 74 0 220 x 380 x 363 1 HT F5550HK 95 0 x 500 0 Max 608 0 x 74 0 Stand base 234 0 x 172 0 95 0 x 500 0 Max 608 0 x 74 0 Stand base 234 0 x 172 0 227 0 x 95 0 x 74 0 220 x 380 x 363 1 Weights Unit kg HT F5502K 0 40 0 38 0 49 6 06 HT F5530K 2 86 0 34 0 51 6 85 HT F5550K 2 86 2 86 0 51 6 85 HT F5550HK 1 59 1 59 0 51 6 85 Network speeds equal to or below 10Mbps ...

Page 60: ... com OMAN 800 SAMSUNG 726 7864 www samsung com ae English www samsung com ae_ar Arabic KUWAIT 183 2255 183 CALL BAHRAIN 8000 4726 QATAR 800 2255 800 CALL EGYPT 08000 726786 www samsung com ALGERIA 0800 100 100 www samsung com n_ africa PAKISTAN 0800 Samsung 72678 www samsung com pk Area Contact Centre Web Site TUNISIA 80 1000 12 www samsung com n_ africa JORDAN 0800 22273 06 5777444 www samsung co...

Reviews: