background image

English  

53


|

07

Appendix

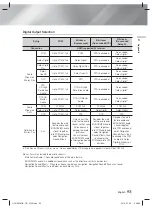
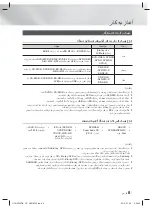
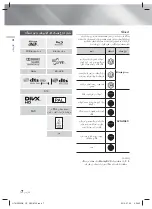
Digital Output Selection

Setup

PCM

Bitstream 

(Unprocessed)

Bitstream 

(Re-encoded DTS)

Bitstream

 (Re-encoded 

Dolby D)

Connection

HDMI supported AV receiver

Audio 

Stream on 

Blu-ray Disc

PCM

Up to PCM 7.1ch

PCM

DTS re-encoded

Re-encoded 

Dolby Digital *

Dolby Digital

Up to PCM 5.1ch

Dolby Digital

DTS re-encoded

Re-encoded 

Dolby Digital *

Dolby Digital 

Plus

Up to PCM 7.1ch

Dolby Digital Plus

DTS re-encoded

Re-encoded 

Dolby Digital *

Dolby 

TrueHD

Up to PCM 7.1ch

Dolby TrueHD

DTS re-encoded

Re-encoded 

Dolby Digital *

DTS

Up to PCM 5.1ch

DTS

DTS re-encoded

Re-encoded 

Dolby Digital *

DTS-

HD High 

Resolution 

Audio

Up to PCM 7.1ch

DTS-HD High 

Resolution Audio

DTS re-encoded

Re-encoded 

Dolby Digital *

DTS-HD 

Master 

Audio

Up to PCM 7.1ch

DTS-HD Master 

Audio

DTS re-encoded

Re-encoded 

Dolby Digital *

Audio 

Stream on 

DVD

PCM

PCM 2ch

PCM 2ch

PCM 2ch

PCM 2ch

Dolby Digital

Up to PCM 5.1ch

Dolby Digital

Dolby Digital

Dolby Digital

DTS

Up to PCM 7.1ch

DTS

DTS

DTS

Definition for 

Blu-ray Disc

Any

Decodes the main 

feature audio and 

BONUSVIEW audio 

stream together 

into PCM audio and 

adds Navigation 

Sound Effects.

Outputs only the 

main feature audio 

stream so that your 

AV receiver can 

decode the audio 

bitstream.

You will not hear 

BONUSVIEW audio 

or Navigation Sound 

Effects.

Decodes the main 

feature audio and 

BONUSVIEW audio 

stream together 

into PCM audio and 

adds Navigation 

Sound Effects, then 

re-encodes the 

PCM audio into DTS 

bitstream.

Decodes the main 

feature audio and 

BONUSVIEW audio 

stream together 

into PCM audio and 

adds Navigation 

Sound Effects, then 

re-encodes the PCM 

audio into Dolby 

Digital bitstream or 

PCM.


If the Source Stream is 2ch or mono, “Re-encoded Dolby D” Setting are not applied. Output will be PCM 2ch.

Blu-ray Discs may include three audio streams :


- Main Feature Audio : The audio soundtrack of the main feature.


- BONUSVIEW audio : An additional soundtrack such as the director or actor’s commentary.


- Navigation Sound Effects : When you choose some menu navigation, Navigation Sound Effects may sound. 

Navigation Sound Effects are different on each Blu-ray Disc.

HT-H5556RK_HC_0702.indd   53

HT-H5556RK_HC_0702.indd   53

2014-07-02     9:48:34

2014-07-02     9:48:34

Summary of Contents for HT-H5556RK

Page 1: ...Samsung product To receive more complete service please register your product at www samsung com register 5 1CH Blu ray Home Entertainment System user manual HT H5556RK HT H5556RK_HC_0702 indd 1 HT H5556RK_HC_0702 indd 1 2014 07 02 9 44 47 2014 07 02 9 44 47 ...

Page 2: ...CEABLE PARTS ARE INSIDE REFER SERVICING TO QUALIFIED SERVICE PERSONNEL CAUTION RISK OF ELECTRIC SHOCK DO NOT OPEN This symbol indicates dangerous voltage inside the product that presents a risk of electric shock or personal injury CAUTION TO PREVENT ELECTRIC SHOCK MATCH WIDE BLADE OF PLUG TO WIDE SLOT FULLY INSERT This symbol indicates important instructions accompanying the product CLASS 1 LASER ...

Page 3: ...in If the product makes an abnormal noise or produces a burning smell or smoke turn off the power switch immediately and disconnect the power plug from the wall outlet Then contact the nearest customer service centre for technical assistance Do not use the product Using the product as it is may cause a fire or an electric shock Licence Manufactured under licence from Dolby Laboratories Dolby Pro L...

Page 4: ...ety information before using the 3D function Some viewers may experience discomfort while viewing 3D TV such as dizziness nausea and headaches If you experience any such symptom stop viewing 3D TV remove the 3D Active Glasses and rest Watching 3D images for an extended period of time may cause eye strain If you feel eye strain stop viewing 3D TV remove your 3D Active Glasses and rest A responsible...

Page 5: ...t 30 Using the AllShare Network Function 31 Controlling Video Playback 34 Controlling Music Playback 39 Playing Photo Contents 40 Listening to Radio 40 Using the Special Effects Remote Control Buttons NETWORK SERVICES 42 Logging In to Your Samsung Account 42 Before Using Movies TV Shows or Apps 43 Using Movies TV Shows 43 Using Apps 47 Using the Web Browser 50 Linking your Internet Service Account...

Page 6: ...e and aspect ratio adjustment Information about the discs is written in detail on the disc box Please refer to this if necessary When you play a BD J title loading may take longer than a normal title or some functions may perform slowly Disc Types your Product cannot Play HD DVD DVD ROM PD MV Disc etc DVD RAM Super Audio CD except CD layer DVD RW VR mode CVD CD ROM CDV CD G CD I LD CD Gs play audi...

Page 7: ... Russia Central and South Asia DVD VIDEO 1 The U S U S territories and Canada 2 Europe Japan the Middle East Egypt Africa Greenland 3 Taiwan Korea the Philippines Indonesia Hong Kong 4 Mexico South America Central America Australia New Zealand Pacific Islands Caribbean 5 Russia Eastern Europe India North Korea Mongolia 6 China NOTES If the Region number of a Blu ray Disc DVDs does not correspond t...

Page 8: ... BD MVC Spec Only Audio decoder Supports WMA 10 Pro Up to 5 1 Does not support WMA lossless audio Supported ADPCM IMA MS Does not support ADPCM A Law μ Low Does not support QCELP AMR NB WB Supports vorbis Up to 2ch Supports Dolby Digital Plus Up to 7 1ch Comments MPEG4 Supports up to GMC 1 Warping Point H 264 Supports up to BP MP HP Level 4 1 WMV Supports V9 VC1 SP MP AP L3 MPEG1 Does not support ...

Page 9: ... characters Some USB digital camera devices may not be compatible with the product Your product supports the FAT 16 FAT 32 and NTFS file systems Connect USB devices directly to the product s USB port Connecting through a USB cable may cause compatibility problems Inserting more than one memory device into a multi card reader may cause the reader to operate improperly The product does not support t...

Page 10: ...of Sony Corporation AVCHD and the AVCHD logo are trademarks of Matsushita Electronic Industrial Co Ltd and Sony Corporation NOTES Some AVCHD format discs may not play depending on the recording conditions AVCHD format discs need to be finalised x v Colour offers a wider colour range than normal DVD camcorder discs Some DivX MKV and MP4 format discs may not play depending on their video resolution ...

Page 11: ...mode with the FUNCTION button Stop the playing contents on the TV first to select the BD DVD mode Rear Panel LAN POWER SPEAKERS OUT CENTER SUBWOOFER FRONT L FRONT R IMPEDANCE 3 SURROUND R SURROUND L AUX IN FM ANT OPTICAL DIGITAL AUDIO IN L R WIRELESS LAN 5V 350mA HDMI OUT HDMI IN COOLING FAN AUX IN HDMI OUT FM ANTENNA HDMI IN SPEAKER OUTPUT CONNECTORS POWER CORD WIRELESS LAN LAN TERMINAL EXTERNAL ...

Page 12: ...mart Hub Selects the disc Audio language To change to Television mode and control the TV press the TV button Press to stop play a disc Press to search contents Press to select MANUAL PRESET in the Tuner function Press to use the karaoke function Mic vol Echo Key Control or Set a Sleep time to shut off the product Press to select the home cinema s mode HDMI AUX BD DVD etc or Press to select TV s vi...

Page 13: ... Anam 01 02 03 04 05 06 07 08 09 10 11 12 13 14 AOC 01 18 40 48 Bell Howell M Wards 57 58 81 Brocsonic 59 60 Candle 18 Cetronic 03 Citizen 03 18 25 Cinema 97 Classic 03 Concerto 18 Contec 46 Coronado 15 Craig 03 05 61 82 83 84 Croslex 62 Crown 03 Curtis Mates 59 61 63 CXC 03 Daewoo 02 03 04 15 16 17 18 19 20 21 22 23 24 25 26 27 28 29 30 32 34 35 36 48 59 90 Daytron 40 Dynasty 03 Emerson 03 15 40 ...

Page 14: ...r tweeters will be at the same height as your ear Align the front face of the front speakers with the front face of the centre speaker or place them slightly in front of the centre speakers Centre Speaker It is best to install the Centre Speaker at the same height as the front speakers You can also install it directly over or under the TV Surround Speakers Place these speakers to the side of your ...

Page 15: ...ther speaker Connecting The Speakers 1 Match each speaker cable bundle to the correct speaker by matching the colour coded plug on each bundle to the coloured sticker on the bottom of each speaker 2 To attach speaker wire to each speaker a Press down the red tab on the back of the speaker insert the red wire and then release the tab b Press down the black tab on the back of the speaker insert the ...

Page 16: ...th or near the speakers They could get hurt if a speaker falls When connecting the speaker wires to the speakers make sure that the polarity is correct Keep the subwoofer speaker out of reach of children to prevent children from inserting their hands or alien substances into the duct hole of the subwoofer speaker Do not hang the subwoofer on the wall using the duct hole NOTES If you place a speake...

Page 17: ...n jack on the product to the AUDIO Out jack on the external analogue component Select the AUX mode Be sure to match the colours on the cable plugs to the colours on the input and output jacks Method 2 OPTICAL Connecting an External Digital Audio Component To connect the digital audio output of digital signal components such as Cable Boxes and Satellite Receivers Set Top Boxes Using a digital optic...

Page 18: ... LAN POWER SPEAKERS OUT CENTER SUBWOOFER FRONT L FRONT R 03 1 SURROUND R SURROUND L AUX IN FM ANT OPTICAL DIGITAL AUDIO IN L R WIRELESS LAN 5V 350mA HDMI IN HDMI OUT Broadband service Wireless IP sharer NOTES This product is compatible with only Samsung s Wireless LAN Adapter not supplied Model name WIS 12ABGNX The Samsung Wireless LAN Adapter is sold separately Contact a Samsung Electronics retai...

Page 19: ...ss the Internet using the Web Browser application 4 Apps Download Access various for pay or free of charge applications 5 Photos Videos Music Play photos videos or music content from Disc USB PC or mobile devices 6 Settings Set various functions to suit your personal preferences 7 RED A Press the RED A button on your remote to create and or log in to your personal Samsung account Selecting an Opti...

Page 20: ... BD Wise is Samsung s latest inter connectivity feature When you connect a Samsung product and a Samsung TV with BD Wise to each other via HDMI and BD Wise is on in both the product and TV the product outputs video at the video resolution and frame rate of the Blu ray DVD Disc Resolution Lets you set the output resolution of the HDMI video signal to BD Wise Auto 1080p 1080i 720p 576p 480p The numb...

Page 21: ...set the product so that the volume remains stable when a scene change occurs or when you change the channel Speaker Selection Lets you select which speakers you want active either the TV s speakers or the Home cinema s speakers Audio Return Channel Lets you direct the sound from the TV to the Home Cinema speakers Requires a HDMI connection and an Audio Return Channel ARC compatible TV If Audio Ret...

Page 22: ...Internet BD Live Internet Connection Lets you fully allow partly allow or prohibit a BD Live Internet connection BD Data Management Manage BD data downloaded from a BD Live service or Blu ray Disc Smart Features Apps Settings Lets you configure App notification settings and view basic info about your Apps Push Notification Settings Receive notifications from selected services Properties See basic ...

Page 23: ...o the factory default settings NOTES When the factory default settings are restored all the user stored BD data will be deleted General You can specify the display brightness and time zone Front Display Lets you change the brightness of the front panel Time Zone You can specify the time zone that is applicable to your area Menu Transparency Adjust the transparency of the menu box Anynet HDMI CEC A...

Page 24: ...the instructions for Wired networks starting below or the instructions for Wireless networks starting on page 25 Wired Network Wired Automatic After following Steps 1 to 3 above 1 In the Network Settings screen change Network type to Wired Then select Connect and press the E button The product detects the wired connection verifies the network connection and then connects to the network 2 When it i...

Page 25: ...nnection and then connects to the network NOTES You should be able to find the security code or pass phrase on one of the set up screens you used to set up your router or modem Wireless Manual If you have a static IP address or the Automatic procedure does not work you ll need to set the Network Settings values manually After following Steps 1 to 3 in Configuring Your Network Connection on page 24...

Page 26: ...r wireless router has a WPS PBC button follow these steps After following Steps 1 to 3 in Configuring Your Network Connection on page 24 1 In the Network Settings screen change Network type to Wireless The product searches for and then displays a list of the available networks 2 Scroll the list down select WPS PBC and then press the E button 3 Press the WPS PBC button on your router within two min...

Page 27: ...Wi Fi Direct device you want to connect 4 The Connecting pop up appears followed by the Connected pop up When it closes you should see the device listed on the Wi Fi Direct screen as connected NOTES The current wired or wireless network connection will be disconnected when you use the Wi Fi Direct function Text files such as files with a TXT or DOC extension will not display when you are using the...

Page 28: ...e product will ask you if you want to install it when you turn the product on NOTES To use the Auto update function your product must be connected to the Internet Update by USB 1 Visit www samsung com 2 Click SUPPORT on the top right of the page 3 Enter the product s model number into the search field As you enter the model number a drop down will display products that match the model number 4 Lef...

Page 29: ...the product on 2 Connect the USB device to the USB port on the front panel of the product The New Device Connected pop up appears Movies TV Shows Apps Photos Videos Music Apps Phot Vide Mus Apps Phot o i Photos Videos Music All Content New device connected USB Flash Disk Add App Add App Add App Web Browser Settings NOTES If the pop up does not appear go to Method 2 3 Use the buttons to select Phot...

Page 30: ...ay Photos Videos or Music and then press the E button NOTES Even though the product will display folders for all content types it will only display files of the Content Type you selected in Step 2 For example if you selected music you will only be able to see music files You can change this selection by returning to the Home screen and repeating Step 2 3 A screen appears listing the contents of th...

Page 31: ...lable with Samsung phones supporting AllShare functionality 1 Connect the product your PC and your DLNA compatible cellular phone to the same wireless network 2 Follow the directions in the AllShare software Installation Instruction manual to set up devices and files for playing or viewing 3 On your computer using the AllShare software confirm your phone is connected 4 On the phone select the file...

Page 32: ...epeat options The screen may not display Chapter or Title immediately Continue to press the buttons until your choice is inside the applicable field To return to normal play press the REPEAT button again press the buttons to select Off and then press the E button The screen may not display Repeat A B immediately Continue to press the buttons until Repeat A B is inside the applicable field You must...

Page 33: ...elect repeat A B and then press the E button 2 Press the E button at the point where you want repeat play to start A Let the movie play 3 Press the E button at the point where you want repeat play to stop B NOTES You must set point B at least 5 seconds of playing time after point A Picture Mode Select to set the picture mode Dynamic Increases sharpness and brightness Standard Choose this setting f...

Page 34: ... works essentially the same way for all media See Creating a Playlist from a CD on page 36 Send Select Send to upload selected files to apps Picasa Facebook etc or devices To use Send you need to establish an account with the on line site and then log in using the Log In function NOTES Depending on the disc or storage device the Options View menus may differ All options may not be displayed The Vi...

Page 35: ...tons to select View or Options in the upper right and then press the E button Music View Track Displays all the music tracks on the media or storage device Album Displays all the music on the media or storage by album Artist Displays all the music files on the media or storage device by artist Genre Displays all music on the media or storage by genre Folder Displays all the folders on the media or...

Page 36: ...en press the E button The Music Playback screen reappears listing only the tracks you checked The selected tracks play automatically NOTES You can create a playlist with up to 99 tracks from Audio CDs CD DA If you have created a playlist Play Selected is replaced by Edit playlist on the Options menu On the Play Selected screen you can also choose Select All Deselect All and Cancel Use Select All t...

Page 37: ... to Photos Videos Music If you hear strange noises squealing or howling while using the Karaoke feature move the microphone away from the speakers Turning down the microphone s volume or the speaker volume is also effective The microphone does not operate in the D IN AUX HDMI FM and BT mode The karaoke scoring displays the score automatically when the Karaoke scoring is set to On and a microphone ...

Page 38: ...d with product If the Bluetooth device is turned off not in place or malfunctions Note that such devices as microwave ovens wireless LAN adapters fluorescent lights and gas stoves use the same frequency range as the Bluetooth device and can cause electric interference To disconnect the Bluetooth device from the Home Cinema You can disconnect the Bluetooth device from the Home Cinema For instructio...

Page 39: ...splayed To enable the background music function the photo file must be in the same storage media as the music file However the sound quality can be affected by the bit rate of the MP3 file the size of the photo and the encoding method You can t enlarge the subtitle and PG graphic in the full screen mode Using the View and Options Menus When you See the Photo File List Photos View Date Groups all t...

Page 40: ... to a preset station press the MANUAL PRESET button to select Preset and then press the TUNING CH button to select the preset station Using the Special Effects Remote Control Buttons SOUND EFFECT Function SOUND EFFECT Lets you select a mode that optimizes the sound 1 Press the SOUND EFFECT button 2 Press the button to select the desired mode DSP Dolby Pro Logic II or SFE Mode 3 Press the buttons t...

Page 41: ... TV SOUND You can listen via Home theatre speakers or TV Speaker with TV SOUND button 1 Connect the HDMI cable to TV and Home cinema See page 17 2 Set the connected Home cinema and TV to Anynet HDMI CEC On 3 Press the TV SOUND button on the remote control 4 Each time you press the TV SOUND button TV SOUND ON OFF flashes shortly on the Display part on the Front panel then change to D IN TV SOUND ON...

Page 42: ...you have logged in the My Account pop up appears On the pop up you can select Logout Change Account Information Link Service Accounts Remove Accounts from the Device and Deactivate Account To rent movies and purchase for pay apps you must have a credit card registered in your account If you haven t registered a card select Change Account Information On the Change Account information page select Re...

Page 43: ...ollow the directions on the screen to start the movie NOTES If you haven t logged into your Samsung account the Log in screen will appear after Step 3 and you will need to log in If you don t have a credit card associated with your Samsung account after you log in the Register Card screen will appear Follow the directions on the screen You must have a credit card registered to your account to rent...

Page 44: ...ategory Each time you move the highlight to another category a different set of applications appears on the right 6 Use the button to move to the applications and the buttons to move from app to app 7 To see more information about an app select it and then press the E button 8 To download the app follow the directions in Steps 2 and 3 Starting an Application 1 Select Apps on the Home screen and th...

Page 45: ... 1 On the More Apps screen use the buttons to go to Options at the top of the screen and then press the E button 2 Select Edit My Apps and then press the E button The Edit My Apps screen appears 3 Select the app you want to delete from My Apps press the E button and then press the buttons in the direction of the The Remove from My Apps pop up appears 4 Select Yes and then press the E button 5 When...

Page 46: ... for the folder When finished select Done on the right side and then press the E button The Rename popup reappears displaying the new name 6 Select OK and then press the E button The folder is renamed 7 Select Close on the right side of the screen and then press the E button Delete Delete lets you delete apps and folders from the My Apps screen If there are apps in a folder both the folder and the...

Page 47: ...er provides two types of browsing Pointer Browsing and Link Browsing When you launch the browser for the first time Pointer Browsing is active If you are using a mouse to navigate in the Web Browser we recommend leaving Pointer Browsing active If you are using your remote to navigate in the Web Browser we recommend that you replace Pointer Browsing with Link Browsing Link Browsing moves a highligh...

Page 48: ... the letter or number into the entry field 3 To access capital letters move the highlight to the Caps key on the top left and then press the E button Press the E button again with the Caps key highlighted to access small letters again 4 To access symbols and additional punctuation marks highlight the 123 button on the left and then press the E button 5 To delete a character you entered move the hi...

Page 49: ...anage Approved Sites Lets you key in URLs to add to the Approved Sites List and delete sites from the Approved Sites list If you turn Approved Sites on and have not added any sites to the Approved Sites list you will not be able to access any Internet sites Private browsing on off Enable or disable the Privacy mode When the Privacy mode is enabled the browser does not retain the URLs of sites you ...

Page 50: ...ng the pop up keyboard When finished select Done and then press the E button 7 Repeat the same process for the password When finished select Done and then press the E button 8 Select OK and then press the E button BD LIVE Once the product is connected to your network you can enjoy various movie related service contents available on BD LIVE compliant discs 1 Attach a USB flash drive to the USB jack...

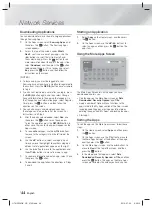
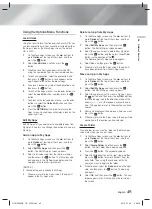
Page 51: ...ct Digital Output or you will hear no sound or just loud noise If the HDMI device AV receiver TV is not compatible with compressed formats Dolby Digital DTS the audio signal outputs as PCM Regular DVDs do not have BONUSVIEW audio and Navigation Sound Effects Some Blu ray Discs do not have BONUSVIEW audio and Navigation Sound Effects This Digital Output setup does not affect the analogue L R audio ...

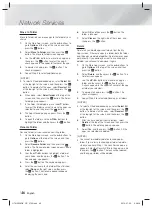
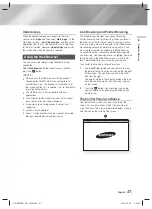
Page 52: ...dtrack in English Selecting the Subtitle Language Depending on the Blu ray Disc DVD you may be able to change the subtitle language in the Disc Menu Press the DISC MENU button This function depends on the selection of subtitles that are encoded on the disc and may not be available on all Blu ray Discs DVDs Information about the main feature BONUSVIEW mode will also appear if the Blu ray Disc has a...

Page 53: ... ray Disc Any Decodes the main feature audio and BONUSVIEW audio stream together into PCM audio and adds Navigation Sound Effects Outputs only the main feature audio stream so that your AV receiver can decode the audio bitstream You will not hear BONUSVIEW audio or Navigation Sound Effects Decodes the main feature audio and BONUSVIEW audio stream together into PCM audio and adds Navigation Sound E...

Page 54: ...outlet Turn off the power and then turn it back on Playback does not start Check the region number of the Blu ray DVD disc Blu ray DVD disc purchased from abroad may not be playable CD ROMs and DVD ROMs cannot be played on this product Make sure that the rating level is correct Playback does not start immediately when the Play Pause button is pressed Are you using a deformed disc or a disc with sc...

Page 55: ...en select the appropriate function The product is not working Example The power goes out or a strange noise is heard The Product is not working normally Press and hold the remote control s 5 button for 5 seconds in STANDBY mode Using the RESET function will erase all stored settings Do not use this unless necessary You have forgotten the rating level password With no disc in the product press and ...

Page 56: ...device and the product is unstable Check the connection The AllShare connection between the product and PC is unstable IP address under the same subnetwork should be unique otherwise IP collision can results in such a phenomenon Check if you have a firewall enabled If so disable the firewall function BD LIVE I cannot connect to the BD LIVE server Test whether the network connection is active by us...

Page 57: ...1ch speaker system Front Surround Centre Subwoofer Impedance 3 3 3 3 Frequency range 140Hz 20kHz 140Hz 20kHz 140Hz 20kHz 40Hz 160Hz Output sound pressure level 87dB W M 87dB W M 87dB W M 88dB W M Rated input 165W 165W 170W 170W Maximum input 330W 330W 340W 340W Dimensions W x H x D Unit mm 89 x 1053 x 71 Stand base 229 x 229 89 x 1053 x 71 Stand base 229 x 229 228 x 77 x 70 214 x 390 x 350 Weights...

Page 58: ...ﮐﺎﻣﻝ ﺧﺩﻣﺎﺕ ﺩﺭﻳﺎﻓﺕ ﺑﺭﺍی ﮐﻧﻳﺩ ﺛﺑﺕ ﺯﻳﺭ ﺁﺩﺭﺱ ﺩﺭ ﺭﺍ ﺧﻭﺩ ﺩﺳﺗﮕﺎﻩ ً ﺎ ﻟﻁﻔ www samsung com register 5 1CH Blu ray ﺧﺎﻧﮕﯽ ﺳﻳﻧﻣﺎی ﺳﻳﺳﺗﻡ ﮐﺎﺭﺑﺭ ﺭﺍﻫﻧﻣﺎی ﺩﻓﺗﺭﭼﻪ HT H5556RK AH68 02691V 00 AH68 02691V 00 HT H5556RK_HC_PER 0702 indd 1 HT H5556RK_HC_PER 0702 indd 1 2014 07 02 9 50 08 2014 07 02 9 50 08 ...

Page 59: ...ﺩ ﺩﺳﺗﮕﺎﻩ ﺩﺍﺧﻝ ﺩﺭ ﺍی ﻗﻁﻌﻪ ﻫﻳﭻ ﺍﺣﺗﻳﺎﻁ ﮔﺭﻓﺗﮕﯽ ﺑﺭﻕ ﺧﻁﺭ ﻧﮑﻧﻳﺩ ﺑﺎﺯ ﺧﻁﺭﻧﺎک ﻭﻟﺗﺎژ ﻭﺟﻭﺩ ﺩﻫﻧﺩﻩ ﻧﺷﺎﻥ ﻋﻼﻣﺕ ﺍﻳﻥ ﻳﺎ ﮔﺭﻓﺗﮕﯽ ﺑﺭﻕ ﺧﻁﺭ ﮐﻪ ﺍﺳﺕ ﺩﺳﺗﮕﺎﻩ ﺩﺍﺧﻝ ﺩﺭ ﺩﻫﺩ ﻣﯽ ﻧﺷﺎﻥ ﺭﺍ ﺷﺧﺻﯽ ﺟﺭﺍﺣﺕ ﺗﻳﻐﻪ ﮔﺭﻓﺗﮕﯽ ﺑﺭﻕ ﺧﻁﺭ ﺍﺯ ﺟﻠﻭﮔﻳﺭی ﺑﺭﺍی ﺍﺣﺗﻳﺎﻁ ﺑﻁﻭﺭ ﻭ ﮐﺭﺩﻩ ﻣﻳﺯﺍﻥ ﻋﺭﻳﺽ ﺷﮑﺎﻑ ﺑﺎ ﺭﺍ ﺩﻭﺷﺎﺧﻪ ﻋﺭﻳﺽ ﻧﻣﺎﻳﻳﺩ ﺩﺍﺧﻝ ﮐﺎﻣﻝ ﻭﺟﻭﺩ ﺩﻫﻧﺩﻩ ﻧﺷﺎﻥ ﻋﻼﻣﺕ ﺍﻳﻥ ﺩﺳﺗﮕﺎﻩ ﻫﻣﺭﺍﻩ ﻣﻬﻡ ﻫﺎی ﺩﺳﺗﻭﺭﺍﻟﻌﻣﻝ ﺑﺎﺷﺩ ﻣﯽ ﻟﻳﺯﺭی ﻣﺣﺻﻭﻝ 1 ﮐﻼﺱ LASER PRODUKT KLASSE 1 LASER LAITE LUOKAN 1 LA...

Page 60: ...ﺎﺩی ﺻﺩﺍی ﺩﺳﺗﮕﺎﻩ ﺍﺯ ﺍﮔﺭ ﺩﻭﺷﺎﺧﻪ ﻭ ﮐﺭﺩﻩ ﺧﺎﻣﻭﺵ ً ﺍ ﻓﻭﺭ ﺭﺍ ﺩﺳﺗﮕﺎﻩ ﺧﺎﻣﻭﺵ ﺭﻭﺷﻥ ﮐﻠﻳﺩ ﺍﻳﺩ ﺷﺩﻩ ﺩﻭﺩ ﻓﻧﯽ ﺭﺍﻫﻧﻣﺎﻳﯽ ﻭ ﮐﻣﮏ ﺩﺭﻳﺎﻓﺕ ﺑﺭﺍی ﺳﭘﺱ ﺑﮑﺷﻳﺩ ﺩﻳﻭﺍﺭی ﭘﺭﻳﺯ ﺍﺯ ﺭﺍ ﺍﺳﺗﻔﺎﺩﻩ ﺩﺳﺗﮕﺎﻩ ﺍﺯ ﺑﮕﻳﺭﻳﺩ ﺗﻣﺎﺱ ﻣﺷﺗﺭﻳﺎﻥ ﺧﺩﻣﺎﺕ ﻣﺭﮐﺯ ﺗﺭﻳﻥ ﻧﺯﺩﻳﮏ ﺑﺎ ﺑﺭﻕ ﺧﻁﺭ ﺩﻫﻳﺩ ﺍﺩﺍﻣﻪ ﻭﺿﻌﻳﺕ ﺍﻳﻥ ﺩﺭ ﺩﺳﺗﮕﺎﻩ ﺍﺯ ﺍﺳﺗﻔﺎﺩﻩ ﺑﻪ ﺍﮔﺭ ﻧﮑﻧﻳﺩ ﺩﺍﺷﺕ ﺧﻭﺍﻫﺩ ﻭﺟﻭﺩ ﺳﻭﺯی ﺁﺗﺵ ﻳﺎ ﻭ ﮔﺭﻓﺗﮕﯽ ﻣﺟﻭﺯ Dolby ﻣﺟﻭﺯ ﺗﺣﺕ ﺷﺩﻩ ﺳﺎﺧﺗﻪ Laboratories D ﺣﺭﻑ ﺩﻭ ﻭ Dolby Pro Logic Dolby ﺷﺩﻩ ﺛﺑﺕ ﺗﺟﺎﺭی...

Page 61: ...ﮔﺎﻥ ﺑﺭﺧﯽ ﺩﺍﺭﺩ ﺍﻣﮑﺎﻥ ﺷﻭﻧﺩ ﻣﺑﺗﻼ ﺩﺭﺩ ﺳﺭ ﻭ ﺗﻬﻭﻉ ﺣﺎﻟﺕ ﺳﺭﮔﻳﺟﻪ ﺑﻪ ﻭ ﮐﺭﺩﻩ ﻧﺎﺭﺍﺣﺗﯽ ﻣﺗﻭﻗﻑ ﺭﺍ ﺑﻌﺩی 3 ﺗﻠﻭﻳﺯﻳﻭﻥ ﺗﻣﺎﺷﺎی ﺷﺩﻳﺩ ﻫﺎﻳﯽ ﺣﺎﻟﺕ ﭼﻧﻳﻥ ﺩﭼﺎﺭ ﺍﮔﺭ ﮐﻧﻳﺩ ﺍﺳﺗﺭﺍﺣﺕ ﻭ ﺑﺭﺩﺍﺷﺗﻪ ﺭﺍ ﺧﻭﺩ ﺑﻌﺩی 3 ﺍﮐﺗﻳﻭ ﻋﻳﻧﮏ ﮐﺭﺩﻩ ﺍﮔﺭ ﮐﻧﺩ ﻣﯽ ﺧﺳﺗﻪ ﺭﺍ ﭼﺷﻡ ﻁﻭﻻﻧﯽ ﻣﺩﺕ ﺑﺭﺍی ﺑﻌﺩی 3 ﺗﺻﺎﻭﻳﺭ ﺗﻣﺎﺷﺎی ﻋﻳﻧﮏ ﮐﺭﺩﻩ ﻣﺗﻭﻗﻑ ﺭﺍ ﺑﻌﺩی 3 ﺗﻠﻭﻳﺯﻳﻭﻥ ﺗﻣﺎﺷﺎی ﺷﺩ ﺧﺳﺗﻪ ﺷﻣﺎ ﭼﺷﻡ ﮐﻧﻳﺩ ﺍﺳﺗﺭﺍﺣﺕ ﻭ ﺑﺭﺩﺍﺷﺗﻪ ﺭﺍ ﺧﻭﺩ ﺑﻌﺩی 3 ﺍﮐﺗﻳﻭ 3 ﻗﺎﺑﻠﻳﺕ ﺍﺯ ﮐﻪ ﮐﻭﺩﮐﺎﻧﯽ ﺑﻪ ﻣﺭﺗﺏ ﺑﻁﻭﺭ ﺑﺎﻳﺩ ﻣﺳﺋﻭﻝ ﺑﺯﺭﮔﺳ...

Page 62: ...are ﺷﺑﮑﻪ ﻗﺎﺑﻠﻳﺕ ﺍﺯ ﺍﺳﺗﻔﺎﺩﻩ 30 ﻓﻳﻠﻡ ﭘﺧﺵ ﮐﻧﺗﺭﻝ 31 ﻣﻭﺳﻳﻘﯽ ﭘﺧﺵ ﮐﻧﺗﺭﻝ 34 ﻫﺎ ﻋﮑﺱ ﭘﺧﺵ 39 ﺭﺍﺩﻳﻭ ﺑﻪ ﺩﺍﺩﻥ ﮔﻭﺵ 40 ﺩﻭﺭ ﺭﺍﻩ ﺍﺯ ﮐﻧﺗﺭﻝ ﻭﻳژﻩ ﺟﻠﻭﻩ ﻫﺎی ﺩﮐﻣﻪ ﺍﺯ ﺍﺳﺗﻔﺎﺩﻩ 40 ﺷﺑﮑﻪ ﺧﺩﻣﺎﺕ ﺧﻭﺩ Samsung ﺍﺷﺗﺭﺍک ﺑﻪ ﺷﺩﻥ ﻭﺍﺭﺩ 42 ﻫﺎی ﺑﺭﻧﺎﻣﻪ ﻳﺎ ﺗﻠﻭﻳﺯﻳﻭﻧﯽ ﻫﺎی ﺑﺭﻧﺎﻣﻪ ﻭ ﻫﺎ ﻓﻳﻠﻡ ﺍﺯ ﺍﺳﺗﻔﺎﺩﻩ ﺍﺯ ﭘﻳﺵ 42 ﮐﺎﺭﺑﺭﺩی ﺗﻠﻭﻳﺯﻳﻭﻧﯽ ﻫﺎی ﺑﺭﻧﺎﻣﻪ ﻭ ﻫﺎ ﻓﻳﻠﻡ ﺍﺯ ﺍﺳﺗﻔﺎﺩﻩ 43 ﮐﺎﺭﺑﺭﺩی ﻫﺎی ﺑﺭﻧﺎﻣﻪ ﺍﺯ ﺍﺳﺗﻔﺎﺩﻩ 43 ﻭﺏ ﻣﺭﻭﺭﮔﺭ ﺍﺯ ﺍﺳﺗﻔﺎﺩﻩ 47 ﺩﺳﺗﮕﺎﻩ ﺑﻪ ﺧﻭﺩ ﺍﻳﻧﺗﺭﻧﺗﯽ ﻫﺎی...

Page 63: ... ﻟﻁﻔ ﺍﺳﺕ ﺷﺩﻩ ﻧﻭﺷﺗﻪ ﺁﻧﻬﺎ ﺟﻌﺑﻪ ﺭﻭی ﻣﺷﺭﻭﺡ ﺑﻁﻭﺭ ﻫﺎ ﺩﻳﺳﮏ ﺑﻌﺿﯽ ﺍﺳﺕ ﻣﻣﮑﻥ ﺍﻳﻧﮑﻪ ﻳﺎ ﺑﮑﺷﺩ ﻁﻭﻝ ﻣﻌﻣﻭﻟﯽ ﻋﻧﻭﺍﻥ ﻳﮏ ﺍﺯ ﺑﻳﺷﺗﺭ ﺩﻳﺳﮏ ﺑﺎﺭﮔﻳﺭی ﻋﻣﻝ ﺍﺳﺕ ﻣﻣﮑﻥ ﮐﻧﻳﺩ ﻣﯽ ﭘﺧﺵ ﺭﺍ BD J ﻋﻧﻭﺍﻥ ﻳﮏ ﮐﻪ ﻫﻧﮕﺎﻣﯽ ﺷﻭﻧﺩ ﺍﺟﺭﺍ ﮐﻧﺩی ﺑﻪ ﻫﺎ ﻗﺎﺑﻠﻳﺕ ﻧﻳﺳﺗﻧﺩ ﭘﺧﺵ ﻗﺎﺑﻝ ﺩﺳﺗﮕﺎﻩ ﺍﻳﻥ ﺑﺎ ﮐﻪ ﻫﺎﻳﯽ ﺩﻳﺳﮏ ﺍﻧﻭﺍﻉ HD DVD DVD ROM PD MV ﻏﻳﺭﻩ Disc DVD RAM Super Audio CD CD ﻻﻳﻪ ﺍﺯ ﻏﻳﺭ VR ﺣﺎﻟﺕ DVD RW CVD CD ROM CDV CD G CD I LD ﻓﻘﻁ ﻫﺎ CD G ﻣﻭﺭﺩ ﺩﺭ ﮔﺭﺍﻓﻳﮏ ﻧﻪ ﺻﺩﺍ ﭘﺧﺵ ...

Page 64: ... ﺧﺎﻭﺭﻣﻳﺎﻧﻪ C ﻭ ﻣﺭﮐﺯی ﺁﺳﻳﺎی ﺭﻭﺳﻳﻪ ﭼﻳﻥ ﻫﻧﺩ ﺟﻧﻭﺑﯽ DVD VIDEO 1 ﮐﺎﻧﺎﺩﺍ ﻭ ﺗﺎﺑﻌﻪ ﻧﻭﺍﺣﯽ ﻭ ﺁﻣﺭﻳﮑﺎ 2 ﺁﻓﺭﻳﻘﺎی ﻣﺻﺭ ﺧﺎﻭﺭﻣﻳﺎﻧﻪ ژﺍﭘﻥ ﺍﺭﻭﭘﺎ ﮔﺭﻳﻧﻠﻧﺩ 3 ﻫﻧﮓ ﺍﻧﺩﻭﻧﺯی ﻓﻳﻠﻳﭘﻳﻥ ﮐﺭﻩ ﺗﺎﻳﻭﺍﻥ ﮐﻧﮓ 4 ﺁﻣﺭﻳﮑﺎی ﺟﻧﻭﺑﯽ ﺁﻣﺭﻳﮑﺎی ﻣﮑﺯﻳﮏ ﺟﺯﺍﻳﺭ ﻧﻳﻭﺯﻳﻠﻧﺩ ﺍﺳﺗﺭﺍﻟﻳﺎ ﻣﺭﮐﺯی ﮐﺎﺭﺍﺋﻳﺏ ﺣﻭﺯﻩ ﺁﺭﺍﻡ ﺍﻗﻳﺎﻧﻭﺱ 5 ﮐﺭﻩ ﻫﻧﺩ ﺷﺭﻗﯽ ﺍﺭﻭﭘﺎی ﺭﻭﺳﻳﻪ ﻣﻐﻭﻟﺳﺗﺎﻥ ﺷﻣﺎﻟﯽ 6 ﭼﻳﻥ ﺗﺫﮐﺭﺍﺕ ﺩﺳﺗﮕﺎﻩ ﺍﻳﻥ ﻣﻧﻁﻘﻪ ﮐﺩ ﺑﺎ Blu ray DVD ﺩﻳﺳﮏ ﻣﻧﻁﻘﻪ ﮐﺩ ﺍﮔﺭ ﮐﻧﺩ ﭘﺧﺵ ﺭﺍ ﺩﻳﺳﮏ ﺗﻭﺍﻧﺩ ﻧﻣﯽ ﺩﺳﺗﮕﺎﻩ ﺑﺎﺷ...

Page 65: ...ﺳﺗﺟﻭ ﻗﺎﺑﻠﻳﺕ ﺑﺎﺷﺩ ﺩﻳﺩﻩ ﺁﺳﻳﺏ ﻓﺎﻳﻝ ﻧﻣﺎﻳﻪ ﺟﺩﻭﻝ ﺍﮔﺭ ﺑﻭﺩ ﻧﺧﻭﺍﻫﺩ ﺩﺳﺗﺭﺱ ﺗﺻﻭﻳﺭ ﭘﺧﺵ ﮐﻧﻳﺩ ﭘﺧﺵ ﺷﺑﮑﻪ ﺍﺗﺻﺎﻝ ﻁﺭﻳﻕ ﺍﺯ ﺩﻭﺭ ﺭﺍﻩ ﺍﺯ ﺭﺍ ﻓﺎﻳﻠﯽ ﺍﮔﺭ ﺑﺎﺷﺩ ﻣﻭﺍﺟﻪ ﭘﺭﺵ ﺑﺎ ﺷﺑﮑﻪ ﺳﺭﻋﺕ ﺑﻪ ﺑﺳﺗﻪ ﺍﺳﺕ ﻣﻣﮑﻥ ﺁﻥ ﺩﺳﺗﮕﺎﻩ ﺍﻳﻥ ﺑﺎ ﺩﻳﺟﻳﺗﺎﻝ ﻫﺎی ﺩﻭﺭﺑﻳﻥ USB ﺗﺟﻬﻳﺯﺍﺕ ﺑﺭﺧﯽ ﺩﺍﺭﺩ ﺍﻣﮑﺎﻥ ﻧﺑﺎﺷﻧﺩ ﺳﺎﺯﮔﺎﺭ ﻭﻳﺩﻳﻭﻳﯽ ﮐﺩﮔﺷﺎی FMO ASO ﺑﺭﺍی ﺑﺟﺯ ﺷﻭﺩ ﻣﯽ ﭘﺷﺗﻳﺑﺎﻧﯽ H 264 Level 4 1 ﺗﺎ RS ﺷﻭﺩ ﻧﻣﯽ ﭘﺷﺗﻳﺑﺎﻧﯽ VC1 AP L4 WMV v7 v8 MSMPEG4 v3 MVC VP6 ﺑﺭﺍی ﺑﺟﺯ ﮐﺎﺩﺭ 60 ﺣﺩﺍﮐﺛﺭ 1...

Page 66: ...ﻡ ﺍﺯ ﺩﺳﺗﮕﺎﻩ ﺍﻳﻥ ﮐﻧﺩ ﻧﻣﯽ ﭘﺷﺗﻳﺑﺎﻧﯽ ﺩﺳﺗﮕﺎﻩ ﺍﻳﻥ ﺑﺎ ﺩﻳﺟﻳﺗﺎﻝ ﻫﺎی ﺩﻭﺭﺑﻳﻥ USB ﺗﺟﻬﻳﺯﺍﺕ ﺑﺭﺧﯽ ﺩﺍﺭﺩ ﺍﻣﮑﺎﻥ ﻧﺑﺎﺷﻧﺩ ﺳﺎﺯﮔﺎﺭ ﭘﺷﺗﻳﺑﺎﻧﯽ NTFS ﻭ FAT16 FAT32 ﻓﺎﻳﻝ ﻫﺎی ﺳﻳﺳﺗﻡ ﺍﺯ ﺷﻣﺎ ﺩﺳﺗﮕﺎﻩ ﮐﻧﺩ ﻣﯽ ﻭﺻﻝ ﮐﻧﻳﺩ ﻭﺻﻝ ﺩﺳﺗﮕﺎﻩ USB ﺩﺭﮔﺎﻩ ﺑﻪ ً ﺎ ﻣﺳﺗﻘﻳﻣ ﺭﺍ USB ﺗﺟﻬﻳﺯﺍﺕ ﺁﻭﺭﺩ ﺑﻭﺟﻭﺩ ﺳﺎﺯﮔﺎﺭی ﻣﺷﮑﻼﺕ ﺗﻭﺍﻧﺩ ﻣﯽ USB ﮐﺎﺑﻝ ﻁﺭﻳﻕ ﺍﺯ ﮐﺭﺩﻥ ﺧﻁﺎی ﺑﺎﻋﺙ ﭼﻧﺩﻣﻧﻅﻭﺭﻩ ﺧﻭﺍﻥ ﮐﺎﺭﺕ ﺑﻪ ﺣﺎﻓﻅﻪ ﻳﮏ ﺍﺯ ﺑﻳﺵ ﮐﺭﺩﻥ ﻭﺻﻝ ﺷﺩ ﺧﻭﺍﻫﺩ ﺧﻭﺍﻥ ﮐﺎﺭﺕ ﮐﺎﺭی ﮐﻧﺩ ﻧﻣﯽ ﭘﺷﺗﻳﺑﺎﻧﯽ PTP ﭘﺭﻭﺗﮑﻝ ﺍﺯ ...

Page 67: ...on ﺷﺩﻩ ﺛﺑﺕ ﺗﺟﺎﺭی ﻋﻼﻣﺕ x v Colour ﺑﺎﺷﺩ ﻣﯽ Matsushita ﺷﺩﻩ ﺛﺑﺕ ﺗﺟﺎﺭی ﻋﻼﺋﻡ AVCHD ﺁﺭﻡ ﻭ AVCHD Sony Corporation ﻭ Electronic Industrial Co Ltd ﺑﺎﺷﻧﺩ ﻣﯽ ﺗﺫﮐﺭﺍﺕ ﭘﺧﺵ ﺷﺎﻳﺩ AVCHD ﻓﺭﻣﺕ ﻫﺎی ﺩﻳﺳﮏ ﺍﺯ ﺑﺭﺧﯽ ﺿﺑﻁ ﺷﺭﺍﻳﻁ ﺑﻪ ﺑﺳﺗﻪ ﻧﺷﻭﻧﺩ ﺷﻭﻧﺩ ﻧﻬﺎﻳﯽ ﺑﺎﻳﺩ AVCHD ﻓﺭﻣﺕ ﻫﺎی ﺩﻳﺳﮏ DVD ﻋﺎﺩی ﻫﺎی ﺩﻳﺳﮏ ﺑﺎ ﻣﻘﺎﻳﺳﻪ ﺩﺭ x v Colour ﻫﺎی ﺩﻳﺳﮏ ﺩﺍﺭﻧﺩ ﺗﺭی ﮔﺳﺗﺭﺩﻩ ﺭﻧﮕﯽ ﻁﻳﻑ ﻭﻳﺩﻳﻭﻳﯽ ﻫﺎی ﺩﻭﺭﺑﻳﻥ ﺩﻗﺕ ﺑﻪ ﺑﺳﺗﻪ ﺷﺎﻳﺩ MP4 ﻭ DivX MKV ﻓﺭﻣﺕ ﻫﺎی ﺩﻳﺳﮏ ﺍﺯ ﺑﺭﺧﯽ ...

Page 68: ...B ﻭﺳﻳﻠﻪ ﻣﺣﺗﻭﻳﺎﺕ ﻳﺎ ﮐﺭﺩﻩ ﺍﺳﺗﻔﺎﺩﻩ ﺍﻳﻧﺗﺭﻧﺕ ﺍﺯ ﺍﮔﺭ ﻧﻣﺎﻳﻳﺩ ﻣﺗﻭﻗﻑ ﺗﻠﻭﻳﺯﻳﻭﻥ ﺩﺭ ﺭﺍ ﻣﺣﺗﻭﻳﺎﺕ ﭘﺧﺵ ﺍﺑﺗﺩﺍ ﺑﺎﻳﺩ BD DVD ﺣﺎﻟﺕ ﺍﻧﺗﺧﺎﺏ ﭘﺷﺕ ﭘﺎﻧﻝ LAN POWER SPEAKERS OUT CENTER SUBWOOFER FRONT L FRONT R IMPEDANCE 3 SURROUND R SURROUND L AUX IN FM ANT OPTICAL DIGITAL AUDIO IN L R WIRELESS LAN 5V 350mA HDMI OUT HDMI IN ﮐﻧﻧﺩﻩ ﺧﻧﮏ ﻓﻥ AUX IN HDMI OUT FM ﺁﻧﺗﻥ HDMI IN ﺑﻠﻧﺩﮔﻭ ﺧﺭﻭﺟﯽ ﻫﺎی ﺭﺍﺑﻁ ﺑﺭﻕ ﺳﻳﻡ ﺑﻳﺳﻳﻡ LAN LAN ﭘﺎﻳﺎﻧﻪ ﺩﻳﺟﻳﺗﺎ...

Page 69: ...ﻧﺗﺧﺎﺏ ﺭﺍ ﺩﻳﺳﮏ ﺻﺩﺍی ﺯﺑﺎﻥ ﻭ ﺭﻓﺗﻪ ﺗﻠﻭﻳﺯﻳﻭﻥ ﺣﺎﻟﺕ ﺑﻪ ﺧﻭﺍﻫﻳﺩ ﻣﯽ ﺍﮔﺭ ﻓﺷﺎﺭ ﺭﺍ TV ﺩﮐﻣﻪ ﮐﻧﻳﺩ ﮐﻧﺗﺭﻝ ﺭﺍ ﺗﻠﻭﻳﺯﻳﻭﻥ ﺩﻫﻳﺩ ﺩﻳﺳﮏ ﭘﺧﺵ ﺳﺎﺧﺗﻥ ﻣﺗﻭﻗﻑ ﺟﻬﺕ ﺩﻫﻳﺩ ﻓﺷﺎﺭ ﻓﺷﺎﺭ ﻫﺎ ﺑﺭﻧﺎﻣﻪ ﺟﺳﺗﺟﻭی ﺑﺭﺍی ﺩﻫﻳﺩ ﺗﻳﻭﻧﺭ ﻣﻧﻭی ﺩﺭ ﺗﻧﻅﻳﻡ ﭘﻳﺵ ﺩﺳﺗﯽ ﺍﻧﺗﺧﺎﺏ ﺑﺭﺍی ﺩﻫﻳﺩ ﻓﺷﺎﺭ ﺩﻫﻳﺩ ﻓﺷﺎﺭ Blu ray ﺣﺎﻟﺕ ﺍﻧﺗﺧﺎﺏ ﺑﺭﺍی ﻏﻳﺭﻩ HDMI AUX BD DVD ﻳﺎ ﺩﻫﻳﺩ ﻓﺷﺎﺭ ﺗﻠﻭﻳﺯﻳﻭﻥ ﺗﺻﻭﻳﺭ ﺣﺎﻟﺕ ﺍﻧﺗﺧﺎﺏ ﺑﺭﺍی ﺍﻧﺗﺧﺎﺏ ﺭﺍﺩﻳﻭ ﭘﺧﺵ ﺑﺭﺍی ﺭﺍ ﺍﺳﺗﺭﻳﻭ ﻳﺎ ﻣﻭﻧﻭ ﺣﺎﻟﺕ ﮐﻧﻳﺩ ﺩﻫﻳﺩ ﻓﺷﺎﺭ ﺟﻠﻭ ﻳﺎ ﻋﻘﺏ ﺑﻪ ﺟ...

Page 70: ...ﺩﺍﺷﺕ ﺗﻠﻭﻳﺯﻳﻭﻥ ﮐﻧﺗﺭﻝ ﻫﺎی ﮐﺩ ﻣﺎﺭک ﮐﺩ Admiral M Wards 58 57 56 AMark 15 01 Anam 06 05 04 03 02 01 12 11 10 09 08 07 14 13 AOC 48 40 18 01 Bell Howell M Wards 81 58 57 Brocsonic 60 59 Candle 18 Cetronic 03 Citizen 25 18 03 Cinema 97 Classic 03 Concerto 18 Contec 46 Coronado 15 Craig 84 83 82 61 05 03 Croslex 62 Crown 03 Curtis Mates 63 61 59 CXC 03 Daewoo 18 17 16 15 04 03 02 25 24 23 22 21 20 19 34 3...

Page 71: ...ﺎ ﺗﻭﺍﻧﻳﺩ ﻣﯽ ﻧﺩﺍﺭﻳﺩ ﮐﺎﻓﯽ ﺟﺎی ﺍﮔﺭ ﺩﻫﻳﺩ ﻗﺭﺍﺭ ﺍﻳﺩ ﮐﺭﺩﻩ ﺍﻧﺗﺧﺎﺏ ﺷﻧﻳﺩﻥ ﻭ ﻧﺷﺳﺗﻥ ﺑﺭﺍی ﮐﻪ ﻣﺣﻠﯽ ﻁﺭﻓﻳﻥ ﺩﺭ ﺭﺍ ﺑﻠﻧﺩﮔﻭﻫﺎ ﺍﻳﻥ ﺑﺎﺷﻧﺩ ﭘﺎﻳﻳﻥ ﺳﻣﺕ ﺑﻪ ﮐﻣﯽ ﻭ ﺷﻣﺎ ﮔﻭﺵ ﺍﺯ ﺑﺎﻻﺗﺭ ﺳﺎﻧﺗﻳﻣﺗﺭ 90 ﺗﺎ 60 ﮐﻪ ﺩﻫﻳﺩ ﻗﺭﺍﺭ ﻁﻭﺭی ﺭﺍ ﺁﻧﻬﺎ ﺩﻫﻳﺩ ﻗﺭﺍﺭ ﻫﻡ ﺭﻭﺑﺭﻭی ﺑﻪ ﺁﻧﻬﺎ ﻫﻣﻪ ﺍﺯ ﻫﻣﻳﺷﻪ ﺻﺩﺍ ﺩﺍﺭﻧﺩ ﮐﺎﺭﺑﺭﺩ ﺻﻭﺗﯽ ﻫﺎی ﺟﻠﻭﻩ ﺑﺭﺍی ﺑﻳﺷﺗﺭ ﻣﺭﮐﺯ ﻭ ﺟﻠﻭ ﺑﻠﻧﺩﮔﻭﻫﺎی ﺑﺭﺧﻼﻑ ﺳﻭﺭﺍﻧﺩ ﺑﻠﻧﺩﮔﻭﻫﺎی ﺭﺳﻳﺩ ﻧﺧﻭﺍﻫﺩ ﮔﻭﺵ ﻭﻭﻓﺭ ﺳﺎﺏ ﺩﻫﻳﺩ ﻗﺭﺍﺭ ﺑﻭﺩﻳﺩ ﻣﺎﻳﻝ ﮐﻪ ﺟﺎ ﻫﺭ ﺁﻧﺭﺍ ﻧﻳﺳﺕ ﻣﻬﻡ ﭼﻧﺩﺍﻥ ﻭﻭ...

Page 72: ... ﺍﻳﻥ ﺩﻫﻳﺩ ﺍﻧﺟﺎﻡ ﺭﺍ ﻣﺭﺍﺣﻝ ﻫﻣﻳﻥ ﺩﻳﮕﺭ ﺑﻠﻧﺩﮔﻭی ﻧﺻﺏ ﺑﺭﺍی ﺑﻠﻧﺩﮔﻭﻫﺎ ﮐﺭﺩﻥ ﻭﺻﻝ 1 ﺑﻠﻧﺩﮔﻭی ﺑﻪ ﺑﻠﻧﺩﮔﻭ ﻫﺭ ﺯﻳﺭ ﺭﻧﮕﯽ ﺑﺭﭼﺳﺏ ﺑﺎ ﺳﻳﻡ ﺩﺳﺗﻪ ﻫﺭ ﺭﻧﮕﯽ ﺳﺭﺳﻳﻡ ﺩﺍﺩﻥ ﻣﻁﺎﺑﻘﺕ ﺑﺎ ﺭﺍ ﺑﻠﻧﺩﮔﻭ ﺳﻳﻡ ﺩﺳﺗﻪ ﻫﺭ ﮐﻧﻳﺩ ﻭﺻﻝ ﺻﺣﻳﺢ 2 ﺑﻠﻧﺩﮔﻭ ﻫﺭ ﺑﻪ ﺑﻠﻧﺩﮔﻭ ﺳﻳﻡ ﮐﺭﺩﻥ ﻭﺻﻝ ﺑﺭﺍی a ﮐﻧﻳﺩ ﺭﻫﺎ ﺭﺍ ﺯﺑﺎﻧﻪ ﺳﭘﺱ ﻭ ﺑﮕﺫﺍﺭﻳﺩ ﺭﺍ ﻗﺭﻣﺯ ﺳﻳﻡ ﺩﺍﺩﻩ ﻓﺷﺎﺭ ﭘﺎﻳﻳﻥ ﺑﻪ ﺭﺍ ﺑﻠﻧﺩﮔﻭ ﭘﺷﺕ ﻗﺭﻣﺯ ﺯﺑﺎﻧﻪ b ﮐﻧﻳﺩ ﺭﻫﺎ ﺭﺍ ﺯﺑﺎﻧﻪ ﺳﭘﺱ ﻭ ﺑﮕﺫﺍﺭﻳﺩ ﺭﺍ ﻣﺷﮑﯽ ﺳﻳﻡ ﺩﺍﺩﻩ ﻓﺷﺎﺭ ﭘﺎﻳﻳﻥ ﺑﻪ ﺭﺍ ﺑﻠﻧﺩﮔﻭ ﭘﺷﺕ ﻣﺷﮑﯽ ﺯ...

Page 73: ...ﺍﺳﺕ ﻣﻣﮑﻥ ﺑﻳﻔﺗﺩ ﺑﻠﻧﺩﮔﻭ ﺍﮔﺭ ﮐﻧﻧﺩ ﺑﺎﺯی ﺁﻧﻬﺎ ﻣﺟﺎﻭﺭﺕ ﺩﺭ ﻳﺎ ﺑﻠﻧﺩﮔﻭﻫﺎ ﺑﺎ ﮐﻭﺩﮐﺎﻥ ﻧﺩﻫﻳﺩ ﺍﺟﺎﺯﻩ ﺑﺎﺷﺩ ﺩﺭﺳﺕ ﻫﺎ ﺟﻬﺕ ﮐﻪ ﮐﻧﻳﺩ ﺩﻗﺕ ﺑﻠﻧﺩﮔﻭ ﺑﻪ ﺑﻠﻧﺩﮔﻭ ﺳﻳﻡ ﮐﺭﺩﻥ ﻭﺻﻝ ﻫﻧﮕﺎﻡ ﺑﮑﻧﻧﺩ ﻭﻭﻓﺭ ﺳﺎﺏ ﺣﻔﺭﻩ ﮐﺎﻧﺎﻝ ﺩﺍﺧﻝ ﺭﺍ ﺷﺎﻥ ﺩﺳﺕ ﻳﺎ ﻭ ﺑﻳﺭﻭﻧﯽ ﺫﺭﺍﺕ ﻭ ﺍﺷﻳﺎ ﻧﺗﻭﺍﻧﻧﺩ ﺗﺎ ﺳﺎﺯﻳﺩ ﺧﺎﺭﺝ ﮐﻭﺩﮐﺎﻥ ﺩﺳﺗﺭﺱ ﺍﺯ ﺭﺍ ﻭﻭﻓﺭ ﺳﺎﺏ ﻧﮑﻧﻳﺩ ﺁﻭﻳﺯﺍﻥ ﺩﻳﻭﺍﺭ ﺑﻪ ﺁﻥ ﺣﻔﺭﻩ ﮐﺎﻧﺎﻝ ﺍﺯ ﺍﺳﺗﻔﺎﺩﻩ ﺑﺎ ﺭﺍ ﻭﻭﻓﺭ ﺳﺎﺏ ﺗﺫﮐﺭﺍﺕ ﺁﻳﺩ ﺑﻭﺟﻭﺩ ﺗﺻﻭﻳﺭ ﺭﻧﮓ ﺩﺭ ﺍﺧﺗﻼﻻﺗﯽ ﻣﻐﻧﺎﻁﻳﺳﯽ ﻣﻳﺩﺍﻥ ﻭﺟﻭﺩ ﺩﻟﻳﻝ ﺑﻪ ﺍﺳﺕ ﻣﻣ...

Page 74: ...ut ﺧﺭﻭﺟﯽ ﻓﻳﺵ ﺑﻪ ﺭﺍ ﺩﺳﺗﮕﺎﻩ AUDIO In ﻭﺭﻭﺩی ﻓﻳﺵ ﺍﺳﺕ ﻧﺷﺩﻩ ﺍﺭﺍﺋﻪ RCA ﺻﺩﺍی ﮐﺎﺑﻝ ﻳﮏ ﺍﺯ ﺍﺳﺗﻔﺎﺩﻩ ﺑﺎ ﮐﻧﻳﺩ ﺍﻧﺗﺧﺎﺏ ﺭﺍ AUX ﺣﺎﻟﺕ ﮐﻧﻳﺩ ﺩﻫﻳﺩ ﻣﻁﺎﺑﻘﺕ ﺧﺭﻭﺟﯽ ﻭ ﻭﺭﻭﺩی ﻫﺎی ﻓﻳﺵ ﺭﻧﮓ ﺑﺎ ﺭﺍ ﮐﺎﺑﻝ ﻫﺎی ﺳﺭﺳﻳﻡ ﺭﻧﮓ ﮐﻪ ﮐﻧﻳﺩ ﺩﻗﺕ ﺑﻳﺭﻭﻧﯽ ﺩﻳﺟﻳﺗﺎﻝ ﺻﻭﺗﯽ ﺩﺳﺗﮕﺎﻩ ﻳﮏ ﮐﺭﺩﻥ ﻭﺻﻝ ﻧﻭﺭی 2 ﺭﻭﺵ ﻧﻭﺭی ﮐﺎﺑﻝ ﻳﮏ ﺍﺯ ﺍﺳﺗﻔﺎﺩﻩ ﺑﺎ ﮔﻳﺭﻧﺩﻩ ﻣﺎﻫﻭﺍﺭﻩ ﺭﺳﻳﻭﺭ ﻭ ﮐﺎﺑﻠﯽ ﺗﻠﻭﻳﺯﻳﻭﻥ ﮔﻳﺭﻧﺩﻩ ﻳﮏ ﻣﺎﻧﻧﺩ ﺩﻳﺟﻳﺗﺎﻝ ﻫﺎی ﺩﺳﺗﮕﺎﻩ ﺩﻳﺟﻳﺗﺎﻝ ﺻﻭﺗﯽ ﺧﺭﻭﺟﯽ ﮐﺭﺩﻥ ﻭﺻﻝ ﺑﺭﺍی ﻧﻣﺎﻳﻳﺩ ﻭﺻﻝ ﺑﻳﺭﻭﻧﯽ ﺩﻳﺟﻳ...

Page 75: ...T CENTER SUBWOOFER FRONT L FRONT R 03 1 SURROUND R SURROUND L AUX IN FM ANT OPTICAL DIGITAL AUDIO IN L R WIRELESS LAN 5V 350mA HDMI IN HDMI OUT ﺑﺎﻧﺩ ﺳﺭﻭﻳﺱ ﮔﺳﺗﺭﺩﻩ IP ﺑﻳﺳﻳﻡ ﮐﻧﻧﺩﻩ ﺗﻘﺳﻳﻡ ﺗﺫﮐﺭﺍﺕ ﻫﻣﺭﺍﻩ ﺍﺳﺕ ﺳﺎﺯﮔﺎﺭ Samsung ﺑﻳﺳﻳﻡ LAN ﻣﺑﺩﻝ ﺑﺎ ﻓﻘﻁ ﺩﺳﺗﮕﺎﻩ ﺍﻳﻥ WIS 12ABGNX ﻣﺩﻝ ﻧﺎﻡ ﻧﻳﺳﺕ ﺩﺳﺗﮕﺎﻩ ﺑﺭﺍی ً ﺎ ﻟﻁﻔ ﺷﻭﺩ ﻣﯽ ﻓﺭﻭﺧﺗﻪ ﺟﺩﺍﮔﺎﻧﻪ Samsung ﺑﻳﺳﻳﻡ LAN ﻣﺑﺩﻝ Samsung Electronics ﻣﺣﺻﻭﻻﺕ ﻓﺭﻭﺷﻧﺩﮔﺎﻥ ﺍﺯ ﻳﮑﯽ ﺑﺎ ﺧﺭﻳﺩ ﺑﮕﻳﺭﻳﺩ ﺗﻣﺎ...

Page 76: ...ﺭ ﻭ ﻣﻔﻳﺩ ﮐﺎﺭﺑﺭﺩی ﮐﻧﻳﻡ ﻣﯽ ﺗﻭﺻﻳﻪ 3 ﺑﻪ ﺗﻭﺍﻧﻳﺩ ﻣﯽ ﻭﺏ ﻣﺭﻭﺭﮔﺭ ﺑﺭﻧﺎﻣﻪ ﺍﺯ ﺍﺳﺗﻔﺎﺩﻩ ﺑﺎ ﻭﺏ ﻣﺭﻭﺭﮔﺭ ﻳﺎﺑﻳﺩ ﺩﺳﺗﺭﺳﯽ ﺍﻳﻧﺗﺭﻧﺕ 4 ﮐﺭﺩﻩ ﺩﺍﻧﻠﻭﺩ ﺭﺍ ﻣﺧﺗﻠﻑ ﭘﻭﻟﯽ ﻳﺎ ﺭﺍﻳﮕﺎﻥ ﻫﺎی ﺑﺭﻧﺎﻣﻪ ﻫﺎ ﺑﺭﻧﺎﻣﻪ ﻳﺎﺑﻳﺩ ﺩﺳﺗﺭﺳﯽ ﺁﻧﻬﺎ ﺑﻪ 5 ﺍﺯ ﺭﺍ ﻣﻭﺳﻳﻘﯽ ﻳﺎ ﻋﮑﺱ ﻓﻳﻠﻡ ﺗﻠﻭﻳﺯﻳﻭﻧﯽ ﻧﻣﺎﻳﺷﻬﺎی ﻭ ﻫﺎ ﻓﻳﻠﻡ ﮐﻧﺩ ﻣﯽ ﭘﺧﺵ ﻫﻣﺭﺍﻩ ﺗﺟﻬﻳﺯﺍﺕ ﻳﺎ ﻭ ﮐﺎﻣﭘﻳﻭﺗﺭ USB ﺩﻳﺳﮏ 6 ﺗﺭﺟﻳﺢ ﺑﺎ ﻣﻁﺎﺑﻕ ﺭﺍ ﻣﺧﺗﻠﻑ ﻋﻣﻠﮑﺭﺩﻫﺎی ﺗﻭﺍﻧﻳﺩ ﻣﯽ ﺗﻧﻅﻳﻣﺎﺕ ﮐﻧﻳﺩ ﺗﻧﻅﻳﻡ ﺧﻭﺩ ﺷﺧﺻﯽ 7 ﺑﺭﺍی ﺩﻭﺭ ﺭﺍﻩ ﺍﺯ ﮐﻧﺗﺭﻝ ﺭﻭی A ﻗﺭﻣﺯ...

Page 77: ...se ﺍﺳﺕ Samsung ﻳﮏ ﻭ Samsung ﺩﺳﺗﮕﺎﻩ ﻳﮏ ﮐﻪ ﻫﻧﮕﺎﻣﯽ BD Wise ﻁﺭﻳﻕ ﺍﺯ ﺭﺍ Samsung ﺗﻠﻭﻳﺯﻳﻭﻥ ﻗﺎﺑﻠﻳﺕ ﻭ ﮐﻧﻳﺩ ﻣﯽ ﻭﺻﻝ ﺑﻬﻡ HDMI ﮐﺎﺑﻝ ﺑﺎ ﺍﺳﺕ ﺭﻭﺷﻥ ﺗﻠﻭﻳﺯﻳﻭﻥ ﻭ ﺩﺳﺗﮕﺎﻩ BD Wise ﺩﻳﺳﮏ ﮐﺎﺩﺭ ﻧﺭﺥ ﻭ ﺩﻗﺕ ﺑﺎ ﺭﺍ ﺗﺻﺎﻭﻳﺭ ﺩﺳﺗﮕﺎﻩ ﮐﺭﺩ ﺧﻭﺍﻫﺩ ﺗﻭﻟﻳﺩ Blu ray DVD ﺗﻔﻛﻳﻙ ﻗﺩﺭﺕ ﺳﻳﮕﻧﺎﻝ ﺧﺭﻭﺟﯽ ﺩﻗﺕ ﺗﺎ ﺩﻫﺩ ﻣﯽ ﺍﺟﺎﺯﻩ ﺷﻣﺎ ﺑﻪ ﺭﻭی ﺭﺍ HDMI ﻭﻳﺩﻳﻭﻳﯽ 1080p 1080i ﺧﻭﺩﮐﺎﺭ BD Wise ﻧﺷﺎﻥ ﻋﺩﺩ ﮐﻧﻳﺩ ﺗﻧﻅﻳﻡ 720p 576p 480p ﺍﺳﺕ ﮐﺎﺩﺭ ﻫﺭ ﺩﺭ ﺗﺻﻭﻳﺭ ﺧﻁﻭﻁ ﺗﻌﺩﺍﺩ ﺩﻫﻧﺩﻩ ﺍﻳﻧﺗ...

Page 78: ...ﻳﻡ ﺩﺳﺗﯽ ﺑﺻﻭﺭﺕ ﻫﻭﺷﻣﻧﺩ ﺻﺩﺍی ﺗﻧﻅﻳﻡ ﻁﻭﺭی ﺭﺍ ﺩﺳﺗﮕﺎﻩ ﺗﺎ ﺩﻫﺩ ﻣﯽ ﺍﺟﺎﺯﻩ ﺷﻣﺎ ﺑﻪ ﻭ ﮐﻧﺩ ﻣﯽ ﺗﻐﻳﻳﺭ ﺻﺣﻧﻪ ﮐﻪ ﻣﻭﺍﻗﻌﯽ ﺩﺭ ﮐﻪ ﮐﻧﻳﺩ ﻣﺗﻌﺎﺩﻝ ﺻﺩﺍ ﻣﻳﺯﺍﻥ ﮐﻧﻳﺩ ﻣﯽ ﻋﻭﺽ ﺭﺍ ﮐﺎﻧﺎﻝ ﻳﺎ ﺑﻣﺎﻧﺩ ﺑﺎﻗﯽ ﺑﻠﻧﺩﮔﻭ ﺍﻧﺗﺧﺎﺏ ﺑﻠﻧﺩﮔﻭﻫﺎی ﻣﻳﺎﻥ ﺍﺯ ﻓﻌﺎﻝ ﺑﻠﻧﺩﮔﻭﻫﺎی ﺍﻧﺗﺧﺎﺏ ﺍﻣﮑﺎﻥ ﺑﻪ ﺭﺍ ﺧﺎﻧﮕﯽ ﺳﻳﻧﻣﺎی ﺑﻠﻧﺩﮔﻭﻫﺎی ﻳﺎ ﻭ ﺗﻠﻭﻳﺯﻳﻭﻥ ﺩﻫﺩ ﻣﯽ ﺷﻣﺎ ﺟﺎﺑﺟﺎﻳﯽ ﮐﺎﻧﺎﻝ ﺻﻭﺗﯽ ﺑﻪ ﺗﻠﻭﻳﺯﻳﻭﻥ ﺍﺯ ﺭﺍ ﺻﺩﺍ ﺗﺎ ﺩﻫﺩ ﻣﯽ ﺍﺟﺎﺯﻩ ﺷﻣﺎ ﺑﻪ ﻧﻳﺎﺯﻣﻧﺩ ﮐﻧﻳﺩ ﻫﺩﺍﻳﺕ ﺧﺎﻧﮕﯽ ﺳﻳﻧﻣﺎی ﺑﻠﻧﺩﮔﻭﻫﺎی ﮐﺎﻧﺎﻝ ﺑﺎ ﺳﺎﺯﮔﺎﺭ ﺗ...

Page 79: ... ﺍﻳﻧﺗﺭﻧﺕ ﺍﺗﺻﺎﻝ ﻳﮏ ﺗﺎ ﺩﻫﺩ ﻣﯽ ﻣﻣﻧﻭﻉ ﻳﺎ ﻣﺟﺎﺯ ﺑﺧﺷﯽ ﻣﺟﺎﺯ ً ﻼ ﮐﺎﻣ ﺭﺍ ﮐﻧﻳﺩ ﺗﻧﻅﻳﻡ ﺩﺍﺩﻩ ﺗﻭﺍﻧﻳﺩ ﻣﯽ ﺁﻥ ﺑﺎ BD ﺍﻁﻼﻋﺎﺕ ﻣﺩﻳﺭﻳﺕ BD ﺳﺭﻭﻳﺱ ﻳﮏ ﺍﺯ ﺷﺩﻩ ﺩﺍﻧﻠﻭﺩ BD ﻫﺎی ﮐﻧﻳﺩ ﻣﺩﻳﺭﻳﺕ ﺭﺍ Blu ray ﺩﻳﺳﮏ ﻳﺎ Live ﻫﻭﺷﻣﻧﺩ ﻫﺎی ﻭﻳژﮔﯽ ﺑﺭﻧﺎﻣﻪ ﺗﻧﻅﻳﻣﺎﺕ ﻫﺎی ﺑﺭﻧﺎﻣﻪ ﻫﺎی ﺍﻋﻼﻡ ﺗﻧﻅﻳﻡ ﺍﺟﺎﺯﻩ ﺷﻣﺎ ﺑﻪ ﺑﺭﻧﺎﻣﻪ ﺩﺭﺑﺎﺭﻩ ﭘﺎﻳﻪ ﺍﻁﻼﻋﺎﺕ ﻣﺷﺎﻫﺩﻩ ﻭ ﮐﺎﺭﺑﺭﺩی ﺩﻫﺩ ﻣﯽ ﺭﺍ ﮐﺎﺭﺑﺭﺩی ﻫﺎی ﺩﺍﺩﻩ ﺍﺭﺳﺎﻝ ﺍﻋﻼﻥ ﺗﻧﻅﻳﻣﺎﺕ ﮐﻧﻳﺩ ﺩﺭﻳﺎﻓﺕ ﺍﻋﻼﻣﻳﻪ ﺑﺭﮔﺯﻳﺩﻩ ﺧﺩﻣﺎﺕ ﺍﺯ ﺑﺭﻧﺎﻣﻪ ﺩﺭﺑﺎﺭﻩ ﺍی ﭘﺎﻳﻪ ﺍ...

Page 80: ...ﯽ ﺗﺫﮐﺭﺍﺕ ﮐﺎﺭﺧﺎﻧﻪ ﻓﺭﺽ ﭘﻳﺵ ﺗﻧﻅﻳﻣﺎﺕ ﺑﻪ ﮐﻪ ﻫﻧﮕﺎﻣﯽ ﮐﺎﺭﺑﺭی ﻫﺎی ﺩﺍﺩﻩ ﺗﻣﺎﻡ ﮔﺭﺩﻳﺩ ﻣﯽ ﺑﺎﺯ ﺍی ﺷﻭﻧﺩ ﻣﯽ ﭘﺎک BD ﺷﺩﻩ ﺫﺧﻳﺭﻩ ﻋﻣﻭﻣﯽ ﻣﻧﻁﻘﻪ ﻭ ﻧﻣﺎﻳﺵ ﺭﻭﺷﻧﺎﻳﯽ ﻣﻳﺯﺍﻥ ﺗﻭﺍﻧﻳﺩ ﻣﯽ ﺷﻣﺎ ﮐﻧﻳﺩ ﺗﻧﻅﻳﻡ ﺭﺍ ﺯﻣﺎﻧﯽ ﺟﻠﻭ ﭘﺎﻧﻝ ﺭﻭﺷﻧﺎﻳﯽ ﺗﻭﺍﻧﻳﺩ ﻣﯽ ﺟﻠﻭ ﻧﻣﺎﻳﺷﮕﺭ ﺩﻫﻳﺩ ﺗﻐﻳﻳﺭ ﺭﺍ ﺯﻣﺎﻧﯽ ﻣﻧﻁﻘﻪ ﺗﻭﺍﻧﻳﺩ ﻣﯽ ﺯﻣﺎﻧﯽ ﻣﻧﻁﻘﻪ ﮐﻧﻳﺩ ﺗﻧﻅﻳﻡ ﺭﺍ ﺧﻭﺩ ﻧﺎﺣﻳﻪ ﺑﻪ ﻣﺭﺑﻭﻁ ﺭﺍ ﻣﻧﻭ ﺟﻌﺑﻪ ﺷﻔﺎﻓﻳﺕ ﻣﻳﺯﺍﻥ ﻣﻧﻭ ﺷﻔﺎﻓﻳﺕ ﮐﻧﻳﺩ ﺗﻧﻅﻳﻡ HDMI CEC Anynet ﺍﺳﺕ ﻣﻔﻳﺩ ﺑﺳﻳﺎﺭ ﻗﺎﺑﻠﻳﺕ ﻳﮏ Anynet ﻫﺎی ﺩﺳﺗﮕﺎ...

Page 81: ...ﮑﻪ ﺗﻧﻅﻳﻣﺎﺕ 4 ﺩﺳﺗﻭﺭﺍﻟﻌﻣﻝ ﻳﺎ ﺳﻳﻣﯽ ﻫﺎی ﺷﺑﮑﻪ ﺑﻪ ﻣﺭﺑﻭﻁ ﺯﻳﺭ ﻫﺎی ﺩﺳﺗﻭﺭﺍﻟﻌﻣﻝ ﺑﻪ ﮐﻧﻳﺩ ﻣﺭﺍﺟﻌﻪ 25 ﺻﻔﺣﻪ ﺩﺭ ﺑﻳﺳﻳﻡ ﻫﺎی ﺷﺑﮑﻪ ﺑﻪ ﻣﺭﺑﻭﻁ ﻫﺎی ﺳﻳﻣﯽ ﺷﺑﮑﻪ ﺧﻭﺩﮐﺎﺭ ﺳﻳﻣﯽ ﻓﻭﻕ 3 ﻭ 1 ﻣﺭﺍﺣﻝ ﺍﺟﺭﺍی ﺍﺯ ﺑﻌﺩ 1 ﺳﭘﺱ ﺩﻫﻳﺩ ﺗﻐﻳﻳﺭ ﻛﺎﺑﻝ ﺑﻪ ﺭﺍ ﺷﺑﮑﻪ ﻧﻭﻉ ﺷﺑﮑﻪ ﺗﻧﻅﻳﻣﺎﺕ ﺻﻔﺣﻪ ﺩﺭ ﺍﺗﺻﺎﻝ ﺩﺳﺗﮕﺎﻩ ﺩﻫﻳﺩ ﻓﺷﺎﺭ ﺭﺍ E ﺩﮐﻣﻪ ﻭ ﮐﺭﺩﻩ ﺍﻧﺗﺧﺎﺏ ﺭﺍ ﺍﺗﺻﺎﻝ ﺑﻪ ﺳﭘﺱ ﻭ ﻧﻣﻭﺩﻩ ﺑﺭﺭﺳﯽ ﺭﺍ ﺷﺑﮑﻪ ﺍﺗﺻﺎﻝ ﺩﺍﺩﻩ ﺗﺷﺧﻳﺹ ﺭﺍ ﺳﻳﻣﯽ ﺷﻭﺩ ﻣﯽ ﻭﺻﻝ ﺷﺑﮑﻪ 2 ﻓﺷﺎﺭ ﺭﺍ E ﺩﮐﻣﻪ ﺳﭘﺱ ﻭ ﺳﺎﺧﺗﻪ ﺑﺭﺟﺳﺗﻪ ﺭﺍ ﻗﺑﻭ...

Page 82: ...ﺩ ﻣﯽ ﻭﺻﻝ ﺗﺫﮐﺭﺍﺕ ﮐﻪ ﺗﻧﻅﻳﻡ ﺻﻔﺣﺎﺕ ﺍﺯ ﻳﮑﯽ ﺩﺭ ﺭﺍ ﻭﺍژﻩ ﮔﺫﺭ ﻳﺎ ﺍﻣﻧﻳﺗﯽ ﮐﺩ ﺑﺗﻭﺍﻧﻳﺩ ﺑﺎﻳﺩ ﺷﻣﺎ ﺑﻳﺎﺑﻳﺩ ﺑﻭﺩﻳﺩ ﮐﺭﺩﻩ ﺍﺳﺗﻔﺎﺩﻩ ﻣﻭﺩﻡ ﻳﺎ ﺭﻭﺗﺭ ﺗﻧﻅﻳﻡ ﺑﺭﺍی ﺩﺳﺗﯽ ﺑﻳﺳﻳﻡ ﻣﻘﺎﺩﻳﺭ ﺑﺎﻳﺩ ﮐﻧﺩ ﻧﻣﯽ ﮐﺎﺭ ﺧﻭﺩﮐﺎﺭ ﺭﻭﺍﻝ ﻳﺎ ﻭ ﺍﺳﺕ ﺍﺳﺗﺎﺗﻳﮏ ﺷﻣﺎ IP ﺁﺩﺭﺱ ﺍﮔﺭ ﮐﻧﻳﺩ ﻭﺍﺭﺩ ﺩﺳﺗﯽ ﺭﺍ ﺷﺑﮑﻪ ﺗﻧﻅﻳﻡ 24 ﺻﻔﺣﻪ ﺩﺭ ﺷﺑﮑﻪ ﺍﺗﺻﺎﻝ ﭘﻳﮑﺭﺑﻧﺩی ﻗﺳﻣﺕ 3 ﺗﺎ 1 ﻣﺭﺍﺣﻝ ﺍﺟﺭﺍی ﺍﺯ ﺑﻌﺩ 1 ﺩﻫﻳﺩ ﺗﻐﻳﻳﺭ ﺳﻳﻡ ﺑﯽ ﺑﻪ ﺭﺍ ﺷﺑﮑﻪ ﻧﻭﻉ ﺷﺑﮑﻪ ﺗﻧﻅﻳﻣﺎﺕ ﺻﻔﺣﻪ ﺩﺭ ﺭﺍ ﻣﻭﺟﻭﺩ ﻫﺎی ﺷﺑﮑﻪ ﺍﺯ ﻓﻬﺭﺳﺗﯽ ﻭ ﮐﺭﺩﻩ ﺟﺳﺗﺟﻭ...

Page 83: ... ﻳﮑﯽ WPS PBC ﺩﮐﻣﻪ ﺷﻣﺎ ﺑﻳﺳﻳﻡ ﺭﻭﺗﺭ ﺍﮔﺭ ﺍﺳﺕ WPS PBC ﻗﺎﺑﻠﻳﺕ ﺍﺯ ﮐﻧﻳﺩ ﺩﻧﺑﺎﻝ ﺭﺍ ﻣﺭﺍﺣﻝ ﺍﻳﻥ ﺩﺍﺭﺩ 24 ﺻﻔﺣﻪ ﺩﺭ ﺷﺑﮑﻪ ﺍﺗﺻﺎﻝ ﭘﻳﮑﺭﺑﻧﺩی ﻗﺳﻣﺕ 3 ﺗﺎ 1 ﻣﺭﺍﺣﻝ ﺍﺟﺭﺍی ﺍﺯ ﺑﻌﺩ 1 ﺩﻫﻳﺩ ﺗﻐﻳﻳﺭ ﺳﻳﻡ ﺑﯽ ﺑﻪ ﺭﺍ ﺷﺑﮑﻪ ﻧﻭﻉ ﺷﺑﮑﻪ ﺗﻧﻅﻳﻣﺎﺕ ﺻﻔﺣﻪ ﺩﺭ ﺭﺍ ﻣﻭﺟﻭﺩ ﻫﺎی ﺷﺑﮑﻪ ﺍﺯ ﻓﻬﺭﺳﺗﯽ ﻭ ﮐﺭﺩﻩ ﺟﺳﺗﺟﻭ ﺭﺍ ﻫﺎ ﺷﺑﮑﻪ ﺩﺳﺗﮕﺎﻩ ﺩﻫﺩ ﻣﯽ ﻧﻣﺎﻳﺵ 2 E ﺩﮐﻣﻪ ﺳﭘﺱ ﺑﺭﺳﻳﺩ WPS PBC ﺑﻪ ﺗﺎ ﺭﻓﺗﻪ ﭘﺎﻳﻳﻥ ﻓﻬﺭﺳﺕ ﺩﺭ ﺩﻫﻳﺩ ﻓﺷﺎﺭ ﺭﺍ 3 ﺩﻫﻳﺩ ﻓﺷﺎﺭ ﺭﺍ ﺧﻭﺩ ﺭﻭﺗﺭ WPS PBC ﺩﮐﻣﻪ ﺩﻗﻳﻘﻪ ﺩﻭ ﻣﺩﺕ ﻅﺭﻑ ﺑﺩ...

Page 84: ... ﺷﻭﺩ ﻣﯽ ﻧﻣﺎﻳﺎﻥ ﺍﺗﺻﺎﻝ ﭘﻧﺟﺭﻩ ﺳﭘﺱ ﻭ ﺍﺗﺻﺎﻝ ﺣﺎﻝ ﺩﺭ ﭘﻧﺟﺭﻩ ﻭﺻﻝ ﺑﻌﻧﻭﺍﻥ Wi Fi Direct ﺻﻔﺣﻪ ﺩﺭ ﺭﺍ ﻭﺳﻳﻠﻪ ﺑﺎﻳﺩ ﺷﺩ ﺑﺳﺗﻪ ﺍﻳﻧﮑﻪ ﮐﻧﻳﺩ ﻣﺷﺎﻫﺩﻩ ﺷﺩﻩ ﺗﺫﮐﺭﺍﺕ ﺑﻳﺳﻳﻡ ﻳﺎ ﺳﻳﻣﯽ ﺍﺗﺻﺎﻝ Wi Fi Direct ﻗﺎﺑﻠﻳﺕ ﺍﺯ ﺍﺳﺗﻔﺎﺩﻩ ﺻﻭﺭﺕ ﺩﺭ ﺷﺩ ﺧﻭﺍﻫﺩ ﻗﻁﻊ ﺷﺑﮑﻪ ﮐﻧﻭﻧﯽ ﺩﺭ DOC ﻳﺎ TXT ﭘﺳﻭﻧﺩﻫﺎی ﺩﺍﺭﺍی ﻫﺎی ﻓﺎﻳﻝ ﻣﺎﻧﻧﺩ ﻣﺗﻧﯽ ﻫﺎی ﻓﺎﻳﻝ ﺷﺩ ﻧﺧﻭﺍﻫﻧﺩ ﺩﺍﺩﻩ ﻧﻣﺎﻳﺵ Wi Fi Direct ﻗﺎﺑﻠﻳﺕ ﺍﺯ ﺍﺳﺗﻔﺎﺩﻩ ﺻﻭﺭﺕ ﺍﻓﺯﺍﺭ ﻧﺭﻡ ﺍﺭﺗﻘﺎی ﺑﺭﺍی ﺭﺍ ﺧﻭﺩ ﺩﺳﺗﮕﺎﻩ ﺍﻓﺯﺍﺭ ﻧﺭﻡ ﺗﻭﺍﻧﻳﺩ ﻣﯽ ﺍﻓﺯﺍﺭ ﻧﺭﻡ ...

Page 85: ... ﺑﺎﺷﺩ ﺷﺩﻩ ﺩﺍﻧﻠﻭﺩ ﺟﺩﻳﺩی ﺍﺭﺗﻘﺎی ﺍﻓﺯﺍﺭ ﻧﺭﻡ ﺍﮔﺭ ﮐﻧﺩ ﻣﯽ ﺩﺍﻧﻠﻭﺩ ﻧﺻﺏ ﺁﻧﺭﺍ ﻣﺎﻳﻠﻳﺩ ﺁﻳﺎ ﮐﻪ ﭘﺭﺳﺩ ﻣﯽ ﺷﻣﺎ ﺍﺯ ﮐﻧﻳﺩ ﻣﯽ ﺭﻭﺷﻥ ﺭﺍ ﺩﺳﺗﮕﺎﻩ ﮐﻪ ﺧﻳﺭ ﻳﺎ ﮐﻧﻳﺩ ﺗﺫﮐﺭﺍﺕ ﺍﻳﻧﺗﺭﻧﺕ ﺑﻪ ﺑﺎﻳﺩ ﺩﺳﺗﮕﺎﻩ ﺧﻭﺩﮐﺎﺭ ﺑﺭﻭﺯﺭﺳﺎﻧﯽ ﻗﺎﺑﻠﻳﺕ ﺍﺯ ﺍﺳﺗﻔﺎﺩﻩ ﺑﺭﺍی ﺑﺎﺷﺩ ﻭﺻﻝ USB ﺑﺎ ﺑﺭﻭﺯﺭﺳﺎﻧﯽ 1 ﺑﺭﻭﻳﺩ www samsung com ﺳﺎﻳﺕ ﺑﻪ 2 ﮐﻠﻳﮏ ﺻﻔﺣﻪ ﺭﺍﺳﺕ ﺳﻣﺕ ﺑﺎﻻ ﮔﻭﺷﻪ ﺩﺭ SUPPORT ﮔﺯﻳﻧﻪ ﺭﻭی ﮐﻧﻳﺩ 3 ﺷﻣﺎﺭﻩ ﮐﻪ ﻫﻧﮕﺎﻣﯽ ﮐﻧﻳﺩ ﻭﺍﺭﺩ ﺟﺳﺗﺟﻭ ﻗﺳﻣﺕ ﺩﺭ ﺭﺍ ﺩﺳﺗﮕﺎﻩ ﻣﺩﻝ ﺷﻣﺎﺭﻩ ﺩﺍﺭﺩ ﻣﻁﺎﺑﻘﺕ ﺁﻧﻬﺎ ﻣﺩﻝ...

Page 86: ...ﺭﻭﺵ 1 ﮐﻧﻳﺩ ﺭﻭﺷﻥ ﺭﺍ ﺩﺳﺗﮕﺎﻩ 2 ﮐﻧﻳﺩ ﻭﺻﻝ ﺩﺳﺗﮕﺎﻩ ﺟﻠﻭی ﺩﺭ ﻭﺍﻗﻊ USB ﺩﺭﮔﺎﻩ ﺑﻪ ﺭﺍ USB ﻭﺳﻳﻠﻪ ﺷﻭﺩ ﻣﯽ ﻧﻣﺎﻳﺎﻥ ﺟﺩﻳﺩ ﻭﺳﻳﻠﻪ ﺍﺗﺻﺎﻝ ﭘﻧﺟﺭﻩ ﻭ ﯽ ﻭ ﺭ ﭘ ﻫﺎ ﻋﮑﺲ ﻭ ﻭﯾﺪﯾﻮﻫﺎ ﻣﻮﺳﻴﻘﯽ ﻫﺎ ﺑﺮﻧﺎﻣﻪ ﻭ ﻫﺎ ﻓﻴﻠﻢ ﻧﻤﺎﯾﺸﻬﺎی ﺗﻠﻮﯾﺰﯾﻮﻧﯽ ﻭﯾﺪﯾﻮ ﻣﻮﺳ ﻭﯾﺪﯾﻮ ﺳ ﻫﺎ ﻋﮑﺲ ﻫﺎ ﻓﻴﻠﻢ ﻣﻮﺳﻴﻘﯽ ﻣﺤﺘﻮﺍﻫﺎ ﻫﻤﻪ ﺷﺪ ﻣﺘﺼﻞ ﺟﺪﯾﺪ ﺩﺳﺘﮕﺎﻩ USB ﺩﯾﺴﮏ ﻓﻠﺶ ﺑﺮﻧﺎﻣﻪ ﺍﻓﺰﻭﺩﻥ ﮐﺎﺭﺑﺮﺩی ﻫﺎی ﺑﺮﻧﺎﻣﻪ ﺍﻓﺰﻭﺩﻥ ﮐﺎﺭﺑﺮﺩی ﻫﺎی ﺑﺮﻧﺎﻣﻪ ﺍﻓﺰﻭﺩﻥ ﮐﺎﺭﺑﺮﺩی ﻫﺎی ﻭﺏ ﻣﺮﻭﺭﮔﺮ ﺗﻨﻈﻴﻤﺎﺕ ﺗﺫﮐﺭﺍﺕ ﺑﺭﻭﻳﺩ 2 ﺭﻭﺵ ﺑﻪ ﻧﺷﺩ ...

Page 87: ...ﺭﺩﻩ ﺍﻧﺗﺧﺎﺏ ﻫﺎی ﺩﮐﻣﻪ ﺍﺯ ﺍﺳﺗﻔﺎﺩﻩ ﺑﺎ ﺭﺍ ﻣﻭﺳﻳﻘﯽ ﺩﻫﻳﺩ ﻓﺷﺎﺭ ﺭﺍ E ﺗﺫﮐﺭﺍﺕ ﻓﻘﻁ ﺍﻣﺎ ﺩﻫﺩ ﻣﯽ ﻧﻣﺎﻳﺵ ﺭﺍ ﻣﺣﺗﻭﻳﺎﺕ ﺍﻧﻭﺍﻉ ﮐﻠﻳﻪ ﻫﺎی ﭘﻭﺷﻪ ﺩﺳﺗﮕﺎﻩ ﺍﮔﺭﭼﻪ ﺩﺍﺩ ﺧﻭﺍﻫﺩ ﻧﻣﺎﻳﺵ ﺭﺍ 2 ﻣﺭﺣﻠﻪ ﺩﺭ ﺷﺩﻩ ﺍﻧﺗﺧﺎﺏ ﻣﺣﺗﻭﺍی ﻧﻭﻉ ﺍﺯ ﻫﺎﻳﯽ ﻓﺎﻳﻝ ﻫﺎی ﻓﺎﻳﻝ ﺗﻭﺍﻧﻳﺩ ﻣﯽ ﻓﻘﻁ ﺑﺎﺷﻳﺩ ﮐﺭﺩﻩ ﺍﻧﺗﺧﺎﺏ ﺭﺍ ﻣﻭﺳﻳﻘﯽ ﺍﮔﺭ ﻣﺛﺎﻝ ﺑﻌﻧﻭﺍﻥ ﺍﺻﻠﯽ ﺻﻔﺣﻪ ﺑﻪ ﺗﻭﺍﻧﻳﺩ ﻣﯽ ﺍﻧﺗﺧﺎﺏ ﺍﻳﻥ ﺩﺍﺩﻥ ﺗﻐﻳﻳﺭ ﺑﺭﺍی ﺑﺑﻳﻧﻳﺩ ﺭﺍ ﻣﻭﺳﻳﻘﯽ ﮐﻧﻳﺩ ﺗﮑﺭﺍﺭ ﺭﺍ 2 ﻣﺭﺣﻠﻪ ﻭ ﺑﺭﮔﺷﺗﻪ 3 ﺑﺳﺗﻪ ﮐﻧﺩ ﻣﯽ ﻓﻬﺭﺳﺕ ﺭﺍ ﺩﻳﺳﮏ ﻣﺣﺗﻭﺍی ﻭ ﺷﺩ...

Page 88: ...re ﺍﺯ ﮐﻪ Samsung ﻫﺎی ﺗﻠﻔﻥ ﺑﺭﺍی ﻓﻘﻁ ﻗﺎﺑﻠﻳﺕ ﺍﻳﻥ ﺑﺎﺷﺩ ﻣﯽ ﻣﻭﺟﻭﺩ ﮐﻧﻧﺩ ﻣﯽ 1 ﻫﻣﺎﻥ ﺑﻪ ﺭﺍ ﺧﻭﺩ DLNA ﺑﺎ ﺳﺎﺯﮔﺎﺭ ﻫﻣﺭﺍﻩ ﺗﻠﻔﻥ ﻭ ﮐﺎﻣﭘﻳﻭﺗﺭ ﺩﺳﺗﮕﺎﻩ ﮐﻧﻳﺩ ﻭﺻﻝ ﺑﻳﺳﻳﻡ ﺷﺑﮑﻪ 2 ﺭﺍ AllShare ﻧﺻﺏ ﺭﺍﻫﻧﻣﺎی ﺭﺍﻫﻧﻣﺎ ﺩﻓﺗﺭﭼﻪ ﺩﺭ ﺷﺩﻩ ﺩﺍﺩﻩ ﺩﺳﺗﻭﺭﺍﺕ ﮐﻧﻳﺩ ﺩﻧﺑﺎﻝ ﻣﺷﺎﻫﺩﻩ ﻳﺎ ﭘﺧﺵ ﺑﺭﺍی ﻫﺎ ﻓﺎﻳﻝ ﻭ ﻫﺎ ﺩﺳﺗﮕﺎﻩ ﺗﻧﻅﻳﻡ ﺑﺭﺍی 3 ﺗﻠﻔﻥ ﺍﺗﺻﺎﻝ ﺧﻭﺩ ﮐﺎﻣﭘﻳﻭﺗﺭ ﺩﺭ AllShare ﺍﻓﺯﺍﺭ ﻧﺭﻡ ﺍﺯ ﺍﺳﺗﻔﺎﺩﻩ ﺑﺎ ﮐﻧﻳﺩ ﺗﺎﻳﻳﺩ ﺭﺍ 4 ﻭ ﮐﺭﺩﻩ ﺍﻧﺗﺧﺎﺏ ﺭﺍ ﮐﻧﻳﺩ ﭘﺧﺵ ﻳﺎ ﻣﺷﺎﻫﺩﻩ ﺧﻭﺍﻫﻳﺩ ﻣﯽ ﮐﻪ ﻓﺎﻳ...

Page 89: ... ﺩﺍﺩﻩ ﻧﻣﺎﻳﺵ ﺻﻔﺣﻪ ﺩﺭ ً ﺍ ﻓﻭﺭ ﻋﻧﻭﺍﻥ ﻳﺎ ﺑﺧﺵ ﺍﺳﺕ ﻣﻣﮑﻥ ﻫﺎی ﺩﮐﻣﻪ ﺩﺍﺩﻥ ﻓﺷﺎﺭ ﺑﻪ ﺍﺳﺕ ﻧﻳﺎﻣﺩﻩ ﻣﺭﺑﻭﻁﻪ ﻗﺳﻣﺕ ﺩﺭ ﺷﻣﺎ ﺍﻧﺗﺧﺎﺏ ﮐﻪ ﺩﻫﻳﺩ ﺍﺩﺍﻣﻪ ﺩﺍﺩﻩ ﻓﺷﺎﺭ ً ﺍ ﻣﺟﺩﺩ ﺭﺍ REPEAT ﺩﮐﻣﻪ ﻋﺎﺩی ﭘﺧﺵ ﺑﻪ ﺑﺎﺯﮔﺷﺕ ﺑﺭﺍی ﺩﮐﻣﻪ ﺳﭘﺱ ﻭ ﺩﻫﻳﺩ ﻓﺷﺎﺭ ﺧﺎﻣﻭﺵ ﺍﻧﺗﺧﺎﺏ ﺑﺭﺍی ﺭﺍ ﻫﺎی ﺩﮐﻣﻪ ﺳﭘﺱ ﺩﻫﻳﺩ ﻓﺷﺎﺭ ﺭﺍ E ﮐﻪ ﺯﻣﺎﻧﯽ ﺗﺎ ﻧﺷﻭﺩ ﺩﺍﺩﻩ ﻧﻣﺎﻳﺵ ﺻﻔﺣﻪ ﺩﺭ ً ﺍ ﻓﻭﺭ A B ﺗﮑﺭﺍﺭ ﺍﺳﺕ ﻣﻣﮑﻥ ﻫﺎی ﺩﮐﻣﻪ ﺩﺍﺩﻥ ﻓﺷﺎﺭ ﺑﻪ ﺍﺳﺕ ﻧﻳﺎﻣﺩﻩ ﻣﺭﺑﻭﻁﻪ ﻗﺳﻣﺕ ﺩﺭ A B ﺗﮑﺭﺍﺭ ﺩﻫﻳﺩ ﺍﺩﺍﻣﻪ ﺑﺎﺷﺩ A ﻧﻘﻁﻪ ﭘﺧﺵ ﺯ...

Page 90: ... ﻭ ﺩﺍﺩﻩ ﻓﺷﺎﺭ A B ﺗﮑﺭﺍﺭ ﺩﻫﻳﺩ ﻓﺷﺎﺭ ﺭﺍ E ﺩﮐﻣﻪ 2 ﮐﻪ ﺍی ﻧﻘﻁﻪ ﺩﺭ ﺭﺍ E ﺩﮐﻣﻪ ﺷﻭﺩ ﺁﻏﺎﺯ ﻣﮑﺭﺭ ﭘﺧﺵ ﺧﻭﺍﻫﻳﺩ ﻣﯽ ﻓﻳﻠﻡ ﺩﻫﻳﺩ ﺍﺟﺎﺯﻩ ﺩﻫﻳﺩ ﻓﺷﺎﺭ A ﺷﻭﺩ ﭘﺧﺵ 3 ﮐﻪ ﺍی ﻧﻘﻁﻪ ﺩﺭ ﺭﺍ E ﺩﮐﻣﻪ ﻣﺗﻭﻗﻑ ﻣﮑﺭﺭ ﭘﺧﺵ ﺧﻭﺍﻫﻳﺩ ﻣﯽ ﺩﻫﻳﺩ ﻓﺷﺎﺭ B ﺷﻭﺩ ﺗﺫﮐﺭﺍﺕ ﺯﻣﺎﻥ ﺍﺯ ﺑﻌﺩ ﺛﺎﻧﻳﻪ 5 ﺣﺩﺍﻗﻝ ﺑﺎﻳﺩ B ﻧﻘﻁﻪ ﺑﺎﺷﺩ A ﻧﻘﻁﻪ ﭘﺧﺵ ﺗﺻﻭﻳﺭ ﺣﺎﻟﺕ ﮐﻧﻳﺩ ﺍﻧﺗﺧﺎﺏ ﺗﺻﻭﻳﺭ ﺣﺎﻟﺕ ﺗﻌﻳﻳﻥ ﺑﺭﺍی ﺍﻓﺯﺍﻳﺵ ﺭﺍ ﻭﺿﻭﺡ ﻭ ﺭﻭﺷﻧﺎﻳﯽ ﭘﻭﻳﺎ ﺩﻫﺩ ﻣﯽ ﺍﮐﺛﺭ ﺑﺭﺍی ﮔﺯﻳﻧﻪ ﺍﻳﻥ ﺍﺳﺗﺎﻧﺩﺍﺭﺩ ﺍﺳﺕ ﻣﻧﺎﺳﺏ ﻣﺷﺎﻫﺩﻩ ﻋﺎﺩی ﮐﺎﺭﺑﺭ...

Page 91: ...ﻫﺩ ﮔﺯﻳﻧﻪ ﺍﻳﻥ ﮐﺎﺭﮐﺭﺩ ﺑﺳﺎﺯﻳﺩ ﭘﺧﺵ ﻓﻬﺭﺳﺕ ﺍﺳﺕ ﻳﮑﺳﺎﻥ ﻫﺎ ﺭﺳﺎﻧﻪ ﺗﻣﺎﻡ ﺑﺭﺍی ً ﺎ ﺍﺳﺎﺳ ﻳﮏ ﺍﺯ ﭘﺧﺵ ﻓﻬﺭﺳﺕ ﺍﻳﺟﺎﺩ ﻗﺳﻣﺕ ﺑﻪ ﮐﻧﻳﺩ ﻣﺭﺍﺟﻌﻪ 36 ﺻﻔﺣﻪ ﺩﺭ CD ﺍﺭﺳﺎﻝ ﻫﺎی ﻓﺎﻳﻝ ﺍﺭﺳﺎﻝ ﺑﺭﺍی ﺭﺍ ﺍﺭﺳﺎﻝ ﮔﺯﻳﻧﻪ ﮐﺎﺭﺑﺭﺩی ﻫﺎی ﺑﺭﻧﺎﻣﻪ ﺑﻪ ﺷﺩﻩ ﺍﻧﺗﺧﺎﺏ ﻏﻳﺭﻩ ﻭ Picasa Facebook ﺍﺳﺗﻔﺎﺩﻩ ﺑﺭﺍی ﮐﻧﻳﺩ ﺍﻧﺗﺧﺎﺏ ﻭﺳﺎﻳﻝ ﻳﺎ ﺳﺎﻳﺕ ﺩﺭ ﺍﺷﺗﺭﺍک ﻳﮏ ﺑﺎﻳﺩ ﺍﺭﺳﺎﻝ ﺍﺯ ﺍﺯ ﺍﺳﺗﻔﺎﺩﻩ ﺑﺎ ﺳﭘﺱ ﻭ ﮐﺭﺩﻩ ﺍﻳﺟﺎﺩ ﺍﻳﻧﺗﺭﻧﺗﯽ ﺷﻭﻳﺩ ﺁﻥ ﻭﺍﺭﺩ ﺳﻳﺳﺗﻡ ﺑﻪ ﻭﺭﻭﺩ ﻗﺎﺑﻠﻳﺕ ﺗﺫﮐﺭﺍﺕ ﻭﺳﻳﻠﻪ ﻳﺎ ﺩﻳﺳﮏ ﻧﻭﻉ ﺑﻪ ﺑﺳﺗﻪ...

Page 92: ... E ﺩﮐﻣﻪ ﺳﭘﺱ ﻭ ﮐﺭﺩﻩ ﺍﺳﺗﻔﺎﺩﻩ ﻣﻭﺳﻳﻘﯽ ﻣﺷﺎﻫﺩﻩ ﺁﻫﻧﮓ ﺭﺳﺎﻧﻪ ﺩﺭ ﻣﻭﺳﻳﻘﯽ ﻫﺎی ﺗﺭﺍک ﺗﻣﺎﻡ ﻧﻣﺎﻳﺵ ﺭﺍ ﺳﺎﺯی ﺫﺧﻳﺭﻩ ﻭﺳﻳﻠﻪ ﻳﺎ ﺩﻫﺩ ﻣﯽ ﺁﻟﺑﻭﻡ ﺩﺭ ﻣﻭﺟﻭﺩ ﻣﻭﺳﻳﻘﯽ ﻫﺎی ﻓﺎﻳﻝ ﺗﻣﺎﻡ ﺑﺭ ﺭﺍ ﺳﺎﺯی ﺫﺧﻳﺭﻩ ﻭﺳﻳﻠﻪ ﻳﺎ ﺭﺳﺎﻧﻪ ﺩﻫﺩ ﻣﯽ ﻧﻣﺎﻳﺵ ﺁﻟﺑﻭﻡ ﻧﺎﻡ ﺍﺳﺎﺱ ﻫﻧﺭﻣﻧﺩ ﺩﺭ ﻣﻭﺟﻭﺩ ﻣﻭﺳﻳﻘﯽ ﻫﺎی ﻓﺎﻳﻝ ﺗﻣﺎﻡ ﺑﻪ ﺭﺍ ﺳﺎﺯی ﺫﺧﻳﺭﻩ ﻭﺳﻳﻠﻪ ﻳﺎ ﺭﺳﺎﻧﻪ ﺩﻫﺩ ﻣﯽ ﻧﻣﺎﻳﺵ ﻫﻧﺭﻣﻧﺩ ﻧﺎﻡ ﺗﺭﺗﻳﺏ ژﺍﻧﺭ ﺩﺭ ﻣﻭﺟﻭﺩ ﻣﻭﺳﻳﻘﯽ ﻫﺎی ﻓﺎﻳﻝ ﺗﻣﺎﻡ ﺑﺭ ﺭﺍ ﺳﺎﺯی ﺫﺧﻳﺭﻩ ﻭﺳﻳﻠﻪ ﻳﺎ ﺭﺳﺎﻧﻪ ﺩﻫﺩ ﻣﯽ ﻧﻣﺎﻳﺵ ژﺍﻧﺭ ﻧﺎﻡ ﺍﺳﺎﺱ...

Page 93: ... ﻧﻣﺎﻳﺎﻥ ﺩﻭﺑﺎﺭﻩ ﻣﻭﺳﻳﻘﯽ ﭘﺧﺵ ﺻﻔﺣﻪ ﺩﻫﻳﺩ ﻓﺷﺎﺭ ﺭﺍ E ﺩﮐﻣﻪ ﺳﭘﺱ ﺗﺭﺍک ﺷﺩ ﺧﻭﺍﻫﻧﺩ ﻓﻬﺭﺳﺕ ﺁﻥ ﺩﺭ ﺷﺩﻩ ﺍﻧﺗﺧﺎﺏ ﻫﺎی ﺗﺭﺍک ﻓﻘﻁ ﻭ ﺷﺩﻩ ﺷﺩ ﺧﻭﺍﻫﻧﺩ ﭘﺧﺵ ﺧﻭﺩﮐﺎﺭ ﺑﻁﻭﺭ ﺷﺩﻩ ﺍﻧﺗﺧﺎﺏ ﻫﺎی ﺗﺫﮐﺭﺍﺕ ﺍﺯ ﺣﺩﺍﮐﺛﺭ ﭘﺧﺷﯽ ﻓﻬﺭﺳﺕ ﺗﻭﺍﻧﻳﺩ ﻣﯽ CD DA ﺻﻭﺗﯽ ﻫﺎی ﺩﻳﺳﮏ ﺩﺭ ﮐﻧﻳﺩ ﺍﻳﺟﺎﺩ ﺁﻫﻧﮓ 99 ﺍﻧﺗﺧﺎﺑﯽ ﭘﺧﺵ ﻫﺎ ﮔﺯﻳﻧﻪ ﻣﻧﻭی ﺩﺭ ﺍﻳﺩ ﮐﺭﺩﻩ ﺍﻳﺟﺎﺩ ﭘﺧﺵ ﻓﻬﺭﺳﺕ ﻳﮏ ﺍﮔﺭ ﺷﺩ ﺧﻭﺍﻫﺩ ﺟﺎﻳﮕﺯﻳﻥ ﭘﺧﺵ ﻟﻳﺳﺕ ﻭﻳﺭﺍﻳﺵ ﺑﺎ ﺭﺍ ﻟﻐﻭ ﻭ ﻫﻣﻪ ﺣﺫﻑ ﻫﻣﻪ ﺍﻧﺗﺧﺎﺏ ﺗﻭﺍﻧﻳﺩ ﻣﯽ ﺍﻧﺗﺧﺎﺑﯽ ﭘﺧﺵ ﺻﻔﺣﻪ ﺩﺭ ﮐﻧﻳﺩ ﺍﻧﺗﺧﺎﺏ ...

Page 94: ...ﻭﺷﻪ ﺿﺑﻁ ﺍﺗﻣﺎﻡ ﺍﺯ ﺑﻌﺩ ﮔﺭﺩﺩ ﻣﯽ ﺫﺧﻳﺭﻩ KARAOKE mp3 ﺑﺻﻭﺭﺕ ﺗﺫﮐﺭﺍﺕ ﺑﺎﺷﺩ ﺷﺩﻩ ﻭﺻﻝ USB ﻭﺳﻳﻠﻪ ﺑﺎﻳﺩ ﺿﺑﻁ ﻓﺎﻳﻝ ﺫﺧﻳﺭﻩ ﺑﺭﺍی ﻧﺷﺎﻥ ﺿﺑﻁ ﻓﺎﻳﻝ ﺷﻭﻳﺩ ﻣﻭﺳﻳﻘﯽ ﻭ ﻭﻳﺩﻳﻭﻫﺎ ﻫﺎ ﻋﮑﺱ ﻭﺍﺭﺩ ﺩﻭﺑﺎﺭﻩ ﺍﮔﺭ ﻣﯽ ﺩﺍﺩﻩ ﺷﻧﻭﻳﺩ ﻣﯽ ﻏﻳﺭﻋﺎﺩی ﺻﺩﺍﻫﺎی ﮐﺎﺭﺍﺋﻭﮐﻪ ﻗﺎﺑﻠﻳﺕ ﺍﺯ ﺍﺳﺗﻔﺎﺩﻩ ﺣﻳﻥ ﺩﺭ ﺍﮔﺭ ﮐﻡ ﮐﻧﻳﺩ ﺩﻭﺭ ﺑﻠﻧﺩﮔﻭﻫﺎ ﺍﺯ ﺭﺍ ﻣﻳﮑﺭﻭﻓﻭﻥ ﮐﺷﻳﺩﻥ ﺯﻭﺯﻩ ﻳﺎ ﺟﻳﻎ ﻣﺎﻧﻧﺩ ﻧﻳﺯ ﺑﻠﻧﺩﮔﻭ ﺻﺩﺍی ﻣﻳﺯﺍﻥ ﮐﺭﺩﻥ ﮐﻡ ﻳﺎ ﻭ ﻣﻳﮑﺭﻭﻓﻭﻥ ﺻﺩﺍی ﻣﻳﺯﺍﻥ ﮐﺭﺩﻥ ﺷﺩ ﺧﻭﺍﻫﺩ ﻭﺍﻗﻊ ﻣﻔﻳﺩ ﮐﺎﺭ BT ﻭ FM HDMI AUX D I...

Page 95: ...ﻪ ﭼﻧﺩ ﺍﮔﺭ ﺩﭼﺎﺭ ﻳﺎ ﻭ ﻧﺑﺎﺷﺩ ﻣﺣﻝ ﺩﺭ ﺑﺎﺷﺩ ﺷﺩﻩ ﺧﺎﻣﻭﺵ Bluetooth ﻭﺳﻳﻠﻪ ﺍﮔﺭ ﺑﺎﺷﺩ ﮐﺎﺭی ﺍﺷﮑﺎﻻﺕ LAN ﻣﺑﺩﻝ ﻣﺎﻳﮑﺭﻭﻳﻭ ﻓﺭ ﻣﺎﻧﻧﺩ ﻭﺳﺎﻳﻠﯽ ﮐﻪ ﺑﺎﺷﻳﺩ ﺩﺍﺷﺗﻪ ﺗﻭﺟﻪ ً ﺎ ﻟﻁﻔ ﻭﺳﺎﻳﻝ ﻣﺷﺎﺑﻪ ﻓﺭﮐﺎﻧﺳﯽ ﻣﺣﺩﻭﺩﻩ ﺍﺯ ﮔﺎﺯ ﺍﺟﺎﻕ ﻭ ﻓﻠﻭﺭﺳﻧﺕ ﻻﻣپ ﺑﻳﺳﻳﻡ ﺍﺧﺗﻼﻻﺕ ﺑﺭﻭﺯ ﺑﺎﻋﺙ ﺗﻭﺍﻧﺩ ﻣﯽ ﮐﻪ ﮐﻧﻧﺩ ﻣﯽ ﺍﺳﺗﻔﺎﺩﻩ Bluetooth ﮔﺭﺩﺩ ﺍﻟﮑﺗﺭﻳﮑﯽ ﺧﺎﻧﮕﯽ ﺳﻳﻧﻣﺎی ﺍﺯ Bluetooth ﻭﺳﻳﻠﻪ ﺍﺗﺻﺎﻝ ﻗﻁﻊ ﺑﺭﺍی ﮐﻧﻳﺩ ﻗﻁﻊ Bluetooth ﻭﺳﻳﻠﻪ ﺍﺯ ﺭﺍ ﺧﺎﻧﮕﯽ ﺳﻳﻧﻣﺎی ﺍﺗﺻﺎﻝ ﺗﻭﺍﻧﻳﺩ ﻣﯽ ﺷﻣﺎ ﻣﺭﺍﺟﻌﻪ Bluetoo...

Page 96: ...ﺕ ﻣﻣﮑﻥ ﺑﺎﺷﺩ ﻣﺗﻔﺎﻭﺕ ﻣﺣﻳﻁ ﻫﻣﺎﻥ ﺩﺭ ﺑﺎﻳﺩ ﻋﮑﺱ ﻓﺎﻳﻝ ﺯﻣﻳﻧﻪ ﻣﻭﺳﻳﻘﯽ ﻗﺎﺑﻠﻳﺕ ﮐﺭﺩﻥ ﻓﻌﺎﻝ ﺑﺭﺍی ﺻﺩﺍ ﮐﻳﻔﻳﺕ ﺑﺎﺷﺩ ﻣﻭﺟﻭﺩ ﻣﻭﺳﻳﻘﯽ ﻓﺎﻳﻝ ﻗﺭﺍﺭﮔﻳﺭی ﻣﺣﻝ ﺳﺎﺯی ﺫﺧﻳﺭﻩ ﻭ ﻋﮑﺱ ﺍﻧﺩﺍﺯﻩ MP3 ﻓﺎﻳﻝ ﺑﻳﺕ ﻧﺭﺥ ﻣﺎﻧﻧﺩ ﻋﻭﺍﻣﻠﯽ ﺑﻪ ﺑﺳﺗﻪ ﺍﺳﺕ ﻣﻣﮑﻥ ﺷﻭﺩ ﺗﻐﻳﻳﺭ ﺩﺳﺗﺧﻭﺵ ﺭﻣﺯﮔﺫﺍﺭی ﺭﻭﺵ ﺭﺍ ﻧﻣﺎﻳﺷﯽ ﻫﺎی ﮔﺭﺍﻓﻳﮏ ﻭ ﺯﻳﺭﻧﻭﻳﺱ ﺗﻭﺍﻧﻳﺩ ﻧﻣﯽ ﺻﻔﺣﻪ ﺗﻣﺎﻡ ﺣﺎﻟﺕ ﺩﺭ ﮐﻧﻳﺩ ﺑﺯﺭگ ﻣﺷﺎﻫﺩﻩ ﻫﻧﮕﺎﻡ ﻫﺎ ﮔﺯﻳﻧﻪ ﻭ ﻣﺷﺎﻫﺩﻩ ﻣﻧﻭی ﺍﺯ ﺍﺳﺗﻔﺎﺩﻩ ﻋﮑﺱ ﻫﺎی ﻓﺎﻳﻝ ﻓﻬﺭﺳﺕ ﻫﺎ ﻋﮑﺱ ﻣﺷﺎﻫﺩﻩ ﺗﺎﺭﻳﺦ ﺩﺭ ﻣﻭﺟﻭﺩ ﻋﮑﺱ ﻫﺎی...

Page 97: ...ﺵ ﺍﺯ ﺍﻳﺳﺗﮕﺎﻩ ﻳﮏ ﺑﻪ ﺭﻓﺗﻥ ﺑﺭﺍی ﺩﮐﻣﻪ ﺳﭘﺱ ﻭ ﺩﺍﺩﻩ ﻓﺷﺎﺭ ﺗﻧﻅﻳﻡ ﭘﻳﺵ ﺍﻧﺗﺧﺎﺏ ﺑﺭﺍی ﺭﺍ PRESET ﺗﻧﻅﻳﻡ ﭘﻳﺵ ﺍﻳﺳﺗﮕﺎﻩ ﺍﻧﺗﺧﺎﺏ ﺑﺭﺍی ﺭﺍ TUNING CH ﺩﻫﻳﺩ ﻓﺷﺎﺭ ﺷﺩﻩ ﺩﻭﺭ ﺭﺍﻩ ﺍﺯ ﮐﻧﺗﺭﻝ ﻭﻳژﻩ ﺟﻠﻭﻩ ﻫﺎی ﺩﮐﻣﻪ ﺍﺯ ﺍﺳﺗﻔﺎﺩﻩ SOUND EFFECT ﻗﺎﺑﻠﻳﺕ SOUND EFFECT ﮐﻧﻳﺩ ﺍﻧﺗﺧﺎﺏ ﺻﺩﺍ ﺳﺎﺧﺗﻥ ﺑﻬﻳﻧﻪ ﺑﺭﺍی ﺭﺍ ﺣﺎﻟﺗﯽ ﺗﻭﺍﻧﻳﺩ ﻣﯽ 1 ﻓﺷﺎﺭ ﺭﺍ ﺻﻭﺗﯽ ﺟﻠﻭﻩ SOUND EFFECT ﺩﮐﻣﻪ ﺩﻫﻳﺩ 2 ﻓﺷﺎﺭ ﺭﺍ ﻫﺎی ﺩﮐﻣﻪ ﺩﻟﺧﻭﺍﻩ ﺣﺎﻟﺕ ﺍﻧﺗﺧﺎﺏ ﺟﻬﺕ ﺣﺎﻟﺕ ﻳﺎ DSP Dolby Pro Logic II ﺣﺎﻟﺕ ﺩﻫﻳﺩ SFE...

Page 98: ...ﺭﺍ ﺻﺩﺍ ﺗﻭﺍﻧﻳﺩ ﻣﯽ TV SOUND ﺩﮐﻣﻪ ﺑﺎ ﺑﺷﻧﻭﻳﺩ ﺗﻠﻭﻳﺯﻳﻭﻥ ﺑﻠﻧﺩﮔﻭی ﻳﺎ ﺧﺎﻧﮕﯽ 1 ﮐﻧﻳﺩ ﻭﺻﻝ ﺧﺎﻧﮕﯽ ﺳﻳﻧﻣﺎی ﻭ ﺗﻠﻭﻳﺯﻳﻭﻥ ﺑﻪ ﺭﺍ HDMI ﮐﺎﺑﻝ ﮐﻧﻳﺩ ﻣﻼﺣﻅﻪ ﺭﺍ 17 ﺻﻔﺣﻪ 2 ﺳﻳﻧﻣﺎی ﺩﺭ ﺭﺍ ﺭﻭﺷﻥ HDMI CEC Anynet ﮔﺯﻳﻧﻪ ﮐﻧﻳﺩ ﺗﻧﻅﻳﻡ ﺗﻠﻭﻳﺯﻳﻭﻥ ﻭ ﺧﺎﻧﮕﯽ 3 ﺩﻫﻳﺩ ﻓﺷﺎﺭ ﺭﺍ ﺩﻭﺭ ﺭﺍﻩ ﺍﺯ ﮐﻧﺗﺭﻝ ﺭﻭی TV SOUND ﺩﮐﻣﻪ 4 TV ﺩﻫﻳﺩ ﻣﯽ ﻓﺷﺎﺭ ﺭﺍ TV SOUND ﺩﮐﻣﻪ ﮐﻪ ﺑﺎﺭ ﻫﺭ ﻧﻣﺎﻳﺷﮕﺭ ﻗﺳﻣﺕ ﺭﻭی ﮐﻭﺗﺎﻫﯽ ﻣﺩﺕ ﺑﺭﺍی SOUND ON OFF ﺧﻭﺍﻫﺩ ﺗﻐﻳﻳﺭ D IN ﺑﻪ ﺳﭘﺱ ﻭ ﺯﺩ ﺧﻭﺍﻫﺩ ﭼﺷﻣﮏ ﺟﻠﻭ ﭘﺎﻧﻝ ...

Page 99: ...ﺎی ﮔﺯﻳﻧﻪ ﺗﻭﺍﻧﻳﺩ ﻣﯽ ﭘﻧﺟﺭﻩ ﺍﻳﻥ ﺩﺭ ﺷﺩ ﺧﻭﺍﻫﺩ ﺑﺎﺯ ﻣﻥ ﺍﺷﺗﺭﺍک ﺣﺫﻑ ﺧﺩﻣﺎﺗﯽ ﻫﺎی ﺍﺷﺗﺭﺍک ﺳﺎﺧﺗﻥ ﻣﺭﺗﺑﻁ ﺍﺷﺗﺭﺍک ﺍﻁﻼﻋﺎﺕ ﮐﻧﻳﺩ ﺍﻧﺗﺧﺎﺏ ﺭﺍ ﺍﺷﺗﺭﺍک ﺳﺎﺯی ﻏﻳﺭﻓﻌﺎﻝ ﻭ ﺩﺳﺗﮕﺎﻩ ﺍﺯ ﻫﺎ ﮐﺎﺭﺕ ﻳﮏ ﺑﺎﻳﺩ ﻏﻳﺭﺭﺍﻳﮕﺎﻥ ﻫﺎی ﺑﺭﻧﺎﻣﻪ ﺧﺭﻳﺩ ﻳﺎ ﻭ ﻓﻳﻠﻡ ﮐﺭﺩﻥ ﮐﺭﺍﻳﻪ ﺑﺭﺍی ﺍﻳﺩ ﻧﮑﺭﺩﻩ ﺛﺑﺕ ﮐﺎﺭﺕ ﻳﮏ ﺍﮔﺭ ﺑﺎﺷﻳﺩ ﮐﺭﺩﻩ ﺛﺑﺕ ﺧﻭﺩ ﺍﺷﺗﺭﺍک ﺩﺭ ﺍﻋﺗﺑﺎﺭی ﺍﻁﻼﻋﺎﺕ ﺗﻐﻳﻳﺭ ﺻﻔﺣﻪ ﺩﺭ ﮐﻧﻳﺩ ﺍﻧﺗﺧﺎﺏ ﺭﺍ ﺍﺷﺗﺭﺍک ﺍﻁﻼﻋﺎﺕ ﺗﻐﻳﻳﺭ ﮔﺯﻳﻧﻪ ﻭ ﺩﺍﺩﻩ ﻓﺷﺎﺭ ﺭﺍ E ﺩﮐﻣﻪ ﮐﻧﻳﺩ ﺍﻧﺗﺧﺎﺏ ﺭﺍ ﮐﺎﺭﺕ ﺛﺑﺕ ﮔﺯﻳﻧﻪ ﺍﺷﺗﺭﺍ...

Page 100: ...ﺩ ﻣﯽ ﻧﻣﺎﻳﺵ ﻫﺎ 4 ﺷﺭﻭﻉ ﺑﺭﺍی ﺩﻫﻳﺩ ﻓﺷﺎﺭ ﺭﺍ E ﺩﮐﻣﻪ ﺳﭘﺱ ﻭ ﮐﺭﺩﻩ ﺍﻧﺗﺧﺎﺏ ﺭﺍ ﻣﺣﻠﯽ ﮐﻧﻳﺩ ﺍﺟﺭﺍ ﺷﻭﺩ ﻣﯽ ﺩﺍﺩﻩ ﻧﻣﺎﻳﺵ ﺻﻔﺣﻪ ﺭﻭی ﮐﻪ ﺭﺍ ﺩﺳﺗﻭﺭﺍﺗﯽ ﻓﻳﻠﻡ ﺗﺫﮐﺭﺍﺕ ﺍﺯ ﺑﻌﺩ ﻭﺭﻭﺩ ﺻﻔﺣﻪ ﺍﻳﺩ ﻧﺷﺩﻩ ﺧﻭﺩ Samsung ﺍﺷﺗﺭﺍک ﻭﺍﺭﺩ ﺍﮔﺭ ﺷﻭﻳﺩ ﻭﺍﺭﺩ ﺑﺎﻳﺩ ﻭ ﺷﺩ ﺧﻭﺍﻫﺩ ﻧﻣﺎﻳﺎﻥ 3 ﻣﺭﺣﻠﻪ ﺍﻳﺩ ﻧﮑﺭﺩﻩ ﺗﻌﺭﻑ ﺧﻭﺩ Samsung ﺍﺷﺗﺭﺍک ﺩﺭ ﺍﻋﺗﺑﺎﺭی ﮐﺎﺭﺕ ﻳﮏ ﺍﮔﺭ ﺩﺳﺗﻭﺭﺍﺕ ﺷﺩ ﺧﻭﺍﻫﺩ ﻧﻣﺎﻳﺎﻥ ﺷﺩﻳﺩ ﻭﺍﺭﺩ ﺍﻳﻧﮑﻪ ﺍﺯ ﺑﻌﺩ ﮐﺎﺭﺕ ﺛﺑﺕ ﺻﻔﺣﻪ ﻳﺎ ﻭ ﻓﻳﻠﻡ ﮐﺭﺩﻥ ﮐﺭﺍﻳﻪ ﺑﺭﺍی ﮐﻧﻳﺩ ﺍﺟﺭﺍ ﺭﺍ ﺻﻔﺣﻪ ﺭﻭی ﺷﺩﻩ...

Page 101: ...ﻳﮏ ﺍﻧﺗﺧﺎﺏ ﺑﺭﺍی ﺍﺯ ﻣﺗﻔﺎﻭﺕ ﻣﺟﻣﻭﻋﻪ ﻳﮏ ﺑﺑﺭﻳﺩ ﺩﻳﮕﺭی ﮔﺭﻭﻩ ﺭﻭی ﺭﺍ ﺧﻭﺩ ﺍﻧﺗﺧﺎﺏ ﺷﺩ ﺧﻭﺍﻫﺩ ﻧﻣﺎﻳﺎﻥ ﺭﺍﺳﺕ ﺳﻣﺕ ﺩﺭ ﻫﺎ ﺑﺭﻧﺎﻣﻪ 6 ﻫﺎی ﺩﮐﻣﻪ ﺑﺎ ﻭ ﺭﻓﺗﻪ ﻫﺎ ﺑﺭﻧﺎﻣﻪ ﺑﺭﻭی ﺩﮐﻣﻪ ﺍﺯ ﺍﺳﺗﻔﺎﺩﻩ ﺑﺎ ﺑﺭﻭﻳﺩ ﺩﻳﮕﺭ ﺑﺭﻧﺎﻣﻪ ﺑﻪ ﺍی ﺑﺭﻧﺎﻣﻪ ﺍﺯ 7 ﺳﭘﺱ ﻭ ﮐﺭﺩﻩ ﺍﻧﺗﺧﺎﺏ ﺁﻧﺭﺍ ﺑﺭﻧﺎﻣﻪ ﻳﮏ ﺩﺭﺑﺎﺭﻩ ﺍﻁﻼﻋﺎﺕ ﻣﺷﺎﻫﺩﻩ ﺑﺭﺍی ﺩﻫﻳﺩ ﻓﺷﺎﺭ ﺭﺍ E ﺩﮐﻣﻪ 8 ﺩﻫﻳﺩ ﺍﻧﺟﺎﻡ ﺭﺍ 3 ﻭ 2 ﻣﺭﺍﺣﻝ ﻫﺎی ﺩﺳﺗﻭﺭﺍﻟﻌﻣﻝ ﺑﺭﻧﺎﻣﻪ ﺩﺍﻧﻠﻭﺩ ﺑﺭﺍی ﺑﺭﻧﺎﻣﻪ ﻳﮏ ﺍﺟﺭﺍی 1 E ﺩﮐﻣﻪ ﺳﭘﺱ ﻭ ﮐﺭﺩﻩ ﺍﻧﺗﺧﺎﺏ ﺍﺻﻠﯽ ﺻﻔﺣﻪ ﺩﺭ ﺭﺍ ﻫ...

Page 102: ... ﮐﺎﺭﺑﺭﺩی ﻫﺎی ﺑﺭﻧﺎﻣﻪ ﺍﺯ ﺑﺭﻧﺎﻣﻪ ﻳﮏ ﺣﺫﻑ 1 ﻫﺎ ﮔﺯﻳﻧﺵ ﺑﻪ ﻫﺎی ﺩﮐﻣﻪ ﺍﺯ ﺍﺳﺗﻔﺎﺩﻩ ﺑﺎ ﺑﻳﺷﺗﺭ ﺑﺭﻧﺎﻣﻪ ﺻﻔﺣﻪ ﺩﺭ ﺩﻫﻳﺩ ﻓﺷﺎﺭ ﺭﺍ E ﺩﮐﻣﻪ ﺳﭘﺱ ﻭ ﺭﻓﺗﻪ ﺻﻔﺣﻪ ﺑﺎﻻی ﺩﺭ 2 ﺳﭘﺱ ﻭ ﮐﺭﺩﻩ ﺍﻧﺗﺧﺎﺏ ﺭﺍ ﻣﻥ ﺑﺭﻧﺎﻣﻪ ﻭﻳﺭﺍﻳﺵ ﮔﺯﻳﻧﻪ ﺍﺻﻠﯽ ﺻﻔﺣﻪ ﺩﺭ ﻧﻣﺎﻳﺎﻥ ﮐﺎﺭﺑﺭﺩی ﻫﺎی ﺑﺭﻧﺎﻣﻪ ﻭﻳﺭﺍﻳﺵ ﺻﻔﺣﻪ ﺩﻫﻳﺩ ﻓﺷﺎﺭ ﺭﺍ E ﺩﮐﻣﻪ ﺷﺩ ﺧﻭﺍﻫﺩ 3 ﺭﺍ ﮐﻧﻳﺩ ﺣﺫﻑ ﻣﻥ ﮐﺎﺭﺑﺭﺩی ﻫﺎی ﺑﺭﻧﺎﻣﻪ ﺍﺯ ﺧﻭﺍﻫﻳﺩ ﻣﯽ ﮐﻪ ﺍی ﺑﺭﻧﺎﻣﻪ ﻫﺎی ﺩﮐﻣﻪ ﺳﭘﺱ ﻭ ﺩﻫﻳﺩ ﻓﺷﺎﺭ ﺭﺍ E ﺩﮐﻣﻪ ﮐﺭﺩﻩ ﺍﻧﺗﺧﺎﺏ ﺩﻫﻳﺩ ﻓﺷﺎﺭ ﺟﻬﺕ ﺩﺭ ﺭﺍ ﺷﺩ ﺧﻭﺍ...

Page 103: ...ﺎﻡ ﺍﺯ ﺑﻌﺩ ﮐﻧﻳﺩ ﻭﺍﺭﺩ ﺭﺍ ﭘﻭﺷﻪ ﺟﺩﻳﺩ ﻧﺎﻡ ﻧﺎﻡ ﺗﻐﻳﻳﺭ ﭘﻧﺟﺭﻩ ﺩﻫﻳﺩ ﻓﺷﺎﺭ ﺭﺍ E ﺩﮐﻣﻪ ﺳﭘﺱ ﻭ ﮐﺭﺩﻩ ﺍﻧﺗﺧﺎﺏ ﺭﺍﺳﺕ ﺷﺩ ﺧﻭﺍﻫﺩ ﻣﺷﺎﻫﺩﻩ ﺁﻥ ﺩﺭ ﺟﺩﻳﺩ ﻧﺎﻡ ﻭ ﺷﺩﻩ ﻧﻣﺎﻳﺎﻥ ﺩﻭﺑﺎﺭﻩ 6 ﺗﻐﻳﻳﺭ ﭘﻭﺷﻪ ﺩﻫﻳﺩ ﻓﺷﺎﺭ ﺭﺍ E ﺩﮐﻣﻪ ﺳﭘﺱ ﻭ ﮐﺭﺩﻩ ﺍﻧﺗﺧﺎﺏ ﺭﺍ ﻗﺑﻭﻝ ﺍﺳﺕ ﻳﺎﻓﺗﻪ ﻧﺎﻡ 7 E ﺩﮐﻣﻪ ﺳﭘﺱ ﻭ ﮐﺭﺩﻩ ﺍﻧﺗﺧﺎﺏ ﺻﻔﺣﻪ ﺭﺍﺳﺕ ﺳﻣﺕ ﺍﺯ ﺭﺍ ﺑﺳﺗﻥ ﮔﺯﻳﻧﻪ ﺩﻫﻳﺩ ﻓﺷﺎﺭ ﺭﺍ ﺣﺫﻑ ﻫﺎی ﺑﺭﻧﺎﻣﻪ ﺻﻔﺣﻪ ﺍﺯ ﺭﺍ ﻫﺎ ﭘﻭﺷﻪ ﻭ ﻫﺎ ﺑﺭﻧﺎﻣﻪ ﺗﻭﺍﻧﻳﺩ ﻣﯽ ﺣﺫﻑ ﻗﺎﺑﻠﻳﺕ ﺑﺎ ﺑﺎﺷﻧﺩ ﺩﺍﺷﺗﻪ ﻭﺟﻭﺩ ﻫﺎﻳﯽ ﺑﺭﻧﺎﻣﻪ ﭘﻭﺷﻪ ﻳﮏ ﺩﺭ...

Page 104: ...ﺭ ﺍﻳﻧﺗﺭﻧﺗﯽ ﺻﻔﺣﺎﺕ ﻣﺭﻭﺭ ﺑﺭﺍی ﺷﻳﻭﻩ ﺩﻭ ﻭﺏ ﻣﺭﻭﺭﮔﺭ ﮐﻪ ﻫﻧﮕﺎﻣﯽ ﻫﺳﺗﻧﺩ ﻧﺷﺎﻧﮕﺭ ﺑﺎ ﻣﺭﻭﺭ ﻭ ﻟﻳﻧﮏ ﻣﺭﻭﺭ ﻫﺎ ﺷﻳﻭﻩ ﺍﻳﻥ ﺩﻫﺩ ﻣﯽ ﻓﻌﺎﻝ ﻧﺷﺎﻧﮕﺭ ﺑﺎ ﻣﺭﻭﺭ ﺷﻳﻭﻩ ﮐﻧﻳﺩ ﻣﯽ ﺍﺟﺭﺍ ﺑﺎﺭ ﻧﺧﺳﺗﻳﻥ ﺑﺭﺍی ﺭﺍ ﻣﺭﻭﺭﮔﺭ ﮐﻧﻳﺩ ﻣﯽ ﺍﺳﺗﻔﺎﺩﻩ ﻭﺏ ﻣﺭﻭﺭﮔﺭ ﺑﺎ ﮐﺎﺭ ﺑﺭﺍی ﻣﺎﻭﺱ ﻳﮏ ﺍﺯ ﺍﮔﺭ ﺑﻭﺩ ﺧﻭﺍﻫﺩ ﮐﻧﺗﺭﻝ ﺍﺯ ﺍﮔﺭ ﺑﮕﺫﺍﺭﻳﺩ ﺑﺎﻗﯽ ﻓﻌﺎﻝ ﺭﺍ ﻧﺷﺎﻧﮕﺭ ﺑﺎ ﻣﺭﻭﺭ ﺷﻳﻭﻩ ﮐﻧﻳﻡ ﻣﯽ ﺗﻭﺻﻳﻪ ﮐﻧﻳﻡ ﻣﯽ ﺗﻭﺻﻳﻪ ﮐﻧﻳﺩ ﻣﯽ ﺍﺳﺗﻔﺎﺩﻩ ﻭﺏ ﻣﺭﻭﺭﮔﺭ ﺑﺎ ﮐﺎﺭ ﺑﺭﺍی ﺩﻭﺭ ﺭﺍﻩ ﺍﺯ ﻣﺭﻭﺭ ﺷﻳﻭﻩ ﺩﺭ ﮐﻧﻳﺩ ﺟﺎﻳﮕﺯﻳﻥ ﻟﻳﻧﮏ ﻣﺭﻭﺭ...

Page 105: ...ﺳﻣﺕ ﺩﺭ ﻋﺩﺩ ﻳﺎ ﺣﺭﻑ ﮐﺭﺩﻥ ﻭﺍﺭﺩ ﺑﺭﺍی ﺭﺍ E ﺩﮐﻣﻪ ﺩﻫﻳﺩ 3 ﺩﺭ Caps ﮐﻠﻳﺩ ﺑﻪ ﺭﺍ ﺍﻧﺗﺧﺎﺏ ﺑﺯﺭگ ﺣﺭﻭﻑ ﺑﻪ ﻳﺎﻓﺗﻥ ﺩﺳﺗﺭﺳﯽ ﺑﺭﺍی ﺑﺭﺍی ﺩﻫﻳﺩ ﻓﺷﺎﺭ ﺭﺍ E ﺩﮐﻣﻪ ﺳﭘﺱ ﻭ ﺑﺭﺩﻩ ﭼپ ﺳﻣﺕ ﺑﺎﻻ ﮔﻭﺷﻪ ً ﺍ ﻣﺟﺩﺩ ﺭﺍ E ﺩﮐﻣﻪ ﻳﺎﺑﻳﺩ ﺩﺳﺗﺭﺳﯽ ﮐﻭﭼﮏ ﺣﺭﻭﻑ ﺑﻪ ﺩﻭﺑﺎﺭﻩ ﺍﻳﻧﮑﻪ ﺩﻫﻳﺩ ﻓﺷﺎﺭ ﺍﺳﺕ ﺑﺭﺟﺳﺗﻪ Caps ﮐﻪ ﺣﺎﻟﯽ ﺩﺭ 4 ﻧﻘﻁﻪ ﻭ ﮔﺫﺍﺭی ﻧﺷﺎﻥ ﻫﺎی ﻋﻼﻣﺕ ﻭ ﻋﻼﺋﻡ ﺑﻪ ﻳﺎﻓﺗﻥ ﺩﺳﺗﺭﺳﯽ ﺑﺭﺍی ﻭ ﺳﺎﺧﺗﻪ ﺑﺭﺟﺳﺗﻪ ﺭﺍ ﭼپ ﺳﻣﺕ ﺩﺭ 123 ﺩﮐﻣﻪ ﺗﮑﻣﻳﻠﯽ ﮔﺫﺍﺭی ﺩﻫﻳﺩ ﻓﺷﺎﺭ ﺭﺍ E ﺩﮐﻣﻪ ﺳﭘﺱ 5 ﻭ ﺑﺭﺩﻩ ﺩﮐﻣﻪ ﺑ...

Page 106: ...ﺷﻣﺎ ﺑﻪ ﺗﺄﻳﻳﺩ ﻣﻭﺭﺩ ﺳﺎﻳﺗﻬﺎی ﻣﺩﻳﺭﻳﺕ ﺭﺍ URL ﻫﺎی ﺁﺩﺭﺱ ﺗﺎ ﺩﻫﺩ ﻣﯽ ﺍﺟﺎﺯﻩ ﻫﺎی ﺳﺎﻳﺕ ﻓﻬﺭﺳﺕ ﺑﻪ ﺍﻓﺯﻭﺩﻥ ﺑﺭﺍی ﻫﺎﻳﯽ ﺳﺎﻳﺕ ﻭ ﮐﺭﺩﻩ ﻭﺍﺭﺩ ﺗﺎﻳﻳﺩ ﻣﻭﺭﺩ ﺗﺎﻳﻳﺩ ﻣﻭﺭﺩ ﻫﺎی ﺳﺎﻳﺕ ﻓﻬﺭﺳﺕ ﺍﺯ ﺭﺍ ﺭﺍ ﺗﺄﻳﻳﺩ ﻣﻭﺭﺩ ﺳﺎﻳﺗﻬﺎی ﺍﮔﺭ ﮐﻧﻳﺩ ﺣﺫﻑ ﻓﻬﺭﺳﺕ ﺩﺭ ﺳﺎﻳﺗﯽ ﻫﻳﭻ ﻭ ﮐﺭﺩﻩ ﺭﻭﺷﻥ ﺑﺎﺷﻳﺩ ﻧﮑﺭﺩﻩ ﻭﺍﺭﺩ ﺗﺎﻳﻳﺩ ﻣﻭﺭﺩ ﻫﺎی ﺳﺎﻳﺕ ﺍﻳﻧﺗﺭﻧﺗﯽ ﺳﺎﻳﺕ ﻫﻳﭻ ﺑﻪ ﺗﻭﺍﻧﺳﺕ ﻧﺧﻭﺍﻫﻳﺩ ﻳﺎﺑﻳﺩ ﺩﺳﺗﺭﺳﯽ ﺧﺻﻭﺻﯽ ﻣﺭﻭﺭﮔﺭ ﻏﻳﺭﻓﻌﺎﻝ ﻓﻌﺎﻝ ﺳﺎﺯﻳﺩ ﻏﻳﺭﻓﻌﺎﻝ ﻳﺎ ﻓﻌﺎﻝ ﺭﺍ ﺧﺻﻭﺻﯽ ﺣﺎﻟﺕ ﺁﺩﺭﺱ ﺑﺎﺷﺩ ﻓﻌﺎﻝ ﺧﺻﻭﺻﯽ ﺣﺎﻟﺕ ...

Page 107: ... ﺍﻧﺗﺧﺎﺏ ﺭﺍ ﺷﺩ ﺍﻧﺟﺎﻡ ﮐﺎﺭ ﺍﺗﻣﺎﻡ ﺍﺯ ﺑﻌﺩ ﺩﻫﻳﺩ ﻓﺷﺎﺭ 7 ﮐﺎﺭ ﺍﺗﻣﺎﻡ ﺍﺯ ﺑﻌﺩ ﮐﻧﻳﺩ ﺗﮑﺭﺍﺭ ﻋﺑﻭﺭ ﺭﻣﺯ ﺑﺭﺍی ﺭﺍ ﺭﻭﺍﻝ ﻫﻣﻳﻥ ﺩﻫﻳﺩ ﻓﺷﺎﺭ ﺭﺍ E ﺩﮐﻣﻪ ﺳﭘﺱ ﻭ ﮐﺭﺩﻩ ﺍﻧﺗﺧﺎﺏ ﺭﺍ ﺷﺩ ﺍﻧﺟﺎﻡ 8 ﺩﻫﻳﺩ ﻓﺷﺎﺭ ﺭﺍ E ﺩﮐﻣﻪ ﺳﭘﺱ ﻭ ﮐﺭﺩﻩ ﺍﻧﺗﺧﺎﺏ ﺭﺍ ﻗﺑﻭﻝ BD LIVE ﻣﺗﻧﻭﻉ ﺧﺩﻣﺎﺕ ﺍﺯ ﺷﺑﮑﻪ ﺑﻪ ﺧﻭﺩ ﺩﺳﺗﮕﺎﻩ ﮐﺭﺩﻥ ﻭﺻﻝ ﺍﺯ ﺑﻌﺩ ﺗﻭﺍﻧﻳﺩ ﻣﯽ ﺷﻣﺎ ﮐﻧﻳﺩ ﺍﺳﺗﻔﺎﺩﻩ BD LIVE ﺑﺎ ﺳﺎﺯﮔﺎﺭ ﻫﺎی ﺩﻳﺳﮏ ﺩﺭ ﻣﻭﺟﻭﺩ ﺳﻳﻧﻣﺎﻳﯽ 1 ﻭ ﮐﺭﺩﻩ ﻭﺻﻝ ﺩﺳﺗﮕﺎﻩ ﺟﻠﻭی USB ﻓﻳﺵ ﺑﻪ USB ﺩﺭﺍﻳﻭ ﻓﻠﺵ ﻳﮏ ﺍﺯ ﺍﺳﺗﻔﺎﺩﻩ ﺑﺭﺍی ...

Page 108: ...ﺢ ﺩﻳﺟﻳﺗﺎﻝ ﺧﺭﻭﺟﯽ ً ﺎ ﺣﺗﻣ ﺧﻭﺍﻫﻳﺩ ﺑﻠﻧﺩ ﻧﻭﻳﺯ ﺻﺩﺍی ﻳﺎ ﻭ ﺷﻧﻭﻳﺩ ﻧﻣﯽ ﺻﺩﺍﻳﯽ ﻫﻳﭻ ﺍﻳﻧﺻﻭﺭﺕ ﺷﻧﻳﺩ ﻓﺷﺭﺩﻩ ﻫﺎی ﻓﺭﻣﺕ ﺑﺎ ﺗﻠﻭﻳﺯﻳﻭﻥ AV ﮔﻳﺭﻧﺩﻩ HDMI ﺩﺳﺗﮕﺎﻩ ﺍﮔﺭ ﺳﻳﮕﻧﺎﻝ ﺧﺭﻭﺟﯽ Dolby Digital DTS ﻧﺑﺎﺷﺩ ﺳﺎﺯﮔﺎﺭ ﺷﺩﻩ ﺷﻭﺩ ﻣﯽ ﺍﻳﺟﺎﺩ PCM ﺻﻭﺭﺕ ﺑﻪ ﺻﺩﺍ ﺻﻭﺗﯽ ﺟﻠﻭﻩ ﻭ BONUSVIEW ﺻﺩﺍی ﻣﻌﻣﻭﻟﯽ ﻫﺎی DVD ﻧﺩﺍﺭﻧﺩ ﭘﻳﻣﺎﻳﺷﯽ BONUSVIEW ﺻﺩﺍی ﺩﺍﺭﺍی Blu ray ﻫﺎی ﺩﻳﺳﮏ ﺍﺯ ﺑﻌﺿﯽ ﻧﻳﺳﺗﻧﺩ ﭘﻳﻣﺎﻳﺷﯽ ﺻﻭﺗﯽ ﺟﻠﻭﻩ ﻭ ﺭﺍﺳﺕ ﭼپ ﺁﻧﺎﻟﻭگ ﺻﺩﺍی ﺑﺭ ﺗﺎﺛﻳﺭی ﺩﻳﺟﻳﺗﺎﻝ ﺧﺭﻭﺟﯽ ﺗﻧﻅﻳﻡ ﺍﻳﻥ ﻧﺩ...

Page 109: ...ﻧﮕﻠﻳﺳﯽ ﺑﻪ ﺭﺍ Dolby Digital ﻳﺎ PCM ﺯﻳﺭﻧﻭﻳﺱ ﺯﺑﺎﻥ ﺍﻧﺗﺧﺎﺏ ﺩﺭ ﺭﺍ ﺯﻳﺭﻧﻭﻳﺱ ﺯﺑﺎﻥ ﺑﺗﻭﺍﻧﻳﺩ ﺷﺎﻳﺩ Blu ray DVD ﺑﻪ ﺑﺳﺗﻪ ﺩﻳﺳﮏ ﻣﻧﻭی DISC MENU ﺩﮐﻣﻪ ﺩﻫﻳﺩ ﺗﻐﻳﻳﺭ ﺩﻳﺳﮏ ﻣﻧﻭی ﺩﻫﻳﺩ ﻓﺷﺎﺭ ﺭﺍ ﺩﻳﺳﮏ ﺩﺭ ﮐﻪ ﺩﺍﺭﺩ ﻫﺎﻳﯽ ﺯﻳﺭﻧﻭﻳﺱ ﻣﺟﻣﻭﻋﻪ ﺑﻪ ﺑﺳﺗﮕﯽ ﻗﺎﺑﻠﻳﺕ ﺍﻳﻥ Blu ray ﻫﺎی ﺩﻳﺳﮏ ﺗﻣﺎﻡ ﺩﺭ ﺍﺳﺕ ﻣﻣﮑﻥ ﻭ ﺍﻧﺩ ﺷﺩﻩ ﺭﻣﺯﮔﺫﺍﺭی ﻧﺑﺎﺷﺩ ﺩﺳﺗﺭﺱ ﻗﺎﺑﻝ DVD ﻫﺎی ﺩﻳﺳﮏ ﻣﯽ ﺑﺎﺷﺩ BONUSVIEW ﺑﺧﺵ ﺩﺍﺭﺍی Blu ray ﺩﻳﺳﮏ ﺍﮔﺭ BONUSVIEW ﺣﺎﻟﺕ ﺍﺻﻠﯽ ﺑﺭﻧﺎﻣﻪ ﺑﻪ ﻣﺭﺑﻭﻁ ﺍﻁﻼﻋﺎﺕ ﺗﻭﺍﻧﻳﺩ ﮐ...

Page 110: ...TS ﮐﺎﻧﺎﻝ PCM 7 1 ﺗﺎ DTS DTS DTS ﺑﺭﺍی ﺗﻌﺭﻳﻑ ﻫﺎی ﺩﻳﺳﮏ Blu ray ﻫﺭﮐﺩﺍﻡ ﺑﺭﻧﺎﻣﻪ ﺍﺻﻠﯽ ﺻﺩﺍی ﺻﻭﺗﯽ ﺟﺭﻳﺎﻥ ﻭ ﺑﺎ ﺭﺍ BONUSVIEW ﺻﺩﺍی ﺑﺻﻭﺭﺕ ﻳﮑﺩﻳﮕﺭ ﻭ ﮐﺭﺩﻩ ﺭﻣﺯﮔﺷﺎﻳﯽ PCM ﺻﻭﺗﯽ ﭘﻳﻣﺎﻳﺵ ﻫﺎی ﺟﻠﻭﻩ ﮐﻧﺩ ﻣﯽ ﺍﺿﺎﻓﻪ ﺍﺻﻠﯽ ﺻﺩﺍی ﺟﺭﻳﺎﻥ ﻓﻘﻁ ﺩﻫﺩ ﻣﯽ ﺧﺭﻭﺟﯽ ﺭﺍ ﺑﺭﻧﺎﻣﻪ ﺟﺭﻳﺎﻥ ﺑﺗﻭﺍﻧﺩ AV ﮔﻳﺭﻧﺩﻩ ﺗﺎ ﺭﻣﺯﮔﺷﺎﻳﯽ ﺭﺍ ﺻﺩﺍ ﺑﻳﺕ ﮐﻧﺩ BONUSVIEW ﺻﺩﺍی ﺻﻭﺗﯽ ﭘﻳﻣﺎﻳﺵ ﻫﺎی ﺟﻠﻭﻩ ﻳﺎ ﺷﻧﻳﺩ ﻧﺧﻭﺍﻫﻳﺩ ﺭﺍ ﺑﺭﻧﺎﻣﻪ ﺍﺻﻠﯽ ﺻﺩﺍی ﺻﻭﺗﯽ ﺟﺭﻳﺎﻥ ﻭ ﺑﺎ ﺭﺍ BONUSVIEW ﺻﺩﺍی ﺑﺻﻭﺭﺕ ﻳﮑﺩﻳﮕﺭ ﮐﺭﺩ...

Page 111: ...ﻳﺯ ﺩﺍﺧﻝ ﮐﺎﻣﻝ ﺑﻁﻭﺭ ﺑﺭﻕ ﺳﻳﻡ ﺁﻳﺎ ﮐﻧﻳﺩ ﺭﻭﺷﻥ ﺩﻭﺑﺎﺭﻩ ﺳﭘﺱ ﻭ ﮐﺭﺩﻩ ﺧﺎﻣﻭﺵ ﺭﺍ ﺩﺳﺗﮕﺎﻩ ﺷﻭﺩ ﻧﻣﯽ ﺷﺭﻭﻉ ﭘﺧﺵ ﮐﻧﻳﺩ ﭼﮏ ﺭﺍ Blu ray DVD ﺩﻳﺳﮏ ﻣﻧﻁﻘﻪ ﺷﻣﺎﺭﻩ ﻧﺑﺎﺷﻧﺩ ﭘﺧﺵ ﻗﺎﺑﻝ ﺍﺳﺕ ﻣﻣﮑﻥ ﮐﺷﻭﺭ ﺍﺯ ﺧﺎﺭﺝ ﺩﺭ ﺷﺩﻩ ﺧﺭﻳﺩﺍﺭی Blu ray DVD ﻫﺎی ﺩﻳﺳﮏ ﻧﻳﺳﺗﻧﺩ ﭘﺧﺵ ﻗﺎﺑﻝ ﺩﺳﺗﮕﺎﻩ ﺍﻳﻥ ﺩﺭ ﻫﺎ DVD ROM ﻭ ﻫﺎ CD ROM ﺑﺎﺷﺩ ﺻﺣﻳﺢ ﺑﻧﺩی ﺩﺭﺟﻪ ﺳﻁﺢ ﮐﻪ ﺷﻭﻳﺩ ﻣﻁﻣﺋﻥ ﺩﮐﻣﻪ ﮐﻪ ﻫﻧﮕﺎﻣﯽ ﺷﻭﺩ ﻣﯽ ﺩﺍﺩﻩ ﻓﺷﺎﺭ ﻣﮑﺙ ﭘﺧﺵ ﺷﻭﺩ ﻧﻣﯽ ﺷﺭﻭﻉ ﺑﻼﻓﺎﺻﻠﻪ ﭘﺧﺵ ﺍﻳﺩ ﮐﺭﺩﻩ ﺍﺳﺗﻔﺎﺩﻩ ﺩﺍﺭﺩ ﻭﺟﻭﺩ ﺧﺭﺍﺵ ﺁﻥ ﺳﻁﺢ ...

Page 112: ...ﺩ ﮐﻧﺩ ﻧﻣﯽ ﮐﺎﺭ ﺩﺳﺗﮕﺎﻩ ﻳﺎ ﺷﻭﺩ ﻣﯽ ﻗﻁﻊ ﺑﺭﻕ ﻣﺛﺎﻝ ﻣﯽ ﮔﻭﺵ ﺑﻪ ﻏﻳﺭﻋﺎﺩی ﺻﺩﺍﻳﯽ ﺭﺳﺩ ﮐﻧﺩ ﻧﻣﯽ ﮐﺎﺭ ﺩﺭﺳﺕ ﺩﺳﺗﮕﺎﻩ ﺩﺍﺭﻳﺩ ﻧﮕﻪ ﺛﺎﻧﻳﻪ 5 ﺑﺭﺍی ﻭ ﺩﺍﺩﻩ ﻓﺷﺎﺭ STANDBY ﺣﺎﻟﺕ ﺩﺭ ﺭﺍ ﺩﻭﺭ ﺭﺍﻩ ﺍﺯ ﮐﻧﺗﺭﻝ 5 ﺩﮐﻣﻪ ﮐﺭﺩ ﺧﻭﺍﻫﺩ ﭘﺎک ﺭﺍ ﺷﺩﻩ ﺫﺧﻳﺭﻩ ﺗﻧﻅﻳﻣﺎﺕ ﮐﻠﻳﻪ RESET ﻗﺎﺑﻠﻳﺕ ﺍﺯ ﺍﺳﺗﻔﺎﺩﻩ ﺑﺎﺷﺩ ﺩﺍﺷﺗﻪ ﺿﺭﻭﺭﺕ ﺍﻳﻧﮑﻪ ﻣﮕﺭ ﻧﺩﻫﻳﺩ ﺍﻧﺟﺎﻡ ﺭﺍ ﮐﺎﺭ ﺍﻳﻥ ﺭﺍ ﺑﻧﺩی ﺩﺭﺟﻪ ﺳﻁﺢ ﻋﺑﻭﺭ ﺭﻣﺯ ﺍﻳﺩ ﮐﺭﺩﻩ ﻓﺭﺍﻣﻭﺵ ﺩﺍﺭﻳﺩ ﻧﮕﻪ ﺛﺎﻧﻳﻪ 5 ﺍﺯ ﺑﻳﺵ ﺑﺭﺍی ﻭ ﺩﺍﺩﻩ ﻓﺷﺎﺭ ﺭﺍ ﺩﺳﺗﮕﺎﻩ 5 ﺩﮐﻣﻪ ﻧﻳﺳﺕ ﺩﺳﺗﮕﺎﻩ...

Page 113: ...NA ﺑﺎ ﺳﺎﺯﮔﺎﺭ ﻭﺳﻳﻠﻪ ﻣﻳﺎﻥ ﺍﺗﺻﺎﻝ ﮐﻧﻳﺩ ﺑﺭﺭﺳﯽ ﺭﺍ ﺍﺗﺻﺎﻝ ﻭ ﺩﺳﺗﮕﺎﻩ ﻣﻳﺎﻥ AllShare ﺍﺗﺻﺎﻝ ﺩﺍﺭﺩ ﺍﺧﺗﻼﻝ ﮐﺎﻣﭘﻳﻭﺗﺭ ﻣﺷﮑﻼﺕ ﺍﻳﻧﮕﻭﻧﻪ ﺑﺭﻭﺯ ﺑﻪ IP ﺗﺩﺍﺧﻝ ﺍﻳﻧﺻﻭﺭﺕ ﺩﺭﻏﻳﺭ ﺑﺎﺷﺩ ﻳﮑﺳﺎﻥ ﺑﺎﻳﺩ ﺯﻳﺭﺷﺑﮑﻪ ﻳﮏ ﺩﺭ IP ﺁﺩﺭﺱ ﺍﻧﺟﺎﻣﺩ ﻣﯽ ﺧﻳﺭ ﻳﺎ ﺍﺳﺕ ﻓﻌﺎﻝ ﻓﺎﻳﺭﻭﺍﻝ ﺁﻳﺎ ﺑﺑﻳﻧﻳﺩ ﮐﻧﻳﺩ ﻏﻳﺭﻓﻌﺎﻝ ﺭﺍ ﻓﺎﻳﺭﻭﺍﻝ ﺑﻭﺩ ﻓﻌﺎﻝ ﺍﮔﺭ BD LIVE ﻣﻣﮑﻥ BD LIVE ﺳﺭﻭﺭ ﺑﻪ ﺍﺗﺻﺎﻝ ﻧﻳﺳﺕ ﺧﻳﺭ ﻳﺎ ﺍﺳﺕ ﻓﻌﺎﻝ ﺷﺑﮑﻪ ﺍﺗﺻﺎﻝ ﺁﻳﺎ ﺑﺑﻳﻧﻳﺩ ﻭ ﮐﺭﺩﻩ ﺍﺳﺗﻔﺎﺩﻩ ﺷﺑﮑﻪ ﻭﺿﻌﻳﺕ ﻗﺎﺑﻠﻳﺕ ﺍﺯ ﺧﻳﺭ ﻳﺎ ﺍﺳﺕ ﻭﺻﻝ ﺩﺳﺗﮕﺎﻩ ...

Page 114: ...ﻧﺩﮔﻭی ﺳﻳﺳﺗﻡ ﺟﻠﻭ ﺳﻭﺭﺍﻧﺩ ﻣﺭﮐﺯ ﻭﻭﻓﺭ ﺳﺎﺏ ﺍﻣﭘﺩﺍﻧﺱ ﺍﻫﻡ 3 ﺍﻫﻡ 3 ﺍﻫﻡ 3 ﺍﻫﻡ 3 ﻓﺭﮐﺎﻧﺱ ﻣﺣﺩﻭﺩﻩ 20 ﺗﺎ ﻫﺭﺗﺯ 140 ﮐﻳﻠﻭﻫﺭﺗﺯ 20 ﺗﺎ ﻫﺭﺗﺯ 140 ﮐﻳﻠﻭﻫﺭﺗﺯ 20 ﺗﺎ ﻫﺭﺗﺯ 140 ﮐﻳﻠﻭﻫﺭﺗﺯ 160 ﺗﺎ ﻫﺭﺗﺯ 40 ﮐﻳﻠﻭﻫﺭﺗﺯ ﺻﺩﺍ ﺧﺭﻭﺟﯽ ﻓﺷﺎﺭ ﺳﻁﺢ W M ﺑﻝ ﺩﺳﯽ 87 W M ﺑﻝ ﺩﺳﯽ 87 W M ﺑﻝ ﺩﺳﯽ 87 W M ﺑﻝ ﺩﺳﯽ 88 ﻧﺎﻣﯽ ﻭﺭﻭﺩی ﻭﺍﺕ 165 ﻭﺍﺕ 165 ﻭﺍﺕ 170 ﻭﺍﺕ 170 ﻭﺭﻭﺩی ﺣﺩﺍﮐﺛﺭ ﻭﺍﺕ 330 ﻭﺍﺕ 330 ﻭﺍﺕ 340 ﻭﺍﺕ 340 ﺍﺑﻌﺎﺩ ﻋﺭﺽ x ﺍﺭﺗﻔﺎﻉ x ﻁﻭﻝ ﻣﻳﻠﻳﻣﺗﺭ ﻭﺍﺣﺩ 71 x 1053 x 89 229x2...

Page 115: ...IN 800 2255 800 CALL QATAR www samsung com eg support 08000 726786 16580 EGYPT www samsung com n_africa support 021 36 11 00 ALGERIA www samsung com pk support 0800 Samsung 72678 PAKISTAN www samsung com n_africa support 80 1000 12 TUNISIA www samsung com Levant support English 0800 22273 06 5777444 JORDAN www samsung com Levant support English 18252273 SYRIA www samsung com iran support 021 8255 ...

Reviews: