


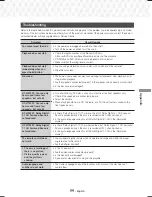
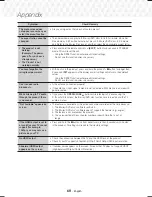

50
- English
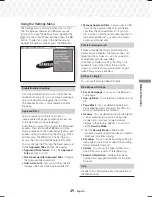
Network Services
✎
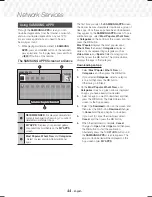
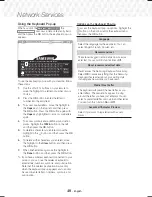
Depending on the web site, some of the
Web
Browser Settings
functions may not be activated.
Functions that are not activated are greyed out
and cannot be used.
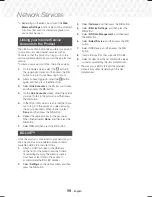
Linking your Internet Service
Accounts to the Product
The Link Accounts function lets you link your product
to your accounts with Internet services such as
Pandora so that the product can log you in to the
service automatically when you start the app for that
service.
To create a service account link, follow these steps:
1.
On the Home screen, select the
button in
the upper right corner, and then press the
OK
button to log in to your Samsung Account.
2.
After you have logged in, select the
button
again, and then press the
OK
button.
3.
Select
Link Accounts
in the My Account screen,
and then press the
OK
button.
4.
On the
Link Accounts
screen, select the service
you want to link to the product, and then press
the
OK
button.
5.
In the ID and Password screen, enter the ID you
use to log in to the service you selected using
the pop-up keyboard. When finished, select
Done
, and then press the
OK
button.
6.
Repeat the same process for the password.
When finished select
Done
, and then press the
OK
button.
7.
Select
OK
, and then press the
OK
button.
BD-LIVE™
Once the product is connected to your network, you
can enjoy various movie-related service contents
available on BD-LIVE compliant discs.
1.
Attach a USB flash drive to the USB jack
on the front of the product, and then check
its remaining memory. The memory device
must have at least 1GB of free space to
accommodate the BD-LIVE services.
2.
Select
Settings
on the Home screen, and then
press the
OK
button.
3.
Select
Network
, and then press the
OK
button.
4.
Select
BD-Live Settings
, and then press the
OK
button.
5.
Select
BD Data Management
, and then press
the
OK
button.
6.
Select
Select Device
, and then press the
OK
button.
7.
Select USB device, and then press the
OK
button.
8.
Insert a Blu-ray Disc that supports BD-LIVE.
9.
Select an item from the list of BD-LIVE service
contents provided by the disc manufacturer.
✎
The way you use BD-LIVE and the provided
contents may differ, depending on the disc
manufacturer.
HT-J7500W_J7750W-XU-ENG-0114.indd 50
HT-J7500W_J7750W-XU-ENG-0114.indd 50
2015-01-14 4:18:13
2015-01-14 4:18:13