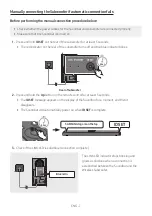
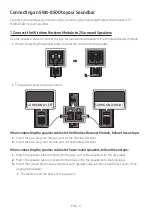
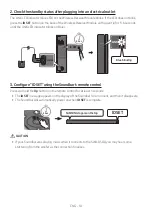
background image

HW-A670

FULL MANUAL

Imagine the possibilities 

Thank you for purchasing this Samsung product.

To receive more complete service, please register 

your product at www.samsung.com/register

Summary of Contents for HW-A670

Page 1: ...HW A670 FULL MANUAL Imagine the possibilities Thank you for purchasing this Samsung product To receive more complete service please register your product at www samsung com register ...

Page 2: ...e This symbol indicates that the rated voltage marked with the symbol is AC voltage DC voltage This symbol indicates that the rated voltage marked with the symbol is DC voltage Caution Consult instructions for use This symbol instructs the user to consult the user manual for further safety related information WARNING To reduce the risk of fire or electric shock do not expose this appliance to rain...

Page 3: ... the unit malfunctions Your product is not intended for industrial use It is for personal use only Condensation may occur if your product has been stored in cold temperatures If transporting the unit during the winter wait approximately 2 hours until the unit has reached room temperature before using 5 The battery used with this product contains chemicals that are harmful to the environment Do not...

Page 4: ...tomatic connection between the Subwoofer and the Soundbar 6 Manually connecting the Subwoofer if automatic connection fails 7 Connecting an SWA 8500 to your Soundbar 9 04 ConnectingtoyourTV 12 Method 1 Connecting with a Cable 12 Connecting a TV using an HDMI Cable 12 Connecting using an Optical Cable 14 Method 2 Connecting Wirelessly 15 Connecting a TV via Bluetooth 15 05 ConnectinganExternalDevic...

Page 5: ...e than one function 28 Output specifications for the different sound effect modes 28 09 InstallingtheWallMount 29 Installation Precautions 29 Wallmount Components 29 10 PlacingtheSoundbaronaTVstand 31 11 SoftwareUpdate 32 Update Procedure 32 If UPDATE is not displayed 33 Reset 33 12 Troubleshooting 34 13 Licence 36 14 OpenSourceLicenceNotice 37 15 ImportantNotesAboutService 37 16 Specificationsand...

Page 6: ... information about the power supply and power consumption refer to the label attached to the product Label Bottom of the Soundbar Main Unit To purchase additional components or optional cables contact a Samsung Service Centre or Samsung Customer Care The appearance of the accessories may differ slightly from the illustrations above InsertingBatteriesbeforeusingtheRemoteControl AAbatteriesX2 Slide ...

Page 7: ...bar s front display Source Button Selects the source input mode Inputmode Display Optical Digital input D IN ARC HDMI OUT input D IN TV ARC Auto conversion HDMI input HDMI BLUETOOTH mode BT USB mode USB To turn on BTPAIRING mode change the source to BT mode and then press and hold the Source button for more than 5 seconds When you plug in the AC cord the power button will begin working in 4 to 6 s...

Page 8: ...er adapter HDMI Inputs digital video and audio signals simultaneously using an HDMI cable Connect to the HDMI output of an external device HDMITOTV ARC Connect to the HDMI ARC port on a TV DIGITALAUDIOIN OPTICAL Connect to the digital optical output of an external device When disconnecting the power cable of the AC DC power adapter from a wall outlet pull the plug Do not pull the cable Do not conn...

Page 9: ...e information about the required electrical power and power consumption refer to the label attached to the product Label Bottom of the Soundbar Main Unit POWER RearofSubwoofer PowerCord Connecting ElectricalPower USB 5V0 5A DC 24V DC 24V Bottomofthe SoundbarMainUnit AC DCAdapter PowerCord Connecting ElectricalPower Make sure to rest the AC DC Adapter flat on a table or the floor If you place the A...

Page 10: ...ofer LED Status Description Resolution Blue On Successfully connected normal operation Blinking Recovering the connection Check if the power cable attached to the main Soundbar unit is connected properly or wait about 5 minutes If blinking persists try manually connecting the subwoofer See page 7 Red On Standby with the Soundbar main unit turned off Check if the power cable attached to the main So...

Page 11: ...woofer turns off and the blue indicator blinks 5 Sec RearofSubwoofer 2 Press and hold the Upbutton on the remote control for at least 5 seconds The IDSET message appears on the display of the Soundbar for a moment and then it disappears The Soundbar will automatically power on when IDSET is complete OUND E PAIR 5 Sec IDSET SAMSUNGlogoisonthetop 3 Check if the LINK LED is solid blue connection comp...

Page 12: ... 8GHz as the Soundbar near the Soundbar interference may cause some sound interruption The maximum transmission distance of the main unit s wireless signal is about 10 meters but may vary depending on your operating environment If a steel concrete or metallic wall is between the main unit and the wireless subwoofer the system may not operate at all because the wireless signal cannot penetrate meta...

Page 13: ...PEDANCE 3Ω POWER L R SURROUNDSPEAKERSOUT SURROUND RIGHT SURROUND LEFT SURROUND RIGHT WhenconnectingthespeakercablestotheWirelessReceiverModule followthesesteps 1 Insert the grey plug into the grey port on the Wireless Receiver 2 Insert the blue plug into the blue port on the Wireless Receiver Whenconnectingthespeakercablestothesurroundspeakers followthesesteps 1 Match the speaker cable connected t...

Page 14: ...RIMPEDANCE 3Ω POWER POWER IDSET STANDBY LINK LINK Blueblinking 5 Sec 3 Configure IDSET usingtheSoundbar sremotecontrol Press and hold the Upbutton on the remote control for at least 5 seconds The IDSET message appears on the display of the Soundbar for a moment and then it disappears The Soundbar will automatically power on when IDSET is complete IDSET OUND E PAIR 5 Sec SAMSUNGlogoisonthetop CAUTI...

Page 15: ...r sstatus LEDstatus Action LINK Blue On Connected with the Soundbar Blinking Connection standby status Check if the Soundbar is turned on Repeat steps 3 through 4 STANDBY Red On Connection failure Check if the Soundbar is turned on 1 Press the IDSET button on the back of the Wireless Receiver Module with a pen tip for 5 6 seconds until the LINK LED indicator blinks in Blue IDSET L R SURROUNDSPEAKE...

Page 16: ...hod1 ConnectingwithaCable ConnectingaTVusinganHDMICable CAUTION When both the HDMI cable and optical cable are connected the HDMI signal is received first To connect the HDMI cable between the TV and Soundbar be sure to connect the terminals marked ARC Otherwise the TV sound may not be output The recommended cable is HighSpeedHDMICablewithEthernet ConnecttotheHDMIIN ARC portofyourTV HDMI IN ARC HD...

Page 17: ...sion of video and audio data with just a single connector If the TV provides an ARC port connect the HDMI cable to the HDMI IN ARC port We recommend you use a coreless HDMI cable if possible If you use a cored HDMI cable use one whose diameter is less than 14 mm This function is not available if the HDMI cable does not support ARC When the audio in a broadcast is encoded in Dolby Digital and the D...

Page 18: ...d the terminals have covers be sure to remove the covers OPTICAL OUT DIGITAL AUDIO IN OPTICAL BottomoftheSoundbar TopoftheSoundbar OpticalCable notsupplied D IN 1 Connect the DIGITALAUDIOIN OPTICAL port on the Soundbar to the OPTICAL OUT port of the TV with a digital Optical Cable not supplied 2 Press the Source button on the top panel or remote control and then select the D IN mode ...

Page 19: ...dbar for more than 5 seconds to display BTPAIRING 2 Select Bluetooth mode on the TV For more information see the TV s manual 3 Select AV SamsungSoundbarA6 Series from the list on TV s screen An available Soundbar is indicated with NeedPairing or Paired on the TV s Bluetooth device list To connect the TV to the Soundbar select the message and then establish a connection When the TV is connected TVN...

Page 20: ...on the remote control or press and hold the Source button on the top of the Soundbar for more than 5 seconds while the Soundbar is in BT mode NOTES If asked for a PIN code when connecting a Bluetooth device enter 0000 In Bluetooth connection mode the Bluetooth connection will be lost if the distance between the Soundbar and the Bluetooth device exceeds 10 meters The Soundbar automatically turns of...

Page 21: ...e HDMICable BottomoftheSoundbar ExternalDevice TopoftheSoundbar HDMI 1 Connect an HDMI cable from the HDMI port on the back of the product to the HDMI OUT port on your digital device 2 Connect an HDMI cable from the HDMITOTV ARC port on the back of the product to the HDMI IN port on your TV 3 Press the Source button on the top panel or on the remote control and then select HDMI 4 HDMI mode is disp...

Page 22: ...tomoftheSoundbar BD DVDplayer Set topbox Gameconsole TopoftheSoundbar D IN 1 Connect DIGITALAUDIOIN OPTICAL on the main unit to the OPTICAL OUT port of the Source Device using a digital Optical Cable not supplied 2 Select D IN mode by pressing the Source button on the top panel or on the remote control ...

Page 23: ... no USB device has been connected for more than 20 minutes FileFormatTypeCompatibilitylist Extension Codec SamplingRate Bitrate mp3 MPEG1 Layer2 32kHz 48kHz 32kbps 320kbps MPEG1 Layer3 32kHz 48kHz 32kbps 320kbps MPEG2 Layer3 16kHz 24kHz 8kbps 160kbps MPEG2 5 Layer3 8kHz 12kHz 8kbps 160kbps wma WMA7 8 9 Audio Only 32kHz 48kHz 32kbps 320kbps ogg Vorbis 32kHz 48kHz 45kbps 500kbps aac m4a mp4 AAC LC M...

Page 24: ...Y if there is a connect record b When BTREADY appears press and hold the Source button on the top panel of the Soundbar for more than 5 seconds to display BTPAIRING 2 On your device select AV SamsungSoundbarA6 Series from the list that appears When the Soundbar is connected to the Bluetooth device BluetoothDeviceName BT appears in the front display 3 Play music files from the device connected via ...

Page 25: ...devices may cause radio interference Devices that generate electromagnetic waves must be kept away from the Soundbar main unit e g microwaves wireless LAN devices etc The Soundbar supports SBC data 44 1kHz 48kHz Connect only to a Bluetooth device that supports the A2DP AV function You cannot connect the Soundbar to a Bluetooth device that supports only the HF Hands Free function Once you have pair...

Page 26: ...tooth Bluetooth is a technology that enables Bluetooth compliant devices to interconnect easily with each other using a short wireless connection A Bluetooth device may cause noise or malfunction depending on usage if A part of your body is in contact with the receiving transmitting system of the Bluetooth device or the Soundbar It is subject to electrical variation from obstructions caused by a w...

Page 27: ...4 In versions prior to AVRCP V1 4 the switching time of the device playing music may be delayed NOTES The device can be switched by notification or alarm on some devices Some devices do not support Bluetooth multi connection BTPAIRING mode stops when no device is paired within 3 minutes Switching devices may take about 7 seconds on some apps If you attempt to connect a 3rd Bluetooth device the A o...

Page 28: ...through the available sound modes SURROUNDSOUND BASSBOOST GAME ADAPTIVE DTSVIRTUAL X or STANDARD SURROUNDSOUND Provides a wider sound field than standard BASSBOOST Sound field mode with emphasis on bass sound GAME Provides stereoscopic sound to immerse you in the action while gaming ADAPTIVE Analyses the content in real time and automatically provides an optimal sound field based on the characteri...

Page 29: ...AIR Bluetooth PAIR Press the PAIR button BTPAIRING appears in the Soundbar s display You can connect the Soundbar to a new Bluetooth device in this mode by selecting the Soundbar from the Bluetooth device s search list Play Pause Press the p button to pause a music file temporarily When you press the button again the music file plays Up Down Left Right PresstheindicatedareastoselectUp Down Left Ri...

Page 30: ...ynchronised press the SoundControl button to select AUDIOSYNC and then set the audio delay between 0 300milliseconds by using the Up Down buttons Not available in USB or BT mode AUDIOSYNC is only supported for some functions When the Rear Speakers are connected the settings REARSPEAKERON OFF and REARLEVEL are supported Use the Up Down buttons to set the REARSPEAKERON OFF and to adjust the volume o...

Page 31: ...1 Turn Off the Soundbar 2 Push up and hold the WOOFER button for 5 seconds Each time you push the WOOFER button up and hold it for 5 seconds the mode switches in the following order OFF TVREMOTE Default mode SAMSUNG TVREMOTE ALL TVREMOTE RemoteControlButton Display Status S O U N D M O D E V O L W O O F E R S O U N D B 5 Sec OFF TVREMOTE Default mode Disable the TV remote control S O U N D M O D E...

Page 32: ...ge 25 Bluetooth Power page 25 Outputspecificationsforthedifferentsoundeffectmodes Effect Input Output WithoutWirelessRear SpeakerKit WithWirelessRear SpeakerKit SOUNDMODE SOUND MODE SURROUND SOUND 2 0 ch 3 1 ch 5 1 ch 5 1 ch 3 1 ch 5 1 ch BASS BOOST 2 0 ch 3 1 ch 5 1 ch 5 1 ch 3 1 ch 5 1 ch GAME 2 0 ch 3 1 ch 5 1 ch 5 1 ch 3 1 ch 5 1 ch ADAPTIVE 2 0 ch 3 1 ch 5 1 ch 5 1 ch 3 1 ch 5 1 ch DTS VIRTUA...

Page 33: ...uds Purchase wall mounting screws according to the type and thickness of the wall you want to mount the Soundbar on Diameter M5 Length 35 mm or longer recommended Connect cables from the unit to external devices before you install the Soundbar on the wall Make sure the unit is turned off and unplugged from the power source before you install it Otherwise it may cause an electric shock WallmountCom...

Page 34: ...appropriately sized drill bit drill a hole in the wall at each marking If the markings do not correspond to the positions of studs make sure you insert appropriate anchors into the holes before you insert the support screws If you use anchors make sure the holes you drill are large enough for the anchors you use 5 Push a screw not supplied through each Holder Screw and then screw each screw firmly...

Page 35: ...the Bracket Wall Mounts and then slide the Bracket Wall Mounts down so that the Bracket Wall Mounts rest securely on the Holder Screws 10 PLACINGTHE SOUNDBARONA TVSTAND Place the Soundbar on a TV stand 3cmormore As illustrated in the image align the centre of the Soundbar with the centre of the TV carefully place the Soundbar onto the TV stand For optimal sound quality position the Soundbar at lea...

Page 36: ... 1 Connect a USB thumb drive to the USB port on your computer Important Make sure there are no music files on the USB thumb drive This may cause the firmware update to fail 2 Go to samsung com select Enter Model Number and enter the model of your Soundbar Select manuals and downloads and download the latest software file 3 Save the downloaded software to a USB stick and select Extract Here to unzi...

Page 37: ...s initialised so you can reset your settings We recommend you write down your settings so that you can easily reset them after the update Note that updating firmware resets the subwoofer connection too If the connection to the subwoofer is not re established automatically after the update refer to page 6 If the software update fails check if the USB stick is defective Mac OS users should use MS DO...

Page 38: ...d completely reconnect and turn the power on Reset the product and try again See page 33 Subwooferdoesnotoutputanysound Check whether the LED indicator on the rear of the Subwoofer is on in blue Reconnect the Soundbar and Subwoofer if the indicator is blinking in blue or turned red See page 7 You may experience an issue if there is an obstacle between the Soundbar and Subwoofer Move devices to an ...

Page 39: ...ct and try again See page 33 Sounddropsoutwhenconnectedvia Bluetooth Some devices can cause radio interference if they are located too close to the Soundbar e g microwaves wireless routers etc If your device that is connected via Bluetooth moves too far away from the Soundbar it may cause the sound to drop out Move the device closer to the Soundbar If a part of your body is in contact with the Blu...

Page 40: ...Rqualifiedmodelonly Your Samsung product is ENERGY STAR qualified in its factory default setting Change to certain features settings and functionality in this product can change the power consumption possibly beyond the limits required for ENERGY STAR qualification Environmental Protection Agency and Department of Energy ENERGY STAR is a joint program of the Government agencies designed to promote...

Page 41: ... requests for questions regarding open sources contact Samsung Open Source http opensource samsung com 15 IMPORTANT NOTESABOUT SERVICE Figures and illustrations in this User Manual are provided for reference only and may differ from actual product appearance ...

Page 42: ...g Dimensions W x H x D 205 0 x 353 0 x 303 2 mm AMPLIFIER Rated Output power 250W Wireless Surround Speaker SET Name SWA 8500 Weight Wireless Receiver Module Surround Speaker 0 7 kg 0 5 kg Dimensions W x H x D Wireless Receiver Module Surround Speaker 50 0 x 201 0 x 132 0 mm 76 0 X 127 0 X 76 0 mm Operating Temperature Range 5 C to 35 C Operating Humidity Range 10 75 Frequency range 20Hz 20kHz NOT...

Page 43: ...com nz support VIETNAM 1800588889 www samsung com vn support THAILAND 1800 29 3232 Tollfreeforallproduct www samsung com th support MYANMAR 95 1 2399 888 www samsung com mm support CAMBODIA 1800 20 3232 Tollfree www samsung com th support LAOS 856 214 17333 MALAYSIA 1800 88 9999 603 77137420 Overseascontact www samsung com my support INDONESIA 021 5699 7777 0800 112 8888 AllProduct TollFree www sa...

Reviews: