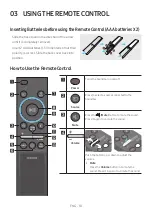
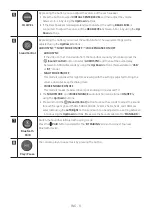
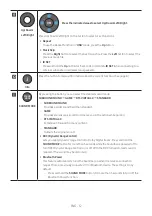
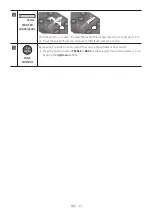
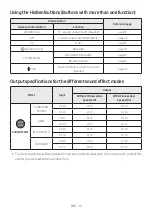
background image

HW-B53M

FULL MANUAL

Imagine the possibilities 

Thank you for purchasing this Samsung product. 
To receive more complete service, please register 
your product at www.samsung.com/register

Summary of Contents for HW-B53M

Page 1: ...HW B53M FULL MANUAL Imagine the possibilities Thank you for purchasing this Samsung product To receive more complete service please register your product at www samsung com register ...

Page 2: ...This symbol instructs the user to consult the user manual for further safety related information WARNING To reduce the risk of fire or electric shock do not expose this appliance to rain or moisture To prevent injury this apparatus must be securely attached to the floor wall in accordance with the installation instructions This product contains chemicals known to the State of California to cause c...

Page 3: ...and receiver Connecting the equipment to an outlet that is on a different circuit than the radio or TV Consulting the dealer or an experienced radio TV technician for help FCCRadiationExposureStatement This equipment complies with FCC radiation exposure limits set forth for an uncontrolled environment This equipment should be installed and operated so there is at least 8 inches 20 cm between the r...

Page 4: ... the power requirements listed on the identification sticker located on the bottom of your product Install your product horizontally on a suitable base furniture with enough space around it for ventilation 3 4 inches Make sure the ventilation slots are not covered Do not place the unit on amplifiers or other equipment which may become hot This unit is designed for continuous use To fully turn off ...

Page 5: ...ore than one function 14 Output specifications for the different sound effect modes 14 Adjusting the Soundbar volume with a TV remote control 15 04 ConnectingtheSoundbar 16 Connecting Electrical Power 16 Connecting the Soundbar to the Subwoofer 17 Connecting the Samsung Wireless Rear Kit to your Soundbar 19 05 UsingawiredconnectiontotheTV 20 Method 1 Connecting using an Optical Cable 20 Method 2 C...

Page 6: ...MobileDevice 28 Connecting via Bluetooth 28 10 InstallingtheWallMount 32 Installation Precautions 32 Wallmount Components 32 11 SoftwareUpdate 34 How to check the Firmware version 34 Update Procedure 35 If UPDATE is not displayed 35 12 Troubleshooting 36 13 License 38 14 OpenSourceLicenseNotice 39 15 ImportantNotesAboutService 39 16 SpecificationsandGuide 40 Specifications 40 ...

Page 7: ...n about the power supply and power consumption refer to the label attached to the product Label Bottom of the Soundbar Main Unit To purchase additional components or optional cables contact a Samsung Service Center or Samsung Customer Care Depending on the region the appearance of the AC plug may differ from the plug displayed above or it may be supplied integrated with the AC DC adapter The appea...

Page 8: ...Selects the source input mode Inputmode Display Optical Digital input D IN ARC HDMI OUT input D IN TV ARC Auto conversion HDMI input HDMI BLUETOOTH mode BT USB mode USB To turn on BTPAIRING mode change the source to BT mode and then press and hold the Source button for more than 5 seconds When you plug in the AC cord the power button will begin working in 4 to 6 seconds When you turn on this unit ...

Page 9: ...C DC 24V HDMI IN HDMI TO TV ARC DIGITAL AUDIO IN OPTICAL USB 5V 0 5A DC 24V DIGITALAUDIOIN OPTICAL Connect to the digital optical output of an external device USB 5V0 5A Connect a USB device here to play music files stored on the USB device through the Soundbar HDMIIN Inputs digital video and audio signals simultaneously using an HDMI cable Connect to the HDMI output of an external device HDMITOTV...

Page 10: ...TROL CHLEVEL Power Turns the Soundbar on and off SOUND MODE WOOFER TONE CONTROL CHLEVEL Source Press to select a source connected to the Soundbar SOUND MODE WOOFER TONE CONTROL CHLEVEL Mute Press the Mute button to mute the sound Press it again to unmute the sound SOUND MODE WOOFER TONE CONTROL CHLEVEL Volume C H L E V E L T O N E C O N T R O L W O O F E R S O U N D M O D E C H L E V E L T O N E C...

Page 11: ...conds by using the Up Down buttons Not available in USB or BT mode NIGHTMODEON OFF This mode is optimized for nighttime viewing with the settings adjusted to bring the volume down but keep the dialog clear VOICEENHANCEON OFF This mode is makes it easier to hear spoken dialog in movies and TV The NIGHTMODE and VOICEENHANCEaudio function can be turned ON OFF by using the Up Down buttons Press and ho...

Page 12: ...ton you can select the desired sound mode SURROUNDSOUND GAME DTSVIRTUAL X STANDARD SURROUNDSOUND Provides a wider sound field than standard GAME Provides stereoscopic sound to immerse you in the action while gaming DTSVIRTUAL X Immersive 3D sound from any content STANDARD Outputs the original sound DRC DynamicRangeControl Lets you apply dynamic range control to Dolby Digital tracks Press and hold ...

Page 13: ... E C O N T R O L W O O F E R S O U N D M O D E Push the button up or down to adjust the level of the woofer bass to 12 or between 6 to 6 To set the woofer bass volume level to 0 Default press the button SOUND MODE WOOFER TONE CONTROL CHLEVEL TONE CONTROL By pressing the button you can adjust the volume of the treble or bass sound Press the button to select TREBLE or BASS and then adjust the volume...

Page 14: ... On Off Standby page 31 Outputspecificationsforthedifferentsoundeffectmodes Effect Input Output WithoutWirelessRear SpeakerKit WithWirelessRear SpeakerKit SOUNDMODE Surround VOL WOOFER SOUND MODE Bluetooth POWER SURROUND SOUND 2 0 ch 2 1 ch 4 1 ch 5 1 ch 2 1 ch 4 1 ch GAME 2 0 ch 2 1 ch 4 1 ch 5 1 ch 2 1 ch 4 1 ch DTS VIRTUAL X 2 0 ch 2 1 ch 4 1 ch 5 1 ch 2 1 ch 4 1 ch STANDARD 2 0 ch 2 1 ch 2 1 c...

Page 15: ... 2 Push up and hold the WOOFER button for 5 seconds Each time you push the WOOFER button up and hold it for 5 seconds the mode switches in the following order OFF TVREMOTE Default mode SAMSUNG TVREMOTE ALL TVREMOTE RemoteControlButton Display Status S O U N D M O D E W O O F E R C H L E V E L T O N E C O N T R O L 5 Sec OFF TVREMOTE Default mode Disable the TV remote control S O U N D M O D E W O ...

Page 16: ...lectrical power and power consumption refer to the label attached to the product Label Bottom of the Soundbar Main Unit POWER RearofSubwoofer PowerCord Connecting ElectricalPower Bottomofthe SoundbarMainUnit AC DCAdapter Connecting ElectricalPower HDMI HDMI TO TV ARC HDMI IN HDMI TO TV ARC DIGITAL AUDIO IN OPTICAL USB 5V 0 5A DC 24V DC 24V PowerCord Make sure to rest the AC DC Adapter flat on a ta...

Page 17: ...oofer LED Status Description Resolution Blue On Successfully connected normal operation Blinking Recovering the connection Check if the power cable attached to the main Soundbar unit is connected properly or wait about 5 minutes If blinking persists try manually connecting the subwoofer See page 18 Red On Standby with the Soundbar main unit turned off Check if the power cable attached to the main ...

Page 18: ...oofer turns off and the blue indicator blinks 5 Sec RearofSubwoofer 2 Press and hold the Upbutton on the remote control for at least 5 seconds The IDSET message appears on the display of the Soundbar for a moment and then it disappears The Soundbar will automatically power on when IDSET is complete SOUND MODE PAIR 5 Sec IDSET SAMSUNGlogoisonthetop 3 Check if the LINK LED is solid blue connection c...

Page 19: ...nal is about 32 8 ft 10 m but may vary depending on your operating environment If a steel concrete or metallic wall is between the main unit and the wireless subwoofer the system may not operate at all because the wireless signal cannot penetrate metal PRECAUTIONS Wireless receiving antennas are built into the wireless subwoofer Keep the unit away from water and moisture For optimal listening perf...

Page 20: ... the sound field and various settings as well as the volume and mute Method1 ConnectingusinganOpticalCable Pre connectionChecklist When both the HDMI cable and optical cable are connected the HDMI signal is received first When you use an optical cable and the terminals have covers be sure to remove the covers AUX IN USB 5V 0 5A DIGITAL AUDIO IN OPTICAL OPTICAL OUT OpticalCable BottomoftheSoundbar ...

Page 21: ...rmainunit TopoftheSoundbar HDMICable notsupplied TVARC 1 With the Soundbar and TV turned on connect the HDMI cable not supplied as shown in the figure 2 TVARC appears in the display window of the Soundbar main unit and the Soundbar plays TV sound If TV sound is inaudible press the Source button on the remote control or on the top of the Soundbar to switch to D IN mode The screen displays D IN and ...

Page 22: ...I cable use one whose diameter is less than 0 55 inches 14 mm This function is not available if the HDMI cable does not support ARC When the audio in a broadcast is encoded in Dolby Digital and the Digital Output Audio Format on your TV is set to PCM we recommend that you change the setting to Dolby Digital When the setting on the TV is changed you will experience better sound quality The TV menu ...

Page 23: ...nel of the Soundbar for more than 5 seconds to display BTPAIRING 2 Select Bluetooth mode on the TV For more information see the TV s manual 3 Select AV SoundbarB5 Series from the list on TV s screen An available Soundbar is indicated with Needspairing or Paired on the TV s Bluetooth device list To connect the TV to the Soundbar select the message and then establish a connection When the TV is conn...

Page 24: ... the remote control or press and hold the Source button on the top of the Soundbar for more than 5 seconds while the Soundbar is in BT mode NOTES If asked for a PIN code when connecting a Bluetooth device enter 0000 In Bluetooth connection mode the Bluetooth connection will be lost if the distance between the Soundbar and the Bluetooth device exceeds 32 8 ft 10 meters The Soundbar automatically tu...

Page 25: ...tingusinganOpticalCable AUX IN USB 5V 0 5A DIGITAL AUDIO IN OPTICAL OPTICAL OUT OpticalCable BottomoftheSoundbar D IN TopoftheSoundbar BD DVDplayer Set topbox Gameconsole 1 Connect DIGITALAUDIOIN OPTICAL on the main unit to the OPTICAL OUT port of the Source Device using a digital optical cable 2 Select D IN mode by pressing the Source button on the top panel or on the remote control ...

Page 26: ...HDMI cable not supplied from the HDMIIN port on the bottom of the Soundbar to the HDMI OUT port on your digital device 2 Connect an HDMI cable not supplied from the HDMITOTV ARC port on the bottom of the Soundbar to the HDMI IN port on your TV 3 Press the Source button on the top panel or on the remote control and then select HDMI 4 HDMI mode is displayed on the Soundbardisplaypanel and sound play...

Page 27: ...ylist Extension Codec SamplingRate Bitrate mp3 MPEG 1 Layer2 16kHz 48kHz 80kbps 320kbps MPEG 1 Layer3 16kHz 48kHz 80kbps 320kbps MPEG 2 Layer3 16kHz 48kHz 80kbps 320kbps MPEG 2 5 Layer3 16kHz 48kHz 80kbps 320kbps wma Wave_Format_MSAudio1 16kHz 48kHz 56kbps 128kbps Wave_Format_MSAudio2 16kHz 48kHz 56kbps 128kbps aac AAC 16kHz 96kHz 48kbps 320kbps AAC LC 16kHz 96kHz 128kbps 192kbps 5 1ch 320kbps HE ...

Page 28: ...BTREADY if there is a connect record b When BTREADY appears press and hold the Source button on the top panel of the Soundbar for more than 5 seconds to display BTPAIRING 2 On your device select AV SamsungSoundbarB5 Series from the list that appears When the Soundbar is connected to the Bluetooth device BluetoothDeviceName BT appears in the front display 3 Play music files from the device connecte...

Page 29: ...c devices may cause radio interference Devices that generate electromagnetic waves must be kept away from the Soundbar main unit e g microwaves wireless LAN devices etc The Soundbar supports SBC data 44 1kHz 48kHz Connect only to a Bluetooth device that supports the A2DP AV function You cannot connect the Soundbar to a Bluetooth device that supports only the HF Hands Free function Once you have pa...

Page 30: ...etooth Bluetooth is a technology that enables Bluetooth compliant devices to interconnect easily with each other using a short wireless connection A Bluetooth device may cause noise or malfunction depending on usage if A part of your body is in contact with the receiving transmitting system of the Bluetooth device or the Soundbar It is subject to electrical variation from obstructions caused by a ...

Page 31: ... Bluetooth device side switch Bluetooth on and select the Soundbar from the list of available devices the Soundbar will automatically connect to the Bluetooth device 3 A 2nd Bluetooth device can be paired and connected to the Soundbar using the same method If you attempt to connect a 3rd device a connected device that is not playing audio will lose its Bluetooth connection but will still be paired...

Page 32: ...ting screws according to the type and thickness of the wall you want to mount the Soundbar on Diameter M5 Length 1 3 8 inches 35 mm or longer recommended Connect cables from the unit to external devices before you install the Soundbar on the wall Make sure the unit is turned off and unplugged from the power source before you install it Otherwise it may cause an electric shock WallmountComponents W...

Page 33: ... the markings do not correspond to the positions of studs make sure you insert appropriate anchors into the holes before you insert the support screws If you use anchors make sure the holes you drill are large enough for the anchors you use 5 Push a screw not supplied through each Holder Screw and then screw each screw firmly into a support screw hole Notsupplied 6 Install the 2 Bracket WallMounts...

Page 34: ...ICAL If an update is offered you can update the firmware by connecting a USB device with the firmware update stored on it to the USB port on your Soundbar For more information about how to download update files go to the Samsung Electronics website at https www samsung com us support downloads Then select the product type or enter the model number of your Soundbar select the Software Apps option a...

Page 35: ...he Soundbar turns off The update is complete This product has a DUAL BOOT function If the firmware fails to update you can update the firmware again 7 Restore your settings on the Soundbar IfUPDATEisnotdisplayed 1 Turn off the Soundbar disconnect and then reconnect the USB storage device that contains the update files to the Soundbar s USB port 2 Disconnect the Soundbar s power cord reconnect it a...

Page 36: ... The cable connection to the Soundbar may not be loose Remove the cable and connect again Remove the power cord completely reconnect and turn the power on Reset the product and try again See page 35 Subwooferdoesnotoutputanysound Check whether the LED indicator on the rear of the Subwoofer is on in blue Reconnect the Soundbar and Subwoofer if the indicator is blinking in blue or turned red See pag...

Page 37: ...the selection Remove and reconnect the power plug then try again Reset the product and try again See page 35 Sounddropsoutwhenconnectedvia Bluetooth If your device that is connected via Bluetooth moves too far away from the Soundbar it may cause the sound to drop out Move the device closer to the Soundbar If a part of your body is in contact with the Bluetooth transceiver or the product is install...

Page 38: ...only Your Samsung product is ENERGY STAR qualified in its factory default setting Change to certain features settings and functionality in this product can change the power consumption possibly beyond the limits required for ENERGY STAR qualification Environmental Protection Agency and Department of Energy ENERGY STAR is a joint program of the Government agencies designed to promote energy efficie...

Page 39: ...a An engineer is called out to your home at your request and there is no defect in the product b You bring the unit to a repair center and there is no defect in the product You will be advised of the amount of the administration fee before any work is done or a home visit is made If you have a problem with this product we strongly recommend you read the appropriate section of this manual visit the...

Page 40: ...ER Rated Output power 160W 40Wx4 Supported play formats DTS 2 0 and DTS Virtual X sound are played in DTS format LPCM 2ch Dolby Audio supporting Dolby Digital DTS DTS Virtual X Subwoofer Name PS WB55D Weight 9 7 lbs 4 4 kg Dimensions W x H x D 7 2 x 13 6 x 11 6 inches 184 0 x 346 0 x 295 0 mm AMPLIFIER Rated Output power 200W NOTES Samsung Electronics Co Ltd reserves the right to change the specif...

Page 41: ... service problems incorrect electrical line voltage fluctuations and surges customer adjustments and failure to follow operating instructions cleaning maintenance and environmental instructions that are covered and prescribed in the instruction book product removal or reinstallation reception problems and distortion related to noise echo interference or other signal transmission and delivery probl...

Page 42: ... Ltd All rights reserved QUESTIONS OR COMMENTS Country IN THE US 1 800 SAMSUNG 726 7864 www samsung com us support Samsung Electronics America Inc 85 Challenger Road Ridgefield Park NJ 07660 Samsung Service Center Web Site Address ...

Reviews: