background image

Summary of Contents for HW-D700

Page 1: ...the possibilities Thank you for purchasing this Samsung product To receive more complete service please register your product at www samsung com register ...

Page 2: ...o provide reasonable protection against harmful interference in a residential installation This equipment generates uses and can radiate radio frequency energy and if not installed and used in accordance with the instructions may cause harmful interference to radio communications However there is no guarantee that interference will not occur in a particular installation If this equipment does caus...

Page 3: ...dry cloth 7 Do not block any ventilation openings Install in accordance with the manufacturer s instructions 8 Do not install near any heat sources such as radiators heat registers stoves or other apparatus including amplifiers that produce heat 9 Do not defeat the safety purpose of the polarized or grounding type plug A polarized plug has two blades with one wider than the other A grounding type ...

Page 4: ...During thunderstorms disconnect the AC plug from the wall outlet Voltage spikes caused by lightning could damage the product Do not expose the product to direct sunlight or other heat sources This could cause the product to overheat and malfunction Protect the product from moisture excess heat and equipment creating strong magnetic or electric fields i e speakers Disconnect the power cable from th...

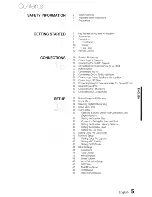
Page 5: ...l Amplifier Ex Second Room 28 Connecting an iPod 30 Connecting the FM Antenna 30 Connecting AUX Components SETUP 31 Before Using the AV Receiver 31 Home Menu 32 Selecting Digital HOM Analog 33 Setup Menu Tree 36 Audio Setup 36 Selecting a Source Device And Connection Jack Digital Audio In 36 Setting the Speaker Size 38 Connection Setting For Surround Back 39 Setting the Speaker Listening Distance ...

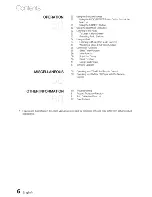
Page 6: ...io function 54 Watching a Movie iPod video function 55 Convenient Functions 55 Sleep Timer Function 56 Mute Function 56 Adjust the Display 56 Reset Function 57 Using Headphones 57 Software Upgrade 58 Operating your 1V with the Remote Control 59 Operating your DVD or BD Player with the Remote Control 60 Troubleshooting 61 Product Protection Function 61 Auto Calibration Error List 62 Specifications ...

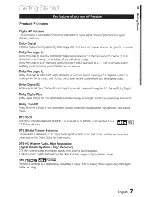
Page 7: ...ng sound Dolby Digital EX Adds a surround back channel for more spacious sound compared to regular 5 1 channel Dolby Digital Dolby Digital Plus Dolby Digital Plus is the next generation audio technology for all high definition programming and media Dolby True HD Dolby True HD is Dolby s next generation lossless technology developed for high definition disc based media DTS 96 24 DTS 96 24 encodes s...

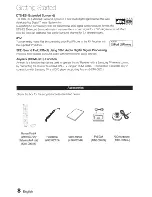
Page 8: ... AV Receiver with Madetor the supplied iPod dock iPod CiPhone SFE Sound Field Effect Using 32bit Audio Digital Signal Processing Provides more realistic surround sound with normal stereo audio sources Anynet HDMI CEC Function Anynet is a function that can be used to operate this AV Receiver with a Samsung TV remote control by connecting the receiver to a SAMSUNG TV using an HOMI Cable This functio...

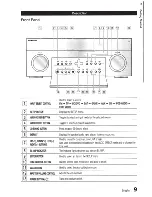
Page 9: ...O Displays the SETUP menu Toggles to select an input mode for the selected source Toggles to select asurround sound mode Press to apply 3D Sound effect Displays the speaker audio input status listening mode etc Used to move the cursor up down left or right Also used to select detailed options in the AUDIO EFFECT mode and to change the tone level The indicator lights on when you turn on Bi AMP Used...

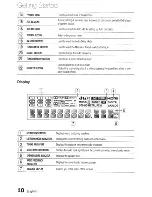
Page 10: ...al signal as it is without applying the sound field effect or any other sound effect Display r m 4 co m CQ u u Es_m t 1 1_ 1_j Ho 1 GO aiD Rura t o G TAL Ex n c s 96 r fN Eo a oiGITAL CEJ 1 looLeviPROLOGIClix 24 I H oiGITAL PLusPROLOGICliz DTS HDMSTRL PCM ANALOG _____ __ _ o d kHZ I I _ _ _ _ u h j SPEAKER INDICATORS Displays sound producing speakers I USTENING MODE INDICATORS Displays the current...

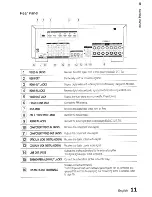
Page 11: ...repair AUDIO IN JACKS Receives the audio signal from avideo player BO DVD SAT TV 1QJ COMPONENT VIDEO IN JACKS Receives the component video signal ill COMPONENT VIDEO OUT JACKS Outputs the component video signal j J OPTICAL IN JACKS DIGITAL AUDIO IN Receives the digital optical audio signal l1 J COAXIAL IN JACK DIGITAL AUDIO IN Receives the digital coaxial audio signal LINE OUT JACKS Outputs the an...

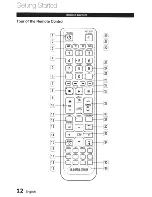
Page 12: ...Getting Started Remote Control Tour of the Remote Control A 29 TUNING CH v 12 English ...

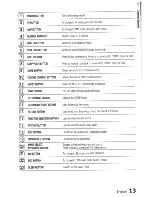
Page 13: ...ice ill MOIST BUTTON Select MONO or STEREO for radio broadcasts g TONE BUTTON You can adjust the bass and treble level G J SETUP MENU BUTTON Displays the SETUP menu G UP DOWN LEFT RIGHT BUTIONS Used to navigate the menus ID RETURN BUTTON Used to return to the previous menu from the SETUP menu G FUNCTION SELECTOR BUTTONS Used to select an input source GlJ AV SYNC BUTTON Used to select the Audio Del...

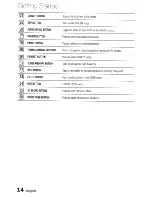
Page 14: ...device TUNING CHANNEL BUTIONS Used to change the radio broadcasting frequency or TV channel S DIRECT BUTION Press to select S DIRECT mode TUNER MEMORY BUTION Used to set apreset radio frequency INFOBUTION Display information on the connected device currently being used ID ENTER BUTION Used to select an item in the SETUP menu EXIT BUTTON Exits the SETUP menu ID 3D SOUND BUTION Press to apply 3D Sou...

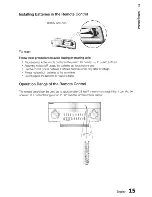
Page 15: ...r about one year Use the correct type of batteries Batteries that look similar may differ in voltage 11 Always replace both batteries at the same time Do not expose the batteries to heat or aflame Operation Range of the Remote Control The remote control can be used up to approximately 23 feet 7 meters in a straight line It can also be operated at a horizontal angle of up to 30 from the remote cont...

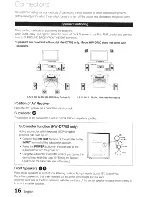
Page 16: ...e The position of the subwoofer is not so critical Place it anywhere you like Subwoofer function HW 07705 only Active subwoofer with integrated 150W amplifier provides rich bass sound Connect the SW OUT terminal of the amplifier to the INPUT terminal of the subwoofer speaker Press the POWER button on the rear side of the subwoofer to turn the power on Using the subwoofer s VOLUME control you can s...

Page 17: ...ers 0 G Using Dolby Pro Logic liz When using Dolby Pro Logic liz place the Surround Back Speakers on the FHL FHR position above the front Land front R speakers at least 3 3 feet 1 m above each one NOTE When you attach the speakers to the wall make sure to fasten them tightly so they do not fall off Speaker Configuration For the best surround sound experience you should connect seven speakers and a...

Page 18: ...ith model HW D770S only Model HW D700 does not come with speakers One Active Subwoofer is provided if you would like to use another purchase it from the retailer where you bought the player and connect it to the other SUBWOOFER OUT Jack X Keep the subwoofer speaker out of reach of children to prevent them from inserting their hands or objects into the duct hole Never touch speaker terminals while ...

Page 19: ...in the front right speaker 3 Connect the SURROUND BACK L connector rear side of main unit to the Woofer port in the front left speaker 4 Connect the SURROUND BACK Rconnector rear side of main unit to the Woofer port in the front right speaker CAUTION If Bi amp is active you may encounter a restricted access if you have not removed the shorting bar like ajumper in both tweeter and subwoofer ports i...

Page 20: ...reated in the digital source By connecting through the HDMI High Definition Multimedia Interface interface you can play back digital video and audio DVDor Blu ray Player I SUB l J l J ARC Using two HDMI OUT jacks you can connect two TVs or projectors at the same time SAT Cable Satellite Set top box r 0 _ i TV ro ft G TV 20 English 0 Game console or HDTVTuner HDTV Terrestrial Receiver Camcorder HDM...

Page 21: ...d have been connected to the MAIN jack High bandwidth Digital Content Protection System HDCP support To play digital contents through the HDMI connection both the connected external device and 1V must support High bandwidth Digital Content Protection System HDCP This product supports HDCP Compatibility with a TV Supporting HDMI A1V with an HOMIjack Video Audio A1V with a OVI D jack TV supporting H...

Page 22: ...UP OFF 2 Press the buttons to select OPTION and then press the ENTER button 3 Press the buttons to select HDMI SETUP and then press the ENTER button 4 Press the buttons to select HOMI ANYNET and then press the ENTER button 5 Press the buttons to set ANYNET to ON and then press the ENTER button To exit setup mode Press the SETUP MENU or EXIT button on the remote control SETUP OFF appears on the dis...

Page 23: ...tput PR Ps and Y jacks on the back of your AV Receiver to the Component Video Input jacks on your 1V OR Connect the Video cable not supplied from the VIDEO OUT MONITOR jack on the back of your AV Receiver to the Video Input jack on your 1V Audio Connection Connect the Digital Input OPTICAL 3 on your AV Receiver to the Digital Output of the 1V OR Connect AUDIO IN 1V on your AV Receiver to the Audio...

Page 24: ...from the COMPONENT IN BD DVD PR Ps and Y jacks on the back of your AV Receiver to the Component Video Output jacks on your DVD BD player OR Connect aVideo cable not supplied from the VIDEO IN BD DVD jack on the back of your AV Receiver to the Video Output jack on your DVD BD player Audio Connection Connect the Digital Input OPTICAL 1 on your AV Receiver to the Digital Output of the DVD BD player O...

Page 25: ...d from the VIDEO IN SAT jack on the back of your AV Receiver to the Video Output jack on your SAT Audio Connection Connect the Digital Input OPTICAL 2 on your AV Receiver to the Digital Output of the SAT OR Connect AUDIO IN SAT on your AV Receiver to the Audio Out of the SAT NOTE 11 Disconnect the power plug from the outlet if you will not use this unit for along period of time I If the cable set ...

Page 26: ...D on your AV Receiver to the Audio Out of the CD player NOTE Connect the audio cable s red plug to the red jack and white cable to the white jack If the CD player has only one audio output jack connect it to either the right or left audio input jack of the main unit If the CD player has only OPTICAL digital output jack connect it to OPTICAL1or 2 JACK of the main unit Please see II Audio SetupII at...

Page 27: ...inals on your Second Room amplifier NOTE OJI AV RECEIVER Install speaker in main space Install speaker in sub space Second Room Connecting using the external amplifier I I I I I I I I I I ___________________________________ Second Room I I I I I I I I I I I Usually the secondary amplifier is used in a second room Line Out only outputs analog signal Line Out does not provide the Volume Control The ...

Page 28: ...into the dock See pages 54 55 3 Press the iPod button on the remote control You can also use the INPUT SELECT on the main unit The mode switches as follows FM TV BD DVD SAT GAME AUX CD IPOD AUDIO IPOD VIDEO NOTE You must have the VIDEO Monitor or TV output connected to your TV to view iPod video See page 23 11 Adjust the volume to a moderate level before you connect your iPod and AV Receiver m Whe...

Page 29: ...NOTE iPod nano 5th generation m iPod nano 4th generation iW iPod nano 3rd generation iPod nano 2nd generation iPod nano I st generation iPhone 4 iPhone 3GS iPhone 3G m iPhone 11 Made for iPod means that an electronic accessory has been designed to connect specifically to iPods and has been certified by the developer to meet Apple performance standards Made for iPhone means that an electronic acces...

Page 30: ...ther rigid surface 1 FM FM antenna supplied NOTE Do not place the antenna cable close to the power cord Keep it as far away as possible If you experience poor FM reception use an external antenna Connecting AUX Components You can connect external devices you use for ashort time camcorder game console mobile equipment etc to the front of this unit for convenience VIDEO 0 AUDIO G mm L_ AUXIN ___j VI...

Page 31: ...lect a Function Method 1 Press the INPUT SELECT button on the remote control Each time you press this button FM TV BD DVD SAT GAME AUX CD IPOD AUDIO IPOD VIDEO will be selected in turn Method 2 Press the BD DVD SAT GAME TV CD iPod or TUNER button You can directly select the desired function Home Menu Use the HDMI cable to connect between main unit and monitor Press SETUP MENU to display the INPUT ...

Page 32: ... in ilri T r u 1 For SAT function T HD i 1 I e For TV function DPT IC For CD function CDF f I F L For AUX function u NOTE 1 1n 1111 T1 1 nu _ DVD 1 I I I T jl OCf I I I r LLI 011 r 1 Jl_l fl n 11 1 n n L u _ It 1 I 1 11 n L u _ nir n l s rr nT T r 1 1 or T _ m You can also change the input mode by pressing the AUDIO ASSIGN button on the front of your AV Receiver You can enjoy Dolby Digital or DTS ...

Page 33: ...Setup Menu Tree Here s a quick look at how the setup menus are organized on your AV Receiver BD DVD OPTICAL1 2 COAXIAL SAT OPTICAL1 2 COAXIAL CD OPTICAL1 2 COAXIAL English 33 ...

Page 34: ...HT SURROUNDBACKLEFT SURROUND BACKRIGHT SUBWOOFER AUTO MANUAL LARGE SMALL LARGE SMALL NONE LARGE SMALL NONE LARGE SMALL NONE LARGE SMALL YES NO 60Hz 80Hz 100Hz 120Hz 150Hz 180Hz 200Hz 1 30FT 1 foot steps default 1OFT FRONTHEIGHTLEFT FRONTHEIGHTRIGHT 1 0 1OdB 1 dB step default OOdB FRONTHEIGHTLEFT FRONTHEIGHTRIGHT move to Test Tone check Page If Dolby Pro Logic liz is set to On the Surround Back spe...

Page 35: ...ON 0 7 ON ON ON ON 1V ON AUTO BYPASS English 35 ...

Page 36: ...puts and frequency response from the speaker will be adjusted according to your speaker configuration and whether certain speakers are used or not 1 Press the SETUP MENU button on the remote control Each time the button is pressed the mode switches between INPUT and SETUP OFF 2 Press the A buttons to select SPEAKER and then press the ENTER button 3 Press the A buttons to select SPK SIZE and then p...

Page 37: ...L Select this when using small speakers NONE Select when no speaker is used YES subwoofer Select when using the subwoofer speaker NO subwoofer Select when not using the subwoofer speaker CROVR Select the crossover frequency for the best bass response in your speakers NOTE You can also use the SETUP 1 V ENTER RETURN buttons on the front of your AV Receiver When the Front speaker is only set to LARG...

Page 38: ...peaker SURR BACK Select this if you want to install the surround back speaker in the default settings With this setting you can enable the Dolby Pro Logic llx mode PLIIz Select this if you want to install the surround back speaker in the top front corner With this setting you can enable the Dolby Pro Logic liz mode BI AMP Select this if you want to connect the Bi Amp compliant speaker to the surro...

Page 39: ... set the Speaker Distance I I L i Tr r hli I 1 U r i For the FRONT LEFT FRONT RIGHT CENTER SURR LEFT SURR RIGHT SURRBACK LEFT SURRBACK RIGHT and SUBWOOFER Speakers you can set the distance from the speaker to listening position between 1ft 30ft 0 3 9 0m in intervals of 1ft 0 3m l 1 f I Setting Speaker Distance v 10FT 1 10Ft 10Pr Set the distance from the speaker to listening position in intervals ...

Page 40: ...be selected in turn 5 Press the IIIII buttons to set the Speaker Level mode You can adjust it from 10 to 1OdB in 1 step increments The sound gets quieter at 1 OdB and louder at IOdB Setting Speaker Level F L front left 10 IOdB SW subwoofer 1 0 1OdB i F R front right 10 1OdB SBL surround back left 1 0 1OdB S L surround left 1 0 1OdB SBR surround back right 1 0 1OdB S R surround right 10 1OdB FHL fr...

Page 41: ...les you to adjust the output level of the speaker manually 1 Press the ENTER button to select the speaker you want Each time you press the ENTER button F L 7 CEN 7 S W 7 F R 7 S R 7 SBR 7 SBL 7 S L will be selected in turn 2 Press the buttons to set the Test Tone mode you want You can adjust the speaker output level from 10 to 1OdB by 1 step The sound gets quieter at 1OdB and louder at 10dB Test T...

Page 42: ...ect SURROUND and then press the ENTER button 3 Press the buttons to select DPLIIx and then press the ENTER button 4 Press the buttons to select the option you want and then press the ENTER button PANORAMA Press the buttons to select ON or OFF This mode extends the front stereo image to include the surround speakers for an exciting wraparound effect with side wall imaging it f il ri r r r _ rr r r ...

Page 43: ...cies of 32KHz 44KHz or 48KHz Setting EX ES Mode When surround back speakers are connected you can listen to 7 1 multi channel sound using the built in Dolby Digital Surround EX or DTS ES decoder This function works when a Dolby Digital or DTS source such as a DVD player is input and does not work with L PCM and Dolby Digital2 channel sources 1 Press the SETUP MENU button on the remote control Each...

Page 44: ...e button is pressed the mode switches between INPUT and SETUP OFF 2 Press the T buttons to select OPTION and then press the ENTER button 3 Press the A T buttons to select TONE CONTROL and then press the ENTER button 4 Press the A T buttons to select TONE and then press the ENTER button ICPT I CI J IFiUDIC _ i IGF TIGI i ITni iF I l 5 Press the A T buttons to select ON or OFF you want and then I pr...

Page 45: ...CER and then press the ENTER button 4 Press the buttons to select ON or OFF Smart Volume I T i i_ i l _l hi li P This will regulate and stabilize the volume level against a drastic volume change when changing channels or during a scene transition 1 Press the SETUP MENU button on the remote control Each time the button is pressed the mode switches between INPUT and SETUP OFF 2 Press the buttons to ...

Page 46: ... the remote control Each time the button is pressed the mode switches between INPUT and SETUP OFF 2 Press the A buttons to select OPTION and then press the ENTER button 3 Press the buttons to select AUTO CALIBRATION and then press the ENTER button 4 Press the A buttons to select MEASUREMENT and then press the ENTER button To create the optimal 7 1 channel sound field the selections are in the foll...

Page 47: ... OPTION and then press the ENTER button 3 Press the T buttons to select DRC and then press the ENTER button 4 Press the T buttons to set the DRC you want AUTO The Dynamic Range Control will be set automatically based on the information provided by the Dolby TrueHD Soundtrack MIN Sets DRC effect to minimum STD Sets DRC effect to standard MAX Sets DRC effect to maximum Dual Mono Setup Dual mono prog...

Page 48: ...HOMI connected external device through your HOMI connected TV1 s speakers set it to TV Otherwise leave it on AVR to listen to audio from the NV receiver AVR HDMI audio is not output TV HDMI audio is output HDMIANYNET ON OFF Anynet is a function that enables you to control other Samsung Devices with your Samsung TV1 S remote control ON Anynet is enabled OFF Anynet is disabled ARC AUTO OFF If you us...

Page 49: ... the unit s HOMI Out is connected to a1V or monitor the analog video source composite or component from the video device is processed for up conversion automatically for HDMI output If connected to a 1V or monitor through Composite or Component ports corresponding analog signal will be output respectively without any conversion In case if the unit and video source device is connected in multiple m...

Page 50: ...h time you press this button PROLOGICII x 7 n C Ei l rJ J iiJ J I 7 3D SOUND will be selected in turn 2 Press the button Each time you press the button STEREO 7 HALL 1 7 HALL 2 7 J CLUB 7 CHURCH 7 ROCK 7 CLASSIC 7 LIVE 7 GAME 7 MOVIE 7 CONCERT 7 STADIUM will be selected in turn You can also select the DSP mode by pressing the DSP button on the remote control Selecting the 3D SOUND mode 1 Press the...

Page 51: ... SUSR surround speaker left right SBUSBR surround back speaker left right H FHUFHR front height speaker left right SW subwoofer Display Information SUBW Signal Format Channel Status 0 Digital Dolby Digital L C R SL SR SW 0 Digital tDolby Digital EX L C R SL SR SBL SBR SW 0 Digital Dolby Digital Prologic llx L C R SL SR SBL SBR SW 0 Digital Dolby Digital Prologic liz L C R SL SR H SW 0 Digital Dolb...

Page 52: ...er the Display with S W The display disappears automatically lc 1 u II Setting the Subwoofer Level SW Subwoofer 10 1OdB Listening to the Radio You can listen to the radio by using either automatic or manual tuning 1 Press the INPUT SELECT button on the remote control to select FM 2 Select a frequency radio broadcast Preset tuning Press the buttons on the remote control to select the preset frequen...

Page 53: ...ly 3 Press the TUNER MEMORY button on the main unit You can also use the TUNER MEMORY button on the remote control Tuner number will blink on the display 4 Press the TUNING CH V 1 buttons on the remote control to select preset 2 You can select from presets 1 to 15 5 Press the TUNER MEMORY button on the main unit Tuner number will disappear and station 89 10 will be saved in preset 2 6 To preset ot...

Page 54: ...See page 29 for compatible iPods Compatibility depends on the software version of your iPod m You can also select iPod by pressing the iPod button on the remote control Watching a Movie iPod video function You can play video files stored in the iPod player on aTV by connecting it to the AV receiver 1 Connect the iPod dock connector to the iPod jack on the AV receiver 2 In the iPod screen move to V...

Page 55: ...9 for compatible iPods Compatibility depends on the software version of your iPod When the current file is played to the end the next file will not be played automatically To play the next file select a file to play in the list screen of the iPod player m No other screen than the playback one will appear on the TV screen Check other screens on the iPod player Convenient Functions Sleep Timer Funct...

Page 56: ...E 11 SLEEP Mute and the Adjust Display functions can only be operated with the remote control Reset Function When the Power is on 1 Press the MUTE button MUTE appears on the display 2 Press the 2 button five times and then press the ENTER button INITIAL NO appears on the display 3 Press the 111111 buttons to select YES The unit will turn off after 5 seconds When the Power is Off 1 Press and hold t...

Page 57: ...SB port located on your AV Receiver NOTE Insert a USB drive containing the firmware upgrade into the USB port on the back of the main unit Please be careful to not disconnect the power or remove the USB drive while upgrades are being applied The main unit will turn off automatically after completing the firmware upgrade When software is upgraded settings you have made will return to their default ...

Page 58: ...ell 57 58 81 M Wards Brocsonic 59 60 Candle 18 Cetronic 03 KEC 03 15 40 KMC 15 LG Goldstar 01 15 16 17 37 38 39 40 41 42 43 44 Luxman 18 Scott 03 40 60 61 Sears 15 18 19 Sharp 15 57 64 Signature 2000 57 58 M Wards Citizen 03 18 25 LXI Sears 19 54 56 59 60 62 63 65 71 Sony 50 51 52 53 55 Cinema 97 Magnavox 15 17 18 48 54 59 60 62 72 89 Soundesign 03 40 Classic 03 Marantz 40 54 Spectricon 01 Concert...

Page 59: ...can use DVD BD POWER PLAY PAUSE STOP SKIP MENU and Numeric buttons 0 9 NOTE The remote control may not work on some brands of DVD Also some operations may not be possible depending on your brand of DVD The remote control will work with Samsung DVD BD by default DVD Brand Code List Ar rut cooe Numtier c D_ lle 2 BI Cil J lliCIII DENON 003 032 ONKYO 004 014 TOSHIBA DOONOON 019 OPTIMUS 011 YAMAHA DMT...

Page 60: ... the left right speaker or left right Check the left right channel and right channels is input output cables connected connect it them correctly reversed properly Can t receive radio Is FM antenna connected Connect the antenna correctly broadcasts properly If the input strength of antenna signal is weak install the FM antenna in aplace with good reception There is no sound from Are the surround sp...

Page 61: ...able is shorted If there is no problem when you turn the unit on again after turning it off PROTECTION mark will disappear on the display and the unit will work properly Auto Calibration Error List Error No Auto Calibration Error Message on OSD E02 NOMIC Connect the calibration microphone E03 NOISY Keep quiet during the measurement E04 MIC LEVL The speaker are too close to the microphone Install a...

Page 62: ...nput Output TV format Input level impedance Output level impedance Video frequency response S N Ratio 120V 60Hz 0 9W 75W 35W 13 671bs 16 9 x6 5 x14 2 inches 10 75 87 5 1 08 0MHz 12dBf MONO STE EO 55 55dB MONO STEREO 0 3 0 8 30dB 1kHz 75kHz Dev 20Hz 20kHz THD 0 9 60 120W CH 60 120W CH 60 120W CH 6Q 120W CH 8Q 150W CH 450mV 47kQ 80dB 60dB 20Hz 20kHz 3dB 20Hz 44kHz 3dB Compatible 1080p Compatible 108...

Page 63: ...rts supplies accessories applications installations repairs external wiring or connectors not supplied and authorized by SAMSUNG or which damage this product or result in service problems incorrect electrical line voltage fluctuations and surges customer adjustments and failure to follow operating instructions cleaning maintenance and environmental instructions that are covered and prescribed in t...

Page 64: ...800 500 55 500 Moldova 00 800 500 55 500 www samsung coml Belgium 02 201 24 18 be Dutch www samsung coml be_fr French As1a Pac1f1c Australia 1300 362 603 www samsung com New Zealand 0800 SAMSUNG 0800 726 786 www samsung com Bosnia 051331999 China 400 810 5858 I 010 6475 1880 www samsung com Bulgaria 07001 33 11 www samsung com Croatia 062 SAMSUNG 062 726 7864 www samsung com 800 SAMSUNG 800 726786...

Page 65: ...ONS OR COMMENTS COUNTRY CALL OR VISIT US ONLINE AT WRITE 1 800 SAMSUNG Samsung Electronics America Inc IN THE US 7267864 www samsung com us 85 Challenger Road Ridgefield Park NJ 07660 0511 Code No AH68 02354X ...

Page 66: ...o change thetone level Bi AMP INDICATOR The indicator lights on when you turn on Bi AMP ENTER BUTION Used to select an item inthe SETUP menu TONE CONTROL BUTION Used to set the bass treblelevel and tone to on off ASC BUTTON Used to select the auto calibration mode MASTERVOLUME CONTROL Adjusts the volume level POWERBUTION Turns the receiver on off PHONES JACK Used to connect aset of headphones AUXI...

Page 67: ...U BUTION Displays the SETUP menu UP DOWN LEFT RIGHT BUTIONS Used to navigate the menus RETURN BUTION Used to return to the previous menu from the SETUP menu FUNCTION SELECTOR BUTIONS Used to select an input source AV SYNC BUTION Used to select the Audio Delay Mode ASCBUTION Used to set the Auto Sound Calibration function SUBWOOFER BUTION Used to select the Subwoofer f English INPUT SELECT TV SOURC...

Page 68: ...ght the player and connect it to the other SUBWOOFER OUT Jack Connecting Speaker Wire 1 Loosen the knob by turning counterclockwise 2 Insert the bare part of the wire into the hole in the side of each terminal 3 Tighten the knob by turning clockwise to secure the wire Connecting the Speakers 1 Press down the terminal tab on the back of the speaker 2 Insert the black wire into the black terminal an...

Page 69: ... if you want to use Anynet If connected TV support ARC it is not necessary to connect the OPTICAL OLJT Audio from SACD discs will not be heard with this connection To play a DVD disc whose copyright is protected by CPPM use a player supporting CPPM The quality of the audio output through the HOMIjack sampling frequency and bit rate may be limited by the performance of the connected device Since HD...

Page 70: ...V Disconnect the power plug from the outlet if you will not use this unit for a long period of time If the cable set top box has only one audio output jack connect it to either the right or left audio inputjack of the main unit Connect the audio cable s red plug to the red jack and white cable to the white jack 0 English ...

Page 71: ...nput jack of the main unit Connecting the FM Antenna 1 Connect the FM antenna supplied to the FM ANTENNA terminal as a temporary measure 2 Slowly move the antenna wire around until you find a location where reception is good then fasten it to a wall or other rigid surface FM antenna supplied NOTE Do not place the antenna cable close to the power cord Keep it as far away as possible If you experien...

Page 72: ... Valued Customers Thank you for purchasing Samsung Products If you have any further questions please contact Samsung Electronics America Web www samsung com Call 1 800 Samsung II 11111111111111 6801 001672 ...

Page 73: ...R SAMSUNG PRODUCTS Valued Customer If you experience any technical problems with your new Samsung Products please call Samsung Customer Support Monday Sunday 9 00 AM 9 00PM Before returning this product to your place of purchase ...

Page 74: ......

Page 75: ......

Reviews: