background image

LIMITED WARRANTY TO ORIGINAL PURCHASER

Samsung Electronics Canada Inc.(SECA), warrants that this product is free from 
defective material and workmanship.

SECA further warrants that if this product falls to operate properly within the specifi 

ed warranty period and the failure is due to improper workmanship or defective 
materials, SECA will repair or replace the product at its option.
All warranty repairs must be performed by a SECA Authorized Service Center. (The name and 
address of the location nearest you can be obtained by calling toll free: 1- 800- SAMSUNG)

LABOR

One year (Carry- in)

PARTS

One year

On carry-in models, transportation to and from the service center is the customer’s 
responsibility.
The original dated sales receipt must be retained by the customer and is the only 
acceptable proof of purchase. It must be presented to the authorized service center at 
the time service is requested.

EXCLUSIONS (WHAT IS NOT COVERED)

This warranty does not cover damage due to accident, fi re, fl ood and/ or other acts of 

God; misuse,incorrect line voltage, improper installation, improper or unauthorized 

repairs, commercial use or damage that occurs in shipping. Exterior and interior fi nish, 

lamps, glass are not covered under this warranty. Customer adjustments which are 
explained in the instruction manual are not covered under the terms of this warranty. 
This warranty will automatically be voided for any unit found with a missing or altered 
serial number. This warranty is valid only on products purchased and used in Canada.

Samsung Electronics Canada Inc 

2050 Derry Rd West 

Mississauga, On. L5N 0B9 

Tel: 1-800-SAMSUNG (726-7864) 

Fax: (905) 542- 1199 

Website: www.samsung.com/ca

Summary of Contents for HW-M550/ZA

Page 1: ...FULL MANUAL Imagine the possibilities Thank you for purchasing this Samsung product To receive more complete service please register your product at www samsung com register HW M550 ...

Page 2: ...to rain or moisture To prevent injury this apparatus must be securely attached to the floor wall in accordance with the installation instructions CAUTION Do not expose this apparatus to dripping or splashing Do not put objects filled with liquids such as vases on the apparatus To turn this apparatus off completely you must pull the power plug out of the wall socket Consequently the power plug must...

Page 3: ... has two blades with one wider than the other A grounding type plug has two blades and a third grounding prong The wide blade or the third prong are provided for your safety If the provided plug does not fit into your outlet consult an electrician for replacement of the obsolete outlet 10 Protect the power cord from being walked on or pinched particularly at plugs convenience receptacles and the p...

Page 4: ... sunlight or other heat sources This could lead to overheating and cause the unit to malfunction 4 Protect the product from moisture i e vases and excess heat e g a fireplace or equipment creating strong magnetic or electric fields Unplug the power cable from the AC wall socket if the unit malfunctions Your product is not intended for industrial use It is for personal use only Condensation may occ...

Page 5: ...y instructions product installation components connections and product specifications FULLMANUAL You can access the customer support centre by scanning the QR code To see the manual on your PC or mobile device download the manual in document format from the website http www samsung com support Design and specifications are subject to change without prior notice ...

Page 6: ...r to the Subwoofer 6 Automatic connection between the subwoofer and the Soundbar 6 Manually connecting the subwoofer if automatic connection fails 7 04 ConnectingtoyourTV 9 Method 1 Connecting with a Cable 9 Connecting using an Optical Cable 9 Connecting a TV using an HDMI Cable 10 Method 2 Connecting Wirelessly 11 Connecting a TV via Bluetooth 11 05 ConnectinganExternalDevice 13 Connecting using ...

Page 7: ...dbar volume with a TV remote control 24 Using the Hidden Buttons 25 Output specifications for the different sound effect modes 25 09 InstallingtheWallMount 26 Installation Precautions 26 Wallmount Components 26 Detaching the Soundbar from the Wall 29 10 SoftwareUpdate 29 Updating Procedure 30 If UPDATE is not displayed 30 11 Troubleshooting 31 12 License 32 13 OpenSourceLicenseNotice 32 14 Importa...

Page 8: ...5 For Soundbar wall mounting components see page 26 Micro USB to USB adapter and HDMI cables are sold separately To purchase contact a Samsung Service Center or Samsung Customer Care The appearance of the accessories may differ slightly from the illustrations above InsertingBatteriesbeforeusingtheRemoteControl AAbatteriesX2 Slide the battery cover in the direction of the arrow until it is complete...

Page 9: ...e Display Optical Digital input D IN ARC HDMI OUT input D IN TV ARC Auto conversion AUX input AUX HDMI input HDMI BLUETOOTH mode BT USB mode USB To turn on BTPAIRING mode change the source to BT mode and then press and hold the Source button for more than 5 seconds When you plug in the AC cord the power button will begin working in 4 to 6 seconds When you turn on this unit there will be a 4 to 5 s...

Page 10: ...B device through the Soundbar AUXIN Connect to the Analog output of an external device HDMIIN Inputs digital video and audio signals simultaneously using an HDMI cable Connect to the HDMI output of an external device HDMIOUT TV ARC Connect to the HDMI ARC jack on a TV DC24V PowerSupplyIn Connect the AC DC power adapter When disconnecting the power cable of the AC DC power adaptor from a wall outle...

Page 11: ...abel attached to the product Label Bottom of the Soundbar Main Unit POWER RearofSubwoofer 1 PowerCord Connecting ElectricalPower SPK ADD HDMI IN HDMI OUT TV ARC DC 24V DC 24V Bottomofthe SoundbarMainUnit 2 AC DCAdapter 3 PowerCord Connecting ElectricalPower Make sure to rest the AC DC Adapter flat on a table or the floor If you place the AC DC Adapter so that it is hanging with the AC cord input f...

Page 12: ...eRearofSubwoofer LED Status Description Resolution Blue On Successfully connected normal operation Blinking Recovering the connection Check if the power cable to the main Soundbar unit is connected properly or wait for a while If blinking persists try manually connecting the subwoofer See page 7 Red On Standby with the Soundbar main unit turned off Check if the power cable to the main Soundbar uni...

Page 13: ...the Soundbar for 1 3 seconds and then disappear IDSET S u r r o u n d S O U N D M O D E B l u e t o o t h P O W E R V O L W O O F E R S O U N D B A R 5 Sec 5 When the blue indicator on the subwoofer blinks turn on the Soundbar s power by pressing Power button on the right side of the main unit or on the remote control 6 When the connection is successfully established the blue indicator on the rear...

Page 14: ... If a steel concrete or metallic wall is between the main unit and the wireless subwoofer the system may not operate at all because the wireless signal cannot penetrate metal PRECAUTIONS Wireless receiving antennas are built into the wireless subwoofer Keep the units away from water and moisture For optimal listening performance make sure that the area around the wireless subwoofer and Wireless Re...

Page 15: ...nectingusinganOpticalCable DIGITAL AUDIO IN OPTICAL USB 5V 0 5A AUX IN OPTICAL OUT OpticalCable BottomofSoundbar D IN RightSideoftheSoundbar 1 Connect the DIGITALAUDIOIN OPTICAL jack on the Soundbar to the OPTICAL OUT jack of the TV with a digital optical cable 2 Press the Source button on the right side panel or remote control and then select the D IN mode When the Soundbar is connected to a Sams...

Page 16: ...to Power Link may not function This function is only available in the D IN mode ConnectingaTVusinganHDMICable RightSideoftheSoundbar HDMI IN ARC HDMI OUT TV ARC HDMI IN HDMICable notsupplied BottomofSoundbar TVARC Checkthe ARC at HDMIINportofyourTV ChecktheHDMIOUT TV ARC portof theSoundbarmainunit 1 With the Soundbar and TV turned on connect the HDMI cable not supplied as shown in the figure 2 TVA...

Page 17: ...ngaTVviaBluetooth When a TV is connected using Bluetooth you can hear stereo sound without the hassle of cabling Only one TV can be connected at a time Theinitialconnection 1 Press the Source button on the right side panel or on the remote control and then select BT 2 Change BT to BTPAIRING If BTREADY appears press and hold the Source button on the right side panel of the Soundbar or on the remote...

Page 18: ...h device enter 0000 In Bluetooth connection mode the Bluetooth connection will be lost if the distance between the Soundbar and the Bluetooth device exceeds 32 8 ft The Soundbar automatically turns off after 5 minutes in the Ready state The Soundbar may not perform Bluetooth search or connection correctly under the following circumstances If there is a strong electrical field around the Soundbar I...

Page 19: ...notsupplied BottomofSoundbar BD DVDplayer Set topbox Gameconsole 1 OpticalCable X X Connect DIGITALAUDIOIN OPTICAL on the main unit to the OPTICAL OUT jack of the Source Device using a digital optical cable Y Y Select D IN mode by pressing the Source button on the right side panel or on the remote control 2 Audio AUX Cable X X Connect AUXIN Audio on the main unit to the AUDIO OUT jack of the Sourc...

Page 20: ...I cable not supplied from the HDMIIN jack on the back of the product to the HDMI OUT jack on your digital device 2 Connect an HDMI cable not supplied from the HDMIOUT TV ARC jack on the back of the product to the HDMI IN jack on your TV 3 Press the Source button on the right side panel or on the remote control and then select HDMI 4 HDMI mode is displayed on the Soundbardisplaypanel and sound play...

Page 21: ... female 2 0 USB jack Type A on the other end to the micro USB jack on your Soundbar Micro USB to USB adapter Cable is sold separately To purchase contact a Samsung Service Center or Samsung Customer Care 2 Connect your USB device to the female end of the adapter cable 3 Press the Source button on the right side panel or on the remote control and then select USB 4 USB appears in the display screen ...

Page 22: ...SAudio1 16KHz 48KHz 56kbps 128kbps Wave_Format_ MSAudio2 16KHz 48KHz 56kbps 128kbps aac AAC 16KHz 96KHz 48kbps 320kbps AAC LC 16KHz 96KHz 128kbps 192kbps 5 1ch 320kbps HE AAC 24KHz 96KHz 48kbps 64kbps 5 1ch 160kbps wav 16KHz 48KHz up to 3000kbps ogg OGG 1 1 0 16KHz 48KHz 50kbps 500kbps flac FLAC 1 1 0 FLAC 1 2 1 16KHz 96KHz up to 3000kbps If there are too many folders and files stored on the USB d...

Page 23: ...he remote control for more than 5 seconds to display BTPAIRING 3 Select AV SamsungSoundbarMxxxM Series from the list When a Soundbar is connected to the Bluetooth device BluetoothDeviceName BT appears in the front display 4 Play music files from the device connected via Bluetooth through the Soundbar Ifthedevicefailstoconnect If the previously connected Soundbar listing e g AV SamsungSoundbarMxxxM...

Page 24: ...electromagnetic waves must be kept away from the Soundbar main unit e g microwaves wireless LAN devices etc The Soundbar supports SBC data 44 1kHz 48kHz Connect only to a Bluetooth device that supports the A2DP AV function You cannot connect the Soundbar to a Bluetooth device that supports only the HF Hands Free function Once you have paired the Soundbar to a Bluetooth device selecting AV SamsungS...

Page 25: ...uetooth Bluetooth is a technology that enables Bluetooth compliant devices to interconnect easily with each other using a short wireless connection A Bluetooth device may cause noise or malfunction depending on usage if A part of your body is in contact with the receiving transmitting system of the Bluetooth device or the Soundbar It is subject to electrical variation from obstructions caused by a...

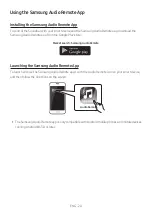
Page 26: ...emote app from the Google Play store Marketsearch SamsungAudioRemote LaunchingtheSamsungAudioRemoteApp To launch and use the Samsung Audio Remote app touch the Audio Remote icon on your smart device and then follow the directions on the screen AudioRemote The Samsung Audio Remote app is only compatible with Android mobile phones and mobile devices running Android OS 3 0 or later ...

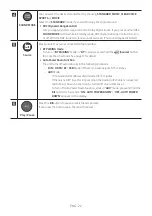
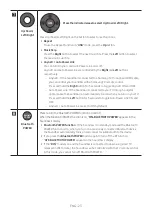
Page 27: ... adjust the sound for each frequency band 150Hz 300Hz 600Hz 1 2KHz 2 5KHz 5KHz and 10KHz are selectable Left Right and each can be adjusted to a setting between 6 6 Up Down If the video and audio between the TV and your Soundbar are not synchronized select AUDIOSYNC in Sound Settings and then set audio delay between 0 300 milliseconds by using the Up Down buttons Except USB mode Audio Sync is only...

Page 28: ...BTPAIRINGmode To turn on BTPAIRING mode in BT mode press and hold the Source button for more than 5 seconds See page 17 for details AutoPowerDownFunction The unit turns off automatically in the following situations D IN HDMI BT USBMode If there is no audio signal for 5 minutes AUX Mode If the Audio AUX Cable is disconnected for 5 minutes If there is no KEY input for 8 hours when the Audio AUX Cabl...

Page 29: ...hrough a digital optical cable the Soundbar can automatically turn on when you turn on your TV Press and hold the Left button for 5 seconds to toggle Auto Power Link ON and OFF Anynet Auto Power Link are set to ON by default Surround VOL WOOFER SOUND MODE Bluetooth POWER Bluetooth POWER Press to turn the Bluetooth POWER function on and off When the Bluetooth POWER function is on ON BLUETOOTHPOWER ...

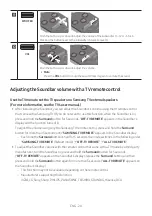
Page 30: ...VmenutosettheTVspeakeronaSamsungTVexternalspeakers Formoreinformation seetheTV susermanual After installing the Soundbar you can adjust the Soundbar s volume using the IR remote control that came with a Samsung TV If you do not want to use this function when the Soundbar is on press and hold the Surround button for 5 seconds OFF TVREMOTE appears in the Soundbar s display and the function turns off...

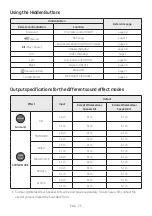
Page 31: ...deffectmodes Effect Input Output ExceptWirelessRear SpeakerKit IncludeWirelessRear SpeakerKit Surround Surround VOL WOOFER SOUND MODE Bluetooth POWER ON 2 0 ch 3 1 ch 5 1 ch 5 1 ch 3 1 ch 5 1 ch SOUNDMODE Surround VOL WOOFER SOUND MODE Bluetooth POWER STANDARD 2 0 ch 2 1 ch 4 1 ch 5 1 ch 3 1 ch 5 1 ch MUSIC 2 0 ch 2 1 ch 4 1 ch 5 1 ch 3 1 ch 5 1 ch CLEAR VOICE 2 0 ch 3 1 ch 5 1 ch 5 1 ch 3 1 ch 5 ...

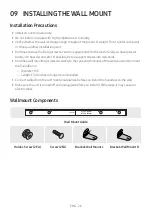
Page 32: ...d iron board wood etc If possible fix the support screws into wall studs Purchase wall mounting screws according to the type and thickness of the wall you want to mount the Soundbar on Diameter M5 Length 1 3 8 inches or longer recommended Connect cables from the unit to external devices before you install the Soundbar on the wall Make sure the unit is turned off and unplugged before you install it...

Page 33: ... 360mm 3 Push a pen tip or sharpened pencil tip through the center of the A TYPE images on each end of the Guide to mark the holes for the supporting screws and then remove the WallMountGuide CENTER LINE A B B A A TYPE 616mm B TYPE 360mm A B 4 Using an appropriately sized drill bit drill a hole in the wall at each marking If the markings do not correspond to the positions of studs make sure you in...

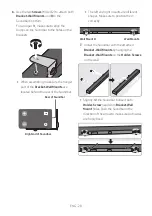
Page 34: ...hind the rear of the Soundbar RearofSoundbar RightendofSoundbar The left and right mounts are different shapes Make sure to position them correctly WallMountR WallMountL 7 Install the Soundbar with the attached Bracket WallMounts by hanging the Bracket WallMounts on the Holder Screws on the wall Slightly tilt the Soundbar to insert both Holder Screw heads into Bracket Wall Mount holes Push the Sou...

Page 35: ...m at least 2 inches 5 cm below the TV if the TV is mounted on the wall For your safety if you do not mount the unit on the wall install it on a secure flat surface where it is unlikely to fall 10 SOFTWARE UPDATE SamsungmayofferupdatesfortheSoundbar s systemfirmwareinthefuture USBport Wi Fi SETUP SPK ADD DIGITAL AUDIO IN OPTICAL USB 5V 0 5A AUX IN HDMI IN HDMI OUT TV ARC DC 24V USB 5V 0 5A MicroUSB...

Page 36: ...play and then the Soundbar turns off The update is complete This product has a DUAL BOOT function If the firmware fails to update you can update the firmware again IfUPDATEisnotdisplayed 1 Turn off the Soundbar disconnect and then reconnect the USB storage device that contains the update files to the Soundbar s USB port 2 Disconnect the Soundbar s power cord reconnect it and then turn on the Sound...

Page 37: ...utton to cancel the function Isthevolumesettominimum Adjust the Volume Theremotecontroldoesnotwork Arethebatteriesdrained Replace with new batteries IsthedistancebetweentheremotecontrolandSoundbarmainunittoofar Move the remote control closer to the Soundbar main unit TheredLEDonthesubwooferblinksandthesubwooferisnotproducingsound ThisissuecanoccurifthesubwooferisnotconnectedtotheSoundbarmainunit T...

Page 38: ...nnel is a trademark of DTS Inc DTS Inc All Rights Reserved The terms HDMI and HDMI High Definition Multimedia Interface and the HDMI Logo are trademarks or registered trademarks of HDMI Licensing LLC in the United States and other countries 13 OPENSOURCE LICENSENOTICE To send inquiries and requests regarding open sources contact Samsung via Email oss request samsung com 14 IMPORTANT NOTESABOUT SER...

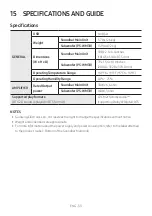
Page 39: ... 95 F 5 C to 35 C OperatingHumidityRange 10 75 AMPLIFIER RatedOutput power SoundbarMainUnit 30W x 6 6 ohm Subwoofer PS WM30 160W 3 ohm Supportedplayformats DTS 2 0 sound is played in DTS format LPCM 2ch Dolby Audio supporting Dolby Digital DTS NOTES Samsung Electronics Co Ltd reserves the right to change the specifications without notice Weight and dimensions are approximate For more information a...

Page 40: ...pt must be retained by the customer and is the only acceptable proof of purchase It must be presented to the authorized service center at the time service is requested EXCLUSIONS WHATISNOTCOVERED This warranty does not cover damage due to accident fi re fl ood and or other acts of God misuse incorrect line voltage improper installation improper or unauthorized repairs commercial use or damage that...

Page 41: ...ronics Co Ltd All rights reserved Contact SAMSUNG WORLD WIDE If you have any questions or comments relating to Samsung products please contact the SAMSUNG customer care Center Country Contact Center Web Site North America CANADA 1 800 SAMSUNG 726 7864 www samsung com ca support English www samsung com ca_fr support French U S A 1 800 SAMSUNG 726 7864 www samsung com us support ...

Page 42: ...HW M550 MANUEL COMPLET Imaginez les possibilités Merci d avoir choisi un appareil Samsung Pour recevoir une assistance plus complète veuillez enregistrer votre produit sur www samsung com register ...

Page 43: ...r éviter des blessures cet appareil doit être solidement fixé au plancher au mur conformément aux directives d installation MISEENGARDE Veillez à éviter toute projection sur l appareil Ne placez jamais de récipients contenant un liquide ex vase dessus La prise d alimentation fait office de système de déconnexion Elle doit donc rester disponible en permanence ATTENTION PourleCanada Le présent appar...

Page 44: ...arisée Une fiche polarisée comporte deux lames dont l une est plus large que l autre Une fiche de mise à la terre comporte deux lames et une troisième broche de mise à la terre La lame la plus large et la troisième broche sont destinées à assurer votre sécurité Si la fiche fournie ne s insère pas dans la prise utilisée faites appel à un électricien pour faire remplacer celle ci 10 Placez le cordon...

Page 45: ... pourrait causer une surchauffe du fil et causer un dysfonctionnement de l unité 4 Protégez le produit de l humidité comme les vases et d une chaleur excessive comme une cheminée ou de tout équipement capable de créer des champs magnétiques ou électriques Débranchez le câble d alimentation en cas de dysfonctionnement Votre produit n est pas prévu pour un usage industriel Ce produit ne peut être ut...

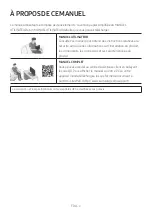
Page 46: ...es à la sécurité ainsi que des informations sur l installation du produit les composants les connexions et les caractéristiques du produit MANUELCOMPLET Vous pouvez accéder au centre d assistance client en balayant le code QR Pour afficher le manuel sur votre PC ou votre appareil mobile téléchargez le sous forme de document à partir du site Web http www samsung com support La conception et les spé...

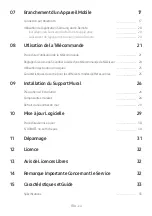
Page 47: ...u caisson des basses et du Soundbar 6 Connexion manuelle du caisson des basses en cas d échec de la connexion automatique 7 04 BranchementàvotreTéléviseur 9 Méthode 1 Branchement avec un câble 9 Branchement à l aide d un câble optique 9 Branchement d un téléviseur à l aide d un câble HDMI 10 Méthode 2 Connexion sans fil 11 Connexion d un téléviseur par Bluetooth 11 05 Branchementd unPériphériqueEx...

Page 48: ...olume du Soundbar à l aide d une télécommande de téléviseur 24 Utilisation des boutons masqués 25 Caractéristiques de sortie pour les différents modes d effets sonores 25 09 InstallationduSupportMural 26 Précautions d installation 26 Composantes murales 26 Retrait du Soundbar du mur 29 10 MiseàjourLogicielle 29 Procédure de mise à jour 30 Si UPDATE ne s affiche pas 30 11 Dépannage 31 12 Licence 32...

Page 49: ...us à la page 5 Pour plus d informations sur les composants du montage mural du Soundbar reportez vous à la page 26 Le câble HDMI et le câble adaptateur Micro USB USB sont vendus séparément Pour l acheter contactez un Centre de service Samsung ou le service à la clientèle de Samsung Les accessoires pourraient légèrement différer de ceux figurant sur la photo ci dessus Insertiondespilesavantd utilis...

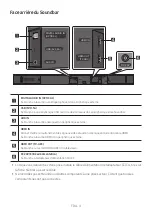
Page 50: ...N Entrée ARC HDMI OUT D IN TV ARC Conversion automatique Entrée AUX AUX Entrée HDMI HDMI Mode BLUETOOTH BT Mode USB USB Pour activer le mode BTPAIRING définissez la source sur le mode BT puis appuyez sur le bouton Source et maintenez le appuyé pendant plus de 5 secondes Lorsque vous branchez le cordon c a la touche de mise en fonction s activera dans un délai de 4 à 6 secondes Lorsque vous mettez ...

Page 51: ...anche à la sortie analogue d un périphérique externe HDMIIN Permet d entrer simultanément des signaux vidéo et audio numériques à l aide d un câble HDMI Se branche à la sortie HDMI d un périphérique externe HDMIOUT TV ARC Se branche au raccord HDMI ARC d un téléviseur DC24V Entréed alimentation Se branche à l adaptateur d alimentation CA CC Lorsque vous débranchez d une prise murale le câble d ali...

Page 52: ...te apposée sur le produit Étiquette Arrière de l Unité Principale du Soundbar POWER Arrièreducaisson desbasses 1 Cordon d alimentation Branchementde l alimentation SPK ADD HDMI IN HDMI OUT TV ARC DC 24V DC 24V Arrièredel unité principaleduSoundbar 2 AdaptateurCA CC 3 Cordon d alimentation Branchementde l alimentation Veillez à bien poser à plat l adaptateur CA CC sur une table ou au sol Si l adapt...

Page 53: ...cription Résolution Bleu Activé Connexion établie fonctionnement normal Clignotant Récupération de la connexion Vérifiez que le câble d alimentation est bien branché sur l unité principale du Soundbar ou patientez quelques instantes Si le clignotement persiste essayez de raccorder manuellement le caisson des basses Voir page 7 Rouge Activé Veille unité principale du Soundbar éteinte Vérifiez que l...

Page 54: ...DSET apparaît sur l affichage du Soundbar pendant 1 3 seconde puis disparaît IDSET S u r r o u n d S O U N D M O D E B l u e t o o t h P O W E R V O L W O O F E R S O U N D B A R 5 Sec 5 Lorsque le voyant bleu du caisson des basses clignote allumez le Soundbar en appuyant sur le bouton Alimentation situé sur la droite de l4unité principale ou sur la télécommande 6 Une fois la connexion établie le ...

Page 55: ...éton armé se trouve entre l unité principale et le caisson des basses sans fil il est possible que le système ne fonctionne pas car le signal sans fil ne peut pas traverser le métal PRÉCAUTIONS Les antennes de réception sans fil sont intégrées au caisson des basses sans fil Maintenez les unités à l écart de l eau et de l humidité Pour des performances d écoute optimales assurez vous que la zone en...

Page 56: ...ntàl aided uncâbleoptique DIGITAL AUDIO IN OPTICAL USB 5V 0 5A AUX IN OPTICAL OUT Câbleoptique ArrièreduSoundbar D IN FacedroiteduSoundbar 1 Branchez le connecteur DIGITALAUDIOIN OPTICAL du Soundbar sur le connecteur OPTICAL OUT du téléviseur avec un câble optique numérique 2 Appuyez sur le bouton Source situé sur la face latérale droite ou sur la télécommande puis sélectionnez le mode D IN Lorsqu...

Page 57: ... que la fonction Auto Power Link ne fonctionne pas Cette fonction est uniquement disponible en mode D IN Branchementd untéléviseuràl aided uncâbleHDMI VérificationduportHDMIIN ARC devotretéléviseur HDMI IN ARC HDMI OUT TV ARC HDMI IN CâbleHDMI nonfourni ArrièreduSoundbar TVARC VérifiezleportHDMIOUT TV ARC sur l unitéprincipaleduSoundbar FacedroiteduSoundbar 1 Allumez le Soundbar et le téléviseur p...

Page 58: ... du son stéréo sans vous encombrer avec des câbles Un seul téléviseur peut être connecté à la fois Connexioninitiale 1 Appuyez sur le bouton Source situé sur la face latérale droite ou sur la télécommande puis sélectionnez le mode BT 2 Choisissez BTPAIRING à la place de BT Si BTREADY apparaît appuyez sur le bouton Source situé sur la face latérale droite du Soundbar ou sur la télécommande et maint...

Page 59: ...rique Bluetooth entrez 0000 En mode de connexion Bluetooth la connexion Bluetooth est perdue si la distance entre le Soundbar et le périphérique Bluetooth est supérieure à 32 8 pi Le Soundbar se désactive automatiquement après avoir passé 5 minutes à l état Prêt Il se peut que le Soundbar n effectue pas correctement la recherche ou la connexion Bluetooth dans les cas suivants En présence d un cham...

Page 60: ...eurBD DVD Décodeur Consoledejeu 1 Câbleoptique X X Branchez le connecteur DIGITALAUDIOIN OPTICAL de l unité principale sur le connecteur OPTICAL OUT du périphérique source à l aide d un câble optique numérique Y Y Sélectionnez le mode D IN en appuyant sur le bouton Source sur la face latérale droite ou sur la télécommande 2 Câbleaudio AUX X X Branchez le connecteur AUXIN Audio de l unité principal...

Page 61: ...ur HDMIIN situé à l arrière du produit et le connecteur HDMI OUT de votre périphérique numérique 2 Branchez un câble HDMI non fourni entre le connecteur HDMIOUT TV ARC situé à l arrière du produit et le connecteur HDMI IN de votre téléviseur 3 Appuyez sur le bouton Source situé sur la face latérale droite ou sur la télécommande puis sélectionnez le mode HDMI 4 Le mode HDMI est affiché surl écran d...

Page 62: ...tandard type A sur l autre au connecteur Micro USB de votre Soundbar Le câble adaptateur Micro USB USB est vendu séparément Pour l acheter contactez un Centre de service Samsung ou le service à la clientèle de Samsung 2 Connectez votre périphérique USB à l extrémité femelle du câble adaptateur 3 Appuyez sur le bouton Source situé sur la face latérale droite ou sur la télécommande puis sélectionnez...

Page 63: ...s Wave_Format_MSAudio2 16 KHz à 48 KHz 56 à 128 kbps aac AAC 16 KHz à 96 KHz 48 à 320 kbps AAC LC 16 KHz à 96 KHz 128 à 192 kbps 5 1 canaux 320 kbps HE AAC 24 KHz à 96 KHz 48 à 64 kbps 5 1 canaux 160 kbps wav 16 KHz à 48 KHz jusqu à 3000 kbps ogg OGG 1 1 0 16 KHz à 48 KHz 50 à 500 kbps flac FLAC 1 1 0 FLAC 1 2 1 16 KHz à 96 KHz jusqu à 3000 kbps Si un trop grand nombre de dossiers et de fichiers s...

Page 64: ...enfoncé pendant plus de 5 secondes pour afficher BTPAIRING 3 Sélectionnez AV SamsungSoundbarMxxxM Series dans la liste Lorsqu un Soundbar est connecté au périphérique Bluetooth NomdupériphériqueBluetooth BT apparaît sur l écran situé à l avant 4 Lisez des morceaux depuis le périphérique connecté par Bluetooth via le Soundbar Encasd échecdelaconnexiondupériphérique Si l entrée correspondant au Soun...

Page 65: ...étiques doivent être gardés à distance de l unité principale du Soundbar par exemple les micro ondes les appareils de réseau sans fil etc Le Soundbar prend en charge les données SBC 44 1kHz 48kHz La connexion est possible uniquement sur un périphérique Bluetooth compatible avec la fonction A2DP AV Vous ne pouvez pas brancher le Soundbar à un dispositif Bluetooth qui prend seulement en charge la fo...

Page 66: ...erconnexion d appareils compatibles Bluetooth via une connexion sans fil à faible distance Un appareil Bluetooth peut engendrer des bruits ou un dysfonctionnement selon les conditions d utilisation Si une partie du corps est en contact avec le système de réception transmission du périphérique Bluetooth ou du système Soundbar Variations électriques dues à un brouillage du signal par un mur un coin ...

Page 67: ...ogle Play Store Recherchedemarché SamsungAudioRemote Lancementdel applicationSamsungAudioRemote Pour lancer et utiliser l application Samsung Audio Remote touchez l icône Audio Remote de votre appareil intelligent puis suivez les instructions à l écran AudioRemote L application Samsung Audio Remote est uniquement compatible avec les téléphones cellulaires Android et les appareils mobiles fonctionn...

Page 68: ...son de chaque bande de fréquence Fréquences disponibles 150 Hz 300 Hz 600 Hz 1 2 KHz 2 5 KHz 5 KHz et 10 KHz Gauche Droite avec un réglage de 6 à 6 Haut Bas Si la vidéo et l audio ne sont pas synchronisés entre le téléviseur et votre Soundbar sélectionnez AUDIOSYNC dans les réglages sonores puis réglez le son entre 0 et 300 millisecondes en utilisant les boutons Haut Bas Sauf le mode USB La foncti...

Page 69: ... BTPAIRING en mode BT appuyez sur le bouton Source et maintenez le enfoncé pendant plus de 5 secondes Pour plus de détails reportez vous à la page17 FonctionAutoPowerDown L unité se met automatiquement hors tension dans les situations suivantes Mode D IN HDMI BT USB si pendant 5 minutes aucun signal audio n est émis Mode AUX Si le câble audio AUX est débranché pendant 5 minutes Si aucune saisie n ...

Page 70: ...iais d un câble optique numérique le Soundbar peut s activer automatiquement lorsque vous allumez votre téléviseur Appuyez sur le bouton de Gauche et maintenez le enfoncé pendant 5 secondes pour régler la fonction Auto Power Link sur ON ou OFF Les fonctions Anynet Auto Power Link sont réglées sur ON par défaut Surround VOL WOOFER SOUND MODE Bluetooth POWER Bluetooth POWER Appuyez sur ce bouton pou...

Page 71: ...téléviseurSamsung Pourplusd informations reportez vousaumanuelutilisateur dutéléviseur Après avoir installé le Soundbar vous pouvez régler son volume à l aide de la télécommande infrarouge fournie avec le téléviseur Samsung Si vous ne voulez pas utiliser cette fonction allumez le Soundbar appuyez sur le bouton Surround et maintenez le enfoncé pendant 5 secondes Le message OFF TVREMOTE apparaît sur...

Page 72: ... Sanshaut parleurarrière sansfil Avechaut parleurarrière sansfil Surround Surround VOL WOOFER SOUND MODE Bluetooth POWER ON 2 0 canaux 3 1 canaux 5 1 canaux 5 1 canaux 3 1 canaux 5 1 canaux SOUNDMODE Surround VOL WOOFER SOUND MODE Bluetooth POWER STANDARD 2 0 canaux 2 1 canaux 4 1 canaux 5 1 canaux 3 1 canaux 5 1 canaux MUSIC 2 0 canaux 2 1 canaux 4 1 canaux 5 1 canaux 3 1 canaux 5 1 canaux CLEAR ...

Page 73: ... etc Si possible fixez les vis de support sur les montants des murs Achetez des vis de montage mural en fonction du type et de l épaisseur du mur sur lequel vous souhaitez installer le Soundbar Diamètre M5 Longueur 1 3 8 pouces ou plus long Raccordez les câbles de l unité à des périphériques externes avant de fixer le Soundbar au mur Assurez vous que l unité est éteinte et débranchée avant de proc...

Page 74: ...ez une pointe de stylo ou une pointe de crayon bien taillé au centre des images A TYPE à chaque extrémité du guide pour marquer les trous des vis de support puis retirez le Guidedemontagemural CENTER LINE A B B A A TYPE 616mm B TYPE 360mm A B 4 À l aide d un foret de taille appropriée percez un trou dans le mur à chaque marque Si les marques ne correspondent pas aux positions des montants de la cl...

Page 75: ... du Soundbar ArrièreduSoundbar ExtrémitédroiteduSoundbar Les supports gauche et droit ont des formes différentes Veillez à les positionner correctement SupportmuralD SupportmuralG 7 Installez le Soundbar à l aide des Supportde fixationmurale en accrochant ces derniers sur les Visdesupport fixées au mur Inclinez légèrement le Soundbar pour insérer les têtes des Visdesupport dans les trous du Suppor...

Page 76: ...eur si ce dernier est fixé au mur Pour votre sécurité si vous ne fixez pas l unité au mur installez la sur une surface plane et sécurisée d où elle ne pourra pas tomber 10 MISEÀJOUR LOGICIELLE IlsepeutqueSamsungproposeultérieurement desmisesàjourpourlemicrologicieldusystème duSoundbar PortUSB Wi Fi SETUP SPK ADD DIGITAL AUDIO IN OPTICAL USB 5V 0 5A AUX IN HDMI IN HDMI OUT TV ARC DC 24V USB 5V 0 5A...

Page 77: ...e micrologiciel ne parvient pas à effectuer la mise à jour vous pouvez à nouveau mettre à jour le micrologiciel SiUPDATEnes affichepas 1 Éteignez le Soundbar débranchez le périphérique de stockage qui contient les fichiers de mise à jour du port USB du Soundbar puis rebranchez le 2 Débranchez le cordon d alimentation du Soundbar rebranchez le puis allumez le Soundbar La mise à jour du micrologicie...

Page 78: ...Levolumeest ilrégléauminimum Réglez le volume Latélécommandenefonctionnepas Lespilessont ellesdéchargées Remplacez les par de nouvelles piles Ladistanceentrelatélécommandeetl unitéprincipaleduSoundbarest elletropgrande Approchez la télécommande de l unité principale du Soundbar LevoyantDELrougesurlecaissondesbassesclignoteetaucunsonn estémisparcedernier Ce problème peut arriver lorsque le caisson ...

Page 79: ...s droits réservés Les termes HDMI High Definition Multimedia Interface et le logo HDMI sont des marques de commerce ou des marques déposées de HDMI Licensing LLC aux États Unis ou dans d autres pays 13 AVISDE LICENCESLIBRES Pour transmettre des demandes et des questions portant sur les sources ouvertes communiquez avec Samsung par courriel oss request samsung com 14 REMARQUE IMPORTANTE CONCERNANTL...

Page 80: ...onnement 10 à 75 AMPLIFICATEUR Puissancede sortie nominale Unitéprincipaledu Soundbar 30W x 6 6 ohm Caissondesbasses PS WM30 160W 3 ohm Formatsdelectureprisencharge Le son DTS 2 0 est lu au format DTS LPCM 2ch Dolby Audio prise en charge de Dolby Digital DTS REMARQUES Samsung Electronics Co Ltd se réserve le droit de modifierles caractéristiques sans préavis Le poids et les dimensions sont approxi...

Page 81: ...nt doit le présenter au Centre de service agréé au moment où il fait la demande d une réparation sous garantie EXCLUSIONS CEQUIN ESTPASCOUVERT Cette garantie ne couvre pas les dommages causés par un accident un incendie une inondation un cas de force majeure un mauvais usage ou une tension incorrecte La garantie ne couvre pas une mauvaise installation une mauvaise réparation une réparation non aut...

Page 82: ... Tous droits réservés Comment contacter Samsung dans le monde Si vous avez des suggestions ou des questions concernant les produits Samsung veuillez contacter le Service Consommateurs Samsung Country Contact Center Web Site North America CANADA 1 800 SAMSUNG 726 7864 www samsung com ca support English www samsung com ca_fr support French U S A 1 800 SAMSUNG 726 7864 www samsung com us support ...

Reviews: