36_
network connection and setup
network connection and setup
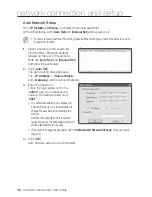
auto network Setup
Run <
ip installer_v2.XX.exe
> to display the camera search list.
At the initial startup, both [
auto Set
] and [
manual Set
] will be grayed out.
M
`
For cameras found with the IPv6 setting, these buttons will be grayed out as the cameras do not
support this function.
1.
Select a camera in the search list.
Find the MAC (Ethernet) address
labeled on the rear of the camera.
Both the [
auto Set
] and [
manual Set
]
buttons will be activated.
2.
Click [
auto Set
].
The Auto Setting dialog appears.
The <
ip address
>, <
Subnet mask
>,
and <
Gateway
> will be set automatically.
3.
Enter the password.
This is the login password for the
“
admin
” user who accesses the
camera. The default password is
“
4321
”.
`
The default password can be exposed to
a hacking thread so it is recommended to
change the password after installing the
product.
Note that the security and other related
issues caused by the unchanged password
shall be responsible for the user.
`
If you want to change the password, refer to “
Administrator Password Change
” of the user setup.
(page 74)
4.
Click [
oK
].
Auto network setup will be completed.

