background image

LCD TV

LE26R53BD
LE32R53BD

Owner’s Instructions

Before operating the unit,

please read this manual thoroughly,

and retain it for future reference.

- AFTER SALES SERVICE

- Do not hesitate to contact your retailer or service agent if a

change in the performance of your product indicates that a
faulty condition may be present.

BN68-00953A-00

ON-SCREEN MENUS

PC DISPLAY

PICTURE IN PICTURE (PIP)

TELETEXT

This device is a Class B digital apparatus.

Register your product at

www.samsung.com/global/register

Correct Disposal of This Product
(Waste Electrical & Electronic Equipment)

(Applicable in the European Union and other European
countries with separate collection systems)

This marking shown on the product or its literature, 
indicates that it should not be disposed with other 

household wastes at the end of its working life.  To prevent possible 
harm to the environment or human health from uncontrolled waste 
disposal, please separate this from other types of wastes and recycle 
it responsibly to promote the sustainable reuse of material resources.
Household users should contact either the retailer where they 
purchased this product, or their local government office, for details of 
where and how they can take this item for environmentally safe 
recycling.  
Business users should contact their supplier and check the terms and 
conditions of the purchase contract. This product should not be mixed 
with other commercial wastes for disposal.

 BN68-00953A-00Cover.qxd  9/27/05 1:29 PM  Page 1

Summary of Contents for LE26R53BD

Page 1: ...parate collection systems This marking shown on the product or its literature indicates that it should not be disposed with other household wastes at the end of its working life To prevent possible harm to the environment or human health from uncontrolled waste disposal please separate this from other types of wastes and recycle it responsibly to promote the sustainable reuse of material resources...

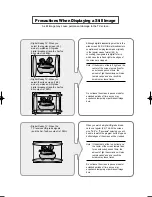
Page 2: ...ixed for an extended period of time the amount of light transmission will also remain varied and as a result the borders may leave traces Digital Ready TV When you select the wide screen 16 9 mode to watch an SD grade digital broadcast and the Set Top Box output is 1080i Digital Ready TV When the TV receives HD grade signals and the Set Top Box output is 1080i When you watch a digital HD grade bro...

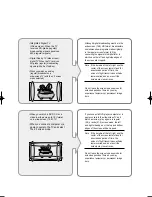
Page 3: ...borders at the left right and the center of the screen remain fixed for an extended period of time the amount of light transmission will also remain varied and as a result the borders may leave traces When you watch a DVD CD or a video in wide screen 21 9 format on a wide screen 16 9 TV When you connect a computer or a game console to the TV and select the 4 3 screen mode If you connect a DVD play...

Page 4: ...ontrol 12 Switching On and Off 13 Placing Your Television in Standby Mode 13 Becoming Familiar with the Remote Control 14 Plug and Play 15 Choosing Your Language 16 SETTING THE CHANNELS Storing Channels Automatically 17 Storing Channels Manually 18 Editing the Channels 20 Sorting the Stored Channels 21 Assigning Channels Names 22 Fine Tuning Channel Reception 23 LNA Low Noise Amplifier 24 SETTING ...

Page 5: ...ching the Television On and Off Automatically 46 Activating the Child Lock 47 SETTING THE OTHERS Setting the Blue Screen Mode 48 Selecting the Melody 48 Colour Weakness 49 Selecting a Device from External Sources 50 Viewing Pictures from External Sources 51 SETTING THE PC Setting up Your PC Software Based on Windows XP 52 Adjusting the PC Screen Automatically 53 Coarse and Fine Tuning of the Image...

Page 6: ...2R53BD 74 Installing the Stand 76 Using the Anti Theft Kensington Lock 77 Technical and Environmental Specifications 78 Display Mode PC 79 Pin Configurations 80 Press Important Note Symbols Checking Parts Sold Separately D Sub Cable DVI Cable Component Cables RCA RF Cable PC Audio Cable S VIDEO Cable Scart Cable Remote Control AAA Batteries Power Cord Owner s Instructions Cleaning Cloth Cover Bott...

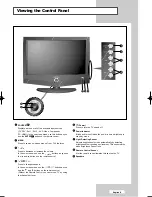
Page 7: ... buttons on the remote control Press to change channels In the on screen menu use the buttons as you use the and buttons on the remote control Without the Remote Control you can turn on TV by using the channel buttons Power Press to turn the TV on and off Power Indicator Blinks and turns off when the power is on and lights up in stand by mode Light Detecting Sensor Adjusts brightness of screen aut...

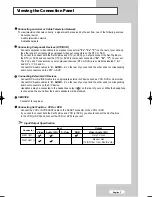
Page 8: ...e Connection Panel Whenever you connect an audio or video system to your set ensure that all elements are switched off When connecting an external device match the colour of the connection terminal to the cable Power Input ...

Page 9: ... the rear of your set and the other ends to corresponding audio out connectors on the DTV or DVD Connecting External A V Devices Connect RCA or S VIDEO cable to an appropriate external A V device such as VCR DVD or Camcorder Connect RCA audio cables to R AUDIO L on the rear of your set and the other ends to corresponding audio out connectors on the A V device Headphone may be connected to the head...

Page 10: ... the D Sub cable to PC PC IN on the rear of your set and the other end to the D Sub connector of the Video Card on your computer Connect the stereo audio cable to AUDIO PC IN on the rear of your set and the other end to Audio Out of the sound card on your computer Connecting AUDIO Connect RCA audio cables to R AUDIO L on the rear of your set and the other ends to corresponding audio in connectors ...

Page 11: ...played please contact your service provider When the channel information configuration has finished the message Updating Completed is displayed indicating that the channel list is now updated You must obtain a CI Card from a local cable service provider Remove the CI Card by carefully pulling it out with your hands since dropping the CI Card may cause damage to it Connecting CI Common Interface Ca...

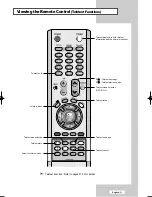
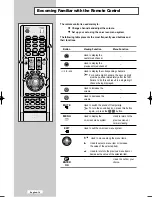
Page 12: ...us channel This key is also used to back to the previous page in D Menu Available source selection Refer to page 51 Use to see information on the current broadcast Refer to page 44 Control the cursor in the menu Refer to page 14 Picture effect selection Refer to page 25 Automatic Power off Refer to page 45 Exit the on screen menu Refer to page 14 Next channel Previous channel Refer to page 14 Soun...

Page 13: ...ge Teletext Function Refer to pages 57 59 for details Teletext display mix both teletext information and the normal broadcast Teletext mode selection LIST FLOF Teletext reveal Teletext index Teletext size selection Teletext store Teletext sub page Teletext cancel Teletext hold Select the teletext mode ...

Page 14: ...ool dry place if you won t be using the remote control for a long time The remote control can be used up to about 23 feet from the TV Assuming typical TV usage the batteries last for about one year If the remote control doesn t work Check the following 1 Is the TV power on 2 Are the plus and minus ends of the batteries reversed 3 Are the batteries drained 4 Is there a power cut or is the power cor...

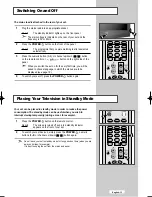
Page 15: ...est to unplug the set from the mains and aerial The mains lead is attached to the rear of your set 1 Plug the mains lead into an appropriate socket Result The standby indicator lights up on the front panel The main voltage is indicated on the rear of your set and the frequency is 50 or 60Hz 2 Press the POWER button on the front of the panel Result The programme that you were watching last is resel...

Page 16: ... be pushed immediately after the first Failure to do this will result in a single digit channel being displayed Used to increase the volume Used to decrease the volume MUTE Used to switch the sound off temporarily To turn the sound back on press this button again or press the button MENU Used to display the Used to return to the on screen menu system previous menu or normal viewing EXIT Used to ex...

Page 17: ...eas are available Belgium France Germany Italy Netherlands Spain Sweden Switzerland United Kingdom Eastern Europe Others 5 Select your Country by pressing the or button Press the ENTER button Result The Auto Store menu is displayed with the Start selected 6 Press the ENTER button Result The channel search will start and end automatically To stop the search before it has finished press the ENTER bu...

Page 18: ...Language When you start using your set for the first time you must select the language which will be used for displaying menus and indications 1 Press the MENU button Result The main menu is displayed 2 Press the or button to select Setup Result The options available in the Setup group are displayed 3 Press the ENTER button 4 Press the or button to select Language Press the ENTER button Result The...

Page 19: ...ayed with the Start selected 7 Press the ENTER button to search the channels The sub menu is changed from Start to Stop with channel search started Result The search will end automatically Channels are sorted and stored in an order which reflects their position in the frequency range with lowest first and highest last The programme originally selected is then displayed To return to the previous me...

Page 20: ...ss the ENTER button again To assign a programme number to a channel find the correct number by pressing the or button and then press the ENTER button You can also set a programme number by pressing number buttons on the remote control 6 Press the or button to select Colour System and then press the ENTER button Select the colour standard required by pressing the or button repeatedly and then press...

Page 21: ...ge until the first channel or the channel that you selected is received on your screen 10 Press the or button to select Store Select OK by pressing the ENTER button Result The channel and associated programme number are stored 11 Repeat steps 5 to 10 for each channel to be stored 12 Press the MENU button to return to the previous menu or press the EXIT button to return to normal viewing Channel mo...

Page 22: ... 3 Press the or button to select Add Delete Press the ENTER button Result The state of the current channel is displayed 4 Press the button to select channel that you wish to add or delete Result If the channel that you wish to edit is not in memory the Add is selected and displayed Otherwise if the channel that you wish to edit is in memory the Delete is selected and displayed 5 Press the ENTER bu...

Page 23: ... to select Sort Press the ENTER button Result The Prog Ch and Name are displayed 4 Select the channel number that you wish to change by pressing the or button repeatedly Press the ENTER button Result The selected the channel number and name are moved to right side 5 Press the or button to move to the position in which you would like to change and then press the ENTER button Result The selected cha...

Page 24: ...ssary select the channel to be assigned to a new name by pressing the or button Press the ENTER button Result The selection bar is displayed around the name box 5 To Then Select a letter number or symbol Press the or button Move on the next letter Press the button Move back the previous letter Press the button Confirm the name Press the ENTER button The characters available are Letters of the alph...

Page 25: ...the or button to select Fine Tune Press the ENTER button Result The horizontal bar is displayed 4 Press the or button to reach the required setting Press the ENTER button Result An asterisk appears on the right hand side of the channel number The channel number turns red To reset the fine tuning select Reset by pressing the or button and then press the ENTER button 5 When you are satisfied with th...

Page 26: ...esult The options available in the Channel group are displayed 3 Press the or button to select LNA Press the ENTER button Result The LNA menu is displayed 4 Select On by pressing or button Press the ENTER button Result Amplifies signals when antenna reception is poor However if incoming signals are interfering with each other tune off LNA as it may malfunction 5 When it has finished press the EXIT...

Page 27: ... again Result The options available in the Mode group are displayed 5 Press the ENTER button Result The Mode is selected 6 Select the required picture effect by pressing the or button repeatedly Result The following picture effects are available Dynamic Standard Movie Custom 7 When you are satisfied with the setting press the MENU button to return to the previous menu or press the EXIT button to r...

Page 28: ... Press the ENTER button Result The horizontal bar is displayed 6 Press the or button to reach the required setting Press the ENTER button 7 When you are satisfied with the setting press the MENU button to return to the previous menu or press the EXIT button to return to normal viewing The adjusted values are stored according to the selected Picture mode Each adjusted setting will be stored separat...

Page 29: ...lable Cool2 Cool1 Normal Warm1 Warm2 6 When you are satisfied with your choice press the EXIT button to return to normal viewing The adjusted values are stored according to the selected Picture mode English 27 Resetting the Picture Settings to the Factory Defaults You can return to the factory defaults picture settings 1 Press the MENU button Result The main menu is displayed 2 Press the or button...

Page 30: ...gnifies the size of the picture on the screen Positioning and Sizing the screen using Zoom Resizing the screen using the Zoom enables the positioning and sizing of the screen to up down direction using the or button as well as the screen size Move the screen up down using the or button after selecting the by pressing the or button Resize the screen vertically using the or button after selecting th...

Page 31: ...te this feature to help reduce any static and ghosting that may appear on the screen 1 Press the MENU button Result The main menu is displayed 2 Press the or button to select Picture Result The options available in the Picture group are displayed 3 Press the ENTER button 4 Press the or button to select Digital NR Press the ENTER button 5 Press the or button to select On Press the ENTER button 6 Pr...

Page 32: ...ess the ENTER button 4 Press the or button to select DNIe Demo and then press the ENTER button Press the or button to select On Press the ENTER button DNIe Demo Off DNIe Demo mode is deactivated DNIe Demo On The right hand side of the screen shows improved DNle image The left hand side of the screen shows the original image 5 When you are satisfied with your choice press the EXIT button to return ...

Page 33: ...tton and press the ENTER button Result The sources are displayed in the following order Wine Green Blue Gold Pink White Standard Custom 6 Press the or button to select Detail Control and press the ENTER button Select a source of the sub picture by pressing the or button and press the ENTER button Result The sources are displayed in the following order Wine Green Blue Gold Pink White Reset 7 Press ...

Page 34: ...Result The options available in the Picture group are displayed 3 Press the ENTER button 4 Press the or button to select Dynamic Contrast Press the ENTER button Result The Dynamic Contrast menu is displayed 5 Select On by pressing the or button Press the ENTER button 6 When it has finished press the EXIT button to return to normal viewing This function doesn t work when source is in PC mode Englis...

Page 35: ...e Picture group are displayed 3 Press the ENTER button 4 Press the or button to select Brightness Sensor Press the ENTER button Result The Brightness Sensor menu is displayed 5 Select On by pressing the or button Press the ENTER button Result Brightness on the screen is adjusted automatically according to brightness of surrounding environment 6 When it has finished press the ENTER button to return...

Page 36: ...cture by pressing the or button and press the ENTER button Result The sources are displayed in the following order When the main picture is set to TV Ext 1 Ext 2 AV S Video Component only HDMI can be selected and when the main picture is set to PC HDMI TV Ext 1 Ext 2 AV S Video Component can be selected 7 Press the or button to select Swap To interchange the main picture and the sub picture select...

Page 37: ... become active and available in PC HDMI mode 11 To return to normal viewing press the EXIT button Remote control functions while PIP is On Features Description PIP Used to operate On Off function of PIP directly SWAP Used to interchange the main picture and the sub picture When the main picture is in the video mode and the sub picture is in the TV mode you might not hear the sound of the main pict...

Page 38: ...e button The cursor moves to the right to indicate the volume Press the button to decrease the volume Result A horizontal bar is displayed and the volume decreases until you release the button The cursor moves to the left to indicate the volume Additional sound adjustments are available on your set For further details refer to pages 37 to 43 English 36 Adjusting the Volume ...

Page 39: ... as before and the Mute indication disappears Selecting the Sound Mode You can set the sound mode by pressing the DUAL button When you press it the current sound mode is displayed on the screen If the receiving conditions deteriorate listening will be easier if the mode is set to Mono If the stereo signal is weak and automatic switching occurs switch to Mono Default Automatic change DUAL 1 Automat...

Page 40: ... Result The Mode is selected 5 Select the required sound effect by pressing the or button repeatedly and then press the ENTER button Result The following sound effects are available Standard Music Movie Speech Custom 6 When you are satisfied with the setting press the MENU button to return to the previous menu or press the EXIT button to return to normal viewing You can also select these options b...

Page 41: ...ion by pressing the or button 6 Press the or button to reach the required setting Press the ENTER button 7 When you are satisfied with the setting press the MENU button to return to the previous menu or press the EXIT button to return to normal viewing If you make any changes to these settings the Sound Mode is automatically switched to Custom L R Sound Balance Adjustment To adjust the sound balan...

Page 42: ... Result The main menu is displayed 2 Press the or button to select Sound Result The options available in the Sound group are displayed 3 Press the ENTER button 4 Press the or button to select SRS TSXT and then press the ENTER button 5 Select the required option by pressing the or button Press the ENTER button Result The sources are displayed in the following order Off 3D Mono Stereo 6 Press the EX...

Page 43: ...output when the modulation signal is high or by raising the sound output when the modulation signal is low 1 Press the MENU button Result The main menu is displayed 2 Press the or button to select Sound Press the ENTER button Result The options available in the Sound group are displayed 3 Press the or button to select Auto Volume Press the ENTER button 4 Press the or button to select On Press the ...

Page 44: ...eceive sound from the speakers when you connect headphones to the system Selecting the Internal Mute If you want to hear the sound through separate speakers cancel the internal amplifier 1 Press the MENU button Result The main menu is displayed 2 Press the or button to select Sound Result The options available in the Sound group are displayed 3 Press the ENTER button 4 Press the or button to selec...

Page 45: ...e Sound group are displayed 3 Press the ENTER button 4 Press the or button to select Sound Select and then press the ENTER button Result Main and Sub are displayed You can select this option when the PIP is in On 5 Select the Sub by pressing the or button Press the ENTER button Result You can listen to the sound of the sub picture To listen to the sound of the current main picture set to Main 6 Pr...

Page 46: ...ble in the Setup group are displayed 3 Press the or button to select Time Press the ENTER button Result The Time menu is displayed with Clock Set selected 4 Press the ENTER button 5 To Press the Move to Hour or Minute or button Set the Hour or Minute or button Press the ENTER button 6 When you are satisfied with the setting press the MENU button to return to the previous menu or press the EXIT but...

Page 47: ...utton repeatedly and cycle through the preset time intervals Off 30 60 90 120 150 180 Press the ENTER button Result The TV automatically switches to standby mode when the timer reaches 0 6 To cancel the sleep timer function select Off by pressing the or button and then press the ENTER button 7 Press the EXIT button to return to normal viewing You can set the sleep timer by simply pressing the SLEE...

Page 48: ...s displayed with Clock Set selected 4 Press the or button to select On Timer Press the ENTER button Result The On Timer menu is displayed 5 Set the time channel and volume level at which you wish the set to be switched on To Press the Move to Hour Minute Programme and Volume or button Set Hour Minute Programme and Volume or button Move to Activation or button Select Yes to enable above setting or ...

Page 49: ...etup group are displayed 3 Press the or button to select Child Lock Press the ENTER button Result The options available in the Child Lock group are displayed 4 Press the ENTER button again Result The Child Lock is selected 5 Press the or button to select On Press the ENTER button 6 Press the or button to select Programme Press the ENTER button 7 Press the or button to select the channels to lock P...

Page 50: ...t Blue Screen Press the ENTER button 4 Press the or button to select On Press the ENTER button 5 Press the EXIT button to return to normal viewing Setting the Blue Screen Mode You can hear melody sound when the television is powered on or off 1 Press the MENU button Result The main menu is displayed 2 Press the or button to select Setup Press the ENTER button Result The options available in the Se...

Page 51: ... select Setup Press the ENTER button Result The options available in the Setup group are displayed 3 Press the or button to select Colour Weakness Press the ENTER button 4 Press the ENTER button Press the or button to select On 5 Press the ENTER button Press the or button to select Red Green and Blue Press the ENTER button 6 Press the or button to adjust the Colour Weakness 7 When you are satisfie...

Page 52: ... ENTER button 4 Repeat step 1 Press the or button to select Edit Name Press the ENTER button Result The options available in the Edit Name menu are displayed 5 Select the device that you wish to edit by pressing the or button Result The following options are available Ext 1 Ext 2 AV S Video Component PC HDMI 6 Press the ENTER button 7 Select the required device by pressing the or button repeatedly...

Page 53: ...ve been made 2 Press the SOURCE button Result The edited device and audio status are displayed on top left of the set 3 Press the SOURCE button until the required input source is selected If you change the external source while viewing pictures might take a short period of time to be switched TV DTV mode can be selected by pressing the TV DTV or button on the remote control but you cannot select i...

Page 54: ...our computer manufacturer or Samsung Dealer 1 First click on Control Panel on the Windows start menu 3 When the control panel window appears click on Display and a display dialog box will appear 2 When the control panel window appears click on Appearance and Themes and a display dialog box will appear 4 Navigate to the Settings tab on the display dialog box The correct size setting resolution Opti...

Page 55: ...button to select Setup Press the ENTER button Result The options available in the Setup group are displayed 3 Press the or button to select PC Press the ENTER button Result The options available in the PC menu are displayed 4 Press the or button to select Auto Adjustment Press the ENTER button Result The screen quality and position are automatically adjusted 5 When you are satisfied with your choi...

Page 56: ...o select Setup Press the ENTER button Result The options available in the Setup group are displayed 3 Press the or button to select PC Press the ENTER button Result The options available in the PC menu are displayed 4 Press the ENTER button again Result The Image Lock menu is selected 5 Press the or button to select Coarse or Fine Press the ENTER button Result The horizontal bar is displayed 6 Pre...

Page 57: ...isplayed 3 Press the or button to select PC Press the ENTER button Result The options available in the PC menu are displayed 4 Press the or button to select Position Press the ENTER button Result You can adjust the image Position 5 Press the or button to adjust horizontal position Press the or button to adjust vertical position Press the ENTER button 6 Press the MENU button to return to the previo...

Page 58: ...e options available in the Setup group are displayed 3 Press the or button to select PC Press the ENTER button Result The options available in the PC menu are displayed 4 Press the or button to select Image Reset Press the ENTER button Result You can initialize all image setting to the factory default values 5 Press the MENU button to return to the previous menu or press the EXIT button to return ...

Page 59: ...sing the or button select the channel providing the teletext service 2 Press the TTX MIX button to activate the teletext mode Result The contents page is displayed It can be redisplayed at any time by pressing the MENU button 3 Press the TTX MIX button again Result The screen will split into two This Double Teletext feature lets you view the actual broadcast and teletext information separately on ...

Page 60: ...played in sequence To freeze the display on a given page press the APP Press the APP button again to resume 3 Using the various display options To display Press the Both teletext information and TTX MIX the normal broadcast Hidden text INFO answers to quiz games for example The normal screen INFO A secondary page SLEEP by entering its 4 digit number The next page P The previous page P Double size ...

Page 61: ... display the Press the Previous page Red button Next page Green button 4 When you have finished press the TV DTV button to return to the normal broadcast Storing Teletext Pages You can store up to four teletext pages to display them later at leisure 1 Select the LIST mode using the SOURCE button Result Four 3 digit numbers are displayed in different colours The SOURCE button is used to switch betw...

Page 62: ...ning Reset to Factory Defaults Channel Organising Delete Frequency Delete Channel Delete All Channels Move Edit Channel Parental Lock Set Channel Lock Change PIN Code Set Modem Lock System Setup Language Selection OSD Setting Time Timer Setting System Information Software Upgrade MHP App Control Modem Setup Auto Operation Setting Common Interface Top Up TV The sub items of the CI Menu may vary dep...

Page 63: ...t program can be displayed on another banner if there is more information When this information is more than one page P can be used for page up and down 2 Volume Control 3 Select Soundtrack Press the ALT button to see the soundtrack list Press the and ENTER OK buttons to select one To control the volume level Press the buttons to adjust the volume level Press the MUTE button to turn to silence mod...

Page 64: ...the previous date GREEN button Green button is for moving to the next coming date INFO button This button is used to watch the program information if there is more information than one page Use the P buttons to move up and down pages button Use to display the program list by 30 minutes per block Time interval can be adjusted by press buttons as followings on EPG screen 1 button 1 hour and 30 minut...

Page 65: ...country which you are in You can select the value of ITALY SPAIN SWEDEN UK USER BELGIUM GERMANY FINLAND or FRANCE by using button After select option press the ENTER OK button to choose the nation of broadcasting area to be served If you don t want to save the changed press EXIT button without ENTER OK button pressed To tune in new channels the TV has been provided with the option Select Country S...

Page 66: ... provided with the option Manual Scanning where the channel data can be entered by the user After selecting the Manual Scanning from the Installation Menu the following screen will be displayed 1 4 Reset to Factory Defaults This is to restore the factory set values in case the user has encountered some problems after changing any values of channel data and others which may be in error At the reque...

Page 67: ...Press the buttons to change the position of the channel you want and P for monving up or down pages on list Press the ENTER OK button for confirmation If you want to return the channel to the initial position do not press the ENTER OK button but press the BLUE button This feature doesn t delete frequency itself but deletes the list of channels registered for frequency Select the TV RADIO Interacti...

Page 68: ...means that you can access all parental locked channels with entering PIN Code on any parental locked channel successfully To cancel the lock Press the RED button again in order to cancel the lock 3 2 Change PIN Code To change the PIN Code select the second option Change PIN Code This will take you to the following menu In this option you need to enter the current PIN Code at the first cursor and a...

Page 69: ...tton The OSD Soundtrack Teletext or EPG language will vary according to the selected language The Language Selection option allows the user to select the desired language of the OSD Soundtrack Teletext and EPG 4 2 OSD Setting Select OSD Transparency level The OSD Transparency level from 0 to 100 Setting is made with the numeric buttons buttons or P buttons Set the display duration of the informati...

Page 70: ... contact your service provider or a service center they might ask for information available from this menu Place the cursor on this sub menu and press the ENTER OK button The following will be the on screen display 4 5 Software Upgrade You can download and upgrade the system software of the TV through a specific channel through a specific channel designated by the broadcaster The Broadcaster will ...

Page 71: ...ix by using buttons to specify your pre dialing button for phone extension Press ENTER OK to save Modem configuration if modified If you want to setup Modem please follow the instruction below Exit without ENTER OK button makes Modem Setup unchanged 4 8 Auto Operation Setting Select YES or NO in Standby Mode and Operate Mode by using buttons Insert the preferable time by the Numerical 0 9 P and bu...

Page 72: ...ication The Application Info inserting is about the CI card You can install the CAM anytime whether the TV is ON or OFF 1 Purchase the CI CAM module by visiting your nearest dealer or by phone 2 Insert the CI card into the CAM in the direction of the arrow until it fits 3 Insert the CAM with the CI card installed into the common interface slot Note Insert the CAM in the direction of the arrow righ...

Page 73: ...ce that is affecting the set and move it further away Plug your set into a different mains socket Check the direction location and connections of your aerial This interference is often due to the use of an indoor aerial Replace the remote control batteries Clean the upper edge of the remote control transmission window Check the battery terminals Check that the signal cable is firmly connected to t...

Page 74: ...tely M4 X L12 Wall Bracket Set Bracket Screw 8EA M4 X L20 Wood Screw 4EA Anchor 4EA Installation Guide How to assemble the Wall Mount Bracket 1 Mark the location of hole on the wall Drill a hole of 35mm depth on the marked location Fix anchors on each hole on the wall Connect wall bracket to the wall with wood screws after fitting anchors into the wall bracket Note If the bracket is not firmly fix...

Page 75: ...m the back of the TV Separate the stand from the TV Cover the bottom hole with a cap Attach the set bracket onto the rear side of the TV set and secure the screws 3 Insert three Hangers of the set bracket into the grooves of the wall bracket Fix set bracket and wall bracket with screws Note Before installing the set on the wall connect the cables to the set first How to assemble the Wall Mount Bra...

Page 76: ... Bracket Set Bracket Screw 8EA Wood Screw 7EA Anchor 7EA Screw 3EA Installation Guide How to assemble the Wall Mount Bracket 1 Mark the location of hole on the wall Drill a hole of 35mm depth on the marked location Fix anchors on each hole on the wall Connect wall bracket to the wall with wood screws after fitting anchors into the wall bracket Note If the bracket is not firmly fixed to the wall LC...

Page 77: ...m the back of the TV Separate the stand from the TV Cover the bottom hole with a cap Attach the set bracket onto the rear side of the TV set and secure the screws 3 Insert three Hangers of the set bracket into the grooves of the wall bracket Fix set bracket and wall bracket with screws Note Before installing the set on the wall connect the cables to the set first How to assemble the Wall Mount Bra...

Page 78: ...nglish 76 Installing the Stand 1 Place the TV faced down on a soft cloth or cushion on a table 2 Attach the stand to the TV set as shown in the picture 3 Use the four screws to tightly fix the stand 2 3 ...

Page 79: ...eavy stationary object The Kensington lock is a device used to physically fix the system when using it in a public place The locking device has to be purchased separately The appearance and locking method may differ from the illustration depending on the manufacturer Please refer to the manual provided with the Kensington lock for proper use The place of the Kensington Lock may be different depend...

Page 80: ...L DTV Signal Reception UHF Channel Channel 21 68 474 850 MHz Channel 21 68 474 850 MHz Bandwidth 8MHz Bandwidth 8MHz Demodulation DVB T DVB T DTV Video Audio Decoding Video Decoding MPEG2 DVB Compliant Main Profile Main Level MPEG2 DVB Compliant Main Profile Main Level Bit rate UP to 15Mb s UP to 15Mb s Resolution 720 x 576 pixels 720 x 576 pixels Audio Decoding MPEG 2 Layer I II MPEG 2 Layer I II...

Page 81: ...ormally if a non standard video format is selected DVI dose not support PC function Model LE26R53BD LE32R53BD Weight With stand 11 3 kg 24 91 lbs 17 7 kg 39 02 lbs Environmental Considerations Operating Temperature 10 C to 40 C 50 F to 104 F 10 C to 40 C 50 F to 104 F Operating Humidity 10 to 80 non condensing 10 to 80 non condensing Storage Temperature 20 C to 45 C 4 F to 113 F 20 C to 45 C 4 F t...

Page 82: ...n input Pin Signal 12 13 Video chassis return RGB red 14 15 RGB red input 16 Blanking signal RGB switching 17 Video chassis return 18 Blanking signal ground 19 Video output 20 Video input 21 Screening chassis return PC Input Connector 15Pin Pin Signal 1 Red R 2 Green G 3 Blue B 4 Grounding 5 Grounding DDC 6 Red R Grounding 7 Green G Grounding 8 Blue B Grounding Pin Signal 9 Reserved 10 Sync Ground...

Page 83: ...Memo ...

Page 84: ...hold wastes at the end of its working life To prevent possible harm to the environment or human health from uncontrolled waste disposal please separate this from other types of wastes and recycle it responsibly to promote the sustainable reuse of material resources Household users should contact either the retailer where they purchased this product or their local government office for details of w...

Reviews: