background image

English-14

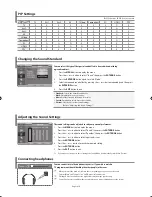
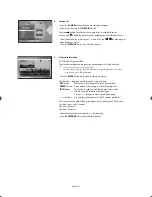
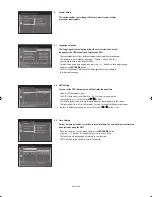
You can select the type of the special sound effect to be used when watching 
a given broadcast.

1. Press 

the 

MENU 

button to display the menu. 

 Press 

the 

 or   button to select "Sound", then press the 

ENTER/OK

 button.

2. Press 

the 

ENTER/OK

 button again, to select "Mode".

3. 

 Select the required sound effect by pressing the   or   button repeatedly and then press 
the 

ENTER/OK

 button.

4. Press 

the 

EXIT 

button to exit.

Œ


Standard: 

Selects the normal sound mode.

Œ


Music: 

Emphasizes music over voices.

Œ


Movie: 

Provides live and full sound for movies.

Œ


Speech: 

Emphasizes voices over other sounds.

Œ


Custom:  

Selects your custom sound settings. 

(Refer to "Adjusting the Sound Settings")

Changing the Sound Standard

O

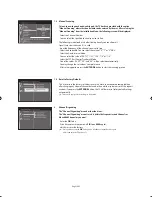
: PIP operates, 

X

: PIP doesn’t operate

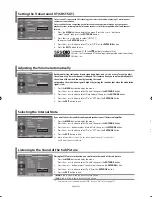
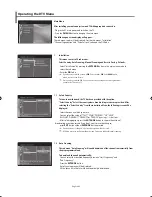
The sound settings can be adjusted to suit your personal preferences.

1. Press 

the 

MENU 

button to display the menu. 

 Press 

the 

 or   button to select "Sound", then press the 

ENTER/OK

 button.

2. Press 

the  or   button to select "Equalizer", then press the 

ENTER/OK

 button.

3.  

Press 

the  or   button to select a particular item.

Press the 

ENTER/OK

 button.

4. Press 

the  or 


button to reach the required setting. 

 Press 

the 

ENTER/OK

 button.

5. Press 

the 

EXIT 

button to exit.

    If you make any changes to these settings, the Sound Mode is automatically switched to "Custom".

Adjusting the Sound Settings

TV

Ext.1
Ext.2

AV

S-Video

Component

PC

HDMI

DTV

TV

X
X
X
X
X
X

O
O

X

Ext.1

X
X
X
X
X
X

O
O

X

Ext.2

X
X
X
X
X
X

O
O

X

AV

X
X
X
X
X
X

O
O

X

S-Video

X
X
X
X
X
X
X

O

X

Component

X
X
X
X
X
X
X

O

X

PC

X
X
X
X
X
X
X
X
X

HDMI

O
O
O
O
O
O

X
X
X

DTV

X
X
X
X
X
X
X
X
X

Sub

Main

PIP Settings

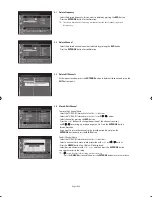
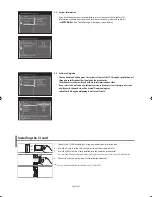
You can connect a set of headphones to your set if you wish to watch a
TV programme without disturbing the other people in the room.

  When you insert the head set jack into the corresponding port, you can operate only


“Internal Mute” and “Sound Select” (in PIP mode) in Sound menu.

  Prolonged use of headphones at a high volume may damage your hearing.

  You will not receive sound from the speakers when you connect headphones to the system.

Connecting headphones

BN68-01007R-00Eng.indd   14

BN68-01007R-00Eng.indd   14

2006-08-08   

 9:24:06

2006-08-08   

 9:24:06

Summary of Contents for LE32S7

Page 1: ... 200 88 0 10 Min 231 627 22 0 801 801 881 80 8 200 128 8 800 200 0400 0850 123 989 902 10 11 30 08 585 367 87 0870 242 0303 8 800 502 0000 Web Site www samsung com be www samsung com cz www samsung com dk www samsung com fi www samsung com fr www samsung de www samsung com hu www samsung com it www samsung lu www samsung com nl www samsung com no www samsung com pl www samsung com pt www samsung r...

Page 2: ...splaying still images Precauciones al mostrar en la pantalla una imagen fija La imagen fija puede causar daños permanentes en la pantalla del televisor No deje una imagen fija en la pantalla LCD durante más de dos horas ya que se podría producir una retención de la imagen en la pantalla Este fenómeno de retención de imágenes también se denomina quemadura de pantalla Para evitar que se produzca esa...

Page 3: ...the Sleep Timer 16 Switching the Television On and Off Automatically 16 SETTING THE OTHERS Choosing Your Language 17 Using Game Mode 17 Setting the Blue Screen Mode Selecting the Melody 17 Using the Energy Saving Feature 18 Selecting the Source 18 Editing the Input Source Names 18 USING THE DTV FEATURE Previewing the DTV Menu System 19 Basic Functions 20 1 Display Screen 20 2 Volume Control 20 3 S...

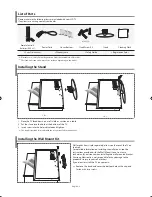
Page 4: ...h the screen size of 40 inch and above Installing the Stand Warranty card Safety Guide Registration Cards Not available in all locations The stand and stand screw may not be included depending on the model Wall mount items sold separately allow you to mount the TV on the wall For detailed information on installing the wall mount see the instructions provided with the Wall Mount items Contact a tec...

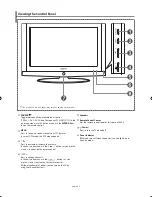
Page 5: ...e the volume In the on screen menu use the buttons as you use the and buttons on the remote control Press to change channels In the on screen menu use the buttons as you use the and buttons on the remote control Without the Remote Control you can turn on the TV by using the Channel buttons Speakers Remote Control Sensor Aim the remote control towards this spot on the TV Power Press to turn the TV ...

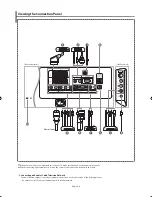
Page 6: ... When connecting an external device match the colour of the connection terminal to the cable Side Panel Jacks Rear Panel Jacks Connecting an Aerial or Cable Television Network To view television channels correctly a signal must be received by the set from one of the following sources An outdoor aerial A cable television network A satellite network ...

Page 7: ...other end to the Video Card of your computer Connect the stereo audio cable optional to AUDIO PC IN on the rear of your set and the other end to Audio Out of the sound card on your computer Connecting Component Devices DTV DVD Connect component video cables optional to component connector PR PB Y on the rear of your set and the other ends to corresponding component video out connectors on the DTV ...

Page 8: ...letext Functions Exit from the teletext display Teletext index Teletext hold Teletext size selection Teletext mode selection LIST FLOF Teletext sub page P Teletext next page P Teletext previous page Teletext cancel Teletext reveal Alternately select Teletext Double or Mix Fastext topic selection Teletext store The performance of the remote control may be affected by bright light This is a special ...

Page 9: ...on at any time to interrupt the memorization process 6 Press the ENTER OK button Select the Hour or Minute by pressing the or button Set the Hour or Minute by pressing the or button You can also set the hour and minute by pressing the number buttons on the remote control 7 Press the ENTER OK button to confirm your setting The DTV channel scan menu appears and the DTV channel is automatically updat...

Page 10: ...hannel which you wish to identify 1 Press the MENU button to display the menu Press the or button to select Channel then press the ENTER OK button 2 Press the or button to select Manual Store then press the ENTER OK button 3 Press the ENTER OK button to select Programme 4 To assign a programme number to a channel find the correct number by pressing the or button and then press the ENTER OK button ...

Page 11: ... such as children from watching unsuitable programmes by muting out video and audio Child Lock cannot be released using the buttons on the side Only the remote control can release the Child Lock setting so keep the remote control away from children 1 Press the MENU button to display the menu Press the or button to select Channel then press the ENTER OK button 2 Press the or button to select Channe...

Page 12: ...the or button to select Fine Tune then press the ENTER OK button 4 Press the or button to adjust the fine tuning Press the ENTER OK button 5 Press the EXIT button to exit Fine tuned channels that have been saved are marked with an asterisk on the right hand side of the channel number in the channel banner And the channel number turns red To reset the fine tuning select Reset by pressing the or but...

Page 13: ...cture quality 1 To select the desired picture effect follow the Changing the Picture Standard instructions number 1 to 3 2 Press the or button to select a particular item Press the ENTER OK button 3 Press the or button to decrease or increase the value of a particular item Press the ENTER OK button 4 Press the EXIT button to exit Adjusting the Custom Picture The adjusted values are stored accordin...

Page 14: ...an be adjusted Select by pressing the or button Use the or button to move the picture up and down After selecting use the or button to magnify or reduce the picture size in the vertical direction The Zoom mode cannot be selected in the DTV mode Resetting the Picture Settings to the Factory Defaults Changing the Picture Size If the broadcast signal received by your TV is weak you can activate the D...

Page 15: ...R OK button Select a source of the sub picture by pressing the or button and press the ENTER OK button The sub picture can serve different source selections based on what the main picture is set to 5 Press the or button to select Swap To interchange the main picture and the sub picture select Swap option and press the ENTER OK button The main picture and the sub picture are interchanged If main pi...

Page 16: ...the or button to select Equalizer then press the ENTER OK button 3 Press the or button to select a particular item Press the ENTER OK button 4 Press the or button to reach the required setting Press the ENTER OK button 5 Press the EXIT button to exit If you make any changes to these settings the Sound Mode is automatically switched to Custom Adjusting the Sound Settings TV Ext 1 Ext 2 AV S Video C...

Page 17: ...ress the ENTER OK button 4 Press the EXIT button to exit You can select this option when the PIP is set to On refer to page 13 If you want to hear the sound through separate speakers cancel the internal amplifier 1 Press the MENU button to display the menu Press the or button to select Sound then press the ENTER OK button 2 Press the or button to select Internal Mute then press the ENTER OK button...

Page 18: ...ess the EXIT button to exit The TV automatically switches to standby mode when the timer reaches 0 You can set the On Off timers so that the set will Switch on automatically and tune to the channel of your choice at the time you select Switch off automatically at the time you select The first step is to set the television s clock 1 Press the MENU button to display the menu Press the or button to s...

Page 19: ...Adjust the sound using the equalizer The Reset Sound function is activated Selecting the Reset function after setting the equalizer resets the equalizer setting to the factory defaults Blue Screen If no signal is being received or the signal is very weak a blue screen automatically replaces the noisy picture background If you wish to continue viewing the poor picture you must set the Blue Screen m...

Page 20: ...ed to your set only TV Ext 1 Ext 2 DTV are activated in the Source List AV S Video Component PC HDMI are activated only when they are connected to your set 3 Select the required device by pressing the or button Press the ENTER OK button Name the device connected to the input jacks to make your input source selection easier 1 Press the MENU button to display the menu Press the ENTER OK button to se...

Page 21: ...tem Press the D MENU button Parental Lock Set Channel Lock Change PIN Code Channel Organising Delete Frequency Delete Channel Delete All Channels Move Edit Channel The sub items of the CI Menu may vary depending on the CAM model In the Digital TV mode do not turn the power off before the screen is completely loaded Installation Select Country Auto Scanning Manual Scanning Reset to Factory Defaults...

Page 22: ...d time you will receive detailed program information for current program can be displayed on another banner if there is more information When this information is more than one page P can be used for page up and down This service depends on service provider 2 Volume Control To control the volume level Press the buttons to adjust the volume level Press the MUTE button to turn to silence mode Press t...

Page 23: ...zed the GMT time from the signal which takes few seconds it can display correct EPG information Press the GUIDE button while you are viewing a program This function is displayed on the screen by using only time RED button Red button is for moving back to the previous date GREEN button Green button is for moving to the next coming date INFO button This button is used to watch the program informatio...

Page 24: ...w channels the TV has been provided with the option Select Country Select the country where broadcasting services are provided After selecting the Select Country from the Installation Menu the following screen will be displayed Select the country which you are in You can select the value of ITALY SPAIN SWEDEN UK USER BELGIUM GERMANY FINLAND or FRANCE by using buttons After selecting option press t...

Page 25: ...he values AUOT 2 K and 8 K will be selected automatically You may change the set value as your preference After selecting option press the ENTER OK button to start the scanning process 1 4 Reset to Factory Defaults This is to restore the factory set values in case the user has encountered some problems after changing any values of channel data and others which may be in error At the request window...

Page 26: ...e list with buttons Select the TV RADIO Interactive list with or P buttons Select channel by pressing the RED button Press the buttons to change the position of the channel you want and P for moving up or down pages on list Press the ENTER OK button for confirmation If you want to return the channel to the initial position do not press the ENTER OK button but press the BLUE button To edit Channel ...

Page 27: ...will have to enter the PIN Code at the request window After entering PIN Code to be able to access a parental locked channel it will work on all parental locked channels It means that you can access all parental locked channels with entering PIN Code on any parental locked channel successfully To cancel the lock Press the RED button again in order to cancel the lock 3 2 Change PIN Code To change t...

Page 28: ...lected language 4 2 OSD Setting You can set the OSD transparency and the display banner time Select OSD Transparency level The OSD Transparency level from 0 to 100 Setting is made with the numeric buttons buttons or P buttons Set the display duration of the information banner box displayed in the screen The time ranges from 0 5 to 60 0 seconds Setting is made with the numeric buttons buttons to be...

Page 29: ...about that If you select to download a new software version all your previous settings access code and favourite channels etc will be erased Downloading may take a While During downloading don t turn off the TV Installing the CI card 1 Purchase the CI CAM module by visiting your nearest dealer or by phone 2 Insert the CI card into the CAM in the direction of the arrow until it fits 3 Insert the CA...

Page 30: ... 4 Press the TV DTV button to exit from the Text display If any broken character appears while Text is being viewed make sure that the Text language is identical with the language in the Setup menu mode If both languages are different select the same language with the Text language on the Setup menu Displaying the Teletext Information Teletext Decoder Most set channels carry teletext pages of writ...

Page 31: ...age Press the number buttons on the remote control to enter the page number directly 1 Enter the three digit page number listed in the contents by pressing the corresponding numeric buttons 2 If the selected page is linked with several secondary pages the secondary pages are displayed in sequence To freeze the display on a given page press the PIP Press the PIP button again to resume 3 Using the v...

Page 32: ...et up repeat steps 2 3 and 4 but try one of the other codes listed for your brand of VCR If no other codes are listed try each code 000 through 080 Note on Using Remote Control Modes VCR When your remote control is in VCR mode the volume buttons still control your TV s volume Setting Up the Remote to Operate Your Cable Box 1 Turn off your cable box 2 Press the CABLE button on your TV s remote cont...

Page 33: ...Control Modes DVD When your remote control is in DVD mode the volume buttons still control your TV s volume Setting Up the Remote to Operate Your STB 1 Turn off your STB 2 Press the STB button on your TV s remote control 3 Press the SET button on your TV s remote control 4 Using the number buttons on your remote control enter three digits of the STB code listed on page 34 of this manual for your b...

Page 34: ... 021 026 037 062 MARTA 006 MEI 021 MEMOREX 006 021 024 025 MGA 034 MIDLAND 005 MINOLTA 019 041 075 MITSUBISHI 019 034 041 046 Brand Code MONTGOMERYWARD 020 MTC 002 025 MULTITECH 002 005 025 038 NEC 007 008 018 026 037 062 064 OPTIMUS 020 ORION 073 074 075 076 PANASONIC 021 056 071 072 PENTAX 019 041 075 PENTEX RESEARCH 008 PHILCO 021 056 059 PHILIPS 021 080 PIONEER 019 026 039 053 PORTLAND 015 049...

Page 35: ... 018 STB DVD COMBO 019 DVD Receiver 020 AV Receiver 021 DVD Brand Code ANAM 030 AUDIOVOX 075 AUDIOLOGIC 085 ANABA 072 APEX DIGITAL 070 071 074 086 083 084 088 111 112 AIWA 114 BROKSONIC 062 BLAUPUNKT 074 B K 122 123 CURTIS MATHES 027 CYBER HOME 077 078 079 082 CLARION 080 125 CIRRUS 081 CYBER HOME 065 CINEVISION 095 DAEWOO 066 DENON 146 FARENHEIT 067 068 FISHER 090 GPX 060 GO VIDEO 061 089 133 135...

Page 36: ...lite STB HDD COMBO Standard 009 SET TOP BOX Brand Code ALPHASTAR 023 ANAM 043 CHANNEL MASTER 018 034 CROSSDIGITAL 019 CHAPARRAL 035 DIRECT TV 015 016 017 019 022 045 060 061 062 065 066 067 068 DAEWOO 074 DISHNETWORKSYSTEM 069 070 DISHPRO 069 DRAKE 018 024 032 DX ANTENNA 027 ECHOSTAR 025 069 070 071 EXPRESSVU 069 GOI 069 GE 065 GENERALINSTRUMENT 046 047 048 063 064 HTS 069 HOME CABLE 056 HITACHI 0...

Page 37: ... box the correct value is 60 or 60 Hz Otherwise just click OK and exit the dialog box Setting up Your PC Software Based on Windows XP The interface mode is not supported The set might operate abnormally if a non standard video format is selected DVI does not support PC function Separate and Composite modes are supported SOG is not supported Display Modes Both screen position and size will vary dep...

Page 38: ...screen positioning if it does not fit the TV screen 1 Follow the Coarse and Fine Tuning of the Image Image Lock instructions number 1 to 3 2 Press the or button to select Position then press the ENTER OK button 3 Press the or button to adjusting the Vertical Position Press the or button to adjust the Horizontal Position Press the ENTER OK button 4 Press the EXIT button to exit Adjusting the PC Scr...

Page 39: ...ve it further away Plug your set into a different mains socket Check the direction location and connections of your aerial This interference is often due to the use of an indoor aerial Replace the remote control batteries Clean the upper edge of the remote control transmission window Check the battery terminals Check that the signal cable is firmly connected to the PC or video sources Check that t...

Page 40: ...893 x 249 x 615 mm 13 9 kg 10 C to 40 C 50 F to 104 F 10 to 80 non condensing 20 C to 45 C 4 F to 113 F 5 to 95 non condensing LE37S7 37 inch AC 220 240 V 50 Hz 170 W 1360 x 768 60 Hz 10 W X 2 1027 94 626 mm 1027 330 699 mm 22 5 kg 10 C to 40 C 50 F to 104 F 10 to 80 non condensing 20 C to 45 C 4 F to 113 F 5 to 95 non condensing LE40S7 40 inch AC 220 240 V 50 Hz 190 W 1360 x 768 60 Hz 10 W X 2 11...

Page 41: ...This page is intentionally left blank ...

Page 42: ...elevisión automáticamente 16 OTROS AJUSTES Selección del idioma 17 Uso del Modo Juego 17 Ajuste del modo Pantalla Azul Selección de Melodía 17 Uso de la función de ahorro de energía 18 Selección de la fuente 18 Edición de los nombres de fuentes de entrada 18 USO DE LA FUNCIÓN DE DTV Previsualización del sistema de menús del DTV 19 Funciones básicas 20 1 Pantalla de visualización 20 2 Control del v...

Page 43: ... más el soporte ya está instalado Instalación del soporte Tarjeta de garantía Guía de seguridad Tarjetas de registro no esta disponible en todas las localidades El soporte y el tornillo del soporte podrían no estar incluidos según el modelo Los elementos para montaje en la pared se venden por separado permiten instalar el televisor en una pared Si desea más información sobre la instalación de los ...

Page 44: ...enú de la pantalla use estos botones del mismo modo que los botones y del mando a distancia Púlselos para cambiar de canal En el menú de la pantalla use estos botones del mismo modo que los botones y del mando a distancia Sin mando a distancia puede encender el TV utilizando el botón de los canales Altavoces Sensor del mando a distancia Dirija el mando a distancia hacia este punto del televisor En...

Page 45: ...do conecte un terminal externo debe hacer coincidir los colores del terminal de conexión y del cable Conexión a la antena o a la red de televisión por cable Para ver los canales de televisión correctamente la unidad debe recibir una señal de una de las fuentes siguientes Una antena exterior Una red de televisión por cable Una red por satélite Tomas del panel lateral Tomas del panel posterior ...

Page 46: ...deo del ordenador Conecte el cable estéreo de audio opcional a la entrada AUDIO PC IN en la parte posterior del equipo y el otro extremo a la salida Audio Out de la tarjeta de sonido del ordenador Conexión de dispositivos con salida de vídeo por componentes DTV DVD Conecte los cables de vídeo de componentes opcionales al conector de componentes PR PB Y de la parte posterior del equipo y los otros ...

Page 47: ...io actual Funciones de Teletexto Sale de la visualización del teletexto Índice del teletexto Hold del teletexto Selección de tamaño de teletexto Selección del modo de teletexto Lista o Flof Página secundaria de teletexto P Siguiente página de teletexto P Página de teletexto anterior Cancelar teletexto Mostrar teletexto Seleccione alternativamente Teletxt Double o Mix Selección de tema de fastext A...

Page 48: ...mpir el proceso de memorización 6 Pulse el botón ENTER OK Seleccione la Hora o el Minuto pulsando los botones o Establezca la Hora o el Minuto pulsando los botones o También puede ajustar la hora y los minutos pulsando los botones numéricos del mando a distancia 7 Pulse el botón ENTER OK para confirmar el ajuste Aparece el menú de búsqueda de canales de DTV y el canal de DTV se actualiza automátic...

Page 49: ...canal memorizado 1 Pulse el botón MENU para ver el menú Pulse los botones o para seleccionar Canal y pulse el botón ENTER OK 2 Pulse los botones o para seleccionar Guardado manual y pulse el botón ENTER OK 3 Pulse el botón ENTER OK para seleccionar Programa 4 Para asignar un número de programa a un canal busque el número correcto pulsando el botón o y pulse el botón ENTER OK También puede establec...

Page 50: ...ndo el vídeo y el audio El bloqueo infantil no se puede desactivar mediante los botones del panel lateral Únicamente con el mando a distancia es posible desactivar el ajuste del bloqueo infantil por tanto mantenga el mando a distancia fuera del alcance de los niños 1 Pulse el botón MENU para ver el menú Pulse los botones o para seleccionar Canal y pulse el botón ENTER OK 2 Pulse los botones o para...

Page 51: ...n fina y pulse el botón ENTER OK 4 Pulse los botones o para ajustar la sintonización fina Pulse el botón ENTER OK 5 Pulse el botón EXIT para salir Los canales guardados en los que se haya efectuado un ajuste fino están marcados con un asterisco en el lado derecho del número del canal en la banda de canales Y el número de canal se pone de color rojo Para reiniciar el ajuste fino seleccione Restabl ...

Page 52: ... efecto de imagen deseado siga las instrucciones 1 a 3 de Cambio de la imagen estándar 2 Pulse los botones o para seleccionar un elemento concreto Pulse el botón ENTER OK 3 Pulse los botones o para reducir o aumentar el valor de un elemento concreto Pulse el botón ENTER OK 4 Pulse el botón EXIT para salir Ajuste de imagen personal Los parámetros ajustados se almacenan de acuerdo con el modo Imagen...

Page 53: ... modo 16 9 y 4 3 Seleccione pulsando los botones o Utilice los botones o para mover la imagen arriba y abajo Después de seleccionar utilice los botones o para ampliar o reducir el tamaño de la imagen en dirección vertical El modo Zoom Zoom no se puede seleccionar en el modo de DTV Reajuste de los valores de la imagen a los valores predefinidos de fábrica Selección del Tamaño de la imagen Si la señ...

Page 54: ...trada de la imagen secundaria pulsando los botones o y pulse el botón ENTER OK La imagen secundaria puede servir a diferentes selecciones de fuente basadas en cómo esté configurada la imagen principal 5 Pulse el botón o para seleccionar Intercambiar Para intercambiar la imagen principal y la imagen secundaria seleccione la opción Intercambiar y pulse el botón ENTER OK Se intercambian la imagen pri...

Page 55: ...ones o para seleccionar Ecualizador y pulse el botón ENTER OK 3 Pulse los botones o para seleccionar un elemento concreto Pulse el botón ENTER OK 4 Pulse el botón o para llegar al ajuste necesario Pulse el botón ENTER OK 5 Pulse el botón EXIT para salir Si efectúa algún cambio en esta configuración el modo de sonido cambiará automáticamente a Personal Ajuste de los parámetros de sonido TV Ext 1 Ex...

Page 56: ...otón o seleccionar Sub Pulse el botón ENTER OK 4 Pulse el botón EXIT para salir Puede seleccionar esta opción cuando PIP está ajustado como Activado consulte la página 13 Si desea oír el sonido a través de altavoces independientes desactive el amplificador interno 1 Pulse el botón MENU para ver el menú Pulse los botones o para seleccionar Sonido y pulse el botón ENTER OK 2 Pulse los botones o para...

Page 57: ...elevisor cambiará automáticamente a modo de espera cuando el temporizador llegue a 0 Puede ajustar los temporizadores de Des Act para que el Televisor Se encienda automáticamente y sintonice el canal seleccionado en el momento que seleccione Se apague automáticamente a la hora que seleccione El primer paso es ajustar el reloj del televisor 1 Pulse el botón MENU para ver el menú Pulse los botones o...

Page 58: ... establecer el sonido se activa Si tras configurar el ecualizador selecciona la función Reset Restablecer se restauran los parámetros de fábrica de la configuración del ecualizador Pantalla azul Si no se recibe ninguna señal o la señal es muy débil una pantalla azul sustituirá automáticamente el fondo ruidoso de la imagen Si desea continuar visualizando la imagen deficiente ajuste el modo Pantalla...

Page 59: ...ones TV EXT 1 EXT 2 DTV están activadas en Fuentes AV S Vídeo Componente PC y HDMI solo se activan si tales fuentes están conectadas a su unidad 3 Seleccione el dispositivo que desea pulsando de forma repetida el botón o Pulse el botón ENTER OK Dé un nombre al dispositivo conectado en las tomas de entrada de esta manera será más fácil seleccionar el dispositivo de entrada 1 Pulse el botón MENU par...

Page 60: ...eo de canales Cambiar el código PIN Organización de los canales Borrar frecuencia Suprimir canal Suprimir todos los canales Desplazar y editor canal Las opciones secundarias del menú CI pueden variar según el modelo de CAM En el modo Digital TV Televisión digital no desconecte el aparato antes de que la pantalla se cargue completamente Instalación Selec País Exploración automática Exploración manu...

Page 61: ...llada del programa actual que se puede mostrar en otra banda si hay más información Si la extensión de la información es superior a una página puede utilizar P para ir a la página anterior y siguiente Este servicio depende del proveedor de servicios 2 Control del volumen Para controlar el volumen Pulse los botones para ajustar el nivel de volumen Pulse el botón MUTE para cambiar al modo de silenci...

Page 62: ...or ha reconocido la hora GMT de la señal lo que lleva unos segundos puede mostrar la información correcta de la EPG Pulse el botón GUIDE mientras está viendo un programa Esta función aparece en la pantalla usando sólo la hora Botón ROJO El botón rojo sirve para retroceder a la fecha anterior Botón VERDE El botón verde sirve para ir a la fecha siguiente Botón INFO Este botón sirve para ver la infor...

Page 63: ...a sintonizar nuevos canales el televisor cuenta con la opción Selec país Debe seleccionar un país que proporcione servicio de emisión Tras seleccionar Selec país en el menú Instalación aparecerá la pantalla siguiente Seleccione el país donde se encuentra Puede seleccionar el valor de ITALY SPAIN SWEDEN UK USER BELGIUM GERMANY FINLAND o FRANCE mediante los botones Tras seleccionar la opción pulse e...

Page 64: ...ecido de acuerdo con sus preferencias Una vez seleccionada la opción pulse el botón ENTER OK para iniciar el proceso de exploración 1 4 Restaurar los valores de fábrica El menú Reset to Factory Defaults Restaurar los valores predeterminados de fábrica sirve para restaurar los valores predeterminados establecidos en fábrica si el usuario se encuentra con problemas después de cambiar algún valor de ...

Page 65: ...V RADIO Interactiva mediante los botones o P Seleccione el canal pulsando el botón ROJO Pulse los botones para cambiar la posición del canal que desee y pulse P para desplazarse a la página anterior o siguiente de la lista Pulse el botón ENTER OK para confirmar Si desea que el canal vuelva a la posición inicial no pulse el botón ENTER OK sino el botón AZUL Para editar el nombre del canal Seleccion...

Page 66: ...e lo solicite Una vez introducido el código PIN para acceder a un canal bloqueado se podrá acceder a los demás canales bloqueados Es decir puede acceder a todos los canales bloqueados para seguridad infantil si ha accedido a uno introduciendo correctamente el código PIN Para cancelar el bloqueo Pulse de nuevo el botón ROJO para anular el bloqueo 3 2 Cambiar el código PIN Para cambiar el código PIN...

Page 67: ...uración de OSD Puede establecer la transparencia de la OSD y el tiempo de visualización banda Selección del nivel de transparencia de la OSD El nivel va de 0 a 100 El ajuste se realiza mediante los botones numéricos o P Ajuste de la duración de la visualización del cuadro de información banda mostrado en la pantalla El tiempo va de 0 5 a 60 segundos El ajuste se realiza mediante los botones numéri...

Page 68: ...versión del software la configuración el código de acceso los canales favoritos etc se borrarán La descarga puede tardar un poco No apague el televisor durante el proceso de descarga Instalación de la tarjeta CI 1 Puede adquirir el módulo del CAM de CI por teléfono o en el distribuidor más cercano a su domicilio 2 Inserte la tarjeta CI en el CAM siguiendo la dirección de la flecha hasta que encaje...

Page 69: ...ormación Algunas páginas no se visualizarán Para activar el modo de teletexto y visualizar la página de ndice 1 Mediante los botón P o P seleccione el canal que proporciona el servicio de teletexto 2 Pulse el botón TTX MIX para activar el modo de teletexto Se visualiza el contenido de la página Se puede volver a visualizar en cualquier momento si se pulsa el botón MENU 3 Pulse de nuevo el botón TT...

Page 70: ...gina secundaria escriba los 4 dígitos del número Página siguiente Página anterior O doble de las letras en Mitad superior de la pantalla Mitad inferior de la pantall La pantalla normal Pulse TTX MIX INFO INFO PRE CH P P DUAL I II Una vez Dos veces Tres veces Uso de Fastext para seleccionar una página del teletexto Las distintos temas que aparecen en las páginas del teletexto tienen varios colores ...

Page 71: ...uebe con todos los códigos de vídeo desde el 000 hasta el 080 Nota sobre el uso de los modos del mando a distancia vídeo Cuando el mando a distancia esté en el modo VCR los botón de volumen seguirán con trolando el volumen del televisor Configuración del mando a distancia para controlar el decodificador de cable 1 Apague el decodificador de cable 2 Pulse el botón CABLE del mando a distancia del te...

Page 72: ...l mando a distancia esté en el modo DVD los botóns de volumen seguirán controlando el volumen del televisor Configuración del mando a distancia para controlar el STB 1 Apague el STB 2 Pulse el botón STB del mando a distancia del televisor 3 Pulse el botón SET del mando a distancia del televisor 4 Mediante los botóns de número del mando a distancia intro duzca los tres dígitos del código del STB co...

Page 73: ...056 059 MARANTZ 007 008 018 021 026 037 062 MARTA 006 MEI 021 MEMOREX 006 021 024 025 MGA 034 MIDLAND 005 MINOLTA 019 041 075 MITSUBISHI 019 034 041 046 Marca Código MONTGOMERYWARD 020 MTC 002 025 MULTITECH 002 005 025 038 NEC 007 008 018 026 037 062 064 OPTIMUS 020 ORION 073 074 075 076 PANASONIC 021 056 071 072 PENTAX 019 041 075 PENTEX RESEARCH 008 PHILCO 021 056 059 PHILIPS 021 080 PIONEER 019...

Page 74: ...TRAY COMBO 018 STB DVD COMBO 019 DVD Receiver 020 AV Receiver 021 DVD Marca Código ANAM 030 AUDIOVOX 075 AUDIOLOGIC 085 ANABA 072 APEX DIGITAL 070 071 074 086 083 084 088 111 112 AIWA 114 BROKSONIC 062 BLAUPUNKT 074 B K 122 123 CURTIS MATHES 027 CYBER HOME 077 078 079 082 CLARION 080 125 CIRRUS 081 CYBER HOME 065 CINEVISION 095 DAEWOO 066 DENON 146 FARENHEIT 067 068 FISHER 090 GPX 060 GO VIDEO 061...

Page 75: ...tellite STB HDD COMBO Standard 009 Receptor TV digital Marca Código ALPHASTAR 023 ANAM 043 CHANNEL MASTER 018 034 CROSSDIGITAL 019 CHAPARRAL 035 DIRECT TV 015 016 017 019 022 045 060 061 062 065 066 067 068 DAEWOO 074 DISHNETWORKSYSTEM 069 070 DISHPRO 069 DRAKE 018 024 032 DX ANTENNA 027 ECHOSTAR 025 069 070 071 EXPRESSVU 069 GOI 069 GE 065 GENERALINSTRUMENT 046 047 048 063 064 HTS 069 HOME CABLE ...

Page 76: ...tical en ese cuadro de diálogo de configuración dela pantalla el valor correcto es 60 o 60 Hz Si no basta con hacer clic en OK y salir del cuadro de diálogo Configuración del software del PC basado en Windows XP No se admite el modo entrelazado El aparato puede funcionar incorrectamente si se selecciona un formato de vídeo que no sea estándar El DVI no es compatible con la función PC Los modos Ind...

Page 77: ... no se ajusta a la pantalla del TV 1 Siga las instrucciones de 1 a 3 del apartado Sintonización gruesa y fina de la imagen Bloqueo de Imagen 2 Pulse los botones o para seleccionar Posición y pulse el botón ENTER OK 3 Pulse el botón o para ajustar la posición vertical Pulse el botón o para ajustar la posición horizontal Pulse el botón ENTER OK 4 Pulse el botón EXIT para salir Configuración automáti...

Page 78: ...ando al televisor y aléjelo Enchufe el televisor en una toma de corriente diferente Compruebe la dirección la ubicación y las conexiones de la antena Esta interferencia a menudo se debe al uso de una antena interna Sustituya las pilas del mando a distancia Limpie el borde superior del mando a distancia ventana de transmisión Compruebe los terminales de la pila Compruebe que el cable de señal se ha...

Page 79: ... x 249 x 615 mm 13 9 kg Entre 10 C y 40 C 50 F a 104 F Del 10 al 80 sin condensación Entre 20 C y 45 C 4 F a 113 F Del 5 al 95 sin condensación LE37S7 37 pulg AC 220 240 V 50 Hz 170 W 1360 x 768 60 Hz 10 W X 2 1027 x 94 1 x 626 1 mm 1027 x 330 0 x 698 8 mm 22 5 kg Entre 10 C y 40 C 50 F a 104 F Del 10 al 80 sin condensación Entre 20 C y 45 C 4 F a 113 F Del 5 al 95 sin condensación LE40S7 40 pulg ...

Page 80: ...Esta página se ha dejado en blanco expresamente ...

Page 81: ... other commercial wastes for disposal Eliminación correcta de este producto material eléctrico y electrónico de descarte Aplicable en la Unión Europea y en países europeos con sistenmas de recogida selectiva de residuos La presencia de esta marca en el producto o en el material informativo que lo acompaña indica que al finalizar su vida útil no deberá eliminarse junto con otros residuos domésticos...

Reviews: