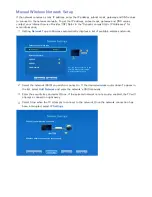
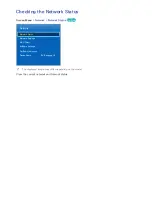
background image

44

45

Buttons and Descriptions

<For Australia>

<For the other countries>

Summary of Contents for LED 8000 series

Page 1: ...E MANUAL Thank you for purchasing this Samsung product To receive more complete service please register your product at www samsung com register Model______________ Serial No ______________...

Page 2: ...12 For the S9 models Computer Connection 13 HDMI Connection 13 For the LED 7500 8000 8500 and PDP 8500 series models 13 For the S9 models 14 HDMI to DVI Connection 14 For the LED 7500 8000 8500 and P...

Page 3: ...Using the Number Panel 53 Using the Playback Control Panel 53 Using the Quick Access Panel 53 Adjusting the virtual remote control Universal Remote Setup 54 Connecting the IR EXTENDER CABLE 54 For th...

Page 4: ...ng Device Management 86 Programme Recording 86 Instant Recording 86 Guide 86 Programme Info 87 Specified Time and Date 87 Cancel the Schedule Recording function 87 Edit Timer List Recorded Programme P...

Page 5: ...Additional Features 127 Changing the Menu Language 127 Game Mode 127 Precautions and Restrictions 128 BD Wise 128 Menu Transparency 128 Sound Feedback 128 Panel Locking 129 Booting Logo 129 Light Eff...

Page 6: ...151 USB Device Connection 151 USB Device Removal 151 Playing all the Content on a Storage Device 151 Watching Recorded Programmes 151 Clearing the Photos Videos Music Screen 152 Using Networked Exter...

Page 7: ...8 Internal 179 Supported image resolutions 179 Supported music file formats 180 Video Codec 181 Video Codecs 181 Other Restrictions 181 Video Decoders 181 Audio Decoders Supported 3D Resolutions 182 H...

Page 8: ...support Scrolling a Page To scroll a page use of one of the following methods Press the or button on the scroll bar at the right edge of the screen Drag or flick up or down the line on either the left...

Page 9: ...sible to jump from a menu item directly to the related section in the e Manual On the screen menu press the MORE button on the Smart Touch Control and then select e Manual on the virtual control panel...

Page 10: ...ber of connectors and their names and locations may vary depending on the model Connect the correct aerial cable for your viewing environment over the air or cable broadcasting However an aerial conne...

Page 11: ...nect the video device to the TV via an HDMI connector for the best picture quality If the device does not have an HDMI connector try a component connector to get the next best possible picture quality...

Page 12: ...HDMI Cable with Ethernet Use an HDMI cable with a thickness of 14 mm or less Using a non certified HDMI cable may result in a blank screen or a connection error Some HDMI cables and devices may not b...

Page 13: ...Use an HDMI cable with a thickness of 14 mm or less Using a non certified HDMI cable may result in a blank screen or a connection error Some HDMI cables and devices may not be compatible with the TV...

Page 14: ...connect to each other as shown in the figure For the LED 8000 8500 PDP 8500 series models Refer to the diagram and connect a component cable to the provided two jack to RCA extension cables so that t...

Page 15: ...lours match the connector colours AV Connection Refer to the diagram and connect the AV cable to the TV s external input connectors and the device s AV output connectors If you are using the TV s exte...

Page 16: ...the LED 8000 8500 PDP 8500 series models For the S9 models Refer to the diagram and connect the video and audio cables to the A V adapter included and the adapter to One Connect s external input conne...

Page 17: ...nnector and the device s digital audio input connector Connecting the device using an optical cable does not automatically turn off the TV speakers To turn off the TV speakers open the Speaker Select...

Page 18: ...enables digital sound to be output using just an HDMI cable However ARC is only available through the HDMI ARC port and only when the TV is connected to an ARC enabled AV receiver Connect the HDMI cab...

Page 19: ...ARC enables digital sound to be output using just an HDMI cable However ARC is only available through the HDMI ARC port and only when the One Connect is connected to an ARC enabled AV receiver Connec...

Page 20: ...connect the computer to the TV Refer to the Display Resolution for information on the resolution settings supported by the TV HDMI Connection For the LED 7500 8000 8500 and PDP 8500 series models Refe...

Page 21: ...external speaker to the computer s audio output connector The connectors names and locations may vary depending on the model For the S9 models Refer to the diagram and connect the HDMI to DVI cable t...

Page 22: ...automatically switches Picture Size to Screen Fit This setting will not change automatically if you are using an HDMI adapter In this case change the setting manually in the menu If you are using an H...

Page 23: ...l sources With a computer connected to the TV s HDMI DVI port via an HDMI cable for example you can change Edit Name to PC With a computer connected to the TV s HDMI DVI port via an HDMI to DVI cable...

Page 24: ...ngs The displayed image may differ depending on the model Automatically scans and indexes all channels received through the TV s aerial input connector 111 To start navigate to Broadcasting and select...

Page 25: ...l Settings Country or Area Depending on the country Select your country or area so that the TV can correctly auto tune the broadcasting channels The PIN input screen appears Enter your 4 digit PIN num...

Page 26: ...Set the Programme Colour System Sound System Channel and Search 333 Select the Store When scanning has finished a channel is updated in the channel list Channel mode P programme mode When tuning is co...

Page 27: ...e country Imports or exports the channel map You should connect USB storage to use this function The PIN input screen appears Enter the PIN using your remote Import from USB Import channel list from U...

Page 28: ...ollowing An analogue channel A favourites channel A locked channel From the Edit Channel screen select the Virtual Remote panel s TOOLS button to access the following options Sorting digital channels...

Page 29: ...remove them from the index 111 From the screen select the channels you wish to remove Unselect channels by choosing them again 222 Press button The selected channel s will be deleted Edit Channel Num...

Page 30: ...You can lock channels you don t want your children to view Lock is only available with Channel Lock set to On Navigate to the Edit Channel screen select the channels you wish to lock press b button an...

Page 31: ...condary audio language Audio Format Try Now Digital channels only Change a desired audio format The supported audio format may vary depending on the broadcast programme Audio Description Try Now Not a...

Page 32: ...also rename and edit favourites channel lists From the Edit Favourites screen select the Virtual Remote panel s TOOLS button to access the following options Sorting Change the list ordered by Name or...

Page 33: ...hpad to finish Rename a Favourites Channel List Rename an existing favourites channels list 111 Select the Virtual Remote panel s TOOLS button to display the list Select Rename Favourites from the lis...

Page 34: ...e services such as the Smart Hub and AllShare Play as well as software updates Wired Network For the LED 7500 8000 8500 and PDP 8500 series models There are three ways to connect the TV to a Local Are...

Page 35: ...For the S9 models There are three ways to connect the TV to a Local Area Network LAN External Modem IP Router External Modem Wall mounted LAN Outlet...

Page 36: ...odem If the wireless router supports DHCP the TV can use a DHCP or static IP address to connect to the wireless network Select a channel that is not currently in use for the wireless router If the cha...

Page 37: ...r has been set to Pure High throughput Greenfield 802 11n mode and the Encryption Type to WEP or TKIP Samsung SMART TVs will not support the connection in compliance with the new Wi Fi certification s...

Page 38: ...depending on the model Automatic Wired Network Setup The TV s wired network connection is automatically configured when it is connected to a network that supports DHCP 111 Set Network Type to Wired a...

Page 39: ...mic versus Static IP Addresses for more information 111 Set Network Type to Wired and then select Connect Network Settings Select your network type Network Type Wired Connect Plug a network cable into...

Page 40: ...en select OK IP Settings IP setting Enter manually IP Address 0 0 0 0 Subnet Mask 0 0 0 0 Gateway 0 0 0 0 DNS setting Enter manually DNS Server 0 0 0 0 OK Cancel 444 The TV attempts to connect to the...

Page 41: ...Unable to connect to the network Try Now Check the following 111 Check the IP Settings 222 Ensure that the DHCP server is enabled on the router and unplug and then plug the router back in 333 If this...

Page 42: ...und on the wireless router s configuration screen 111 Setting Network Type to Wireless automatically displays a list of available wireless networks 222 Select the network SSID you wish to connect to I...

Page 43: ...ess network AP0000 AP0001 Add Network You can connect your TV to the internet Please select which wireless network to use Refresh WPS PBC 222 Select the network SSID you wish to connect to If the desi...

Page 44: ...en select OK IP Settings IP setting Enter manually IP Address 0 0 0 0 Subnet Mask 0 0 0 0 Gateway 0 0 0 0 DNS setting Enter manually DNS Server 0 0 0 0 OK Cancel 666 The TV attempts to connect to the...

Page 45: ...d Select OK to proceed Failed Wireless Connection Wireless network connection failed or no wireless router selected Try Now Try Now Go to Network Settings and select the correct router Unable to conne...

Page 46: ...ice Provider Dynamic versus Static IP Addresses If the network requires a dynamic IP address use an ADSL modem or router that supports the Dynamic Host Configuration Protocol DHCP Modems and routers t...

Page 47: ...twork Network Status Try Now Network Network Status Network Settings Wi Fi Direct AllShare Settings Set Remote Access Device Name TV Samsung LE The displayed image may differ depending on the model Vi...

Page 48: ...g LE The displayed image may differ depending on the model Connect a mobile device that supports Wi Fi Direct to the TV without using a wireless router 111 Enable Wi Fi Direct on the mobile device and...

Page 49: ...ts For details see Screen Mirroring Set Remote Access Screen Menu Network Set Remote Access Remote access allows you to access and control your TV from other devices You need to log in to set this ser...

Page 50: ...the positive and negative ends correctly 333 Align the battery cover with the back of the remote control and press down along the edges until it is cleanly attached to the remote control Connecting to...

Page 51: ...be accessed by removing the Smart Touch Control s battery cover Pressing the pairing button automatically reestablishes the connection between the control unit and the TV Battery Low Alarm If the bat...

Page 52: ...Buttons and Descriptions For Australia For the other countries...

Page 53: ...nel a colour and playback control panel and a quick access panel Use the touchpad to select numbers and buttons Touchpad Drag your finger on the touchpad as you would on the touchpad of a laptop to mo...

Page 54: ...ing TV to display CH List on the screen In addition you can press and hold the touchpad for 2 seconds or more while an application is running to access the application s hidden features Not available...

Page 55: ...ce Manager Smart Touch Control Settings Tutorial to view an on screen guide to using the Smart Touch Control Try Now Dragging Drag on the touchpad in the desired direction Move the focus or the pointe...

Page 56: ...the touchpad while watching TV to display CH List on the screen In addition you can tap and hold the touchpad for 2 seconds or more while an application is running to access the application s hidden f...

Page 57: ...his scrolls a webpage or a list up down This scrolling feature easily accommodates both right handed and left handed users Scrolling Left Right Move your finger horizontally on the projected line at t...

Page 58: ...to watch The recognised number is displayed on the screen and the TV switches to the corresponding channel However the number you have entered may not be recognised properly by the TV Refer to the gui...

Page 59: ...channel or a programme that is scheduled to air to set up a Schedule Viewing or Schedule Recording setting Refer to the Scheduled Recommended Programme Info for more information Select an application...

Page 60: ...t Touch Control The virtual remote panel appears on the screen Press and hold the touch pad for one second Users can change a position of the virtual remote panel of the screen Using the Number Panel...

Page 61: ...et HDMI CEC for more information Some or new models of the external device connected to the TV may not be supported the Universal Remote Setup Connecting the IR EXTENDER CABLE For the LED 7500 8000 85...

Page 62: ...the cable towards the external device s remote panel receiver However there can be any obstacles between the IR extension cable and the external device The presence of an obstacle will interfere with...

Page 63: ...guring the universal remote control feature for a connector to which an external device is already connected you can use the Smart Touch Control as a universal remote control simply by sending the inp...

Page 64: ...text Enable disable the Recommended Text feature Enabling the Recommended Text feature displays word recommendations based on the entered characters To enter the word Internet for example all you hav...

Page 65: ...ons the use misuse of the TV camera may result in legal liability There may be obligations under local privacy laws regarding the protection of individuals concerning personal data and on the free mov...

Page 66: ...s The performance varies depending on the language chosen voice volume and ambient noise levels in the surrounding area Perform a Voice Recognition Environment Test prior to using Voice Recognition to...

Page 67: ...e you use Voice Recognition Set the Clock System Time Clock Voice Recognition can be used in the following ways Using the TV s built in microphone from a distance Using the VOICE button up close Voice...

Page 68: ...nding on the volume tone pronunciation and ambient environment TV sound and ambient noise Voice Recognition Environment Test Screen Menu Smart Features Voice Recognition Voice Recognition Environment...

Page 69: ...Say Show all commands to display a complete list of voice commands by category Say the name of a category Available Voice Commands A list of basic voice commands available in the current state is sho...

Page 70: ...ignate certain commands as trigger words Saying a trigger word activates Voice Recognition To turn on the TV using a voice command say a trigger word Power On Example Hi TV Power On Try Now Use TV Voi...

Page 71: ...When you need information about a specific genre Which genre name shows are on today When you want to watch a programme featuring a specific actor or directed by a specific director Please look up pr...

Page 72: ...and 4m from the camera The actual recognition range may vary depending on the camera angle and other factors Motion Control relies on the TV camera and therefore will not function if the camera is po...

Page 73: ...u have finished adjusting the camera angle wave one hand slowly from left to right Spread your hand out with the palm facing the TV An arrow cursor appears on the screen when the TV recognizes the act...

Page 74: ...ion or execute a command Keeping your fist clenched is like holding down a remote control button Return Make a circle with your hand in the counterclockwise direction to return to the previous menu Tu...

Page 75: ...off Changes the channel Check the recommended programme information and aerial times Select a programme from the list to view detailed information about that programme Launch Smart Hub Enter a channe...

Page 76: ...he TV sound on off However this can only be used from Apps For Australia Changes the channel However this can only be used from On TV For the other countries Changes the channel However this can only...

Page 77: ...mart Hub the icons will disappear automatically after two seconds of inactivity To retrieve the icons move the pointer to one of the three edges shown below marked in blue and then hold it there for 1...

Page 78: ...400 Lux Living Room Face Recognition can recognize up to 5 different users at a time The TV may have difficulty recognising twins and people with similar faces as two different individuals Note the f...

Page 79: ...side I want to enter a password as well for increased security for higher security With the checkbox selected the user must enter the password when logging in using face recognition 444 Select Save to...

Page 80: ...keyboards and mice Keyboard Connection Screen Menu System Device Manager Keyboard Settings Try Now Connect a keyboard to the TV for easier text entry To use a USB keyboard plug the keyboard cable int...

Page 81: ...screen menu Smart Hub and other TV functions using the mouse as you would on a computer To use a USB mouse plug the mouse cord into the TV s USB port To use a Bluetooth mouse pair it using the TV s B...

Page 82: ...ever Programme Info is only available with digital channels In order to use the Programme Info you must first set the TV s clock To set the clock navigate to Time System Time Clock The Programme Info...

Page 83: ...that channel right away Recording the Current Programme Select the virtual remote panel s or the regular remote s INFO button to display the information screen Select Record from the detailed informa...

Page 84: ...ing Select a programme that you wish to record and then select the Virtual Remote panel s INFO button to display the detailed information screen Schedule Recording is only available for programmes tha...

Page 85: ...nel A Schedule Recording reserved channel A locked channel Change Channels Select a channel to jump to it right away To quickly scroll through the list use the channel up down buttons The focus moves...

Page 86: ...ediately Change the Channel List Drag right on the touchpad and then switch to the Added Channels or Favourites list However the Favourites list can only be selected if it contains at least one favour...

Page 87: ...y under the System Time Clock menu The icon appears next to programmes that have been configured for a Schedule Viewing Digital Channel Schedule Viewing Schedule Viewing for programmes on digital chan...

Page 88: ...ing to process 222 Specify that programme s Aerial Channel Repeat and Start Time and then select OK to finish Cancel a Schedule Viewing To cancel a Schedule Viewing for a specific programme select the...

Page 89: ...d programmes that have been configured for a Schedule Recording You can view recordings by selecting Recorded TV of the On TV or Photos Videos Music Precautions To set up a Schedule Recording you must...

Page 90: ...efore a recording can be made A Device Performance Test can be performed from the On TV or Photos Videos Music Recorded TV If recording is selected from Guide or the Programme Info and the USB storage...

Page 91: ...ct the device you wish to use A popup window appears 222 Select Yes From the Format Device screen you can format the device to a system compatible for video recording Note that formatting the device e...

Page 92: ...he top of the screen and then Manage Devices The following options are available from the Manage Devices screen Format Device Format the external storage device to a system compatible for video record...

Page 93: ...button You can record the selected programme Alternatively when you select a programme scheduled to air later you can reserve the recording This function is only available with digital channels Progra...

Page 94: ...Time and End Time and then select OK to finish Cancel the Schedule Recording function To cancel a Schedule Recording for a specific programme select the programme from the Schedule Manager screen A p...

Page 95: ...el s button or press the RETURN button Changing the Viewing Mode Select View at the top of the list and then select a viewing mode The list will be sorted in the order corresponding to the selected vi...

Page 96: ...h to unlock and select Unlock This unlocks all selected programmes Deleting Saved Programmes From the Options list at the top of the screen select Delete Select all the programmes you wish to delete a...

Page 97: ...ck speed 1 4 Slow playback doesn t support audio and is available in the forward direction only Press to pause the screen and then to scan through the paused video in 1 frame increments Audio is not s...

Page 98: ...tton and then power on the receiver Picture Mode Select the Settings on screen button and then select Picture Mode Select the Picture Mode setting Sound Mode Select the Settings on screen button and t...

Page 99: ...t must be performed on the USB storage device connected to the TV before the Timeshift function can be used Device Performance Test can be initiated from Smart Hub On TV or Photos Videos Music Recorde...

Page 100: ...left right on the touchpad Scan 10 seconds backward or forward Press while viewing a Timeshift segment to return to real time Press while in real time viewing mode to deactivate the Timeshift function...

Page 101: ...ons Carefully read the health and safety information concerning 3D viewing before viewing the TV in 3D Refer to the 3D Precautions for more information Tips The left and right 3D images may initially...

Page 102: ...l Line Switches between left and right images one horizontal line at a time This mode is not supported on the UHD S9 Series models Vertical Line Switches between left and right images one vertical lin...

Page 103: ...able if 3D mode is set to Normal or Off Try Now 3D Auto View Setting 3D Auto View to On switches the TV to 3D automatically Setting 3D Auto View to Message Alert brings up a message screen when the TV...

Page 104: ...rning off the TV while PIP is active automatically deactivates PIP PIP Activates deactivates PIP Source Selects the PIP sub picture source Depending on the country Channel Selects the PIP sub picture...

Page 105: ...ecome shaky and full of noise If this happens you can fine tune the signal and or reduce noise to clear up the picture Fine Tune Screen Menu Broadcasting Channel Settings Fine Tune Try Now Clear up sh...

Page 106: ...ting Edit Favourites Channel Settings Subtitle Off Audio Options Programme Rating Lock Allow All Teletext Language Channel Lock On The displayed image may differ depending on the model View subtitles...

Page 107: ...the subtitle mode Try Now Subtitle Language Sets the subtitle language Try Now DVD Subtitles are only available when connected to an external input connector Subtitle Options Screen Menu Broadcasting...

Page 108: ...is enabled MHEG Multimedia and Hypermedia Information Coding Experts Group An International standard for data encoding systems used in multimedia and hypermedia This is at a higher level than the MPEG...

Page 109: ...tain modes can be chosen Dynamic This increases the brightness of the screen It is most suitable for bright environments Standard This is the default mode Natural This is useful for reducing eye strai...

Page 110: ...ED TVs Cell Light Adjusts the brightness of the panel Decreasing the brightness reduces power consumption This option is only available for PDP TVs Contrast Adjusts the screen contrast Try Now Brightn...

Page 111: ...e picture size more than 4 3 A magnified picture can be moved up and down Zoom Magnifies the 16 9 wide pictures vertically to fit the screen size A magnified picture can be moved up and down 4 3 Sets...

Page 112: ...n 4 3 Screen Size Screen Menu Picture Picture Size 4 3 Screen Size Try Now Depending on the country Available only when picture size is set to Auto Wide You can determine the desired picture size at t...

Page 113: ...the TV screen The Advanced Settings option is only available when Picture Mode is set to Standard or Movie When the TV is connected to a computer via an HDMI DVI cable only White Balance and Gamma can...

Page 114: ...available when Picture Mode is set to Movie and may not be supported by some external devices Try Now Gamma Adjusts the primary colour intensity Try Now Expert Pattern Displays picture calibration pa...

Page 115: ...ly change Colour Tone Colour Tone Adjusts the colour tone The setting is applied on an individual Picture Mode basis When Picture Mode is changed the corresponding setting will apply automatically If...

Page 116: ...r Reduction Adjusts the judder reduction level from video sources when playing films LED Clear Motion Removes drag from fast scenes with a lot of movement to provide a clear picture Reset Reset the cu...

Page 117: ...e the sound mode enable disable surround sound adjust the equalizer and optimize the TV s sound Changing the Sound Mode Screen Menu Sound Sound Mode Try Now Sound modes make adjustments to the sound o...

Page 118: ...ngs Screen Menu Sound Sound Effect Try Now Use sound effects to alter how the TV projects sound These options are available only when Speaker Select is set to TV Speaker and Sound Mode is set to Stand...

Page 119: ...ed source device deactivate the Auto Volume function When using the Auto Volume function with a source device the device s volume control may not function properly TV Installation Type Screen Menu Sou...

Page 120: ...creen Menu Sound Sound Customiser Create Sound Profile Try Now Remain quiet and run Create Sound Profile 111 Select Start to preview a test tone Select Next to proceed 222 A 6 step test will start Dur...

Page 121: ...teps as used in creating a sound profile This function is only available when you add a custom sound mode in the Custom Sound Profile Managing Custom Sounds Screen Menu Sound Sound Customiser Manage S...

Page 122: ...may differ depending on the model You can choose which speakers to use from among available several speakers Choose one from the list of speakers To use both the TV speakers and the AV receiver speake...

Page 123: ...al Settings Digital Audio Out Try Now This SMART TV is SPDIF enabled The Sony Philips Digital Interface SPDIF provides digital audio output to speakers and various digital devices including A V Receiv...

Page 124: ...ce for a richer clearer sound This function is available for Samsung Audio Device supported the SoundShare function Pair the Samsung audio device using the TV s Bluetooth function Refer to the Samsung...

Page 125: ...you can select the Virtual Remote panel s INFO button to check the current time The clock must be reset every time the power is disconnected Setting the Time Screen Menu System Time Clock Try Now Set...

Page 126: ...t through a network if the TV fails to receive the time information including the broadcast signal from TV stations ex Watching TV via set top box Satellite receiver or etc Manual Manually enter the t...

Page 127: ...mer to work Setup Use the left and right arrow buttons to specify the time period Use Manual to specify the days of the week Time Specifies the on time Volume Specifies the volume when the TV turns on...

Page 128: ...g names cannot be selected Always use different folder names for multiple USB devices Use a USB memory stick or multi card reader On Timer may not work with certain battery powered USB devices MP3 pla...

Page 129: ...ts overheating to reduce overall power consumption Energy Saving Select a brightness setting from the list to reduce the TV s power consumption Try Now Eco Sensor Automatically adjusts the TV s bright...

Page 130: ...urn Protection Screen Menu System Screen Burn Protection This feature is only available for PDP TVs To reduce the possibility of screen burn the TV uses Pixel Shift screen burn prevention technology P...

Page 131: ...Screen Fit mode Settings Horizontal Available Settings 0 4 pixels Optimum settings for TV AV Component HDMI 4 Vertical Available Settings 0 4 pixels Optimum settings for TV AV Component HDMI 4 Time m...

Page 132: ...mages If the after image is not removed the first time repeat the process Press any button to cancel this process Side Grey Screen Menu System Screen Burn Protection Side Grey This allows selection of...

Page 133: ...m Change PIN Try Now Change the TV s password 111 Run Change PIN and then enter the current password in the password field The default password is 0000 222 Enter a new password and then enter it again...

Page 134: ...the country Game Mode Screen Menu System General Game Mode Try Now Game Mode optimizes the TV s settings for playing video games on a gaming console such as PlayStation or Xbox Read the following inf...

Page 135: ...ble Menu Transparency Screen Menu System General Menu Transparency Try Now Adjust the menu screen s transparency Sound Feedback Screen Menu System General Sound Feedback Try Now Adjust the sound feedb...

Page 136: ...or off Turn it off to save power or if the LED is too bright for you The colour of light may vary depending on the model Flash Adjustment Screen Menu System General Anti Flicker Try Now Change the pow...

Page 137: ...Hub Choose a service using the icons displayed in the top part of the screen Social Watch the latest YouTube videos you and your friends video posts on Facebook and Twitter You can also make video ca...

Page 138: ...mage may differ depending on the model Creating a Samsung Account Screen Menu Smart Features Samsung Account Create Account Create a Samsung account From the login screen select Create Account and the...

Page 139: ...automatically If you forgot your password select Reset password to receive the password resetting instructions via email Linking a Samsung Account to Other Accounts Screen Menu Smart Features Samsung...

Page 140: ...ts from TV The Samsung account used to sign into the Smart Hub is automatically saved on the TV You can delete your account information from among the saved accounts on the TV Resetting Smart Hub Scre...

Page 141: ...s The selected item s page appears Setting Search Scope If you select in the search result screen you can set the search range With Keyword recommendation selected suggested words appear above the on...

Page 142: ...Environment Test and the Motion Control Environment Test Samsung Account Configuration Select My Account from the status and notification banner to manage your Samsung account Network Configuration Se...

Page 143: ...ocial Settings Screen Menu Smart Features Social Settings Try Now Checking the Application Certain applications need to be installed on the TV in order to use the Social feature If a selected applicat...

Page 144: ...he list The selected friend s profile containing his her basic information and posts is displayed Select a friend to call Select Video Call at the bottom of the Social screen This launches Skype and d...

Page 145: ...certain features applications and services may not be available on all devices or in all territories Some Smart Hub features may also require additional peripheral devices or membership fees Visit htt...

Page 146: ...bsite In some applications depending on the policy of the service provider multi tasking is not supported Installing Standard Applications Launching Smart Hub for the first time and loading the Apps s...

Page 147: ...ng Apps to bring up the keypad Enter the application s name and then select Done Installing Applications Select the application you wish to install to bring up a screen with detailed information about...

Page 148: ...elect Yes from the popup window to remove the selected applications from the My Apps list From the Edit My Apps screen select Remove All to remove all applications from the My Apps list Adding Applica...

Page 149: ...ate and then select application from the list The application starts updating to the latest version However Apps to update appears on the screen only when the update is required Setting up the Applica...

Page 150: ...elect the virtual remote panel s TOOLS button The list screen appears Select Tutorial Video from the list user can view the introductory video for more information about Kids anytime Web Browser Web B...

Page 151: ...account you have with that SNS Once linked you can use the buttons at the bottom of the screen to access the registered SNS You can update your feed post comments and even change the viewing mode Apps...

Page 152: ...these notifications to get more information Channel Bound Apps Screen Menu Smart Features Apps Settings Channel Bound Apps Channel Bound Apps can be used when watching a channel that supports applica...

Page 153: ...function and watch recorded programmes Certain features within Smart Hub require internet access and may not be available based on service provider language dialect and region On TV s programme and c...

Page 154: ...e screen This changes the channel to the selected programme Scheduled Recommended Programme Info The following list displays the information and viewing times of recommended programmes that have not y...

Page 155: ...ore information refer to Guide Programme Recommendations by Time Select Timeline View at the bottom of the screen to display programme recommendations for different times of the day Watching Recorded...

Page 156: ...ia network Restrictions Supports MSC Mass Storage Class USB devices only MSC is a class designation for mass storage devices Types of MSC devices include external hard drives flash card readers and di...

Page 157: ...t to the TV using PTP mode it may not be recognised Supported File Formats This TV is capable of playing back the following types of files For more information refer to the Subtitle and Media Contents...

Page 158: ...to remove and then select Tools at the top of the screen Select Disconnect USB Device from the list to safely remove the selected USB device Playing all the Content on a Storage Device You can play Al...

Page 159: ...age and play the media files Use a Smartphone to send a request to the TV to play the media files stored on a computer or use a computer to request playing the media files stored on a Smartphone Log i...

Page 160: ...ieve and enjoy media files from computers and DLNA enabled devices However computers need to be installed with AllShare PC and mobile devices need to support AllShare For more information visit the Sa...

Page 161: ...ight of the screen and choose a category The file list is sorted by the chosen category Playlist Creation From the Options list located at the top of the screen select Play Selected specify all the vi...

Page 162: ...is will take you to a scene in the video If the index information is damaged or unsupported user will not be able to use the Search Scene function Select the Search on screen button and then select Se...

Page 163: ...his function is not available on the UHD resolution screen that is supported by UHD S9 models Receiver Select the Receiver button and then power on the AV receiver Picture Mode Select the Settings on...

Page 164: ...gory Playlist Creation From the Options list located at the top of the screen select Play Selected specify all the music files you want to play and then select Play This creates a playlist If the list...

Page 165: ...ent file only whereas All repeats all files contained in the playlist Shuffle Select the On on screen button Choose between normal and random play Receiver Select the Receiver button and then power on...

Page 166: ...ew on the top right of the screen and choose a category The file list is sorted by the chosen category Slideshow From the Options list located at the top of the screen select Slide Show You can view a...

Page 167: ...reen button Background Music Enable music to play in the background during a slideshow However all music files must be located on the same storage device Select the Background Music on screen button w...

Page 168: ...n and then power on the AV receiver Picture Mode Select the Settings on screen button and then select Picture Mode Select a picture mode Sound Mode Select the Settings on screen button and then select...

Page 169: ...ol may not function under certain circumstances In this case select the Anynet device again Anynet HDMI CEC only works with external devices that support Anynet HDMI CEC and only when those devices ar...

Page 170: ...external devices using just the TV remote control Switching between Anynet Devices 111 Select the Virtual Remote panel s TOOLS button to display the list Select Anynet HDMI CEC from the list A device...

Page 171: ...Display the menu of the connected device If the target device is a DVD player the DVD menu is shown Connected Device Tools Display a list of frequently used functions that are available for the devic...

Page 172: ...Connect an MHL cable to the mobile device and the TV However MHL is only available through the TV s HDMI MHL port and only when used in conjunction with an MHL enabled mobile device This feature is on...

Page 173: ...the TV Screen Mirroring Screen Menu Network AllShare Settings Screen Mirroring Displays mobile device screens on your TV wirelessly However Screen Mirroring is only available with mobile devices that...

Page 174: ...ature to let Samsung Electronics diagnose your TV remotely You will need to read and agree to the service agreement before using this feature A Samsung Electronics technician will then diagnose repair...

Page 175: ...rvice your TV is really pretty simple Call Samsung Contact Centre and ask for remote support Open the menu on your TV and go to the Support section Select Remote Management and Provide the Pin to the...

Page 176: ...Picture Test Sound Test Voice Motion Control Environment Check Signal Information Reset Picture Test Screen Menu Support Self Diagnosis Picture Test Try Now The Picture Test displays HD pictures to ex...

Page 177: ...ow Test the the ambient noise and brightness levels to see if they are suitable for SMART Interaction use Signal Information Screen Menu Support Self Diagnosis Signal Information Try Now The signal In...

Page 178: ...oad the latest update file from the Samsung website Decompress the file and copy it into the root directory of a flash drive Insert the flash drive one of the TV s USB ports to install the update Auto...

Page 179: ...nments only With Store Demo certain functions are disabled and the TV automatically resets itself after a certain amount of time Support Info Screen Menu Support Contact Samsung Try Now Check the info...

Page 180: ...ndary pages that follow automatically To undo press it again Colour buttons red green yellow blue If the FASTEXT system is used by the broadcasting company the different topics on a Teletext page are...

Page 181: ...Typical Teletext page Part Contents A Selected page number B Broadcasting channel identity C Current page number or search indications D Date and time E Text F Status information FASTEXT information...

Page 182: ...on for the TV on the computer The optimal resolution is 1920 x 1080 60 Hz If it is set to any other than in the table below the TV may display nothing Set the resolution properly referring to the user...

Page 183: ...800x600 75Hz 46 875 75 000 49 500 1024x768 60Hz 48 363 60 004 65 000 1024x768 70Hz 56 476 70 069 75 000 1024x768 75Hz 60 023 75 029 78 750 1152x864 75Hz 67 500 75 000 108 000 1280x720 60Hz 45 000 60 0...

Page 184: ...1080i 1080p HDMI 480i p 576i p 720p 1080i 1080p Smart View 1 HDMI 480i p 576i p 720p 1080i 1080p Smart View 2 DTV 576i p 720p 1080i 1080p HDMI 480i p 576i p 720p 1080i 1080p Screen Fit DTV 1080i 1080...

Page 185: ...File Extension MPEG 4 Timed text ttxt SAMI smi SubRip srt SubViewer sub Micro DVD sub or txt SubStation Alpha ssa Advanced SubStation Alpha ass Powerdivx psb Internal Name Container Xsub AVI SubStatio...

Page 186: ...e formats File Extension Type Codec Comments mp3 MPEG MPEG1 Audio Layer 3 m4a mpa aac MPEG4 AAC flac FLAC FLAC Supports up to 2 channel ogg OGG Vorbis Supports up to 2 channel wma WMA WMA WMA 10 Pro s...

Page 187: ...BP MP HP AC3 LPCM 3gp vro ASF MP4 Motion JPEG 1920x1080 WMV v7 v8 ADPCM IMA MS AAC mpg mpeg 3GP MOV Microsoft MPEG 4 v3 MSMPEG4 v3 1280x720 6 30 30 HE AAC WMA ts tp FLV VRO Window Media Video v7 v8 v9...

Page 188: ...devices may not be compatible with the player The S4UD format supports only on the UHD S9 Series models However the Picture Size and the Rotate functions are not supported Video Decoders Supports up...

Page 189: ...840 x 2160p for UHD S9 Series model 24 25 30 3D Format Frame Packing Resolution Frequency Hz 1280 x 720p 50 59 94 60 Hz 1920 x 1080i 50 59 94 60 Hz 1920 x 1080p 23 98 24 25 29 97 30 Hz Component Resol...

Page 190: ...general wear sunglasses protective goggles etc While watching 3D content you may experience eye strain headache dizziness and nausea If eye fatigue occurs stop viewing 3D video immediately take off t...

Page 191: ...onent consult your doctor immediately Keep the used battery out of the reach of children so that they do not accidently swallow the battery If your child has swallowed the battery consult your doctor...

Page 192: ...rranty you must contact the Samsung Centre during the Warranty Period to discuss the problems you are having with the product If a repair or replacement is required you will be provided with a Warrant...

Page 193: ...form to national or local technical or safety standards in force in any country other than the one for which the product was originally designed and manufactured This warranty will not cover and no re...

Page 194: ...USE OR LOSS OF DATA OR DAMAGE TO GOODWILL REPUTATION OR LOST BUSINESS ARISING DIRECTLY OR INDIRECTLY FROM THE PURCHASE USE OR SALE OF THE PRODUCT WHETHER OR NOT SAMSUNG WAS ADVISED OR AWARE OF THE PO...

Page 195: ...require internet access and may not be available based on service provider language dialect and region Visit www samsung com au for more information about service operator compatibility Actual remote...

Page 196: ...more information on how to complete your registration Covered by one or more of the following U S patents 7 295 673 7 460 668 7 515 710 7 519 274 Manufactured under a licence from U S Patent No s 5 95...

Page 197: ...re quality adjustment settings Motion Plus Blur for LED TV If you find that there is a blur or ghost shadow to the images on your television screen you might be able to correct the issue using Motion...

Page 198: ...nd digital channels The colour is wrong or missing If you re using a Component connection make sure that the component cables are connected to the correct jacks Incorrect or loose connections may caus...

Page 199: ...example you may need to change your cable box s audio option to HDMI if the box connected to your TV is using an HDMI cable If you are using a DVI to HDMI cable a separate audio cable is required If...

Page 200: ...es when you are not using them If you leave the 3D glasses on the battery lifespan is shortened Aerial Air Cable Connection There is something wrong with the TV Try this The TV is not receiving all ch...

Page 201: ...o output setting on your PC If you are using a DVI to HDMI cable a separate audio cable is required Networking There is something wrong with the TV Try this The wireless network connection failed Make...

Page 202: ...picture size options on your external device or set the TV to full screen The Mode Not Supported message appears Check the supported resolutions of the TV and adjust the external device s output reso...

Page 203: ...de to Home Use The TV is making a popping noise The expansion and contraction of the TV s outer casing may cause a popping noise This does not indicate a product malfunction The TV is safe to use The...

Page 204: ...B device There is a message saying I need to format the USB storage device Check if the USB device is in a locked state Use the USB recovery function to recover the USB device Schedule Recording canno...

Page 205: ...the Anynet menu Select a non Anynet device from Source The message Connecting to Anynet device or Disconnecting from Anynet device appears on the screen You cannot use the remote control when you are...

Page 206: ...files Apps There is something wrong with the TV Try this Some application content only appears in English How can I change the language The application content language may be different from the user...

Page 207: ...Link Browsing mode Switch to Pointer Browsing to activate this 1111 Only a limited number of fonts are supported Certain symbols and characters may not be displayed properly 1111 The response to remot...

Page 208: ...g SmartTV Bookmark 2222 If Clock System Time Clock has not been enabled the browsing history will not be saved 2222 The browsing history is saved in the order of latest to oldest with the oldest entri...

Reviews: