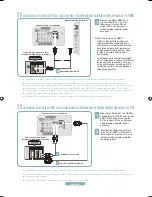
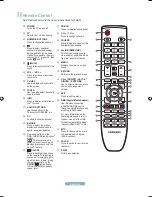
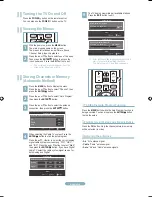
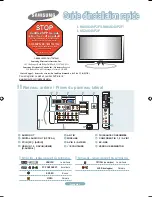
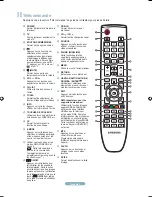
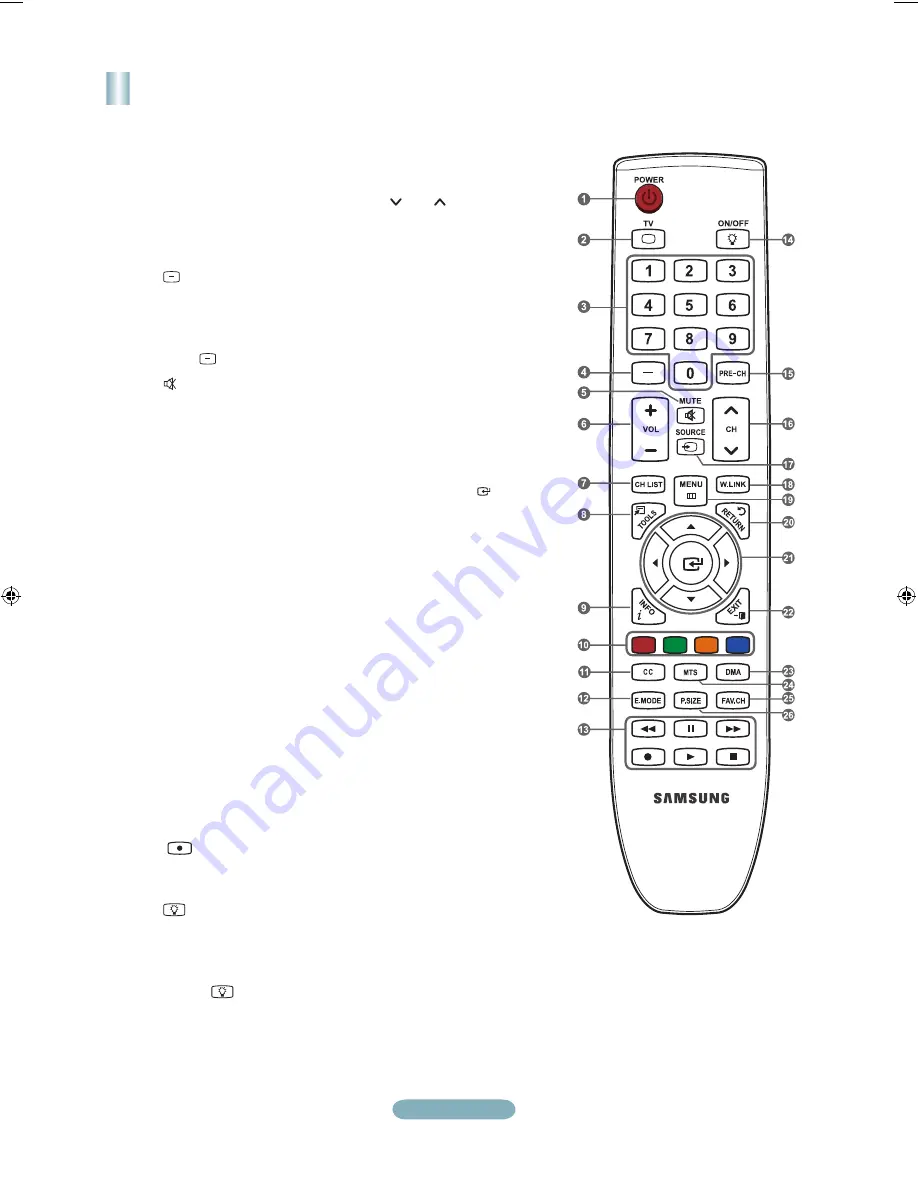
background image

English-2

Remote Control

See “Remote Control” in the owner’s instructions for details.

1

  POWER

Turns the TV on and off.

2

   TV

Selects the TV mode directly.

3

  NUMERIC BUTTONS

Press to change the channel.

4


 Press to select additional 

channels (digital and analog) 

being broadcast by the same 

station. For example, to select 

channel “54-3”, press “54”, then 

press “ ” and “3”. 

5


(MUTE)

 Press to temporarily cut off the 

sound.

6

  VOL – / VOL +

Press to increase or decrease 

the volume.

7

  CH LIST

 Used to display Channel Lists 

on the screen.

8

  TOOLS

Use to quickly select frequently 

used functions.

9

  INFO

 Press to display information on 

the TV screen.

0

  COLOR BUTTONS

Use these buttons in the 

Channel list, WISELINK, etc. 

!

  CC

Controls the caption decoder.

@

  E.MODE

Press to select the preset 

display and sound modes for 

sports, cinema and games.

#


Use these buttons in the 

DMA, WISELINK and  

modes. 

(

: This remote can be 

used to control recording on 

Samsung recorders with the 

 feature)

$


ON/OFF 

Press to backlight the buttons 

on the remote. This function is 

convenient for using at night or 

when the room is dark. (Using 

the remote control with the 

ON/OFF


 light button set 

to On will reduce the battery 

usage time.)

%

  PRE-CH

Tunes to the previous channel.

^

  CH   / CH 

Press to change channels.

&

  SOURCE

Press to display and select the 

available video sources.

*

  W.LINK (WISELINK)

This function enables you to 

view and play photo and music 

files from an external device. 

(

  MENU

Displays the main on-screen 

menu.

)

  RETURN

Returns to the previous menu.

a

   UP▲ / DOWN▼ / LEFT◄ / 


RIGHT► / ENTER 


Use to select on-screen menu 

items and change menu 

values.

b

  EXIT

Press to exit the menu.

c

  DMA (Digital Media Adapter)

Use this when connecting 

a SAMSUNG DMA device 

through an HDMI interface and 

switching to DMA mode.
For more information on the 

operating procedures, refer to 

the user manual of the DMA.
This button is available when 

“(HDMI-CEC)” is “On”.

d

  MTS

Press to choose stereo, mono 

or Separate Audio Program 

(SAP broadcast).

e

  FAV.CH

Press to switch to your favorite 

channels.

f

  P.SIZE

Picture size selection.

BN68-01393J-00Eng.indd   2

2008-04-14   ¿ÀÈÄ 4:23:05

Summary of Contents for LN40A540P2F

Page 1: ...www samsung com global register LN40A540P2F LN46A540P2F LN52A540P2F Rear Panel Side Panel Jacks 1 AUDIO OUT 2 DIGITAL AUDIO OUT OPTICAL 3 PC IN PC AUDIO 4 HDMI IN 1 2 3 DVI IN HDMI2 R AUDIO L 5 ANT IN...

Page 2: ...recorders with the Anynet feature ON OFF Press to backlight the buttons on the remote This function is convenient for using at night or when the room is dark Using the remote control with the ON OFF...

Page 3: ...te receiver Set Top Box DVD Player or Cable Box Satellite receiver Set Top Box Each DVD Player or Cable Box Satellite receiver Set Top Box has a different back panel configuration When connecting a DV...

Page 4: ...e component video and audio connections For example if connecting a Component video cable to COMPONENT IN 1 connect the audio cable to COMPONENT IN 1 also Each DVD Player or Cable Box Satellite receiv...

Page 5: ...VCR and the ANT IN terminal on the TV Connect a Video Cable between the VIDEO OUT jack on the VCR and the AV IN 1 Y VIDEO or AV IN 2 VIDEO jack on the TV Unplug the cable or antenna from the back of...

Page 6: ...sound to the Home theater receiver When the source is a digital component such as a DVD and is connected to the TV via HDMI only 2 channel sound will be heard from the Home Theater receiver If you wa...

Page 7: ...ng a PC match the color of the connection terminal to the cable When using an HDMI DVI cable connection you must use the HDMI IN 2 terminal Using the D Sub Cable 1 Connect an HDMI DVI cable between th...

Page 8: ...auto program Press the or to select the correct analog signal cable system source among STD HRC and IRC Press the or button to select Start then press the ENTER button If you have Digital cable TV se...

Page 9: ...n to select Dynamic Standard or Movie Press the ENTER button Customizing the Picture Settings Your television has several setting options that allow you to control the picture quality 1 To select the...

Page 10: ...atch Available signal sources TV AV1 AV2 S Video Component1 Component2 PC HDMI1 HDMI2 DVI HDMI3 USB You can choose only those external devices that are connected to the TV In the Source List connected...

Page 11: ...een Make sure the broadcast you re receiving is High Definition HD HD channels sometimes broadcast Standard Definition SD programming which can cause black bars Set your cable satellite box to stretch...

Page 12: ...COMPONENT S VID O VID O La meilleure Excellente Bonne Normale Guide d installation rapide Centre d appel heures de service du lundi au dimanche de 9 h 12 h HNE Pour enregistrer ce produit veuillez SV...

Page 13: ...nction Anynet ON OFF Appuyer sur cette touche pour r tro clairer les touches de la t l commande Cette fonction est utile durant la nuit ou lorsque la pi ce est sombre L utilisation de la t l commande...

Page 14: ...tier d codeur DVD ou du d codeur C ble r cepteur satellite bo tier d codeur La configuration du panneau arri re de chaque lecteur DVD ou de chaque d codeur C ble r cepteur satellite bo tier d codeur d...

Page 15: ...exemple si un C ble vid o Composante est branch la prise d entr e COMPONENT IN 1 le C ble audio doit tre branch la prise d entr e COMPONENT IN 1 galement La configuration du panneau arri re de chaque...

Page 16: ...borne ANT IN du t l viseur Relier au moyen d un C ble vid o la prise de sortie vid o du magn toscope et la prise AV IN 1 Y VIDEO ou AV IN 2 VIDEO du t l viseur D branchez l antenne ou le C ble de l ar...

Page 17: ...viseur Lorsque le t l viseur met des signaux num riques air il transmet le son en 5 1 canaux au r cepteur de la cha ne de cin ma maison Lorsque la source est un composant num rique comme un lecteur D...

Page 18: ...Lorsque vous connectez un PC faites correspondre les couleurs de la borne et du C ble La prise d entr e HDMI IN 2 doit tre utilis e pour un branchement de C ble HDMI DVI C ble HDMI DVI non fourni 1 C...

Page 19: ...pri e STD HRC ou IRC Appuyer sur la touche ou pour s lectionner D marrer puis sur ENTER Si le C ble est num rique s lectionner la source de signal pour une diffusion analogique et num rique Visualisat...

Page 20: ...ion des r glages de l image Le t l viseur offre plusieurs options de r glage de la qualit de l image 1 Pour s lectionner le mode souhait suivre les instructions 1 et 2 de la rubrique Changement du for...

Page 21: ...les TV AV1 AV2 S Vid o Composante1 Composante2 PC HDMI1 HDMI2 DVI HDMI3 USB Vous pouvez s lectionner uniquement les appareils externes d j branch s sur le t l viseur Dans la Liste source les entr es b...

Page 22: ...an Assurez vous que votre r ception est en haute d finition HD Les stations des canaux haute d finition mettent parfois en signaux d finition standard SD ce qui peut causer la formation de barres noir...

Page 23: ...Cette page est laiss e intentionnellement en blanc...

Page 24: ...illez contacter le Service Consommateurs Samsung Country Customer Care Center Web Site Address CANADA 1 800 SAMSUNG 726 7864 www samsung com ca Samsung Electronics Canada Inc Customer Service 55 Stand...

Reviews: