background image

Português - 5

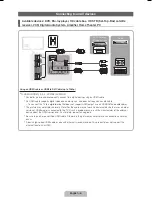
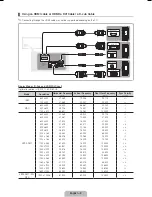
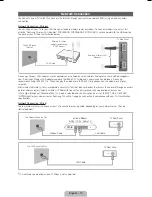
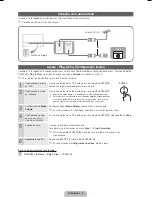
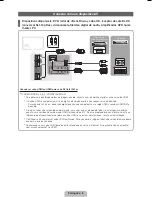
Conexão com uma antena

Quando a TV for ligada, os ajustes básicos serão realizados automaticamente.


Conexão do cabo de força e da antena.

Cabo


R-AUDIO-L

P

R

P

B

Y

ANT OUT

Antena VHF/UHF

Entrada de energia

ou

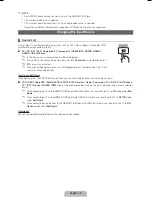
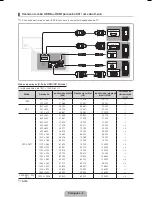
Ajuste - Plug & Play (Configuração inicial)

Quando a TV for ligada, uma sequência de avisos na tela irá auxiliá-lo a realizar as configurações básicas. Pressione o botão 

POWER

P

Plug & Play

 está disponível apenas quando a 

Entrada

 está definida como TV.


Para retornar à etapa anterior, pressione o botão vermelho.

1

Selecionando o idioma 
do OSD

Pressione o botão 

 ou 

, e então pressione o botão 

ENTER

E

Selecione o idioma desejado para o menu da tela.

P

POWER

FAV.CH

CHLIST

MEDIA.P

P.MODE

S.MODE

P.SIZE

CC

MTS

INFO

SLEEP

2

Selecionando o modo 
de utilização

Pressione o botão 

 ou 

, e então pressione o botão 

ENTER

E


y

Selecione o modo 

Casa

. O modo 

Loja

 é o modo utilizado pelas lojas.


y

Para retornar as configurações da unidade de 

Loja

 para 

Casa

 (padrão): 

Pressione o botão de volume da TV. Ao ver o menu de volume na tela, 
aperte e mantenha o botão pressionado 

MENU

 por 5 segundos.

3

Configuração do 

Modo 

Relógio.

Configure a opção 

Modo Relógio

 automática ou manualmente.


Se você selecionar o modo 

Auto

, selecione o fuso horário do seu local.

4

Selecionando opções 
de pesquisa para a 
sintonia automática

Pressione o botão 

 ou 

, e então pressione o botão 

ENTER

E

. Selecione 

Ar

 ou 

Cabo

5

Seleção de canal

A pesquisa terminará automaticamente.
Para obter mais informações, consulte 

Canal


Prog. Automática

.


Pressione o botão 

ENTER

E

quando desejar interromper o processo de 

memorização.

6

Aproveite a sua TV!

Selecione o 

Ver TV

. Pressione o botão 

ENTER

E


Se você selecionar 

Configurações de Rede

, defina a rede.

Se você quiser restaurar essa função...


O

MENU

m


Sistema


Plug & Play


ENTER

E

[LD550-ZD]BN68-03376A-Eng.indb   5

2011-02-21   �� 10:47:43

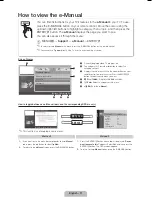
Summary of Contents for LN40D550

Page 1: ... Customer Care Center Web Site ARGENTINA 0800 333 3733 www samsung com BRAZIL 0800 124 421 4004 0000 www samsung com CHILE 800 SAMSUNG 726 7864 www samsung com COLOMBIA 01 8000112112 www samsung com COSTA RICA 0 800 507 7267 www samsung com DOMINICA 1 800 751 2676 www samsung com ECUADOR 1 800 10 7267 www samsung com EL SALVADOR 800 6225 www samsung com GUATEMALA 1 800 299 0013 www samsung com HON...

Page 2: ... formats as a full screen picture Be careful in the selection and duration of television formats used for viewing Uneven LCD aging as a result of format selection and use as well as burned in images are not covered by your Samsung limited warranty Still image warning Avoid displaying still images such as jpeg picture files or still image elements such as TV channel logos panorama or 4 3 image form...

Page 3: ...es between all the available input sources In the on screen menu use this button as you would use the ENTERE button on the remote control MENU Displays an on screen menu the OSD on screen display of your TV s features y Adjusts the volume In the OSD use the y buttons as you would use the and buttons on the remote control z Changes the channels In the OSD use the z buttons as you would use the and ...

Page 4: ... Choose the picture size CC Controls the caption decoder MTS Press to choose stereo mono or Separate Audio Program SAP broadcast Display the EPG Electronic Program Guide Returns to the previous menu Quickly select frequently used functions Selects the on screen menu items and changes the values seen on the menu Displays the My Contents Watch TV and Source Displays the channel list on the screen Pr...

Page 5: ...button then press the ENTERE button y y Select the Home Use mode Store Demo Mode is for retail environments y y To return the unit s settings from Store Demo to Home Use standard Press the volume button on the TV When you see the volume in the OSD press and hold MENU for 5 sec 3 Setting the Clock Mode Set the Clock Mode automatically or manually If you select the Auto select the time zone where yo...

Page 6: ...ut use an HDMI DVI and audio cables x x The picture may not display normally if at all or the audio may not work if an external device that uses an older version of HDMI mode is connected to the TV If such a problem occurs ask the manufacturer of the external device about the HDMI version and if out of date request an upgrade x x Be sure to purchase a certified HDMI cable Otherwise the picture may...

Page 7: ...DIGITAL AUDIO OUT OPTICAL jack decrease the volume of both the TV and the system x x 5 1 CH channel audio is available when the TV is connected to an external device supporting 5 1 CH x x When the receiver home theater is set to on you can hear sound output from the TV s optical jack When the TV is receiving a DTV signal the TV will send 5 1 CH sound to the home theater receiver When the source is...

Page 8: ...72 809 31 500 640 x 480 37 500 75 000 31 500 800 x 600 37 879 60 317 40 000 800 x 600 48 077 72 188 50 000 800 x 600 46 875 75 000 49 500 1024 x 768 48 363 60 004 65 000 1024 x 768 56 476 70 069 75 000 1024 x 768 60 023 75 029 78 750 1152 x 864 67 500 75 000 108 000 1280 x 1024 63 981 60 020 108 000 1280 x 1024 79 976 75 025 135 000 1280 x 800 49 702 59 810 83 500 1280 x 800 62 795 74 934 106 500 ...

Page 9: ...If the connected external devices are not highlighted press the red button The TV will search for connected devices How to use Edit Name In the Source press the TOOLS button and then you can set an external input sources name you want VCR DVD Cable STB Satellite STB PVR STB AV Receiver Game Camcorder PC DVI PC DVI Devices TV IPTV Blu ray HD DVD DMA Name the device connected to the input jacks to m...

Page 10: ...smoothly Most wireless network systems incorporate a security system that requires devices that access the network through an access point or wireless router typically a wireless IP Sharer to transmit an encrypted security code called an access key If Pure High throughput Greenfield 802 11n mode is selected and the Encryption type is set to WEP TKIP or TKIP AES WPS2Mixed for your wireless router S...

Page 11: ... Page e Exit This function is not enabled in some menus Method 1 Method 2 1 If you want to use the menu that corresponds to an e Manual topic press the red button to select Try Now 2 To return to the e Manual screen press the E MANUAL button 1 Press the ENTERE button when a topic is displayed Do you want to execute this appears Select Yes and then press the ENTERE button The OSD window appears 2 T...

Page 12: ...ns 5 L Page Moves to previous or next page Using the Zoom mode UMove R Return Select Zoom and then press ENTERE to magnify the screen You can scroll through the magnified screen by using the or buttons To return to the screen to normal size press the RETURN button How to search for a topic on the index page 1 To search for a topic press the left or right arrow button to select a letter and then pr...

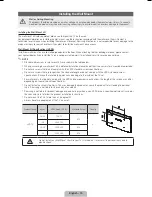
Page 13: ... below x x When purchasing our wall mount kit a detailed installation manual and all parts necessary for assembly are provided x x Do not use screws that do not comply with the VESA standard screw specifications x x Do not use screws that are longer than the standard length or do not comply with the VESA standard screw specifications Screws that are too long may cause damage to the inside of the T...

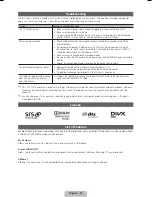
Page 14: ...r cable The remote control does not work Replace the remote control batteries with correct polarity Clean the transmission window located on the top of the remote control Try pointing the remote control directly at the TV from 5 6 feet away The cable set top box remote control does not turn the TV on or off or adjust the volume Program the Cable Set remote control to operate the TV Refer to the Ca...

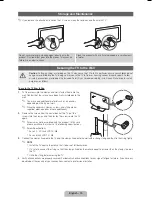
Page 15: ...e wall You may need additional material such as an anchor depending on the type of wall Since the necessary clamps screws and string are not supplied please purchase these additionally 2 Remove the screws from the center back of the TV put the screws into the clamps and then fasten the screws onto the TV again Screws may not be supplied with the product In this case please purchase the screws of t...

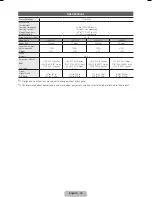
Page 16: ...2 X 20 0 inches 804 7 X 80 3 X 507 4 mm 31 7 X 9 4 X 22 2 inches 804 7 X 240 0 X 563 7 mm 36 4 X 3 1 X 22 6 inches 923 5 X 78 5 X 573 2 mm 36 4 X 10 X 24 8 inches 923 5 X 255 0 X 629 2 mm 39 1 X 3 2 X 24 1 inches 992 1 X 80 4 X 611 0 mm 39 1 X 10 X 26 3 inches 992 1 X 255 0 X 667 2 mm 44 3 X 3 2 X 27 0 inches 1124 1 X 80 4 X 686 1 mm 44 3 X 10 8 X 29 2 inches 1124 1 X 275 0 X 742 8 mm Weight Witho...

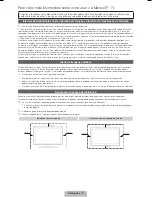
Page 17: ...ntes como uma imagem em tela cheia Esteja atento à seleção e à duração dos formatos de TV utilizados para visualização O desgaste irregular do monitor LCD como resultado da seleção e do uso de formatos bem como imagens fantasmas permanentes não são cobertos pela garantia limitada Samsung Alerta de imagens estáticas Evite exibir imagens estáticas como arquivos de fotos jpeg ou elementos de imagens ...

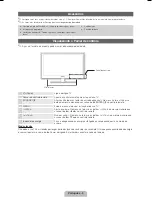
Page 18: ...emoto para este ponto na TV SOURCEE Alterna entre todas as fontes de entrada disponíveis No menu na tela utilize esse botão da mesma maneira que usaria o botão ENTERE no controle remoto MENU Exibe o menu na tela com as funções da sua TV y Ajusta o volume No menu na tela use os botões y da mesma maneira que usaria os botões e no controle remoto z Muda os canais No menu na tela use os botões z da me...

Page 19: ...em CC Controla o decodificador de legendas MTS Pressione para selecionar estéreo mono ou programa de áudio separado transmissão SAP Exibe o EPG Electronic Program Guide Guia eletrônico de programas Volta ao menu anterior Seleciona rapidamente funções utilizadas com frequência Seleciona os itens do menu de tela e troca os valores vistos no menu Exibe Meu conteúdo Ver TV e Entrada Exibe a Lista de C...

Page 20: ...sione o botão ENTERE y y Selecione o modo Casa O modo Loja é o modo utilizado pelas lojas y y Para retornar as configurações da unidade de Loja para Casa padrão Pressione o botão de volume da TV Ao ver o menu de volume na tela aperte e mantenha o botão pressionado MENU por 5 segundos 3 Configuração do Modo Relógio Configure a opção Modo Relógio automática ou manualmente Se você selecionar o modo A...

Page 21: ...I use cabos HDMI DVI e de áudio x x A imagem talvez não seja exibida normalmente caso seja ou o áudio poderá falhar se um dispositivo externo que usa uma versão anterior do modo HDMI for conectado à TV Se esse problema ocorrer informe se junto ao fabricante do dispositivo externo sobre a versão HDMI e se estiver desatualizada solicite uma atualização x x Certifique se de comprar um cabo HDMI certi...

Page 22: ...Quanto o receiver home theater estiver ajustado em ligado você poderá ouvir a reprodução de som pelo conector óptico da TV Quando a TV estiver recebendo um sinal de DTV ela irá enviar som 5 1 CH ao amplificador ou DVD home theater vendido separadamente Quando a fonte é um componente digital como um receptor de DVD player Blu ray player Cabo Satélite e estiver conectada à TV via HDMI somente será o...

Page 23: ... x 480 37 861 72 809 31 500 640 x 480 37 500 75 000 31 500 800 x 600 37 879 60 317 40 000 800 x 600 48 077 72 188 50 000 800 x 600 46 875 75 000 49 500 1024 x 768 48 363 60 004 65 000 1024 x 768 56 476 70 069 75 000 1024 x 768 60 023 75 029 78 750 1152 x 864 67 500 75 000 108 000 1280 x 1024 63 981 60 020 108 000 1280 x 1024 79 976 75 025 135 000 1280 x 800 49 702 59 810 83 500 1280 x 800 62 795 7...

Page 24: ...anece sempre ativo Se os dispositivos externos conectados não estiverem destacados pressione o botão vermelho A TV irá procurar os dispositivos conectados Como usar Editar Nome Na Entrada pressione o botão TOOLS e em seguida é possível definir um nome desejado para as entradas externas VCR DVD Sinal Cabo Sinal Satélite PVR STB Receptor AV Jogos Filmadora PC DVI PC Dispositivos DVI TV IPTV Blu ray ...

Page 25: ...e rede sem fio incorpora um sistema de segurança que exige que os dispositivos que acessam a rede por meio de um ponto de acesso ou roteador sem fio normalmente um Compartilhador de IP sem fio transmitam um código de segurança criptografado chamado chave de acesso Se o modo Pure High throughput Greenfield 802 11n for selecionado e o tipo de criptografia for configurado como WEP TKIP ou TKIP AES WP...

Page 26: ... está habilitada em alguns menus Método 1 Método 2 1 Se desejar usar o menu que corresponde a um tópico do e Manual pressione o botão vermelho para selecionar Tentar Agora 2 Para retornar à tela do e Manual pressione o botão E MANUAL 1 Pressione o botão ENTERE quando um tópico for exibido A mensagem Você deseja executar é exibida Selecione Sim e em seguida pressione o botão ENTERE A janela OSD é e...

Page 27: ...gina anterior ou para a próxima página Utilização do modo de zoom UMover R Retornar Selecione Zoom e em seguida pressione o botão ENTERE para ampliar a tela É possível percorrer a tela ampliada usando os botões ou Para que a tela volte ao tamanho normal pressione o botão RETURN Como pesquisar um tópico na página do índice 1 Para pesquisar um tópico pressione o botão de seta para a esquerda ou para...

Page 28: ...r o nosso Kit de montagem na parede um manual de instalação detalhado e todas as peças necessárias acompanham o produto x x Não use parafusos que não estejam em conformidade com as especificações VESA de parafuso padrão x x Não utilize parafusos mais longos que a dimensão padrão ou que não estejam em conformidade com as especificações de parafusos padrão VESA Parafusos muito longos podem danificar...

Page 29: ...onectado reconectando o cabo do mesmo O controle remoto não funciona Substitua as pilhas do controle remoto com a polaridade correta Limpe a janela de transmissão localizada no topo do controle remoto Tente apontar o controle remoto diretamente para a TV cerca de 1 5 m O controle remoto do decodificador de TV a cabo receptor não liga ou desliga a TV e nem ajusta seu volume Programe o controle remo...

Page 30: ... estão bem presos à parede Você pode precisar de material extra como um chumbador dependendo do tipo de parede Como os grampos parafusos e corda necessários não são fornecidos você deve comprá los separadamente 2 Remova os parafusos da parte central traseira da TV coloque os em grampos e em seguida aperte os novamente na TV Os parafusos podem não ser fornecidos com o produto Neste caso adquira par...

Page 31: ...orte 31 7 X 3 2 X 20 0 polegadas 804 7 X 80 3 X 507 4 mm 31 7 X 9 4 X 22 2 polegadas 804 7 X 240 0 X 563 7 mm 36 4 X 3 1 X 22 6 polegadas 923 5 X 78 5 X 573 2 mm 36 4 X 10 X 24 8 polegadas 923 5 X 255 0 X 629 2 mm 39 1 X 3 2 X 24 1 polegadas 992 1 X 80 4 X 611 0 mm 39 1 X 10 X 26 3 polegadas 992 1 X 255 0 X 667 2 mm 44 3 X 3 2 X 27 0 polegadas 1124 1 X 80 4 X 686 1 mm 44 3 X 10 8 X 29 2 polegadas ...

Page 32: ...This page is intentionally left blank ...

Reviews: