background image

English-1

1-800-SAMSUNG (7267864)

Samsung Electronics America, Inc.


105 Challenger Road Ridgefield Park, NJ 07660-0511

Samsung Electronics Canada Inc., Customer Service


55 Standish Court Mississauga, Ontario L5R 4B2

Call center hours of operation (Mon-Sun 9AM-12AM EST).

To register this product please visit  
www.samsung.com/global/register.

LN46A850S1F/LN52A850S1F
LN46A860S2F/LN52A860S2F

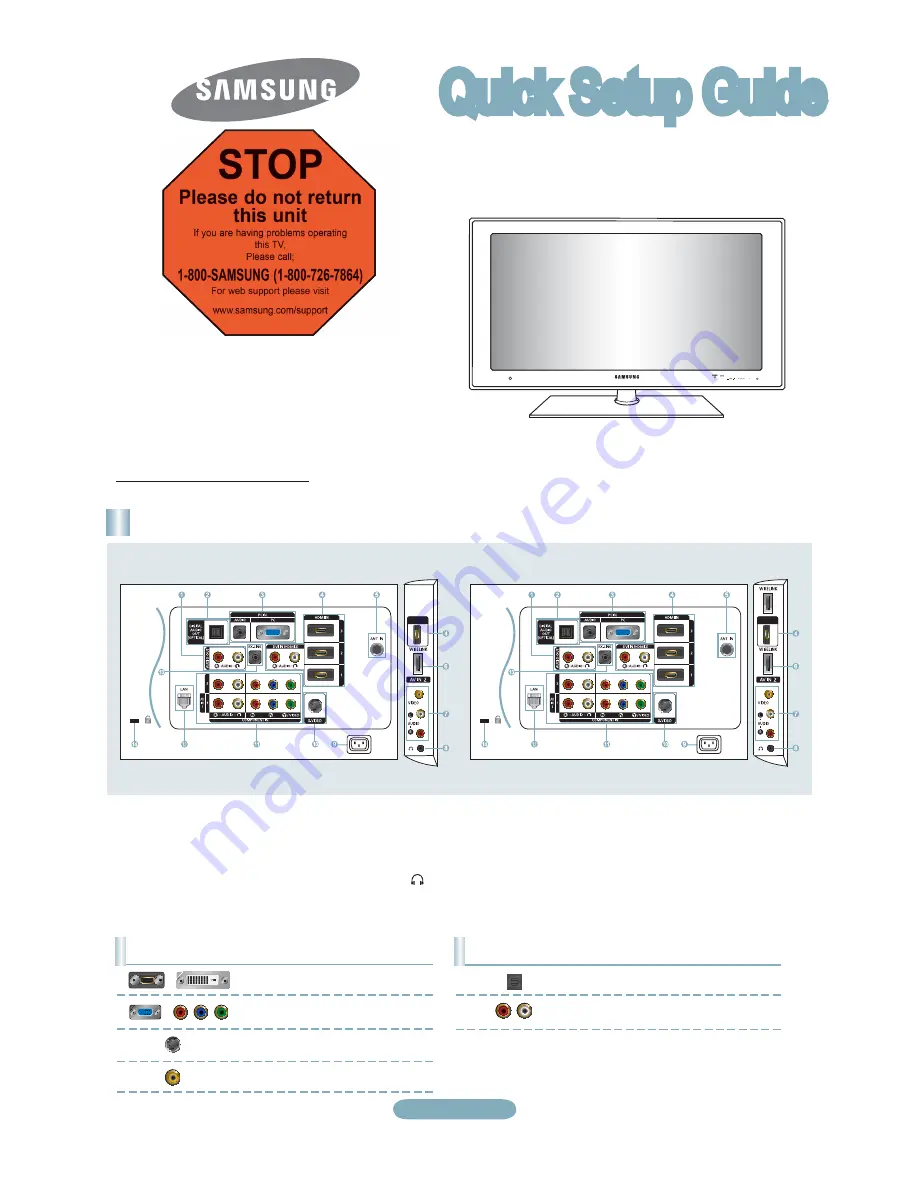
Rear Panel / Side Panel Jacks (depending on the model)

HDMI IN4

HDMI IN4

1

 AUDIO OUT

2

 DIGITAL AUDIO OUT (OPTICAL)

3

  PC IN [PC] / [AUDIO]

4

   HDMI IN 1, 2, 3, 4 /  

DVI IN(HDMI2)[R-AUDIO-L]

5

 ANT IN 

6

 WISELINK

7

  AV IN 2

8


HEADPHONE

9

 POWER INPUT

0

 S-VIDEO

!

  COMPONENT IN 1, 2 / AV IN 1

@

   LAN 

#

   EX-LINK

$

   KENSINGTON LOCK

Audio Output Performance Comparison

OPTICAL (Digital)

AUDIO (Analog)

Best

Normal

Video Input Performance Comparison

HDMI/DVI

PC/COMPONENT

S-VIDEO

VIDEO

Best

 Better

Good

Normal

/

/

Quick Setup Guide

STOP

Please do not return 

this unit 

If you are having problems operating

this TV, 

Please call;

1-800-SAMSUNG (1-800-726-7864)

For web support please visit

www.samsung.com/support 


[LN46A850S1F/LN52A850S1F]

[LN46A860S2F/LN52A860S2F]

Summary of Contents for LN46A850S1F

Page 1: ...imagine the possibilities Thank you for purchasing this Samsung product To receive more complete service please register your product at www samsung cam glabal register Model Serial No _ ...

Page 2: ...ensed contents No rights are granted for commercial use The license does not cover any product unit other than this product unit and the license does not extend to any unlicensed product unit or process conforming to ISOIIEC 11172 3 or ISOIIEC 13818 3 used or sold in combination with this product unit The license only covers the use of this product unit to encode andlor decode audio fiies conformi...

Page 3: ...tting the TruSurround XT 41 Choosing Preferred Language 42 Choosing a Multi Channel Sound MTS track 42 Automatic Volume Control 43 Selecting the Speaker 43 Listening to the Sound of the Sub PIP Picture 44 Resetting the Sound Settings to the Factory Defaults 45 Connecting Headphones Sold separately 45 Channel Control Managing Channels 46 Clearing Scrambled Channels Digital 53 Fine Tuning Analog Cha...

Page 4: ...s 131 Setting Up Anynet 132 Scanning and Switching between Anynet Devices 133 Recording 134 Listening through a Receiver Home theater 134 Troubleshooting for Anynet 135 Appendix Troubleshooting 136 Installing the Stand 138 Disconnecting the Stand 138 Auto Wall Mount Adjustment Sold separately 139 Wall Mount Kit Specifications VESA 140 Using the Anti Theft Kensington Lock 141 Securing the TV to the...

Page 5: ...es and view pictures on USB Mass Storage Class MSC devices HDMIIDVI connection of your PC to this TV Excellent Picture Quality DNle technology provides life like clear images SRS TruSurround XT SRS TruSurround XT provides a virtual surround system I Accessories Remote Control Batteries MAx 2 BN59 00700A Mini Remote Control Lithium battery 3V x 1ea Warranty Card I Registration Card I Safety Guide M...

Page 6: ...ent2 PC HDMI1 HDMI2IDVI HDMI3 HDMI4 In the on screen menu use this button as you would use the ENTER G button on the remote control f MENU Press to see an on screen menu of your TV s features e VOL Press to increase or decrease the volume In the on screen menu use the VOL buttons as you would use the and buttons on the remote control e VCHA Press to change channels In the on screen menu use the v ...

Page 7: ...more information on connecting equipment see pages 9 15 LN46A850S1 F LN52A850S1 F TV Side Panel TV Rear Panel AUDIO VIDEO 0 ID WSELNK L1 J __ I M IDj lc J lJ II j ANT IN II j 0 II j LAN 0 0I LN46A860S2F LN52A860S2F 0 VIDEO e I tM WiSElINK I H t Lill W SEliNK I H t LC JJ ANT IN lL JJ 0 l JJ LAN I 0 0 R L Y The product color and shape may vary depending on the model _ ...

Page 8: ...eparately f AV IN 2 Video and audio inputs for external devices such as a camcorder or VCR 9 0 HEADPHONE Connects a set of external headphones for private listening o POWER INPUT Connects the supplied power cord e S VIDEO Connects an S Video signal from a camcorder or VCR Use the AV IN 1 R AUOIO L jacks for audio CD COMPONENT IN 1 2 AV IN 1 Connects Component video audio The COMPONENT IN 1 jack is...

Page 9: ... remote control with the 2 ON OFF light button set to On will reduce the battery usage time See page 9 9 PRE CH Tunes to the previous channel 9 CH vi CH Press to change channels mSOURCE Press to display and select the available video sources W W L1NK WISELINK Pro This function enables you to view and play photo music and movie files from an external device Refer to pages 77 Photo 87 Music and 94 M...

Page 10: ...re them in a cool dry place if you won t be using the remote control for a long time The remote control can be used up to about 23 feet from the TV Assuming typical TV usage the batteries should last for about one year Using the remote control with the IT ON OFF light button set to On will reduce the battery usage time Mini Remote Control 1 Turn the battery cover counterclockwise to unlock it and ...

Page 11: ... gr m to the right see Antenn with 300 0 Flat Twin Leads below 1 _ If your antenna has one lead that looks like the diagram to the right see Antennas with 750 Round Leads If you have two antennas see Separate VHF and UHF Antennas Antennas with 300 0 Flat Twin Leads If you are using an off air antenna such as a roof antenna or rabbit ears that has 300 o twin flat leads follow the directions below 1...

Page 12: ... are available at most electronics stores 1 Find and disconnect the cable that is connected to the ANT IN terminal on your cable box This terminal might be labeled ANT IN VHF IN or simply IN 3 Connect an RF cable between the OUTPUT terminal on the splitter and the IN terminal on the cable box p In I ng J _ omrr co IIDI OIf Splitter l Cable Box Switch 4 Connect an RF cable between the ANT OUT termi...

Page 13: ...g an older HOMI cable and there is no sound connect the HOMI cable to the HOMI IN 2 jack and the audio cables to the OVI IN HOMI2 R AUOIO L jacks on the back of the TV If this happens contact the company that provided the OVO Blu Ray player Cable Box Satellite receiver to confirm the HOMI version then request an upgrade HOMI cables that are not 1 3 may cause annoying flicker or no screen display W...

Page 14: ...t Top Box match the color of the connection terminal to the cable Connect a Component Cable between the COMPONENT IN 1 or 2 Y Ps PRJ jacks on the TV and the COMPONENT Y Ps PRJ jacks on the DVD Blu Ray player or Cable Box Satellite receiver Set Top Box 2 Connect Audio Cables between the COMPONENT IN 1 or 2 R AUDIO Lj jacks on the TV and the AUDIO OUT jacks on the DVD Blu Ray player or Cable Box Sat...

Page 15: ...CR match the color of the connection terminal to the cable When connecting to AV IN 1 the color of the AV IN 1 YNIDEO jack Green does not match the color of the video cable Yellow If you have a mono non stereo VCR use a Y connector not supplied to connect to the right and left audio input jacks of the TV Alternatively connect the cable to the R jack If your VCR is stereo you must connect two cable...

Page 16: ... DTV air signal the TV will send out 5 1 channel sound to the Home theater receiver When the source is a digital component such as a DVD and is connected to the TV via HDMI only 2 channel sound will be heard from the Home Theater receiver If you want to hear 5 1 channel audio connect the DIGITAL AUDIO OUT OPTICAL jack on the DVD Blu Ray player or Cable Satellite Box directly to an Amplifier or Hom...

Page 17: ...ack on your computer 2 Connect a 3 5 mm Stereo mini plug 2RCA Cable between the DVI IN HDMI2 R AUDIO L jack on the TV and the Audio Out jack of the sound card on your computer TV Rear Panel pc II PC Audio Cable Not supplied mO Sub Cable Not supplied TV Rear Panel PC II 3 5 mm Stereo mini plug 2RCA Cable Not supplied mHOMIIOVI Cable Not supplied Each PC has a different back panel configuration When...

Page 18: ...ton to select Start Air Air antenna signal Cable Cable antenna signal Auto Air and Cable antenna signals In Cable mode you can select the correct signal source among STD HRC and IRC by pressing the T or button then press the ENTER G button If you have Digital cable select the cable system signal source for both Analog and Digital Contact your local cable company to identify the type of cable syste...

Page 19: ... time zone in which you live is displayed 8 Press the or T button to highlight the time zone for your local area Press the ENTER G button If you have received a digital signal the time will be set automatically If not see page 58 to set the clock 9 The message Enjoy your watching is displayed When you have finished press the ENTER G button If you want to reset this feature 1 Press the MENU button ...

Page 20: ...e last channel viewed To quickly switch between two channels that are far apart tune to one channel then use the number button to select the second channel Then use the PRE CH button to quickly alternate between them Using the 0 Button The 0 button is used to select stations that broadcast a digital signal 1 For example for Channel 7 1 press 7 then 0 then 1 HD indicates the TV is receiving a Digit...

Page 21: ...sappears automatically Viewing the Menus 1 With the power on press the MENU button The main menu appears on the screen The menu s left side has icons Picture Sound Channel Setup Input Application 2 Press the or button to select one of the icons Then press the ENTER G button to access the icon s sub menu To move to a lower menu turn the wheel clockwise when the menu Display is displayed To move to ...

Page 22: ...r both off air Air and Cable channels After the available channels are memorized use the CH v or CH A button to scan through the channels This eliminates the need to change channels by entering the channel digits There are three steps for memorizing channels selecting a broadcast source memorizing the channels automatic and adding or deleting channels Channel Lists Selecting the Video Signal sourc...

Page 23: ...igital cable TV select the cable system signal source for both Analog and Digital STD HRC and IRC identify various types of cable TV systems Contact your local cable company to identify the type of cable system that exists in your particular area At this point the signal source has been selected 5 The TV begins memorizing all available stations After all the available channels are stored it starts...

Page 24: ...ate in different modes TV VCR DVD Set Top Box Pressing the corresponding button on the remote control allows you to switch between these modes and control whichever piece of equipment you choose l The remote control might not be compatible with all DVD Players VCRs and Set Top Boxes llVD 18 o 0 POWER 0 vg T 1 80 1 080 rT OflfSI s TV MODE ONIOFF OIIJ OJct 00CD CDITJCTI GCD _G _ If your DVD does not...

Page 25: ...emote to Operate Your Cable Box 1 Turn off your Cable Box 2 Press the MODE button and make sure that the STB LED is illuminated 3 Press the SET button on your TV s remote control 4 Using the number buttons on your remote control enter three digits of the cable box code listed on page 26 of this manual for your brand of cable box Make sure you enter three digits of the code even if the first digit ...

Page 26: ...ER FUNAI GENERAL ELECTRIC GO VIDEO HARMAN KARDON HITACHI INSTANT REPLAY _ JC PENNEY JCL JVC KENWOOD KLH KONIA LG Goldstar llOYD LOGIK LXI MAGNAVOX MARANTZ MARTA MEl MEMOREX MGA MIDLAND MINOLTA MITSUBISHI Ir Re On COdes VCR Brand Code SAMSUNG 000 001 002 003 004 005 077 078 079 _ _ ADMIRAL 020 _ __ _ AIWA 025 AKAI 004 027 032 _ _ __ _ _ _ _ AUDIO DYNAMICS 007 026 _ _ _ BELL HOWELL 018 _ BROKSONIC 0...

Page 27: ... 035 074 075 131 132 RAITE f tDn ROWA 038 SAMPO 104 NANTAUS 144 NESA_J 974 _ _ _ _ _ OPTOMEOIA ELECTRONICS I 105 Brand I Code LG Goldstar 025 031 I L073_ KONKA 059 100 106 107 _ _ j KLH 074 075 i LOEWE 057 LASONIC r058 MOBILE AUTHORITY i 054 MEMOREX rOSS MALATA To56 _____________ M _ MAGNAVOX 076 093 _ _ _ _ _ __ _ _ _ 1 __ _ _ __ _ _ _ __ __ __ _ MINTEK i 074 094 MONy KA To73 ANAM __ __ 1_0_30 _ ...

Page 28: ... Jy __ _ _ _ _ __ _ _ LG Goldstar i 044 073 MAGNAVOX 1 0 1 6 02 1 0 3 6 0 38 03 9 0 40 04 1 0 4 2 08 4 098 103 A ci __l____ MACOM 1018100_1_0_5 _ MITSUBISHI I 015 NEXTLE vrrI04io48 064 Brand Code _ OAK 101 PHILIPS 015 016 017 021 033 036 038 039 040 041 042 067 094 096 098 103 PIONEER 093 095 079 119 _ 1 _ _ _ PRIMESTAR 046 049 050 063 PANASONIC 058 059 061 062 078 097 102 112 119 PAYSAT 016 PROSC...

Page 29: ...ing Using the Color buttons on the remote with the Source list Red Refresh Refreshes the connecting external devices TOOLS Option Displays the Edit Name and Information menus jMm I L lo cl J V J5J Press the SOURCE button on the remote control to view an external signal source Name the device connected to the input jacks to make your input source selection easier 1 Press the MENU button to display ...

Page 30: ...cular item Press the ENTER G button Press the EXIT button to exit When you make changes to Backlight Contrast Brightness Sharpness Color or Tint G R the OSD will be adjusted accordingly In PC mode you can only make changes to Backlight Contrast and Brightness Settings can be adjusted and stored for each external device you have connected to an input of the TV The energy consumed during use can be ...

Page 31: ...items Setting the Black adjust You can select the black level on the screen to adjust the screen depth 4 Press the or T button to select Black adjust then press the ENTER 8 button 5 Press the or T button to select Off Low Medium or High Press the ENTER 8 button Off Turns off the black adjustment function Low Sets the black color depth to low Medium Sets the black color depth to medium Sets the bla...

Page 32: ...t Color then press the ENTER G button Color is available when Color Space is set to Custom 14 Press the or button to select Red Green Blue Yellow Cyan or Magenta Press the ENTER G button 15 Press the or button to select Red Green or Blue to change it Press the ENTER G button 16 Press the or button to decrease or increase the value of a particular item Press the ENTER G button In Color you can adju...

Page 33: ...ghtness B Gain Adjusts the blue color brightness Reset The previously adjusted white balance will be reset to the factory defaults Changing the adjustment value will refresh the adjusted screen Adjusting the Flesh Tone You can emphasize the pink flesh tone in the picture 20 Press the or button to select Flesh Tone then press the ENTER G button 21 Press the or button to decrease or increase the val...

Page 34: ... external input is set to HDMI YCbCr Signals or Component mode Resetting the Picture Settings to the Factory Defaults 1 To select the desired picture mode follow the Changing the Picture Standard instructions numbers 1 and 2 see page 28 2 Press the A or button to select Picture Reset then press the ENTER G button 3 Press the or button to select Reset Picture Mode or Cancel then press the ENTER G b...

Page 35: ...size of the image on your screen Your TV comes with six screen size options each designed to work best with specific types of video input Your cable box or satellite receiver may have its own set of screen sizes as well In general though you should view the TV in 16 9 mode as much as possible 1 Follow the Activating Picture Options instructions numbers 1 and 2 2 Press the A or button to select Siz...

Page 36: ...or button to select Reset then press the ENTER G button You can initialize the setting HD High Definition 16 9 1080il1080p 1920x1080 720p 1280x720 Settings can be adjusted and stored for each external device you have connected to an input of the TV Input Source ATV AV S Video Component 480i 480p DTV 1080i Component 1080L 1080p HOMI 720p 1080i 1080P PC Picture Size 16 9 Zoom1 Zoom2 4 3 16 9 4 3 Wid...

Page 37: ...llow the Activating Picture Options instructions numbers 1 and 2 Refer to page 33 2 Press the or f button to select DNle then press the ENTER G button 3 Press the or f button to select Off or On then press the ENTER G button Off Switches off the DNle mode On Switches on the DNle mode Press the EXIT button to exit DNleTM Digital Natural Image engine Dt lIe 1 This feature brings you a more detailed ...

Page 38: ... the blue signal only by removing the red and green signals from the video signal so as to provide a Blue Filter effect that is used to adjust the Color and Tint of video equipment such as DVD players Home Theaters etc Using this function you can adjust the Color and Tint to preferred values appropriate to the signal level of each video device using the Red Green Blue Cyan MagentalYeliow Color Bar...

Page 39: ...t Off Low Medium High or Demo then press the ENTER G button Off Switches Auto Motion Plus 120Hz off Low Sets Auto Motion Plus 120Hz to minimum Medium Sets Auto Motion Plus 120Hz to medium High Sets Auto Motion Plus 120Hz to maximum Demo Displays the difference between Auto Motion Plus 120Hz on and off modes The screen after applying Auto Motion Plus 120Hz appears on the left Press the EXIT button ...

Page 40: ...off while watching in PIP mode and turn it on again the PIP window will disappear You can view TV broadcasts on the PIP screen sub picture when the main picture is from an external device connected to HOMI 1 HOMI OVI 2 HOMI 3 HDMI 4 Component1 2 or PC PIP Settings Main picture Component 1 2 HOMI 1 HOMIIDVI 2 HDMI 3 HDMI 4 TV PC Changing the Size of the PIP Window 3 Press the or button to select Si...

Page 41: ... button 8 Press the or button to select the desired channel in the PIP window Press the ENTER G button Press the EXIT button to exit Easy Setting 1 Press the TOOLS button on the remote control 2 Press the or button to select PIP then press the ENTER G button 3 Press the or button to select On 4 Press the or button to select a particular item 5 Press the or button to select the required option 6 Pr...

Page 42: ...r movies Speech Emphasizes voice over othersounds Custom Recalls your customized sound settings see Customizing the Sound Easy Setting 1 Press the TOOLS button on the remote control 2 Press the or f button to select Sound Mode 3 Press the or button to select the required option 4 Press the EXIT or TOOLS button to exit I ICustomizing the Sound The sound settings can be adjusted to suit your persona...

Page 43: ... or T button to select Off or On then press the ENTER G button Press the EXIT button to exit the TruSurround XT Setti TruSurround XT is a patented SRS technology that solves the problem of playing 5 1 multichannel content over two speakers TruSurround delivers a compelling virtual surround sound experience through any two speaker playback system including internal television speakers It is fully c...

Page 44: ...ulti Channel Sound MrS track 1 Press the MENU button to display the menu Press the or button to select Sound then press the ENTER G button 2 Press the or button to select Multi Track Sound then press the ENTER G button 3 Press the or button to select a setting you want then press the ENTER G button Press the EXIT button to exil Mono Choose for channels that are broadcasting in mono or if you are h...

Page 45: ..._ External Speaker Used to listen to the sound of the External Speaker TV Speaker Used to listen to the sound of the TV Speaker Press the EXIT button to exit When Select Speaker is set to External Speaker you can operate only Preferred Language in digital TV mode Multi Track Sound in analog TV mode Sound Select in PIP mode and Sound Reset in Sound menu The VOL VOL and MUTE buttons do not operate w...

Page 46: ... feature is activated you can listen to the sound of the sub PIP picture 1 Press the MENU button to display the menu Press the or T button to select Sound then press the ENTER G button 2 Press the or T button to select Sound Select then press the ENTER G button Easy Setting 1 Press the TOOLS button on the remote control 2 Press the or T button to select PIP 3 Press the or button to select On 4 Pre...

Page 47: ...fault settings Cancel Select the sound reset optionS 1 Connecting Headphones Sold separately You can connect a set of headphones to your set if you wish to watch a TV program without disturbing other people in the room When you insert the headphone s plug into the headphone jack you can TV Side Panel operate only Preferred Language in digital TV mode Multi Track Sound in analog TV mode Auto Volume...

Page 48: ...channel to view then press the ENTER G button You can watch the selected channel b Press the CH LIST button on the remote control to bring up the channel lists Using the Color buttons on the Remote with the Channel List Red Antenna Switches to Air or Cable Green Zoom Enlarges or shrinks a channel number Yellow Select Selects multiple channel lists TOOLS Option Displays the Add or Delete Add to Fav...

Page 49: ...or T button to select a channel to delete then press the TOOLS button 5 Press the ENTER G button to select Delete All deleted channels will be shown on All Channels menu 6 Press the EXIT button to exit You can also delete a channel to the Added Channels menu in the same manner A channel must be deleted before it can be added back to the Added Channels list To Add Restore a channel back to the All ...

Page 50: ...utton to select Add to Favorite then press the ENTER G button The symbol will be displayed and the channel will be set as a favorite 7 To cancel your favorite channel selection press the TOOLS button when a favorite channel is selected Press the or T button to select Delete from Favorite then press the ENTER G button The channel is deleted from Favorites and the mark also disappears Press the EXIT...

Page 51: ...a Program Timer Viewing screen appears 4 Press the 1 I buttons to reserve a program and then press the ENTER G button Reserving a program has been completed Press the EXIT button to exit You can also reserve a program in the All Channels or Favorite menus using the same procedures For information on how to confirm a viewing reservation refer to page 50 Only memorized channels can be reserved You c...

Page 52: ... Info 6 Press the A T 1 lIlI buttons to change a reservation setting and then press the ENTER G button The reservation modification is applied Canceling a reservation 4 To select a reservation item to be canceled press the A or T button and then press the TOOLS button 5 Press the A or T button to select Cancel schedules then press the ENTER G button 6 Press the lIlI or button to select OK then pre...

Page 53: ...the or T button to select Channel Name Edit then press the ENTER G button 4 Press the T t4 button to select a letter then press the ENTER G button Numeric buttons You can enter numbers Red button You can switch between English and Characters Green button You can delete an already entered character Yellow button You can enter a blank space Blue button Press this button to finish renaming a channel ...

Page 54: ...f the selected channels Storing Channels in Memory Auto Program 1 Press the MENU button Press the or button to select Channel then press the ENTER G button Press the or button to select Channel List then press the ENTER G button 2 Press the or button to select a channel then press the TOOLS button 3 Press the or button to select Auto Program then press the ENTER G button For further details on set...

Page 55: ...G button Press the EXIT button to exit This function is only available in Cable mode Fine Tuning Analog Channels Use fine tuning to manually adjust a particular channel for optimal reception 1 Press the MENU button to display the menu Press the or T button to select Channel then press the ENTER G button 2 Press the or T button to select Fine Tune then press the ENTER G button 3 Press the or button...

Page 56: ...r antenna to improve the reception of available digital channels 1 Press the MENU button to display the menu Press the or Y button to select Channel then press the ENTER G button 2 Press the or Y button to select Signal Strength then press the ENTER G button If the signal strength meter indicates that the signal is weak physically adjust your antenna to increase the signal strength Continue to adj...

Page 57: ...ignal from the system equals the standard signal mode the screen is adjusted automatically If the signal from the system doesn t equal the standard signal mode adjust the mode by referring to your videocard user guide otherwise there may be no video For the display modes listed below the screen image has been optimized during manufacturing D Sub Input I I Sync Polarity HN VESA Mode I Resolution __...

Page 58: ...n Adjusting the Screen Quality The purpose of the picture quality adjustment is to remove or reduce picture noise If the noise is not removed by fine tuning alone then make the vertical frequency adjustments on your PC and fine tune again After the noise has been reduced re adjust the picture so that it is aligned on the center of the screen Preset Press the SOURCE button to select PC mode 1 Press...

Page 59: ...e or button to adjust the V Position Press the or button to adjust the H Position Press the ENTER G button Press the EXIT button to exit Initializing the Screen Position Coarse and Fine You can replace all image settings with the factory default values Preset Press the SOURCE button to select PC mode 1 Press the MENU button to display the menu Press the or button to select Picture then press the E...

Page 60: ...R G button 2 Press the ENTER G button to select Clock 3 Press the ENTER G button to select Clock Mode Press the A or button to select Manual then press the ENTER G button 4 Press the A or button to select Clock Set then press the ENTER G button 5 Press the or button to move to Month Day Year Hour Minute or am pm Set the date and time you want by pressing the A or button then press the ENTER G butt...

Page 61: ...elect Auto then press the ENTER G button 4 Press the or T button to select Time Zone then press the ENTER G button 5 Press the or T button to highlight the time zone for your local area then press the ENTER G button 6 Press the or T button to select DST Daylight Saving Time then press the ENTER G button Press the or T button to select Off On or Auto then press the ENTER G button Press the EXIT but...

Page 62: ... ENTER G button 2 Press the A or T button to select Sleep Timer then press the ENTER G button 3 Press the A or T button to select the minute then press the ENTER G button To cancel the set sleep timer Press the A or T button to select Off then press the ENTER G button 4 Press the EXIT button to exit Easy Setting 1 Press the TOOLS button on the remote control 2 Press the A or T button to select Sle...

Page 63: ...t TV or USB Make sure that an USB device is connected to your TV Antenna Select Air or Cable Channel Select the desired channel Music Select the folder containing MP3 files on the USB device Photo Select the folder containing JPEG files on the USB device Repeat Select Once Everyday Mon Fri Mon Sat Sat Sun or Manual When Manual is selected press the button to select the desired day of the week Pres...

Page 64: ...re deemed inappropriate for children The user must enter a PIN personal 10 number before any of the V Chip restrictions are set up or changed V Chip function is not available in HOMI Component or PC mode U S A Only This product is covered by the following U S patents US4 930 158 US4 930 160 Setting Up Your Personal 10 Number PIN 1 Press the MENU button to display the menu Press the or button to se...

Page 65: ...control buttons in the following sequence which resets the pin to 0 0 0 0 Power Off Mute 8 2 4 Power On How to Enable Disable the V Chip 1 Press the MENU button to display the menu Press the or T button to select Setup then press the ENTER G button 2 Press the or T button to select V Chip then press the ENTER G button The message Enter PIN will appear Enter your 4 digit PIN number 3 The V Chip scr...

Page 66: ...ave additional options See the next step to change any of the following sub ratings ALL FV V S L 0 The V Chip will automatically block certain categories that are more restrictive For example if you block TV Y category then TV Y7 will automatically be blocked Similarly if you block the TV G category then all the categories in the young adult group will be blocked TV G TV PG TV 14 and TV MA The sub...

Page 67: ...ress the ENTER G button 4 The MPAA Rating screen will appear Repeatedly press the 0 or T button to select a particular MPAA category Pressing the or T button will cycle through the MPAA categories G General audience no restrictions PG Parental guidance suggested PG 13 Parents strongly cautioned R Restricted Children under 17 should be accompanied by an adult NC 17 No children under age 17 X Adults...

Page 68: ...ENTER G button to activate the restriction selected The 1 symbol is indicated Press the EXIT button to exit Allow all Press to unlock all TV ratings Block all Press to lock all TV ratings C Programming intended for chi ldren under age 8 C8 Programming generally considered acceptable for children 8 years and over to watch onth irown G General programming suitable for all audiences PG Parental Guida...

Page 69: ...ected The 1 symbol is indicated Press the EXIT button to exit Allow all Press to unlock all TV ratings Block all Press to lock all TV ratings G General 8 ans Programming generally considered acceptable for children 8 years and over to watch on their own 13 ans Programming may not be suitable for children under the age of 13 16 ans Programming is not suitable for children under the age of 16 18 ans...

Page 70: ...Allow all Press to unlock all TV ratings Block all Press to lock all TV ratings Parental restriction levels differ depending on the broadcasting station The default menu name and Downloadable US rating changes depending on the downloaded information Even if you set the On screen display to your desired language the Downloadable U S Rating menu will appear in English only 0 The rating will automati...

Page 71: ... exit The default is CC1 CC1 The Primary Synchronous Caption Service These are captions in the primary language that must be in sync with the sound preferably matched to a specific frame CC2 The Special Non Synchronous Use Captions This channel carries data that is intended to augment information carried in the program CC3 Secondary Synchronous Caption Service Alternate program related caption dat...

Page 72: ...T button to exit The availability of captions depends on the program being broadcast Default means to follow the standard set by the broadcaster Foreground and Background cannot be set to have the same color Foreground Opacity and Background Opacity cannot be both set to Transparent _ Size This option consists of Default Small Standard and Large The default is Standard Font Style This option consi...

Page 73: ... When no sound is output from the TV because the MUTE button has been pressed When no sound is output from the TV because the volume has been reduced to minimum with the VOL button Setting the Light Effect You can turn the LED on the front of TV on off 1 Press the MENU button to display the menu Press the or button to select Setup then press the ENTER G button 2 Press the or button to select Exter...

Page 74: ... be turned off The Entertainment settings are saved for each input source If you set any of the three Entertainment modes to On SRS TruSurround XT function is not available In PC mode This function is not available The Entertainment Mode is not available in all resolutions You can press the E MODE button on the remote control repeatedly to change the Entertainment setting INFO L MOOE CONTENT FAV C...

Page 75: ...the or f button to select Software Upgrade then press the ENTER G button 4 Press the ENTER G button The message Scanning for USB It may take up to 30 seconds is displayed 5 The message Upgrade version XXXX to version XXXX The system would be reset after upgrade is displayed Press the or to select the OK then press the ENTER G button Please be careful to not disconnect the power or remove the USB d...

Page 76: ...You can check the sound by playing a built in melody sound through the TV 1 Press and hold the J button for more than 5 seconds Self Diagnostic Test appears on the screen 2 Press the or button to select Sound Test then press the ENTER G button Does the problem still exist with this sound test appears on the screen 3 Press the or button to select Yes or No If during the sound test you can hear soun...

Page 77: ...o the TV please back up your files to prevent them from damage or loss of data SAMSUNG is not responsible for any data file damage or data loss Do not disconnect the USB device while it is loading MSC supports MP3 and JPEG files while a PTP device supports JPEG files only The sequential jpeg format is supported Photo and audio files must be named in English French or Spanish If not the files can n...

Page 78: ... button Press the or button to select Application then press the ENTER G button 2 Press the or button to select WISELINK Pro then press the ENTER G button The WISELINK Pro menu is displayed or bJ Press the W L1NK button on the remote control to display the WISELINK Pro menu or I A VOL SOURCE CH EJ bJ Press the SOURCE button on the remote control repeatedly to select USB then press the ENTER G butt...

Page 79: ...iles are displayed This menu only shows files whose file extension is jpg Files of other formats such as bmp or tiff will not be displayed Press the 0 Play ENTER G button to start the Slide Show To move to the previous next group press the G REW or B FF button When moving to a photo loading may take a few seconds At this point the loading icon will appear on the screen It may take some time to loa...

Page 80: ...previous sorting jroup I Jumps to the next sorting group TOOLS Option button Displays the Slide Show PlayCurrenfGroup Rotate Delete Change Group Info in Color or Composition group lnformation or Safe Remove menus Sorting Photo List I You can sort photos in the Photo List by a particular standard 1 Press the W L1NK button on the remote control to display the WISELINK Pro menu 2 Press the or button ...

Page 81: ...olor as the sorting standard in the Photo List 2 Press the or button to select from the sublist of photos grouped by color To move to the previous I next color group press the G REW or o FF button 3 Press the TOOLS button Press the or T button to select Play Current Group 4 Press ENTER G to play the selected group of photo files from the sublist Changing the color information of a selected photo Y...

Page 82: ...e above operation to select multiple photos The V mark appears to the left of the selected photo 2 Press the TOOLS button 3 Press the or T button to select Change Group Info Press the ENTER G button 4 Press the or button to select the composition option then press the ENTER G button The group information of the current file is updated and the photos are moved to the new composition group Compositi...

Page 83: ...ngs change completed Favorite options _ w 11I I 11I I Users can select the number of stars up to 3 according to their preference The stars are for grouping purposes only For example the 3 star setting does not have any priority over the one star setting Rotating the Photo file 0 Press the or button to select the desired photo in the Photo list Press the TOOLS button Press the or T button to select...

Page 84: ...operation to select multiple photos The v mark appears to the left of the selected photo 2 Press the TOOLS button 3 Press the or button to select Delete selected File then press the ENTER G button The Delete the selected file s message appears 4 Press the or button to select OK then press the ENTER G button The selected photos are deleted If you select Cancel the deletion is cancelled 5 To exit WI...

Page 85: ...ft of the selected photo If you select one file the SlideShow will not be performed 2 Press the 8 Play ENTER G button The selected files will be used for the Slide Show If you have selected files only the selected files will be used for the Slide Show GJGJ CD _ J Playing current group 1 Press the or button to select a sorting standard Monthly Timeline Color Composition Folder Preference 2 Press th...

Page 86: ...ow You can start or stop a Slide Show Press the A or Y button to select Start Slide Show or Stop Slide Show then press the ENTER G button Rotate You can rotate images in full screen mode Press the A or Y button to select Rotate then press the ENTER G button Press the or button repeatedly to rotate the photo by the desired amount Whenever you press the button it rotates by 270 180 90 and 0 Whenever...

Page 87: ...n up to view the upper part of a ____________ __ _ __ _ _O C _ p_h ___ Jpa _R ti op th_ _ I s de_ _a I J Pan left to view the left side of a ___ _ _L _ L 9 n_p o __ _ Slide Show Speed You can select the slide show speed Press the A or button to select Slide Show Speed Press the or button to select the desired option Fast Slow Normal You can select the SlideShow speed only during a slide show You c...

Page 88: ...sic file then press the yellow button The V mark appears to the left of the selected music Repeat the above operation to select multiple music files Press the ENTER G button Selecting the background music file mood Press the or button to set BGM Mode to Mood Press the or button to select BGM Mood Then press or button to select the desired BGM mood Press the ENTER G button BGM mode option Energetic...

Page 89: ...o play the music To move to the previous next group press the G REW or G FF button Screen Display o Currently selected music Shows the currently selected music 6 Current Sort Standard Press the or Y button to change the standard for sorting music files Title Artist l v1ood Genre Folder Preference 9 View Groups Shows the sorting groups The sorting group including the currently selected music file i...

Page 90: ...iles are displayed 3 Press the or button to select a sorting standard Title Artist Mood Genre Folder Preference Music files are sorted according to the newly selected sorting standard 4 Press the ENTER G button to start playing music in the order selected by the user Music information is set automatically and you can change the Favorite information Music files for which information cannot be displ...

Page 91: ...ted music file 0 You can change a selected music file s or group of files mood information in order to move it from one mood group to another 1 Select Mood as the sorting standard in the Music List and press the or button to select a music file Changing the information of multiple music files Press the or button to select the desired music in the Music list Then press the yellow button Repeat the ...

Page 92: ...lect Play Current Group 5 Press ENTER G to play the selected group of music files from the sublist Preference You can sort and play music files by preference Favorite 1 Select Preference as the sorting standard in the Music List 2 Press the or button to select from the sublist of music files grouped by Preference To move to the previous next preference group press the G REW or G FF button 3 Press ...

Page 93: ...t ri Iple musIc files The mark appears to the left of the selected music files 2 Press the TOOLS button 3 Press the or button to S8i t Delete selected File Hlen press the ENTER G button The Delete the selected file s message appears 4 Press the or builon to select OK then press the ENTER G button The selected music files are deleted If you select Cancel the ljeletion is cancelled 5 To exit WISELIN...

Page 94: ...at the top with its playing time To adjust the music volume press the VOL or VOL button on the remote control To mute the sound press the MUTE button on the remote control The playing duration of a music file may be displayed as 00 00 00 if its playing time information is not found at the start of the file 4 To exit WISELINK Pro mode press the W L1NK button on the remote control Playing the music ...

Page 95: ... the remote control Music function information icon Displayed at the top left of the screen Repeating Music Play 1 While a Music file is playing press the TOOLS button 2 Press the 4 or T button to select Repeat Mode 3 Press the or button to select On or Off On Plays back all music files in the folder or the selected file repeatedly Off Doesn t play back repeatedly 4 To exit WISELINK Pro mode press...

Page 96: ...g may take a few seconds At this point the loading icon will appear on the screen Supported Video Formats avi mp4 mpg vro vob Screen Display Xvid H264 MP MPEG4 SP MPEG4ASP MJPEG H264 BP H 264 MP MPEG2 MPEG2 Resolution 800X600 1920X1080 800X600 800X600 800X600 1920X1080 1920X1080 1920X1080 1920X1080 I Audio codec _ _ _ _ PCM ADPCM AC3 PCM ADPCM ADPCM PCM AAC PCM AAC AC3 AC3 o Currently selected mov...

Page 97: ...ays the Play Current Group Delete Information or Safe Remove menus I i b y ula r st an d a rd 1 Press the W L1NK button on the remote control to display the WISELINK Pro menu 2 Press the or button to select Movie then press the ENTER G button Movie files are displayed 3 Press the A or button to select a sorting standard Title Timeline Folder Preference The movies are sorted according to the newly ...

Page 98: ... 3 Press the TOOLS button Press the or T button to select Play Current Group 4 Press ENTER 8 to play the selected group of movie files from the sublist Preference You can sort and play movie files by preference Favorite 1 Select Preference as the sorting standard in the Movie List 2 Press the lII or button to select from the sublist of movie files grouped by preference To move to the previous I ne...

Page 99: ...tiple movie files 1 The V mark appears to the left of the selected movie files 2 Press the TOOLS button 3 Press the or T button to select Delete selected File then press the ENTER G button 1 The Delete the selected file s message appears 4 Press the or button to select OK then press the ENTER G button 1 The selected movie files are deleted 1 If you select Cancel the deletion is cancelled 5 To exit...

Page 100: ... movie group 1 Press the W L1NK button on the remote control to display the WISELINK Pro menu 2 Press the or button to select Movie then press the ENTER G button 3 Press the or button to select the desired movie file 4 Press the TOOLS button 5 Press the A or T button to select Play Current Group then press the ENTER G button The movie files in the sorting group including the selected file are play...

Page 101: ...he selected file are repeated Re I Mode is On all movie files in the folder or the selected file are played once Rem 1 Mode is Off When pressing the G ENTER G button on the remote control while When pressing the B FF button on the remote control while movie is Repeating Movie Play 1 While a Movie file is playing press the TOOLS button 2 Press the or T button to select Repeat Mode 3 Press the or bu...

Page 102: ...c Standard or Movie 4 Press the A or T button to move to an item Contrast Brightness Color Dynamic Contrast Black Adjust Auto Motion Plus 120Hz or Reset Select Reset to initialize the picture settings 5 Press the or button to adjust the settings For more information on the picture settings refer to pages 28 32 Using the Setup Menu ISetup displays the user settings of the WISELINK Pro menu 1 Press ...

Page 103: ...elp Select to display the help pop up message for continuous movie playback Press the or button to select Continuous Movie Play Help Press the or button to select On or Off Screen Saver Run Time Select to set the waiting time before the screen saver appears Press the or button to select Screen Saver Run Time Press the or button to select 1 min 3 min or 5 min Information Select to viewing the infor...

Page 104: ...e LAN port on the rear panel of the TV to the external modem with a LAN Cable 2 Connect the PC to which the DLNA PC Share Manager program will be installed and the external modem using a LAN cable 3 Connect the LAN port on the wall and the external modem with a Modem Cable Connecting to the Network 1 When connecting to the network is complete set up the network on the TV see page 121 A Wireless In...

Page 105: ... mp3 3 Video MPEG1 mpg mpeg MPEG2 PS TS mpg mpeg trp ts tp divx mpg mpeg avi MPEG4 H 264 mpg mpeg Install the application 1 Run the Setup exe file on the Program CD supplied with the product Alternatively you can download the file from www samsung com 2 Install the SAMSUNG PC Share Manager as shown in the figures below e Setup Status Welcome 10 the In tallShield Wilald 101 SAMSUNG PC Shaw Maoagel ...

Page 106: ...us are provided File Share Server and Help 2 Click to share the selected PC server folder see page 106 3 Click to cancel sharing see page 106 4 Click to refresh the PC folder and files 5 Click to synchronize the share status see page 107 6 The folders and files of the PC to be shared are listed 7 Folders shared by the user are listed ...

Page 107: ...t 01 Z0P G Folderl Sbare Sbare Unshare KInd Ale Folder Path C ttDocumentsand SeWngs Size 68 49 MB Conte Folder 8 Ale 16 Created Om 2808 2 20 formllt JPEG Path C lIDowments and SeWnu Size 151 11 IW Cremd Om 2008 2 20 Exit Exits the DLNA application If you select Exit without applying the changes after changing the shared status a message will appear asking if you want to apply the changed settings ...

Page 108: ...t Yes 111 _ _ Cancelling a Shared Folder You can cancel a shared folder on your PC Select a folder from the Shared Folder pane and select Unshare Folder Method 1 Select a folder from the Shared Folder pane select the Share menu and then select Unshare Folder bhldel e a f dffZ 3Fekl fJ f dcf f FokIcfS ii lfolde l 2QOlHl2 20P _Fold 200HZ ZOP 200HZ ZOP 200HZ tel 1IlO Ol lOP _ C fffio mcn1Ii1 dSet C l...

Page 109: ...e PC share program Since applying changes to the internal data is a time consuming process this function enables users to apply changes to the data only when required Until the Set Changed State menu is selected the changed state of the shared folder is not applied to the server Changes to the shared folders are not applied to your PC until you select the Set Changed State menu Setting the Access ...

Page 110: ...IIO l umcnlt ndStt C lIOocum nll nd Sel C DOCVIIU nt lJRd Set C ttOlH U cnl dScl Change server name You can rename the PC server Enter a new name and click OK The new name will appear at the top right of the window and will appear on the TV f fDl 1 OFGlGr Z OFotdlo l jFohter e F dcr5 CwteM N_ WI tUnIlF l PC Sc i N N_ IST y J f _ _ _ _ C tl low cnb rod Sct C W mtnb end SeL Version The program versi...

Page 111: ...he remote control to display the DLNA menu 2 Press the or button to select an icon Photo Music Movie Setup then press the ENTER G button To exit DLNA mode press the W L1NK button on the remote control Photo Photo List Sorting Photo List Refer to page 78 Viewing the Information Refer to page 82 Rotating the Photo file Refer to page 81 Viewing a Slide Show Refer to page 83 During a Slide Show Play P...

Page 112: ...tions The Background Music and Background Music Setting functions Sorting files by preference in the Photo Music and Movie folders The Change Group Info function The Delete function The Safe Remove function The REW FF key functions while a movie is playing Function to watch continuously when playing movie The Skip keys or Pause function may not work while a movie is playing for the DLNA of other m...

Page 113: ...ooking Game Children Fitness then press the ENTER G button To return to TV mode press the CH ViA button on the remote control If you press the Volume or MUTE button no OSD is displayed but the function operates accordingly Using the Remote Control Button in Content Library Menu _ _ Button loperations Wh I Move the cursor and select an item _ __ L _ __ _ _ __ _ _ ENTER G I Select the currently sele...

Page 114: ... Gallery contents and all issues related to them are reserved by Gallery Player Inc For additional Gallery contents check for information through www samsung com Please refer to the Using Additional Content Using External USB Memory Storage section page 117 to see how to play additional imagery CONTENT LIBRARY CONTAINS TEXT GRAPHICS IMAGES MULTIMEDIA AND OTHER MATERIALS FOR INFORMATIONAL AND PROMO...

Page 115: ...and Grill Desserts Wide choice of sweet treats and fancy beverages The recipes introduced in the Cooking contents on the Samsung TV are based on recipes published by Anness Publishing The copyrights of the Cooking contents and all issues related to them are reserved by Practical Pictures 3 Press the or Y button to select a particular item Press the ENTER G button 4 Press the Y or button to select ...

Page 116: ...that you can play with the ENTER G button only Since operating the game is easy the whole family can enjoy this game Each game will give you a different delight IQ Academy A brain training game the whole family can enjoy This game improves your power to think fast memorize and calculate by letting you solve problems within a specified time The problems start at the elementary school level You have...

Page 117: ... You can watch storytelling content with the Boowa and Kwala characters Song You can enjoy Sing Along content with the Boowa and Kwala characters Play You can enjoy exciting and fun interactive games using the remote control The copyrights of the Children contents and issues related to them are reserved by UpToTen 3 Press the or T button to select an item to play Press the ENTER G button The selec...

Page 118: ... by the OK Publishing Company The copyrights to the Massage content are reserved by Practical Pictures All issues related to copyrights are reserved by the corresponding company 3 Press the or button to select an item to view Press the ENTER G button The Basic Stretches contents are automatically played so that you can easily follow the movements on the screen To move to the previous or next opera...

Page 119: ...he built in contents will be provided via the Samsung com website with or without charge Downloading Content 1 Visit the www samsung com website and open the Content Library page 2 Enter the product number UDN Unique Device Number 3 Select a content item in the Contents Download page 4 Download the contents onto the USB memory device Content Library only supports USB Mass Storage Class devices MSC...

Page 120: ... The Modem Port on the Wall You can connect the LAN via a Sharer Router IP Sharer TV Rear Panel The Modem Port on the Wall Modem Cable You can connect the LAN port and the TV directly depending on your network status The LAN Port on the Wall LAN Cable The terminals the position of the port and the type of the external device may differ depending on the manufacturer If the IP address allocation by ...

Page 121: ... the port and the type of the external device may differ depending on the manufacturer If you are using a static IP address your ISP will inform you of the IP address subnet mask gateway and DNS You must enter these values to complete the network settings If you do not know the values ask your network administrator For the information on how to configure and connect a Sharer Router refer to the ow...

Page 122: ... the wireless IP sharer to Infrastructure mode Ad hoc mode is not supported Select a channel for the wireless IP sharer that is not currently being used If the channel set for the wireless IP sharer is currently being used by another device nearby this will result in interference and communications may fail When applying the security key for the AP wireless IP sharer only the following is supporte...

Page 123: ...s the ENTER G button 2 Press the A or T button to select Cable Network Setup then press the ENTER G button Manual Setup To connect the TV to the LAN using a static IP address you must set up the Internet Protocol IP Please check if the LAN cable is connected See page 119 1 Press the MENU button to display the menu Press the A or T button to select Setup then press the ENTER G button 2 Press the A ...

Page 124: ...you connect to the Intemet your TV may not be able to connect to the Internet as the MAC address differs from that of the device PC used to connect to the Internet the first time In this case ask your Internet service provider about the procedures to connect devices other than your PC such as your TV to the Internet 2 If your Internet service provider requires an 10 or password to connect to the I...

Page 125: ...ess Point Select to check the network connectivity Refer to page 124 Press the EXIT button to exit Manual Setup 1 Press the MENU button to display the menu Press the or T button to select Setup then press the ENTER G button 2 Press the or T button to select Wireless Network Setup then press the ENTER G button 3 Press the ENTER G button to select Internet Protocol Setup 4 Press the or T button to s...

Page 126: ...n the connection is made you will be returned to the screen automatically If you selected an Access Point that requires security authentication enter the security key You can enter up to characters for a security key The character set may differ and the red button may not appear depending on the Access Point If you have selected an Access Point with a security authentication The Security Key input...

Page 127: ...ur TV may fail to locate an AP that is configured as a private SSID type In this case please change the AP settings and try again 2 If your Internet service provider has registered the MAC address of the device used to connect to the Internet for the first time and authenticates the MAC address each time you connect tothe Internet your TV may not be able to connect to the Internet as the MAC addre...

Page 128: ...SERVICE MAY BE TIME DELAYED AS SPECIFIED BY THE CONTENT OWNER AND OR ITS AFFILIATES INFOLINK IS PROVIDED THROUGH AGREEMENT BETWEEN SAMSUNG AND THE CONTENT OWNER INFOLINK MAY BE TERMINATED OR INTERUPTED AT ANY TIME BY EITHER SAMSUNG OR THE CONTENT PROVIDER OR THROUGH TERMINATION OF THE AGREEMENT BETWEEN THEM UNDER NO CIRCUMSTANCES INCLUDING NEGLIGENCE SHALL SAMSUNG OR THE CONTENT PROVIDER BE HELD L...

Page 129: ...on To exit the Weather service press the Blue button To exit the lnfoLink service press the EXIT button Using the News Service The news provider may be changed in the future 1 Press the INFO L button on the remote control 2 Press the or button to move to the News service and press the ENTER G button Press the ENTER G button to view the detailed article Press the or Y button to view the previous or...

Page 130: ...ex and Financial news are displayed Stock quotes delayed at least 15 minutes To exit the Stocks service press the Blue button To exit the lnfoLink service press the EXIT button Setting Favorite Stocks Items 1 Press the Yellow button when Favorite Stocks or Stocks News is selected The Set Favorite Stocks screen appears 2 Press the button to move to the Category Press the or T button to select a Cat...

Page 131: ...he news service on the TV screen You can select 4 Hours 8 Hours 10 Hours or Always Font Size You can select letter size Standard or Large through InfoLink service Background Color You can select the Background Color of InfoLink service The color is applied to each service option and setup window InfoLink s Position You can set the position of each InfoLink service on the screen You can select from...

Page 132: ...can navigate the Product Guide screen by using the and buttons Full HD 1080p Auto Motion Plus 120 Hz InfoLink Content Library _ Entertainment Mode WISELINK Pro DLNA 4HDMI Anynet 6 Press the EXIT button to exit Using the Remote Control Button in Product Guide Menu Button Operations Yellow Button Shows the contents of the Product Guide sequentially AutoPlay Wheel Move the cursor and select an item E...

Page 133: ...ble t Anynet Device 2 Anynet Device 1 HDMI1 3 Cable Home Theater G J c70 n J HOMI 1 3 Cable 8 J L r F t 1 l HDMI1 3 Cable HDMI1 3 Cable j Optical Cable TV Rear Panel v o 0 0 o Connect the Optical cable between the Digital Audio Out Optical jack on your TV and the Digital Audio Input on the Home Theater When following the connection above the Optical jack only outputs 2 channel audio You will only ...

Page 134: ...tion is disabled all the Anynet related operations are deactivated Setting an Anynet Device to turn Off Automatically when the TV is Turned Off 1 Press the or Y button to select Auto Turn Off then press the ENTER G button 2 Press the or Y button to select Yes then press the ENTER G button The Auto Turn Off function is enabled If you select No the Auto Turn Off function is canceled Press the EXIT b...

Page 135: ...menu of the DVD recorder will appear device_name Operation Shows the play menu of the connected device E g If a DVD recorder is connected the play menu of the DVD recorder will appear Record recorder Starts recording immediately using the recorder This is only available for devices that support the recording function recorder Reserve Recording Enables reserving a recording for the recorder This is...

Page 136: ... iuSc t n otS h 9 a e ri a T k er 1 Press the TOOLS button Press the ENTER G button to select Anynet HDMI CEC 2 Press the A or T button to select Receiver Press the or button to select On or Off 3 Press the EXIT button to exit If your receiver supports audio only it may not appear in the device list The receiver will work when you have properly connected the Optical IN jack of the receiver to the ...

Page 137: ... the TV remote control to switch to TV Then press the 1 t jAnYn tt t t I than Anynet devices I Press CH CH LIST PRE CH and FAV CH to change the TV mode I Note that the channel button operates only when a tuner embedded Anynet device is not connected I You cannot use the remote control when you are configuring Anynet or II switching to a view mode Use the remote control when the Anynet setting or s...

Page 138: ...fun tion lR PI C the remot c t Ibatteries I Clean the upper edge of the remote control transmission window I i Check the battery terminals i _ _ _ Check signal cable message j Ensure that the signal cable is firmly connected to the PC source t Not Supported Mode message i Check the maximum resolution and connected device s Video frequency i _ r _S _ lJ _ i h_t __ atc _ _ is l y odes __ __ __ __ I ...

Page 139: ...tical position The screen position must be adjusted on the output source i e STB with a digital signal The picture appears If Just Scan is selected with some external devices the picture may appear corner of the screen distorted in the corner of the screen This symptom is caused by the external devices not TV The Resets all settings to the default This appears when you press and hold the EXIT butt...

Page 140: ...pply excess downward pressure to the upper left of right sides of the TV 2 Fasten two screws at position 0 and then fasten three screws at position f Stand the product up and fasten the screws If you fasten the screws with the LCD TV placed down it may lean to one side II Disconnecting the Stand I 1 Remove five screws from the back of the TV 2 Separate the stand from the TV Two or more people shou...

Page 141: ...ellow button moves the auto wall mount to the saved position You can move the wall mount to one of the 3 pre set positions by pressing the Red Position 1 Green Position 2 or Yellow Position 3 buttons If you adjust the position after moving to a pre set position the position display will disappear Entering the menu 1 Press the OIl or button on your remote control The Wall Mount Adjustment screen is...

Page 142: ...for assembly are provided Do not use screws longer than the standard dimension as they may cause damage to the inside of the TV set For wall mounts that do not comply with the VESA standard screw specifications the length of the screws may differ depending on their specifications Do not use screws that do not comply with the VESA standard screw specifications Do not fasten the screws too strongly ...

Page 143: ...urer Refer to the manual provided with the Kensington Lock for proper use The locking device has to be purchased separately Optional The location of the Kensington Lock may be different depending on its model 1 Insert the locking device into the Kensington slot on the LCD TV Figure 1 and turn it in the locking direction Figure 2 2 Connect the Kensington Lock cable 3 Fix the Kensington Lock to a de...

Page 144: ...emove the screws from the center back of the TV put the screws into the clamps and then fasten the screws onto the TV again Screws may not be supplied with the product In this case please purchase the screws of the following specifications Screw Specifications For a 17 29 Inch LCD TV M4 X 15 For a 32 40 Inch LCD TV M6 X 15 3 Connect the clamps fixed onto the TV and the clamps fixed onto the wall w...

Page 145: ...X 32 7 inches 1 1190 X 283 0 X 745 1 mm 1263 1 X 314 0 X 831 7 mm Weight With Stand 55 0 Ibs 25 0 kg 68 8 Ibs 312 kg Without Stand 46 1 Ibs 20 9 kg 59 1 Ibs 26 8 kg Environmental Considerations Operating Temperature 50 F to 104 F 10 C to 40 C Operating Humidity 10 to 80 non condensing Storage Temperature 4OF to 113 F 20 C to 45 C Storage Humidity 5 to 95 non condensing Stand Swivel Left I Right 20...

Page 146: ...11 1 FRONT VIEW I SIDE VIEW 1 157 400 mm __1 1 15 7 400 mm I o 0 REAR VIEW NOTE All drawings are not necessarily to scale Some dimensions are subject to change without prior notice Refer to the dimensions prior to performing installation of your TV Not responsible for typographical or printed errors 2008 Samsung Electronics America Inc ...

Page 147: ...W __ 15 7 400 mm ____1 I t 6 I 15 7 400 mm 0 1 0 REAR VIEW NOTE All drawings are not necessarily to scale Some dimensions are subject to change without prior notice Refer to the dimensions prior to performing installation of your TV Not responsible for typographical or printed errors 2008 Samsung Electronics America Inc ...

Page 148: ...a free program will individually obtain patent licenses in effect making the program proprietary To prevent this we have made it clear that any patent must be licensed for everyone s free use or not licensed at all The precise terms and conditions for copying distribution and modification follow TERMS AND CONDITIONS FOR COPYING DISTRIBUTION AND MODIFICATION O This License applies to any program or...

Page 149: ...erwise to copy modify sublicense or distribute the Program is void and will automatically terminate your rights under this License However parties who have received copies or rights from you under this License will not have their licenses terminated so long as such parties remain in full compliance 5 You are not required to accept this License since you have not signed it However nothing else gran...

Page 150: ...New Programs If you develop a new program and you want it to be of the greatest possible use to the public the best way to achieve this is to make it free software which everyone can redistribute and change under these terms To do so attach the following notices to the program It is safest to attach them to the start of each source file to most effectively convey the exclusion of warranty and each...

Page 151: ...ms that might be introduced by others Finally software patents pose a constant threat to the existence of any free program We wish to make sure that a company cannot effectively restrict the users of a free program by obtaining a restrictive license from a patent holder Therefore we insist that any patent license obtained for a version of the library must be consistent with the full freedom of use...

Page 152: ...y other than as an argument passed when the facility is invoked then you must make a good faith effort to ensure that in the event an application does not supply such function or table the facility still operates and performs whatever part of its purpose remains meaningful For example a function in a library to compute square roots has a purpose that is entirely well defined independent of the app...

Page 153: ...g with the Library A suitable mechanism is one that 1 uses at run time a copy of the library already present on the user s computer system rather than copying library functions into the executable and 2 will operate properly with a modified version of the library if the user installs one as long as the modified version is interface compatible with the version that the work was made with c Accompan...

Page 154: ...ribution limitation excluding those countries so that distribution is permitted only in or among countries not thus excluded In such case this License incorporates the limitation as if written in the body of this License 13 The Free Software Foundation may publish revised and or new versions of the Lesser General Public License from time to time Such new versions will be similar in spirit to the p...

Page 155: ...he GNU Lesser General Public License as published by the Free Software Foundation either version 2 1 of the License or at your option any later version This library is distributed in the hope that it will be useful but WITHOUT ANY WARRANTY without even the implied warranty of MERCHANTABILITY or FITNESS FOR A PARTICULAR PURPOSE See the GNU Lesser General Public License for more details You should h...

Page 156: ...Cliente Country CANADA USA Customer Care Center fr 1 800 SAMSUNG 726 7864 1 800 SAMSUNG 726 7864 Web Site www samsung com ca www samsung com Address Samsung Electronics Canada Inc Customer Service 55 Standish Court Misslssauga Ontario L5R 482 Canada Samsung Electronique Canada Inc Service ala Clientele 55 Standish Court Mississauga Ontario L5R 482 Canada Samsung Electronics America Inc 105 Challen...

Page 157: ... HDMI IN4 1 AUDIO OUT 2 DIGITAL AUDIO OUT OPTICAL 3 PC IN PC AUDIO 4 HDMI IN 1 2 3 4 DVI IN HDMI2 R AUDIO L 5 ANT IN 6 WISELINK 7 AV IN 2 8 HEADPHONE 9 POWER INPUT 0 S VIDEO COMPONENT IN 1 2 AV IN 1 LAN EX LINK KENSINGTON LOCK Audio Output Performance Comparison OPTICAL Digital AUDIO Analog Best Normal Video Input Performance Comparison HDMI DVI PC COMPONENT S VIDEO VIDEO Best Better Good Normal Q...

Page 158: ...is dark Using the remote control with the ON OFF light button set to On will reduce the battery usage time PRE CH Tunes to the previous channel CH CH Press to change channels SOURCE Press to display and select the available video sources W LINK WISELINK This function enables you to view and play photo and music files from an external device a MENU Displays the main on screen menu b RETURN Returns ...

Page 159: ... or Cable Box Satellite receiver Set Top Box DVD Blu Ray player or Cable Box Satellite receiver Set Top Box Each DVD Blu Ray player or Cable Box Satellite receiver Set Top Box has a different back panel configuration When connecting a DVD Blu Ray player or Cable Box Satellite receiver Set Top Box match the color of the connection terminal to the cable When using an HDMI DVI cable connection you mu...

Page 160: ...eo quality Be sure to match the component video and audio connections For example if connecting a Component video cable to COMPONENT IN 1 connect the audio cable to COMPONENT IN 1 also Each DVD Blu Ray player or Cable Box Satellite receiver Set Top Box has a different back panel configuration When connecting a DVD Blu Ray player or Cable Box Satellite receiver Set Top Box match the color of the co...

Page 161: ...NT OUT terminal on the VCR and the ANT IN terminal on the TV Connect a Video Cable between the VIDEO OUT jack on the VCR and the AV IN 1 Y VIDEO or AV IN 2 VIDEO jack on the TV Unplug the cable or antenna from the back of the TV Connect Audio Cables between the AUDIO OUT jacks on the VCR and the AV IN 1 or AV IN 2 R AUDIO L jacks on the TV Video Connection S Video Connection TV Rear Panel 3 Audio ...

Page 162: ...ound to the Home theater receiver When the source is a digital component such as a DVD and is connected to the TV via HDMI only 2 channel sound will be heard from the Home Theater receiver If you want to hear 5 1 channel audio connect the DIGITAL AUDIO OUT OPTICAL jack on the DVD Blu Ray player or Cable Satellite Box directly to an Amplifier or Home Theater not the TV Connecting an Amplifier DVD H...

Page 163: ...ting a PC match the color of the connection terminal to the cable When using an HDMI DVI cable connection you must use the HDMI IN 2 terminal Using the D Sub Cable 1 Connect an HDMI DVI cable between the HDMI IN 2 jack on the TV and the PC output jack on your computer 2 Connect a 3 5 mm Stereo mini plug 2RCA Cable between the DVI IN HDMI2 R AUDIO L jack on the TV and the Audio Out jack of the soun...

Page 164: ...4 When selecting the Cable TV system Press the ENTER button to start the auto program Press the or to select the correct analog signal cable system source among STD HRC and IRC Press the or button to select Start then press the ENTER button If you have Digital cable TV select the cable system signal source for both Analog and Digital Viewing the Menus 5 The TV begins memorizing all available stati...

Page 165: ...pness Color or Tint G R then press the ENTER button Picture Mode Dynamic Selects the picture for high definition in a bright room Standard Selects the picture for the optimum display in a normal environment Movie Selects the picture for viewing movies in a dark room 3 Press the or button to decrease or increase the value of a particular item Press the EXIT button to exit When you make changes to B...

Page 166: ...PC HDMI1 HDMI2 DVI HDMI3 HDMI4 USB DLNA You can choose only those external devices that are connected to the TV In the Source List connected inputs will be highlighted and sorted to the top Inputs that are not connected will be sorted to the bottom Using the Color buttons on the remote with the Source list Red Refresh Refreshes the connecting external devices TOOLS Option Displays the Edit Name an...

Page 167: ...n the screen Make sure the broadcast you re receiving is High De nition HD HD channels sometimes broadcast Standard De nition SD programming which can cause black bars Set your cable satellite box to stretch or widescreen mode to eliminate the bars Picture has a Red Green or Pink tint Make sure the Component cables are connected to the correct jacks Closed Captioning not working If you are using a...

Page 168: ...rvicio de Atención al Cliente Country Customer Care Center Web Site Address CANADA 1 800 SAMSUNG 726 7864 www samsung com ca Samsung Electronics Canada Inc Customer Service 55 Standish Court Mississauga Ontario L5R 4B2 Canada Samsung Electronique Canada Inc Service à la Clientèle 55 Standish Court Mississauga Ontario L5R 4B2 Canada U S A 1 800 SAMSUNG 726 7864 www samsung com Samsung Electronics A...

Page 169: ......

Page 170: ... BN63 01798B 01 ...

Page 171: ...uld continue to work as before for other purposes e g for watching lowpower TV stations still broadcasting in analog watching pre recorded movies or playing video games When a Converter is used with an older television receiver a signal splitter might be necessary to continue to receive low power analog broadcasts via an antenna For more information please see www DTV gov or call 1 888 CALL FCC Fo...

Page 172: ...the wall outlet and disconnect the antenna or cable system This will prevent damage to the set due to lightning and power line surges Belore connecting the AC power cord to the DC adaptor outlet make sure the voltage designation of the DC adaptor corrsponds to the local electrical supply Never insert anything metallic into the open parts of this apparatus Doing so many create a danger of electric ...

Page 173: ...lugar inestable inclinadu u expucsto a vibraciones No 10 dc jc caer ni Ie de golpes Si cI produclO sc cstropea desenchulc el cable de alimcntacion y pongase en contacto con un centro de servicio Desconecte cI cable de alimentacion de la lorna de corriente y scquc el aparalO con un pano suave y seco No utilicc ningtm producto quimico como cera benzol alcohol disolvcntes insecticida amhientador de a...

Page 174: ...omada devidamente ligadas aterra Uma liga ao de terra deficicnte pode causar choque elcctrico au danos no equipamento S6 equipamento de classe I Deve puxar a fieha da tomada para desligar 0 aparelho da corrente de forma a deixar a ficha pronta a ser utilizada Nao deixe as crian as mexcr no produto Guarde os acess6rios bateria etc num local segura fora do alcance das crianlYas Nilo instale 0 produt...

Page 175: ...s been spilled or objects have fallen into the apparatus the apparatus has been exposed to rain or moisture does not operate nonnally or has been dropped This monitor complies with SWEDAC MPR II recommendations for reduced electric and magnetic fields WARNING lo prevent damage which may result in fire or electric shock hazard do not expose this appliance to rain or moisture Optional 1 Do not place...

Page 176: ...AA68 03242L 02 ...

Page 177: ...roduct was not intended altered product or serial numbers cosmetic damage or exterior finish accidents abuse neglect fire water lightning or other acts of nature use of products equipment systems utilities services parts supplies accessories applications installations repairs external wiring or connectors not supplied or authorized by SAMSUNG which damage this product or result in service problems...

Page 178: ...xpanded standard format television video and programming should be limited to no more than 15 ofthe total television viewing per week Additionally viewing other stationary images and text such as stock market reports video game displays station logos web sites or computer graphics and patterns should be limited as described above for all televisions Displaying any stationary images that exceed the...

Reviews: