background image

DE68-04224C-01

QUESTIONS OR COMMENTS?

COUNTRY

CALL

OR VISIT US ONLINE AT

U.S.A 

Consumer Electronics

1-800-SAMSUNG (726-7864)

www.samsung.com/us/support

CANADA

1-800-SAMSUNG (726-7864)

www.samsung.com/ca/support (English) 

www.samsung.com/ca_fr/support (French)

Please be advised that the Samsung warranty does NOT cover service calls to explain product 
operation, correct improper installation, or perform normal cleaning or maintenance.

Scan the QR code* or visit  
www.samsung.com/spsn  
to view our helpful  
How-to Videos and Live Shows

* Requires reader to be installed on your 

smartphone

MC17J8000CS_AA _DE68-04224C-01_EN.indd   80

2015-11-26   �� 4:06:47

Summary of Contents for MC17J8000CS

Page 1: ...ww samsung com ca_fr support French Please be advised that the Samsung warranty does NOT cover service calls to explain product operation correct improper installation or perform normal cleaning or maintenance Scan the QR code or visit www samsung com spsn to view our helpful How to Videos and Live Shows Requires reader to be installed on your smartphone MC17J8000CS_AA _DE68 04224C 01_EN indd 80 2...

Page 2: ...Microwave Oven User manual MC17J8000CS MC17J8000CS_AA _DE68 04224C 01_EN indd 1 2015 11 26 4 06 47 ...

Page 3: ... off feature 23 Turning on the light 23 Turning on the vent 23 Using the warm hold feature 24 Using the defrost button 24 Accessory usage Use accessories in the combinations shown below 26 Using the slim fry button 26 Using the fit choice button 28 Using the popcorn button 34 Using the speed cook button 35 Using the auto cook button 42 Using the express menu feature 49 Using the microwave setting ...

Page 4: ...our microwave oven 63 Cleaning the exterior 63 Cleaning under your microwave oven 63 Cleaning the control panel 63 Cleaning the door and door seals 63 Cleaning the interior 63 Cleaning the turntable and roller rings 63 Storing and repairing your microwave oven 64 Replacing the cooktop night light 64 Replacing the oven light 65 Cleaning the grease filter 66 Replacing the charcoal filter 67 Troubles...

Page 5: ...VOID POSSIBLE EXPOSURE TO EXCESSIVE MICROWAVE ENERGY A Do not attempt to operate this oven with the door open since open door operation can result in harmful exposure to microwave energy It is important not to defeat or tamper with the safety interlocks B Do not place any object between the oven front face and the door or allow soil or cleaner residue to accumulate on the sealing surface C Do not ...

Page 6: ...hese basic safety precautions Do NOT attempt Unplug the power plug from the wall socket Do NOT disassemble Make sure the machine is grounded to prevent electric shock Do NOT touch Call the service center for help Follow directions explicitly Note These warning signs are here to prevent injury to you and others Please follow them explicitly After reading this section keep it in a safe place for fut...

Page 7: ...r on this appliance This type of oven is specifically designed to heat cook or dry food It is not designed for industrial or laboratory use 7 As with any appliance close supervision is necessary when it is used by children Keep children away from the door when opening or closing it as they may bump themselves on the door or catch their fingers in the door 8 Do not operate this appliance if it has ...

Page 8: ...ubbling or boiling when the container is removed from the microwave oven is not always present THIS COULD RESULT IN VERY HOT LIQUIDS SUDDENLY BOILING OVER WHEN THE CONTAINER IS DISTURBED OR A SPOON OR OTHER UTENSIL IS INSERTED INTO THE LIQUID To reduce the risk of injury a Do not overheat liquid b Stir liquid both before and halfway through heating it c Do not use straight sided containers with na...

Page 9: ...rounding plug The plug must be plugged into an outlet that is properly installed and grounded WARNING Improper use of the grounding plug can result in a risk of electric shock Plug into a grounded 3 pronged outlet Do not remove the third grounding prong Do not use an adaptor or otherwise thwart the safety function of the grounding plug Consult a qualified electrician or service person if you do no...

Page 10: ...hock fire an explosion problems with the product or injury Unpack the oven remove all packaging material and examine the oven for any damage such as dents on the interior or exterior of the oven broken door latches cracks in the door or a door that is not lined up correctly If there is any damage do not operate the oven and notify your dealer immediately Make sure to install your oven in a locatio...

Page 11: ...is appliance in a humid oily or dusty location or in a location exposed to direct sunlight or water rain drops This may result in electric shock or fire Plug the power plug into the wall socket firmly Do not use a damaged power plug damaged power cord or loose wall socket This may result in electric shock or fire Do not mount over a sink Do not pull or excessively bend the power cord Do not twist ...

Page 12: ...lug Do not use a ventilating fan A spark may result in an explosion or fire Take care that the door or any of the other parts do not come into contact with your body while cooking or just after cooking Failing to do so may result in burns In the event of a grease fire on the surface units below the oven smother the flaming pan on the surface unit by covering the pan completely with a lid a cookie ...

Page 13: ...materials can be dangerous to children If a child places a bag over its head the child can suffocate Do not let children or any person with reduced physical sensory or mental capabilities use this appliance unsupervised Make sure that the appliance is out of the reach of children Failing to do so may result in electric shock burns or injury Do not touch the inside of the appliance immediately afte...

Page 14: ...door This may result in electric shock fire problems with the product or injury Do not operate the appliance with wet hands This may result in electric shock Do not spray volatile material such as insecticide onto the surface of the appliance As well as being harmful to humans it may also result in electric shock fire or problems with the product Do not place the appliance over a fragile object su...

Page 15: ...aying water directly onto it Do not use benzene thinner or alcohol to clean the appliance This may result in discoloration deformation damage electric shock or fire Before cleaning or performing maintenance unplug the appliance from the wall socket and remove food waste from the door and cooking compartment Failing to do so may result in electric shock or fire Take care not to hurt yourself when c...

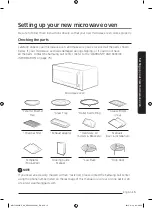
Page 16: ...e Samsung Call Center Refer to the WARRANTY AND SERVICE INFORMATION on page 75 Microwave oven Ceramic Enamel Tray Glass Tray Roller Guide Ring Grease Filters 2 ea Charcoal filter Exhaust adaptor Hardware kit Screws Brackets Manuals User Installation Templates Top Wall Cooking Guide Manual Low Rack High Rack NOTE If you need an accessory marked with an asterisk please contact the Samsung Call Cente...

Page 17: ... Open the door by pulling the handle on the right side of the door 2 Wipe the inside of the oven with a damp cloth 3 Install the pre assembled ring into the indentation at the center of the microwave oven 4 Place the glass tray securely in the center of the pre assembled roller ring CAUTION Make sure the shelf is positioned properly inside the microwave to prevent damage to the oven from arcing da...

Page 18: ...ook Button 10 Convection Bake Roast Button 11 Speed Bake Roast Button 12 Brown Button 13 Warm Hold Button 14 Microwave Button 15 Defrost Button 16 Up Down Buttons 17 Numeric Buttons 18 OK Button 19 Kitchen Timer Button 20 Steam Clean Button 21 My Settings Button 22 Eco Mode Button 23 30sec Button 24 Stop Clear Button 25 Start Button 01 02 03 05 07 09 11 13 15 19 21 23 25 04 06 08 10 12 14 18 20 22...

Page 19: ...ess one of the numeric buttons to select a function you want to customize 3 Press the OK button 4 Press one of the numeric buttons to select a function you want to customize 5 Press the OK button Setting the time Your microwave oven is equipped with a built in clock Set the clock when first installing your microwave oven and after a power failure The time is displayed whenever the microwave oven i...

Page 20: ...eric buttons to enter the current time First 2 digits are for hours last 2 digits are for minutes NOTE If you change your mind while adjusting a setting press the STOP CLEAR button to cancel and then adjust the setting again NOTE If there is a power interruption you will need to reset these options NOTE If the clock is set for standard time the Daylight Savings Time Adjustment function allows you ...

Page 21: ...you to lock all buttons except Eco Mode so that the microwave oven cannot be operated by children accidentally The oven can be locked at any time Activating Deactivating If you want to activate or deactivate the child lock function press the STOP CLEAR button for 3 seconds The display will show CHILD LOCK ON or CHILD LOCK OFF when the oven is locked or unlocked and then redisplay the time Using th...

Page 22: ...th 1 and 2 stage cooking MW Bake Roast Brown Speed Bake Roast and Warm Hold buttons Using the eco mode Use the More or Less feature only after cooking has begun 1 To ADD more time to a cooking procedure press the More button Each time you press the More button the cooking time will be increased by 10 seconds 2 To REDUCE the time of a cooking procedure press the Less button Each time you press the ...

Page 23: ... Clean button 6 Press the START button Steam clean will operate for 6 minutes and 30 seconds The length of time cannot be modified 7 When the cleaning time is over the oven will beep Open the door 8 Clean the cavity of the oven with a dry dishtowel Remove the turntable and wipe under the rack with a piece of paper towel NOTE Use this function only after the oven has completely cooled NOTE Use norm...

Page 24: ... speed and three times for low fan speed Press the Vent button four times to turn the fan off Turning on the light Turning on the vent The vent fan removes steam and other vapors that result from cooking on the rangetop below NOTE The exhaust fan s speed will decrease when the oven s cooking function is activated NOTE The Vent Fan protects the microwave from excess heat rising from the cooktop bel...

Page 25: ... cooked covered should also be covered during Warm Hold NOTE Pastry items pies turnovers etc should be uncovered during Warm Hold NOTE Complete meals kept warm on a dinner plate can be covered during Warm Hold Below are the amounts of food we recommend you apply the Warm Hold function to by Food Type Food Type Recommended Quantity Liquid 1 2 cups Dry 5 10 oz Using the defrost button Remove all pac...

Page 26: ...lace cake on a ceramic plate and if possible turn over as soon as the oven beeps The oven keeps operating and stops only when you open the door This program is suitable for all kinds of bread sliced or whole as well as for bread rolls and baguettes Arrange bread rolls in a circle 3 To select the number that corresponds to the food you want to defrost press the Up Down key or one of the numeric but...

Page 27: ... one of the numeric buttons Refer to the table on the next page 4 Press the OK button 5 Enter the amount of food by pressing the Up Down key or one of the numeric buttons Refer to the table on the next page 6 Press the START button The microwave oven will automatically operate for the pre programmed time 2 6 3 4 5 Ceramic Enamel Tray Ceramic Enamel Tray Ceramic Enamel Tray Glass Tray Glass Tray Gl...

Page 28: ...of 0 4 x 0 4 inches 10 x 10 mm Soak in cold water for 30 mins Dry with a towel and then brush with oz 5 g oil Place on greased ceramic enamel tray Place the tray on high rack C 6 Frozen Potato Wedges 2 servings 8 oz 227 g 4 servings 16 oz 454 g Place frozen potato wedges on greased ceramic enamel tray Place the tray on high rack C 7 Frozen Potato Croquettes 2 servings 8 oz 227 g 4 servings 16 oz 4...

Page 29: ...le beginning on the next page 4 Press the OK button 5 To select the number that corresponds to the food press the Up Down key or one of the numeric buttons Refer to the table beginning on the next page After selecting the food if you do not need to set the amount press the START button If you need to set the amount go to Step 6 6 Press the OK button 7 Enter the amount of food by pressing the Up Do...

Page 30: ...the center of glass tray Cook covered Stir after cooking F 3 Green Beans 1 serving 2 servings 3 servings 4 servings 1 serving cup Wash and clean green beans Put into a microwave safe ceramic or glass bowl and add to 2 oz 15 60 ml of water oz or 15 ml per serving Put bowl in the center of glass tray Cook covered Stir after cooking F 4 Spinach 1 serving 2 servings 3 servings 4 servings 1 serving 1 c...

Page 31: ...tir after cooking F 3 Corn 1 serving 2 servings 3 servings 4 servings 1 serving cup Wash and clean frozen corn Put into a microwave safe ceramic or glass bowl and add to 2 oz 15 60 ml of water oz or 15 ml per serving Put bowl in the center of glass tray Cook covered Stir after cooking F 4 Green Beans 1 serving 2 servings 3 servings 4 servings 1 serving cup Wash and clean frozen green beans Put int...

Page 32: ...cup Put into a microwave safe ceramic or glass bowl Put bowl in the center of glass tray Cook covered Stir after cooking F 4 Peas 1 serving 2 servings 3 servings 4 servings 1 serving cup Put into a microwave safe ceramic or glass bowl Put bowl in the center of glass tray Cook covered Stir after cooking F 5 Spinach 1 serving 2 servings 3 servings 4 servings 1 serving 1 cup Put into a microwave safe...

Page 33: ...time Let stand 3 5 minutes F 4 Whole Wheat Macaroni 2 servings 4 servings 1 serving cup Follow package directions for amount of water Remove from the oven and let stand for 5 minutes Drain hot water carefully F 5 Quinoa 2 servings 4 servings 1 serving cup Follow package directions for amount of water Stir well as soon as oven beeps and push start button to continue process F 6 Whole Wheat Couscous...

Page 34: ... enamel tray When the oven beeps turn over turkey breasts and re start the oven D 4 Ground Turkey 4 servings 1 lb 454 g Place ground turkey in microwave safe 2 quart casserole glass dish then place on glass tray When the oven beeps stir and restart the oven F 6 Seafood 1 White Fish Fillet 1 serving 2 pieces 4 oz 113 g 2 servings 4 pieces 8 oz 227 g 1 serving 2 pcs each piece 2 oz 57 g Spray high r...

Page 35: ... non stick spray Place tuna steaks on high rack Place the high rack on ceramic enamel tray When the oven beeps turn over tuna steaks and re start the oven D Using the popcorn button You can cook the popcorn easily using Popcorn button You do not need to set either the cooking times or the power level 1 Put some food on the tray See Accessory Usage on page 26 2 Press the Popcorn button 3 Enter the ...

Page 36: ...ng on the next page 4 Press the OK button 5 To select the number that corresponds to the food press the Up Down key or one of the numeric buttons Refer to the table beginning on the next page After selecting the food if you do not need to set the amount press the START button If you need to set the amount go to Step 6 6 Press the OK button 7 Enter the amount of food by pressing the Up Down key or ...

Page 37: ...zen 2 servings 4 servings 1 serving 3 links Place links on ceramic enamel tray Place the tray on the high rack C 5 Sausage Patties Frozen 2 servings 4 patties 4 servings 8 patties 1 serving 2 patties Place patties on ceramic enamel tray Place the tray on the high rack C 6 Sausage Patties Fresh 2 servings 2 patties 4 servings 4 patties 1 serving 1 patties Place patties on ceramic enamel tray Place ...

Page 38: ...cken with melted butter B 4 Turkey Breast 4 pieces 12 oz 340 g each 3 oz 85 g Place turkey breasts on high rack Place the high rack on ceramic enamel tray When the oven beeps turn over turkey breasts and re start the oven D 3 Seafood 1 White Fish Fillet 1 serving 2 pieces 4 oz 113 g 2 servings 4 pieces 8 oz 227 g 1 serving 2 pcs each piece 2 oz 57 g Spray high rack with non stick spray Place white...

Page 39: ... low rack on ceramic enamel tray When the oven beeps turn over beef and re start the oven B 2 Top Loin Steak Medium 1 inch 0 5 lb 227 g Place steak on high rack Place the high rack containing the steak on the ceramic enamel tray When the oven beeps turn over steak and re start the oven Let steak stand for 5 minutes before slicing D 3 Top Loin Steak Well Done 1 inch 0 5 lb 227 g Place steak on high...

Page 40: ...k stand for 5 minutes before slicing D 7 Sirloin Steak Well Done 1 Inch 1 lb 454 g Place steak on high rack Place the high rack containing the steak on the ceramic enamel tray When the oven beeps turn over steak and re start the oven Let steak stand for 5 minutes before slicing D 8 Ground Beef 2 servings 0 5 lb 227 g 4 servings 1 lb 454 g Place beef in microwave safe 2 quart casserole glass dish t...

Page 41: ...tart the oven D 3 Pork Tenderloin Small 1 piece 0 5 1 lb 227 454 g Large 1 piece 1 5 2 lbs 680 907 g Place pork on low rack Place the low rack containing the pork on the ceramic enamel tray When the oven beeps turn over pork and re start the oven B 6 Pizza 1 Frozen Pizza Individual 6 Inch 6 inch Place pizza on low rack Place the low rack on ceramic enamel tray B 2 Frozen Pizza Regular 12 Inch 12 i...

Page 42: ...e chicken tenders on the ceramic enamel tray Place the tray on the high rack C 3 Chicken Wings 2 servings 10 ea 4 servings 20 ea 5 wings per serving Place chicken wings on low rack Place the low rack on ceramic enamel tray B 4 Fried Chicken 2 servings 4 servings 1 piece per serving Place chicken on ceramic enamel tray Place the tray on the low rack A 5 Cheese Sticks 2 servings 4 servings 2 sticks ...

Page 43: ... that begins on the next page 4 Press the OK button 5 To select the number that corresponds to the food press the Up Down key or one of the numeric buttons Refer to the table that begins on the next page After selecting the food if you do not need to set the amount press the START button If you need to set the amount go to Step 6 6 Press the OK button 7 Enter the amount of food by pressing the Up ...

Page 44: ...asserole 1 to 4 servings 8 oz 227 g serving Use only refrigerated food Pour into a deep ceramic plate or bowl Cover with lid or vented plastic wrap Stir well before serving F 5 Dinner Plate 1 serving Use only pre cooked refrigerated food Put meal on a ceramic plate Cover plate with vented plastic wrap or wax paper F 6 Beverage cup 1 cup 2 cups Use measuring cup do not cover Place the beverage in t...

Page 45: ...low package instructions for covering and standing After cooking let stand 1 3 minutes When the oven beeps stir and restart the oven F 3 Mashed Potatoes Instant 2 servings 4 servings 1 serving cup flakes Follow package preparation directions F 4 Bacon Uncooked 2 slices 4 slices 6 slices Place 2 paper towels on plate and arrange bacon on towels Do not overlap Cover with additional paper towel Remov...

Page 46: ...h 2 each Follow package preparation directions Let stand for 1 2 minutes after heating F 5 Snack Pocket 1 serving 1 ea 2 servings 2 ea Follow package preparation directions Let stand for 1 2 minutes after heating F 4 Pasta 1 Spaghetti 1 serving 2 oz 57 g 2 servings 4 oz 113 g Placed 4 for 1 serving or 8 for 2 servings cups water in large microwave safe bowl When the oven beeps add spaghetti and re...

Page 47: ...enamel tray Place the tray on the low rack A 6 Baked Goods 1 Box Cake Mix package Preheat oven to 350 F Pour batter into an 8 inch round cake pan In the oven place the filled pan with batter on the low rack A Except ceramic enamel tray 2 Cinnamon Rolls 8 ea Preheat oven to 375 F Place buns on greased ceramic enamel tray Place the tray on the low rack A 3 Brownie Mix 1 package Preheat oven to 350 F...

Page 48: ...on plate without overlapping Sprinkle evenly with cheese Contents 2 cups tortilla chips cup grated cheese F 4 Egg Rolls 2 servings 2 ea 4 servings 4 ea 1 serving 1 ea Preheat oven to max temp Place egg rolls on ceramic enamel tray Place the tray on the high rack C 5 Potato Bites 2 servings 10 ea 4 servings 20 ea 1 serving 5 ea Preheat oven to max temp Place potato bites on ceramic enamel tray Plac...

Page 49: ... stirred the chocolate keeps its shape even when heating time is over F 4 Soften Ice Cream 1 pint gallon Remove top of carton Place carton in center of microwave oven Let stand 2 minutes after microwaving F 5 Soften Cream Cheese 1 package 8 oz 227 g Unwrap cream cheese and place on microwave safe dish Let stand 1 2 minutes F 6 Soften Frozen Juice 1 package 11 5 oz 326 g Do not place metal juice ca...

Page 50: ...the food press the Up Down key or one of the numeric buttons Refer to the table on the next page After selecting the food if you do not need to set the amount press the START button If you need to set the amount go to Step 4 4 Press the OK button 5 Enter the amount of food by pressing the Up Down key or one of the numeric buttons Refer to the table on the next page 6 Press the START button The mic...

Page 51: ... g each Put the pizza on a microwave safe plate with wide end of slice towards the outside edge of the plate Do not let slices overlap Do not cover Before serving let stand 1 2 minutes F 6 Reheat Dinner Plate 1 serving Use only pre cooked refrigerated food Put meal on a ceramic plate Cover plate with vented plastic wrap or wax paper F 7 Reheat Casserole 1 to 4 servings 8 oz 227 g serving Use only ...

Page 52: ...ng you only need to set the cooking time The power level is automatically set to High If you want to set the power level to any other level press OK after entering the cooking time and then use the numeric buttons to set the level 1 Press the Microwave button You can skip this step and start at the next step 2 Use the numeric buttons to set a cooking time You can enter a time from one second to 99...

Page 53: ...h 1 Follow steps 1 2 3 and 4 from the One stage cooking section 2 Press the OK button to move to the second stage 3 Follow steps 2 3 4 and 5 from the One stage cooking section Steam cooking guide You can do some steam cooking using properly accessory by operating the Microwave Mode Use settings and times in this table as guide lines for steam cooking Food Quantity Mode Time Min Instructions Frozen...

Page 54: ...ng stand for 2 3 minutes Chicken Breast 11 oz 312 g 22 oz 624 g 1st MW 100 2nd MW 40 1st 1 2 2nd 7 8 1st 2 3 2nd 10 12 Rinse pieces and snick on surface of skin Add water and put the chicken breasts in a steamer Cover with lid After cooking stand for 2 3 minutes Salmon Fillets 11 oz 312 g 22 oz 624 g 1st MW 100 2nd MW 40 1st 1 2 2nd 7 8 1st 2 3 2nd 8 9 Rinse fish and add 1 tablespoon lemon juice A...

Page 55: ... enter a cooking time of more than 60 minutes your oven will only operate for 60 minutes 3 Press the START button to begin Browning The vent fan operates at low speed while the oven operates in Browning mode Convection bake roast The Convection Bake Roast mode uses dry heat to cook and brown food A high speed fan circulates hot air inside the oven to heat food quickly and evenly When you cook usin...

Page 56: ...minutes Although you can enter a cooking time of more than 60 minutes your oven will only operate for 60 minutes 5 Press the START button to begin convection cooking If you want to add to or reduce the cooking time use the Up Down key You can adjust the cooking time while the microwave oven is operating NOTE To maintain a constant temperature keep the oven door closed while the food is cooking Ope...

Page 57: ... do not need to set the power level just press the START button The Microwave will operate at a pre programmed power level If you want to adjust the power level go to Step 3 NOTE The maximum cooking time is 60 minutes Although you can enter a cooking time of more than 60 minutes your oven will only operate for 60 minutes 3 Press the OK button 4 To set the power level press the Up Down key or one o...

Page 58: ...y of meats and poultry as well as frozen snacks and pizza Speed bake roast cooking guide Use the cooking mode power levels and times in this table as guides for speed cooking NOTE Always use oven gloves when taking the food out of the microwave oven Type Food Quantity Mode Time Min instructions Pizza Frozen Pizza Individual 6 inch Speed Bake 30 12 16 Place the pizza on the low rack then place the ...

Page 59: ...cken on the low rack then place the rack on the ceramic enamel tray Brush the chicken with melted butter oil and seasonings Put chicken breast side down for the first side then breast side up for the second Bone in Chicken pieces 2 4 pieces 1st side Speed Roast 50 2nd side Brown 1st side 12 18 2nd side 10 20 Place the chicken pieces on the high rack then place the rack on the ceramic enamel tray P...

Page 60: ...ich may contain metal and can catch fire Thermometers Use only those labeled Microwave Safe and follow all directions Check the food in several places Conventional thermometers may be used once the food has been removed from the oven Limited use items Aluminum foil Use narrow strips of foil to prevent overcooking of exposed areas Using too much foil can damage your oven so be careful Ceramic porce...

Page 61: ...ish you want to test 2 Set the microwave to 1 minute using the numeric buttons and then press the START button This will heat the glass and dish for one minute at High power When the microwave stops the water should be warm and the dish you are testing should be cool If the dish is warm then it is absorbing microwave energy and is not acceptable for use in the microwave MC17J8000CS_AA _DE68 04224C...

Page 62: ...d cooked in the microwave builds up internal heat and continues to cook for a few minutes after the oven stops Let food stand to complete cooking especially food such as roasts and whole vegetables Roasts need this time to complete cooking in the center without overcooking the outer areas All liquids such as soup or hot chocolate should be shaken or stirred when cooking is complete Let liquids sta...

Page 63: ...ked eggs in the shell They can explode Always pierce whole eggs to keep them from bursting Cook eggs just until set They become tough if overcooked Guide for cooking vegetables in your microwave Vegetables should be washed just before cooking Often no extra water is needed If you are cooking dense vegetables such as cubed potatoes carrots or green beans add about cup water Small vegetables sliced ...

Page 64: ...eals are clean and that the door closes properly Take particular care when cleaning the door seals to ensure that no particles accumulate and prevent the door from closing correctly Wash the glass door with very mild soap and water Be sure to use a soft cloth to avoid scratching NOTE If steam accumulates inside or outside the oven door wipe with a soft cloth Steam can accumulate when you operate t...

Page 65: ...ndescent bulb 4 Raise the light cover and re insert the mounting screw 5 Plug the oven in or turn on the power at the main power supply Reset the clock WARNING Do not repair replace or service any part of your microwave oven yourself Allow only a qualified service technician to perform repairs If the oven is faulty and needs servicing or you are in doubt about its condition unplug the oven from th...

Page 66: ...over mounting screws 2 middle screws 4 Slide the vent grille to the left then pull it straight out 5 Remove the charcoal filter if present 6 Remove the screw securing the lamp cover 7 Remove the bulb by pulling it out gently 8 Replace the bulb with a 20 watt halogen bulb 9 Replace the bulb holder 10 Replace the vent grille and re insert the 2 screws 11 Plug the oven in or turn on the power at the ...

Page 67: ...a mild detergent Rinse well and shake to dry Brushing the filter lightly can remove embedded dirt WARNING Do not use ammonia or put the grease filter in the microwave oven The aluminum will darken 3 To re install the filter slide it into the frame slot on the left or right and then push it upwards and to the right or left to lock it NOTE Your microwave oven has a filter reminder function See page ...

Page 68: ...t www samsungparts com 1 Unplug the oven or turn off the power at the main power supply 2 Open the door 3 Remove the vent grille mounting screws 2 middle screws 4 Slide the vent grille to the left then pull it straight out 5 Push the hook and remove the old filter 6 Slide a new charcoal filter into place The filter should rest at the angle shown 7 Replace the vent grille and 2 screws and close the...

Page 69: ...s or circuit breakers The door is open Close the door and try again The door open safety mechanisms are covered by foreign matter Remove the foreign matter and try again The oven stops while in operation The user has opened the door to turn food over After turning over the food press the START button again to start operation The power turns off during operation The oven has been cooking for an ext...

Page 70: ...of the oven Remove all objects on the top of the oven The door cannot be opened properly Food residue is stuck between the door and oven interior Clean the oven and then open the door The oven does not heat The oven may not work if too much food is being cooked or improper cookware is being used To test the oven put one cup of water in a microwave safe container put the container in the oven and t...

Page 71: ...e interior light is dim or does not turn on The door has been left open for a long time The interior light may automatically turn off when the Eco function operates Close and reopen the door or press the STOP CANCEL button The interior light is covered by foreign matter Clean the inside of the oven and check again A beeping sound occurs during cooking If the Auto Cook function is being used this b...

Page 72: ...his is not an oven malfunction Cooking is finished but the cooling fan is still running To ventilate the oven the cooling fan continues to run for about 3 minutes after cooking is complete This is not an oven malfunction Pressing the START button operates the oven This happens when the oven was not operating The microwave oven is designed to start operating when you press the START button if it wa...

Page 73: ...ents There is a burning smell or a burnt plastic smell when using the oven Plastic or non heat resistant cookware is used Use glass cookware suitable for high temperatures There is a bad smell coming from inside the oven Food residue or plastic has melted and stuck to the interior Use the steam function and then wipe the interior of the microwave with a dry cloth You can put a measuring cup contai...

Page 74: ...an the setting temperature Turn off the microwave oven and let it cool then try the setting again If this code re appears call your local SAMSUNG Customer Care Center C F0 The microwave has sensed an internal communications failure Unplug the power cord of the oven and contact a local SAMSUNG Customer Care Center C A1 The oven has failed to sense the opening or closing of the damper for 1 minute C...

Page 75: ... Watt Heater Microwave Power Output 950 Watts Cook Top Light 40 Watt incandescent lamp 2 EA Oven Light 20 Watt halogen lamp Oven Cavity Dimensions inches 20 9 64 W x 10 9 32 H x 14 D Outside Dimensions inches 29 7 8 W x 16 15 16 H x 18 9 16 D Shipping Dimensions inches 33 11 32 W x 20 25 32 H x 19 3 8 D Net Shipping Weight 74 4 lbs 86 lbs 33 75 kg 39 kg Appendix MC17J8000CS_AA _DE68 04224C 01_EN i...

Page 76: ...d service procedures Warranty service can only be performed by a SAMSUNG authorized service center The original dated bill of sale must be presented upon request as proof of purchase to SAMSUNG or SAMSUNG s authorized service center SAMSUNG will repair this product or replace it if cannot repair it at our option and at no charge as stipulated herein with new or reconditioned parts or products if f...

Page 77: ...APPLY AFTER THE EXPRESS WARRANTY PERIODS STATED ABOVE AND NO OTHER EXPRESS WARRANTY OR GUARANTY GIVEN BY ANY PERSON FIRM OR CORPORATION WITH RESPECT TO THIS PRODUCT SHALL BE BINDING ON SAMSUNG SAMSUNG SHALL NOT BE LIABLE FOR LOSS OF REVENUE OR PROFITS FAILURE TO REALIZE SAVINGS OR OTHER BENEFITS OR ANY OTHER SPECIAL INCIDENTAL OR CONSEQUENTIAL DAMAGES CAUSED BY THE USE MISUSE OR INABILITY TO USE T...

Page 78: ...Memo MC17J8000CS_AA _DE68 04224C 01_EN indd 77 2015 11 26 4 07 07 ...

Page 79: ...Memo MC17J8000CS_AA _DE68 04224C 01_EN indd 78 2015 11 26 4 07 07 ...

Page 80: ...Memo MC17J8000CS_AA _DE68 04224C 01_EN indd 79 2015 11 26 4 07 07 ...

Reviews: