background image

English 

19


Se

tting up y

our ne

w micr

ow

av

e o
v

en

Setting up your new microwave oven

Be sure to follow these instructions closely so that your new microwave oven works 
properly.

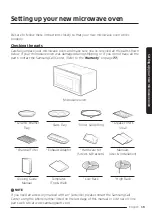
Checking the parts

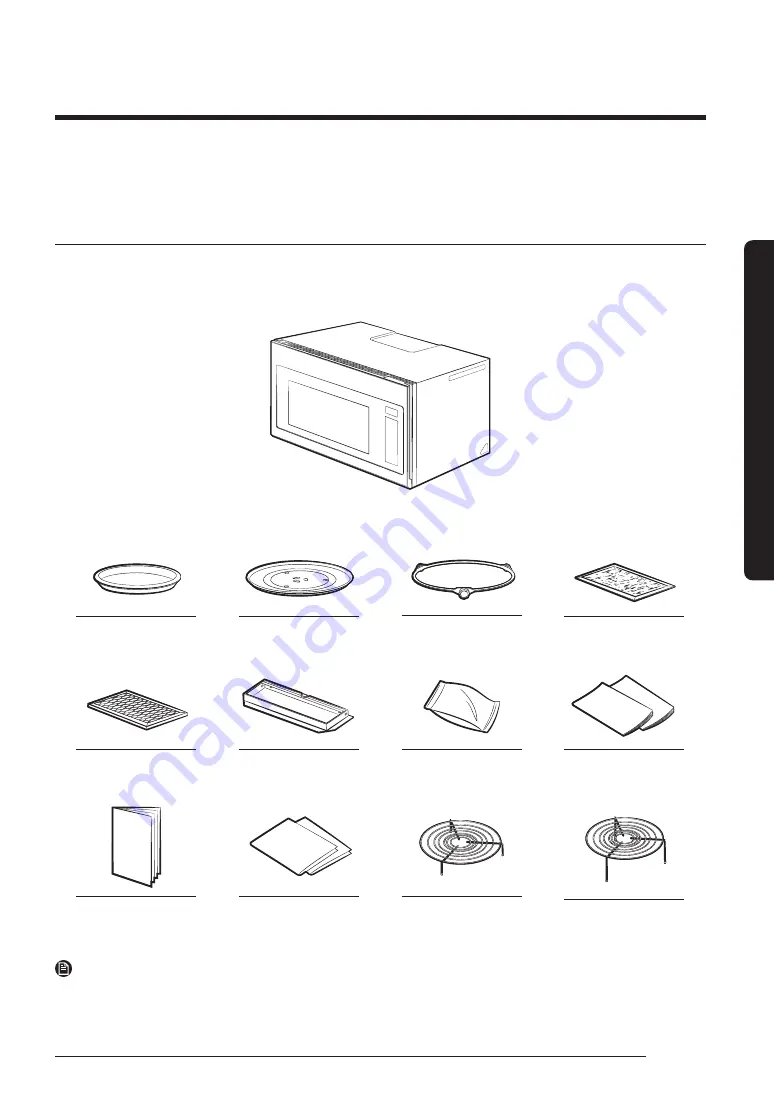
Carefully unpack your microwave oven, and make sure you’ve received all the parts shown 
below. If your microwave oven was damaged during shipping, or if you do not have all the 
parts, contact the Samsung Call Center. (Refer to the “

Warranty

” on page 

77

.)

Microwave oven

* Ceramic Enamel 

Tray

* Glass Tray

* Roller Guide Ring

* Grease Filters 

(2 ea)

* Charcoal Filter

* Exhaust Adaptor

* Hardware Kit 

(Screws & Brackets)

Manuals  

(User & Installation)

Cooking Guide 

Manual

Templates  

(Top & Wall)

* Low Rack

* High Rack

NOTE

If you need an accessory marked with an * (asterisk), please contact the Samsung Call 
Center using the phone number listed on the last page of this manual or visit our on-line 
parts web site at www.samsungparts.com.

Summary of Contents for MC17T8000CS

Page 1: ...Microwave Oven User manual MC17T8000C ...

Page 2: ... 19 Setting up your microwave oven 20 Checking the control panel 21 Clock Settings 22 Child Lock 22 Eco mode 23 Smart Control 23 Voice Control 24 Auto Connectivity 28 My settings 29 Using your microwave oven 31 Kitchen Timer 31 Vent Fan High Mid Low Off 31 Cooktop Lamp High Low Off 32 Turntable On Off 32 STOP CLEAR Eco button 32 30sec button 33 Accessory Combination Guide 33 Popcorn 34 Cookie 35 S...

Page 3: ...nd maintaining your microwave oven 65 Cleaning the exterior 65 Cleaning under your microwave oven 65 Cleaning the control panel 65 Cleaning the door and door seals 65 Cleaning the interior 66 Cleaning the turntable and roller rings 66 Storing and repairing your microwave oven 66 Replacing the cooktop night light 67 Replacing the oven light 67 Cleaning the grease filter 68 Replacing the charcoal fi...

Page 4: ...intaining and operating your microwave oven PRECAUTIONS TO AVOID POSSIBLE EXPOSURE TO EXCESSIVE MICROWAVE ENERGY A Do not attempt to operate this oven with the door open since open door operation can result in harmful exposure to microwave energy It is important not to defeat or tamper with the safety interlocks B Do not place any object between the oven front face and the door or allow soil or cl...

Page 5: ...ing your microwave oven follow these basic safety precautions Do NOT attempt Unplug the power plug from the wall socket Do NOT disassemble Make sure the machine is grounded to prevent electric shock Do NOT touch Call the service center for help Follow directions explicitly Note These warning signs are here to prevent injury to you and others Please follow them explicitly After reading this section...

Page 6: ...le for any radio of TV interference caused by unauthorized modification to this microwave oven It is the responsibility of the user to correct such interference This equipment has been tested and found to comply with the limits for a Class B digital device pursuant to part 15 of the FCC Rules These limits are designed to provide reasonable protection against harmful interference in a residential i...

Page 7: ...vice may not cause interference and 2 this device must accept any interference including interference that may cause undesired operation of the device This Class B digital apparatus complies with Canadian ICES 003 For products available in the US Canadian markets only channels 1 11 are available You cannot select any other channels IC RADIATION EXPOSURE STATEMENT This equipment complies with IC RS...

Page 8: ...or fire Use this appliance only for its intended use as described in the manual Do not put corrosive chemicals or vapors in or on this appliance This type of oven is specifically designed to heat cook or dry food It is not designed for industrial or laboratory use 7 As with any appliance close supervision is necessary when it is used by children Keep children away from the door when opening or clo...

Page 9: ...earing to be boiling Visible bubbling or boiling when the container is removed from the microwave oven is not always present THIS COULD RESULT IN VERY HOT LIQUIDS SUDDENLY BOILING OVER WHEN THE CONTAINER IS DISTURBED OR A SPOON OR OTHER UTENSIL IS INSERTED INTO THE LIQUID To reduce the risk of injury a Do not overheat liquid b Stir liquid both before and halfway through heating it c Do not use str...

Page 10: ...cludes a grounding wire and a grounding plug The plug must be plugged into an outlet that is properly installed and grounded WARNING Improper use of the grounding plug can result in a risk of electric shock Plug into a grounded 3 pronged outlet Do not remove the third grounding prong Do not use an adaptor or otherwise thwart the safety function of the grounding plug Consult a qualified electrician...

Page 11: ...ked electrical rating of the cord set or extension cord should be at least as great as the electrical rating of the appliance 2 The extension cord must be a grounding type 3 wire cord and it must be plugged into a 3 slot outlet 3 The longer cord should be arranged so that it will not drape over the counter top or tabletop where it can be pulled on by children or tripped over accidentally If you us...

Page 12: ...to a properly grounded 3 pronged outlet Your oven should be the only appliance connected to this circuit Sharing a wall socket with other appliances using a power strip or extending the power cord may result in electric shock or fire Do not use an electric transformer It may result in electric shock or fire Ensure that the voltage frequency and current provided match the product s specifications F...

Page 13: ...ct place a heavy object on the power cord insert the power cord between objects or push the power cord into the space behind the appliance This may result in electric shock or fire Do not pull the power cord when you unplug the oven Unplug the oven by pulling the plug only Failing to unplug may result in electric shock or fire When the power plug or power cord is damaged contact your nearest servi...

Page 14: ...g pan on the surface unit by covering the pan completely with a lid a cookie sheet or a flat tray Never leave surface units beneath your oven unattended at high heat settings Boil overs cause smoking and greasy spillovers that may ignite and spread if the vent fan is operating To minimize automatic fan operation use adequate sized cookware and use high heat on surface units only when necessary If ...

Page 15: ...reduced physical sensory or mental capabilities use this appliance unsupervised Make sure that the appliance is out of the reach of children Failing to do so may result in electric shock burns or injury Do not touch the inside of the appliance immediately after cooking The inside of the appliance will be hot The heat on the inside of the oven can cause burns Do not put aluminum foil except as spec...

Page 16: ... coverings directing steam away from your hands and face Remove lids from baby food before heating After heating baby food stir well to distribute the heat evenly Always test the temperature by tasting before feeding the baby The glass jar or surface of the food may appear to be cooler than the food in the interior which can be so hot that it will burn the infant s mouth Make sure all cookware use...

Page 17: ... door just after cooking Take care that children do not come too close to the appliance Failing to do so may result in children burning themselves Do not place food or heavy objects over the door when opening the door The food or object may fall and this may result in burns or injury Do not abruptly cool the door the inside of the appliance or the dish by pouring water over it during or just after...

Page 18: ...forming maintenance unplug the appliance from the wall socket and remove food waste from the door and cooking compartment Failing to do so may result in electric shock or fire Take care not to hurt yourself when cleaning the appliance external internal You may hurt yourself on the sharp edges of the appliance Do not clean the appliance with a steam cleaner This may result in corrosion Keep the ins...

Page 19: ...f you do not have all the parts contact the Samsung Call Center Refer to the Warranty on page 77 Microwave oven Ceramic Enamel Tray Glass Tray Roller Guide Ring Grease Filters 2 ea Charcoal Filter Exhaust Adaptor Hardware Kit Screws Brackets Manuals User Installation Cooking Guide Manual Templates Top Wall Low Rack High Rack NOTE If you need an accessory marked with an asterisk please contact the ...

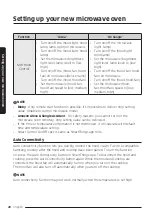
Page 20: ...cloth 1 Open the door by pulling the handle on the right side of the door 2 Wipe the inside of the oven with a damp cloth pre assembled roller ring indentation 3 Install the pre assembled ring into the indentation at the center of the microwave oven glass tray 4 Fit the center of the glass tray to the coupler coupler ...

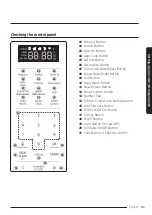
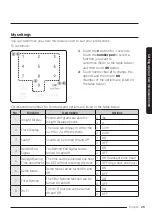
Page 21: ... Button 05 Defrost Button 06 Microwave Button 07 Convection Bake Roast Button 08 Speed Bake Roast Button 09 Grill Button 10 Keep Warm Button 11 Steam Clean Button 12 Smart Control Button 13 Number Pad 14 Kitchen Timer Clock Setting Button 15 OK Child Lock Button 16 STOP CLEAR Eco Button 17 30sec Button 18 START Button 19 Light Button Hi Low Off 20 Turntable On Off Button 21 Vent Button 3 Speed On ...

Page 22: ...umber pad to enter the time 3 Touch the OK button 4 Touch the button to change AM to PM Only for 12hr mode NOTE To change the clock display settings 12hr or 24hr mode refer to My Settings on page 24 5 Touch the OK button Child Lock The Child Lock function allows you to lock all buttons so that the microwave oven cannot be operated by children accidentally The oven can be locked at any time Activat...

Page 23: ... appears on your microwave oven display and the app will confirm you are connected 4 If the connection icon does not turn on follow the instruction on the app to reconnect To Start the microwave oven remotely For safety reasons This function is only available for convection and grill mode but not in microwave mode start 1 After following the above steps touch Smart Control to use the microwave ove...

Page 24: ...th Bixby on SAMSUNG mobile by saying Hi Bixby or by pressing the side key Function OTR Bixby Command Remarks Start Start the microwave in convection bake mode at 350 degrees for 30 minutes Start the microwave in convection roast mode at 350 degrees for 30 minutes Start the microwave in keep warm mode for 30 minutes Start the microwave in grill mode for 30 minutes Convection bake in the microwave a...

Page 25: ...t the microwave hood fan speed to high mid low Oven Timer Change Cook Time Set the timer on the microwave to 1 hour Amazon Alexa Google Assistant Samsung smart home appliances are supported by SmartThings skill in Alexa action in Google Assistant Installation Guide Here s how to link SmartThings account into Amazon Alexa or Google Assistant SmartThings App and Alexa App or Google Assistant App Sho...

Page 26: ...hour Time at 350 degrees Temp Convection bake for 1hour Time at 350degrees Temp Convection roast for 1hour Time at 350degrees Temp Set the microwave to Convection bake at 350 degrees Temp Set the microwave to Convection roast at 350 degrees Temp Convection bake at 350 degrees Temp Convection roast at 350 degrees Temp Set the microwave to Microwave for 90 seconds time Set the microwave to Grill for...

Page 27: ...on the microwave While running Changing cook time Ready Set requested time with microwave mode as default Set the microwave to 5 minutes e g Set the microwave to 2 minutes While running Changing cook time Ready Set requested time with microwave mode as default Adjust timer Add 10 minutes to the microwave 30 more seconds to the microwave e g 2 more minutes to the microwave While running Adding cook...

Page 28: ...possible to deliver only setting value Unable to control microwave mode Amazon Alexa Google Assistant For safety reasons you cannot turn on the microwave oven remotely only setting value can be delivered If the time or temperature information is not mentioned it will operate with default time and temperature setting Smart Control On Off spec is same as SmartThings app note Auto Connectivity Auto C...

Page 29: ... No Function Description Options 1 Weight Display Pounds and grams are able for Weight Display options 1 lbs 2 g 2 Clock Display The clock can display in either the 12 HR or 24 HR time mode 1 12 Hr 2 24 Hr 3 Sound Sound can be turned On and Off 1 ON 2 OFF 4 Remind End Signal The Remind End Signal can be turned On and Off 1 ON 2 OFF 5 Daylight Saving Time Adjustment The time can be advanced one hou...

Page 30: ...g to reset the clock Daylight Saving Time begins for most of the United States at 2 a m on the first Sunday of April and reverts to Standard time at 2 a m on the last Sunday of October Filter Reminder If the Filter Remind function is ON the microwave will remind you to clean or replace the grease filter every four months When it is time to clean or replace the grease filter the microwave displays ...

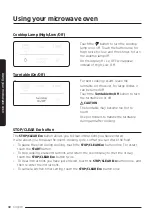
Page 31: ...her vapors that result from cooking on the cooktop below Touch the button once for high fan speed twice for medium fan speed and three times for low fan speed Touch the button four times to turn the fan off On the display 3 2 1 OFF will appear instead of High Mid Low Off NOTE The exhaust fan s speed will decrease when the oven s cooking function is activated The Vent Fan protects the microwave fro...

Page 32: ...ble may become too hot to touch Use pot holders to handle the turntable during and after cooking STOP CLEAR Eco button The STOP CLEAR Eco button allows you to clear instructions you have entered It also allows you to pause the oven s cooking cycle so that you can check the food To pause the oven during cooking touch the STOP CLEAR Eco button once To restart touch the START button To stop cooking e...

Page 33: ...he oven is in manual cooking mode touching 30sec button will add cooking time by 30 seconds Accessory Combination Guide Ceramic Enamel Tray Glass Tray Guide Roller Low Rack Coupler A Ceramic Enamel Tray Glass Tray Guide Roller Low Rack Coupler B Ceramic Enamel Tray Glass Tray Guide Roller High Rack Coupler C Ceramic Enamel Tray Glass Tray Guide Roller High Rack Coupler D Glass Tray Guide Roller Lo...

Page 34: ...set either the cooking time or the power level 3 2 4 1 Put a bag of unpopped popcorn on the tray 2 Touch the Popcorn button 3 Enter the size of the bag by touching the number pad default 2 NO 1 2 3 Amount 3 5 oz 99 g 3 0 oz 85 g 1 5 oz 43 g 4 Touch the START button Then the microwave oven will automatically be operated for pre programmed time ...

Page 35: ...r the desired temperature using the number pad Refer to the temperature table below and then touch the OK button Cookie 275 F 300 F 325 F 350 F 375 F 400 F 3 If you want to preheat the oven touch the START button without setting the cook time NOTE If there is no action within 60 minutes after preheating the oven the oven will turn off automatically 4 Use the number pad to set a cooking time 5 Touc...

Page 36: ...e the food on the tray or the rack See Accessory Combination Guide on page 33 2 Touch the Slim Fry button 3 To select the number that corresponds to the food touch the number pad 1 9 Refer to the table on page 38 4 Touch the OK button 5 Enter the amount of food by touching the number pad 1 or 2 Refer to the table on page 38 6 Touch the START button The microwave oven will automatically operate for...

Page 37: ...ish 37 Using your microwave oven Example for Slim Fry operation To set SF 4 Frozen Chicken Nuggets with 2 servings for example follow the instructions below Touch Display shows 2 3 4 5 6 Time counting down ...

Page 38: ...mic enamel tray Put tray on the center of glass tray F 2 2 servings 16 oz 454 g 5 Frozen Shrimp Breaded 1 2 servings 8 oz 227 g Place frozen shrimp breaded on greased ceramic enamel tray Put tray on high rack C 2 4 servings 16 oz 454 g 6 Frozen Mini Spring Rolls 1 1 servings 10 ea 5 oz 141 g Place frozen mini spring rolls on greased ceramic enamel tray Put tray on high rack C 2 2 servings 18 ea 10...

Page 39: ... the category touch the number pad Refer to the table that begins on page 41 4 Touch the OK button 5 To select the number that corresponds to the food touch the number pad Refer to the table that begins on page 41 After selecting the food if you do not need to set the amount touch the START button If you need to set the amount go to Step 6 6 Touch the OK button 7 Enter the amount of food by touchi...

Page 40: ...owave oven English 40 Using your microwave oven Example for Auto Cook operation To set A 23 Frozen Waffles with 3 servings for example follow the instructions below Touch Display shows 2 3 4 5 6 7 8 Time counting down ...

Page 41: ...sserole 1 1 serving 8 oz 227 g Use only refrigerated food Pour into a deep ceramic plate or bowl Cover with lid or vented plastic wrap Stir well before serving G 2 2 servings 16 oz 454 g 3 3 servings 24 oz 680 g 4 4 servings 32 oz 907 g 4 Reheat Pasta 1 1 serving 8 oz 227 g Use only refrigerated food Pour into a deep ceramic plate or bowl Cover with lid or vented plastic wrap Stir well before serv...

Page 42: ...ons G 2 2 servings 1 cup flake 3 Frozen Waffle 1 2 servings 4 ea Place waffles on low rack Place the rack on ceramic enamel tray Flip when the oven beeps and re start the oven B 2 3 servings 6 ea 4 Fish Sticks 1 2 servings 8 oz 227 g Place sticks on low rack Place the rack on ceramic enamel tray Flip when the oven beeps and re start the oven B 2 4 servings 16 oz 454 g 5 Snack Pocket 1 1 serving 1 ...

Page 43: ...oking G 2 2 servings 1 cup 3 3 servings 1 5 cups 4 4 servings 2 cups 3 Green Beans 1 1 serving 1 2 cup Wash and clean green beans Put into a microwave safe ceramic or glass bowl and add 1 2 to 2 oz 15 60 ml of water 1 2 oz or 15 ml per serving Put bowl in the center of glass tray Cook covered Stir after cooking G 2 2 servings 1 cup 3 3 servings 1 5 cups 4 4 servings 2 cups 4 Spinach 1 1 serving 1 ...

Page 44: ... 5 cups 4 4 servings 2 cups 3 Corn 1 1 serving 1 2 cup Wash and clean frozen corn Put into a microwave safe ceramic or glass bowl and add 1 2 to 2 oz 15 60 ml of water 1 2 oz or 15 ml per serving Put bowl in the center of glass tray Cook covered Stir after cooking G 2 2 servings 1 cup 3 3 servings 1 5 cups 4 4 servings 2 cups 4 Green Beans 1 1 serving 1 2 cup Wash and clean frozen green beans Put ...

Page 45: ...zen Breakfast 1 4 6 oz 113 170 g Remove package from outer wrapping and follow package instructions for covering and standing After cooking let stand 1 3 minutes G 2 7 8 oz 198 227 g 5 Oatmeal 1 1 pack Follow package directions for amount of water Stir well before and after standing time Let stand 3 5 minutes G 2 2 packs 6 Brown Rice 1 2 servings 1 cup Follow package directions for amount of water...

Page 46: ...tray Put tray on the low rack A 5 Box cake mix 1 2 package Pour batter into an 8inch round cake pan In the oven place the filled pan with batter on the low rack E 6 Brownie mix 1 package Pour batter into an 8x8 inch pan and then place the pan on the low rack E 7 Frozen Cookie 5 ea Place frozen cookies on greased ceramic enamel tray Put tray on the low rack A 8 Frozen French Toast 1 2 servings 2 to...

Page 47: ...en Unless stirred the chocolate keeps its shape even when heating time is over G 4 Soften Ice Cream 1 1 pint Remove top of carton Place carton in center of microwave oven Let stand 2 minutes after microwaving G 2 4 pints Half Gallon 5 Soften Cream Cheese 1 package 8 oz 227 g Unwrap cream cheese and place on microwave safe dish Let stand 1 2 minutes G 6 Soften Frozen Juice 1 package 11 5 oz 326 g D...

Page 48: ... beeps stir and restart the oven G 5 Whole Chicken 2 5 3 lbs 1100 1360 g Fold chicken wings under the chicken Place chicken on low rack Place the rack on ceramic enamel tray Brush chicken with melted butter B 6 White Fish Fillet 1 1 serving 2 pieces 4 oz 113 g Spray high rack with non stick spray Place white fillets cod pollack etc on the rack Place the rack on ceramic enamel tray D 2 2 servings 4...

Page 49: ...e rack on ceramic enamel tray When the oven beeps flip pork chops and re start the oven D 2 4 servings 4 ea 16 20 oz 454 546 g 5 Pork Tenderloin 1 1 lb 454 g Place pork on low rack Place the rack containing the pork on the ceramic enamel tray When the oven beeps flip pork and re start the oven B 2 2 lbs 907 g 6 Fresh Sausage Links 1 2 servings 6 links Place links on ceramic enamel tray Place the t...

Page 50: ... the food on the turntable 2 Touch the Defrost button 3 To select the number that corresponds to the food you want to defrost touch the number pad Refer to the table on the next page 4 Touch the OK button 5 Enter the weight of the food by touching the number pad Refer to the table on the next page to see the weights you can enter 6 Touch the START button The microwave oven will automatically opera...

Page 51: ...eld the tail of a whole fish with aluminium foil Flip the fish when the oven beeps This program is suitable for whole fish as well as for fish fillets 4 Bread 0 1 2 0 lbs 100 900 g 5 10 Put bread on a paper towel or place cake on a ceramic plate and if possible flip as soon as the oven beeps The oven keeps operating and stops only when you open the door This program is suitable for all kinds of br...

Page 52: ... to Step 3 3 If you want to set the power level to a level other than High touch the OK button 4 Touch the number pad that corresponds to the power level Refer to the table below 5 Touch the START button to operate One stage cooking mode If you want to use Multi stage cooking go to step 6 6 To use Multi stage cooking mode touch OK enter cooking time for 2nd stage and then touch START if you do not...

Page 53: ...ch the number pad Refer to the temperature table below Bake Roast 100 F 200 F 200 F 225 F 225 F 250 F 250 F 275 F 275 F 300 F 300 F 325 F 325 F 350 F 350 F 375 F 375 F 400 F 400 F 425 F 425 F 3 Touch the OK button If you want to preheat the oven touch the START button without setting cook time NOTE If there is no action within 60 minutes after preheating the oven the oven will turn off automatical...

Page 54: ...od that requires long cooking times when prepared in a conventional oven such as large roasts whole chickens etc When combination cooking use the low rack to allow air to circulate completely around the dish To use combination cooking 2 4 2 5 5 1 3 1 Touch the Speed Bake Roast button once for SPEED BAKE Touch the Speed Bake Roast button twice for SPEED ROAST 2 Use the number pad to set a cooking t...

Page 55: ...is combination mode Do not use any type of plastic cookware as it can melt Food suitable for speed bake roast Other food suitable for this combination mode cooking include all kinds of previously cooked food which needs reheating and browning e g baked pasta as well as food which requires a short cooking time to brown the top of the food This mode can also be used for thick food portions that bene...

Page 56: ...t stand for 10 15 minutes Steaks 0 5 1 0 lb 200 500 g 1st Speed Roast 30 2nd Speed Roast 10 1st 7 13 2nd 10 15 Place the steak on the high rack then place the rack on the ceramic enamel tray After cooking Let the steak rest for 5 minutes before slicing Pork Tenderloin 0 5 1 0 lb 200 500 g 1st Speed Roast 30 2nd Speed Roast 10 1st 12 18 2nd 10 16 Place the pork on the low rack then place the rack o...

Page 57: ...ay French Fries 6 12 oz 170 340 g Speed Bake 10 10 15 Place the french fries on the ceramic enamel tray then place the tray on the high rack Grill Grill mode adds texture and taste to your food When grilling use the low or high rack accessory Use the low rack when the height of food is such that the food would touch the upper heater if placed on the high rack 2 1 3 1 Touch the Grill button 2 Use t...

Page 58: ...aintain the Keep Warm function for 99 minutes 3 Touch the START button NOTE Keep Warm operates for up to 99 minutes and 99 seconds Food that is cooked covered should also be covered during Keep Warm Pastry items pies turnovers etc should be uncovered during Keep Warm Complete meals kept warm on a dinner plate can be covered during Keep Warm Below are the amounts of food we recommend by Food Type w...

Page 59: ...Touch the Steam Clean button 6 Touch the START button Steam clean will operate for 6 minutes and 30 seconds The length of time cannot be modified 7 When the cleaning time is over the oven will beep Open the door 8 Clean the cavity of the oven with a dry dishtowel Remove the turntable and wipe under the rack with a piece of paper towel NOTE Use this function only after the oven has completely coole...

Page 60: ...s Do not use recycled paper which may contain metal and can catch fire Thermometers Use only those labeled Microwave Safe and follow all directions Check the food in several places Conventional thermometers may be used once the food has been removed from the oven Limited use items Aluminum foil Use narrow strips of foil to prevent overcooking of exposed areas Using too much foil can damage your ov...

Page 61: ...e your oven next to the dish you want to test 2 Set the microwave to 1 minute using the number pad and then touch the START button This will heat the glass and dish for one minute at High power When the microwave stops the water should be warm and the dish you are testing should be cool If the dish is warm then it is absorbing microwave energy and is not acceptable for use in the microwave ...

Page 62: ...g include poultry wing tips the ends of poultry legs and the corners of square baking dishes Use only small amounts of aluminum foil Larger amounts can damage your oven Turning Turn foods over midway through cooking to expose all parts to microwave energy This is especially important with large items such as roasts Standing Food cooked in the microwave builds up internal heat and continues to cook...

Page 63: ... than others For example the jelly inside a jelly doughnut will be hotter than the dough Keep this in mind to avoid burns Home canning in the microwave oven is not recommended because all harmful bacteria may not be destroyed by the microwave heating process Although microwaves do not heat the cookware the heat from the food is often transferred to the cookware Always use pot holders when removing...

Page 64: ...ike asparagus and broccoli with the stem ends pointing towards the edge of the dish and the tips toward the center When cooking cut vegetables always cover the dish with a lid or vented microwavable plastic wrap Whole unpeeled vegetables such as potatoes squash eggplant etc should have their skin pricked in several spots before cooking to prevent them from bursting For more even cooking stir or re...

Page 65: ...y clean grease and dust from the bottom of your microwave using a solution of warm water and soap Cleaning the control panel Wipe with a damp cloth and dry thoroughly Do not use cleaning sprays large amounts of soap and water abrasives or sharp objects on the panel as it is easily damaged Cleaning the door and door seals Always ensure that the door seals are clean and that the door closes properly...

Page 66: ...ing and repairing your microwave oven If you need to store your microwave oven for a short or extended period of time choose a dust free dry location Dust and dampness may adversely affect the functionality of the microwave parts WARNING Do not repair replace or service any part of your microwave oven yourself Allow only a qualified service technician to perform repairs If the oven is faulty and n...

Page 67: ...e oven light When replacing the oven light make sure that you are wearing gloves to avoid injury from the heat of the bulb 1 Unplug the oven or turn off the power at the main power supply 2 Open the door 3 Remove the vent cover mounting screws 2 middle screws 4 Slide the vent grille to the left then pull it straight out 5 Remove the charcoal filter if present 6 Remove the screw securing the lamp c...

Page 68: ...ils WARNING To avoid risk of personal injury or property damage do not operate the oven hood without the filters in place 1 To remove the filter slide it to the left or right using the tab 2 Soak the grease filter in hot water and a mild soap Rinse well and shake to dry Brushing the filter lightly can remove embedded dirt WARNING Do not use ammonia or put the grease filter in the microwave oven Th...

Page 69: ...er You can also order online at www samsungparts com The filter angle 1 Unplug the oven or turn off the power at the main power supply 2 Open the door 3 Remove the vent grille mounting screws 2 middle screws 4 Slide the vent grille to the left then pull it straight out 5 Push the hook and remove the old filter The filter angle 6 Slide a new charcoal filter into place The filter should rest at the ...

Page 70: ...icrowave is plugged in Check your fuses or circuit breakers The door is open Close the door and try again The door open safety mechanisms are covered by foreign matter Remove the foreign matter and try again The oven stops while in operation The user has opened the door to turn food over After turning the food over touch the START button again to start operation The power turns off during operatio...

Page 71: ...does not heat The oven may not work if too much food is being cooked or improper cookware is being used To test the oven put one cup of water in a microwave safe container put the container in the oven and then run the microwave for 1 2 minutes to check whether the water is heated If the water is heated reduce the amount of food and start the function again Use a cooking container with a flat bott...

Page 72: ...utton again to restart operation The oven is not level The oven is installed on an uneven surface Make sure the oven is installed on flat stable surface There are sparks during cooking Metal containers are used during cooking or thawing Do not use metal containers When power is connected the oven immediately starts to work The door is not properly closed Close the door and check again There is ele...

Page 73: ...ring is not properly in place Install the roller ring and then try again The turn table drags while turning The roller ring is not properly in place there is too much food or the container is too large and touches the inside of the microwave Adjust the amount of food Do not use containers that are too large The turn table rattles while turning and is noisy Food residue is stuck to the bottom of th...

Page 74: ...he oven Food residue or plastic has melted and stuck to the interior Use the steam function and then wipe the interior of the microwave with a dry cloth You can put a measuring cup containing a cup of water and a lemon slice inside and run the oven to remove the odor more quickly The oven does not cook properly The oven door is frequently opened during cooking Do not open the door frequently unles...

Page 75: ...ol then try the setting again If this code re appears call your local SAMSUNG Customer Care Center C F0 The microwave has sensed an internal communications failure Unplug the power cord of the oven and contact a local SAMSUNG Customer Care Center C A1 The oven has failed to sense the opening or closing of the damper for 1 minute C F1 Only occurs when EEPROM Read or Write is not working C D0 Contro...

Page 76: ...wer Consumption 1700 Watt Microwave 1750 Watt Heater Microwave Power Output 950 Watts Cook Top Light LED lamp 2 EA Oven Light 20 Watt halogen lamp Oven Cavity Dimensions inches 20 9 64 W x 10 9 32 H x 14 D Outside Dimensions inches 29 7 8 W x 16 15 16 H x 16 19 32 D Shipping Dimensions inches 33 11 32 W x 20 25 32 H x 19 3 8 D Net Shipping Weight 75 2 lbs 82 7 lbs 34 10 kg 37 52 kg ...

Page 77: ...as proof of purchase to SAMSUNG or SAMSUNG s authorized service center to receive warranty service SAMSUNG will provide in home service within the contiguous United States during the warranty period at no charge subject to availability of SAMSUNG authorized servicers within the customer s geographic area If in home service is not available SAMSUNG may elect at its option to provide transportation ...

Page 78: ...ection of household electrical or plumbing i e house wiring fuses or water inlet hoses and reduced magnetron power output related to normal aging The cost of repair or replacement under these excluded circumstances shall be the customer s responsibility Visits by an authorized servicer to explain product functions maintenance or installation are not covered by this limited warranty Please contact ...

Page 79: ... EVEN IF SAMSUNG HAS BEEN ADVISED OF THE POSSIBILITY OF SUCH DAMAGES Some states do not allow exclusion or limitation of incidental or consequential damages so the above limitations or exclusions may not apply to you This warranty gives you specific rights and you may also have other rights which vary from state to state SAMSUNG does not warrant uninterrupted or error free operation of the product...

Page 80: ...r perform normal cleaning or maintenance QUESTIONS OR COMMENTS COUNTRY CALL OR VISIT US ONLINE AT U S A Consumer Electronics 1 800 SAMSUNG 726 7864 www samsung com us support Scan the QR code or visit www samsung com spsn to view our helpful How to Videos and Live Shows Requires reader to be installed on your smartphone Scan this with your smartphone ...

Reviews: