background image

SOL MODULE CONTROLLER_IM_05747A-00_EN.indd   2

2016-01-20   오후 12:00:16

Summary of Contents for MCM-A00N

Page 1: ...SOL MODULE CONTROLLER_IM_05747A 00_EN indd 2 2016 01 20 오후 12 00 16 ...

Page 2: ...trol MCM A00N Thank you for purchasing this Samsung air conditioner Before operating this unit please read this installation manual carefully and retain it for future reference SOL MODULE CONTROLLER_IM_05747A 00_EN indd 3 2016 01 20 오후 12 00 16 ...

Page 3: ...l 6 DVM CHILLER Tracking 9 Connecting the module control 10 Restarting the module control communication 12 Module control error display 12 SETTING 14 Setting the service mode 14 Service mode setting 14 Service setting mode 16 Setting the option Example 25 Option code 27 Module or group operation 28 Setting module and group Example 29 SOL MODULE CONTROLLER_IM_05747A 00_EN indd 2 2016 01 20 오후 12 00...

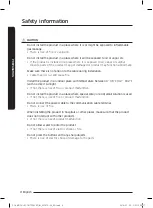
Page 4: ...is installed incorrectly Make sure that all wiring work is done by qualified person complying regional standards and instructions in this manual y y If the installation is done by unqualified person there is risk of product malfunction electric shock or fire caused by incorrect installation Do not attempt to move or re install the product that is already installed y y There is risk of electric sho...

Page 5: ...39 C 32 102 with no direct sunlight y y If not there is risk of fire or product malfunction Do not install the product in a place where special spray or acid alkali solution is used y y If not there is risk of fire or product malfunction Do not connect the power cable to the communication cable terminal y y There is risk of fire When installing the product in hospitals or other places make sure th...

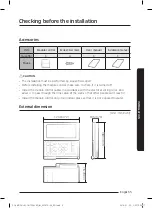
Page 6: ...nstall the module control cables in accordance with the electrical wiring rules and allow it to pass through the inner area of the wall so that other people can t reach it Install the module control only in an indoor place so that it is not exposed to water External dimension Unit mm inch 124 0 19 5 63 8 120 0 120 0 4 72 19 5 0 76 124 0 4 88 63 8 2 51 Checking before the installation INSTALLATION ...

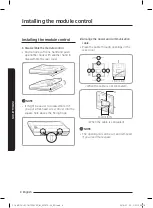
Page 7: ...t if you put a flat head screw driver into the square hole above the fixing hook 2 Arrange the power and communication cable y y Place the cable through openings in the rear cover 15 cm 6 inch When the cable is not concealed 10 cm 4 inch A When the cable is concealed NOTE The opening A can be cut and removed if you need more space Installing the module control SOL MODULE CONTROLLER_IM_05747A 00_EN...

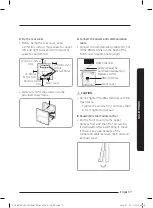
Page 8: ...mmunication cable F3 F4 to the PBA terminal on the back of the front cover in appropriate length DVM CHILLER Module control Cable should be purchased separately PBA terminal Front cover CAUTION Do not tighten the PBA terminal with too much force Tighten the screws for it with less than 6 N cm tightening torque 5 Reassemble the module control y y Put the front cover into the upper grooves first and...

Page 9: ...l cable specification If you install the module control by using two pieces of PVC wire remove the 30 cm 12 inch of the sheath of the cable and install it only with the two pieces of wires Recommended specification AWG20 Specification of compressed U terminal for connecting module control PBA W t F L G E ØD Stud Wire range for connection Rated size Stud size AWG mm2 inch2 mm2 inch2 mm inch 22 16 0...

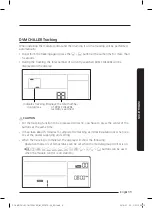
Page 10: ...splays the total number of DVM CHILLERs currently searched CAUTION For the tracking function to be processed correctly you have to press the center of the buttons at the same time It may take about 5 minutes to complete the tracking at initial installation or when you re set the power supplying unit setting When the tracking is completed the display will show the following Operation mode or set te...

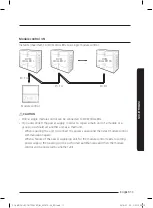
Page 11: ...necting the module control Module control 1 1 Install one DVM CHILLER to a single module control DVM CHILLER F3 F4 Module control Installing the module control SOL MODULE CONTROLLER_IM_05747A 00_EN indd 10 2016 01 20 오후 12 00 19 ...

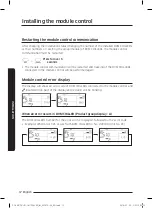
Page 12: ...r supply in order to repair a main unit of a module or a group you should set another unit as a main unit When repairing the unit disconnect the power supply and then start module control communication again When a failure of the power supplying unit for the module control leads to cutting power supply the tracking will be performed automatically and then the module control will be powered by anot...

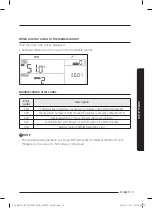
Page 13: ...be restarted and tracking of the DVM CHILLERs connected to the module control will be performed again Module control error display The display will show an error code of DVM CHILLERs connected to the module control and located on top part of the display and red LED will be blinking When an error occurs in DVM CHILLER Product group display A The DVM CHILLER s number for the error will be displayed ...

Page 14: ...ntrol and DVM CHILLERs 618 The maximum number of DVM CHILLER installation is exceeded Maximum 16 627 Displayed when 2 or more module controls are installed 601 Communication error between a module control and DVM CHILLERs 654 Module control EEPROM Read Wirte error NOTE The module group operation will be performed except the malfunctioned unit even though an error occurs in the module or the group ...

Page 15: ...ue of the service mode table Page Displays a Page value of the service mode table Data Segment Displays a Data value of the service mode table Synchronized segment by service mode function Displays the data value of the Page on the left side of the LCD at the same time Setting the service mode SETTING SOL MODULE CONTROLLER_IM_05747A 00_EN indd 14 2016 01 20 오후 12 00 20 ...

Page 16: ...y y When changing a Page number the display will show the set data value of the Page Select a Page number 5 Set Data value y y Refer to the table in Service setting mode for setting each data Adjust the data value 6 Save the data setting value 7 Complete the service mode NOTE If the current setting stage is in the main menu when pressing button the service mode will be completed If not the stage w...

Page 17: ... 1 Option setting checking DVM CHILLER cooling and heating only cooling 0 1 0 Cooling and heating 1 Only cooling Save at Module control Temperature unit display C F 0 2 0 Celsius C 1 Fahrenheit F Save at Module control 2 Option setting checking 2 Temperature display set temperature water temperature Setting the module control s temperature display value 1 1 0 Set temperature 1 current water outlet...

Page 18: ...rmation of the module control program 1 3 Modified date 4 1 Setting DVM CHILLER number option 1 Setting a targeted DVM CHILLER View Master 1 A registered unit number 4 Setting checking basic options Basic options of the target 1 20 Option code Save at DVM CHILLER 5 Setting Checking installation options Installation options of the target 1 20 Option code Save at DVM CHILLER 6 Setting Checking insta...

Page 19: ...80 5 75 6 70 7 65 8 60 9 55 10 50 11 Not applied unrestricted Save at DVM CHILLER 2 Quiet operation level 3 Module number 0 Default value 100 1 Level1 2 Level2 3 Level3 Save at DVM CHILLER 3 Standard for Water law 4 Main unit number 5 Standard for Water Law temperature 0 Based on outdoor temperature 1 Based on room temperature Save at DVM CHILLER SOL MODULE CONTROLLER_IM_05747A 00_EN indd 18 2016 ...

Page 20: ...LLER 6 RoomCool1 for Water law Main unit number 5 Room temperature standard 1 15 24 C in cooling mode Save at DVM CHILLER 7 RoomCool2 for Water law Main unit number 5 Room temperature standard 2 25 35 C in cooling mode Save at DVM CHILLER 8 Tcool1 for Water law Main unit number 5 Cooling set temperature standard 1 10 25 C in cooling mode Save at DVM CHILLER 9 Tcool2 for Water law Main unit number ...

Page 21: ...r 5 Outdoor temperature standard 2 10 20 C in heating mode Save at DVM CHILLER 3 RoomHeat1 for Water law Main unit number 5 Room temperature standard 1 15 24 C in heating mode Save at DVM CHILLER 4 RoomHeat2 for Water law Main unit number 5 Room temperature standard 2 25 35 C in heating mode Save at DVM CHILLER 5 Theat1 for Water law Main unit number 5 Heating set temperature standard 1 35 55 C in...

Page 22: ...ps to units unit Unit number Group 1 4 module 1 8 not set Save at DVM CHILLER 2 Set a main unit 7 Set a main unit for modules Module number Unit number of the selected module Save at DVM CHILLER 3 Set a main unit for groups Group number Unit number of the selected group Save at DVM CHILLER 4 Device option Use Cool storage mode 1 0 Disable 1 Enable Save at DVM CHILLER 5 Use Hot water mode 1 0 Disab...

Page 23: ... DVM CHILLER and module control s addressing 0 1 0 No use 1 Reset 1 y y In 4 1 menu the units connected to the module control will be displayed Select the unit that you want to set and then move to 4 4 5 6 menu 2 y y Set a current limit rate If you set the value less than 100 performance may decrease 3 y y Set a level of the Quiet mode Level3 is the lowest performance and efficiency may decrease i...

Page 24: ...temperature Heating NOTE If the unit is not a low temperature water model the set temperature decided by the Water law control will not decease below 5 C According to indoor temperatrue when using an external temperature sensor Tcool1 Tcool2 RoomCool1 RoomCool2 Set temperature Indoor temperature Cooling Theat1 Theat2 RoomHeat1 RoomHeat2 Set temperature Indoor temperature Heating NOTE If the unit i...

Page 25: ... group or a module setting and then exiting from service mode the module control will be initialized and the tracking will be performed again 8 y y If a backup unit is selected the unit will operate depending on the standards for DVM CHILLER y y A backup module does not operate in the normal operation condition If performance by operating the normal modules is not enough the backup module will ope...

Page 26: ... temperature display unit from Fahrenheit F to Celsius C 1 Start the service mode Press for over 3 seconds 2 Select a desired number in the main menu Select 1 3 Select a desired number in the sub menu Select 1 SOL MODULE CONTROLLER_IM_05747A 00_EN indd 25 2016 01 20 오후 12 00 22 ...

Page 27: ...umber in Page y y The data value of the Page will be set at the same time Select 2 5 Set Data value y y Setting value 0 Celsius C setting value 1 Fahrenheit F Select 0 6 Complete the option setting SOL MODULE CONTROLLER_IM_05747A 00_EN indd 26 2016 01 20 오후 12 00 22 ...

Page 28: ...8 SEG12 Page6 Page10 SEG14 SEG18 Page11 Page15 SEG20 SEG24 Page16 Page20 NOTE SEG1 SEG7 SEG13 and SEG19 do not need to be displayed nor be set SEG2 indicates a type of options so it does not need to be set but to be displayed Set an option value for each Page Page setting Data setting Data value of Page1 is fixed so it will not be blinked and does not need to be changed The setting value of data i...

Page 29: ... can have a maximum of 8 modules 1 8 and 4 groups 1 4 A maximum of 8 units can be connected to a module and a maximum of 8 modules can be connected to a group y y Depending on the working condition below set modules or groups A module or a group must be connected to a single water pipe When modules are controlled by a group the modules cannot operate themselves and the display will not show the mo...

Page 30: ...es and groups by each unit y y Select a unit number on the DVM CHILER Refer to hydro controller option no 11 in the installation manual of DVM CHILLER Unit No 00 01 02 03 04 05 Service mode Table Main menu Sub menu page Data Seg 1 Data Seg 2 Module No 1 1 2 2 3 3 9 1 Unit No 00 05 Module No 1 3 Group No 1 1 1 1 9 1 Unit No 00 03 Module No 1 3 Group No 1 Setting a main Module 00 02 04 9 2 Module No...

Page 31: ...ber in Page y y The smallest number will be displayed among the numbers of currently connected DVM CHILLERs y y The data value of the Page will be displayed on the left side of the LCD at the same time Select 1 5 Set a module number Data1 y y will be displayed if the module number is not set Select 1 Setting the service mode SOL MODULE CONTROLLER_IM_05747A 00_EN indd 30 2016 01 20 오후 12 00 23 ...

Page 32: ...roup from the module control but the group operation cannot be performed A main unit must be set for each module and group A main unit must be set for each modules are connected to one group will be displayed on the display when selecting the main unit If there is a main unit in the module the main unit will be displayed first when selecting the module SOL MODULE CONTROLLER_IM_05747A 00_EN indd 31...

Reviews: