background image

imagine 

the possibilities

Thank you for purchasing this Samsung product. 
Please register your product at

www.samsung.com/register

Microwave oven

Owner’s manual

Me9114w-S

Me9114w

This manual is made with 100% recycled paper.

ME9114W_XFA_03727B-EN.indd   1

2011-04-01     12:07:20

Summary of Contents for ME9114W

Page 1: ...u for purchasing this Samsung product Please register your product at www samsung com register Microwave oven Owner s manual Me9114w S ME9114W This manual is made with 100 recycled paper ME9114W_XFA_03727B EN indd 1 2011 04 01 12 07 20 ...

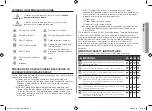
Page 2: ... Suitable accessories and cookware Useful cooking tips Cooking tips IMPORTANT Safety INFORMATION IMPORTANT SAFETY INSTRUCTIONS READ CAREFULLY AND KEEP FOR FUTURE REFERENCE Before using the oven confirm that the following instructions are followed Use this appliance only for its intended purpose as described in this instruction manual Warnings and Important Safety Instructions in this manual do not...

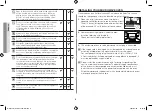
Page 3: ...he oven door closes properly and that there is no damage to the 1 Door bent 2 Door hinges broken or loose 3 door seals and sealing surfaces d The oven should not be adjusted or repaired by anyone other than a properly qualified microwave service technician trained by the manufacturer This product is a Group 2 Class B ISM equipment The definition of group 2 which contains all ISM equipment in which...

Page 4: ...they do not play with the appliance The appliance is not intended for installing in road vehicles caravans and similar vehicles etc Do not store flammable materials in the oven Take special care when heating dishes or drinks that contain alcohol as alcohol vapours may contact a hot part of the oven The microwave oven is intended to be used on the counter or counter top use only the microwave oven ...

Page 5: ... operated with the water during 10 minute and then used This microwave oven has to be positioned so that plug is accessible If the oven generates a strange noise a burning smell or smoke is emitted unplug the power plug immediately and contact your nearest service center during cleaning conditions the surfaces may get hotter than usual and children should be kept away Cleaning function model only ...

Page 6: ...ng of the glass Install the oven in compliance with the clearances stated in this manual see Installing Your Microwave Oven Take care when connecting other electrical appliances to sockets near the oven Installing your microwave oven Place the oven on a flat level surface 85 cm above the floor The surface should be strong enough to safety bear the weight of the oven 1 When you install your oven ma...

Page 7: ...y service provide the above information with a copy of your sales receipt to the Samsung Authorized Service Center How a microwave oven works Cooking principle 1 The microwaves generated by the magnetron are distributed uniformly as the food rotates on the turntable The food is thus cooked evenly 2 The microwaves are absorbed by the food up to a depth of about 1 inch 2 5 cm Cooking then continues ...

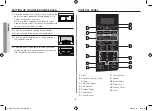
Page 8: ...he inside of the oven with a damp cloth 4 Place the pre assembled ring in the indentation in the center of the oven 5 Place the glass tray on top of the ring so that the three glass tabs in the center of the tray fit securely into the tabs on the floor of the oven Control panel 1 Clock 2 One Touch Sensor Cook Buttons 3 Auto Cook Menus 4 Auto Reheat 5 Number Button 6 Power Level 7 Pause Cancel 8 On...

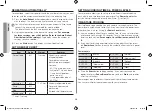
Page 9: ...sing the One Minute button for each minute you want to add Using the One Touch Sensor Cook Buttons By actually sensing the steam that escapes as food heat this feature automatically adjusts the oven s heating time for various types and amounts of precooked food All food should be precooked and at refrigerator temperature 1 Press the Sensor Cook button corresponding to the food you are cooking Popc...

Page 10: ...ress the Instant Cook button corresponding to the food you are cooking Beverage for example The display shows the first serving size ENTER and QTY will flash 2 Press the button repeatedly to select the serving size you want The display will cycle through all available serving sizes Once you select the correct serving size the microwave will begin cooking automatically When the cooking time is over...

Page 11: ... 3 Serv Noodle 1 packet 2 packets 3 packets Water 500 ml 1000 ml 1500 ml Code Item Weight Initial temperature A 7 Porridge 1 2 serves Porridge oats Room Water Milk Cold Remarks Place dry porridge oats and water or milk in a microwave safe bowl and cook uncovered After oven beeps stir the oats well and press start to continue After cooking stir well and top with brown sugar or honey 1 Serv 2 Serv O...

Page 12: ... serving Pasta rH 3 Rice rH 4 Tinned soup rH 5 1 cup 1 serving Setting cooking times power levels Your microwave allows you to set up to two different stages of cooking each with its own time length and power level The Power Level button lets you control the heating intensity from Warm 1 to High 0 One stage cooking For simple one stage cooking you only need to set a cooking time The power level is...

Page 13: ...f these procedures The More Less feature cannot be used with the Sensor Cook button The More Less key cannot be used with the Auto defrost key 1 To ADD more time to an automatic cooking procedure Press the More 9 button 2 To REDUCE the time of an automatic cooking procedure Press the Less 1 button If you wish to increase decrease in Time Cook Kitchen Time mode by 10 sec press the More 9 or Less 1 ...

Page 14: ...so be careful Ceramic porcelain and stoneware Use these if they are labeled Microwave Safe If they are not labeled test them to make sure they can be used safely Never use dishes with metallic trim Plastic Use only if labeled Microwave Safe Other plastics can melt Straw wicker and wood Use only for short term heating as they can be flammable Not recommended Glass jars and bottles Regular glass is ...

Page 15: ...nd the type of cookware you are using can affect cooking time When using a new recipe use the minimum cooking time and check the food occasionally to prevent overcooking Foods with a non porous skin such as potatoes or hot dogs should be pierced to prevent bursting Frying with heating oil or fat is not recommended Fat and oil can suddenly boil over and cause severe burns Some ingredients heat fast...

Page 16: ... sensor Avoid placing the oven near high moisture or gas emitting appliances since this will interfere with the proper performance of the Auto Sensor Always keep the inside of the oven clean Wipe all spills with a damp cloth This oven is designed for household use only Cooking guide Guide for cooking meat in your microwave Place meat on a microwave safe roasting rack in a microwave safe dish Start...

Page 17: ...stand 5 10 min Guide for cooking seafood in your microwave Cook fish until it flakes easily with a fork Place fish on a microwave safe roasting rack in a microwave safe dish Use a tight cover to steam fish A lighter cover of wax paper or paper towel provides less steaming Do not overcook fish check it at minimum cooking time Food Cook time Power level Steaks Cooking Time 9 13 min 0 5 kg Power Leve...

Page 18: ...e counter for five minutes before cooking is completed while a dish of peas can be served immediately Auto defrosting guide Follow the instructions below when defrosting different types of food Code Item Weight Initial temperature 1 Meat 0 1 2 kg 20 60 mins Remarks Shield the sdges with aluminium foil Turn the meat over when the over beeps This programme is suitable for beef lamb pork steaks chops...

Page 19: ...d pepper Cover with lid Cook at Medium for 1 to 1 hours until carrots and beef are tender stirring 2 to 3 times 3 Stir in peas Cover with lid Cook at Medium for 10 minutes Let stand for 10 minutes Remove bay leaf before serving Makes 6 servings Broccoli and cheese casserole cup butter or margarine cup chopped onion 1 Tbs flour tsp salt tsp dry mustard 1 8 tsp pepper 1 cups milk cup chopped red pep...

Page 20: ...ooting guide Before you call a repair person for your oven check this list of possible problems and solutions Neither the oven s display nor the oven operate Properly insert the plug into a grounded outlet If the outlet is controlled by a wall switch make sure the wall switch is turned on Remove the plug from the outlet wait ten seconds then plug it in again Reset the circuit breaker or replace an...

Page 21: ...g Wash the tray carefully in warm sudsy water or in the dishwasher Clean the outside surface of the oven with soap and a damp cloth Dry with a soft cloth To prevent damage to the operating parts of the oven don t let water seep into the openings Wash the door window with very mild soap and water Be sure to use a soft cloth to avoid scratching If steam accumulates inside or outside the oven door wi...

Page 22: ...rost Timer 99 minutes 99 seconds Power source 230 V 50 Hz Power consumption microwave 1550 Watts Power output 1000 Watts IEC 705 Operating frequency 2450 MHz Outside dimensions 518 W X 297 H X 395 D Oven cavity dimensions 334 W X 252 5 H X 357 5 D Weight net 13 5 kg ME9114W_XFA_03727B EN indd 22 2011 04 01 12 07 34 ...

Page 23: ...23 ENGLISH note note ME9114W_XFA_03727B EN indd 23 2011 04 01 12 07 34 ...

Page 24: ...msung com BAHRAIN 8000 4726 Egypt 08000 726786 JORDAN 800 22273 Morocco 080 100 2255 Oman 800 SAMSUNG 726 7864 Saudi Arabia 9200 21230 Turkey 444 77 11 U A E 800 SAMSUNG 726 7864 ME9114W_XFA_03727B EN indd 24 2011 04 01 12 07 34 ...

Reviews: