background image

فيووركيلما نرف

مدختسلما ليلد

MG40J5133AT/MG32J5133A*

MG40J5133AT_SG_DE68-04325E-00_AR.indd   1

2/13/2015   12:23:52 PM

Summary of Contents for MG32J5133A Series

Page 1: ... امليكروويف فرن املستخدم دليل MG40J5133AT MG32J5133A MG40J5133AT_SG_DE68 04325E 00_AR indd 1 2 13 2015 12 23 52 PM ...

Page 2: ...لستخدام عدم حاالت في العناية 18 التشغيل بدء قبل مالحظات 18 احلالي الوقت 19 الطاقة توفير 19 األطفال عبث ضد التأمني 19 الصوت إيقاف تشغيل 20 املطبخ مؤقت 20 التسخني جزء وضع اختيار 21 امليكروويف طاقة على عامة نظرة 22 بامليكروويف اخلاصة الطهي أدوات 24 الطهي عمليات 24 الوظائف لوحة 25 التشغيل لبدء بسيطة خطوات 26 اليدوي الوضع 29 العامة اإلعدادات 31 التلقائي الطهي 42 احتياجاتك يناسب مبا الطهي 47 الرائحة إزا...

Page 3: ...وويف باستخدام الطهي دليل 52 الشواية 52 شواية ميكروويف 53 التسخني إعادة دليل 55 التجميد فك دليل 57 وسهل سريع 58 وحلها املشكالت استكشاف 58 الفحص تعليمات 63 املعلومات رمز 64 الفنية املواصفات MG40J5133AT_SG_DE68 04325E 00_AR indd 3 2 13 2015 12 23 52 PM ...

Page 4: ...ة األدوات للطهي مفيدة تلميحات للطهي تلميحات الدليل هذا في املستخدمة الرموز يلي فيما حتذير الوفاة أو خطيرة جسدية إصابات حدوث عنها ينجم قد آمنة غير أو عشوائية ممارسات تنبيه باملمتلكات الضرر إحلاق أو طفيفة جسدية إصابات حدوث عنها ينجم قد آمنة غير أو عشوائية ممارسات مالحظة املنتج مع التعامل في املستخدمني تساعد مفيدة معلومات أو مقترحات أو تلميحات MG40J5133AT_SG_DE68 04325E 00_AR indd 4 2 13 2015 12 23 5...

Page 5: ...طر نفسه يعرض بذلك فإنه امليكروويف ألشعة التعرض من لالنفجار تتعرض ال حتى مغلقة حاويات في األطعمة أو السوائل تسخني عدم يجب حتذير التالية األماكن في استخدامه يجب وال فقط املنزلي لالستخدام مخصص اجلهاز هذا األخرى العمل وبيئات واملكاتب باحملالت املوجودة املطابخ مجموعة باملزارع امللحقة البيوت األخرى السكنية والبيئات واالستراحات الفنادق نزالء بواسطة الفطور وتناول النوم أماكن يتمكن بحيث املناسبة اإلرشادات ...

Page 6: ...شتعالها ا ً ب جتن الالزمة ألواح وتسخني األقمشة أو األغذية جتفيف يؤدي وقد واملشروبات األغذية لتسخني مخصص امليكروويف فرن أو اإلصابة مخاطر إلى لذلك املشابهة املواد أو الرطبة األقمشة أو اإلسفنج قطع أو البابوج نعال أو التدفئة احلرائق أو االشتعال ا ً مغلق الفرن باب واترك الكهربائي التيار عن فصله أو الفرن تشغيل بإيقاف قم دخان تصاعد مالحظة حالة في اشتعال أي إلخماد يجب لذا غليانها عند شديد فوران حدوث امليك...

Page 7: ...ل مراقبة يجب التابع الصيانة مسؤول أو عة ّ ن املص الشركة بواسطة استبداله فيجب للتلف الكهربي التيار سلك تعرض إذا للمخاطر التعرض لتجنب الكفاءة بنفس مؤهلني أشخاص أو لها للمياه نفاثة آلة باستخدام اجلهاز تنظيف عدم يجب التحكم ومنطقة الفرن جتويف إلى الوصول بحيث ميكن الصحيحني واالرتفاع االجتاه في الفرن هذه وضع يجب بسهولة بها مرة ألول استخدامه قبل دقائق 10 ملدة املاء مع الفرن تشغيل يجب خدمة مركز بأقرب واتصل...

Page 8: ... ملس ب ّ ن لتج احلذر توخي عليك يتعني ّ ثم ومن مستمرة بصفة مراقبني كانوا إذا إال املنتج عن ا ً د بعي سنوات 8 من أقل األطفال على احلفاظ يجب قدرات لديهم الذين األشخاص أو أكثر أو سنوات 8 العمر من البالغني األطفال بل ِ ق من اجلهاز هذا استخدام كن ُ ي وتوصيات إرشادات إعطائهم مت إذا املعرفة أو اخلبرة في نقص لديهم من أو ضعيفة جسدية أو حسية أو عقلية عدم األطفال على ينبغي املوجودة اخملاطر جلميع دركني ُ م وأص...

Page 9: ...ن غيره أو املسال النفطي الغاز أو البروبان غاز مثل الغاز تسرب عند مبتلة ٍ د بأي الكهربي التيار قابس تلمس ال التشغيل قيد يكون عندما الكهربي التيار قابس فصل طريق عن اجلهاز تشغيل توقف ال خدمة مركز بأقرب واتصل الكهرباء مأخذ افصل املاء مثل الفرن إلى غريبة مواد أي دخول حالة وفي الفرن إلى غريبة مواد أي أو أصابعك دخل ُ ت ال مفرط لضغط اجلهاز تعريض ب ّ ن جت زجاجي سطح أو املاء حوض مثل للكسر قابل سطح فوق اجلها...

Page 10: ...ذير أثناء بالتقليب قم احلرارة درجة مبعادلة للسماح الفرن تشغيل إيقاف بعد األقل على ثانية 20 تبلغ ملدة ا ً دوم انتظر املوقف هذا مثل حدوث ملنع التسخني بعد ا ً دوم والتقليب األمر لزم إذا التسخني اآلتية األولية اإلسعافات إرشادات اتبع باحلروق لإلصابة تعرضك حالة في األقل على دقائق 10 ملدة البارد باملاء للحرق تعرض الذي اجلزء اغمر الطبي الشاش من ونظيفة جافة بقطعة احلرق مكان بتغطية قم احلرق على ً ال غسو أو ...

Page 11: ... من الساخن الهواء تفريغ عند الورق أو القماش في النيران تشتعل قد إذ الورق أو القماش من بقطع سواء التهوية فتحات بتغطية تقم ال ٍ كاف بشكل تبرد حتى ا ً تلقائي العمل عن وتتوقف زائد بشكل الفرن حرارة درجة ترتفع قد كما متوقعة غير بحروق اإلصابة لتجنب الفرن من طبق إخراج عند قفازات ا ً دوم استخدم ب ّ ن لتج مباشرة التسخني بعد ثانية 20 ملدة تقليب دون السوائل ترك مع انتهائها بعد أو التسخني عملية أثناء ٍ جزئي ٍ ...

Page 12: ... استبدال مقابل رسوم بفرض Samsung ستقوم الشرط هذا يغطيها التي العناصر العميل بسبب فقدها أ التحكم لوحة أو اخلارجية اللوحة أو املقبض أو الباب في كسر أو كشط أو نتوء وجود ب منهم أي فقد أو السلكي احلامل أو التدوير أداة أو الدوران موجهة أو الفرن صينية في كسر هذا في الواردة املهمة السالمة وإرشادات التحذيرات تغطي ال اإلرشادات دليل في مذكور هو كما فقط له اخملصص للغرض اجلهاز هذا استخدم تركيب عند االنتباه ومر...

Page 13: ...لجزاء جميع أن تأكد التجزئة ببائع اتصل أو احمللي Samsung عمالء بخدمة فاتصل الفرن ميزات على عامة نظرة ٠١ ٠٢ ٠٣ ٠٤ ٠٥ ٠٦ ٠٧ ٠٨ 01 0 الباب 02 0 التهوية فتحات 03 0 التسخني عنصر 04 0 الفرن إضاءة 05 0 العرض شاشة 06 0 التدوير أداة 07 0 الباب الفتح زر 08 0 الوظائف لوحة MG40J5133AT_SG_DE68 04325E 00_AR indd 13 2 13 2015 12 23 53 PM ...

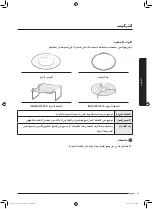
Page 14: ...حللقة الدوارة احللقة الدوارة الصينية لتدعم الفرن قاعدة منتصف في توضع الدوار القرص للطهي كقاعدة وتعمل التدوير أداة في مركزها تعشيق مع الدوارة احللقة على توضع الشواء رف على ضعها األخرى الطهي أوضاع في دمج ُ ي أو كشواية هذا املعدني الرف هذا يستخدم الدوارة الصينية مالحظة الدوارة احللقة على الدوارة الصينية وضع دون الفرن ّل غ تش ال MG40J5133AT_SG_DE68 04325E 00_AR indd 14 2 13 2015 12 23 53 PM ...

Page 15: ...سم 20 ومسافة واجلانبني اخللفية اجلهة العلوية تنبعث أشياء بجوار امليكروويف فرن تركيب حظر ُ ي وضعه املثال سبيل على رطوبة أو حرارة منها مدفأة أو أخرى ميكروويف أفران بجوار الفرن بهذا اخلاصة الطاقة مصدر مبواصفات التزم حالة في فقط املعتمدة التمديد كبالت استخدم الضرورة بقطعة الباب وقفلي الداخلية اجلدران امسح األولى للمرة الفرن استخدام قبل مبللة قماش الدوار القرص الفرن داخل من التغليف مواد كافة بإزالة قم ...

Page 16: ...2 2 باستخدام دقائق عشر ملدة بالتسخني وقم القصوى الطاقة 3 3 ثم الفرن يبرد حتى انتظر الدورة اكتمال بعد الفرن حجيرة ونظف الباب افتح املتأرجح السخان ذات رز ُ الط داخل للتنظيف A بخفض قم الفرن حجيرة من العلوية اجلهة لتنظيف هو كما A درجة 45 بزاوية العلوي التسخني عنصر العلوي اجلزء تنظيف ذلك سيسهل بالصورة موضح وضعه إلى العلوي التسخني عنصر أعد االنتهاء عند األصلي تنبيه إمكانية من وتأكد وقفله الباب نظافة على...

Page 17: ... Samsung مبركز فاتصل اإلضاءة مصباح استبدال أردت إذا استبداله عدم ويرجى احمللي Samsung خدمة بنفسك للفرن اخلارجي اجلسم مع مشكلة أي واجهتك إذا الطاقة مصدر من الكهربائي التيار سلك فافصل احمللي Samsung خدمة مبركز اتصل ثم طويلة لفترات االستخدام عدم حاالت في العناية جاف موقع إلى الفرن وانقل الكهربائي التيار سلك فافصل طويلة زمنية لفترة الفرن تستخدم ال كنت إذا أدائه على الفرن داخل املتراكمة والرطوبة األترب...

Page 18: ...لوقت نفس في 0 و الساعة Clock الزرين على اضغط ثانية 2 2 تعيينه تريد الذي الوقت تنسيق عرض وسيتم ساعة 24 أو ساعة 12 3 3 أزرار على فاضغط أخرى مرة الوقت تنسيق تغيير تريد كنت إذا األرقام أو ساعة 12 تنسيق لتعيني 1 على اضغط املثال سبيل على ساعة 24 تنسيق لتعيني 2 اضغط 4 4 الذي اإلعداد تعيني لتأكيد تشغيل START الزر على اضغط تريده احلالي الوقت لضبط 1 1 الساعة Clock على اضغط 2 2 املثال سبيل على احلالي الوقت إ...

Page 19: ...لفرن احلالي الوقت وعرض سابقة وظيفة الباب فتح من دقائق 5 مرور بعد الفرن مصباح سينطفئ األطفال عبث ضد التأمني ميزة األطفال عبث ضد التأمني وظيفة متنحك حوادث وقوع لتجنب الطاقة توفير Eco الزر عدا فيما التحكم أزرار تعطيل ٍ ثوان 3 ملدة إلغاء إيقاف STOP CANCEL الزر على ً ال مطو اضغط تأمني تنشيط إللغاء أخرى مرة ٍ ثوان 3 ملدة ً ال مطو اضغط أو للتنشيط الوظائف لوحة الصوت إيقاف تشغيل ٠١ ٠٢ نغمته أو الفرن تنبيه ...

Page 20: ...فقط واحد وضع هناك الشي عند التسخني جزء يستخدم الشواية للميكروويف اجملمع الطهي وضع أو للشي األفقي الوضع تنبيه العمودي الوضع في وضعه عند زائد حمل أي تضع وال ا ً د بار يكون عندما فقط التسخني جزء وضع بتغيير قم إلى التسخني جزء لتعيني عندئذ الشواية األفقي الوضع اجملمع الطهي أسلوب أو الشواية امليكروويف التسخني جزء اسحب جتاهك أعلى إلى التسخني جزء ادفع لسقف ً ا موازي يصبح حتى الفرن منه العلوي للجزء MG40J51...

Page 21: ...ر التوزيع نظام باستخدام ٍ متساو بشكل متساوية بدرجة الطعام 2 2 ا ً ب تقري سم 2 5 عمق حتى امليكروويف أشعة الطعام ميتص مواصلة مع الطعام داخل امليكروويف أشعة تتشتت ذلك بعد الطهي 3 3 التالية الطعام بحاالت الطهي مدة تتأثر والكثافة الكمية احملتوى رطوبة الطعام جتمد حالة في ً ة خاص األولية احلرارة درجة مالحظة الطهي عملية اكتمال بعد داخله باحلرارة املطهي الطعام يحتفظ طهي لضمان الدليل هذه في احملددة االنتظار...

Page 22: ...ً ب قري األملونيوم ورق كان إذا شرر يحدث قد الزائد النضج منه مفرطة كميات استخدام مت إذا أو الفرن جدار من التحمير طبق التسخني حالة في دقائق 8 من أكثر ملدة ستخدم ُ ي ال املسبق الفخارية أو الصينية األواني والصينية واملطلية اخلام والفخارية اخلزفية األواني تعد بزخارف مزينة تكن لم ما امليكروويف مع ا ً دائم آمنة معدنية التي البوليستر من املصنوعة الكرتون األطباق واحدة مرة تستخدم األطباق هذه في اجملمدة األط...

Page 23: ...اري البالستيك من املصنوعة األوعية ستخدم ُ ت رمبا أو البالستيكية األوعية أنواع لبعض التواء يحدث قد املرتفعة احلرارة درجات في استخدامها عند لونها يتغير احلراري الورق بعد الرطوبة على للحفاظ احلراري الورق ستخدم ُ ي الطهي من االنتهاء الفريزر أكياس األكياس أو الغليان درجة حتتمل التي األكياس ستخدم ُ ت فقط األفران في لالستخدام الصاحلة الدهني أو الشمعي الورق الطعام تناثر ومنع بالرطوبة لالحتفاظ ستخدم ُ ي ام...

Page 24: ...اللوحة تتوفر مسبق ٠٢ ٠٥ ٠٤ ٠٧ ٠٨ ٠٩ ١٤ ١١ ١٠ ١٦ ١٣ ٠١ ٠٣ ٠٦ ١٢ ١٥ 01 التلقائي الطهي 02 السريع التجميد فك 03 تلقائي تسخني 04 بالسخونة االحتفاظ 05 الشواية 06 شواية ميكروويف 07 الرائحة إزالة 08 األرقام لوحة 09 الطاقة مستوى 10 املطبخ مؤقت 11 اعة ّ الس 12 اقتصادي 13 الصوت 14 إلغاء إيقاف 15 ثانية 30 16 تشغيل MG40J5133AT_SG_DE68 04325E 00_AR indd 24 2 13 2015 12 23 55 PM ...

Page 25: ...ل مبجرد مرات 4 تنبيه صوت الفرن يصدر الطعام إخراج أثناء الفرن قفازات استخدم اجملمد الطعام جتميد لفك ٠٤ ٠٣ ٠٢ 1 1 امليكروويف مع االستخدام آمن وعاء في اجملمد الطعام ضع الدوارة الصينية منتصف في الوعاء ضع ثم 2 2 السريع التجميد فك Power Defrost على اضغط 3 3 الوجبة حجم لضبط األرقام أزرار استخدم 4 4 تشغيل START على اضغط مالحظة القسم راجع املعلومات من مزيد على للحصول السريع التجميد فك MG40J5133AT_SG_DE68 0...

Page 26: ...الطهي مدة لضبط األرقام أزرار استخدم اضغط املثال سبيل على ثانية 99 و دقيقة 99 األقصى احلد لضبط 0 و 0 على واضغط الدقائق لضبط 0 و 1 على 10 00 الثواني 3 3 Power Level على اضغط االفتراضي الطاقة مستوى لتغيير القسم راجع ا ً مختلف ً ى مستو حدد ثم الطاقة مستوى التفاصيل من ملزيد الطاقة مستوى 4 4 تشغيل START على اضغط 5 5 استخدم مرات 4 التنبيه صوت وسماع الطهي اكتمال بعد الطعام خرج ُ ت ل الفرن قفاز MG40J5133AT...

Page 27: ...Grill على اضغط 3 3 الشي وقت لضبط األرقام أزرار استخدم دقيقة 60 األقصى احلد الدقائق لضبط 0 و 1 على اضغط املثال سبيل على 10 00 الثواني لضبط 0 و 0 على واضغط 4 4 عناصر دورات تشغيل وسيتم تشغيل START على اضغط الشي إلكمال تشغيلها وإيقاف التسخني 5 5 قفاز استخدم مرات 4 التنبيه صوت وسماع الشواء اكتمال بعد الطعام إلخراج الفرن مالحظة STOP CANCEL على اضغط التشغيل أثناء الطهي مدة لتغيير أعاله املذكورة 4 إلى 2 م...

Page 28: ...ها وال ميكنك ا ً تلقائي الشواية حرارة 3 3 الطهي مدة لضبط األرقام أزرار استخدم على اضغط املثال سبيل على دقيقة 60 األقصى احلد الثواني لضبط 0 و 3 على واضغط الدقائق لضبط 5 و 2 25 30 4 4 على الطعام بطهي الفرن يبدأ تشغيل START على اضغط بالشي الطهي عملية يكمل ثم امليكروويف وضع 5 5 استخدم مرات 4 التنبيه صوت وسماع الطهي اكتمال بعد الطعام خرج ُ ت ل الفرن قفاز مالحظة STOP CANCEL على اضغط التشغيل أثناء الطهي ...

Page 29: ...خلطوات وكرر إلغاء إيقاف STOP CANCEL على اضغط أو الباب افتح فقط الطهي إليقاف على واضغط الباب أغلق الطهي عملية الستئناف إلغاء إيقاف تشغيل Start الزر مرتني إلغاء إيقاف STOP CANCEL اضغط الطهي إللغاء الطهي مدة زيادة ثانية 30 حتى زيادة فبإمكانك اجلارية الطهي عملية أثناء احلالي الطعام طهي مدة زيادة في رغبتك حالة في ٠٢ ٠١ 1 1 مرات عدة خالله أو الطهي قبل ث 30 30s على اضغط دقيقتني الطهي مدة لزيادة املثال سب...

Page 30: ...ول انظر 10 مرتفع High 0 0 الطاقة مستوى طاقة بال 1 10 الطاقة مستوى التدفئة 2 20 الطاقة مستوى التجميد فك 3 30 الطاقة مستوى منخفض 4 40 الطاقة مستوى االنخفاض متوسط 5 50 الطاقة مستوى متوسط 6 60 الطاقة مستوى هادئة نار على 7 70 الطاقة مستوى االرتفاع متوسط 8 80 الطاقة مستوى تسخني إعادة 9 90 الطاقة مستوى سوتيه 10 مرتفع الطاقة مستوى مرتفع مالحظة على اضغط الطهي أثناء احلالي الطاقة مستوى من للتحقق الطاقة مستو...

Page 31: ...ل سيتم لك بالنسبة امليزات على للتعرف الالزم الوقت تقليل 1 1 ضع ثم امليكروويف مع االستخدام آمن وعاء في الطعام ضع الدوارة الصينية منتصف في الوعاء ٠٤ ٠٣ ٠٢ 2 2 أو الفيشار Popcorn على بالضغط فئة حدد البطاطس Potato 3 3 معني برنامج الختيار األرقام أزرار أو أخرى مرة احملدد الزر استخدم 4 4 تشغيل START على اضغط 5 5 استخدم مرات 4 التنبيه صوت وسماع الطهي اكتمال بعد الطعام خرج ُ ت ل الفرن قفاز MG40J5133AT_SG_...

Page 32: ...الفشار جم 85 3 في للطهي اخملصصة الفيشار أكياس من فقط ا ً د واح ا ً كيس استخدم مرة كل في امليكروويف وفتحه الفرن من الساخن الكيس إخراج عند احلذر توخ 2 الفشار جم 100 3 5 البطاطس 2 الرمز الطعام الوجبة حجم اإلرشادات 1 البطاطس قطعة 1 شوكة بواسطة مرات عدة بطاطس ثمرة كل بثقب قم دائرة شكل على الدوارة الصينية على وضعها دقائق 5 إلى 3 من ملدة البطاطس اترك الطهي بعد 2 البطاطس قطعتان 3 البطاطس قطع 3 4 البطاطس ق...

Page 33: ...لنسبة امليزات على للتعرف الالزم الوقت تقليل أو الوقت توفير 1 1 ضع ثم امليكروويف مع االستخدام آمن وعاء في الطعام ضع الدوارة الصينية منتصف في الوعاء ٠٤ ٠٣ ٠٢ 2 2 خفيفة وجبات Snack الزر على بالضغط فئة حدد 3 3 معني برنامج الختيار األرقام أزرار أو أخرى مرة احملدد الزر استخدم 4 4 تشغيل START على اضغط 5 5 استخدم مرات 4 التنبيه صوت وسماع الطهي اكتمال بعد الطعام خرج ُ ت ل الفرن قفاز MG40J5133AT_SG_DE68 043...

Page 34: ...قلية البطاطس 140 110 مع باستخدامه مسموح طبق على ورقية فوطة 2 عدد ضع فوق تضعها وال الفوط على املقلية البطاطس ورتب امليكروويف املقلية البطاطس مع إضافية ورقية فوطة استخدم بعضها دقيقتني إلى دقيقة من ملدة انتظر الفرن من إخراجها بعد 6 اجملمدة املقلية البطاطس 200 170 7 اجملمدة اجلنب قوالب قطع 6 5 وانتظر تغطها ال دائرة شكل على طبق على اجلنب أصابع ضع دقيقتني إلى دقيقة من ملدة 8 اجملمدة اجلنب قوالب قطع 10 7...

Page 35: ...لليب أو املاء من مل 300 و بدء Start على اضغط ثم ا ً د جي الشوفان بتقليب قم تنبيه أضف ثم ا ً د جي بتقليبه قم الطهي انتهاء بعد للمتابعة فوقه بني سكر أو عسل 12 العصيدة وجبتان 13 البطاطس قطع 350 300 بزيت امسحها أجزاء إلى وقطعها العادية البطاطس اغسل طبق على القطع جانب يكون بحيث وضعها والتوابل الزيتون امليكروويف مع باستخدامه مسموح دقيقتني إلى دقيقة من ملدة وانتظر 14 البطاطس قطع 450 400 MG40J5133AT_SG_DE...

Page 36: ...سبة امليزات على للتعرف الالزم الوقت تقليل أو الوقت 1 1 ضع ثم امليكروويف مع االستخدام آمن وعاء في الطعام ضع الدوارة الصينية منتصف في الوعاء ٠٤ ٠٣ ٠٢ 2 2 أو الصحي الطهي Healthy Cooking على بالضغط فئة حدد الدواجن اللحوم Meat Poultry 3 3 معني برنامج الختيار األرقام أزرار أو أخرى مرة احملدد الزر استخدم 4 4 تشغيل START على اضغط 5 5 استخدم مرات 4 التنبيه صوت وسماع الطهي اكتمال بعد الطعام خرج ُ ت ل الفرن ...

Page 37: ...زجاجي وعاء في ضعها ثم ها ّ ونظف اخلضراء الفاصوليا اغسل ضع ثم املاء من كبيرتني ملعقتان مل 30 أضف بانتظام غطاء اإلناء تغطية يرجى الدوارة الصينية منتصف في الوعاء دقيقتني إلى دقيقة من ملدة وانتظر الطهي بعد ّب ل ق 4 القشرة منزوعة البطاطس 250 متساوية أحجام إلى وقطعها رها ّ وقش البطاطس اغسل مل 60 إلى 45 من أضف غطاء له زجاجي وعاء في ضعها ثم منتصف في الوعاء ضع ثم املاء من كبيرة مالعق 4 إلى 3 من اإلناء تغطي...

Page 38: ...لطازج السلمون شرائح 300 ملعقة إليه أضف ثم خزفي طبق في وضعه السمك اشطف ورق من بطبقة بتغطيتها قم ثم الليمون عصير من كبيرة الصينية على الطبق ضع ثم الغطاء اثقب ثم احلراري امليكروويف دقيقتني إلى دقيقة من ملدة وانتظر الدوارة 9 الطازج اجلمبري 250 ملعقة إليه أضف ثم خزفي طبق في وضعه اجلمبري اشطف ورق من بطبقة بتغطيتها قم ثم الليمون عصير من كبيرة الصينية على الطبق ضع ثم الغطاء اثقب ثم احلراري امليكروويف دقيق...

Page 39: ...احدة كل اللحم من كرة 20 منها اصنع امليكروويف ورق من برقاقة بتغطيتها قم إناء في اللحم كرات ضع قم ثم للتهوية مم 50 حوالي بقطر بالركن فتحة ترك مع احلراري قدمها دقائق 5 ملدة وانتظر اللحم كرات اترك الطهي بعد بطهيها 4 العجة شرائح واحدة وجبة األومليت مكونات املفروم اللحم من جرام 30 و طماطم وثمرة متوسط بحجم بيضات ثالث والتوابل األعشاب أضف ثم اللنب من صغيرتان وملعقتان أضف ثم اللنب من كبيرتني وملعقتني اللحم...

Page 40: ...ت حتتوي الباب أغلق الدوارة الصينية منتصف في الطعام ضع الباب افتح ٠٣ ٠٢ ٠١ 1 1 Auto Grill Cook الزر على بالضغط فئة حدد الشواية بواسطة التلقائي الطهي 2 2 معني برنامج الختيار األرقام أزرار أو أخرى مرة احملدد الزر استخدم 3 3 تشغيل START على اضغط 4 4 استخدم مرات 4 التنبيه صوت وسماع الطهي اكتمال بعد الطعام خرج ُ ت ل الفرن قفاز MG40J5133AT_SG_DE68 04325E 00_AR indd 40 2 13 2015 12 23 58 PM ...

Page 41: ...ثم البايركس دقائق 3 إلى دقيقتني من ملدة انتظر الطهي بعد 4 اجملمدة البيتزا 300 الدوارة الصينية على ضعها العلوي الرف على اجملمدة البيتزا ضع دقيقتني إلى دقيقة من ملدة انتظر الطهي بعد 5 املشكلة اخلضروات صينية 500 الطبق ضع ثم البايركس من صغير طبق في اجملمد الطعام ضع دقائق 3 إلى دقيقتني من ملدة انتظر الطهي بعد الرف على 6 املشوية الطماطم 400 طبق على ضعها ثم أنصاف إلى ها ّ وقطع ونظفّها الطماطم اغسل باألعل...

Page 42: ...وى التشغيل وقت ضبط وسيتم ٠٢ ٠٤ ٠٣ 1 1 الباب أغلق ثم الدوارة الصينية وسط في الطعام ضع 2 2 التلقائي التسخني إعادة Auto Reheat على اضغط 3 3 أخرى مرة التلقائي التسخني إعادة Auto Reheat الزر استخدم معني برنامج الختيار األرقام أزرار أو 4 4 تشغيل START على اضغط 5 5 قفاز استخدم مرات 4 التنبيه صوت وسماع الدورة انتهاء بعد الطعام خرج ُ ت ل الفرن MG40J5133AT_SG_DE68 04325E 00_AR indd 42 2 13 2015 12 23 58 PM ...

Page 43: ...يخني طاجن وجبات 3 690 600 4 يخني طاجن وجبات 4 920 800 5 حساء معجنات ا ً د واح ا ً شخص تكفي وجبة 230 200 سلطانية أو عميق خزفي حساء طبق في الصلصة أو احلساء صب مدة بدء قبل بحرص ّب ل وق واالنتظار التسخني أثناء بتغطيته وقم دقائق 3 إلى دقيقتني من ملدة انتظر وبعدها االنتظار 6 حساء معجنات وجبتان 450 400 7 حساء معجنات وجبات 3 690 600 8 حساء معجنات وجبات 4 920 800 9 البيتزا تسخني واحدة شريحة جعل مع امليكروو...

Page 44: ...حديد 3 3 ما وزن لتحديد األرقام أزرار استخدم 4 4 تشغيل START على اضغط 5 5 قفاز استخدم مرات 4 التنبيه صوت وسماع الدورة انتهاء بعد الطعام خرج ُ ت ل الفرن مالحظة الطعام بقلب ليذكرك الدورة منتصف في تنبيه صوت الفرن يصدر يصدر للمتابعة تشغيل Start الزر على اضغط ثم الطعام اقلب الدورة انتهاء مبجرد مرات 4 تنبيه صوت الفرن طهي وضع اختر بذلك للقيام ا ً يدوي الطعام جتميد فك ميكنك الطهي لوضع االفتراضي الطاقة مستو...

Page 45: ...نب يكون بحيث الدجاج قطع ضع األملونيوم ورق باستخدام منتصف في ألسفل الصدر جانب يكون بحيث الكامل الدجاج أو ألسفل صدر ُ ي عندما الدواجن واقلب امليكروويف مع االستخدام آمن مسطح طبق تنبيه صوت الفرن 3 السمك 1 5 0 1 عندما األسماك ّب ل ق ثم األملونيوم ورق باستخدام السمكة ذيل بتغليف قم وشرائح الكاملة األسماك البرنامج هذا يناسب تنبيه صوت الفرن صدر ُ ي دقيقة 30 إلى 10 من ملدة انتظر الفيليه السمك 4 الكعك اخلبز ...

Page 46: ...ما الختيار أخرى مرة 4 4 تشغيل START على اضغط 5 5 قفاز استخدم مرات 4 التنبيه صوت وسماع الدورة انتهاء بعد الطعام خرج ُ ت ل الفرن تنبيه الباردة األطعمة تسخني إلعادة الوظيفة هذه تستخدم ال منذ طهيها مت التي األطعمة بسخونة لالحتفاظ هذا استخدم قليل وقت ساعة من ألكثر الفرن داخل الطعام تترك ال الطعام سطح يجف قد الفرن في بالستيكي غطاء أو أغطية بأي مغطى طعام أي تضع ال 1 ساخن اجلاف والكعك األسماك وأطباق مقدد ...

Page 47: ...لية تساعد دقائق 5 هو االفتراضي والوقت الطهي بعد الفرن داخل Deodorisation على اضغط العملية هذه لتنشيط تشغيل START على اضغط ثم الرائحة إزالة الوظائف لوحة من ثانية 30 الفترة لزيادة ثانية 30 30s على اضغط املدة لتغيير دقيقة 15 أقصى بحد MG40J5133AT_SG_DE68 04325E 00_AR indd 47 2 13 2015 12 23 59 PM ...

Page 48: ... االنتهاء بعد ومرة الطهي أثناء مرتني بالتقليب قم تفضلها التي الطعام جم الوجبة حجم الطاقة بالدقيقة الوقت السبانخ 150 60 6 5 دقائق 3 إلى دقيقتني من ملدة انتظر البارد املاء من كبيرة ملعقة مل 15 أضف البروكلي 300 60 9 8 دقائق 3 إلى دقيقتني من ملدة انتظر البارد املاء من كبيرتان ملعقتان مل 30 أضف البازالء 300 60 8 7 دقائق 3 إلى دقيقتني من ملدة انتظر البارد املاء من كبيرة ملعقة مل 15 أضف اخلضراء الفاصوليا...

Page 49: ...دقائق 3 ملدة انتظر متساوية أحجام ذات شرائح إلى اجلزر طع ّ ق القرنبيط 250 500 100 5 5 5 8 5 7 5 الوسط إلى السيقان ضع أنصاف إلى الكبيرة الثمار ع ّ قط متساوية أحجام ذات قطع إلى الثمار طع ّ ق دقائق 3 ملدة انتظر الكوسة 250 100 4 5 4 الزبد من قطعة أو املاء من كبيرتان ملعقتان مل 30 أضف شرائح إلى الكوسة ع ّ قط دقائق 3 ملدة انتظر تنضج حتى الطهي يستمر الباذجنان 250 100 4 3 5 دقائق 3 ملدة انتظر عليه الليمون ...

Page 50: ...G32J5133A للطراز 350 100 14 5 14 البيركس من مصنوع إناء في ووضعها سم 3 بسمك وتقطيعها اليام احللوة البطاطا بتقشير قم مرة من أكثر واثقبها بلفافة اإلناء تغطية مع بطهيها قم اإلناء في الغرفة حرارة بدرجة ماء من مل 250 أضف دقيقتني إلى دقيقة من ملدة وانتظر للتقدمي بإعدادها وقم املياه من تخلص الطهي وبعد املسلوقة احللوة البطاطا MG40J5133AT للطراز 350 100 13 12 5 البيركس من مصنوع إناء في ووضعها سم 3 بسمك وتقط...

Page 51: ...50 طهي عند البارد املاء من مل 500 أضف دقائق 5 ملدة مخلوط أرز بري أرز أرز 250 100 17 16 دقائق 5 ملدة انتظر البارد املاء من مل 500 أضف مخلوطة ذرة حبوب أرز 250 100 18 17 دقائق 5 ملدة انتظر البارد املاء من مل 400 أضف املعجنات 250 100 11 10 دقائق 5 ملدة انتظر الساخن املاء من مل 1000 أضف التحضير سريعة نودلز MG32J5133A للطراز جم 80 صغيرة عبوة 100 7 5 7 مع بطهيها قم اإلناء في الفاتر املاء من مل 350 وأضف ا...

Page 52: ...ُ الط في ذلك خالف التعليمات شواية ميكروويف يكون عندما فقط سيعمل وهذا امليكروويف في الطهي وبني التسخني عنصر من املنبعثة احلرارة بني شواية ميكروويف Combi وضع يجمع تدور الدوارة والصينية ا ً مغلق الباب االستخدام وآمنة لالشتعال قابلة غير طهي أدوات فقط ستخدم ُ ت أو املعدن من مصنوعة طهي أدوات أي تستخدم وال امليكروويف مع البالستيك Combi وضع باستخدام طهيها التي ميكن املتوفرة األطعمة إعادة تريد مطهية أطعمة ...

Page 53: ...ي بغطاء بتغطيته قم خزفية سلطانية أو عميق خزفي طبق في يصب دقائق 3 إلى دقيقتني من ملدة انتظر التقدمي قبل أخرى مرة قلب ُ ي ثم التسخني بارد يخني 350 60 5 5 4 5 إعادة أثناء آلخر حني من بالتقليب قم بالستيكي بغطاء بتغطيته قم عميق خزفي طبق في اليخني ضع دقائق 3 إلى دقيقتني من ملدة انتظر والتقدمي االنتظار مدة قبل أخرى ومرة التسخني باردة بالصلصة معجنات 350 60 4 5 3 5 ورق من بطبقة بتغطيتها قم ثم مسطح خزفي طبق...

Page 54: ...م معقمة زجاجة استخدم التسخني إعادة قبل املطاطية الرضاعة حلمة بإزالة قم بالزجاجة املوجود اللنب يفور قد وإال الطعام الوجبة حجم الطاقة بالثواني املدة األطفال طعام حلوم خضروات جم 190 60 30 الطهي مدة بعد بالتقليب وقم اإلناء تغطية يرجى اخلزف من عميق طبق في احملتويات فرغ دقائق 3 إلى دقيقتني من ملدة انتظر التقدمي قبل بعناية احلرارة درجة من وتأكد ا ً د جي قلب األطفال طعام فاكهة لنب حبوب جم 190 60 20 الطهي ...

Page 55: ...ة انتظر التجميد إلذابة الدواجن الدجاج قطع قطعتان جرام 500 20 15 14 الكامل الدجاج جم 1200 34 32 ألسفل الصدر ناحية وضع مع الكاملة الدجاجة أو ألسفل اجللد بها التي الناحية وضع مع الدجاج قطع ً ال أو ضع نصف مرور بعد اقلبها األملونيوم بورق واألطراف األجنحة مثل الرفيعة األجزاء بحماية قم مسطح خزفي طبق في دقيقة 60 إلى 15 من ملدة انتظر التجميد إلذابة اخملصص الوقت السمك الفيليه السمك جرام 200 20 7 6 كامل سمك ...

Page 56: ...كل قطعتان قطع 4 20 1 5 1 3 2 5 الشطائر التوست جم 250 4 5 4 األملاني اخلبز اجلاودار دقيق القمح جرام 500 9 7 الدوارة الصينية منتصف في املطبخ ورق على ا ً أفقي أو دائرة شكل على األرغفة ضع دقيقة 20 إلى 5 من ملدة انتظر التجميد إلذابة اخملصص الوقت نصف مرور بعد اقلبها MG40J5133AT_SG_DE68 04325E 00_AR indd 56 2 13 2015 12 24 00 PM ...

Page 57: ...شكل توت املثال سبيل على الفاكهة من جم 600 ضع السكر من جرام 300 أضف غطاء له البيركس من مناسب زجاجي ا ً د جي بالتقليب وقم طاقة باستخدام دقيقة 12 10 ملدة عليها غطاء وضع مع بطهيها قم 90 تبلغ برطمانات في بتفريغها قم الطهي أثناء مرات عدة بالتقليب قم ثم ملدة مغطاة واتركها محكم غطاء لها احلجم صغيرة زجاجية مربى دقائق 5 الكسترد البودجن إعداد تعليمات اتباع مع مل 500 واللنب السكر مع البودجن مسحوق يقلب البيركس...

Page 58: ...د الطاقة توفير Eco الوظيفة ضبط توفير Eco الوظيفة تشغيل بإيقاف قم الطاقة يعمل ال الفرن كهربائي تيار يوجد ال كهربائي تيار مصدر توصيل من تأكد مفتوح الباب أخرى مرة حاول ثم الباب أغلق الباب فتح أمان بأجزاء غريبة مواد تعلق أخرى مرة احملاولة ثم الغريبة املواد إزالة أثناء العمل عن الفرن يتوقف تشغيله الطعام لتقليب الباب بفتح املستخدم قام الزر على اضغط الطعام تقليب من االنتهاء بعد التشغيل لبدء أخرى مرة تشغي...

Page 59: ...إنه أو يعمل ال الفرن غير طهي أدوات استخدام يتم إنه أو كبيرة مناسبة مسموح إناء في ا ً د واح ماء كوب ضع امليكروويف ِّل غ وش امليكروويف مع باستخدامه تسخني مت إذا مما للتحقق دقيقتني أو دقيقة ملدة ال أم املاء أخرى مرة التشغيل وابدأ الطعام مقدار من قلل ٍ مستو بقاع طهي إناء استخدم بطيء أو ضعيف التسخني طعام كمية طهو يتم إنه أو يعمل ال الفرن غير طهي أدوات استخدام يتم إنه أو كبيرة مناسبة مسموح إناء في ا ً د...

Page 60: ...إلى يشير فهذا التلقائي الطهي الطعام تقليب وقت حان قد أنه يعني التنبيه التجميد فك أثناء الزر على اضغط الطعام تقليب من االنتهاء بعد التشغيل إلعادة أخرى مرة تشغيل Start ٍ مستو غير الفرن ٍ مستو غير سطح على الفرن تثبيت مت وثابت ٍ مستو سطح على الفرن تثبيت من تأكد الطهي أثناء شرر تولد الفرن وظيفتي أثناء املعدنية األواني استخدام التجميد فك املعدنية األواني تستخدم ال يبدأ الكهربائي التيار توصيل عند ا ً فور...

Page 61: ...ذا 30s الزر على الضغط يؤدي الفرن لتشغيل ثانية 30 الفرن يعمل ال عندما احلالة هذه حتدث عن تشغيله ليتم امليكروويف فرن تصميم مت عندما ثانية 30 30s الزر على الضغط طريق يعمل ال الدوار القرص الدوارة الصينية تخرج الدوران أثناء عن تتوقف أنها أو مكانها عن الدوران في ا ً د جي مثبتة غير أنها أو دوارة حلقة توجد ال مكانها أخرى مرة ب ّ جر ثم الدوارة احللقة ت ِّ ب ث أثناء سحبها يتم الدوارة الصينية الدوران مكانها ...

Page 62: ...اترك التسخني عناصر الشواية من ا ً د ج قريب الطعام أثناء مناسبة مسافة عد ُ ب على الطعام ضع الطهي جيد بشكل تنظيمه أو الطعام حتضير يتم لم جيد بشكل تنظيمه أو الطعام حتضير من تأكد مالحظة بأقرب اتصل املشكلة حل في السابقة اإلرشادات تساعدك لم إذا SAMSUNG لشركة تابع عمالء خدمة مركز التالية املعلومات قراءة الرجاء على ًا ع مطبو يكون ما ً ة عاد به اخلاص التسلسل ورقم الفرن طراز الفرن من اخللفي اجلزء بالضمان اخ...

Page 63: ...ل السطح على ماء هناك كان إذا مما والتحقق املفاتيح تنظيف وأعد ثانية 30 عن تزيد ملدة امليكروويف فرن تشغيل بإيقاف فقم أخرى مرة األمر احمللي Samsung عمالء خدمة مبركز اتصل ً ة ثاني التكرار حالة وفي أخرى مرة ضبطه مالحظة احمللي SAMSUNG عمالء خدمة مبركز االتصال فيمكنك املشكلة يحل ال املقترح احلل كان إذا MG40J5133AT_SG_DE68 04325E 00_AR indd 63 2 13 2015 12 24 00 PM ...

Page 64: ...يكروويف واط 1400 واط 1500 الشواية واط 1500 واط 1300 اجملمع الطهي وضع واط 2900 واط 2800 الناجتة الطاقة واط 900 واط 100 IEC 705 واط 900 واط 100 IEC 705 التشغيل تردد ميجاهرتز 2450 املاجنترون OM75P 31 التبريد طريقة التبريد مروحة محرك األبعاد العمق االرتفاع العرض الرئيسية الوحدة مم 402 297 517 مم 555 313 459 الفرن حجيرة مم 357 255 357 مم 392 262 375 احلجم مكعب قدم 1 1 مكعب قدم 1 4 الوزن الصافي كجم 16 ك...

Page 65: ... مالحظة MG40J5133AT_SG_DE68 04325E 00_AR indd 65 2 13 2015 12 24 01 PM ...

Page 66: ... مالحظة MG40J5133AT_SG_DE68 04325E 00_AR indd 66 2 13 2015 12 24 01 PM ...

Page 67: ... مالحظة MG40J5133AT_SG_DE68 04325E 00_AR indd 67 2 13 2015 12 24 01 PM ...

Page 68: ...africa support SAUDI ARABIA 8002474357 www samsung com sa support www samsung com sa_en support English TURKEY 444 77 11 www samsung com tr support NIGERIA 0800 726 7864 www samsung com africa_en support Ghana 0800 10077 0302 200077 Cote D Ivoire 8000 0077 www samsung com africa_fr support SENEGAL 800 00 0077 CAMEROON 7095 0077 KENYA 0800 545 545 www samsung com support UGANDA 0800 300 300 TANZANI...

Page 69: ...Four micro ondes MG32J5133A MG40J5133AT Manuel d utilisation MG40J5133AT_SG_DE68 04325E 00_FR indd 1 2 13 2015 12 23 55 PM ...

Page 70: ...tions contre une période prolongée de non utilisation 17 Avant de commencer 18 Heure actuelle 18 Économie d énergie 19 Sécurité enfants 19 Activation Désactivation du son 19 Minuterie 20 Choix de la position de l élément chauffant 20 À propos de l énergie des micro ondes 21 Récipients utilisés pour la cuisson aux micro ondes 22 Opérations 24 Tableau des fonctions 24 Étapes simples pour commencer 2...

Page 71: ...sson au micro ondes 48 Gril 52 Micro ondes Gril 52 Guide de réchauffage 53 Guide de décongélation 55 Simple et rapide 57 Dépannage 58 Points à contrôler 58 Code d information 63 Caractéristiques techniques 64 MG40J5133AT_SG_DE68 04325E 00_FR indd 3 2 13 2015 12 23 55 PM ...

Page 72: ...és Conseils utiles Conseils de cuisson Les symboles suivants sont utilisés dans ce manuel d utilisation AVERTISSEMENT Risques ou manipulations dangereuses susceptibles d entraîner des blessures graves voire mortelles ATTENTION Risques ou manipulations dangereuses susceptibles d entraîner des blessures légères ou des dégâts matériels REMARQUE Astuces utiles conseils ou informations aidant les utili...

Page 73: ...tions impliquant le démontage de l habillage de protection contre les micro ondes AVERTISSEMENT les liquides et autres aliments ne doivent pas être réchauffés dans des récipients fermés car ils risquent d exploser Cet appareil est destiné à une utilisation domestique uniquement et il n est pas destiné à être utilisé dans l espace cuisine réservé au personnel de magasins bureaux ou autres environne...

Page 74: ...r faire chauffer des aliments et des liquides Le séchage des aliments ou de vêtements et le chauffage de compresses chauffantes pantoufles éponges chiffon mouillé ou similaire peut entraîner des blessures des flammes ou un incendie Si de la fumée s échappe de l appareil ou semble s échapper laissez la porte de celui ci fermée afin d étouffer les flammes et éteignez le ou débranchez le de la prise ...

Page 75: ...e personne qualifiée afin d éviter tout danger Ne tentez jamais de nettoyer le four au jet d eau Ce four doit être positionné dans une direction appropriée et à une hauteur permettant un accès facile à la zone intérieure et aux commandes Avant d utiliser votre four pour la première fois celui ci doit fonctionner pendant 10 minutes avec de l eau Si l appareil génère un bruit anormal une odeur de br...

Page 76: ...ants de moins de 8 ans ne doivent pas s approcher de l appareil s ils sont sans surveillance Cet appareil peut être utilisé par des enfants à partir de 8 ans et des personnes ayant des capacités physiques sensorielles ou mentales réduites ou un manque d expérience et de connaissance uniquement s ils sont assistés ou si vous leur avez donné les instructions appropriées leur permettant de se servir ...

Page 77: ...au présente sur les bornes et les points de contact de la fiche d alimentation à l aide d un chiffon sec Ne tirez pas sur le cordon d alimentation et faites en sorte de ne jamais le plier à l excès ou poser d objets lourds dessus En cas de fuite de gaz propane GPL etc aérez immédiatement la pièce sans toucher la prise d alimentation Ne touchez pas la fiche d alimentation si vous avez les mains mou...

Page 78: ...nés de la porte lors de son ouverture ou de sa fermeture car ils pourraient se cogner contre la porte ou se prendre les doigts dedans AVERTISSEMENT Si vous faites réchauffer des liquides au four micro ondes l ébullition peut survenir à retardement faites donc bien attention lorsque vous sortez le récipient du four Pour éviter cette situation laissez les TOUJOURS reposer au moins une vingtaine de s...

Page 79: ... jamais les orifices de ventilation du four avec un torchon ou du papier Ils risquent de s enflammer lorsque l air chaud est évacué du four Le four peut également surchauffer et se mettre hors tension lui même automatiquement et rester arrêté jusqu à ce qu il soit suffisamment refroidi Utilisez toujours des maniques pour retirer un plat du four afin d éviter toute brûlure accidentelle Remuez les l...

Page 80: ... endommagement ou la perte de l accessoire a été occasionné e par le client Les éléments concernés par cette stipulation sont A Une porte une poignée un panneau extérieur ou le tableau de commandes bosselé e rayé e ou brisé e B Un plateau un guide de plateau roulant un coupleur ou une grille métallique brisé e ou manquant e Utilisez ce four uniquement pour l usage auquel il est destiné tel que déc...

Page 81: ...reil Si vous avez un souci avec le four ou ses accessoires contactez un service après vente Samsung ou le revendeur Coup d œil sur le four 01 02 03 04 05 06 07 08 01 Porte 02 Ventilateur 03 Élément chauffant 04 Éclairage du four 05 Affichage 06 Coupleur 07 Ouvert porte 08 Tableau des fonctions MG40J5133AT_SG_DE68 04325E 00_FR indd 13 2 13 2015 12 23 56 PM ...

Page 82: ...z le sur le centre de la base Il supporte le plateau tournant Plateau tournant Placez le sur l anneau de guidage en enclenchant la partie centrale sur le coupleur Il constitue la base de la cuisson Grille La grille métallique est utilisée avec les modes Gril et de cuisson combinée Posez la sur le plateau tournant REMARQUE Ne faites pas fonctionner le four sans le plateau tournant sur l anneau de g...

Page 83: ...n environnement chaud ou humide ex à côté d un autre four à micro ondes ou d un radiateur Respectez les spécifications électriques de ce four Utilisez uniquement les câbles d extension agréés si vous devez en utiliser Avant d utiliser votre four pour la première fois nettoyez l intérieur de celui ci ainsi que le joint d étanchéité de la porte à l aide d un chiffon humide Plateau tournant Retirez t...

Page 84: ...z et séchez minutieusement Pour retirer les impuretés incrustées produisant de mauvaises odeurs à l intérieur du four 1 Lorsque le four est vide mettez une tasse de jus de citron dilué sur le centre du plateau tournant 2 Faites chauffer le four pendant 10 minutes à puissance maximale 3 Une fois le cycle terminé attendez que le four refroidisse Ensuite ouvrez la porte et nettoyez le compartiment de...

Page 85: ... de réparer le four vous même Si vous rencontrez un problème avec les charnières les joints et ou la porte contactez un technicien qualifié ou un centre de service Samsung local pour obtenir de l assistance technique Si vous souhaitez remplacer l ampoule contactez un centre de service Samsung local Ne la remplacez pas vous même Si vous rencontrez un problème avec la protection extérieure du four d...

Page 86: ...12 24 heures 1 Appuyez simultanément sur les boutons Clock Horloge et 0 pendant 1 seconde 2 Le réglage de l heure que vous souhaitez modifier 12 ou 24 heures s affiche 3 Si vous souhaitez changer à nouveau de format d heure appuyez sur les boutons du pavé numérique Par exemple appuyez sur 1 pour le format 12 heures ou sur 2 pour le format 24 heures 4 Appuyez sur le bouton START DÉPART pour confirm...

Page 87: ...d ouverture de la porte la lampe du four s éteint Sécurité enfants Pour éviter les accidents la fonction Sécurité enfants désactive toutes les commandes sauf le bouton Eco Éco Appuyez sur le bouton STOP CANCEL ARRÊT ANNULER pendant 3 secondes pour l activer ou appuyez dessus à nouveau pendant 3 secondes pour désactiver le verrouillage sur le panneau de commande Activation Désactivation du son 01 0...

Page 88: ... nécessitant un positionnement vertical Position horizontale pour la cuisson au gril ou la cuisson combinée Micro ondes Gril ATTENTION Changez la position de l élément chauffant uniquement lorsque celui ci est froid et n exercez aucune pression excessive dessus lorsque vous le placez en position verticale Pour placer l élément chauffant en Vous devez Position horizontale cuisson au gril ou cuisson...

Page 89: ...açon uniforme 2 Les micro ondes sont absorbées par les aliments jusqu à une profondeur d environ 2 5 cm Puis elles se dissipent à l intérieur des aliments pour la cuisson continue 3 La durée de cuisson est affectée par les conditions suivantes des aliments quantité et densité Quantité d humidité Température initiale en particulier lorsque les aliments sont congelés REMARQUE Les aliments cuits cons...

Page 90: ...incipal Matériau Adapté à la cuisson aux micro ondes Description Aluminium Peut être utilisé pour des aliments de petite quantité pour protéger contre toute surcuisson Des arcs électriques peuvent se former si le papier aluminium est placé trop près des parois du four ou si vous en avez utilisé en trop grande quantité Plat croustilleur Le temps de préchauffage ne doit pas excéder 8 minutes Récipie...

Page 91: ...serviettes de table et papier absorbant Pour une cuisson de courte durée Ils absorbent l humidité excessive Papier recyclé Ils peuvent provoquer des arcs électriques Plastique Récipients Utilisez des récipients en thermoplastique Certaines matières plastiques peuvent se voiler ou se décolorer lorsqu elles sont soumises à des températures élevées Film étirable Utilisez le pour maintenir de l humidi...

Page 92: ...four est sujet à modification sans préavis 02 05 04 07 08 09 14 11 10 16 13 01 03 06 12 15 01 Cuisson automatique 02 Décongélation 03 Réchauffage automatique 04 Maintien au chaud 05 Gril 06 Cuisson combinée 07 Désodorisation 08 Pavé numérique 09 Niveau de puissance 10 Minuterie 11 Horloge 12 Éco 13 Son 14 Arrêt Annuler 15 30s 16 Départ MG40J5133AT_SG_DE68 04325E 00_FR indd 24 2 13 2015 12 23 58 PM...

Page 93: ...e le signal sonore du four retentit 4 fois Utilisez des maniques pour retirer les aliments Pour décongeler des aliments surgelés 04 03 02 1 Placez les aliments surgelés dans un récipient adapté au micro ondes puis déposez le au centre du plateau tournant 2 Appuyez sur le bouton Power Defrost Décongélation 3 Utilisez les boutons du pavé numérique pour régler la quantité 4 Appuyez sur START DÉPART R...

Page 94: ...temps de cuisson max 99 min 99 s Par exemple appuyez sur 1 et 0 pour les minutes et sur 0 et 0 pour les secondes vous obtenez 10 00 3 Pour changer le niveau de puissance par défaut appuyez sur Power Level Niveau de puissance et sélectionnez un niveau de puissance différent Reportez vous à la section Niveau de puissance pour obtenir plus de détails 4 Appuyez sur START DÉPART 5 Une fois la cuisson t...

Page 95: ...ur Grill Gril 3 Utilisez les boutons du pavé numérique pour régler le temps de cuisson au gril max 60 min Par exemple appuyez sur 1 et 0 pour les minutes et sur 0 et 0 pour les secondes vous obtenez 10 00 4 Appuyez sur START DÉPART L élément chauffant alterne entre activation et désactivation pour procéder à la cuisson au gril 5 Une fois la cuisson au gril terminée et les 4 signaux sonores émis ut...

Page 96: ...au gril est réglée automatiquement et vous ne pouvez pas la modifier 3 Utilisez les boutons du pavé numérique pour régler le temps de cuisson max 60 min Par exemple appuyez sur 2 et 5 pour les minutes et sur 3 et 0 pour les secondes vous obtenez 25 30 4 Appuyez sur START DÉPART Le four commence par la cuisson au micro ondes puis continue avec la cuisson au gril 5 Une fois la cuisson terminée et le...

Page 97: ...er la cuisson ouvrez simplement la porte ou appuyez sur STOP CANCEL ARRÊT ANNULER Pour reprendre le fonctionnement fermez la porte et appuyez sur Start Départ Pour annuler la cuisson appuyez deux fois sur STOP CANCEL ARRÊT ANNULER Augmentation du temps Vous pouvez vouloir ajouter un peu plus de temps au temps de cuisson actuel alors que la cuisson est en cours Le temps peut être augmenté par incré...

Page 98: ...que Les niveaux disponibles sont compris entre Aucune puissance 0 et Élevé 10 Voir le tableau ci dessous 0 NP 0 Absence de tension 1 NP 10 Chaud 2 NP 20 Décongélation 3 NP 30 Faible 4 NP 40 Moyennement faible 5 NP 50 À point 6 NP 60 Mijotage 7 NP 70 Moyennement élevé 8 NP 80 Réchauffage 9 NP 90 Sauté 10 NP Élevé Élevé REMARQUE Pour vérifier le niveau de puissance actuel pendant que la cuisson est ...

Page 99: ...ction de la recette sélectionnée 1 Placez les aliments dans un récipient adapté au micro ondes puis déposez le au centre du plateau tournant 04 03 02 2 Sélectionnez une catégorie en appuyant soit sur Popcorn soit sur Potato Pomme de terre 3 Utilisez à nouveau le bouton sélectionné ou les boutons du pavé numérique pour sélectionner un programme spécifique 4 Appuyez sur START DÉPART 5 Une fois la cu...

Page 100: ... 3 85 g Ne faites chauffer qu un seul sachet de pop corn spécial micro ondes à la fois Soyez prudent lorsque vous ouvrez le sachet après l avoir retiré du four 2 Pop corn 3 5 100 g 2 Pomme de terre Code Aliment Quantité Consignes 1 Pomme de terre 1 portions Piquez chaque pomme de terre plusieurs fois à l aide d une fourchette Disposez les en étoile sur le plateau Après la cuisson laissez les pomme...

Page 101: ...cette sélectionnée 1 Placez les aliments dans un récipient adapté au micro ondes puis déposez le au centre du plateau tournant 04 03 02 2 Sélectionnez une catégorie en appuyant sur le bouton Snack 3 Utilisez à nouveau le bouton sélectionné ou les boutons du pavé numérique pour sélectionner un programme spécifique 4 Appuyez sur START DÉPART 5 Une fois la cuisson terminée et les 4 signaux sonores ém...

Page 102: ...s croquettes en cercle par dessus Ne couvrez pas Laissez reposer pendant 1 minute 4 Beignets de poulet surgelés 170 200 5 Frites surgelées 110 140 Placez deux feuilles de papier absorbant sur une assiette adaptée aux micro ondes puis étalez les frites sans qu elles ne se chevauchent Après avoir retiré les frites du four épongez les avec une autre feuille de papier absorbant Laissez reposer 1 à 2 m...

Page 103: ...pour 70 g Faites cuire le tout sans couvrir Lorsque le four émet un signal sonore remuez bien les flocons et appuyez sur Start Départ pour continuer Une fois la cuisson terminée remuez bien et recouvrez de cassonade ou de miel 12 Porridge 2 portions 13 Pommes de terre en morceaux 300 350 Lavez les pommes de terre de taille normale et coupez les en morceaux Badigeonnez les d un mélange d huile d ol...

Page 104: ...la recette sélectionnée 1 Placez les aliments dans un récipient adapté au micro ondes puis déposez le au centre du plateau tournant 04 03 02 2 Sélectionnez une catégorie en appuyant soit sur Healthy Cooking Cuisson saine soit sur Meat Poultry Viande Volaille 3 Utilisez à nouveau le bouton sélectionné ou les boutons du pavé numérique pour sélectionner un programme spécifique 4 Appuyez sur START DÉP...

Page 105: ...couvrez Ajoutez 30 ml 2 cuillères à soupe d eau Placez le bol au centre du plateau tournant Faites cuire à couvert Remuez après cuisson Laissez reposer 1 à 2 minutes 3 Haricots verts 250 Rincez et nettoyez les haricots verts Répartissez les dans une cocotte en verre et couvrez Ajoutez 30 ml 2 cuillères à soupe d eau Placez le bol au centre du plateau tournant Faites cuire à couvert Mélangez et lai...

Page 106: ...lm étirable spécial micro ondes Percez le film Posez le plat sur le plateau tournant Laissez reposer 1 à 2 minutes 8 Filets de saumon frais 300 Rincez le poisson et placez le sur une assiette en céramique ajoutez 1 cuillère à soupe de jus de citron Recouvrez les de film étirable spécial micro ondes Percez le film Posez le plat sur le plateau tournant Laissez reposer 1 à 2 minutes 9 Crevettes fraîc...

Page 107: ...lettes de viande de Ø25 mm chacune Placez les boulettes de viande dans un plat Recouvrez le tout de film étirable transparent aux micro ondes en ménageant une cheminée de 50 mm à une extrémité Procédez à la cuisson Une fois celle ci terminée laissez reposer les boulettes de viande pendant 5 minutes Servez 4 Omelette au jambon 1 Sr Ingrédients pour une omelette 3 œufs de taille moyenne 1 tomate 30 ...

Page 108: ...ents au centre du plateau Fermez la porte 03 02 01 1 Sélectionnez une catégorie en appuyant sur le bouton Auto Grill Cook Cuisson automatique au gril 2 Utilisez à nouveau le bouton sélectionné ou les boutons du pavé numérique pour sélectionner un programme spécifique 3 Appuyez sur START DÉPART 4 Une fois la cuisson terminée et les 4 signaux sonores émis utilisez des maniques pour sortir les alimen...

Page 109: ...ateau tournant Laissez reposer 2 à 3 minutes une fois la cuisson terminée 4 Pizza surgelée 300 Placez la pizza surgelée sur la grille du haut Posez la sur le plateau tournant Laissez reposer 1 à 2 minutes après la cuisson 5 Gratin de légumes 500 Mettez le gratin encore surgelé dans un petit plat en Pyrex Posez le plat sur la grille Laissez reposer 2 à 3 minutes une fois la cuisson terminée 6 Tomat...

Page 110: ...ctionné 02 04 03 1 Placez les aliments au centre du plateau tournant puis fermez la porte 2 Appuyez sur le bouton Auto Reheat Réchauffage automatique 3 Utilisez à nouveau le bouton Réchauffage automatique ou les boutons du pavé numérique pour sélectionner un programme spécifique 4 Appuyez sur START DÉPART 5 Une fois le cycle terminé et les 4 signaux sonores émis utilisez des maniques pour sortir l...

Page 111: ...té Ragoût 3 portions 600 690 4 Plat mijoté Ragoût 4 portions 800 920 5 Pâtes Soupe 1 portion 200 230 Versez le liquide dans une assiette creuse ou un bol en céramique et couvrez le récipient durant la cuisson et le temps de repos Remuez avec précaution avant et après le temps de repos Laissez reposer 2 à 3 minutes 6 Pâtes Soupe 2 portions 400 450 7 Pâtes Soupe 3 portions 600 690 8 Pâtes Soupe 4 po...

Page 112: ...lectionner un poids 4 Appuyez sur START DÉPART 5 Une fois le cycle terminé et les 4 signaux sonores émis utilisez des maniques pour sortir les aliments REMARQUE Le four émet un signal sonore à mi cycle pour vous rappeler de retourner les aliments Retournez les aliments et appuyez à nouveau sur Start Départ pour continuer Lorsque le cycle est terminé le signal sonore retentit 4 fois Vous pouvez déc...

Page 113: ... entier côté poitrine vers le bas au milieu d une assiette plate adaptée aux micro ondes Retournez la volaille au signal sonore 3 Poisson 0 1 1 5 Protégez la queue d un poisson entier avec du papier d aluminium Retournez le poisson au signal sonore Ce programme convient aussi bien à la cuisson des poissons entiers qu à celle des filets Laissez reposer 10 à 30 minutes 4 Pain Gâteaux 0 1 1 0 Placez ...

Page 114: ...ré 2 4 Appuyez sur START DÉPART 5 Une fois le cycle terminé et les 4 signaux sonores émis utilisez des maniques pour sortir les aliments ATTENTION N utilisez pas cette fonction pour faire réchauffer des aliments froids Utilisez cette option uniquement pour maintenir chauds des aliments qui viennent juste d être cuits Ne pas dépasser une heure de maintien au chaud La surface des aliments pourrait d...

Page 115: ...après la cuisson La durée par défaut est de 5 minutes Pour activer cette fonction appuyez sur Deodorisation Désodorisation puis sur START DÉPART sur le panneau des fonctions Pour modifier la durée appuyez sur 30s pour l augmenter par incréments de 30 secondes max 15 min MG40J5133AT_SG_DE68 04325E 00_FR indd 47 2 13 2015 12 24 02 PM ...

Page 116: ...yrex adapté avec un couvercle Mélangez deux fois pendant la cuisson et une fois après puis ajoutez l assaisonnement à votre convenance Aliment Quantité g Puissance Temps min Épinards 150 60 5 6 Ajoutez 15 ml 1 cuillère à soupe d eau froide Laissez reposer 2 à 3 minutes Brocolis 300 60 8 9 Ajoutez 30 ml 2 cuillère à soupe d eau froide Laissez reposer 2 à 3 minutes Petits pois 300 60 7 8 Ajoutez 15 ...

Page 117: ...z 60 à 75 ml 4 à 5 cuillères à soupe d eau Laissez reposer 3 minutes Carottes 250 100 4 5 Coupez les carottes en rondelles de taille égale Laissez reposer 3 minutes Chou fleur 250 500 100 5 5 7 8 Préparez des sommités de taille égale Coupez les plus gros morceaux en deux Orientez les tiges vers le centre Laissez reposer 3 minutes Courgettes 250 100 4 4 Coupez les courgettes en rondelles Ajoutez 30...

Page 118: ... deux ou quatre morceaux de taille égale Laissez reposer 3 minutes Chou rave 250 100 5 6 Coupez le chou rave en petits dés Laissez reposer 3 minutes Yam bouilli Pour MG32J5133A 350 100 14 14 Épluchez et coupez le yam sur 3 cm d épaisseur et placez le sur le bol en pyrex Ajoutez 250 ml d eau à température ambiante dans le bol Cuisez en couvrant avec un film que vous percez plusieurs fois Après la c...

Page 119: ...auvage 250 100 16 17 Ajoutez 500 ml d eau froide Laissez reposer 5 minutes Céréales mélangées riz blé 250 100 17 18 Ajoutez 400 ml d eau froide Laissez reposer 5 minutes Pâtes 250 100 10 11 Ajoutez 1 litre d eau chaude Laissez reposer 5 minutes Nouilles instantanées Pour MG32J5133A 1 Petit emballage 80 g 100 7 7 Utilisez une cocotte en Pyrex Mettez les nouilles et ajoutez 350 ml d eau à températur...

Page 120: ...les concernés uniquement Micro ondes Gril Ce mode Cuisson combinée permet de combiner la chaleur rayonnante provenant de l élément chauffant et la cuisson au micro ondes Ce mode fonctionne uniquement lorsque la porte est fermée et que le plateau tourne Utilisez des récipients ignifuges qui sont adaptés au micro ondes N utilisez pas de récipients métalliques ou en plastique Les aliments pouvant êtr...

Page 121: ... soupe dans une assiette creuse ou un bol en céramique Recouvrez le récipient d un couvercle en plastique Remuez bien après le réchauffage Remuez de nouveau avant de servir Laissez reposer 2 à 3 minutes Plat mijoté réfrigéré 350 60 4 5 Placez le plat mijoté dans une assiette creuse en céramique Recouvrez le récipient d un couvercle en plastique Remuez de temps en temps pendant le réchauffage puis ...

Page 122: ...dé de servir les aliments à une température comprise entre 30 et 40 C Lait pour bébé Utilisez une bouteille en verre stérilisée et réchauffez la sans couvrir Retirez la tétine avant le réchauffage Si vous ne le faites pas le lait à l intérieur de la bouteille déborde Aliment Quantité Puissance Durée secondes Aliments pour bébé légumes viande 190 g 60 30 Versez les aliments dans une assiette creuse...

Page 123: ...er 15 à 30 minutes Volaille Morceaux de poulet 500 g 2 unités 20 14 15 Poulet entier 1200 g 32 34 Posez tout d abord les morceaux de poulet côté peau vers le bas ou côté poitrine vers le bas dans le cas d un poulet entier dans une assiette plate en céramique Recouvrez les parties les plus fines ex ailes et extrémités d aluminium Retournez à la moitié du temps de décongélation Laissez reposer 15 à ...

Page 124: ...ns 20 1 1 2 3 Tartine Sandwich 250 g 4 4 Pain complet Farine de blé et de seigle 500 g 7 9 Disposez les petits pains en cercle ou le pain entier à plat sur du papier absorbant au centre du plateau tournant Retournez à la moitié du temps de décongélation Laissez reposer 5 à 20 minutes MG40J5133AT_SG_DE68 04325E 00_FR indd 56 2 13 2015 12 24 03 PM ...

Page 125: ... de fruits dans une cocotte en Pyrex et couvrez Ajoutez 300 g de sucre spécial confiture et remuez bien Couvrez et faites cuire pendant 10 à 12 minutes à 90 Remuez plusieurs fois en cours de cuisson Videz directement dans de petits pots à confiture munis de couvercles quart de tour Laissez reposer 5 minutes à couvert Préparer un pudding de la crème anglaise Mélangez la préparation pour pudding ave...

Page 126: ...s modèles tactiles Il y a de l humidité à l extérieur Essuyez l humidité à l extérieur La sécurité enfants est activée Désactivez la sécurité enfants L heure n est pas affichée Il n y a pas d alimentation Assurez vous que la prise est alimentée La fonction Éco économie d énergie est activée Désactivez la fonction Éco Le four ne fonctionne pas Il n y a pas d alimentation Assurez vous que la prise e...

Page 127: ... Assurez vous que la prise est alimentée Un crépitement est audible durant le fonctionnement et le four ne fonctionne pas La cuisson d aliments fermés hermétiquement ou utilisant un récipient muni d un couvercle peut provoquer des bruits de crépitement N utilisez pas de récipients fermés hermétiquement car ils peuvent exploser au cours de la cuisson en raison de la dilatation du contenu L extérieu...

Page 128: ...émarrez à nouveau la fonction Utilisez un récipient de cuisson à fond plat La fonction de maintien au chaud ne fonctionne pas Le four peut ne pas fonctionner trop d aliments ont été mis à cuire ou un ustensile incorrect est utilisé Placez une tasse d eau dans un récipient adapté aux micro ondes et lancez le micro ondes durant 1 à 2 minutes pour vérifier si l eau chauffe Réduire la quantité d alime...

Page 129: ...lé sur une surface plane et stable Des étincelles apparaissent durant la cuisson Des récipients métalliques sont utilisés durant l utilisation du four de la décongélation N utilisez pas de récipients métalliques Lorsqu il est sous tension le four fonctionne immédiatement La porte n est pas correctement fermée Fermez la porte et vérifiez à nouveau Il y a de l électricité provenant du four L aliment...

Page 130: ...nt du four Appuyer sur le bouton 30s actionne le four Cela se produit lorsque le four n était pas en fonctionnement Le four micro ondes est conçu pour fonctionner en appuyant sur le bouton 30s lorsqu il est à l arrêt Plateau tournant Lorsqu il tourne le plateau tournant se déplace ou il cesse de tourner Il n y a pas l anneau de guidage ou de dernier n est pas positionné correctement Installez l an...

Page 131: ...t être résolu à l aide des instructions ci dessus contactez votre service après vente SAMSUNG Munissez vous des informations suivantes Les numéros de modèle et de série figurant normalement à l arrière du four Les détails concernant votre garantie Une description claire du dysfonctionnement Contactez ensuite votre revendeur local ou le service après vente SAMSUNG Code d information Code Descriptio...

Page 132: ...trique Micro ondes 1400 W 1500 W Gril 1500 W 1300 W Mode de cuisson combinée 2900 W 2800 W Puissance de sortie 100 W 900 W IEC 705 100 W 900 W IEC 705 Fréquence de fonctionnement 2450 MHz Magnétron OM75P 31 Système de refroidissement Moteur de ventilation Dimensions l x H x P Unité principale 517 x 297 x 402 mm 555 x 313 x 459 mm Enceinte de cuisson 357 x 255 x 357 mm 375 x 262 x 392 mm Capacité 1...

Page 133: ...Notes MG40J5133AT_SG_DE68 04325E 00_FR indd 65 2 13 2015 12 24 04 PM ...

Page 134: ...Notes MG40J5133AT_SG_DE68 04325E 00_FR indd 66 2 13 2015 12 24 04 PM ...

Page 135: ...Notes MG40J5133AT_SG_DE68 04325E 00_FR indd 67 2 13 2015 12 24 04 PM ...

Page 136: ...m sa support www samsung com sa_en support English TURKEY 444 77 11 www samsung com tr support NIGERIA 0800 726 7864 www samsung com africa_en support Ghana 0800 10077 0302 200077 Cote D Ivoire 8000 0077 www samsung com africa_fr support SENEGAL 800 00 0077 CAMEROON 7095 0077 KENYA 0800 545 545 www samsung com support UGANDA 0800 300 300 TANZANIA 0800 755 755 0685 889 900 RWANDA 9999 BURUNDI 200 D...

Page 137: ...Microwave oven MG32J5133A MG40J5133AT User manual MG40J5133AT_SG_DE68 04325E 00_EN indd 1 2 13 2015 12 24 02 PM ...

Page 138: ... Replacement repair 17 Care against an extended period of disuse 17 Before you start 18 Current time 18 Power saving 19 Child Lock 19 Sound On Off 19 Kitchen timer 20 Choosing the heating element position 20 About microwave energy 21 Cookware for microwave 22 Operations 24 Feature panel 24 Simple steps to start 25 Manual mode 26 Common settings 29 Auto cook 31 Convenience 42 Deodorisation 47 MG40J...

Page 139: ...ve cooking guide 48 Grill 52 Microwave Grill 52 Reheating guide 53 Defrosting guide 55 Quick Easy 57 Troubleshooting 58 Checkpoints 58 Information code 63 Technical specifications 64 MG40J5133AT_SG_DE68 04325E 00_EN indd 3 2 13 2015 12 24 02 PM ...

Page 140: ...ries and cookware Useful cooking tips Cooking tips The following symbols are used in this User Manual WARNING Hazards or unsafe practices that may result in severe personal injury or death CAUTION Hazards or unsafe practices that may result in minor personal injury or property damage NOTE Useful tips recommendations or information that helps users manipulate the product MG40J5133AT_SG_DE68 04325E ...

Page 141: ...es the removal of a cover which gives protection against exposure to microwave energy WARNING Liquids and other foods must not be heated in sealed containers since they are liable to explode This appliance is intended to be used in household only and it is not intended to be used such as staff kitchen areas in shops offices and other working environments farm houses by clients in hotels motels and...

Page 142: ...n The microwave oven is intended for heating food and beverages Drying of food or clothing and heating of warming pads slippers sponges damp cloth and similar may lead to risk of injury ignition or fire If smoke is emitted observed switch off or unplug the appliance and keep the door closed in order to stifle any flames WARNING Microwave heating of beverages can result in delayed eruptive boiling ...

Page 143: ...o not play with the appliance If the supply cord is damaged it must be replaced by the manufacturer its service agent or similarly qualified persons in order to avoid a hazard The appliance should not be cleaned with a water jet This oven should be positioned proper direction and height permitting easy access to cavity and control area Before using the your oven first time oven should be operated ...

Page 144: ...harp metal scrapers to clean the oven door glass since they can scratch the surface which may result in shattering of the glass WARNING The appliance and its accessible parts become hot during use Care should be taken to avoid touching heating elements Children less than 8 years of age shall be kept away unless continuously supervised This appliance can be used by children aged from 8 years and ab...

Page 145: ... a location exposed to direct sunlight and water or where gas may leak on un level ground This appliance must be properly grounded in accordance with local and national codes Remove all foreign substances such as dust or water from the power plug terminals and contact points using a dry cloth on a regular basis Do not pull or excessively bend or place heavy objecton the power cord In the event of ...

Page 146: ...ol vapours may contact a hot part of the oven Keep children away from the door when opening or closing it as they may bump themselves on the door or catch their fingers in the door WARNING Microwave heating of beverages can result in delayed eruptive boiling therefore care must be taken when handling the container To prevent this situation ALWAYS allow a standing time of at least 20 seconds after ...

Page 147: ...uring heating or after heating ends and allow the liquid stand at least 20 seconds after heating to prevent eruptive boiling Stand at arms length from the oven when opening the door to avoid getting scalded by escaping hot air or steam Do not operate the microwave oven when it is empty The microwave oven will automatically shut down for 30 minutes for safety purposes We recommend placing a glass o...

Page 148: ...A broken or missing tray guide roller coupler or wire rack Use this appliance only for its intended purpose as described in this instruction manual Warnings and Important Safety Instructions in this manual do not cover all possible conditions and situations that may occur It is your responsibility to use common sense caution and care when installing maintaining and operating your appliance Because...

Page 149: ...package If you have a problem with the oven or accessories contact a local Samsung customer centre or the retailer Oven at a glance 01 02 03 04 05 06 07 08 01 Door 02 Vent 03 Heating element 04 Oven light 05 Display 06 Coupler 07 Open door 08 Feature panel MG40J5133AT_SG_DE68 04325E 00_EN indd 13 2 13 2015 12 24 03 PM ...

Page 150: ...133AT Roller ring Put in the centre of the base It supports the turntable Turntable Put on the roller ring with the centre fitting the coupler It serves as a cooking base Grill rack This metal rack is used with Grill or combined cooking modes Put it on the turntable NOTE Do not operate the oven without the turntable on the roller ring MG40J5133AT_SG_DE68 04325E 00_EN indd 14 2 13 2015 12 24 03 PM ...

Page 151: ...des and 20 cm from above Do not install the oven in hot or damp surroundings such as next to other microwave ovens or radiators Conform to the power supply specifications of this oven Use only approved extension cables if you need to use Wipe the interior and the door seal with a damp cloth before using your oven for the first time Turntable Remove all packing materials inside the oven Install the...

Page 152: ...at the oven for 10 minutes at max power 3 When the cycle is complete wait until the oven cools down Then open the door and clean the cooking chamber To clean inside swing heater models A To clean the upper area of the cooking chamber lower the top heating element by 45 A as shown This will help clean the upper area When done reposition the top heating element CAUTION Keep the door and door sealing...

Page 153: ...tact a local Samsung service centre Do not replace it yourself If you encounter a problem with the outer housing of the oven first unplug the power cord from the power source and then contact a local Samsung service centre Care against an extended period of disuse If you don t use the oven for an extended period of time unplug the power cord and move the oven to a dry dust free location Dust and m...

Page 154: ...y the time in the 12 hour 24 hour notation 1 Press the Clock button and the 0 button at the same time for 1 second 2 Time setting that you want to change 12Hr or 24Hr will be displayed 3 If you want to change the notation again press the number buttons For example press 1 for 12Hr or press 2 for 24 Hr notation 4 Press the START button to confirm your setting To set the current time 1 Press Clock 2...

Page 155: ...ill be cancelled and the current time will be displayed After 5 minutes of the door being open the oven lamp will turn off Child Lock To prevent accidents Child Lock disables all controls except for the Eco button Hold down STOP CANCEL for 3 seconds to activate or hold down for 3 seconds again to deactivate the lock on the feature panel Sound On Off 01 02 You can mute or unmute the beep or melody ...

Page 156: ...should be placed in the vertical position Horizontal position for grilling or combined microwave grill cooking CAUTION Only change the position of the heating element when it is cold and do not apply excessive force when placing it in the vertical position To set the heating element to the Then Horizontal position grill or combined microwave grill Pull the heating element towards you Push it upwar...

Page 157: ...ood is cooked evenly 4 The microwaves are absorbed down to the food up to a depth of approx 2 5 cm Then the microwaves are dissipated inside the food as cooking continues 5 The cooking time is affected by the following conditions of the food Quantity and density Moisture content Initial temperature especially when frozen NOTE The cooked food keeps heat in its core after cooking is complete This is...

Page 158: ...that weigh less than the main pan Material Microwave safe Description Aluminium foil Use for a small serving size to protect against overcooking Arcing can occur if the foil is near the oven wall or if using an excessive amount of foil Crusty plate Do not use for preheating for more than 8 minutes Bone china or earthenware Porcelain pottery glazed earthenware and bone china are usually microwave s...

Page 159: ...g with twist ties Paper Plates cups napkins and kitchen paper Use to cook for a short time These absorb excess moisture Recycled paper Causes arcing Plastic Containers Use thermoplastic containers only Some plastics may warp or discolour at high temperatures Cling film Use to maintain moisture after cooking Freezer bags Use boilable or ovenproof bags only Wax or grease proof paper Use to maintain ...

Page 160: ... of the oven is subject to change without notice 02 05 04 07 08 09 14 11 10 16 13 01 03 06 12 15 01 Auto Cook 02 Power Defrost 03 Auto Reheat 04 Keep Warm 05 Grill 06 Combi 07 Deodorisation 08 Number pad 09 Power Level 10 Kitchen Timer 11 Clock 12 Eco 13 Sound 14 Stop Cancel 15 30S 16 Start MG40J5133AT_SG_DE68 04325E 00_EN indd 24 2 13 2015 12 24 05 PM ...

Page 161: ...TE When cooking is complete the oven beeps 4 times Use oven gloves to take out the food To defrost frozen food 04 03 02 1 Put the frozen food in a microwave safe container and then in the centre of the turntable 2 Press Power Defrost 3 Use the number buttons to set the serving size 4 Press START NOTE For more information see the Power Defrost section MG40J5133AT_SG_DE68 04325E 00_EN indd 25 2 13 2...

Page 162: ... 2 Use the number buttons to set the cooking time max 99 min 99 sec For example press 1 and 0 for the minutes and 0 and 0 for the seconds 10 00 3 To change the default power level press Power Level and select a different level See the Power level section for details 4 Press START 5 When cooking is complete with a beep 4 times use oven gloves to take out the food MG40J5133AT_SG_DE68 04325E 00_EN in...

Page 163: ...tal rack 04 03 02 2 Press Grill 3 Use the number buttons to set the grilling time max 60 min For example press 1 and 0 for the minutes and 0 and 0 for the seconds 10 00 4 Press START The heating element cycles on and off to complete grilling 5 When grilling is complete with a beep 4 times use oven gloves to take out the food NOTE To change the cooking time during operation press STOP CANCEL and fo...

Page 164: ...lling temperature is set automatically which you cannot change 3 Use the number buttons to set the cooking time max 60 min For example press 2 and 5 for the minutes and 3 and 0 for the seconds 25 30 4 Press START The oven starts microwave cooking and then continues to grill 5 When cooking is complete with a beep 4 times use oven gloves to take out the food NOTE To change the cooking time during op...

Page 165: ...EL and repeat the steps above To stop cooking simply open the door or press STOP CANCEL To resume operation close the door and press Start To cancel cooking press STOP CANCEL twice Time increment You might want to add extra time to the current cooking time while cooking is in process Time can be added by 30 seconds 02 01 1 Before or during cooking press 30S as many times as needed For example to a...

Page 166: ...cific power level Available levels range from No power 0 to High 10 See the table below 0 PL 0 No power 1 PL 10 Warm 2 PL 20 Defrost 3 PL 30 Low 4 PL 40 Medium low 5 PL 50 Medium 6 PL 60 Simmer 7 PL 70 Medium high 8 PL 80 Reheat 9 PL 90 Sauté 10 PL Hi High NOTE To check the current power level while cooking is in process press Power Level MG40J5133AT_SG_DE68 04325E 00_EN indd 30 2 13 2015 12 24 06...

Page 167: ...emperature will be adjusted according to the selected recipe 1 Put food in a microwave safe container and then in the centre of the turntable 04 03 02 2 Select a category by pressing either Popcorn or Potato 3 Use the selected button again or the number buttons to select a specific programme 4 Press START 5 When cooking is complete with a beep 4 times use oven gloves to take out the food MG40J5133...

Page 168: ...ze Instructions 1 Popcorn 3 85 g Use only one microwave popcorn bag at a time Be careful when removing the heated bag from the oven and opening it 2 Popcorn 3 5 100 g 2 Potato Code Food Serving Size Instructions 1 Potato 1 pcs Pierce each potato several times with a fork Place on the turntable in a spoke like fashion After cooking let the potatoes stand for 3 5 minutes 2 Potato 2 pcs 3 Potato 3 pc...

Page 169: ...will be adjusted according to the selected recipe 1 Put food in a microwave safe container and then in the centre of the turntable 04 03 02 2 Select a category by pressing the Snack button 3 Use the selected button again or the number buttons to select a specific programme 4 Press START 5 When cooking is complete with a beep 4 times use oven gloves to take out the food MG40J5133AT_SG_DE68 04325E 0...

Page 170: ...spoke fashion on paper towel Do not cover Let stand 1 min 4 Frozen Chicken nuggets 170 200 5 Frozen French Fries 110 140 Place two paper towels on a microwave safe plate and arrange the French fries on the towels without letting them overlap Blot the fries with additional paper towels after removing from the oven Stand for 1 2 minutes 6 Frozen French Fries 170 200 7 Frozen Cheese sticks 5 6 pc Pla...

Page 171: ...e bowl Add 150 ml water or milk for 35 g and 300 ml water or milk for 70 g Cook uncovered After oven beeps stir the oats well and press start to continue After cooking stir well and top with brown sugar or honey 12 Porridge 2 servings 13 Potato wedges 300 350 Wash normal sized potatoes and cut them into wedges Brush with olive oil and spices Place them with the cut side on the microwave safe plate...

Page 172: ...nd temperature will be adjusted according to the selected recipe 1 Put food in a microwave safe container and then in the centre of the turntable 04 03 02 2 Select a category by pressing either Healthy Cooking or Meat Poultry 3 Use the selected button again or the number buttons to select a specific programme 4 Press START 5 When cooking is complete with a beep 4 times use oven gloves to take out ...

Page 173: ...vered Stir after cooking Stand for 1 2 minutes 3 Green Beans 250 Rinse and clean green beans Put them evenly into a glass bowl with lid Add 30 ml 2 tbsp water Put bowl in the centre of turntable Cook covered Stir after cooking Stand for 1 2 minutes 4 Peeled Potatoes 250 Wash and peel the potatoes and cut into a similar size Put them into a glass bowl with lid Add 45 60 ml 3 4 tbsp water Put bowl i...

Page 174: ... Stand for 1 2 minutes 8 Fresh Salmon Fillets 300 Rinse fish and put on a ceramic plate add 1 tbsp lemon juice Cover with microwave cling film Pierce film Put dish on turntable Stand for 1 2 minutes 9 Fresh Prawns 250 Rinse prawns on a ceramic plate add 1 tbsp lemon juice Cover with microwave cling film Pierce film Put dish on turntable Stand for 1 2 minutes MG40J5133AT_SG_DE68 04325E 00_EN indd 3...

Page 175: ...ients and mix well Shape into 20 meat balls each Ø25 mm Place meat balls in utensil Cover with microwave cling wrap turning back one corner of the wrap by about 50 mm to vent Cook After cooking stand meat balls for 5 minutes Serve 4 Ham Omelet 1 Sr Ingredients for omelette 3 med sized eggs 1 tomato 30 g chopped ham 2 tablespoons milk herbs Spices Beat eggs add ham 2 tablespoons milk herbs and spic...

Page 176: ...en the door Place the food in the centre of the turntable Close the door 03 02 01 1 Select a category by pressing the Auto grill cook button 2 Use the selected button again or the number buttons to select a specific programme 3 Press START 4 When cooking is complete with a beep 4 times use oven gloves to take out the food MG40J5133AT_SG_DE68 04325E 00_EN indd 40 2 13 2015 12 24 07 PM ...

Page 177: ...sh Put the dish directly on the turntable After cooking stand for 2 3 minutes 4 Frozen Pizza 300 Put the frozen pizza on the High rack Put it on the turntable After cooking stand for 1 2 minutes 5 Vegetable Gratin 500 Put frozen gratin into a small glass pyrex dish Put the dish on the rack After cooking stand for 2 3 minutes 6 Grilled Tomatoes 400 Rinse and clean tomatoes cut them into halves and ...

Page 178: ...ding to the selected programme 02 04 03 1 Put food in the centre of the turntable and close the door 2 Press Auto Reheat 3 Use the Auto Reheat button again or the number buttons to select a specific programme 4 Press START 5 When the cycle is complete with a beep 4 times use oven gloves to take out the food MG40J5133AT_SG_DE68 04325E 00_EN indd 42 2 13 2015 12 24 08 PM ...

Page 179: ...serole Stew 3 servings 600 690 4 Casserole Stew 4 servings 800 920 5 Pasta Soup 1 serving 200 230 Pour into a deep ceramic soup plate or bowl and cover during heating and standing Stir carefully before and after standing time Stand for 2 3 minutes 6 Pasta Soup 2 servings 400 450 7 Pasta Soup 3 servings 600 690 8 Pasta Soup 4 servings 800 920 9 Pizza Reheat 1 Slice Place pizza slices on a microwave...

Page 180: ...ns to select a weight 4 Press START 5 When the cycle is complete with a beep 4 times use oven gloves to take out the food NOTE The oven beeps in the middle of the cycle to remind you to turn the food over Turn the food over and press Start again to continue When the cycle is complete the oven beeps 4 times You can defrost food manually To do this use a cooking mode with just 20 of the default powe...

Page 181: ...es skin side down and whole chicken breast side down on the middle of a flat microwave safe plate Turn the poultry over when the oven beeps 3 Fish 0 1 1 5 Shield the tail of a whole fish with aluminium foil Turn the fish over when the oven beeps This programme is suitable for whole fishes as well as for fish fillets Stand for 10 30 minutes 4 Bread Cake 0 1 1 0 Put bread on a piece of kitchen paper...

Page 182: ...t 1 or Mild 2 4 Press START 5 When the cycle is complete with a beep 4 times use oven gloves to take out the food CAUTION Do not use this function to reheat cold foods Use this only for keeping food warm that has just been cooked Do not keep food for more than 1 hour The food surface may be dried Do not put food covered with lids or plastic wrap in the oven 1 Hot lasagne soups gratin pizza bacon f...

Page 183: ...ad smells from inside the oven after cooking The default time is 5 minutes To activate press Deodorisation and then START on the feature panel To change the time press 30S to increase by 30 seconds max 15 min MG40J5133AT_SG_DE68 04325E 00_EN indd 47 2 13 2015 12 24 08 PM ...

Page 184: ... suitable glass Pyrex container with a lid Stir twice during cooking and once after cooking and then add seasoning to your preference Food Serving Size g Power Time min Spinach 150 60 5 6 Add 15 ml 1 tbsp cold water Stand for 2 3 minutes Broccoli 300 60 8 9 Add 30 ml 2 tbsp cold water Stand for 2 3 minutes Peas 300 60 7 8 Add 15 ml 1 tbsp cold water Stand for 2 3 minutes Green Beans 300 60 7 8 Add...

Page 185: ...00 4 5 Cut carrots into even sized slices Stand for 3 minutes Cauliflower 250 500 100 5 5 7 8 Prepare even sized florets Cut big florets into halves Arrange stems to the centre Stand for 3 minutes Courgettes 250 100 4 4 Cut courgettes into slices Add 30 ml 2 tbsp water or a knob of butter Cook until just tender Stand for 3 minutes Egg plants 250 100 3 4 Cut egg plants into small slices and sprinkl...

Page 186: ...t turnip cabbage into small cubes Stand for 3 minutes Boiled Yam For MG32J5133A 350 100 14 14 Peel and cut yam 3 cm thick and put on pyrex bowl Add room temperature 250 ml water in bowl Cook covered with wrap and pierce at several times After cooking drain water and serve Stand for 1 2 minutes Boiled Yam For MG40J5133AT 350 100 12 13 Peel and cut yam 3 cm thick and put on pyrex bowl Add room tempe...

Page 187: ...d for 5 minutes Mixed Rice Rice Wild Rice 250 100 16 17 Add 500 ml cold water Stand for 5 minutes Mixed Corn Rice Grain 250 100 17 18 Add 400 ml cold water Stand for 5 minutes Pasta 250 100 10 11 Add 1000 ml hot water Stand for 5 minutes Instant Noodle For MG32J5133A 1 Small pack 80 g 100 7 7 Use a glass pyrex bowl Put the noodle and add room temperature 350 ml water in bowl Cook covered with wrap...

Page 188: ...pecified applicable models only Microwave Grill This Combi mode combines the radiant heat from the heating element with Microwave cooking This will run only while the door is closed and the turntable is rotating Use only flameproof cookware that is microwave safe Do not use metal or plastic cookware Foods available with this Combi mode are basically any kinds of cooked food that you want to reheat...

Page 189: ...g 350 g 450 g 550 g 90 2 3 3 3 3 4 4 5 Pour into a deep ceramic plate or deep ceramic bowl Cover with plastic lid Stir well after reheating Stir again before serving Stand for 2 3 minutes Stew Chilled 350 60 4 5 Put stew in a deep ceramic plate Cover with plastic lid Stir occasionally during reheating and again before standing and serving Stand for 2 3 minutes Pasta with Sauce Chilled 350 60 3 4 P...

Page 190: ...d serving temperature is 30 40 C Baby milk Use a sterilised glass bottle and reheat it uncovered Remove the teat before reheating Otherwise the milk in the bottle boils over Food Serving Size Power Time sec Baby Food Vegetables Meat 190 g 60 30 Empty into ceramic deep plate Cook covered Stir after cooking time Before serving stir well and check the temperature carefully Stand for 2 3 minutes Baby ...

Page 191: ...g time Stand for 15 30 minutes Poultry Chicken Pieces 500 g 2 pcs 20 14 15 Whole Chicken 1200 g 32 34 First put chicken pieces first skin side down whole chicken first breast side down on a flat ceramic plate Shield the thinner parts like wings and ends with aluminium foil Turn over after half of defrosting time Stand for 15 60 minutes Fish Fish Fillets 200 g 20 6 7 Whole Fish 400 g 11 13 Put froz...

Page 192: ...2 pcs 4 pcs 20 1 1 2 3 Toast Sandwich 250 g 4 4 German Bread Wheat Rye Flour 500 g 7 9 Arrange rolls in a circle or bread horizontally on kitchen paper in the middle of turntable Turn over after half of defrosting time Stand for 5 20 minutes MG40J5133AT_SG_DE68 04325E 00_EN indd 56 2 13 2015 12 24 09 PM ...

Page 193: ... for example mixed berries in a suitable sized glass pyrex bowl with lid Add 300 g preserving sugar and stir well Cook covered for 10 12 minutes using 90 Stir several times during cooking Empty directly into small jam glasses with twist off lids Stand on lid for 5 minutes Cooking pudding custard Mix pudding powder with sugar and milk 500 ml by following the manufacturers instructions and stir well...

Page 194: ...and try again For touch models Moisture is on the exterior Wipe the moisture from the exterior Child lock is activated Deactivate Child lock The time is not displayed Power is not supplied Make sure power is supplied The Eco power saving function is set Turn off the Eco function The oven does not work Power is not supplied Make sure power is supplied The door is open Close the door and try again T...

Page 195: ...the oven There is no power to the oven Power is not supplied Make sure power is supplied There is a popping sound during operation and the oven doesn t work Cooking sealed food or using a container with a lid may causes popping sounds Do not use sealed containers as they may burst during cooking due to expansion of the contents The oven exterior is too hot during operation There is not sufficient ...

Page 196: ...e the amount of food and start the function again Use a cooking container with a flat bottom The warm function does not work The oven may not work too much food is being cooked or improper cookware is being used Put one cup of water in a microwave safe container and run the microwave for 1 2 minutes to check whether the water is heated Reduce the amount of food and start the function again Use a c...

Page 197: ...ontainers are used during the oven thawing functions Do not use metal containers When power is connected the oven immediately starts to work The door is not properly closed Close the door and check again There is electricity coming from the oven The power or power socket is not properly grounded Make sure the power and power socket are properly grounded There is water dripping There may be water o...

Page 198: ...ing The microwave oven is designed to operate by pressing the 30 sec button when it was not operating Turntable While turning the turntable comes out of place or stops turning There is no roller ring or the roller ring is not properly in place Install the roller ring and then try again The turn table drags while turning The roller ring is not properly in place there is too much food or the contain...

Page 199: ...o solve the problem then contact your local SAMSUNG customer service centre Please have the following information read The model and serial numbers normally printed on the rear of the oven Your warranty details A clear description of the problem Then contact your local dealer or SAMSUNG aftersales service Information code Code Description Action C d0 Control buttons are pressed over 10 seconds Cle...

Page 200: ...rce 230 V 50 Hz Power Consumption Microwave 1400 W 1500 W Grill 1500 W 1300 W Combined mode 2900 W 2800 W Output Power 100 W 900 W IEC 705 100 W 900 W IEC 705 Operating Frequency 2450 MHz Magnetron OM75P 31 Cooling Method Cooling fan motor Dimensions W x H x D Main unit 517 x 297 x 402 mm 555 x 313 x 459 mm Cooking chamber 357 x 255 x 357 mm 375 x 262 x 392 mm Volume 1 1 cu ft 1 4 cu ft Weight Net...

Page 201: ...Memo MG40J5133AT_SG_DE68 04325E 00_EN indd 65 2 13 2015 12 24 09 PM ...

Page 202: ...Memo MG40J5133AT_SG_DE68 04325E 00_EN indd 66 2 13 2015 12 24 09 PM ...

Page 203: ...Memo MG40J5133AT_SG_DE68 04325E 00_EN indd 67 2 13 2015 12 24 09 PM ...

Page 204: ...RABIA 8002474357 www samsung com sa support www samsung com sa_en support English TURKEY 444 77 11 www samsung com tr support NIGERIA 0800 726 7864 www samsung com africa_en support Ghana 0800 10077 0302 200077 Cote D Ivoire 8000 0077 www samsung com africa_fr support SENEGAL 800 00 0077 CAMEROON 7095 0077 KENYA 0800 545 545 www samsung com support UGANDA 0800 300 300 TANZANIA 0800 755 755 0685 88...

Reviews: