background image

',1*%$7%XOOHW

DINGBAT-Star

',1*%$7%XOOHW

',1*%$7%XOOHW

Air to Water Heat Pump

Installation manual

Control Kit MIM-E03CN


• Thank you for purchasing this Samsung Product.


• Before operating this unit, please read this installation manual carefully and retain it for future 

reference.

Summary of Contents for MIM-E03CN

Page 1: ...XOOHW 1 7 XOOHW AirtoWaterHeat Pump Installation manual Control Kit MIM E03CN Thank you forpurchasing this Samsung Product Before operating this unit please read this installation manual carefully and retain it forfuture reference ...

Page 2: ...e g charger headset USB cable should not be disposed of with other household waste at the end of their working life To prevent possible harm to the environment or humanhealth from uncontrolled waste disposal please separate these items from other types of waste and recycle them responsibly to promote the sustainable reuse of material resources Household users should contact either the retailer whe...

Page 3: ...r or reinstall the unit by unauthorized personnel these operations may cause product damage electric shocks and fires f Do not place containers with liquids or other objects on the unit f All the materials used for the manufacture and packaging of the air to water heat pump are recyclable f The packing materials must be disposed of in accordance with local regulations f Wear protective gloves to u...

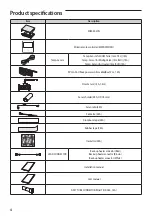
Page 4: ...Sensor for Heater 15m BLK 1EA PV Control Peak power control cable Red 2 m 1 EA Flow Sensor 1EA 1 5m Sensor holder 2EA OD 7 8mm Sensor clip 2EA Cable tie 4EA Aluminum tape 2EA Rubber tape 2EA Insulartor 2EA LEAD CONNECTOR Back up heater conector Red Back up heater conector Brown Back up heater conector White Installation manual User manual ASSYTUBE CONNECTOR RIGHT OD28 0 1EA 4 ...

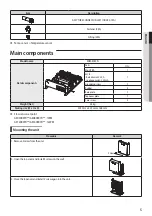
Page 5: ...rent 30mA 1 Grounding screw 7 Rubber 3 Base plate 1 Top cover plate 1 Case screw 2 Weight Net 3 5 kg Packing size W x H x D 329 mm x 439 mm x 168 mm Flow sensor set point AE050RXYD AE080RXYD 7LPM AE120RXYD AE160RXYD 12LPM Mounting the unit Procedure Remark 1 Remove 2 screw from the unit Screw 2 Open the top cover and install 4 screws on the wall 3 Close the top cover and install 2 screw again into...

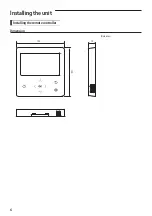
Page 6: ...Installing the unit Installing the remote controller Dimension 120 120 19 Unit mm 6 ...

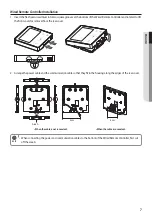
Page 7: ...t cover for removal from the rear cover 2 Arrange the power cable and the communication cable so that they fit in the housing along the edges of the rear cover When the cable is not concealed When the cable is concealed 8 cm 8 cm Area A When connecting the power and communication cables to the bottom of theWired Remote Controller first cut off the area A NOTE 7 ENGLISH ...

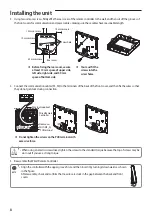
Page 8: ...ables F3 F4 to the terminals of the back of the front cover and then fix the wires so that they do not get stuck during connection V1 F1 F2 V2 F3 F4 PCB terminal Front cover Wire not supplied Do not tighten the screws on the PCB terminal with excessive force Wired Remote Controller F4 COM2_A F3 COM2_B When using an electric screwdriver tighten the screws to the standard torque because the top of s...

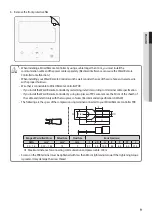
Page 9: ...erminal cable specification If you install theWired Remote Controller by using two pieces of PVC wire remove the 30 cm of the sheath of the cable and install it only with the two pieces of wires Recommended specification AWG20 The following are the specs of the compression ring terminal connected to yourWired Remote Controller PCB Stud W t E F G L ØD Range of PermittedWires Rated Size Stud Size Ba...

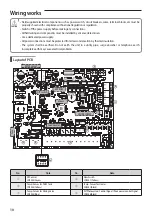
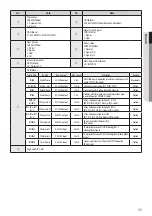
Page 10: ...ected from dew condensation by thermal insulation The system shall be earthed Do not earth the unit to a utility pipe surge absorber or telephone earth Incomplete earth may cause electrical problems CAUTION Layout of PCB 1 12 10 2 9 8 6 13 7 4 3 5 1 ON 2 3 4 16 1 11 15 14 SMPS circuit Micom EEPROM DIP switch 2 WIRE COMM Load control Fuse No Note No Note FR Control CNS003 Green Flow Switch CNS041 Y...

Page 11: ...orBackupBoiler B5 Neutral Option B7 B8 WaterPump AC 230Voutput 0 5A AdditionalWaterpumpoperation maximuminput powerofpump100W B8 Lived Option B9 B10 B11 B12 2Wayvalve 1 AC 230Voutput 22mA 2WayValveoperationforZone 1 UFH B9 NO B10 NC B11 Neutral B12 Lived Option B13 B14 B11 B12 2Wayvalve 2 AC 230Voutput 22mA 2WayValveoperationforZone 2 FCU B13 NO B14 NC B11 Neutral B12 Lived Option B15 B16 B17 B18 ...

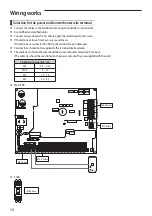
Page 12: ...s loose fire may occur caused by arc If the terminal is connected too firmly the terminal may be damaged f External force should not be applied to the terminal block and wires f The cable ties to fasten the wire should be an incombustible material V0 or above The cable ties should be used to fasten the power wire and they are supplied with the unit TighteningTorque kgf cm M3 0 5 0 75 M3 5 8 12 M4 ...

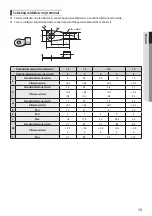
Page 13: ...cable mm2 1 5 2 5 4 6 10 Nominal dimensions for screw mm 4 4 4 8 8 B Standard dimension mm 8 9 5 9 5 12 12 Allowance mm 0 2 0 2 0 2 0 2 D Standard dimension mm 3 4 4 2 5 6 7 1 Allowance mm 0 3 0 2 0 3 0 2 0 3 0 2 0 3 0 2 d1 Standard dimension mm 1 7 2 3 3 4 4 5 Allowance mm 0 2 0 2 0 2 0 2 E Min 4 1 4 1 6 7 9 F Min 6 7 5 9 9 L Max 16 17 5 20 28 5 30 d2 Standard dimension mm 4 3 5 3 4 3 8 4 8 4 All...

Page 14: ...le 3 Insert both sides of core wire of the power cable into the connection sleeve f Method 1 Push the core wire into the sleeve from both sides Connection sleeve f Method 2 Twist the wire cores together and push it into the sleeve Connection sleeve Ifcablewiresareconnectedwithoutusingconnectingsleeves theircontactareabecomesreduced orcorrosiondevelopsonthe outersurfacesofthewires copperwires overa...

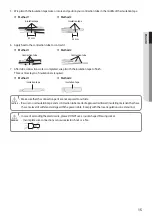
Page 15: ... to finish Three or more layers of insulation are required f Method 1 Insulation tape f Method 2 Insulation tape Make sure that the connection parts are not exposed to outside Be sure to use insulation tape and a contraction tube made of approved reinforced insulating materials that have the same level of withstand voltage with the power cable Comply with the local regulations on extensions CAUTIO...

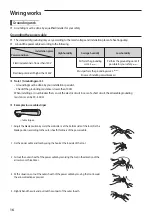
Page 16: ...nding must be done by your installation specialist Check if the grounding resistance is lower than 100 Ω When installing a circuit breaker that can cut the electric circuit in case of a short circuit the allowable grounding resistance can be 30 500 Ω Examples to use cable striper Cable striper 1 Adjust the blade position by coin the controller is at the bottom side of the tool Fix the blade positi...

Page 17: ... 240V 50Hz 1 5 3 L 10m 2 5 3 10m L Use Booster Heater Max 3kW 4 0 3 L 10m 6 0 3 10m L f The power cable is not supplied with Air to water heat pump f This equipment with IEC 61000 3 12 f Power supply cords of parts of appliances for outdoor use shall not be lighter than polychloroprene sheathed flexible cord Code designation IEC 60245 IEC 57 CENELEC H05RN F or IEC 60245 IEC 66 CENELEC H07RN F f Wh...

Page 18: ...control kit s F1 F2 inTB C by 2 core cable Outdoor Unit at Control Plate Control Kit Communication with a wired remote controller 1 unit Wired Remote Controller Master Communication with a wired remote controller 2 units Wired Remote Controller Slave Wired Remote Controller Master 18 ...

Page 19: ... the sensor side of a temp sensor wire into the designated location in a DHW 2 Connect the other side of the line at CNS042 Connecting a temp sensor wire to outlet of backup heater 1 Put the sensor side of a temp sensor wire into the designated location in a backup heater 2 Connect the other side of the line at CNS047 Connecting a flow sensor 1 Install a flow sensor in water line 2 Connect a wire ...

Page 20: ... CNP001 CNP002 f When a backup heater mode is ON at 1st step a control signal of AC 230V goes through CNP003 and CNP001 f When a backup heater mode is ON at 2nd step a control signal of AC 230V goes through CNP003 and CNP002 1st step 2nd step N L1 N L2 This port can NOT supply enough power for driving a backup heater It s just for providing a ON OFF control signal Maximum current is 0 5A NOTE 20 ...

Page 21: ... 10mA 50mA 0 75mm2 H05RN F or H07RN F Field supply 220 240V Input L N L N When it set back up boiler on the control kit relay off Boiler B4 Back up boiler L B5 Neutral N Boiler When it order to back up boiler operates relay on 1 Before the installation control kit should be turned off 2 Using the appropriate equipment to correct position of terminal block as shown on the diagram 3 Make sure EXT CT...

Page 22: ...wer 100W 1 Power supply For additional INV Pump B6 Live additional pump B1 Neutral additional pump 2 PWM control For additional INV Pump only refer to page 29 Reference GND PWM signal SIG If there is wrong wiring between PWM and reference INV Water Pump may not work or wrong operation CAUTION PWM characteristic curve PWM input signal Max Speed The additional pump should be the same type of product...

Page 23: ...power 100W 1 Power supply AC Pump B8 Live additional pump B7 Neutral additional pump L N M C PCB Terminal block Neutral additional pump Live additional pump B7 B8 Pump Power Terminal of this product is for additional water pump and the maximum allowable current is 0 5 A CAUTION 23 ENGLISH ...

Page 24: ...hen it opens When it closes Normal Open type B12 Live L B13 2WAY2 L1 B14 2WAY2 L2 B11 Neutral N B10 2WAY1 L2 B9 2WAY1 L1 2 way motorized valve f When outlet water temperature reach to lower than 16 C in cooling mode UFH loops will be closed f 220 240V f 2 wires Normal Open or Normal Close 1 Before the installation control kit should be turned off 2 Using the appropriate equipment to correct positi...

Page 25: ...3WAYV V Outdoor Unit FLOOR HEATING A DHWTANK 3WAYV V Outdoor Unit FLOOR HEATING B DHWTANK 3WAYV V Outdoor Unit FLOOR HEATING B DHWTANK 3WAYV V Outdoor Unit Connection of the thermostat escription No of wires Max current Thickness Supply Scope RoomThermostat 4 22mA 0 75 mm2 H05RN F or H07RH F Field supply 220 240V Input N L C1H1 N L C2H2 B24 THERMOSTAT02_HEATING H2 THERMOSTAT01 THERMOSTAT02 B23 THE...

Page 26: ...ne 1 zone 2 heating mode Room thermostat N L Room thermostat N L Room thermostat N L Before completing installation of Room thermostat check the wiring method in a manual of Room thermostat to output L line WARNING Target zone Zone 1 Thermostat on off controller s output signal Only Heat f Connect a thermostat on off controller s power to B19 B20 and connect output of a thermostat on off controlle...

Page 27: ...In manual of a RF receiver RX1 and RX2 1 Terminal 1 RX2 only Electronics Zone 2 on Zone 1 on Zone 1 off Com f Example of wiring works 1 Control kit RF receiver RX1 Cool zone 1 Cool zone 2 Heat zone 1 Com Heat zone 2 27 ENGLISH ...

Page 28: ...Wiring schematics Wiring diagram It does not support external input CNS083 output CNS081 signal function NOTE 28 ...

Page 29: ...st Mode Display that shows operation value satus and menus that can turn each component on or off Self Test Mode Self Test Mode Display Water Pump Booster Heater DHW Valve 3 Way valve Zone 1 Valve Back Up Heater1 Water Pump Back Up Heater2 Water Pump Back Up Boiler Zone 2 Valve Mixing Valve OFF OFF OFF OFF OFF OFF OFF OFF OFF Self Test Mode Display Water Inlet Temp 00 0ঐ to 000 0ঐ Water Outlet Tem...

Page 30: ...is filled with water before the electricity is hooked up or else the warranty is not valid If the heater is installed and not used it must be flushed with water once a week CAUTION Connection of the solar circulation pump DHWThermostat for DHW tank Description No of wires Max current Thickness Supply Scope Solar pump DHWThermostat 2 ground 10 mA 0 75mm2 H05RN F or H07RN F Field supply 230V Input B...

Page 31: ...60245 IEC 57 CENELEC H05RN F Connecting a booster heater PTC heater allowed limit Max 3kW 1 Directly connect a Booster heater with A3 and A4 inTB A Wire spec 6 0 mm2 regardless of distance Code designation IEC 60245 IEC 57 CENELEC H05RN F NOTE Specification table Part Specification Terminal Block output N L ofTB A1 Connection load Direct connection a booster heater Output N L AC 230V MAX 20A 31 EN...

Page 32: ...p between the supplied sensor and DHW tank sensor pocket is big use thermal grease When you set the hot water supply temperature to 55 C or less do not use the booster heater The heatpump and the booster heater operate until the initial set temperature is reached After that only the booster heater may operate depending on the settings NOTE 32 ...

Page 33: ...re it might need to be replaced Some dripping is normal Alternatively an expansion vessel can be fitted Leak warning outlet is dripping The heating element may not be properly tightened Check the heating element o ring seal and all connections There may be a leak Other problems or if none of the above solves the problem Contact the installer supplier regarding any other failure Incorrect handling ...

Page 34: ...e FSV default 90 sec by referring to the FSV value below Maker BELIMO SIEMENS HONEYWELL Model code 3WayValve R3020 6P3 S2 VXP45 20 4 kvs 4 V5011E1213 Actuator LR230A S SSB31 ML6420A3015 Running time 90 sec 150 sec 60 sec FSV 4046 setting 9 15 6 The table above is for your reference It can be changed without advanced notice 4 Set the FSV value by referring to the table below depending on installati...

Page 35: ...ncreases depending on the load The additional pump and mixing valve should be purchased separately TW4 sensor is included in the product accessories TW2 Water temp sensor 2 When the thermostat control is set as Use the mixing valve can be used for Zone 1 and Zone 2 When both FSV 2091 and 2092 are set as 1 CAUTION Connection of the mixing valve N L N L N L N L N L N L Under Floor Radiator TW4 Balan...

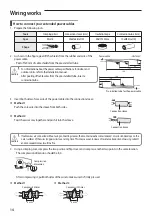
Page 36: ...correct position of terminal block as shown on the diagram Example of sensor installation TW3 TW4 Weld the sensor holder on the selected location of the pipe and then insulate it When the pipe is a copper pipe When the pipe is not a copper pipe Pipe Sensor holder Pipe Sensor Sensor clip Sensor Aluminum tape Sensor Rubber tape Sensor Cable tie Insulator Insulator When the holder sensor cannot be we...

Page 37: ...on will continue 2 Temperature of discharge water is controlled as time goes on like below Ռ ՍՋ ՍՐ ՎՋ ՎՐ ՏՋ ՏՐ ՐՋ ՐՐ ՑՋ Ս Վ Տ Ր Ց Ւ Փ Ք ՌՋ ՌՌ ՌՍ ՌՎ ՌՏ ՌՐ ՌՑ ՌՒ ՌՓ ՌՔ ՍՋ ՍՌ ՍՍ ՍՎ Day Temp Classification Initial Heating Step raise Heating Step down Total Hour Time 96 72 24 24 24 24 24 144 24 24 24 24 24 552 Temperature 30 55 30 35 40 45 50 55 50 45 40 35 30 3 Remaining days are displayed on the wire...

Page 38: ...ly change by local condition it is an option to auto restart system Classification When the outdoor unit is power off When the outdoor unit is power on Hydro Unit operation according to the DIP S W 4 setting ON default Hydro Unit E101 error occurs Hydro Unit E101 error disappears Hydro Unit operation turns off OFF Hydro Unit E101 error occurs Hydro Unit E101 error disappears Hydro Unit keeps its p...

Page 39: ...igh Fan Button Mode change LowTemp Button Low Fan Button Entering mode for option setting Option setting mode Entering mode to set option 1 Remove batteries from the remote controller 2 Insert batteries and enter the option setting mode while pressing HighTemp button and LowTemp button 3 Check if you have entered the option setting status 39 ENGLISH ...

Page 40: ...ue 0 F When changing a digit of an control kit address setting option set the SEG3 as A When changing a digit of control kit installation option set the SEG3 as 2 Ex When setting the central controller into disuse status Option SEG1 SEG2 SEG3 SEG4 SEG5 SEG6 Explanation PAGE MODE The option mode you want to change The tens digit of an option SEG you will change The unit digit of an option SEG you w...

Page 41: ...ne 2 indoor unit detected only when the room thermostat is used Short or open circuit error of the room temperature sensor of the Zone 1 indoor unit detected only when the room thermostat is used Wired remote controller thermistor SHORT or OPEN Water Inlet thermistor SHORT or OPEN PHE Outlet thermistor SHORT or OPEN Water outlet Back up Heater temp sensor SHORT or OPEN The Backup heater for using ...

Page 42: ...ntrol kit Tracking error between remote controller and the Control kit Memory EEPROM Read Write Error Wired remote Controller data error E601 E604 E654 MEMORY EEPROM Read Write Error Wired controller data error Micro SD card EEPROM Downloadconnector Thermistor Connector F3 COM2_B F4 COM2_A Terminal Block 42 ...

Page 43: ...gnals is ON After starting Normal flow rate error in case of normal flow rate in 10min during water pump signal is OFF E911 f Water pump ON Low flow rate NOT enough water flow Water flow 12LPM Outdoor unit capacity 9kW Water flow 7LPM Outdoor unit capacity 9kW E912 f Water pump OFF Normal flow rate Water flow 12LPM Outdoor unit capacity 9kW Water flow 7LPM Outdoor unit capacity 9kW 43 ENGLISH ...

Page 44: ... 231 Condenser temperature sensor error OUTDOOR UNIT 251 Discharge temperature sensor error OUTDOOR UNIT 320 OLP sensor error OUTDOOR UNIT 403 Detection of OUTDOOR UNIT compressor freezing During cooling operation OUTDOOR UNIT 404 Protection of OUTDOOR UNIT when it is overload during Safety Start Normal operation state OUTDOOR UNIT 407 Comp down due to high pressure OUTDOOR UNIT 416 Discharge of a...

Page 45: ...en circuit error of the Zone 1 water out temperature sensor CONTROL KIT 900 Short or open circuit error of the Zone 2 water out temperature sensor CONTROL KIT 901 Water inlet PHE temperature sensor error open short OUTDOOR UNIT 902 Water outlet PHE temperature sensor error open short OUTDOOR UNIT 903 Water outlet backup heater temperature sensor error CONTROL KIT 904 DHW tank temperature sensor er...

Page 46: ...0RXYDEG EU AE260RNWMEG EU 007 CU0103 AE080RXYDGG EU AE260RNWMGG EU AE080RXYDGG EU space heating only MIM E03CN AE120RXYDEG EU AE200RNWMEG EU 007 CU0104 AE120RXYDEG EU space heating only MIM E03CN AE160RXYDEG EU AE200RNWMEG EU AE160RXYDEG EU space heating only MIM E03CN AE120RXYDEG EU AE260RNWMEG EU 007 CU0105 AE120RXYDGG EU AE260RNWMGG EU AE120RXYDGG EU space heating only MIM E03CN AE160RXYDEG EU ...

Page 47: ...Memo 47 ENGLISH ...

Page 48: ...Samsung PO Box12987 Blackrock Co Dublin Ireland orBlackbushe Business Park Yateley GU46 6GG UK This appliance is ѣ ʪʒ и ϩ ŵࣗߤߣࢋ ...

Reviews: