background image

Microwave Oven

(COMMERCIAL)

Owner’s Instructions & Cooking Guide

MJ26A6091 (1850 WATT)
MJ26A6051 (1500 WATT)

imagine 

the possibilities

Thank you for purchasing this Samsung product. 

Please be advised that the Samsung warranty does NOT cover service 
calls to explain product operation, correct improper installation, or 
perform normal cleaning or maintenance.

Summary of Contents for MJ26A6051

Page 1: ...850 WATT MJ26A6051 1500 WATT imagine the possibilities Thank you for purchasing this Samsung product Please be advised that the Samsung warranty does NOT cover service calls to explain product operation correct improper installation or perform normal cleaning or maintenance ...

Page 2: ...ome use only Do not heat any type of textiles or cushions filled with grains which could cause burns and fire The manufacturer cannot be held liable for damage caused by improper or incorrect use of the appliance Failure to maintain the oven in a clean condition could lead to deterioration of the surface that could adversely affect the life of the appliance and possible result in a hazardous situa...

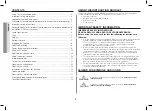
Page 3: ...ment of material and EDM and arc welding equipment For Class B equipment is equipment suitable for use in domestic establishments and in establishments directly connected to a low voltage power supply network which supplies buildings used for domestic purposes IMPORTANT SAFETY INSTRUCTIONS Make sure that these safety precautions are obeyed at all times WARNING Only qualified staff should be allowe...

Page 4: ...h the appliance Cleaning and user maintenance shall not be made by children without supervision WARNING If the door or door seals are damaged the oven must not be operated until it has been repaired by a competent person WARNING It is hazardous for anyone other than a competent person to carry out any service or repair operation that involves the removal of a cover which gives protection against e...

Page 5: ... ties from paper or plastic bags Reason Electric arcing or sparking may occur and may damage the oven When heating food in plastic or paper containers keep an eye on the oven due to the possibility of ignition Do not use your microwave oven to dry papers or clothes Use shorter times for smaller amounts of food to prevent overheating and burning food If smoke is observed switch off or unplug the ap...

Page 6: ...ide the oven at all times to absorb microwave energy in case the microwave oven is started accidentally Do not use harsh abrasive cleaners or sharp metal scrapers to clean the oven door glass since they can scratch the surface which may result in shattering of the glass Install the oven in compliance with the clearances stated in this manual See installing your microwave oven Take care when connec...

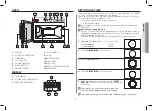
Page 7: ...l be turned off after 5 minutes with door open condition 1 To display the time in the Then press 20s 24 hour notation 12 hour notation Once Twice 2 Turn the TIMER DIAL to set the hour 3 Press the START button 4 Turn the TIMER DIAL to set the minutes 5 When the right time is displayed press the START BUTTON to start the clock The clock sets itself within 10 seconds If you don t want to setting the ...

Page 8: ...time is elapsed the end of cycle Beep Tone will sound 4 times and all heating will stop The oven lamp will go off For 1 min the cooling fan will keep working in order to cool down the interior parts During the time the fan will not stop even when you open the door 1 min later it will stop Food may be removed from oven whilst the fan is still running 4 Open the door and take the food out Close the ...

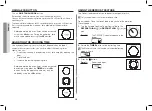
Page 9: ...power level and heating time Changed values are promptly shown in the display The oven is designed not to work when power level is set to 0 mode between the heating mode and the defrosting mode When you first plug in the power cord the oven beeps once and all the indicators show for 5 sec in the display window POWER LEVELS AND TIME VARIATIONS The power level function enables you to adapt the amoun...

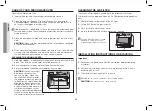
Page 10: ...ly You can increase the cooking time by pressing the 20s button when in a heating cycle The cooking time increases by 20 seconds at each press on 20s button But it can not exceed the maximum time allowed for the power level selected Before operating the oven times can be increased using the 20s button During the operating time may only be added by using the 20s button ADJUSTING THE COOKING TIME Li...

Page 11: ...operation with no load or small load or due to some blocking materials around the Air Filter or Air Exhaust at the back of the oven Open the oven door and check if 1 the oven has been operating with no load or too small load 2 the air filter is placed in a wrong position or 3 any blocking materials exist around the Air Exhaust Cool down the oven for approx 30 min under the normal temperature The o...

Page 12: ...use harsh detergents or abrasives If food remnant or spilled liquids stick to the oven walls or between door seal and door surface they will absorb microwaves possibly resulting in arcing or sparks 3 Clean the outside of the oven with soap and water then dry with a soft cloth CAUTION Make sure that water does not get into the back ventilation or control panel opening 4 When you clean the window of...

Page 13: ... microwave oven Cookware Microwave Safe Comments Aluminum foil Can be used in small quantities to protect areas against overcooking Arcing can occur if the foil is too close to the oven wall or if too much foil is used China and earthenware Porcelain pottery glazed earthenware and bone china are usually suitable unless deco rated with a metal trim Disposable polyester cardboard dishes Some frozen ...

Page 14: ...se proof paper Can be used to retain moisture and prevent spattering Recommended Use Caution Unsafe Cooking Guide F Frozen C Chilled Recipe Method Power Level Timing Stand Time 1850W 1500W BREAD PASTRIES To Defrost Vienna Baton 9 F DEFROST 1 0 45 0 50 5 mins Vienna Baton 9 X 2 F DEFROST 1 1 10 1 15 5 mins Gateaux ind Slice F Place on plate DEFROST 2 2 30 2 40 5 mins To warm Quiche 11 sliced 136g P...

Page 15: ...00 2 15 1 min Baked Beans 500g Cover and Stir half way HIGH 2 00 2 10 2 mins Baked Beans 250g Cover and Stir half way HIGH 1 00 1 05 2 mins Recipe Method Power Level Timing Stand Time 1850W 1500W DESSERTS To warm Apple Crumble 200g F Cover in dish HIGH 1 20 1 30 2 mins Christmas Pudding 150g C Place in bowl HIGH 0 20 0 25 2 mins Jam Roly Poly 80g F On a plate HIGH 1 00 1 05 2 mins Crepes Suzette 2...

Page 16: ...g C Covered HIGH 3 00 3 15 1 min Recipe Method Power Level Timing Stand Time 1850W 1500W FRESH VEGETABLES To cook 500g Beans green sliced 60ml 4tbsps water cover HIGH 3 00 3 15 2 mins Brocolli florets 60ml 4tbsps water cover HIGH 3 00 3 15 2 mins Cabbage shredded 10tbsps water cover HIGH 5 00 5 30 2 mins Carrots sliced 60ml 4tbsps water cover HIGH 3 30 3 45 2 mins Cauliflower florets 60ml 4tbsps w...

Page 17: ...hazardous situation 1 Clean the outside surfaces with a soft cloth and warm soapy water Rinse and dry 2 Remove any splashes or stains on the inside surfaces or on the roller ring with a soapy cloth Rinse and dry 3 To loosen hardened food particles and remove smells place a cup of diluted lemon juice on the turntable and heat for ten minutes at maximum power DO NOT spill water in the vents NEVER us...

Page 18: ...ce Model MJ26A6091 MJ26A6051 Power source 230 240 V 50 Hz Power consumption Microwave 13 A 12 7 A Output power 1850 W IEC 705 240 V 1850 W 230 V 1780 W 1500W IEC 705 240 V 1500 W 230 V 1450 W Operating frequency 2450 MHz Dimensions W x H x D Outside Oven cavity 464 x 368 x 557 mm 370 x 190 x 370 mm Volume 26 liter Weight Net 33 1 kg approx 514 1000 368 444 10 464 486 530 43 26 557 MEMO ...

Page 19: ...19 ENGLISH MEMO MEMO ...

Page 20: ...PORTUGAL 808 207 267 www samsung com pt support SPAIN 91 175 00 15 www samsung com es support SWEDEN 0771 726 786 www samsung com se support SWITZERLAND 0800 726 786 www samsung com ch support German www samsung com ch_fr support French UK 0333 000 0333 www samsung com uk support COUNTRY CALL OR VISIT US ONLINE AT IRELAND EIRE 0818 717100 www samsung com ie support POLAND IM 801 172 678 lub 48 22 ...

Page 21: ...ties Vielen Dank dass Sie sich für dieses Gerät von Samsung entschieden haben Bitte beachten Sie dass die Garantie von Samsung keine Inanspruchnahme des Kundendienstes für Erläuterungen zum Gerätebetrieb die Behebung einer unsachgemäßen Installation oder die Durchführung normaler Reinigungs oder Wartungsarbeiten am Gerät abdeckt ...

Page 22: ... Speisen vorgesehen Das Gerät ist ausschließlich für die Verwendung in Privathaushalten geeignet Erwärmen Sie keine Textilien oder mit Körnern gefüllte Kissen Dies könnte zu Verbrennungen oder einem Brand führen Der Hersteller haftet für keinerlei Schäden die durch unsachgemäße oder falsche Nutzung des Geräts entstehen Wenn das Gerät nicht sauber gehalten wird kann die Oberfläche beschädigt werden...

Page 23: ... in Form elektromagnetischer Strahlung zur Bearbeitung von Werkstoffen für Funkenerosions und Elektroschweißgeräte verwendet wird Geräte der Klasse B sind zum Einsatz in Wohnbereichen und in Anlagen bestimmt die direkt an eine Niederspannungsversorgung angeschlossen sind mit der Wohngebäude versorgt werden WICHTIGE SICHERHEITSHINWEISE Achten Sie darauf sich jederzeit an diese Sicherheitshinweise z...

Page 24: ...i Reinigung und Wartung nur dann helfen wenn sie dabei beaufsichtigt werden WARNUNG Wenn die Gerätetür oder die Türscharniere beschädigt sind darf das Gerät bis zur Reparatur durch sachkundiges Fachpersonal nicht verwendet werden WARNUNG Wartungs oder Reparaturarbeiten für die der Schutz gegen Mikrowellenstrahlung entfernt werden muss dürfen nur von sachkundigem Fachpersonal ausgeführt werden WARN...

Page 25: ...schädigen Lassen Sie das Gerät nicht unbeaufsichtigt wenn Sie Speisen in Kunststoff oder Papierbehältern erhitzen da die Gefahr besteht dass sich die Behälter entzünden Verwenden Sie das Gerät nicht zum Trocknen von Zeitungen oder Kleidung Stellen Sie bei kleinen Mengen geringere Garzeiten ein um ein Überhitzen und Verbrennen der Speisen zu verhindern Halten Sie die Gerätetür bei Rauchentwicklung ...

Page 26: ...n stets ein Glas Wasser in das Gerät zu stellen damit die Mikrowellen absorbiert werden falls das Gerät versehentlich eingeschaltet wird Benutzen Sie keine scharfen Scheuermittel oder Metallschaber um den Glaseinsatz der Gerätetür zu reinigen Sie könnten die Oberfläche zerkratzen und damit das Glas zerbrechen lassen Halten Sie beim Aufstellen des Geräts die in dieser Bedienungsanleitung angegebene...

Page 27: ...Drücken Sie 20 Sek 24 Stunden Notierung 12 Stunden Notierung Einmal Zweimal 2 Drehen Sie den TIMER DREHREGLER um die Stunden einzustellen 3 Drücken Sie die START Taste 4 Drehen Sie den TIMER DREHREGLER um die Minuten einzustellen 5 Wenn die richtige Uhrzeit angezeigt wird drücken Sie die START TASTE um die Uhr einzuschalten Die Uhr schaltet sich innerhalb von 10 Sekunden ein Wenn Sie die Uhrzeit n...

Page 28: ...wird angehalten Die Innenleuchte wird abgeschaltet Der Kühlungsventilator läuft noch 1 Minute weiter um die Teile im Inneren abzukühlen Während dieser Zeit hält der Ventilator auch dann nicht an wenn Sie die Tür öffnen Nach 1 Minute hält er an Sie können die Speisen bereits aus dem Mikrowellengerät nehmen während der Ventilator läuft 4 Öffnen Sie die Gerätetür und nehmen Sie die Speisen heraus Sch...

Page 29: ...ie Garzeit ändern Die geänderten Werte werden sofort auf dem Display angezeigt Das Gerät ist so ausgelegt dass es nicht funktioniert wenn die Leistungsstufe auf 0 zwischen dem Aufwärmmodus und dem Auftaumodus eingestellt ist Wenn Sie den Netzstecker erstmalig in die Steckdose stecken ertönt ein einmaliger Signalton und alle Anzeigen werden 5 Sekunden lang auf dem Display eingeblendet LEISTUNGSSTUF...

Page 30: ... Garzeit erhöhen indem Sie während des Erhitzens die 20s Taste drücken Die Garzeit wird durch jedes Drücken auf die 20s Taste um 20 Sekunden erhöht Die maximal erlaubte Zeit für die ausgewählte Leistungsstufe kann jedoch nicht überschritten werden Vor dem Betrieb des Mikrowellengeräts kann die Zeit mit der 20s Taste erhöht werden Während des Betriebs kann nur mit der 20s Taste die Zeit erhöht werd...

Page 31: ...oder weil der Luftfilter oder der Luftauslass an der Rückseite des Mikrowellengeräts verstopft ist zu heiß Öffnen Sie die Tür des Mikrowellengeräts und prüfen Sie ob 1 das Mikrowellengerät ohne Befüllung oder mit zu geringer Befüllung betrieben wurde 2 der Luftfilter in falscher Position angebracht ist oder 3 der Luftauslass verstopft ist Lassen Sie das Mikrowellengerät ca 30 Minuten unter die nor...

Page 32: ...er von Flüssigkeiten an den Innenwänden des Mikrowellengeräts oder zwischen der Türdichtung und der Türfläche kleben können Sie Mikrowellen absorbieren was möglicherweise zu Lichtbogen oder Funkenbildung führen kann 3 Reinigen Sie das Gerät von außen mit Seifenwasser und trocknen Sie es mit einem weichen Tuch VORSICHT Achten Sie darauf dass kein Wasser in die Belüftungsöffnungen auf der Rückseite ...

Page 33: ...rwendet werden können Geschirr Mikrowellengeeignet Kommentare Alufolie Kann in kleineren Mengen verwendet werden um bestimmte Bereiche vor Überhitzung zu schützen Wenn sich die Folie zu dicht an den Innenwänden des Mikrowellengeräts befindet oder zu viel Folie verwendet wird kann es zu Lichtbogenbildung kommen Porzellan und Steingut Keramik Töpferware glasiertes Steingut und feines Porzellan sind ...

Page 34: ... zu verhindern Empfohlen Mit Vorsicht Nicht sicher Zubereitungshinweise F Tiefgekühlt C Gekühlt Rezept Methode Leistungsstufe Zeit Ruhezeit 1850W 1500W BROT BACKWAREN Zum Auftauen Baguettebrötchen 23 cm F AUFTAUEN 1 0 Min 45 Sek 0 Min 50 Sek 5 Min Baguettebrötchen 23 cm X 2 F AUFTAUEN 1 1 Min 10 Sek 1 Min 15 Sek 5 Min Torte Einzelstück F Auf einen Teller geben AUFTAUEN 2 2 Min 30 Sek 2 Min 40 Sek ...

Page 35: ...n 500 g Abdecken und nach der Hälfte der Zeit umrühren HOCH 2 Min 00 Sek 2 Min 10 Sek 2 Min Gebackene Bohnen 250 g Abdecken und nach der Hälfte der Zeit umrühren HOCH 1 Min 00 Sek 1 Min 05 Sek 2 Min Rezept Methode Leistungsstufe Zeit Ruhezeit 1850W 1500W DESSERTS Zum Aufwärmen Apfel Crumble 200 g F Im Behälter abdecken HOCH 1 Min 20 Sek 1 Min 30 Sek 2 Min Christmas Pudding 150 g C In eine Schüssel...

Page 36: ...hezeit 1850W 1500W FRISCHES GEMÜSE Zum Garen 500 g Grüne Bohnen geschnitten 60 ml 4 EL Wasser hinzugeben abdecken HOCH 3 Min 00 Sek 3 Min 15 Sek 2 Min Brokkoliröschen 60 ml 4 EL Wasser hinzugeben abdecken HOCH 3 Min 00 Sek 3 Min 15 Sek 2 Min Kohl gehackt 10 EL Wasser hinzugeben abdecken HOCH 5 Min 00 Sek 5 Min 30 Sek 2 Min Möhren geschnitten 60 ml 4 EL Wasser hinzugeben abdecken HOCH 3 Min 30 Sek ...

Page 37: ...hen mit einem weichen Tuch und warmem Seifenwasser Wischen Sie sie erst mit klarem Wasser und dann trocken nach 2 Entfernen Sie Spritzer oder Flecken an den Innenflächen oder am Drehring mit einem in Seifenwasser getränkten Tuch Wischen Sie sie erst mit klarem Wasser und dann trocken nach 3 Um angetrocknete Essenreste und Gerüche zu entfernen stellen Sie eine Tasse mit verdünntem Zitronensaft auf ...

Page 38: ...26A6051 Eingangsspannung und Frequenz 230 240 V 50 Hz Leistungsaufnahme Microwave Mikrowelle 13 A 12 7 A Ausgangsleistung 1850 W IEC 705 240 V 1850 W 230 V 1780 W 1500W IEC 705 240 V 1500 W 230 V 1450 W Betriebsfrequenz 2450 MHz Abmessungen B x H x T Außen Garraum 464 x 368 x 557 mm 370 x 190 x 370 mm Fassungsvermögen 26 Liter Gewicht Netto ca 33 1 kg 514 1000 368 444 10 464 486 530 43 26 557 NOTI...

Page 39: ...19 DEUTSCH NOTIZEN NOTIZEN ...

Page 40: ...PORTUGAL 808 207 267 www samsung com pt support SPAIN 91 175 00 15 www samsung com es support SWEDEN 0771 726 786 www samsung com se support SWITZERLAND 0800 726 786 www samsung com ch support German www samsung com ch_fr support French UK 0333 000 0333 www samsung com uk support IRELAND EIRE 0818 717100 www samsung com ie support LAND RUFEN SIE UNS AN UNTER ODER BESUCHEN SIE UNS ONLINE UNTER POLA...

Page 41: ... VATIOS imagine las posibilidades Gracias por adquirir este producto Samsung Debe tener en cuenta que la garantía de Samsung NO cubre las llamadas al servicio técnico para pedir información sobre el funcionamiento del producto corregir una instalación inadecuada o trabajos normales de limpieza o de mantenimiento ...

Page 42: ...caliente ningún tipo de textil ni cojines rellenos de granos ya que podrían provocar quemaduras e incendios El fabricante no se hace responsable de los daños derivados de un uso inadecuado o incorrecto de este aparato Si no mantiene el horno limpio puede que se dañe la superficie lo que podría restar efectividad a la vida del aparato y provocar riesgos innecesarios LEYENDA DE LOS SÍMBOLOS E ICONOS...

Page 43: ...iación electromagnética para el tratamiento del material así como equipos EDM y de soldadura por arco Los equipos de la Clase B son apropiados para su uso en establecimientos domésticos y en establecimientos conectados directamente a una red de suministro de energía de bajo voltaje en edificios de uso doméstico INSTRUCCIONES IMPORTANTES DE SEGURIDAD Asegúrese de que se cumplan estas precauciones d...

Page 44: ...s no deben hacer la limpieza y el mantenimiento sin vigilancia ADVERTENCIA Si la puerta o los cierres de la puerta están dañados no se debe usar el horno hasta que no lo haya reparado una persona cualificada ADVERTENCIA Es arriesgado que una persona no cualificada realice la reparación ya que esta supone la retirada de una cubierta que protege contra la exposición a la energía de las microondas AD...

Page 45: ...e alambre de las bolsas de papel o plástico Motivo Pueden ocurrir arcos eléctricos o chispas que pueden dañar el horno Cuando caliente alimentos en recipientes de papel o plástico vigile el horno ya que existe un riesgo de incendio No utilice su horno microondas para secar papeles o ropa Utilice tiempos más cortos para cantidades más pequeñas de alimentos para evitar que se sobrecalienten y se que...

Page 46: ...n agua en el interior del horno para absorber la energía microondas si el horno microondas se pone en marcha accidentalmente No use limpiadores abrasivos ni útiles metálicos afilados para limpiar la puerta de cristal del horno ya que pueden rayar la superficie y producirse rotura del cristal Instale el horno de acuerdo con las distancias especificadas en este manual Consulte instalación del horno ...

Page 47: ...zca la hora en A continuación pulse 20s Formato de 24 horas Formato de 12 horas Una vez Dos veces 2 Gire el DIAL DEL TEMPORIZADOR para ajustar la hora 3 Pulse el botón START INICIO 4 Gire el DIAL DEL TEMPORIZADOR para ajustar los minutos 5 Cuando aparezca la hora correcta pulse el BOTÓN DE INICIO para poner en marcha el reloj El reloj se ajusta solo en 10 segundos Si no desea ajustar la hora pulse...

Page 48: ...rido todo el tiempo el tono de fin de ciclo sonará 4 veces y todo el calentamiento se detendrá La luz del horno se apagará Durante 1 minuto el ventilador seguirá funcionando para enfriar las partes interiores Durante este tiempo el ventilador no se detendrá aunque se abra la puerta 1 minuto más tarde se detendrá Los alimentos pueden sacarse del horno mientras el ventilador sigue funcionando 4 Abra...

Page 49: ... tiempo de calentamiento Los valores modificados se muestran rápidamente en la pantalla El horno se ha diseñado para que no funcione cuando el nivel de potencia se ajusta al modo 0 mientras se encuentra en el modo de calentamiento y en el de descongelación Cuando se enchufa por primera vez el cable de alimentación el horno emite un pitido y todos los indicadores aparecen durante 5 segundos en la p...

Page 50: ... Puede aumentar el tiempo de cocción al pulsar el botón 20s cuando está en un ciclo de calentamiento El tiempo de cocción aumenta de a 20 segundos cada vez que se pulsa el botón 20s Pero no puede superar el tiempo máximo permitido para el nivel de potencia seleccionado Antes de que el horno funcione el tiempo puede ser incrementado usando el botón 20s Durante el funcionamiento solo es posible añad...

Page 51: ...a un funcionamiento excesivo sin carga o con poca carga o debido a algunos materiales de bloqueo situados en torno al filtro de aire o a la salida de aire en la parte posterior del horno Abra la puerta del horno y compruebe si 1 el horno ha estado funcionando sin carga o con una carga demasiado pequeña 2 el filtro de aire está colocado en una posición incorrecta o 3 existe algún material de bloque...

Page 52: ...derramados se adhieren a las paredes del horno o entre la junta de la puerta y la superficie de la misma absorberán las microondas pudiendo provocar arcos o chispas 3 Limpie el exterior del horno con agua y jabón y luego séquelo con un paño suave PRECAUCIÓN Asegúrese de que el agua no entre en la ventilación trasera o en la abertura del panel de control 4 Cuando limpie la ventana de la puerta aseg...

Page 53: ...s cantidades para evitar que determinadas áreas se cuezan demasiado Si el papel de aluminio está demasiado cerca de las paredes del horno o si se utiliza en grandes cantidades pueden producirse arcos eléctricos Porcelana y barro cocido La porcelana la cerámica la loza vidriada y la porcelana fina son normalmente adecuados a menos que estén decorados con adornos metálicos Poliéster desechable plato...

Page 54: ...ncerado o a prueba de grasa Se puede utilizar para retener la humedad y evitar salpicaduras Recomendaciones Usar con precaución Inseguro Guía de cocción F Congelados C Comida preparada Receta Método Nivel de potencia Tiempo Tiempo de parada 1850W 1500W PAN Y BOLLERÍA Para descongelar Bastón de Viena 9 F DESCONGELAR 1 0 45 0 50 5 min Bastón de Viena 9 X 2 F DESCONGELAR 1 1 10 1 15 5 min Gateaux ind...

Page 55: ... 00 2 15 1 min Alubias al horno 500g Tapar y revolver a medio tiempo ALTO 2 00 2 10 2 min Alubias al horno 250g Tapar y revolver a medio tiempo ALTO 1 00 1 05 2 min Receta Método Nivel de potencia Tiempo Tiempo de parada 1850W 1500W POSTRES Para calentar Crumble de manzana 200g F Plato con cubierta ALTO 1 20 1 30 2 min Pudín de navidad 150g C Colocar en un bol ALTO 0 20 0 25 2 min Mermelada Roly P...

Page 56: ...eta Método Nivel de potencia Tiempo Tiempo de parada 1850W 1500W VERDURAS FRESCAS Para cocinar 500g Judías verdes en rodajas 60 ml 4 cucharadas de agua cubierta ALTO 3 00 3 15 2 min Brócoli en floretes 60 ml 4 cucharadas de agua cubierta ALTO 3 00 3 15 2 min Repollo rallado 10 cucharadas de agua cubierta ALTO 5 00 5 30 2 min Zanahorias en rodajas 60 ml 4 cucharadas de agua cubierta ALTO 3 30 3 45 ...

Page 57: ...ve y agua tibia y jabonosa Enjuague y seque 2 Elimine cualquier salpicadura o mancha en las superficies interiores o en el aro del plato con un paño jabonoso Enjuague y seque 3 Para aflojar las partículas de comida endurecidas y eliminar los olores coloque una taza de jugo de limón diluido en el plato giratorio y caliéntelo durante diez minutos a máxima potencia NO derrame agua en las rejillas de ...

Page 58: ...delo MJ26A6091 MJ26A6051 Fuente de alimentación 230 240 V 50 Hz Consumo de energía Microondas 13 A 12 7 A Potencia de salida 1850 W IEC 705 240 V 1850 W 230 V 1780 W 1500W IEC 705 240 V 1500 W 230 V 1450 W Frecuencia de funcionamiento 2450 MHz Dimensiones An x Al x Pr Exterior Cavidad del horno 464 x 368 x 557 mm 370 x 190 x 370 mm Volumen 26 litros Peso Neto 33 1 kg aprox 514 1000 368 444 10 464 ...

Page 59: ...19 ESPAÑOL NOTAS NOTAS ...

Page 60: ... PORTUGAL 808 207 267 www samsung com pt support SPAIN 91 175 00 15 www samsung com es support SWEDEN 0771 726 786 www samsung com se support SWITZERLAND 0800 726 786 www samsung com ch support German www samsung com ch_fr support French UK 0333 000 0333 www samsung com uk support IRELAND EIRE 0818 717100 www samsung com ie support PAÍS LLAME O VISITE NUESTRA PÁGINA WEB POLAND IM 801 172 678 lub 4...

Page 61: ...TT immagina le possibilità Grazie per aver acquistato questo prodotto Samsung Si prega di notare che la garanzia Samsung NON copre le richieste di assistenza per ottenere spiegazioni sul funzionamento del prodotto correggere una installazione non idonea o eseguire la normale pulizia o manutenzione del prodotto ...

Page 62: ...oonde è inteso per il riscaldamento dei cibi È stato progettato solo per un uso domestico Non riscaldare tessuti o cuscini riempiti con chicchi poiché ciò potrebbe provocare scottature o un incendio Il costruttore non potrà essere ritenuto responsabile per eventuali danni causati da un uso improprio dell apparecchio Se il forno non viene mantenuto in condizioni di pulizia ottimali le superfici pot...

Page 63: ... di radiazioni elettromagnetiche per il trattamento di materiali apparecchi a elettro erosione EDM e apparecchi per saldatura ad arco Gli apparecchi di Classe B sono idonei per un uso domestico o direttamente connesso a una rete elettrica a basso voltaggio in edifici a uso abitativo ISTRUZIONI DI SICUREZZA IMPORTANTI Assicurarsi di osservare sempre queste precauzioni di sicurezza AVVERTENZA Eventu...

Page 64: ... manutenzione dell apparecchio non devono essere eseguite da bambini senza la supervisione di un adulto AVVERTENZA Se lo sportello o le sue guarnizioni sono danneggiate il forno non deve essere utilizzato fino ad avvenuta riparazione da parte di personale qualificato AVVERTENZA Ogni operazione o riparazione che implichi la rimozione del coperchio che protegge dall esposizione all energia a microon...

Page 65: ...e ecc Rimuovere i lacci in carta o plastica dalle buste Motivo Potrebbero generare scintille o archi elettrici in grado di danneggiare il forno Qualora si cuociano cibi in contenitori di plastica o carta sorvegliare il forno per evitare possibili principi di incendio Non utilizzare il forno a microonde per asciugare carta o indumenti Usare tempi di utilizzo più brevi per piccole quantità di cibo a...

Page 66: ...iare un recipiente con acqua all interno del forno per assorbire l energia proveniente dal forno a microonde qualora venga azionato accidentalmente Per pulire lo sportello del forno non utilizzare prodotti abrasivi o raschietti di metallo potrebbero graffiare la superficie e ciò potrebbe mandare in frantumi il vetro Installare il forno rispettando le distanze indicate in questo manuale Vedere Inst...

Page 67: ...sportello aperto 1 Per visualizzare l ora in Quindi premere 20s Formato 24 ore Formato 12 ore Una volta Due volte 2 Ruotare la MANOPOLA TIMER per impostare l ora 3 Premere il tasto START AVVIO 4 Ruotare la MANOPOLA TIMER per impostare i minuti 5 Quando appare l ora esatta premere il tasto START AVVIO per avviare l orologio L orologio si imposta entro 10 secondi Se non si desidera impostare l ora p...

Page 68: ... 4 volte il segnale acustico di fine ciclo e il riscaldamento si interrompe La luce del forno si spegne Per 1 minuto la ventola di raffreddamento continua a funzionare per raffreddare le parti interne Durante il tempo la ventola non si arresta neanche quando si apre lo sportello 1 minuto dopo si arresta Il cibo può essere estratto dal forno mentre la ventola è ancora in funzione 4 Aprire lo sporte...

Page 69: ...cati vengono visualizzati immediatamente sul display Il forno è progettato per non funzionare quando il livello di potenza è impostato sulla modalità 0 tra la modalità di riscaldamento e la modalità di scongelamento Quando si collega per la prima volta il cavo di alimentazione il forno emette un segnale acustico e tutti gli indicatori vengono visualizzati per 5 secondi nella finestra del display L...

Page 70: ...re immediatamente il riscaldamento È possibile aumentare il tempo di cottura premendo il tasto 20s durante un ciclo di riscaldamento Il tempo di cottura aumenta di 20 secondi ad ogni pressione del tasto 20s Tuttavia non può superare il tempo massimo consentito per il livello di potenza selezionato Prima di utilizzare il forno è possibile aumentare i tempi utilizzando il tasto 20s Durante il funzio...

Page 71: ...ccessivo senza carico o di un carico ridotto oppure a causa di alcuni materiali di blocco attorno al filtro dell aria o allo scarico dell aria sul retro del forno Aprire lo sportello del forno e verificare se 1 il forno ha funzionato senza carico o con un carico troppo ridotto 2 il filtro dell aria è posizionato in una posizione errata o 3 sono presenti materiali di blocco attorno allo scarico del...

Page 72: ...i attaccano alle pareti del forno o tra la guarnizione e la superficie dello sportello assorbiranno le microonde con il rischio di formazione di archi elettrici o scintille 3 Pulire l esterno del forno con acqua e sapone quindi asciugare con un panno morbido ATTENZIONE Assicurarsi che l acqua non penetri nella ventilazione posteriore o nell apertura del pannello di controllo 4 Quando si pulisce la...

Page 73: ...er impedire che determinate aree vengano cotte eccessivamente Se il foglio di alluminio è troppo vicino alla parete del forno o se la quantità usata è troppo elevata può innescare un arco elettrico Porcellana cinese e terracotta Porcellana terracotta terracotta porcellanata e porcellana cinese sono materiali adatti a meno che non siano decorati con finiture in metallo Piatti usa e getta in cartone...

Page 74: ...necessario Carta oleata o resistente ai grassi Può essere utilizzata per trattenere l umidità ed evitare gli schizzi Uso consigliato Usare con attenzione Non sicura Guida alla cottura F Congelato C Surgelato Ricetta Metodo Livelli di potenza Tempo Tempi di riposo 1850W 1500W PANE E DOLCI Per scongelare Vienna Baton 9 F DEFROST 1 SCONGELAMENTO 1 0 45 0 50 5 min Vienna Baton 9 X 2 F DEFROST 1 SCONGE...

Page 75: ... 2 15 1 min Fagioli cotti 500 g Coprire e mescolare a metà cottura ALTO 2 00 2 10 2 min Fagioli cotti 250 g Coprire e mescolare a metà cottura ALTO 1 00 1 05 2 min Ricetta Metodo Livelli di potenza Tempo Tempi di riposo 1850W 1500W DESSERT Per riscaldare Dolce di mele 200 g F Mettere sul piatto e coprire ALTO 1 20 1 30 2 min Dolce di Natale 150 g C Mettere in una scodella ALTO 0 20 0 25 2 min Roto...

Page 76: ... Per cucinare 500 g Fagioli freschi affettati Aggiungere 60 ml 4 cucchiai da tavola di acqua e coprire ALTO 3 00 3 15 2 min Broccoli divisi in fiori Aggiungere 60 ml 4 cucchiai da tavola di acqua e coprire ALTO 3 00 3 15 2 min Cavolo tagliato a pezzi Aggiungere 10 cucchiai da tavola di acqua e coprire ALTO 5 00 5 30 2 min Carote affettate Aggiungere 60 ml 4 cucchiai da tavola di acqua e coprire AL...

Page 77: ...le superfici esterne con un panno soffice e con una soluzione di acqua calda e sapone Sciacquare e asciugare 2 Rimuovere schizzi o macchie dalle superfici interne o dall anello girevole con un panno imbevuto di sapone Sciacquare e asciugare 3 Per sciogliere particole indurite di cibo e per togliere gli odori mettere una tazza di succo di limone diluito nel piatto girevole e scaldare per dieci minu...

Page 78: ... MJ26A6091 MJ26A6051 Sorgente di alimentazione 230 240 V 50 Hz Consumo elettrico Microwave Microonde 13 A 12 7 A Potenza emessa 1850 W IEC 705 240 V 1850 W 230 V 1780 W 1500W IEC 705 240 V 1500 W 230 V 1450 W Frequenza operativa 2450 MHz Dimensioni L x A x P Parte esterna Cavità del forno 464 x 368 x 557 mm 370 x 190 x 370 mm Volume 26 litri Peso Netto 33 1 kg circa 514 1000 368 444 10 464 486 530...

Page 79: ...19 ITALIANO PROMEMORIA PROMEMORIA ...

Page 80: ...ORTUGAL 808 207 267 www samsung com pt support SPAIN 91 175 00 15 www samsung com es support SWEDEN 0771 726 786 www samsung com se support SWITZERLAND 0800 726 786 www samsung com ch support German www samsung com ch_fr support French UK 0333 000 0333 www samsung com uk support IRELAND EIRE 0818 717100 www samsung com ie support NAZIONE CHIAMARE IL NUMERO O VISITARE IL SITO WEB POLAND IM 801 172 ...

Page 81: ...onde de possibilités Nous vous remercions d avoir choisi ce produit Samsung Veuillez noter que la garantie Samsung n inclut pas les déplacements du service après vente pour expliquer le fonctionnement de l appareil corriger une installation non correcte ou effectuer des opérations de nettoyage ou d entretien normaux ...

Page 82: ...t uniquement destiné à un usage domestique Ne faites jamais chauffer de textiles ou de coussins remplis de grains car cela pourrait entraîner des départs de feu Le fabricant ne peut être tenu responsable des dommages provoqués par une utilisation non conforme ou incorrecte de l appareil En négligeant la propreté de votre four vous risquez d en détériorer les surfaces et par conséquent d en réduire...

Page 83: ...sinage par électro érosion et de soudure à l arc Les équipements de classe B sont des équipements adaptés à l usage dans les établissements domestiques et ceux directement reliés à un réseau d alimentation électrique basse tension qui alimente les bâtiments utilisés à des fins domestiques CONSIGNES DE SÉCURITÉ IMPORTANTES Assurez vous que ces consignes de sécurité soient respectées en tout temps A...

Page 84: ...vec l appareil Le nettoyage et l entretien de l appareil ne doivent pas être effectués par un enfant sans surveillance AVERTISSEMENT si la porte ou les joints de la porte sont endommagés le four ne doit pas être utilisé tant que ces pièces n ont pas été réparées par une personne qualifiée AVERTISSEMENT il est très dangereux pour toute personne non habilitée d effectuer des manipulations ou des rép...

Page 85: ...ou en plastique Raison il peut y avoir des arcs électriques ou des étincelles ce qui pourrait endommager votre four Lorsque vous faites réchauffer des aliments dans des récipients en plastique ou en papier veillez à ce que ces derniers ne s enflamment pas dans le four N utilisez pas votre four à micro ondes pour faire sécher du papier ou des vêtements Utilisez des temps de cuisson ou de chauffe ré...

Page 86: ...aisons de sécurité Nous vous recommandons de laisser en permanence un verre d eau à l intérieur du four ainsi si vous mettez le four à micro ondes en marche par inadvertance alors qu il est vide l eau absorbera les micro ondes N utilisez jamais de produits abrasifs ou de grattoirs métalliques pour nettoyer la vitre de la porte du four ils pourraient en rayer la surface et par conséquent casser le ...

Page 87: ... 12 heures Une fois Deux fois 2 Tournez le BOUTON DE RÉGLAGE DE LA MINUTERIE pour régler l heure 3 Appuyez sur le bouton START 4 Tournez le BOUTON DE RÉGLAGE DE LA MINUTERIE pour régler les minutes 5 Quand la bonne heure est affichée appuyez sur le BOUTON START pour lancez l horloge L horloge se définit toute seule à dix secondes près Si vous ne voulez pas régler l horloge appuyez sur le bouton AN...

Page 88: ...tit 4 fois et le réchauffage s arrête La lumière du four s éteint Le ventilateur continue de fonctionner pendant 1 minute afin de refroidir les pièces intérieures Pendant ce temps le ventilateur ne s arrête pas quand vous ouvrez la porte Il s arrêtera une minute après La nourriture peut être enlevée du four quand le ventilateur continue de fonctionner 4 Ouvrez la porte et enlevez les aliments Ferm...

Page 89: ...emps de réchauffage Les valeurs modifiées s affichent rapidement à l écran Le four est conçu pour ne pas fonctionner lorsque le niveau de puissance est réglé sur le mode 0 entre le mode de réchauffage et le mode de décongélation Quand vous branchez le cordon d alimentation pour la première fois le four émet un signal sonore et tous les indicateurs s affichent pendant 5 secondes à l écran PUISSANCE...

Page 90: ...er le temps de cuisson en ayant sur le bouton 20s au cours du cycle de réchauffage Le temps de cuisson s allonge de 20 secondes en 20 secondes à chaque fois que vous appuyez sur le bouton 20s Mais il ne peut pas dépasser la durée maximum allouée au niveau de puissance sélectionné Avant de faire fonctionner le four les durées peuvent être allongées à l aide du bouton 20s Lors du fonctionnement on n...

Page 91: ...ud à cause d un fonctionnement excessif à vide ou presque ou à cause de matériaux bloquants autour du filtre à air ou de l évacuation d air à l arrière du four Ouvrez la porte du four et vérifiez si 1 le four a fonctionné à vide ou presque 2 le filtre à air est placé dans la mauvaise position ou 3 s il y a des matériaux bloquant autour de l évacuation d air Laissez le four refroidir pendant enviro...

Page 92: ... porte et la surface de la porte ils absorberont des micro ondes ce qui peut engendrer des arcs électriques ou des étincelles 3 Nettoyez l extérieur du four avec de l eau et du savon puis essuyez le à l aide d un chiffon doux ATTENTION assurez vous que l eau ne pénètre pas dans la ventilation à l arrière ou dans les ouvertures du tableau de commande 4 Quand vous nettoyez la vitre de la porte utili...

Page 93: ...en petite quantité afin d empêcher toute surcuisson de certaines zones peu charnues Des arcs électriques peuvent se former si l aluminium est placé trop près des parois du four ou si vous en avez utilisé en trop grande quantité Porcelaine et terre cuite S ils ne comportent pas d ornements métalliques les récipients en céramique en terre cuite en faïence et en porcelaine sont généralement adaptés P...

Page 94: ...iquement Perforez en la surface avec une fourchette si nécessaire Papier paraffiné ou sulfurisé Peut être utilisé afin de retenir l humidité et d empêcher les projections Recommandé À utiliser avec précaution Risqué Guide de cuisson F Surgelé C Réfrigéré Recette Méthode Niveau de puissance Temps Temps de repos 1850W 1500W PAIN ET PÂTISSERIES À décongeler Baguette viennoise 9 F DÉCONGÉLATION 1 0 45...

Page 95: ...in Haricots blancs à la sauce tomate 500 g Couvrez et remuez à la moitié du temps ÉLEVÉ 2 00 2 10 2 min Haricots blancs à la sauce tomate 250 g Couvrez et remuez à la moitié du temps ÉLEVÉ 1 00 1 05 2 min Recette Méthode Niveau de puissance Temps Temps de repos 1850W 1500W DESSERTS Pour tiédir Crumble à la pomme 200 g F Mettez le dans un plat et couvrez ÉLEVÉ 1 20 1 30 2 min Pudding de Noël 150 g ...

Page 96: ...ette Méthode Niveau de puissance Temps Temps de repos 1850W 1500W LÉGUMES FRAIS À cuire 500 g Haricots verts coupés 60 ml 4 cuillères à café d eau au dessus ÉLEVÉ 3 00 3 15 2 min Brocolis en fleurettes 60 ml 4 cuillères à café d eau au dessus ÉLEVÉ 3 00 3 15 2 min Choux en morceaux 10 cuillères à café d eau au dessus ÉLEVÉ 5 00 5 30 2 min Carottes coupées en rondelles 60 ml 4 cuillères à café d ea...

Page 97: ... 2 Enlevez toutes les éclaboussures ou taches sur les surfaces intérieures ou sur l anneau du plateau tournant à l aide d un chiffon imbibé de savon Rincez et séchez 3 Pour ramollir les particules alimentaires durcies et faire disparaître les odeurs placez une tasse de jus de citron dilué sur le plateau tournant et réchauffez pendant dix minutes à la puissance maximum NE RENVERSEZ PAS d eau dans l...

Page 98: ...091 MJ26A6051 Alimentation 230 240 V 50 Hz Consommation d énergie Micro ondes 13 A 12 7 A Puissance de sortie 1850 W IEC 705 240 V 1850 W 230 V 1780 W 1500W IEC 705 240 V 1500 W 230 V 1450 W Fréquence de fonctionnement 2450 MHz Dimensions l x H x P Extérieures Intérieures 464 x 368 x 557 mm 370 x 190 x 370 mm Capacité 26 litres Poids Net 33 1 kg env 514 1000 368 444 10 464 486 530 43 26 557 NOTES ...

Page 99: ...19 FRANÇAIS NOTES NOTES ...

Page 100: ...ort PORTUGAL 808 207 267 www samsung com pt support SPAIN 91 175 00 15 www samsung com es support SWEDEN 0771 726 786 www samsung com se support SWITZERLAND 0800 726 786 www samsung com ch support German www samsung com ch_fr support French UK 0333 000 0333 www samsung com uk support IRELAND EIRE 0818 717100 www samsung com ie support PAYS APPELEZ LE OU CONTACTEZ NOUS EN LIGNE SUR POLAND IM 801 17...

Page 101: ...051 1500 WATT imagine the possibilities Bedankt voor de aankoop van dit Samsung product Houd er rekening mee dat servicebezoeken voor uitleg over het product herstel van onjuiste installatie of het uitvoeren van normale schoonmaak of onderhoudswerkzaamheden NIET onder de Samsung garantie vallen ...

Page 102: ...men van voedsel De oven is alleen bedoeld voor huishoudelijk gebruik Verhit geen textiel of kussens die met korrels zijn gevuld en brandwonden en brand kunnen veroorzaken De fabrikant is niet verantwoordelijk voor schade door verkeerd of onjuist gebruik van het apparaat Als de oven niet wordt schoongehouden kan het oppervlak beschadigd raken Hierdoor kan de levensduur van het apparaat nadelig word...

Page 103: ...s apparatuur die geschikt is voor gebruik in huishoudelijke omgevingen en in omgevingen die rechtstreeks zijn aangesloten op het stroomnet met laag voltage dat geleverd wordt aan gebouwen die voor huishoudelijk gebruik zijn bedoeld BELANGRIJKE VEILIGHEIDSAANWIJZINGEN Zorg ervoor dat deze veiligheidsvoorschriften te allen tijde worden opgevolgd WAARSCHUWING Alleen bevoegd personeel mag de magnetron...

Page 104: ...derhoudswerkzaamheden uitvoeren WAARSCHUWING Als de deur of de afsluitstrippen zijn beschadigd mag u de oven niet gebruiken voordat deze is gerepareerd door een gekwalificeerde monteur WAARSCHUWING Onderhoud en reparaties waarbij de behuizing die bescherming biedt tegen blootstelling aan microgolven wordt verwijderd mogen alleen worden uitgevoerd door een gekwalificeerde monteur Voor anderen is di...

Page 105: ...trische vonken ontstaan waardoor de magnetron beschadigd kan worden Vanwege het risico op ontbranding raden wij u aan de oven in het oog te houden wanneer u voedsel verwarmt dat in plastic of papier is verpakt Gebruik uw magnetron niet voor het drogen van papier of kleren Gebruik kortere tijden voor kleine hoeveelheden voedsel om oververhitting en verbranden van voedsel te voorkomen Als er rook ui...

Page 106: ...r in de magnetron te laten staan om de microgolven te absorberen als deze per ongeluk wordt ingeschakeld Gebruik geen grove schuurmiddelen of scherpe metalen schrapers om het glas van de deur te reinigen omdat dit krassen op het oppervlak kan veroorzaken die verbrijzeling van het glas kunnen veroorzaken Plaats de oven met voldoende vrije ruimte rondom zoals in deze handleiding wordt vermeld Zie De...

Page 107: ... geopend 1 Voor weergave van het display in de Druk dan op 20s 24 uurs notatie 12 uurs notatie Eenmaal Tweemaal 2 Draai de DRAAIKNOP TIMER om het uur in te stellen 3 Druk op de toets START 4 Draai de DRAAIKNOP TIMER om de minuten in te stellen 5 Druk wanneer de juiste tijd is ingesteld op de STARTTOETS om de klok te starten De klok stelt zichzelf binnen 10 seconden in Als u de tijd niet wilt inste...

Page 108: ...eind van de cyclus 4 maal en alle verwarming zal stoppen De magnetronlamp gaat uit De koelventilator blijft 1 min lang werken om de binnenste delen af te koelen In deze tijd zal de ventilator niet stoppen ook al opent u de deur 1 min later stopt hij Het voedsel kan uit de magnetron worden gehaald terwijl de ventilator nog draait 4 Open de deur en haal het voedsel eruit Sluit de deur De magnetronla...

Page 109: ...verwarmingstijd wel wijzigen Gewijzigde waarden worden direct op het display aangegeven De magnetron is zo ontworpen dat hij niet werkt als het vermogen op de stand 0 tussen de verwarmingsstand en de ontdooistand staat Als u het snoer voor de eerste keer in het stopcontact steekt piept de magnetron eenmaal en worden alle indicatoren 5 sec lang op het display weergegeven VERMOGENSNIVEAUS EN BEREIDI...

Page 110: ...de kooktijd verlengen door op de 20s toets te drukken terwijl u met een verwarmingscyclus bezig bent De kooktijd wordt bij elke keer drukken op de 20s toets met 20 seconden verlengd De maximaal toegestane tijd voor het gekozen vermogen kan niet worden overschreden Vóór het inschakelen van de magnetron kan de tijd met de 20s toets worden verlengd Tijdens de werking kan er alleen tijd met de 20s toe...

Page 111: ...ik zonder of met een kleine hoeveelheid of doordat materialen het luchtfilter of de luchtuitlaat aan de achterkant van de magnetron blokkeren Open de deur en controleer of 1 de magnetron zonder of met een te kleine hoeveelheid heeft gewerkt 2 het luchtfilter op een verkeerde plaats zit of 3 er materiaal de luchtuitlaat blokkeert Laat de magnetron afkoelen ongeveer 30 min tot de normale temperatuur...

Page 112: ...esten of geknoeide vloeistof tegen de wanden van de magnetron of tussen de deurafdichting en het deuroppervlak kleven zullen deze microgolven absorberen wat tot vonkoverslag kan leiden 3 Reinig de buitenkant van de magnetron met water en zeep en droog hem met een zachte doek af LET OP Zorg ervoor dat er geen water in de ventilatieopening aan de achterkant of de opening van het bedieningspaneel ter...

Page 113: ...ookmateriaal Magnetronbestendig Opmerkingen Aluminiumfolie Kan worden gebruikt in kleine hoeveelheden om te voorkomen dat bepaalde delen van het voedsel te gaar worden Als te veel folie wordt gebruikt of de folie te dicht bij de ovenwand komt kunnen echter vonken ontstaan Porselein en aardewerk Porselein aardewerk en geglazuurd aardewerk zijn meestal wel geschikt tenzij er een metalen sierrand op ...

Page 114: ...rk gaatjes aanbrengen Vetvrij papier Kan worden gebruikt om vocht vast te houden en spatten te voorkomen Aanbevolen Wees voorzichtig Onveilig Richtlijnen voor bereiding B Bevroren G Gekoeld Gerecht Methode Vermogensniveau Tijd Nagaartijd 1850W 1500W BROOD BANKET Ontdooien Wit stokbroodje 22 cm B ONTDOOIEN 1 0 45 0 50 5 min Wit stokbroodje 22 cm x2 B ONTDOOIEN 1 1 10 1 15 5 min Taart per punt B Op ...

Page 115: ... 1 min Witte bonen 500 g Afdekken en halverwege omroeren HOOG 2 00 2 10 2 min Witte bonen 250 g Afdekken en halverwege omroeren HOOG 1 00 1 05 2 min Gerecht Methode Vermogensniveau Tijd Nagaartijd 1850W 1500W DESSERTS Verwarmen Appelkruimel 200 g B In schaal afdekken HOOG 1 20 1 30 2 min Christmas Pudding 150 g G In kom plaatsen HOOG 0 20 0 25 2 min Jamrol 80 g B Op een bord HOOG 1 00 1 05 2 min C...

Page 116: ... Afgedekt HOOG 3 00 3 15 1 min Gerecht Methode Vermogensniveau Tijd Nagaartijd 1850W 1500W VERSE GROENTEN Koken van 500 g Bonen groen gesneden Bedek met 60 ml 4 eetl water HOOG 3 00 3 15 2 min Broccoli roosjes Bedek met 60 ml 4 eetl water HOOG 3 00 3 15 2 min Kool gesneden Bedek met 10 eetl water HOOG 5 00 5 30 2 min Wortels in plakjes Bedek met 60 ml 4 eetl water HOOG 3 30 3 45 2 min Bloemkool ro...

Page 117: ...hte doek en warm water met zeep Afspoelen en afdrogen 2 Verwijder alle spetters of vlekken op de binnenoppervlakken of de loopring met een doek met zeep Afspoelen en afdrogen 3 Plaats een kop met verdund citroensap op het draaiplateau en verwarm dit 10 minuten lang op maximaal vermogen zodat opgedroogde voedselresten loskomen en geuren worden verwijderd Mors NIET met water in de ventilatieopeninge...

Page 118: ...geving worden gewijzigd Model MJ26A6091 MJ26A6051 Stroombron 230 240 V 50 Hz Energieverbruik Magnetron 13 A 12 7 A Uitgangsvermogen 1850 W IEC 705 240 V 1850 W 230 V 1780 W 1500 W IEC 705 240 V 1500 W 230 V 1450 W Frequentie 2450 MHz Afmetingen B x H x D Buiten Ovenruimte 464 x 368 x 557 mm 370 x 190 x 370 mm Volume 26 liter Gewicht Netto Ong 33 1 kg 514 1000 368 444 10 464 486 530 43 26 557 MEMO ...

Page 119: ...19 NEDERLANDS MEMO MEMO ...

Page 120: ...PORTUGAL 808 207 267 www samsung com pt support SPAIN 91 175 00 15 www samsung com es support SWEDEN 0771 726 786 www samsung com se support SWITZERLAND 0800 726 786 www samsung com ch support German www samsung com ch_fr support French UK 0333 000 0333 www samsung com uk support IRELAND EIRE 0818 717100 www samsung com ie support LAND BEL OF BEZOEK ONS ONLINE OP POLAND IM 801 172 678 lub 48 22 60...

Page 121: ...zygotowywania potraw MJ26A6091 1850 W MJ26A6051 1500 W wyobraź sobie możliwości Dziękujemy za zakup produktu firmy Samsung Gwarancja oferowana przez firmę Samsung NIE obejmuje wezwań serwisowych dotyczących obsługi instalacji czyszczenia ani konserwacji urządzenia ...

Page 122: ...naczone wyłącznie do użytku domowego Nie należy podgrzewać żadnego rodzaju tkaniny ani poduszek wypełnionych ziarnem ponieważ może to spowodować poparzenia i pożar Producent nie ponosi odpowiedzialności za szkody spowodowane niewłaściwym lub nieprawidłowym użyciem urządzenia Nadmierne zabrudzenie kuchenki może spowodować uszkodzenie jej powierzchni i skrócić czas eksploatacji urządzenia lub doprow...

Page 123: ...agnetycznego do obróbki materiału obróbki typu EDM i spawania łukowego Jako urządzenie klasy B kuchenka nadaje się do użytku w gospodarstwach domowych i lokalach podłączonych bezpośrednio do sieci niskiego napięcia która dostarcza prąd do budynków wykorzystywanych w celach mieszkaniowych WAŻNE INSTRUKCJE DOTYCZĄCE BEZPIECZEŃSTWA Pamiętać o stosowaniu tych środków ostrożności przez cały czas OSTRZE...

Page 124: ...i naprawiać urządzenia OSTRZEŻENIE Nie należy używać kuchenki jeśli drzwiczki lub ich uszczelnienie są uszkodzone usterki muszą najpierw zostać naprawione przez wykwalifikowaną osobę OSTRZEŻENIE Wykonywanie czynności serwisowych i naprawa urządzenia wymagająca zdjęcia pokrywy chroniącej przed promieniowaniem mikrofalowym przez osoby niewykwalifikowane może być bardzo niebezpieczne OSTRZEŻENIE Aby ...

Page 125: ...o i uszkodzenia kuchenki Podgrzewanie żywności w plastikowych lub papierowych pojemnikach powinno odbywać się pod ścisłym nadzorem użytkownika ze względu na ryzyko zapłonu Nie należy używać kuchenki mikrofalowej do suszenia papieru lub odzieży Aby zapobiec nadmiernemu podgrzaniu lub przypaleniu potraw dla mniejszych ilości należy stosować krótszy czas gotowania W przypadku zauważenia dymu kuchenkę...

Page 126: ...ą Woda pochłonie mikrofale w razie przypadkowego włączenia kuchenki Do czyszczenia szklanych drzwiczek kuchenki nie wolno używać środków zawierających składniki ścierne lub ostrych szczotek metalowych ponieważ mogą one zarysować powierzchnię co może doprowadzić do pęknięcia szyby Kuchenkę należy zainstalować z zachowaniem odstępów określonych w niniejszej instrukcji obsługi Patrz Instalowanie kuch...

Page 127: ...minutach 1 Aby wyświetlić godzinę w Następnie naciśnij przycisk 20s 24 godzinnym 12 godzinnym Jednokrotnie Dwukrotnie 2 Aby ustawić godzinę obracaj POKRĘTŁO ZEGARA 3 Naciśnij przycisk START 4 Aby ustawić minuty obracaj POKRĘTŁO ZEGARA 5 Po wyświetleniu właściwego czasu naciśnij przycisk START aby uruchomić zegar Zegar ustawia się samoczynnie w ciągu 10 sekund Jeżeli nie chcesz ustawiać czasu naciś...

Page 128: ... cyklu i podgrzewanie zatrzymuje się Lampka w kuchence gaśnie Aby schłodzić elementy wewnętrzne wentylator chłodzący działa jeszcze przez 1 min W tym czasie wentylator nie wyłączy się nawet po otwarciu drzwiczek Wyłączy się po 1 min Potrawę można wyjąć z kuchenki nawet przy działającym wentylatorze 4 Otwórz drzwiczki i wyjmij potrawę Zamknij drzwiczki Lampka w kuchence gaśnie ZATRZYMYWANIE PRACY K...

Page 129: ...czas podgrzewania można zmieniać Zmienione wartości pojawiają się niezwłocznie na wyświetlaczu Kuchenka nie może działać przy poziomie mocy ustawionym na 0 pomiędzy trybem podgrzewania a trybem rozmrażania Po pierwszym podłączeniu przewodu zasilania kuchenka emituje jeden sygnał dźwiękowy a na okienku wyświetlacza na 5 sekund pojawiają się wszystkie wskaźniki POZIOMY MOCY I CZAS PRZYGOTOWYWANIA PO...

Page 130: ...iwia natychmiastowe rozpoczęcie podgrzewania Podczas cyklu podgrzewania czas można zwiększać naciskając przycisk 20s Każde naciśnięcie przycisku 20s wydłuża czas gotowania o 20 sekund Czas jednak nie może przekroczyć maksymalnego dozwolonego czasu dla wybranego poziomu mocy Przed włączeniem kuchenki czas można zwiększać za pomocą przycisku 20s Podczas pracy za pomocą przycisku 20s czas można jedyn...

Page 131: ...o użytkowania bez obciążenia lub z małym obciążeniem albo z powodu obecności materiałów blokujących otoczenie filtra powietrza lub wylot powietrza z tyłu kuchenki Otwórz drzwiczki kuchenki i sprawdź czy 1 kuchenka pracowała bez obciążenia lub ze zbyt małym obciążeniem 2 filtr powietrza nie jest umieszczony w nieprawidłowym położeniu lub 3 wylot powietrza nie jest zablokowany przez ciała obce Pocze...

Page 132: ...sztki potraw lub rozlanych płynów przylegają do ścianek kuchenki lub między uszczelkami a powierzchnią drzwiczek będą one pochłaniać promieniowanie mikrofalowe i mogą powodować łuki lub iskry elektryczne 3 Wyczyść zewnętrzne powierzchnie kuchenki mydłem i wodą a następnie wysusz miękką ściereczką PRZESTROGA Upewnij się że woda nie dostała się to tylnych otworów wentylacyjnych ani do panelu sterowa...

Page 133: ...a Może być używana w niewielkich ilościach w celu zabezpieczenia jedzenia przed przypaleniem Jeśli folia znajduje się zbyt blisko ścianki kuchenki lub jest jej zbyt dużo może wystąpić zjawisko łuku elektrycznego lub iskrzenia Naczynia porcelanowe i gliniane Porcelana ceramika emaliowane wyroby gliniane i porcelana miękka kostna mogą być używane pod warunkiem że nie mają metalowych elementów ozdobn...

Page 134: ...mknięte W razie potrzeby należy je przedziurawić widelcem Papier woskowany lub tłuszczoodporny Może być używany do zatrzymywania wilgoci i zapobiegania rozpryskiwaniu się tłuszczu Zalecane Używać ostrożnie Niebezpieczne Zasady przygotowywania potraw F Mrożone C Schłodzone Przepis Metoda Poziom mocy Czas Czas oczekiwania po ugotowaniu 1850W 1500W CHLEB I PIECZYWO Rozmrażanie Bułka podłużna 9 F ROZM...

Page 135: ...zasu pomieszaj WYSOKI 2 00 2 10 2 min Pieczona fasola 250 g Przykryj i po połowie czasu pomieszaj WYSOKI 1 00 1 05 2 min Przepis Metoda Poziom mocy Czas Czas oczekiwania po ugotowaniu 1850W 1500W DESERY Podgrzewanie Kruche ciasto z jabłkami 200 g F Przykryj w naczyniu WYSOKI 1 20 1 30 2 min Pudding 150 g C Włóż do miski WYSOKI 0 20 0 25 2 min Rolada z dżemem 80 g F Na talerzu WYSOKI 1 00 1 05 2 mi...

Page 136: ... Przykryj WYSOKI 3 00 3 15 1 min Przepis Metoda Poziom mocy Czas Czas oczekiwania po ugotowaniu 1850W 1500W ŚWIEŻE WARZYWA Gotowanie 500 g Zielona fasolka krojona Zalej 60 ml 4 łyżkami wody WYSOKI 3 00 3 15 2 min Różyczki brokułów Zalej 60 ml 4 łyżkami wody WYSOKI 3 00 3 15 2 min Kapusta szatkowana Zalej 10 łyżkami wody WYSOKI 5 00 5 30 2 min Marchew krojona Zalej 60 ml 4 łyżkami wody WYSOKI 3 30 ...

Page 137: ...rzne należy czyścić miękką ściereczką i ciepłą wodą z mydłem Wypłucz i osusz 2 Usuń wszelkie rozpryski i plamy z powierzchni wewnętrznych i z pierścienia obrotowego za pomocą namydlonej ściereczki Wypłucz i osusz 3 Aby zmiękczyć stwardniałe resztki potraw i usunąć zapachy ustaw filiżankę z rozcieńczonym sokiem z cytryny na talerzu obrotowym i podgrzewaj przez 10 minut z maksymalną mocą NIE wlewaj ...

Page 138: ...Model MJ26A6091 MJ26A6051 Źródło zasilania 230 240 V 50 Hz Zużycie energii Microwave Mikrofale 13 A 12 7 A Moc wyjściowa 1850 W IEC 705 240 V 1850 W 230 V 1780 W 1500W IEC 705 240 V 1500 W 230 V 1450 W Częstotliwość robocza 2450 MHz Wymiary szer wys gł Obudowa Wnętrze kuchenki 464 368 557 mm 370 190 370 mm Pojemność 26 litrów Waga Netto ok 33 1 kg 514 1000 368 444 10 464 486 530 43 26 557 NOTATKI ...

Page 139: ...19 POLSKI NOTATKI NOTATKI ...

Page 140: ...RTUGAL 808 207 267 www samsung com pt support SPAIN 91 175 00 15 www samsung com es support SWEDEN 0771 726 786 www samsung com se support SWITZERLAND 0800 726 786 www samsung com ch support German www samsung com ch_fr support French UK 0333 000 0333 www samsung com uk support IRELAND EIRE 0818 717100 www samsung com ie support KRAJ ZADZWOŃ POD NUMER LUB ODWIEDŹ STRONĘ INTERNETOWĄ POD ADRESEM POL...

Reviews: