background image

GB

GB

21

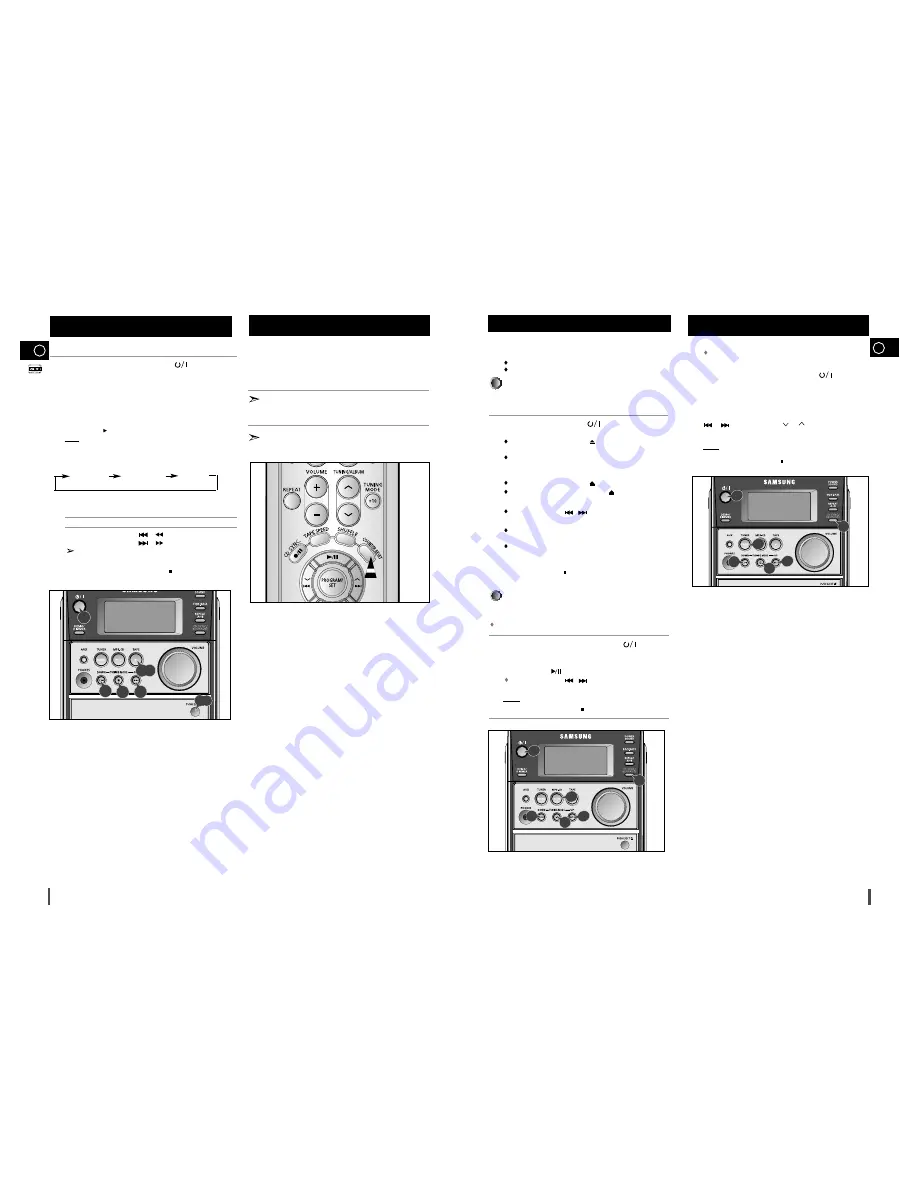
Switch the system on by pressing Standby/On (          ) .

Select the TAPE function by pressing TAPE on the front panel.

Open the cassette deck by pushing on the corner of the cover marked PUSH
EJECT 
until you hear a click and then release  it.

Insert the pre-recorded cassette with the open edge of the tape facing
downwards.

Close the deck by pushing on it until it clicks into place.

Press the TAPE(

) button.

Result: The cassette starts playing.

Press TAPE SPEED on the remote to adjust the speed of the tape

playing.And  each time the button is pressed,the mode changes as

follows.

When the cassette is stopped, select one of the following functions as

required.

To...                                        Press...

Rewind the cassette...................

/

Fast-forward the cassette...........

/

The cassette player stops automatically when the beginning or end of

the cassette is reached.

To stop the playback or search, press STOP (

)  button.

20

Listening to a Cassette

The direct recording mode enables you to start recording with
any track on the compact disc.

You do not need to adjust the volume, as it has no effect on the recording.

Switch your system on by pressing Standby/On (         ) .
Insert a blank cassette in Deck.
Load a compact disc.

Press the MP3-CD(

) button.

Use the CD selection (

,

)  buttons to select the desired song.

Press the REC/PAUSE button. 
Result: Recording will begin.

To stop recording, press STOP (

)  button.

1

2

3
4

5

6

Direct recording

1
2
3

4

5

6

7

8

Recording a Compact Disc

-10%SPEED

+10%SPEED             NORMAL

9

3,5

2,6

1

8

8

1

4

6

4

3

5

9

You can record a compact disc on a cassette in two different ways:

Synchronised recording
Direct recording

This feature enables you to synchronize the start of the
recording with the start of the disc or track of your choice.

Switch the system on by pressing (         ) .

Insert a blank cassette in Deck.

Press the PUSH/EJECT button (

) to open the cassette door,

insert a cassette, and then close the cassette door.

Insert the cassette with the safety tabs.

Load a compact disc.

Press the PUSH/EJECT button (

) to open the CD door.

Insert a CD and press the PUSH/EJECT button (

) to close the CD door.

Press the MP3-CD(

/

»

) button.

Use the CD selection (

,

)  buttons to select the desired song.

Press and hold CD SYNC/REC/PAUSE button.

When stopped, press the button to start the recording from the
first piece of music.

Press and hold CD SYNC/REC/PAUSE button during the play-
back of CD to start the recording from the first part of the music
being played.

To stop recording, press  button.

Synchronised recording

1
2

3

4

5

6

You can record a radio program of your choice.

You do not need to adjust the volume, as it has no effect on
the recording.

Switch the system on by pressing Standby/On (         ) .

Insert a blank cassette in Deck.

Select the TUNER function by pressing TUNER/BAND.

Select the radio station that you wish to record by pressing 

or 

button  on the front panel or 

or 

on the remote control.

Press REC/PAUSE.
Result:

REC

is displayed and recording starts.

To stop recording, press STOP ( )button.

1
2
3
4

5

6

Recording a Radio Program

1

4

6

4

4

5

When playing a cassette in one of the cassette decks, a
counter is displayed to enable you to take note of the counter
value at the start of each track to start playback at the 
beginning of the track to which you wish to listen.

Before starting to record a cassette for which you wish to take
note of the counter values at the beginning of each track, reset
the counter by pressing 

COUNTER RESET

Each cassette deck has a separate counter.

Tape Counter

Summary of Contents for MM-C6DAB

Page 1: ...Instruction Manual MICRO COMPONENT SYSTEM MP3 CD CD R RW PLAYBACK MM C6DAB ...

Page 2: ...sult in hazardous radiation exposure CAUTION INVISIBLE LASER RADIATION WHEN OPEN AND INTER LOCKS DEFEATED AVOID EXPOSURE TO BEAM WARNING TO REDUCE THE RISK OF FIRE OR ELECTRIC SHOCK DO NOT EXPOSE THIS APPLIANCE TO RAIN OR MOIS TURE CAUTION TO PREVENT ELECTRIC SHOCK MATCH WIDE BLADE OF PLUG TO WIDE SLOT FULLY INSERT CAUTION TO REDUCE THE RISK OF ELECTRIC SHOCK DO NOT REMOVE REAR COVER NO USER SERVI...

Page 3: ... SOUND 17 PUSH EJECT CD DOOR OPEN CLOSE 1 STANDBY ON 2 INFORMATION 3 TUNER BAND 4 TUNE 5 AUX 6 DEMO DIMMER 7 VOLUME CONTROL 8 REPEAT 9 TAPE SPEED 10 CD SYNCHRO REC PAUSE 11 CD PLAY PAUSE 12 CD SKIP OR SEARCH 13 TAPE REWIND 14 TAPE STOP 15 TAPE PLAY 16 TAPE FAST FORWARD 17 CD STOP 18 PROGRAM SET 19 COUNTER RESET 20 SHUFFLE 21 TUNING UP OR DOWN ALBUM SKIP 22 TUNING MODE 10 23 EQ S BASS 24 SLEEP 25 R...

Page 4: ...ance on either side of the system to ensure good stereo sound Direct the loudspeakers towards the listening area For optimum performance make sure that both speakers are placed at an equal distance above the floor Where to Install Your Micro Component System Connecting your System to the Power Supply Insert or replace remote control batteries when you Purchase the micro component system Find that ...

Page 5: ... speaker apart from TV or computer monitor The speaker near the TV or computer monitor may influence the quality of the screen display Right Speaker Left Speaker 6 The loudspeaker connector terminals are located on the rear of the system red and black tabs There are four terminals on the system Two for the left speaker marked L Two for the right speaker marked R To achieve the correct sound qualit...

Page 6: ...sult The hour flashes To Press Decrease the hours Increase the hours When the correct hour is displayed press PROGRAM SET Result The minutes flash To Press Decrease the minutes Increase the minutes When the correct time is displayed press PROGRAM SET Result The clock starts and is displayed even when the system is in standby mode You can display the time even when you are using another function by...

Page 7: ... REPEAT 1 is displayed All songs REPEAT ALL is displayed When you wish to stop the Repeat function press REPEAT button Result REPEAT is no longer displayed and the function is cancelled Repeating One or All Tracks on the Compact Discs 1 2 When listening to a compact disc you can quickly search for a specific music passage on a track To search through the tracks Press and hold down Forwards for at ...

Page 8: ...ur selection of tracks at any time You must have selected at least one track Press STOP once if you have started listening to the selection Press PROGRAM SET Each time you press Program Set the next selection is displayed Press PROGRAM SET one or more times until the track to be changed is displayed Press or to select the new track Press PROGRAM SET Press MP3 CD to start listening to the selection...

Page 9: ...ress to move to the desired frequency Press TUNER BAND to select DAB Press to select the service If NO SVC appears on the display press and hold TUNE for longer than 2 seconds SCAN 00 blinks on the display and all available services will be searched If NO SVC continues to be displayed after the ser vice search has finished make sure you are not in a non recep tion area and check the antenna connec...

Page 10: ...dren s programmes Social affairs Religion Phone in Travel Leisure Jazz Music Country Music National Music Oldies Music Folk Music Documentary Alarm Test 1 2 2 2 2 About PS NAME MODE Displays the name of broadcasting station Press the RDS DISPLAY button to select the PS NAME PS NAME appears on the display If the PS information is being received the PS name BBC AFO NDR etc is shown on the display If...

Page 11: ... start of the recording with the start of the disc or track of your choice Switch the system on by pressing Insert a blank cassette in Deck Press the PUSH EJECT button to open the cassette door insert a cassette and then close the cassette door Insert the cassette with the safety tabs Load a compact disc Press the PUSH EJECT button to open the CD door Insert a CD and press the PUSH EJECT button to...

Page 12: ... Result is displayed on the top right of the time indicating that the timer has been set The system will switch on and off automatically at the required times If the timer switch on and off times are identical the word ERROR is displayed You can use button on the front panel instead of button on the remote control in step 4 5 6 7 After having set the timer it will start automatically as shown by t...

Page 13: ... cleaning agent Do not use the same cleaning agents as for vinyl LP records Carefully wipe the disc from the centre outward Regularly clean the player with a special cleaning disc available from your local dealer Tape Decks Press PUSH EJECT to open the cassette deck Use a cotton bud and a special cassette cleaning agent to clean the Head 1 Rollers 2 Drive capstans 3 If you will not be using the re...

Page 14: ...rty The tape is worn The TUNER function has not been selected The radio frequency has not been correctly selected The aerial has been disconnected or is not facing the right way Turn it until you find the best orientation You are in a building that blocks radio waves you must use an outside aerial Check that the tape in the cassette is sufficiently taut To prevent erasing a cassette that you wish ...

Page 15: ...THIS APPLIANCE IS MANUFACTURED BY AH68 01685B ...

Reviews: