background image

GB

9

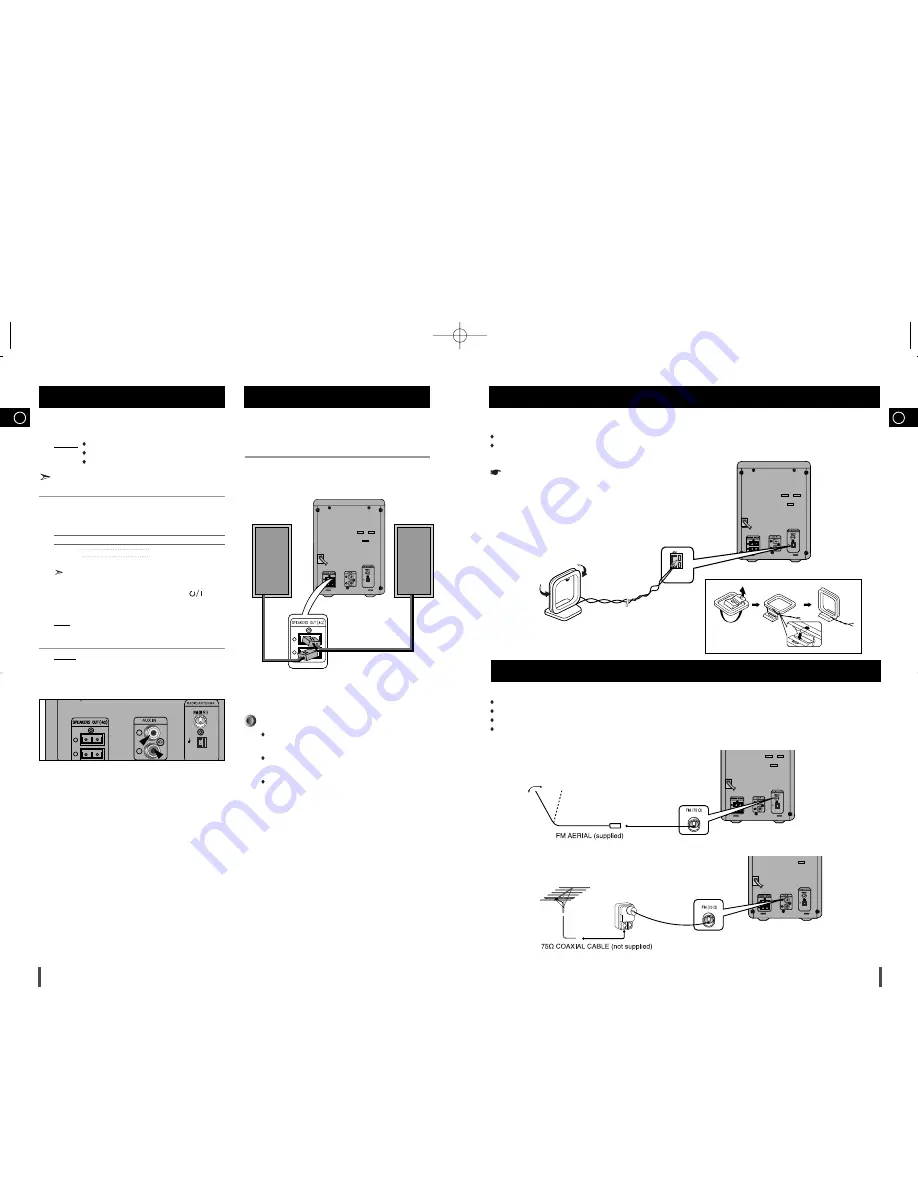
The AM aerial (for medium waves) can be:

Placed on a stable surface
Fixed to the wall (you must first remove the base)

The 

AM

aerial connector terminals are located on the rear of the system and are marked 

AM ANT

.

To avoid noise interference, check that the loudspeaker wires do not run close to the 
aerial wires.
Always keep them at least 2 inches (5 cm) away.

Connecting the AM (MW)Aerial

How to connect a COAXIAL TYPE aerial.

Connect a 75

antenna to the 

FM

antenna terminal. 

Plug the connector on the 

FM

aerial supplied into the coaxial socket (75

) marked 

FM

on the rear of the system.

Follow the instructions given on 

Page 17

to tune into a radio station, and determine the best position for the aerial.

If reception is poor, you may need to install an outdoor aerial.
To do so, connect an outdoor 

FM

aerial to the 

FM

socket on the rear of the system using a 75

coaxial cable (not supplied).

Connecting the FM Aerial

GB

8

The auxiliary input can be used to take advantage of the sound quality
of your micro component system when listening to other sources.

Examples: A 

television

A video disc player
A Hi-Fi stereo video cassette recorder

To connect to  the external source, the source must have an audio
output. In addition, you need an RCA connection cable.

Set the system to standby mode and disconnect it and the external
source from the main socket.

Connect the audio cable to the rear of the micro component system.

Connect the...

To the connector marked...

Red jack

R (right)

White jack

L (left)

For optimum sound quality, do not invert the right and left 
channels.

Plug the system back into the main socket and press (          ) to
switch it on.

Select the AUX source by pressing 

AUX

.

Result: 

AUX

is displayed.

Switch the external source on.

Example: You can watch a film and take advantage of stereo sound

provided that the original sound track is in stereo (as if you
were in a cinema).

Connecting to an External Source

1

2

3

4

5

Speaker Connection

Directions in Installing Speaker 

Installation in a place near heating apparatus, under direct lay of
light or with high humidity may cause performance degradation
of the speaker.
Do not install on the wall or on a high place of pole or other
unstable place to prevent any safety accident caused by falling
of the speaker.
Do not take the speaker apart from TV or computer monitor. 
The speaker near the TV or computer monitor may influence the
quality of the screen display.

(Right Speaker)

(Left Speaker)

AM

L

L

R

R

AM

L

L

R

R

AM

L

L

R

R

AM

L

L

R

R

Main Speaker Connection: Connect the Speaker cords (red/black) to
the Main Speaker jacks of System.

AM

L

L

R

R

L

R

MM-T8(GB)-5  4/24/06 16:1912:0  Page 8

Summary of Contents for MM-T8

Page 1: ...Instruction Manual MICRO COMPONENT AUDIO SYSTEM MP3 WMA CD CD R RW PLAY BACK MM T8 MM T8 GB 5 4 24 06 16 1812 0 Page 1 ...

Page 2: ... 16 To use Last Memory function 16 TUNER Searching for and Storing the Radio Stations 17 Selecting a Stored Station 17 Improving Radio Reception 17 About RDS broadcasting 18 About RDS DISPLAY function 18 PTY Program Type indication and PTY SEARCH function 19 TAPE DECK Listening to a Cassette 20 Selecting the Cassette Playback Mode 20 Recording a Compact Disc 21 Recording a Radio Program 21 OTHER F...

Page 3: ...SB 30 TAPE 31 AUX 1 STANDBY ON 2 CD SYNCHRO REC PAUSE 3 USB JACK 4 HEADPHONE JACK CONNECTOR 5 SEARCH FUNCTION BUTTONS TUNING MODE OR STOP BUTTON 6 EQ 7 CD DOOR OPEN CLOSE 8 POWER SOUND 9 USB AUX 10 FUNCTIONS MP3 CD CD TUNER TAPE 11 VOLUME CONTROL 12 MULTI JOG PUSH ENTER 13 PUSH EJECT CASSETTE DOOR OPEN CLOSE 1 1 2 3 4 5 7 6 8 9 10 11 12 13 2 3 4 5 6 7 16 8 9 10 11 12 13 14 15 30 29 28 27 26 25 24 ...

Page 4: ...e sure that both speakers are placed at an equal distance above the floor Where to Install Your Micro Component System Connecting your System to the Power Supply 2 GB 6 Rear Panel View 1 Voltage 2 Loudspeaker Connector Terminals 3 AUX Input 4 FM Aerial Connector Terminal 5 AM Aerial Connector Terminals Inserting Remote Control Batteries Insert or replace remote control batteries when you Purchase ...

Page 5: ... In addition you need an RCA connection cable Set the system to standby mode and disconnect it and the external source from the main socket Connect the audio cable to the rear of the micro component system Connect the To the connector marked Red jack R right White jack L left For optimum sound quality do not invert the right and left channels Plug the system back into the main socket and press to ...

Page 6: ...nit Select the CD function by pressing MP3 CD CD button Press the Open Close button Result The compartment opens Place your disc in the compartment with the label on the disc facing upwards Close the compartment by pressing the Open Close button again Press the MP3 CD CD button Your CD Player will take a few moments to scan through all the tracks recorded on a particular MP3 WMA CD The English nam...

Page 7: ... you want to finish the Repeat playback press REP A B REPEAT A B Function This function is not available during playback of an MP3 WMA CD 1 2 3 4 VOLUME REV MODE USB MP3 CD CD SLEEP REP A B REPEAT MO ST CD SYNC DISPLAY TAPE PTY RDS DIMMER DEMO MUTE TUNING ALBUM Last Memory Function This function is only available during playback of an MP3 WMA CD When CD playback is selected again after your CD pla...

Page 8: ...etters Delay When selecting USB function depending of the speed of the external USB storage device reading READ IN internal information can take several minutes When playing a USB device recording or finding next track may introduce some delay Especially with a mass storage device such as HDD depending on the type and the number of files the delay might be several minutes Even with the external US...

Page 9: ...NING MODE station Manually One or more times until MANUAL is displayed Automatically One or more times until AUTO is displayed PRESET function is explained in detail in the section Selecting a Stored Station on Select the station to be stored by Pressing or buttons on the front panel or or buttons on the remote control to increase or decrease the frequency respectively To scroll through the freque...

Page 10: ...a System function which enables for the various information such as broadcasting station radio text time and 30 types of programs News Rock Classic etc to be received from the FM RDS station together with normal radio signal Press the button Receive the FM radio See the radio receiving method on the page 17 FM and frequency are shown on the display If the received station transfers the RDS informa...

Page 11: ...music being played To stop recording press button Synchronised recording Funcation is available for CD only Synchronised recording 1 2 3 4 5 6 1 2 Direct recording Recording a Compact Disc 4 6 1 4 2 Load a compact disc Press the OPEN CLOSE button to open the CD door Insert a CD and press the OPEN CLOSE button to close the CD door Press the MP3 CD CD button Use the CD selection buttons to select th...

Page 12: ... a Set the hour by pressing or button b Press PROGRAM SET Result The minutes flash c Set the minutes by pressing or button d Press PROGRAM SET Result OFF TIME is displayed instead of the equalizer symbols for a few seconds followed by any switch off time already set you can now set the timer switch off time Set the timer switch off time a Set the hour by pressing or button b Press PROGRAM SET Resu...

Page 13: ...or any extended period Leaking batteries can cause serious damage to the remote control When using headphones take care not to listen at excessive volumes Extended use of headphones at high volumes will lead to hearing damage Do not place heavy items on the main lead Main cable damage can lead to damage of the equipment fire hazard and can cause electric shock Do not remove any equipment panels Th...

Page 14: ... tape to the discs and do not write on the label Clean them with a special purpose cloth Store your compact discs in a clean place out of direct sunlight where they will not be exposed to high temperatures Always use compact discs marked Precautions When Using Compact Discs Before Contacting the After Sales Service Precautions When Using Audio Cassettes COMPACT DIGITAL AUDIO Problem The system doe...

Page 15: ...m other types of wastes and recycle it responsibly to promote the sustainable reuse of material resources Household users should contact either the retailer where they purchased this product or their local government office for details of where and how they can take this item for environmentally safe recycling Business users should contact their supplier and check the terms and conditions of the p...

Reviews: