background image

SIDE BY SIDE
REFRIGERATOR

OWNER’S  MANUAL AND INSTALLATION

DA99-00275B REV(0.5)

CONTENTS

SAFETY WARNING

..............................................................................2

OPERATING INSTRUCTIONS

........................................................4

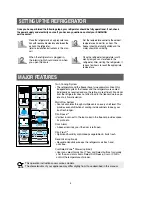
SETTING UP THE  REFRIGERATOR.........................................................4
MAJOR FEATURES .....................................................................................4
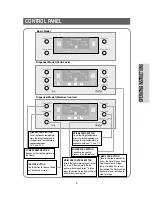
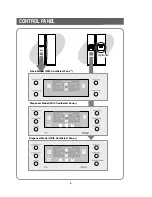
CONTROL PANEL........................................................................................5
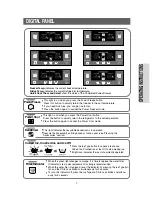
DIGITAL  PANEL...........................................................................................7
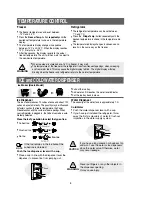
TEMPERATURE CONTROL .......................................................................8
ICE AND COLD WATER DISPENSER........................................................8
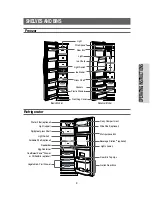
SHELVES AND BINS ...................................................................................9
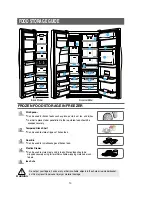
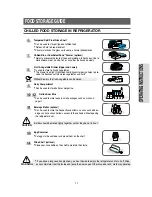
FOOD STORAGE GUIDE .........................................................................10
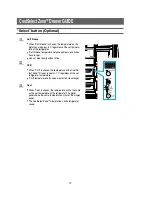
CoolSelect Zone

TM

Drawer GUIDE.............................................................12

REMOVING FREEZER ACCESSORIES ..................................................14
REMOVING REFRIGERATOR  ACCESSORIES .....................................14
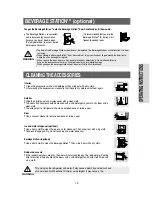
BEVERAGE STATION

TM

(optional).............................................................15

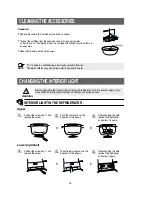
CLEANING ACCESSORIES......................................................................16
CHANGING THE INTERIOR LIGHT .........................................................16
WATER FILTER ..........................................................................................17
DOORS.......................................................................................................17

INSTALLATION INSTRUCTIONS

................................................18

INSTALLATION OF THE REFRIGERATOR  .............................................18
REMOVING THE REFRIGERATOR  DOORS ..........................................19
REATTACHING THE REFRIGERATOR  DOORS ....................................22
ADJUSTING THE CLEARANCE BETWEEN THE DOORS ....................25
CHECKING THE WATER DISPENSER LINE...........................................27
INSTALLAING THE WATER DISPENSER LINE.......................................28
TROUBLESHOOTING ...............................................................................33

Summary of Contents for Model RS27KLMR

Page 1: ...DE 10 CoolSelect ZoneTM Drawer GUIDE 12 REMOVING FREEZER ACCESSORIES 14 REMOVING REFRIGERATOR ACCESSORIES 14 BEVERAGE STATIONTM optional 15 CLEANING ACCESSORIES 16 CHANGING THE INTERIOR LIGHT 16 WATER FILTER 17 DOORS 17 INSTALLATION INSTRUCTIONS 18 INSTALLATION OF THE REFRIGERATOR 18 REMOVING THE REFRIGERATOR DOORS 19 REATTACHING THE REFRIGERATOR DOORS 22 ADJUSTING THE CLEARANCE BETWEEN THE DOORS ...

Page 2: ...r fire Do not bend the power cord excessively or place heavey articles on it This constitutes a fire hazard If the power cord is dam aged have it replaced immediately by the manufacturer or its service agent Do not insert the power plug with wet hands You may receive an electric shock Do not put a container filled with water on the refrigera tor If spilled there is a risk of fire or electric shock...

Page 3: ... smoke pull out the power plug immediately and contact your SAM SUNG Electronics service center Do not touch the inside walls of the freezer or products stored in the freezer with wet hands This may cause frostbite Do not insert your hands into the bottom area under the appliance Any sharp edges may cause personal injury Never put fingers or other objects into the dispenser hole and ice chute It m...

Page 4: ...uttons for quickly chill thaw and cools items Select Soft Freeze Cool or Chill to control the temperature of drawer SETTING UPTHE REFRIGERATOR Once you have performed the following steps your refrigerator should be fully operational If not check the power supply and electricity source If you have any questions contact your SAMSUNG service center Place the refigerator in an appropriate loca tion wi...

Page 5: ...N Speeds up the cooling process in the refrigerator POWER FREEZE BUTTON Speeds up the freezing process in the freeze MOISTURE CONTROL BUTTON Initially the light of moisture control but ton is on If the moisture in the dis penser or Beverage StationTM is found press this button So the light will be on and eliminate the moisture ICE TYPE BUTTON Use this button to choose Cubed or Crushed Ice or Ice o...

Page 6: ...Basic Model With CoolSelect ZoneTM Dispenser Model With CoolSelect ZoneTM Dispenser Model With CoolSelect ZoneTM 6 CONTROL PANEL Opitonal ...

Page 7: ...ss the Ice Type button in seqence to choose Cubed Ice Crushed Ice or Ice Off to stop making ice Bright icon indicates the ice state currently operated Cubed Ice Crushed Ice and Ice Off When the green light changes to orange it is time to replace the water filter If indicator is red quick replacement is strongly recommended When the water filer is replaced reset the indicator by pressing the Ice Ty...

Page 8: ...tray Add water until it reaches the water level indicator Put the ice tray back in place Crushed Ice No Ice TEMPERATURE CONTROL Freezer The freezer temperature can be set between 14 C and 25 C Press the Freezer Temp button repeatedly until the desired set temperature is shown in the temperature display The temperature display changes in sequence between 14 C and 25 C When the display reaches 14 C ...

Page 9: ...t Leg Cover Pockets Freezer Basic Model Egg Container Foldable Shelf optional Light upper Water Filter optional Spill proof glass Shelf Dairy Compartment Wine Shelf optional Muti purpose Bin Beverage StationTM optional Lights lower Gallon Door Bins Door Bin Top Lips CoolSelect ZoneTM Drawer or Chilled Bin optional Vegetable Fruit Drawer Refrigerator Dispenser Model ...

Page 10: ...e used to store all types of frozen food Door Bin Can be used for small packages of frozen food Plastics Drawer Can be used to store meat and dry foods Stored food should be wrapped securely using foil or other suitable wrapping materials or con tainers Ice chute WARNING Do not put your fingers hands or any other in suitable objects in the chute or ice maker bucket as this may result in personal i...

Page 11: ... fruit vegetable can be stored Dairy Compartment Can be used to store butter or margarine Gallon Door Bins Can be used to store foods in small packages such as milk and yogurt Beverage Station optional Can be used to store the frequently used items such as canned bev erages and snacks and allows access to these items without opening the refrigerator door Egg Container Put eggs in the container and...

Page 12: ...r Can cut meat easily without drips Chill When Chill is chosen the temperature of the CoolSe lect ZoneTM Drawer is kept at 1o C regardless of the set refrigerator temperature Chill temperature helps keep meat or fish fresh longer Cool When Cool is chosen the temperature will be the same as the set temperature of the refrigerator The digital panel shows the same temperature as that of the display p...

Page 13: ...hrs 6 hrs 10 hrs and 12 hrs sequentially When Thaw ends CoolSelect ZoneTM displayreturns to chill condition When Thaw ends there are no juice in the meats and they are half freezed condition so it is easy to cut them for cooking To cancel this option press any button except Thaw The approximate thawing time of meat and fish are shown below Based on 1inch thickness Thaw Time 4 hours 6 hours 10 hour...

Page 14: ...t it back to original position and tighten the three screws NOTE REMOVINGTHE REFRIGERATOR ACCESSORIES Spill Proof glass shelf Pull the shelf out as far as it will go Then lift it up and remove it softly Fruit Vegetable Drawer Remove the drawer by holding the handle pulling the drawer out and lifting it up smoothly Remove the optimized humidity control cover by pulling it towards you Gallon Door Bi...

Page 15: ... Do not spray the refrigerator with water It may cause a death by an electric shock Do not clean it with benzene thinner or car detergent It may cause a fire Beverage StationTM optional Use a damp cloth to clean the Beverage StationTM Then wipe it out with a dry cloth Rubber door seals If the rubber door seals are dirty the door will not close properly The refrigerator will not be able to function...

Page 16: ...ew cap and remove the screw Take the lamp cover out in the direction of the arrows After changing the bulb reattach the light cover and screw it again CLEANINGTHE ACCESSORIES Upper Lower optional Deodorizer Remove the cover with a flat blade screw driver as shown Take out the cartridge from the cover and soak it in clean warm water at least than 4 hrs Completely dry out the cartridge with sunlight...

Page 17: ...changes to red see Install the water filter section for more information Using the dispenser without the water filter You can not use the water and ice dispenser without a water filter cartridge because of the water line block at the water supply Ordering replacement filters To order more water filter cartridges contact your authorized Samsung dealer DOORS The refrigerator doors have a special doo...

Page 18: ...ore disassembling the freezer door the water supply line needs to be disconnected If not the water supply line can be damaged See Separating the water supply line from the refrigerator on the next page Caution Checking the Dimensions of your Entrance Door Selecting the Location for the Refrigerator Allow clearance to the right left back and top when installing the refrigerator This has the advanta...

Page 19: ...g the water tube away a a FRONT LEG COVER SCREW Removing the Front Leg Cover Optional Separating the water supply line from the refrigerator Optional Do not cut the water tube but separate it from the coupler WARNING Open the freezer and refrigerator doors and then take off the front leg cover assembly by turn ing the three screws counter clockwise ...

Page 20: ...ong the arrow Take care when removing the door to ensure that it does not fall on you 3 Remove the door from the lower hinge by carefully lifting the door 4 Remove the lower hinge from the bracket lower hinge by lifting the lower hinge in the direction of the arrow Removing the Freezer Door Lift the door straight up Be careful not to pinch the water tubing and wire harness on the door Place doors ...

Page 21: ... lifting the lower hinge in the direction of the arrow 1 With the door closed remove the upper hinge cover using a screwdriver and then discon nect the wires 2 Remove hinge screws and ground screw counter clockwise and take off the upper hinge in the direction of the arrow Take care when removing the door to ensure that it does not fall on you Removing the Refrigerator Door ...

Page 22: ...into the hole in the lower hinge and pulling the hose down 3 Insert the upper hinge shaft into the hole After levelling between the upper hinge hole and the hole of the cabinet Reattach bolts and screw in a clockwise direction 4 Connect the wires 5 Put the front part of the upper hinge cover on the front part of the upper hinge and reattach from the front part of the upper hinge cover first 11 12 ...

Page 23: ...tor door over the lower hinge 3 Insert the upper hinge shaft into the hole After levelling between the upper hinge hole and the hole of the cabinet Reattach hinge screws and screw in the clockwise direc tion 4 Connect the wires 5 Put the front part of the upper hinge cover on the front part of the upper hinge and reattach it from the front part of the upper hinge cover first 11 12 ...

Page 24: ...essing the front face of coupler insert the water line in the coupler 2 Tighten the screw on the clamp a a Put on the front leg cover by turning the three screws clockwise as shown in the figure Reattaching the Water Tube Optional Reattaching the Front Leg Cover Optional ...

Page 25: ...ontrol lever turn it clockwise and level the refrigerator Case 2 Freezer door is higher than that of the refrigerator Insert a straight screwdriver into a slot of the control lever turn it clockwise and level the refrigerator Do not make small adjustment by turning the control lever Please refer to the next page DIFFERANCE OF HEIGHT DIFFERANCE OF HEIGHT DRIVER DRIVER CONTROL LEVER CONTROL LEVER Pl...

Page 26: ...e nut firmly the bolt may be released 2 Please adjust the height difference between the doors turning the bolt turn clockwise or counter clockwise When you turn clockwise the door goes up WRENCH Adjustment part NUT BOLT Adjustment part WRENCH NUT BOLT NUT BOLT WRENCH WRENCH WRENCH BOLT BOLT Please open the doors and adjust the doors as follows 1 Release the nut on the lower hinge until the upper e...

Page 27: ...sure below 1 4kgf cm2 you should install a booster pump to compensate for the low pressure 4 Ensure the water storage tank inside the refrigerator is preperly filled initially Push the water dis penser lever until the water runs from the outlet NOTE A universal water supply kit is available at extra cost from your dealer The refrigerator manufac turer recommends using a water supply kit containing...

Page 28: ...r only NOTE Do not overtighten the compression nut NOTE Slip the compression ferrule and nut on cop per or plastic tubing as shown Tighten the comperssion nut onto the com pression fitting union Turn water on and check for any leakege Check the water supply line Connect the water pipe with coupler and tap Close the main water tap Connect coupler A to the tap Every join should be protected with sea...

Page 29: ...check for any possible leakages at the join point in the water line After securing the water line move the refrigerator to the required location Once the refrigerator is in position do not move possibly Install the water filter Connect the water line to the refrigerator SEPARATION OF RED CAP STICKER MONTH INDICATION COVER FILTER ALIGN THE INDICATION MARK WITH LOCK POSITION Caution Please check if ...

Page 30: ...tallation see the reference illustra tion Select the location where the purifier is to install Model with the purifier WATER INLET SIDE OF PURIFIER LINE OUTLET SIDE OF PURIFIER PURIFIER WATER COUPLER REFERENCE 90 degree Connect to the water supply line For Exterior model Connect the water pipe with coupler and tap Close the main water tap Connect coupler A to the tap Every join should be protected...

Page 31: ...ly into place where to screw TIGHTENING BAND COMPRESSOR COVER OF REFRIGERATOR Connect the water line to the refrigerator Remove the compressor cover of the refrigerator Connect the water line to the valve as shown in the fig ure When connected check if there is any leakage If any repeat the connection Reattach the compressor cover of the refrigerator CONNECTION NUT WATER LINE CLIP A WATER LINE Sec...

Page 32: ...e water to briefly spurt from the dispenser Before reinstalling the water filter remove the wine shelf NOTE 2 When you press the test button the ice cube container is filled with water from the water supply tap Check the amount of water see the illustration below If the water level is too low the ice cubes will be small This is not a problem with the ice maker but of the water pressure in the pipe...

Page 33: ...ted or expanded The front corners and sides of the cabinet are hot condensation occurs Anti condensators are installed in the front corners of the refrigerator to prevent condensation Condensation can occur when you leave the door open for a long time Ice is not dispensed Did you stop the ice making function Is there any ice in the ice storage unit Is the water line connected and the shut off valv...

Page 34: ...MEMO ...

Page 35: ...MEMO ...

Page 36: ...e affected by such factors as the location of the appliance ambient temperature and the frequency with which you open the doors Adjust the temperature as required to compensate for these factors Temperature Symbol Ambient Temperature Class Maximum Minimum Extended Temperate SN 32 C 90 F 10 C 50 F Temperate N 32 C 90 F 16 C 61 F Subtropical ST 38 C 100 F 18 C 64 F Tropical T 43 C 109 F 18 C 64 F ...

Reviews: