background image

S

CANNING

5.3

5

3

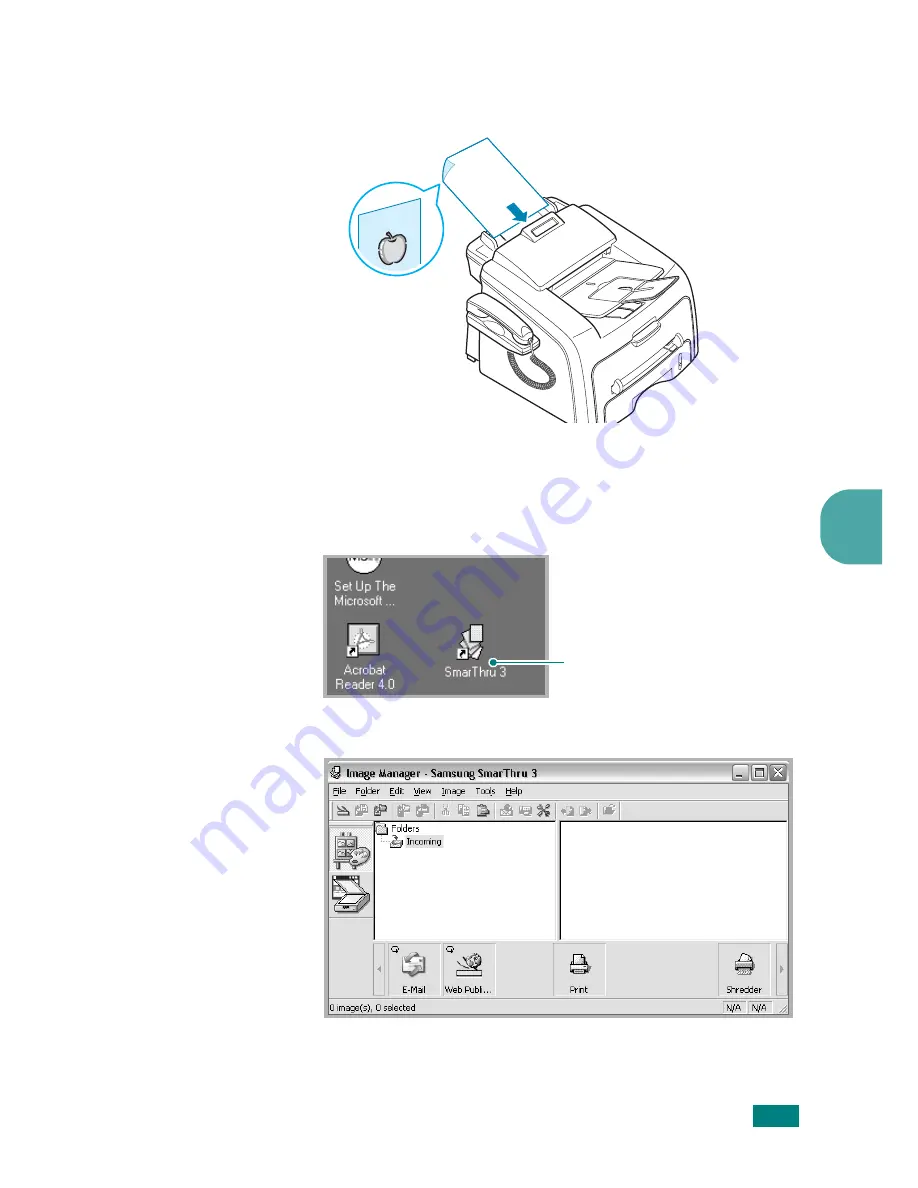
Load the document(s) to be scanned

 face down

 into the 

ADF (Automatic Document Feeder) and adjust the 

document guides.

For detailed guidelines for preparing an original document, 

see page 4.2.

4

Once you have installed Samsung software, you see the SmarThru 
icon on the desktop. Double-click the 

SmarThru 3

 icon.

The SmarThru 3 window opens.

Double-click this icon.

Summary of Contents for Msys 755P

Page 1: ......

Page 2: ...puter You can also find a brief description on the automatic text recognition program AnyPage This manual is provided for information purposes only All information included herein is subject to change without notice Samsung Electronics is not responsible for any direct or indirect damages arising from or related to use of this manual 2007 Samsung Electronics Co Ltd All rights reserved SF 565PR and...

Page 3: ...istributor pro Českou republiku Samsung Zrt česka organizační složka Vyskočilova 4 14000 Praha 4 DENMARK 70 70 19 70 www samsung com dk ECUADOR 1 800 10 7267 www samsung com latin EL SALVADOR 800 6225 www samsung com latin ESTONIA 800 7267 www samsung ee KAZAHSTAN 8 10 800 500 55 500 www samsung kz KYRGYZSTAN 00 800 500 55 500 FINLAND 030 6227 515 www samsung com fi FRANCE 3260 SAMSUNG 08 25 08 65...

Page 4: ... ie RUSSIA 8 800 555 55 55 www samsung com SINGAPORE 1800 SAMSUNG 726 7864 www samsung com sg SLOVAKIA 0800 SAMSUNG 726 7864 www samsung com sk SOUTH AFRICA 0860 SAMSUNG 726 7864 www samsung com SPAIN 902 10 11 30 www samsung com SWEDEN 0771 400 200 www samsung com se SWITZERLAND 0800 SAMSUNG 726 7864 www samsung com ch TADJIKISTAN 8 10 800 500 55 500 TAIWAN 0800 329 999 www samsung com THAILAND 1...

Page 5: ...ru 1 24 Repairing Software 1 27 Removing Software 1 28 Uninstalling the MFP Driver 1 28 Uninstalling Samsung SmarThru 1 29 Changing the Display Language 1 30 Setting the Machine ID 1 31 Entering Characters Using the Number Keypad 1 32 Setting the Date and Time 1 34 Changing the Clock Mode 1 35 Setting the Paper Type and Size 1 36 Setting Sounds 1 37 Speaker Ringer Key Sound and Alarm Sound 1 37 Sp...

Page 6: ...ermark 3 16 Editing a Watermark 3 17 Deleting a Watermark 3 17 Using Overlays 3 18 What is an Overlay 3 18 Creating a New Page Overlay 3 18 Using a Page Overlay 3 20 Deleting a Page Overlay 3 21 Setting Up the Locally Shared Printer 3 22 In Windows 2000 XP 3 22 Chapter 4 COPYING Loading Paper for Copying 4 2 Preparing a Document 4 2 Making a Copy 4 3 Setting Copy Options 4 4 Darkness 4 4 Original ...

Page 7: ...g 6 18 Setting a Group Dial Number 6 18 Editing Group Dial Numbers 6 19 Sending a Fax Using Group Dialing Multi address Transmission 6 20 Searching for a Number in the Memory 6 20 Searching Sequentially through the Memory 6 20 Searching with a Particular First Letter 6 21 Printing a Phonebook List 6 21 Sending Broadcasting Faxes 6 22 Sending a Delayed Fax 6 23 Sending a Priority Fax 6 25 Polling a...

Page 8: ...oring the Toner Empty Message 8 11 Consumables and Replacement Parts 8 12 Replacing the ADF Rubber Pad 8 13 Chapter 9 TROUBLESHOOTING Clearing Document Jams 9 2 Input Misfeed 9 2 Exit Misfeed 9 2 Clearing Paper Jams 9 3 In the Paper Tray 9 4 In the Paper Exit Area 9 5 In the Fuser Area or Around the Toner Cartridge 9 6 In the Manual Feeder 9 6 Tips for Avoiding Paper Jams 9 7 Clearing LCD Error Me...

Page 9: ...cifications A 6 Overview A 6 Supported Sizes of Paper A 6 Guidelines for Using Paper A 7 Paper Specifications A 8 Paper Output Capacity A 8 Paper Storage Environment A 9 Envelopes A 9 Labels A 11 Transparencies A 11 ...

Page 10: ...machine through case or cabinet openings They may touch dangerous voltage points creating a risk of fire or shock Never spill liquid of any kind onto or into the machine 12 To reduce the risk of electric shock do not disassemble the machine Take it to a qualified service technician when repair work is required Opening or removing covers may expose you to dangerous voltages or other risks Incorrect...

Page 11: ...te or service the printer with the protective cover removed from Laser Scanner assembly The reflected beam although invisible can damage your eyes When using this product these basic safety precautions should always be followed to reduce risk of fire electric shock and injury to persons Ozone Safety During normal operation this machine produces ozone The ozone produced does not present a hazard to...

Page 12: ...ers should contact their supplier and check the terms and conditions of the purchase contract This product should not be mixed with other commercial wastes for disposal Radio Frequency Emissions FCC Information to the User This device complies with Part 15 of the FCC Rules Operation is subject to the following two conditions This device may not cause harmful interference and This device must accep...

Page 13: ... modification or alteration of such terminal equipment or otherwise materially affect its use or performance the customer shall be given adequate notice in writing to allow the customer an opportunity to maintain uninterrupted service Ringer Equivalence Number The Ringer Equivalence Number and FCC Registration Number for this machine may be found on the label located on the bottom or rear of the m...

Page 14: ... as of the dates indicated January 1 1995 Council Directive 73 23 EEC Approximation of the laws of the member states related to low voltage equipment January 1 1996 Council Directive 89 336 EEC 92 31 EEC approximation of the laws of the Member States related to electromagnetic compatibility March 9 1999 Council Directive 1999 5 EC on radio equipment and telecommunications terminal equipment and th...

Page 15: ...e moulded plug Warning If you cut off the moulded plug get rid of it straight away You cannot rewire the plug and you may receive an electric shock if you plug it into a socket Important warning You must earth this machine The wires in the mains lead have the following color code Green and Yellow Earth Blue Neutral Brown Live If the wires in the mains lead do not match the colors marked in your pl...

Page 16: ...xv ...

Page 17: ...xvi ...

Page 18: ...our machine This chapter includes Unpacking Understanding the Component Location Attaching Accessories Installing the Toner Cartridge Loading Paper Making Connections Turning the Machine On About Samsung Software Installing Samsung Software in Windows Removing Software Changing the Display Language Setting the Machine ID Setting the Date and Time Setting the Paper Type and Size Setting Sounds Usin...

Page 19: ...on Make sure that the machine has been packed with the following items If there is a missing item contact the retailer where you bought the machine Starter Toner Cartridge AC Power Cord Telephone Line Cord CD ROM Quick Install Guide Document Output Support Handset Cradle TAM Lead for UK only ...

Page 20: ...ons The CD ROM contains the MFP driver SmarThru software the user s guides and the Adobe Acrobat Reader program NOTES You should use the telephone line cord which is supplied with your machine If you are replacing it with another vendor s it should be AWG 26 or larger telephone line cord The power cord must be plugged into a grounded power socket Components may differ from one country to another T...

Page 21: ...d trays The area should be well ventilated and away from direct sunlight or sources of heat cold and humidity Do not set the machine close to the edge of your desk or table Clearance Space Front 482 6 mm enough space so that the paper tray can be removed Back 250 mm enough space for ventilation Right 100 mm Left 100 mm enough space for ventilation ...

Page 22: ...tput Tray Face down Document Input Support Automatic Document Feeder Toner Cartridge Paper Output Extension Manual Feeder Manual Feeder Guides Paper Level Indicator Document Guides Document Output Tray Power Switch USB Connector Rear Cover AC Power Cord Connector EXT Jack Line Jack If your country has a different telephone connection system this socket may be blocked Rear Output Slot Face up ...

Page 23: ...r the current copy job Selects the document type for the current copy job Makes a copy smaller or larger than the original document Selects the number of copies 3 Displays the current status and prompts during an operation 4 Scrolls through the options available for the selected menu item Confirms the selection on the display Enters Menu mode and scrolls through the menus available ...

Page 24: ...sending a fax at a preset toll saving time Using this feature you can take advantage of lower long distance rates at night for example 7 F A X Allows you to select the fax receiving mode Allows you to store frequently dialed fax numbers using a one or two digit speed dial or group number for automatic dialing and edit the stored numbers Allows you to print a Phone book list Adjusts the resolution ...

Page 25: ... Fold out the extender if necessary NOTES When you want to use the paper output extension first slightly lift the document output support up then fold out the extension When detaching the document output tray detach it by pressing the front portion of document output tray as seen from the picture As this time even though the dull sound is heard the components are safe from damge ...

Page 26: ...le as shown attach the handset cradle to the machine Insert the two tabs of the cradle into the slots on the left side of the machine as shown Push the cradle toward the machine until it locks into place NOTES The cradle and handset must be installed for correct operation of the set To remove the cradle push it down pressing the latch on the bottom of the cradle ...

Page 27: ...side the cartridge Thoroughly rolling the cartridge will assure the maximum copies per cartridge CAUTIONS To prevent damage do not expose the toner cartridge to light for more than a few minutes Cover it with a piece of paper if left exposed for more than a few minutes If toner gets on your clothing wipe it off with a dry cloth and wash clothing in cold water Hot water sets toner into the fabric ...

Page 28: ...GETTING STARTED 1 11 1 3 Slide the toner cartridge into the machine until it locks into place completely 4 Close the front cover Make sure that the cover is securely closed ...

Page 29: ...heets To load a stack of Letter sized paper 1 Pull open the paper tray and remove it from the machine 2 Push down on the pressure plate until it locks into place 3 Fan the edges of the paper stack to separate the pages Then tap the stack on a flat surface to even it up ...

Page 30: ...st the paper guides For details see page 1 14 5 Pay attention to the paper limit mark on the left inside wall of the tray Paper overloading may cause paper jams 6 Insert and slide the paper tray back into the machine NOTE After you load the paper you need to set up your machine for the paper type and size you loaded See page 1 36 for copying and faxing or page 3 7 for PC printing ...

Page 31: ... guides to extend the paper tray 1 After pressing and unlatching the guide lock slide the paper length guide out completely to extend the paper tray to its full length 2 After inserting paper into the tray slide in the guide until it lightly touches the end of the paper stack For paper smaller than letter adjust the paper length guide accordingly ...

Page 32: ... lightly touches the side of the stack NOTES Do not push the paper width guide far enough to cause the materials to warp If you do not adjust the paper width guide it may cause paper jams Making Connections 1 Plug the telephone line cord into the LINE jack and the other end into the wall jack To the walljack ...

Page 33: ...NOTES Use the TAM lead and the telephone line cord supplied with your machine In the United Kingdom if a three wire type SHUNT wire found on older equipment telephone or answering machine is connected to the EXT jack on the machine the external equipment will fail to ring when receiving an incoming call as the machine is designed to operate with the latest technology To prevent this incompatibilit...

Page 34: ...ES If you are using a USB cable you must be running Windows 2000 XP Vista When using the USB connection your machine provides two USB modes Fast and Slow Fast is the default mode Some PC users may experience poor USB function in the default mode If this occurs select the Slow mode to achieve successful results For details about changing the USB mode see page 9 14 ...

Page 35: ...tch to turn the machine on Warming Up Please Wait appears on the display indicating that the machine is now on To view your display text in another language see page 1 30 CAUTIONS The fusing area inside the rear part of your machine becomes hot once the machine is turned on Be careful when you access this area Do not disassemble the machine when it is turned on as it may give you an electric shock...

Page 36: ... can print and scan in Linux using your machine For information about installing the printer driver in Linux see page 7 2 Remote Control Panel This Windows based program is automatically installed when you install the MFP driver For information about using the program see page 6 36 SmarThru Software SmarThru is the accompanying Windows based software for your multifunctional machine SmarThru conta...

Page 37: ...celandic Indonesian Irish Italian Latvian Lithuanian Macedonian Norwegian Bokmal Norwegian Nynorsk Polish Portuguese Romanian Russian Serbian Slovak Spanish Swahili Swedish Tagalog Turkish Ukrainian Korean Recommended Scan Option for OCR Resolution 200 or 300 dpi Image Type Mono Black White Printer Driver Features Your printer drivers support the following standard features Paper source selection ...

Page 38: ...ld install the software Item Requirements Operating System Windows 2000 XP Vista CPU Windows 2000 Pentium II 400 or higher Windows XP Vista Pentium II 933 Ghz or higher RAM Windows 2000 64 MB or more Windows XP 128 MB or more Windows Vista 512 MB or more Free disk space Windows 2000 600 MB or more Windows XP 1GB or more Windows Vista 15GB Internet Explorer Windows 2000 XP 5 0 or higher Windows Vis...

Page 39: ...s Accessories Run and type X Setup exe If the AutoPlay window appears in Windows Vista click Run Setup exe in Install or run program field and click Continue in the User Account Control window 2 When the following window opens connect your machine to the computer and turn the printer on Then click Next If the machine is already connected and turned on this screen does not appear Skip to the next s...

Page 40: ...omponent s click Next Install SmarThru Installs the SmarThru program If you select to install SmarThru on this screen follow from step 3 on page 1 24 View User s Guide Allows you to view this User s Guide or SmarThru User s Guide If your computer doesn t have Adobe Acrobat click on this option and it will automatically install Adobe Acrobat for you 4 After the installation is finished the window a...

Page 41: ... reprint it 6 To register yourself as a user of Samsung Printers select the check box and click Finish You are now accessed to the Samsung web site Otherwise just click Finish Installing Samsung SmarThru 1 Insert the supplied CD ROM into your CD ROM drive 2 Click Install SmarThru 3 Click Next ...

Page 42: ...nded for most users Custom You may choose the options you want to install 7 Choosing the SmarThru networking option allows you to share the modems on other computer in your network and the scan device or to access similar devices on other computers If you select the Custom installation you may choose the components you want to install SmarThru Software to scan and edit images and to work with elec...

Page 43: ...are a local fax modem and or a scanner over a LAN You can control sharing by managing a remote service user The Client option allows you to use Remote Fax or Remote Scan services provided by a SmarThru Server over a LAN You need to have a client account provided by the server For details about Remote Fax Scan Services refer to the SmarThru User s Guide 8 Follow the on screen instructions to comple...

Page 44: ... 2 Click Repair NOTE If your machine is not connected to the computer the Connect Samsung MFP 560 Series window opens After connecting the machine click Next 3 Select the components you want to reinstall and click Next If you choose to repair the printer software the window asking you to print a test page appears Do as follows a To print a test page select the check box and click Next b When the t...

Page 45: ...ROM drive 2 Click Remove Then you will see a component list so that you can remove any of them individually If you want to uninstall the printer driver check Printer If you want to uninstall the twain driver check Scaner If you want to uninstall the Remote Control Panel check Remote Control Panel 3 After selecting items you wish to remove click Next 4 When your computer asks you to confirm your se...

Page 46: ...ete Deletes all the SmarThru data and options No backup or copying takes place Be careful while using this option as you can easily lose your data Leave intact Uninstalls SmarThru software leaving data and options intact This can be useful if for example you decide to install the Stand Alone configuration over the SmarThru Networking In this case uninstall Samsung SmarThru having the Leave intact ...

Page 47: ...ntil Machine Setup appears on the top line of the display 2 Press the scroll button W or X until Language appears on the bottom line of the display 3 Press Enter The current setting appears on the bottom line of the display 4 Press the scroll button W or X until the language you want appears on the display 5 Press Enter to save the selection 6 To return to Standby mode press Stop Clear ...

Page 48: ...take while entering numbers press the W button to delete the last digit 4 Press Enter when the number on the display is correct The display asks you to enter the ID 5 Enter your name or company name using the number keypad You can enter alphanumeric characters using the number keypad and include special symbols by pressing the 0 button For details on how to use the number keypad to enter alphanume...

Page 49: ... the button until the correct letter appears on the display For example to enter the letter O press 6 labeled with MNO Each time you press 6 the display shows a different letter M N O and finally 6 You can enter special characters such as space plus sign and so on For details see Keypad Letters and Numbers on page 1 33 2 To enter additional letters repeat step 1 If the next letter is printed on th...

Page 50: ... access code 9 for example and listen for a second dial tone In such cases you must insert a pause in the telephone number You can insert a pause while you are setting up one touch or speed dial numbers To insert a pause press Redial Pause at the appropriate place while entering the telephone number A appears on the display at the corresponding location Key Assigned numbers letters or characters 1...

Page 51: ...line and press Enter 3 Enter the correct time and date using the number keypad Month 01 12 Day 01 31 Year requires all four digits Hour 01 12 12 hour mode 00 23 24 hour mode Minute 00 59 NOTE The date format may differ from each country You can also use the scroll button W or X to move the cursor under the digit you want to correct and enter a new number 4 To select AM or PM for 12 hour format pre...

Page 52: ...an set your machine to display the current time using either 12 hour or 24 hour format 1 Press Menu until Machine Setup appears on the top line of the display 2 Press the scroll button W or X until you see Clock Mode on the bottom line and press Enter The clock mode currently set for the machine displays 3 Press the scroll button W or X to select the other mode and then press Enter to save the sel...

Page 53: ... The display shows Paper Setting on the top line and the first menu item Paper Type on the bottom line 2 Press Enter to access the menu item 3 Use the scroll button W or X to find the paper type you are using and press Enter to save it 4 Press the X button to scroll to Paper Size and press Enter to access the menu item 5 Press Enter when Tray Paper displays on the bottom line 6 Use the scroll butt...

Page 54: ...ote machine answers You can adjust the speaker volume level using the On Hook Dial button or the handset Speaker Ringer Key Sound and Alarm Sound 1 Press Menu until Sound Volume appears on the top line of the display 2 Press the scroll button W or X to scroll through the options Press Enter when you see the sound option you want 3 Press the scroll button W or X to display the status or loudness yo...

Page 55: ...h or Low 3 Press Enter to save selection and replace the handset NOTE You can adjust the speaker volume only when the telephone line is connected Using the Save Modes Toner Save Mode Toner Save mode allows your machine to use less toner on each page Activating this mode extends the life of the toner cartridge longer than normal but it reduces the print quality To turn the toner save mode on or off...

Page 56: ...the number keypad To select AM or PM for 12 hour format press the or button or any number button 4 Press Enter when the starting time on the display is correct 5 Press the scroll button W or X to display End Time and press Enter 6 Enter the time when the toll save transmission ends using the number keypad 7 Press Enter to save the setting 8 To return to Standby Mode press Stop Clear Once Toll Save...

Page 57: ...s Menu until Machine Setup appears on top line of the display 2 Press the scroll button W or X until Power Save appears on the bottom line Press Enter 3 Press the scroll button W or X to display On on the bottom line and press Enter Selecting Off means that Power Save mode turns off 4 Press the scroll button W or X until the time settings you want appears The available options are 5 10 15 30 and 4...

Page 58: ...er introduces you to the basics of selecting print materials and loading them into your machine This chapter includes Selecting Print Materials Selecting an Output Location Loading Paper in the Paper Tray Using the Manual Feeder ...

Page 59: ...ghts as follows 16 24 lbs 60 90 g m2 bond for the paper tray 16 43 lbs 60 163 g m2 bond for the manual feeder Brightness Some papers are whiter than others and produce sharper more vibrant images Surface smoothness The smoothness of the paper affects how crisp the printing looks on the paper CAUTION Using print materials that dose not conform to the specifications listed on page A 6 may cause prob...

Page 60: ...an cause it to wrinkle or curl Store unused materials at temperatures between 15 o C and 30 o C 59 o F to 86 o F The relative humidity should be between 10 and 70 During storage you should use moisture proof wrap such as any plastic container or bag to prevent dust and moisture from contaminating your paper Load special paper types one sheet at a time Only use materials specifically recommended fo...

Page 61: ...e more than once The adhesive backing is designed for one pass through the machine Do not use labels that are separating from the backing sheet or are wrinkled bubbled or otherwise damaged Do not use Carbonless paper and Tracing paper They could make smell of chemicals and damage your machine Selecting an Output Location The machine has two output locations the rear output slot face up and the fro...

Page 62: ... for most print jobs Printing to the Rear Output Slot Face up Using the rear output slot paper comes out of the machine face up Printing from the manual feeder to the rear output slot provides the straight paper path Using the rear output slot might improve the output quality with the following envelopes labels small custom sized paper postcards transparencies ...

Page 63: ...by pulling it upward CAUTION The fusing area inside the rear part of your machine becomes hot once the machine is turned on Be careful when you access this area 2 If you do not want to use the rear output slot close the rear cover The pages stack on the front output tray ...

Page 64: ...pull open the paper tray and load paper with the print side face down You can load letterhead paper with the design side face down The top edge of the sheet with the logo should be placed at the front side of the tray For details about loading paper in the paper tray see Loading Paper on page 1 12 NOTES If you experience problems with paper feed place the paper in the manual feeder You can load up...

Page 65: ...lb and 32 lb NOTES Always load only the print materials specified in the Specifications on page A 6 to avoid paper jams and print quality problems Flatten any curl on postcards envelopes and labels before loading them into the manual feeder When you print on 76 mm X 127 mm 3 X 5 in sized media with loading into the tray open the rear output tray 1 Load a sheet of the print material with the print ...

Page 66: ...n printing on previously printed paper from the manual feeder the printed side should be facing down with an uncurled edge to the machine If you experience problems with paper feed turn the paper around 3 Open the rear cover to use the rear output slot 4 After printing close the rear cover ...

Page 67: ...s Menu The display shows Paper Setting on the top line and the first item Paper Type on the bottom line 2 Press Enter to access the menu item 3 Use the scroll button W or X to find the paper type you are using and press Enter to save it 4 Press the X button to scroll to Paper Size and press Enter to access the menu item 5 Use the scroll button W or X to display Manual Feed on the bottom line Press...

Page 68: ...er includes Printing a Document in Windows Setting Paper Properties Setting Graphic Properties Printing Multiple Pages on One Sheet of the Paper Printing a Reduced or Enlarged Document Fitting Your Document to a Selected Paper Size Printing Posters Using Watermarks Using Overlays Setting Up the Locally Shared Printer ...

Page 69: ...ing Your Printer in Linux 1 Open the document you want to print 2 Select Print from the File menu The Print window opens It may look slightly different depending on your application You can select the basic print settings within the Print window These settings include the number of copies and the print range 3 To take advantage of the printer features provided by your machine click Properties or P...

Page 70: ...u to select the direction in which information is printed on a page Portrait prints across the width of the page letter style Landscape prints across the length of the page spreadsheet style If you want to turn the page upside down select 180 from the Rotate drop down list 5 From the Paper tab select the paper source size and type For further details see page 3 7 The preview image shows the sample...

Page 71: ...l the Print window displays 9 Click OK to start printing Notes Most Windows applications overrides the settings you specified in the printer driver Change all of the print settings available in the software application first and change any remaining settings using the printer driver The settings you change remain in effect only while you are using the current program To make your changes permanent...

Page 72: ... for each job To stop a print job from the Printers folder If the print job is waiting in a print queue or print spooler such as the Printer group in Windows delete the job as follows 1 Click the Windows Start menu 2 For Windows 2000 Select Settings and then Printers For Windows XP select Printers and Faxes For Windows Vista select Control Panel Hardware and Sound Printers 3 Double click the Samsu...

Page 73: ...ect it from the Favorites drop down list To delete a favorite setting item select it from the list and click Delete You can also restore the printer driver s default settings by selecting Printer Default from the list Using Help Your machine has a help screen that can be activated using the Help button in the printer s Properties window The help screen gives detailed information about the printer ...

Page 74: ... Copies Copies allows you to choose the number of copies to be printed You can enter up to 999 Size Size allows you to choose the size of the paper loaded in the tray If the required size is not listed in the Size box click Add Custom When the Custom Page Size window appears set the size and click Ok The setting appears on the list so that you can select it 1 2 3 4 1 2 Enter the custom name you wa...

Page 75: ...eet at a time into the manual feeder See page 2 8 If the paper source is set to Auto Select the machine automatically picks up print material in the following order the manual feeder and the paper tray Type Make sure that Type is set to Printer Default If you load a different type of print material select the corresponding paper type For more information about print materials see Chapter 2 Paper H...

Page 76: ...ermined by the setting you ve made on the control panel of the machine On Select this option to allow the machine to use less toner on each page Off When you do not need to save toner to print a document select this option Advanced Options You can make advanced settings by clicking the Advanced Options button 1 2 3 Darkness Use this option to lighten or darken the image appearance in your print No...

Page 77: ...e about how to image the text in your document Select the appropriate setting according to the status of your document Download as Bit Image When this option is selected the driver downloads the font data as bitmap images Documents with complicated fonts such as Korean or Chinese or various types of fonts print faster in this setting Print as Graphics When this option is selected the driver downlo...

Page 78: ...r drop down list if necessary Check Print Page Border to print a border around each page on the sheet NOTE Page Order and Print Page Border are enabled only when the number of pages per side is 2 4 9 or 16 5 Click the Paper tab and select the paper source size and type 6 Click OK and print the document Right Then Down Down Then Right Left Then Down Down Then Left ...

Page 79: ... from your software application access the printer s Properties See page 3 2 2 From the Layout tab select Reduce Enlarge on the Type drop down list 3 Enter the scaling rate in the Percentage input box You can also click the or button 4 Click the Paper tab and select the paper source size and type 5 Click OK and print the document ...

Page 80: ... to check the fine details on a small document 1 When you change the print settings from your software application access the printer s Properties See page 3 2 2 From the Layout tab select Fit to Page on the Type drop down list 3 Select the correct size from the Target Page drop down list 4 Click the Paper tab and select the paper source and type 5 Click OK and print the document A ...

Page 81: ...r software application access the printer s Properties See page 3 2 2 From the Layout tab select Poster on the Type drop down list 3 Configure the poster option You can select the page layout from 2x2 3x3 or 4x4 If you select 2x2 the image is automatically stretched to cover 4 physical pages Specify an overlap in millimeters or inches to make it easier to reconstruct the resulting poster 2 x 2 3 x...

Page 82: ...AFT or CONFIDENTIAL printed diagonally across the first page or all of the pages of a document There are several predefined watermarks that come with your machine and they can be modified or you can add new ones to the list Using an Existing Watermark 1 When you change the print settings from your software application access the printer s Properties See page 3 2 2 Click the Extras tab and select a...

Page 83: ...x The message displays in the preview image window When the First Page Only box is checked the watermark prints on the first page only 4 Select the watermark options You can select the font name style and size and gray scale level from the Font Attributes section and set the angle of the watermark from the Message Angle section 5 Click Add to add a new watermark to the list 6 When you finish creat...

Page 84: ...rmarks list to change the watermark message and the options Refer to page 3 16 4 Click Update to save the changes 5 Click Ok Deleting a Watermark 1 When you change the print settings from your software application access the printer s Properties See page 3 2 2 From the Extras tab click Edit in the Watermark section The Edit Watermarks window appears 3 Select the watermark you want to delete on the...

Page 85: ...ur company s letterhead you need only tell the machine to print the letterhead overlay on your document Creating a New Page Overlay To use a page overlay you must create a new page overlay containing your logo or image 1 Create or open a document containing text or an image for use in a new page overlay Position the items exactly as you wish them to appear when printed as an overlay If needed save...

Page 86: ...lect the destination path if necessary The default is C Formover 6 Click Save The name appears on the Overlay List 7 Click Ok or Yes to finish creating The file is not printed out Instead it is stored in your computer HDD disk NOTE The overlay document size must be the same as the documents you print with the overlay Do not create an overlay with a watermark ...

Page 87: ...3 Click the Extras tab 4 Select the overlay you want to print from the Overlay drop down list box 5 When the overlay file you want doesn t appear on the Overlay List click Edit and Load Overlay and select the overlay file If you have stored the overlay file you want to use in an external source you can also load the file when you access this Load Overlay window After you select the file click Open...

Page 88: ...lay will be automatically printed with your document 7 Click OK or Yes until the printing starts The overlay downloads with your print job and prints on your document NOTE The resolution of the overlay document must be the same as that of the document you will print with the overlay Deleting a Page Overlay You can delete page overlays that you no longer use 1 In the printer s properties window cli...

Page 89: ... on each computer that will print documents to the printer In Windows 2000 XP Setting Up the Host Computer 1 Start Windows 2 For Windows 2000 from the Start menu select Settings and then Printers For Windows XP from the Start menu select Printers and Faxes For Windows Vista select Control Panel Hardware and Sound Printers 3 Double click your printer icon 4 From the Printer menu select Sharing 5 Fo...

Page 90: ...nd Printers For Windows XP from the Start menu select Printers and Faxes For Windows Vista select Control Panel Hardware and Sound Printers 5 Double click your printer icon 6 From the Printer menu select Properties 7 Press the Ports tab and click Add Port 8 Select Local Port and click New Port 9 Fill in the Enter a port name field and enter the shared name 10 Click OK and click Close 11 Click Appl...

Page 91: ...PRINTING 3 24 ...

Page 92: ...you step by step instructions for copying documents This chapter includes Loading Paper for Copying Preparing a Document Making a Copy Setting Copy Options Changing the Default Settings Setting the Time Out Option Collation Copying ...

Page 93: ...b for one job When you use the ADF Do not load documents smaller than 142 x 148 mm or larger than 216 x 356 mm Do not attempt to feed the following types of documents carbon paper or carbon backed paper coated paper onion skin or thin paper wrinkled or creased paper curled or rolled paper torn paper Remove all staples and paper clips before loading documents Make sure any glue ink or correction fl...

Page 94: ... the document size 4 Customize the copy settings including number of copies copy size darkness and original type by using the control panel buttons See Setting Copy Options on page 4 4 Sorts the copy job For example if you make 2 copies of 3 page documents one complete 3 page document will print followed by the second complete document see page 4 8 To clear the settings use the Stop Clear button ...

Page 95: ...canceled and return to their default status Or they will automatically return to their default status after the machine completes the copy Darkness If you have an original document containing faint markings and dark images you can adjust the brightness to make a copy that is easier to read To adjust the contrast press Darkness Each time you press the button the LED labeled with the selected mode t...

Page 96: ... copy a document containing color on the background such as a newspaper or a catalog you can get the background on your copy If you want to reduce the background change the Darkness setting to Light and or the Original Type setting to Text Number of Copies Using the No of Copies button you can select the number of copies from 1 to 99 1 Press No of Copies 2 Press the scroll button W or X until the ...

Page 97: ...Press Enter to save the selection To fine tune the size of copies 1 Press Reduce Enlarge 2 Press Reduce Enlarge or the scroll button W or X until Custom 50 150 displays on the bottom line Press Enter 3 Press the scroll button W or X until the copy size you want appears on the display Pressing and holding the buttons allows you to quickly increase and decreases in increments of 5 You can enter the ...

Page 98: ...he first menu item Default Change appears on the bottom line 2 Press Enter to access the menu item The first setup option Darkness appears on the bottom line 3 Press the scroll button W or X to scroll through the setup options 4 When the option you want to set appears press Enter to access the option 5 Change the setting using the scroll button W or X or enter the value using the number keypad 6 P...

Page 99: ...the machine does not restore the default settings until you press Start Copy Fax to start copying or Stop Clear to cancel 5 Press Enter to save the selection 6 To return to Standby mode press Stop Clear Collation Copying The Collation copying feature is available only when you load documents in the ADF 1 Press Menu on the control panel until Copy Setup appears on the top line of the display 2 Pres...

Page 100: ...iles on your computer Then you can fax or e mail the files display them on your web site or use them to create projects that you can print using Samsung SmarThru software This chapter includes Scanning Basics Scanning Using Samsung SmarThru Scanning Process with TWAIN enabled Software ...

Page 101: ...th your machine you must install the MFP driver Scanning is done through the same LPT or USB port currently assigned for your printer port Scanning Using Samsung SmarThru Samsung SmarThru is the accompanying software for your machine With the SmarThru scanning becomes a pleasure Follow these steps to start scanning using the SmarThru 1 Make sure that your machine and computer are turned on and pro...

Page 102: ...Document Feeder and adjust the document guides For detailed guidelines for preparing an original document see page 4 2 4 Once you have installed Samsung software you see the SmarThru icon on the desktop Double click the SmarThru 3 icon The SmarThru 3 window opens Double click this icon ...

Page 103: ...ced settings Scan to Email Lets you scan the original documents and then launches a default mail program of your system such as Microsoft Outlook Express so that you can send the scanned image attached to a new mail To send e mail using the Samsung SmarThru system you need to enable the Internet Gate and configure an e mail account in SmarThru Configuration Refer to the SmarThru User s Guide Scan ...

Page 104: ...nt the software processes or recognizes it Then you can change it and either save the file or open it in any word processing program on your computer 6 Click the service icon according to your job 7 The Samsung Scan Manager opens for the selected service Adjust the scan settings You can use the Help button to receive on line help 8 To start scanning click Scan For more information please refer to ...

Page 105: ...our machine select it as your TWAIN source in the application you use The basic scanning process involves a number of steps Place your photograph or page in the ADF See page 5 2 Open an application such as PhotoDeluxe or Photoshop Open the TWAIN window and set the scan options Scan and save your scanned image You need to follow the program s instructions for acquiring an image Please refer to the ...

Page 106: ...This chapter gives you information about using your machine as a fax machine This chapter includes Setting Up the Fax System Sending a Fax Receiving a Fax Automatic Dialing Other Ways to Fax Additional Features ...

Page 107: ...swer displays on the bottom line 2 Press the scroll button W or X until the menu item you want on the bottom line and press Enter 3 Use the scroll button W or X to find the status or use the number keypad to enter the value for the option you have selected 4 Press Enter to save the selection 5 If necessary repeat steps 2 through 4 6 To return to Standby mode press Stop Clear ...

Page 108: ...lly redial a remote fax machine when the line is busy Intervals from 1 to 15 minutes can be entered Redials You can specify the number of redial attempts 0 to 13 If you enter 0 the machine will not redial MSG Confirm You can set your machine to print a report showing whether the transmission was successful how many pages were sent and more The available options are On Off and On Error which prints...

Page 109: ... the margin and the Auto Reduction feature is turned on the machine reduces the document to fit it onto the appropriate sized paper and discard does not occur If the Auto Reduction feature is turned off or fails the data within the margin will be discarded Settings range from 0 to 30 mm Receive Code The Receive Code allows you to initiate fax reception from an extension phone plugged into the EXT ...

Page 110: ... the way out Fold out the extender if necessary 2 Load the documents up to 20 pages face down into the ADF and adjust the document guides to the document size For detailed guidelines for preparing an original document see page 4 2 3 Adjust the document resolution referring to page 6 6 ...

Page 111: ...OTES For the memory transmission Super Fine mode is not available The resolution setting is automatically changed to Fine When your machine is set to Super Fine resolution and the remote fax machine does not support the Super Fine resolution the machine transmits using the highest resolution mode supported by the remote fax machine Mode Recommended for Standard Documents with normal sized characte...

Page 112: ...he darkness see page 6 3 3 Enter the remote fax phone number using the number keypad You can use the one touch keypad or speed or group dial numbers For details about storing a number see page 6 15 4 Press Start Copy Fax The document is scanned into memory the number is then dialed and the documents sent when the remote machine is ready NOTE When you want to cancel the fax job press Stop Clear at ...

Page 113: ...r the remote fax machine s fax number using the number keypad You can use the one touch keypad or speed or group dial numbers For details about storing a number see page 6 15 5 When you hear a high pitched fax signal from the remote fax machine press Start Copy Fax NOTE When you want to cancel the fax job press Stop Clear at any time while sending the fax Redialing the Last Number To redial the la...

Page 114: ...ou can set your machine to print a confirmation report automatically each time sending a fax is completed For further details see the MSG Confirm item on page 6 3 Automatic Redialing When the number you have dialed is busy or there is no answer when you send a fax the machine automatically redials the number every three minutes up to seven times by the factory default settings When the display sho...

Page 115: ...achine senses a fax tone on the line the call automatically switches to Fax mode In DRPD mode you can receive a call using the Distinctive Ring Pattern Detection DRPD feature Distinctive Ring is a telephone company service which enables a user to use a single telephone line to answer several different telephone numbers For further details See page 6 13 The current receiving mode displays when the ...

Page 116: ...s Receive Mode 2 Press and hold Receive Mode until Fax displays on the bottom line You may have to repeat this action once or twice depending on the mode you re in 3 When you receive a fax the machine answers the call on a specified number of rings and automatically receives the fax To change the number of rings see page 6 3 Receiving Manually in Tel Mode You can answer calls using the handset or ...

Page 117: ... leaves a message the answering machine stores the message as it would normally If your machine hears a fax tone on the line it automatically starts to receive the fax NOTES When you have set your machine to Ans Fax mode and your answering machine is switched off or no answering machine is connected to the EXT jack your machine automatically goes into Fax mode after a predefined number of rings If...

Page 118: ...call you on is identified by different ringing patterns which consist of various combinations of long and short ringing sounds This feature is often used by answering services who answer telephones for many different clients and need to know which number someone is calling in on to properly answer the phone Using the Distinctive Ring Pattern Detection feature your fax machine can learn the ring pa...

Page 119: ... Step 3 6 To return to Standby Mode press Stop Clear When the DRPD feature is set up the DRPD option is available in the Receive Mode menu To receive faxes in the DRPD mode you need to set the menu to DRPD NOTES DRPD must be set up again if you re assign your fax number or connect the machine to another telephone line After DRPD has been set up call your fax number again to verify that the machine...

Page 120: ...allow you to change it To start over with another one touch button press Stop Clear 2 Enter the number you want to store using the number keypad and press Enter To insert a pause between numbers press Redial Pause A symbol appears on the display If you make a mistake while entering a number press the W button and re enter the correct number 3 To assign a name to the number enter the name you want ...

Page 121: ...re up to 80 frequently dialed numbers in one or two digit speed dial locations 0 79 Storing a Number for Speed Dialing 1 Press Phone Book on the control panel 2 Press Phone Book or the scroll button W or X to display Store Edit on the bottom line of the display Press Enter 3 Press Enter when Speed Dials appears on the display The display prompts you to enter a location number showing the first ava...

Page 122: ...dby mode press Stop Clear Sending a Fax using a Speed Number 1 Feed the document s face up into the ADF For details about loading a document see page 6 5 2 Adjust the document resolution to suit your fax needs See page 6 6 If you need to change the darkness see page 6 3 3 Enter the speed dial number For a one digit speed dial number press and hold the appropriate digit button For a two digit speed...

Page 123: ...oll button W or X to display Group Dials on the bottom line and press Enter 4 Press Enter when New displays on the bottom line The display prompts you to enter a location number showing the first available number 5 Enter a group number between 0 and 79 using the number keypad or scroll button W or X and press Enter 6 Press a one touch dial button or enter a one or two digit speed number you want t...

Page 124: ...e selected group 1 Press Phone Book on the control panel 2 Press Phone Book or the scroll button W or X to display Store Edit on the bottom line of the display Press Enter 3 Press the scroll button W or X to display Group Dials on the bottom line and press Enter 4 Press the scroll button W or X to display Edit on the bottom line and press Enter 5 Enter the group number you want to edit and press E...

Page 125: ...ter the remote fax number For a one digit group number press and hold the appropriate digit button For a two digit group number press the first digit button and hold the last digit button You can use only one group number for one operation Then continue the procedure to complete the operation Your machine automatically scans the document loaded in the ADF and then dials each of the numbers include...

Page 126: ...th a Particular First Letter 1 Press Phone Book 2 Press Enter when Search Dial appears on the display 3 Press the button labeled with the letter you want to search for A name beginning with the letter displays For example if you want to find the name MOBILE press the 6 button which is labeled with MNO 4 Press the scroll button W or X to display the next name 5 When the name and or the number you w...

Page 127: ...e page 6 6 If you need to change the darkness see page 6 3 3 Press Broadcasting on the control panel 4 Enter the number of the remote machine using the number keypad You can use one touch keypad or speed dial or group dial numbers For details about storing a number see page 6 15 5 Press Enter to confirm the number The display asks you to enter another fax number to send the document NOTE The Anoth...

Page 128: ... 5 2 Adjust the document resolution to suit your fax needs See page 6 6 If you need to change the darkness see page 6 3 3 Press Menu until Fax Feature appears on the top line of the display The first available menu item DelayFax displays on the bottom line 4 Press Enter 5 Enter the number of the remote machine using the number keypad You can use one touch keypad or speed dial or group dial numbers...

Page 129: ...d asks you to enter the starting time when the fax is to be sent 11 Enter the time using the number keypad To select AM or PM for 12 hour format press the or button or any number button If you set a time earlier than the current time the document will be sent at that time on the following day 12 Press Enter when the starting time displays correctly The document is scanned into the memory before tr...

Page 130: ... darkness see page 6 3 3 Press Menu until Fax Feature appears on the top line of the display 4 Press the scroll button W or X to display Priority Fax on the bottom line and press Enter 5 Enter the number of the remote machine using the number keypad To enter the number you can use one touch keypad or speed dial or group dial numbers For details see page 6 15 6 Press Enter to confirm the number The...

Page 131: ...ppears on the top line of the display 2 Press the scroll button W or X to display Delay Rx Poll on the bottom line and press Enter 3 Enter the number of the remote machine to be polled using the number keypad To enter the number you can use a one touch keypad or speed dial number For details see page 6 15 4 Press Enter to confirm the number on the display The display asks you to enter another fax ...

Page 132: ...machine will dial the numbers in the order you entered and receive documents from the remote machines Adding Documents to a Scheduled Fax You can add documents to the delayed transmission previously reserved in your machine s memory 1 Load the document s face down into the ADF For details about loading a document see page 6 5 2 Adjust the document resolution to suit your fax needs See page 6 6 If ...

Page 133: ... and then returns to Standby mode Canceling a Scheduled Fax 1 Press Menu until Fax Feature appears on the top line of the display 2 Press the scroll button W or X to display Cancel Job and press Enter The display shows the last job reserved in the memory 3 Press the scroll button W or X until you see the fax job you want to cancel and press Enter 4 When the display confirms your selection press 1 ...

Page 134: ...vanced Fax appears on the top line of the display 2 Press the scroll button W or X until Secure Receive appears on the bottom line and press Enter 3 Press the scroll button W or X to display On on the bottom line and press Enter 4 Enter a four digit passcode you want to use and press Enter NOTE You can activate Secure Receiving mode without setting a passcode but cannot protect your faxes 5 Re ent...

Page 135: ...press Enter The machine prints all of the faxes stored in the memory To turn Secure Receiving mode off 1 Access the Secure Receive menu by following steps 1 and 2 on page 6 29 2 Press the scroll button W or X to display Off on the bottom line and press Enter 3 Enter the four digit passcode and press Enter The mode is deactivated and the machine prints all of the faxes stored in the memory 4 To ret...

Page 136: ...rt shows information of the faxes you recently received System Data List This list shows the status of the user selectable options You may print this list to confirm your changes after changing any settings Scheduled Job Information This list shows the document currently stored for Delayed faxes or Toll Save faxes The list shows the starting time and type of operation Message Confirmation This rep...

Page 137: ...red after a power failure if there occurs any data loss due to the power failure NOTE The lists you have set to print out automatically don t print out when there is no paper loaded or a paper jam has occurred Printing a Report 1 Press Menu until Reports appears on the top line of the display The first available menu item Phone Book displays on the bottom line 2 Press the scroll button W or X to d...

Page 138: ...6 31 Changing Setting Options 1 Press Menu until Advanced Fax appears on the top line of the display The first available menu item Send Forward displays on the bottom line 2 Press the scroll button W or X until you see the desired menu item on the bottom line and press Enter 3 When the option you want appears on the display choose a status by pressing the scroll button W or X or enter a value usin...

Page 139: ... you to set the machine to print the fax if fax forwarding is completed without any error Toll Save You can set your machine to store your faxes into the memory and send them at the specified toll saving time For details about Toll Save mode see page 1 39 Select Off to turn this feature off Select On to turn this feature on You can set the starting time and or the ending time for Toll Save mode Ju...

Page 140: ...allows the machine to automatically print the page number and the date and time of the reception at the bottom of each page of a received document Select Off to turn this feature off Select On to turn this feature on ECM Mode Error Correction Mode Error Correction Mode helps with poor line quality and makes sure any fax you send are sent smoothly to any other ECM equipped fax machine If the line q...

Page 141: ...ally installed For information about installing the Samsung software see page 1 19 To open the Remote Control Panel 1 Start Windows 2 From the Start menu select Programs 3 Select Samsung MFP 560 Series and then Remote Control Panel The Remote Control Panel program opens 4 The Remote Control Panel window provides the two tabs Phonebook and Firmware Update To exit click the Exit button at the bottom...

Page 142: ...s Deletes all Phonebook entries Allows you to edit the selected Phonebook entry in a separate Edit window Allows you to set up group dial numbers See below Deletes the selected Phonebook entry Shows the Phonebook entries you can include in the group After selecting a number click Add to move it to the Included numbers list Enter a name for the group Shows the numbers included in the group To remov...

Page 143: ...FAXING 6 38 The Firmware Update Tab Click the Firmware Update tab to update the firmware of your machine This feature should be used by an authorized technician Please consult with the purchase point ...

Page 144: ...apter gives you information about how to use your machine in the Linux system This chapter includes Getting Started Installing the MFP Driver Using the MFP Configurator Configuring Printer Properties Printing a Document Scanning a Document ...

Page 145: ...iver is installed on your Linux system the driver package allows you to monitor a number of MFP devices via USB simultaneously The acquired documents can then be edited printed on the same local MFP or network printers sent by e mail uploaded to a FTP site or transferred to an external OCR system The MFP driver package is supplied with a smart and flexible installation program You don t need to se...

Page 146: ...lackware 8 1 and above Recommended Hardware Requirements Pentium II or higher RAM 256 MB or higher HDD 1 GB or higher NOTES It s also necessary to claim swap partition of 200MB or larger for working with large scanned images The Linux scanner driver supports the optional resolution at maximum see Scanner and Copier Specifications on page A 3 Software Linux Kernel 2 4 or higher Glibc 2 2 or higher ...

Page 147: ... the printer software If you are not a super user ask your system administrator 3 Insert the printer software CD ROM The CD ROM will automatically run If the CD ROM does not automatically run click the icon at the bottom of the desktop When the Terminal screen appears type in root localhost root cd mnt cdrom Linux root localhost root install sh NOTE The installation program runs automatically if y...

Page 148: ...ur convenience If you have any difficulties consult the on line help that is available through your system menu or can otherwise be called from the driver package windows applications such as MFP Configurator or Image Editor Uninstalling the MFP Driver 1 From the Startup Menu icon at the bottom of the desktop select Samsung MFP and select Samsung MFP 560 Series Uninstall 2 Click Next 3 Click Finis...

Page 149: ... I O channel After installing the MFP driver see page 7 3 the MFP Configurator icon will automatically be created on your desktop Opening the MFP Configurator 1 Double click MFP Configurator on the desktop You can also click the Startup Menu icon and select Samsung MFP and then MFP Configurator 2 Press each button on the Modules pane to switch to the corresponding configuration window You can use ...

Page 150: ...he available printers list Add Printer allows you to add a new printer Remove Printer removes the selected printer Set as Default sets the current printer as a default printer Stop Start stops starts the printer Test allows you to print a test page to check if the machine is working properly Properties allows you to view and change the printer properties For details see page 7 10 Shows all of the ...

Page 151: ... scan images Shows all of the printer classes Shows the status of the class and the number of printers in the class Renews the classes list Allows you to add a new printer class Removes the selected printer class Allows you to monitor the activity of the scan drivers Allows you to change the scan properties and scan a document See page 7 13 Shows all of the installed scanners Switches to Scanners ...

Page 152: ... drivers The drivers address their devices via so called MFP ports The current status of any MFP port can be viewed via the MFP Ports Configuration The port sharing prevents you from accessing one functional block of the MFP device while another block is in use When you install a new MFP printer onto your system it is strongly recommended you do this with the assistance of an MFP Configurator In t...

Page 153: ...location and name The name entered in this tab displays on the printer list in Printers configuration Connection allows you to view or select another port Driver allows you to view or select another printer driver By clicking Options you can set the default device options Jobs shows the list of print jobs Click Cancel job to cancel the selected job and select the Show completed jobs check box to s...

Page 154: ...sing Common UNIX Printing System CUPS You can print on your machine from any such application 1 From the application you are using select Print from the File menu 2 Select Print directly using lpr 3 In the Samsung LPR window select the model name of your machine from the Printer list and click Properties 4 Change the printer and print job properties Click ...

Page 155: ...start printing 7 The Printing window appears to allow you to monitor the status of your print job To abort the current job click Cancel Printing Files You can print many different types of files on the Samsung MFP device using the standard CUPS way directly from the command line interface The CUPS lpr utility allows you do that But the drivers package replaces the standard lpr tool by a much more ...

Page 156: ...cted to the computer and turned on your scanner appears on the list and is automatically selected If you have two or more scanners attached to your computer you can select any scanner to work at any time For example while acquisition is in progress on the first scanner you may select the second scanner set the device options and start the image acquisition simultaneously NOTE The scanner name show...

Page 157: ...atic Document Feeder and adjust the document guides For detailed guidelines for preparing an original document see page 4 2 6 Click Preview in the Scanner Properties window The document is scanned and the image preview appears in the Preview Pane Drag the pointer to set the image area to be scanned ...

Page 158: ...out the preset Job Type settings see page 7 16 You can restore the default setting for the scan options by clicking Default 8 When you have finished press Scan to start scanning The status bar appears on the bottom left of the window to show you the scanning progress To cancel scanning press Cancel 9 The scanned image appears in the new Image Editor window If you want to edit the scanned image use...

Page 159: ...ng 4 Click OK Your setting is added to the Saved Settings drop down list To save a Job Type setting for the next scan job 1 Select the setting you want to use from the Job Type drop down list 2 Click Save The next time you open the Scanner Properties window the saved setting is automatically selected for the scan job To delete a Job Type setting 1 Select the setting you want to delete from the Job...

Page 160: ...nd tools to edit your scanned image You can use the following tools to edit the image Use these tools to edit the image Tools Function Saves the image Cancels your last action Restores the action you canceled Allows you to scroll through the image Crops the selected image area Zooms the image out Zooms the image in ...

Page 161: ...e size manually or set the rate to scale porportionally vertically or horizontally Allows you to rotate the image you can select the number of degrees from the drop down list Allows you to flip the image vertically or horizontally Allows you to adjust the brightness or contrast of the image or to invert the image Shows the properties of the image Tools Function ...

Page 162: ...formation for maintaining your machine and the toner cartridge This chapter includes Clearing the Memory Adjusting Shading Cleaning Your Machine Maintaining the Toner Cartridge Consumables and Replacement Parts Replacing the ADF Rubber Pad ...

Page 163: ...ptions to the factory default Fax Setup Restores all of the Fax Setup options to the factory default Fax Feature Cancels all of the scheduled fax jobs in the machine s memory Advanced Fax Restores all of the Advanced Fax setting options to the factory default Sound Volume Resets the sound and volume settings to the factory default Machine Setup Resets all of the system settings such as the machine...

Page 164: ...hading value Cleaning Your Machine To maintain the print quality follow the cleaning procedures below each time the toner cartridge is replaced or if print quality problems occur NOTES While cleaning the inside of the machine be careful not to touch the transfer roller located underneath the toner cartridge Oil from your fingers can cause print quality problems Cleaning the cabinet of your machine...

Page 165: ...the machine to cool down 2 Open the front cover and pull the toner cartridge out lightly pushing it down 3 With a dry lint free cloth wipe away any dust and spilled toner from the toner cartridge area and the toner cartridge cavity CAUTION To prevent damage to the toner cartridge do not expose it to light for more than a few minute Cover it with a piece of paper if necessary Do not touch the black...

Page 166: ...el with water 2 Open the control panel by gripping it on the bottom edge and pulling it upwards 3 Disassemble the white roller as follows The right end of the white roller has a plastic bush that is snapped shut with small tab on it Pull the tab inward slightly then lift the tab until the roller is released Lift the roller upwards and to the right releasing the left end from its then rotate the bu...

Page 167: ...y first wipe it with a slightly dampened cloth and then with a dry cloth Be very careful not to scratch the glass surface 6 Replace the roller by inserting the left end first followed by the right end then rotating the bushing until it locks into place 7 Reconnect the support and the control panel and then close the control panel firmly until it clicks into place ...

Page 168: ...nt damage to the toner cartridge do not expose it to light for more than a few minute Saving Toner To save toner press the Toner Save button on the control panel see page 1 38 The button backlight turns on Using this feature extends the life of the toner cartridge and reduces your cost per page but it also reduces the print quality Expected Cartridge Life The life of the toner cartridge depends on...

Page 169: ...e print quality by redistributing the remaining toner in the cartridge 1 Open the front cover 2 Pull the toner cartridge out and gently roll the cartridge 5 or 6 times to distribute the toner evenly inside the cartridge NOTE If the toner gets on your clothing wipe it off with a dry cloth and wash clothing in cold water Hot water sets the toner into fabric 3 Reinstall the cartridge and close the fr...

Page 170: ...Empty and the machine stops printing NOTE You can set the machine to ignore the Toner Empty message and continue printing See page 8 11 1 Open the front cover 2 Lightly pushing the used cartridge down pull it out 3 Unpack the new toner cartridge and gently roll it horizontally four or five times to distribute the toner evenly inside the cartridge Save the box and the Plastic bag for shipping 4 Sli...

Page 171: ...ced The fax number is preset by your dealer when you bought your machine 1 Press Menu on the control panel until Maintenance appears on the top line of the display The first available menu item Clean Drum displays on the bottom line 2 Press the scroll button W or X to display Notify Toner on the bottom line and press Enter 3 Press the scroll button W or X to change the setting Select On to enable ...

Page 172: ...ner particles on the drum surface are affixed to the paper 5 If the problem remains repeat steps 1 through 4 Ignoring the Toner Empty Message When the toner cartridge is empty the machine shows a Toner Empty message and stops printing You can set the machine to ignore the message when it displays and to continue printing the pages 1 Press Menu until Machine Setup appears on the display 2 Press the...

Page 173: ...u have printed a specified number of pages To purchase the consumables and replacement parts contact your Samsung dealer or the retailer where you bought your machine We strongly recommend that items be installed by a trained service professional except for the toner cartridge and the ADF rubber pad Items Yield Average ADF rubber pad Approx 10 000 pages ADF roller Approx 60 000 pages Paper feeding...

Page 174: ...by gripping it on the bottom edge and pulling it 2 Disconnect the support on the left side of the machine from the control panel and lift the control panel up to the complete open position 3 Remove the control panel from the machine by disconnecting the hinge on the right NOTE Be careful not to disconnect the connector on the control panel from the machine as it turns the LCD off ...

Page 175: ...d the plate and insert the tabs on the plate into the slot on the machine Press them until they are lached 6 Replace the control panel by connecting the hinge on the right first then inserting the left arm while pushing the control panel to the right 7 Reconnect the support and the control panel and then close the control panel firmly until it clicks into place ...

Page 176: ...ROUBLESHOOTING This chapter gives helpful information for what to do if you encounter an error This chapter includes Clearing Document Jams Clearing Paper Jams Clearing LCD Error Messages Solving Problems ...

Page 177: ...lay Input Misfeed 1 Remove the remaining documents from the ADF 2 Pull the jammed document gently out of the ADF 3 Load the documents back into the ADF NOTE To prevent document jams do not use thick thin or mixed documents Exit Misfeed 1 Remove the remaining documents from the ADF 2 Open the control panel by gripping it on the bottom edge and pulling it ...

Page 178: ...the table below to locate and clear the paper jam To avoid tearing the paper pull the jammed paper out gently and slowly Follow the steps on the next pages to clear the jam Message Location of Jam Go to Paper Jam 0 Open Close Door In the paper tray page 9 4 Paper Jam 1 Open Close Door In the fuser area or around the toner cartridge In the manual feeder page 9 6 Paper Jam 2 Check Inside In the pape...

Page 179: ...the paper tray open 3 Remove the jammed paper by gently pulling it straight out If there is any resistance and the paper does not move when you pull or if you cannot see the paper in this area skip to the fuser area around the toner cartridge See page 9 6 4 Insert the paper tray into the machine until it snaps into place 5 Open and close the front cover to resume printing ...

Page 180: ... 2 2 Gently pull the paper out of the front output tray Skip to step 6 If there is any resistance and the paper does not move when you pull or if you cannot see the paper in the front output tray continue to step 3 3 Open the rear cover 4 Remove the jammed paper by gently pulling it straight out 5 Close the rear cover 6 Open and close the front cover to resume printing ...

Page 181: ... by gently pulling it straight out 3 Replace the toner cartridge and close the front cover Printing automatically resumes In the Manual Feeder appears on the display when you try to print using the manual feeder and the machine does not detect paper due to no paper or improper paper loading The error message may also occur when the paper is not properly fed into the machine through the manual feed...

Page 182: ...he paper tray Do not remove the paper from the tray while your machine is printing Flex fan and straighten the paper before loading Do not use creased damp or highly curled paper Do not mix paper types in the paper tray Use only recommended print materials See Paper Specifications on page A 6 Ensure that the print side of print materials is facing down in the paper tray and facing up in the manual...

Page 183: ...utton No You should send the remaining pages later when the memory is available Comm Error The machine has a communication problem Ask the sender to try again CRU Fuse Error The machine has a problem with recognizing the new toner cartridge Please contact a service representative Document Jam The loaded document has jammed in the ADF Automatic Document Feeder Clear the document jam See page 9 2 Do...

Page 184: ...r turn the ECM on See page 6 35 Load Document You have attempted to set up a copy or fax operation with no document loaded Load a document and try again Low Heat Error There is a problem in the fuser unit Unplug the power cord and plug it back in If the problem persists please contact a service representative Open Heat Error Over Heat Memory Full The memory is full Delete unnecessary documents ret...

Page 185: ...Paper Jam 2 Check Inside Paper has jammed in the fuser area Clear the jam See page 9 5 Power Failure Power has turned off then on and the machine s memory has not been saved You need to start again the job which you were trying to do before the power failure Retry Redial The machine is waiting for a specified time interval to redial a previously busy station You can press Enter to immediately redi...

Page 186: ...e caused a paper jam clear the paper jam See page 9 3 Paper does not feed into the machine Remove any obstructions inside the machine Paper has not been loaded correctly Remove paper from the tray and reload it correctly There is too much paper in the paper tray Remove excess paper from the tray The paper is too thick Use only paper that meets the specifications required by the machine See Paper S...

Page 187: ...the computer and the machine is not connected properly Disconnect the printer cable and reconnect it The connection cable between the computer and the machine is defective If possible attach the cable to another computer that is working properly and print a document You can also try using a different printer cable The port setting is incorrect Check the Windows printer setting to make sure that th...

Page 188: ...ee page 3 3 The paper size and the paper size settings do not match Ensure that the paper size in the printer driver settings matches the paper in the tray The machine prints but the text is wrong garbled or incomplete The printer cable is loose or defective Disconnect the printer cable and reconnect Try a print job that you have already printed successfully If possible attach the cable and the ma...

Page 189: ... Select Download as Bit Image in the Advanced Options window of the Graphic properties and print the document An error occurs repeatedly when you are printing with the USB connection When the USB mode is set to Fast some PC users may experience poor USB communication Change the USB mode to Slow To do so follow these steps 1 Press Menu on the control panel until Machine Setup appears on the top lin...

Page 190: ...cleaning See Cleaning the Drum on page 8 11 The surface of the scan unit may be dirty Clean the scan unit See page 8 5 Toner specs The paper may not meet specifications for example the paper is too moist or too rough See Paper Specifications on page A 6 The transfer roller or paper path may be dirty Clean the inside of your machine and the drum See page 8 4 and page 8 11 Dropouts If generally roun...

Page 191: ...cifications on page A 6 Remove the toner cartridge and install a new one See Replacing the Toner Cartridge on page 8 9 Vertical repetitive defects If marks repeatedly appear on the printed side of the page at even intervals The toner cartridge may be damaged If a repetitive mark occurs on the page print a cleaning sheet several times to clean the cartridge see Cleaning the Drum on page 8 11 After ...

Page 192: ...d and producing hollow images the paper stock may be too slick Try a different paper See Paper Specifications on page A 6 If characters are improperly formed and producing a wavy effect the scanner unit may need service For service contact a service representative Page skew Ensure that the paper is loaded properly Check the paper type and quality See Paper Specifications on page A 6 Ensure that th...

Page 193: ...ot be installed properly Remove the cartridge and reinsert The toner cartridge may be defective and need replacing Remove the toner cartridge and install a new one See Replacing the Toner Cartridge on page 8 9 The machine may require repair Contact a service representative Loose toner Clean the inside of the machine See page 8 4 Check the paper type and quality See Paper Specifications on page A 6...

Page 194: ...em persists the machine may require repair Contact a service representative Curl If the printed paper is curl or paper does not feed into the printer Turn the stack of paper over in the paper tray Also try rotating the paper 180 in the paper tray Try printing to the rear output slot Condition Suggested solutions Copies are too light or too dark Use the Darkness button to darken or lighten the back...

Page 195: ...nts may contain pictures solids or heavy lines For example they may be forms newsletters books or other documents that use more toner The machine may be turned frequently on and off Condition Suggested solutions Condition Suggested solutions The scanner does not work Make sure that you place the document to be scanned face down in the ADF There may not be enough available memory to hold the docume...

Page 196: ...ing or printing job in progress When the current job is complete try the job again The selected port is currently being used Restart your computer and try again The printer cable may be improperly connected or the power may be off You must use a USB 1 1 compliant cable The scanner driver is not installed or an operating environment is not set up properly Ensure that port is properly connected and ...

Page 197: ...king a copy The toner cartridge may be empty Replace the toner cartridge referring to page 8 9 Some of the words on a incoming fax are stretched The fax machine sending you the fax had a temporary document jam There are lines on the documents you send Check your scan unit for marks and clean it See page 8 5 The machine dials a number but a connection with another fax machine fails The other fax ma...

Page 198: ...ous access of different consumer application to the same MFP port is possible To avoid possible conflicts only one of them at a time is allowed to gain control over the device The other consumer will encounter device busy response You should open MFP ports configuration and select the port assigned to your printer In the Selected port pane you can see if the port is occupied by some other applicat...

Page 199: ...unctioning properly The machine doesn t scan Check if a document is loaded into the machine Check if your machine is connected to the computer Make sure if it is connected properly if I O error is reported while scanning Check if MFP port is not busy Since functional components of MFP printer and scanner share the same I O interface MFP port the situation of simultaneous access of different consum...

Page 200: ...ant to use again If you don t want to uninstall MFP driver and install it again you may make the necessary symbolic link yourself Please log in as root user and invoke the following command ln sf usr local bin samsung slpr usr bin lpr Can t scan via Gimp Front end Check if Gimp Front end has Xsane Device dialog on the Acquire menu If not you should install Xsane plug in for Gimp on the your comput...

Page 201: ...TROUBLESHOOTING 9 26 ...

Page 202: ...A SPECIFICATIONS This chapter includes General Specifications Scanner and Copier Specifications Printer Specifications Facsimile Specifications Paper Specifications ...

Page 203: ...n paper Transparencies Labels Card stock Thick Thin Bond Preprinted Colored Envelopes 60 163 g m2 16 43 lb Consumables 1 piece toner cartridge system Power requirements 100 127 VAC 50 60 Hz 4 0 A 220 240 VAC 50 60 Hz 2 5 A Power consumption Sleep mode 10W 100 127 VAC 12W 220 240 VAC Standby mode 85 W 100 127 VAC 95 W 220 240 VAC Average 300 W Noise Warm up 52 dB Standby mode 39 dB Scanning 52 dB P...

Page 204: ... Item Description Item Description Compatibility TWAIN standard Scan method CIS Mono Scan resolution 200 X 200 dpi optical Scan length Maximum 15 7 inches 400 mm Scan width Maximum 8 5 inches 216 mm Effective 8 2 inches 208 mm Mono bit depth 1 bit for Text mode 8 bit for Gray mode Copy speed Letter 17 copies per minute A4 16 copies per minute Copy resolution 300 x 300 dpi Zoom rate 50 150 Multiple...

Page 205: ...elope 10 Envelope DL Envelope C5 Envelope C6 Envelope B5 Min 76 x 127 mm 3 x 5 in Max 216 x 356 8 5 x 14 in Print resolution Up to 600 x 600 dpi effective output Emulation SPL GDI PC Interface Compatible with USB 2 0 Specifications Compatibility Windows 2000 XP Vista Linux Redhat 7 1 and above Linux Mandrake 8 0 and above SuSE 7 1 and above Caldera OpenLinux 3 1 and above Turbo Linux 7 0 and above...

Page 206: ...ll back Transmission speed Approx 3 seconds page Transmission time applies to memory transmission of text data with ECM compression using only ITU T No 1 Chart Scan speed Approx 6 seconds LTR at standard fax resolution mode Paper size Letter A4 Legal Executive Folio B5 Resolution Standard 203 x 98 dpi Fine 203 x 196 dpi Super Fine 203 x 392 dpi Photo 203 x 196 dpi User Memory 2 MB Halftone 256 lev...

Page 207: ...uantities of paper insure the paper meets the requirements specified in this user s guide CAUTION Using paper that does not meet these specifications may cause problems requiring repairs These repairs are not covered by the Samsung warranty or service agreements Supported Sizes of Paper Size mm in Weight Capacity Plain paper Letter 215 9 x 279 8 5 x 11 A4 210 x 297 8 27 x 11 69 Folio 215 9 x 330 2...

Page 208: ...the manual feeder Transparency films Letter 215 9 x 279 8 5 x 11 A4 210 x 297 8 27 x 11 69 138 to 146 g m2 Card stocks A6 card 105 x 148 4 13 x 5 88 Post Card 101 6 x 152 4 4 x 6 Hagaki 100 x 148 3 94 x 5 83 90 to 163 g m2 Minimum size custom 60 to 120 g m2 bond 16 to 32 lb Maximum size Legal Capacity may vary depending on print materials weight and thickness and environmental conditions Symptom P...

Page 209: ... use paper with cutouts or perforations Problems with feeding Ragged edges Use good quality paper Category Specifications Acid Content 5 5 pH or lower Caliper 0 094 0 18 mm 3 0 7 0 mils Curl in Ream Flat within 5 mm 0 02 in Cut Edge Conditions Cut with sharp blades with no visible fray Fusing Compatibility Must not scorch melt offset or release hazardous emissions when heated to 200 C 392 F for 0 ...

Page 210: ...ral months before use Opened packages of paper have more potential for environment damage especially if they are not wrapped with a moisture proof barrier The paper storage environment should be properly maintained to ensure optimum performance The required condition is 20 to 24 C 68 to 75 F with a relative humidity of 45 to 55 The following guidelines should be considered when evaluating the pape...

Page 211: ...s Double side seams construction has vertical seams at both ends of the envelope rather than diagonal seams This style may be more likely to wrinkle Be sure the seam extends all the way to the corner of the envelope as illustrated below Envelopes with Adhesive Strips or Flaps Envelopes with a peel off adhesive strip or with more than one flap that folds over to seal must use adhesives compatible w...

Page 212: ...rint on the same sheet of labels more than once and never print on a partial sheet of labels When selecting labels consider the quality of each component Adhesives The adhesive material should be stable at 180 C 356 F the machine s fusing temperature Arrangement Only use labels with no exposed backing between them Labels can peel off sheets with spaces between the labels causing serious jams Curl ...

Page 213: ...l 1 6 copying 4 3 default setting change 4 7 image 4 5 number of pages 4 5 time out set 4 8 D date and time set 1 34 delay receive polling 6 26 delayed fax 6 23 display language change 1 30 document jam clear 9 2 loading 1 12 preparing 4 2 drum clean 8 11 E error messages 9 8 extension phone connect 1 16 F Favorite setting use 3 6 fax system set advanced settings 6 33 basic settings 6 2 fitting to...

Page 214: ...l feeder 2 10 paper tray 1 36 print 3 7 7 12 paper source set 3 8 7 12 paper type 2 2 paper type set manual feeder 2 10 paper tray 1 36 print 3 8 7 12 paper load 6 11 polling 6 26 poster print 3 14 power save mode use 1 40 print order set 3 4 print resolution 3 9 printer driver install Linux 7 4 Windows 1 21 printer properties Linux 7 11 windows 3 2 printing fitting to a selected paper size 3 13 f...

Page 215: ...utomatically 6 7 manually 6 8 sharing printer set 3 22 SmarThru install 1 21 uninstall 1 29 sounds set 1 37 specifications facsimile A 5 general A 2 paper A 6 printer A 4 scanner and copier A 3 speed dial dialing 6 17 storing 6 16 system requirements Linux 7 3 Windows 1 21 T tel line connect 1 15 toll save mode use 1 39 toner cartridge install 1 10 life 8 7 redistribute 8 8 replace 8 9 toner save ...

Page 216: ...Rev 2 00 ...

Reviews: