background image

3

2

1

6

5

4

9

8

7

0

Code No. : DE68-01870A

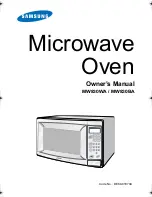
Owner’s Manual

MW830WA / MW830BA

Microwave

Oven

t~_ZW~hTGhjGŽ‰U”GGwˆŽŒGXGG{œŒš‹ˆ SGh—™“GY[SGYWWXGG_aYZGwt

Summary of Contents for MW830BA

Page 1: ...3 2 1 6 5 4 9 8 7 0 Code No DE68 01870A Owner s Manual MW830WA MW830BA Microwave Oven ...

Page 2: ...voltage inside If the oven needs to be repaired call 1 800 SASUNG for the name of an authorized service center near you IMPORTANT SAFETY INSTRUCTIONS When using any electrical appliance basic safety precautions should be followed including the following WARNING To reduce risk of burns electric shock fire personal injury or exposure to excessive microwave energy Read all safety instructions before ...

Page 3: ... materials are inside b Remove wire twist ties from plastic cooking bags before placing bags in oven c If materials inside the oven ignite keep the oven door closed turn the oven off disconnect the power cord or shut off the power at the fuse or circuit breaker panel d Do not use the oven compartment for storage purposes Do not leave paper products cooking utensils or food in the oven when not in ...

Page 4: ... sure if the appliance is properly grounded Use of Extension Cords A short power supply cord is provided to reduce the risk of becoming entangled in or tripping over a longer cord Longer cord sets or extension cords are available and may be used if care is exercised in their use If a long cord or extension cord is used 1 The marked electrical rating of the cord set or extension cord should be at l...

Page 5: ...Using the Instant Cook Buttons 8 Instant Cook Chart 9 Using the One Minute Button 10 Defrosting 10 Setting Cooking Times Power Levels 10 Cooking Instructions 11 Cooking Utensils 11 Testing Utensils 11 Cooking Techniques 12 General Tips 12 Cooking Guide 13 Defrosting Guide 15 Recipes 16 Appendix 18 Troubleshooting Guide 18 Care and Cleaning 19 Specifications 20 Manual Blok Warranty Card 21 Quick Re...

Page 6: ... this manual for easy warranty service Model Number _________________ Serial Number _________________ Date Purchased _________________ Dealer _________________ Setting Up Your Microwave Oven 1 Place the oven on a flat sturdy surface and plug the cord into a grounded outlet Once plugged in the display on your oven will show Make sure there is adequate ventilation for your oven by leaving at least f...

Page 7: ...r every minute of cooking at High power 3 Number buttons Sets cooking times 4 Defrost p 10 Press to set the defrosting time of the food to be defrosted 5 Power Level p 10 Sets power to level other than high 6 Clock p 8 Sets current time 7 Pause Cancel p 8 Press to pause oven or correct a mistake 8 Start Press to start cooking 3 2 1 6 5 4 9 8 7 0 ...

Page 8: ... you to pause the oven s cooking cycle so that you can check the food To pause the oven during cooking press Pause Cancel once To restart press Start To stop cooking erase instructions and return the oven display to the time of day press Pause Cancel twice To Correct a mistake you have just entered press Pause Cancel once then re enter the instructions Using the Instant Cook Buttons 1 Press the In...

Page 9: ...ome water Cover during cooking and stir before standing Frozen Dinner 7 10 oz 10 12 oz Remove package from outerwrapping and follow package instructions for covering and standing After cooking let stand 1 3 min Potato 1 EA 2 EA 3 EA 4 EA Prick each potato several times with fork Place on turntable in spoke like fashion Remove from oven wrap in foil and let stand 3 5 min Once during cooking the ove...

Page 10: ...t button to begin defrosting See page 15 for the Defrosting Guide Setting Cooking Times Power Levels The power level lets you control the heating intensity from Warm to High with the Power Level button 1 Press the Power Level button The power level is automatically set to high If you want to set the power level to something other than High press the Power Level button repeatedly 2 Press the Number...

Page 11: ...uch foil can damage your oven so be careful Ceramic porcelain and stoneware Use these if they are labeled Microwave Safe If they are not labeled test them to make sure they can be used safely Never use dishes with metallic trim Plastic Use only if labeled Microwave Safe Other plastics can melt Straw wicker and wood Use only for short term heating as they can be flammable Not Recommended Glass jars...

Page 12: ...er areas All liquids such as soup or hot chocolate should be shaken or stirred when cooking is complete Let liquids stand a moment before serving When heating baby food stir well and test the temperature before serving Adding Moisture Microwave energy is attracted to water molecules Food that is uneven in moisture content should be covered or allowed to stand so that the heat disperses evenly Add ...

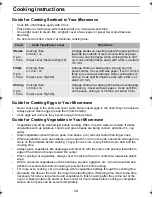
Page 13: ...at side down on roasting rack Cover with wax paper Turn over when cooking time is half up Let stand 10 min Pork Boneless or bone in Up to 4 lbs Cooking Time 8 12 min lb for 160 F Well Done Power Level High Hi for first 5 min then Medium 50 Place roast fat side down on roasting rack Cover with vented plastic wrap Turn over when cooking time is half up Let stand 10 min Bacon 2 6 slices Cooking Time ...

Page 14: ...ways cover the dish with a lid or vented microwavable plastic wrap Whole unpeeled vegetables such as potatoes squash eggplant etc should have their skin pricked in several spots before cooking to prevent them from bursting For more even cooking stir or rearrange whole vegetables halfway through the cooking time Generally the denser the food the longer the standing time Standing time refers to the ...

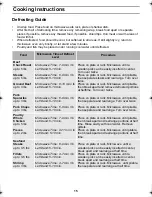
Page 15: ...t halftime Turn over twice Pork Spareribs up to 3 lbs Pork Chops up to 3 lbs Microwave Time 6 8 min lb Let Stand 5 10 min Microwave Time 6 8 min lb Let Stand 5 10 min Place on plate or rack Microwave until pliable then separate and rearrange Turn over twice Place on plate or rack Microwave until pliable then separate and rearrange Turn over twice Poultry Whole Chicken up to 5 lbs Pieces up to 2 lb...

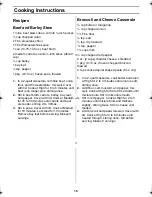
Page 16: ...r 10 minutes Let stand for 10 minutes Remove bay leaf before serving Makes 6 servings Broccoli and Cheese Casserole cup butter or margarine cup chopped onion 1 Tbs flour tsp salt tsp dry mustard 1 8 tsp pepper 1 cups milk cup chopped red pepper 8 oz 2 cups cheddar cheese shredded 1 pkg 9 10 oz frozen chopped broccoli thawed 4 cups cooked spiral shaped pasta 8 oz dry 1 In a 2 quart casserole cook b...

Page 17: ...tir once 4 Stir in sugar salt flour celery seed and pepper Cook at High until mixture boils 30 40 sec Stir in vinegar and cup water Cook at High until liquid boils and thickens slightly 1 2 min stir once Add bacon to dressing Pour dressing over potatoes Stir well Makes 6 servings Black Bean Soup 1 cup chopped onion 1 clove garlic minced 2 cans 15 oz each black beans drained 1 can 14 16 oz stewed t...

Page 18: ...ff before the set time has elapsed If there has not been a power outage remove the plug from the outlet wait ten seconds then plug it in again If there was a power outage the time indicator will display 88 88 Reset the clock and any cooking instructions Reset the circuit breaker or replace any blown fuse The food is cooking too slowly Make sure the oven is on its own 15 amp circuit line Operating ...

Page 19: ...dle it carefully and do not put it in water immediately after cooking Wash the tray carefully in warm sudsy water or in the dishwasher Clean the outside surface of the oven with soap and a damp cloth Dry with a soft cloth To prevent damage to the operating parts of the oven don t let water seep into the openings Wash the door window with very mild soap and water Be sure to use a soft cloth to avoi...

Page 20: ...ity 0 8cuft Controls 10 power levels including defrost Timer 99 minutes 99 seconds Power Source 120 VAC 60 Hz Power Output 800 Watts Outside Dimensions 191 4 W X 1013 16 H X 1313 16 D Oven Cavity Dimensions 13 W X 729 32 H X 1215 16 D Net Gross Weight 26 5 28 5 lbs ...

Page 21: ... to the Original Owner The original dated sales receipt must be retained by the customer and is the only acceptable proof of purchase It must be presented to an SECA Authorized Service Center at the time service is requested before warranty services are rendered On all carry in models transportation to and from the Authorized Service Center is the responsibility of the customer Exclusions of the W...

Page 22: ...Authorized Service Center Along with this Statement the Original Limited Warranty Statement and a dated Bill of Sale as Proof of Purchase must be presented to the Service Center Transportation to and from the Service Center is the responsibility of the purchaser Conditions covered are limited only to manufacturing defects in material or workmanship and only those encountered in normal use of the p...

Page 23: ...Note ...

Page 24: ...RN 2 Press the button repeatedly to select serving size Defrost 1 Press DEFROST 2 Press the buttons 0 9 sequentially to enter the desired defrosting time 3 Press START Set Cooking Time and Power Levels 1 Press the POWER LEVEL button If you wnat to set the power level to something other than High press the POWER LEVEL button repeatedly 2 Use NUMBER buttons to set cooking time 3 Press START to begin...

Page 25: ...3 2 1 6 5 4 9 8 7 0 Manuel du Propriétaire MW830WA MW830BA Four à micro ondes ...

Page 26: ...ISSEMENT Toujours suivre ces précautions de sécurité lorsque vous vous servez de votre micro ondes Ne jamais tenter de le réparer vous même il y a un voltage dangereux à l intérieur Si votre four doit être réparé veuillez communiquer avec le 1 800 SAMSUNG pour obtenir le nom du centre de service autorisé le plus près de vous REMARQUES DE SÉCURITÉ IMPORTANTES Lorsque vous utilisez des appareils éle...

Page 27: ...nge ou linge doux Pour réduire le risque de feu dans le four a Ne pas trop cuire les aliments Surveiller l appareil si vous y placer du papier plastique ou tout autre matériel combustible b Toujours enlever les attaches de métal avant de placer un sac de plastique dans le four c Si un matériel prend un feu garder la porter fermée et mettre le four hors circuit débrancher le cordon d alimentation o...

Page 28: ...areil est correctement mis à la terre UTILISATION DU CORDON D ALIMENTATION Un cordon d alimentation court est fourni pour éviter les risques qu il devienne tordu ou qu il soit accidentellement tiré Des cordons d alimentation plus longs sont disponibles mais doivent être utilisés avec soin Si vous utilisez un cordon d alimentation plus long 1 la puissance d alimentation du cordon électrique ou cord...

Page 29: ...leau de cuisson instantanée 9 Commande One Minute 10 Décongélation 10 Ajustement du temps de cuisson et du niveau de puissance 10 Instructions pour la cuisson 11 Ustensiles de cuisson 11 Essais des ustensiles 11 Techniques de cuisson 12 Conseils pratiques 12 Guide de cuisson 13 Guide pour la décongélation 15 Recettes 16 Appendice 18 Guide de dépannage 18 Nettoyage et entretien 19 Spécifications 20...

Page 30: ... ce manuel afin de faciliter l administration de la garantie le cas échéant Numéro du modèle _________________ Numéro de série _________________ Date de l achat _________________ Vendeur _________________ L ajustement du four micro ondes 1 Placer le four sur une surface plate et solide et brancher la fiche dans une sortie comportant une mise à la terre Une fois mis sous tension l afficheur de votr...

Page 31: ...n à haute puissance 3 Commandes numériques Pour programmer le temps de cuisson 4 Defrost p 10 Appuyer pour ajuster le temps nécessaire pour décongeler le met congelé 5 Power Level p 10 Pour ajuster la puissance à des niveaux autres que haute puissance 6 Clock p 8 Pour ajuster l heure 7 Pause Cancel p 8 Touche servant à arrêter le four ou pour corriger une erreur 8 Start Appuyer pour débuter la cui...

Page 32: ... cycle de cuisson pour vérifier les aliments Pour arrêter momentanément le four pendant la cuisson toucher Pause Cancel une fois Pour redémarrer toucher Start Pour arrêter la cuisson effacer les instructions et retourner l afficheur à l heure appuyer deux fois Pause Cancel Pour corriger une entrée appuyer Pause Cancel une fois puis reprendre l entrée Utilisation de la commande Instant Cook 1 Appuy...

Page 33: ...ur Frozen Dinner Repas congelé 200 gr à 286gr 286 gr à 344 gr Enlever l enveloppe externe et suivre les instructions pour recouvrir et sortir du four Après la cuisson laisser reposer pendant 1 à 3 min Potato Pomme de terre 1 unité 2 unités 3 unités 4 unités Piquer plusieurs fois chaque pomme de terre avec une fourchette Placer sur la tablette tournante sans aucun ordre Retirer du four envelopper d...

Page 34: ... la décongélation 3 Appuyer sur la touche Start pour débuter la décongélation Voir à la page 15 votre guide de la décongélation Ajustement du temps de cuisson et du niveau de puissance Le niveau de puissance vous permet de contrôler l intensité de chaleur de chaud à très chaud à l aide de la commande Power Level 1 Appuyer sur la touche Power Level La puissance est alors automatiquement ajustée à h...

Page 35: ...ger votre four Céramique porcelaine et grès N utiliser des contenants faits de ces matériaux que s ils sont marqués d un sceau garantissant leur capacité à être utilisés dans un four micro ondes S ils ne sont pas marqués vous devrez alors les essayer pour vous assurer qu ils sont adéquats et sécuritaires Ne jamais utiliser un plat comportant un rebord de métal Plastique N utiliser que des contenan...

Page 36: ... doivent être remués ou brassés à leur sortie du four laisser reposer quelques instants avant de servir Lorsque vous réchauffez des aliments pour bébé brasser bien et vérifier la température avant de servir Humidifier L énergie micro ondes a tendance à se concentrer autour des molécules d eau Les aliments dont le taux d humidité n est pas également réparti doivent être couverts ou laissés à repose...

Page 37: ...urles5 premières minutes puis Médium Medium 50 Placer la partie la plus grasse du rôti vers le bas sur la grille Recouvrir de papier ciré Retourner à la mi temps de la cuisson Laisser reposer pendant 10 min Porc avec ou sans os Jusqu à 1 8kg 8 à 12 min 0 5 kg 71 C bien cuit Leniveaudepuissance Haut High pourles5 premières minutes puis Médium Medium 50 Placer la partie la plus grasse du rôti vers l...

Page 38: ...mes coupés toujours recouvrir le plat avec un couvercle ou une enveloppe micro ondes ventilée faite de plastique Pour prévenir leur éclatement percer en plusieurs points avant la cuisson la peau des légumes entiers et non pelés tels les pommes de terre les courges les aubergines etc Pour obtenir une cuisson plus égale brasser ou replacer les légumes entiers à mi temps de la cuisson En général plus...

Page 39: ...qu à 1 35kg Côtelettes de porc Jusqu à 1 35kg 6 à 8 min 0 5 kg laisser reposer 5 à 10 min 6 à 8 min 0 5 kg laisser reposer 5 à 10 min Placer sur une assiette ou une grille Réchauffer au micro ondes jusqu à ce que le tout soit malléable séparer alors les morceaux et replacer Retourner deux fois Placer sur une assiette ou une grille Réchauffer au micro ondes jusqu à ce que le tout soit pliable sépar...

Page 40: ...n Retirer la feuille de laurier avant de servir Donnera 6 portions Casserole de brocoli et fromage 60 ml de beurre ou de margarine 60 ml d oignons hachés 23 ml de farine 8 ml de sel 4 ml de moutarde 2 ml de poivre 375 ml de lait 60 ml de poivrons rouges hachés 225 gr de fromage cheddar râpé 1 pqt 250 à 300 gr de brocoli coupé congelé 1 l de pâtes cuites en spirales 225 gr sèches 1 Dans une cassero...

Page 41: ...es 3 à 4 min remuer une fois 4 Verser en remuant le sucre le sel la farine les graines de céleri et le poivre Chauffer à High pour faire bouillir le mélange 30 à 40 secs Verser en remuant le vinaigre et 125 ml d eau Chauffer à haute température High jusqu à ce que le liquide bouille et épaississe légèrement 1 à 2 min remuer une fois Ajouter le bacon à la préparation Verser la préparation sur les p...

Page 42: ... et rebrancher Dans le cas d une panne de courant l indicateur de temps marquera 88 88 Remettre alors l horloge à l heure et refaire toutes les entrées des instructions de cuisson Réarmer le disjoncteur ou remplacer le fusible brûlé Les aliments cuisent trop lentement Assurez vous que le four est bien alimenté par son propre circuit de 15 A Utiliser un autre appareil sur le même circuit peut cause...

Page 43: ...immédiatement après une cuisson Laver avec soin votre plateau dans de l eau chaude légèrement savonneuse ou dans le lave vaisselle Laver les surfaces extérieures de votre four avec un linge humide et du savon Assécher avec un linge doux Afin de prévenir l endommagement des parties opérationnelles du four ne pas laisser l eau s infiltrer dans les ouvertures Laver la fenêtre du four avec un peu d ea...

Page 44: ... 65 litres Commandes 10 niveaux de puissance incluant décongélation Chronomètre 99 min 99 secs Source d alimentation 120V ca 60 Hz Puissance de sortie 800 Watts Dimensions extérieures 489mm L 275mm H 351mm P Dimension de la cavité 330mm L 201mm H 329mm P Poids net brut 12 kg 13 kg ...

Page 45: ... L original du reçu de la transaction dûment daté doit être conservé par l acheteur et constitue la seule preuve d achat acceptable Cette preuve d achat doit être présentée à un Centre de service autorisé de SECA au moment où le service est requis et avant que le service ne soit rendu Pour tous les modèles transportables carry in le transport vers le Centre de service autorisé de SECA et le retour...

Page 46: ...de l acheteur d origine un reçu dûment daté comme preuve d achat doit être présenté au Centre de service Le transport de l équipement vers le Centre de service et son retour chez le client demeurent la responsabilité du client Les conditions qui s appliquent sont limitées aux défauts de manufactures portant sur le matériel ou la main d œuvre et dans les limites d un usage normal de l équipement vi...

Page 47: ...Notes ...

Page 48: ...n 2 Répéter autant de fois que le nombre de portions Décongeler 1 Toucher la commande Defrost 2 Toucher les commandes numériques pour composer le temps désiré 3 Toucher Start Ajuster le temps de cuisson Les niveaux de puissance 1 Toucher la commande Power Level Pour ajuster la puissance à un niveau autre que Haut High toucher à répétition la même commande jusqu au niveau désiré 2 Toucher les comma...

Reviews: