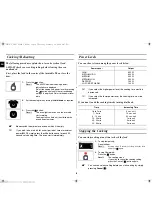
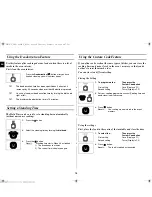
background image

EN

Setting the Time

Your microwave oven has an inbuilt clock. The time can be displayed 
in either the 24-hour or 12-hour notation. You must set the clock:

When you first install your microwave oven

After a power failure

Do not forget to reset the clock when you switch to and from 
summer or winter time.

What to Do if You are in Doubt or Have a 

Problem

If you have any of the problems listed below try the solutions given.

This is normal.

Condensation inside the oven.

Air flow around the door and outer casing.

Light reflection around the door and outer casing.

Steam escaping from around the door or vents.

The oven does not start when you press the 

 button.

Is the door completely closed?

The food is not cooked at all

Have you set the timer correctly and/or pressed the 

 button?

Is the door closed?

Have you overloaded the electric circuit and caused a fuse to blow or a 
breaker to be triggered?

The food is either overcooked or undercooked

Was the appropriate cooking length set for the type of food?

Was an appropriate power level chosen?

Sparking and cracking occur inside the oven (arcing)

Have you used a dish with metal trimmings?

Have you left a fork or other metal utensil inside the oven?

Is aluminium foil too close to the inside walls?

The oven causes interference with radios or televisions

Slight interference may be observed on televisions or radios when the 
oven is operating. This is normal.To solve this problem, install the oven 
away from televisions, radios and aerials.

If interference is detected by the oven’s microprocessor, the display may 
be reset.To solve this problem, disconnect the power plug and reconnect 
it. Reset the time.

If the above guidelines do not enable you to solve the problem, 
contact your local dealer or SAMSUNG after-sales service.

1.

To display the 

Then press the 

 button...

time in the... 

24-hour notation

Once

12-hour notation

Twice

2.

Turn the 

dial knob

 to set the hour. 

3.

Press the 

 button. 

4.

Turn the 

dial knob

 to set the minute.

5.

Press the 

 button. 

t~_^€†loTWZ[_`j†luU”GGwˆŽŒG\GG{œ™š‹ˆ SGmŒ‰™œˆ™ GX[SGYWW_GG[aY^Gwt

Summary of Contents for MW87Y

Page 1: ... Power Defrost Settings 8 Using the Power Steam Function 9 Using the Deodorization Feature 10 Setting a Standing Time 10 Using the Custom Cook Feature 10 Switching the Beeper Off 11 Safety Locking Your Microwave Oven 11 Cookware Guide 12 Cleaning Your Microwave Oven 13 Storing and Repairing Your Microwave Oven 13 Technical Specifications 14 The data concerning cooking and baking are informative Th...

Page 2: ...centre fitting to the coupler Purpose The turntable serves as the main cooking surface it can be easily removed for cleaning 4 Power steam cooker see page 9 Purpose Use the plastic steam cooker when using power steam function VENTILATION HOLES DOOR LATCHES DOOR TURNTABLE COUPLER ROLLER RING SAFETY INTERLOCK HOLES LIGHT DOOR HANDLE DISPLAY CONTROL PANEL 1 DISPLAY 2 AUTO REHEAT SELECTION 3 AUTO POWE...

Page 3: ...hen heating food in plastic or paper containers keep an eye on the oven due to the possibility of ignition Do not use your microwave oven to dry papers or clothes Small amounts of food require shorter cooking or heating time If normal times are allowed they may overheat and burn If smoke is observed switch off or unplug the appliance and keep the door closed in order to stifle any flames Microwave...

Page 4: ...t person WARNING It is hazardous for anyone other than a comperent person to carry out any service or repair operation which involves the removal of a cover which gives protection against exposure to microwave energy WARNING Liquids and other foods must not be heated in sealed containers since they are liable to explode WARNING Only allow children to use the oven without supervision when adequate ...

Page 5: ...overcooked or undercooked Was the appropriate cooking length set for the type of food Was an appropriate power level chosen Sparking and cracking occur inside the oven arcing Have you used a dish with metal trimmings Have you left a fork or other metal utensil inside the oven Is aluminium foil too close to the inside walls The oven causes interference with radios or televisions Slight interference...

Page 6: ...start cooking by simply pressing Cancel 1 Press the button Result The 850W maximum cooking power indications are displayed Select the appropriate power level by pressing the button again until the corresponding wattage is displayed Refer to the power level table 2 Set the cooking time by turning the dial knob as required 3 Press the button Result The oven light comes on and the turntable starts ro...

Page 7: ...Press the button Result Cooking starts When it has finished 1 The oven beeps four times 2 The end reminder signal will beep 3 times once every minutes 3 The current time is displayed again Code Food Serving Size Standing Time Recommendations 1 Ready Meal Chilled 300 350 g 400 450 g 3 min Put on a ceramic plate and cover with microwave cling film This programme is suitable for meals consisting of 3...

Page 8: ...and appropriate recommendations Remove all kind of package material before defrosting Place meat poultry and fish on a flat ceramic plate 1 Press the Auto Power Defrost button Result The following indication is displayed 2 Select the food weight by turning the dial knob It is possible to set up to a maximum of 1500g 3 Press button Result Defrosting begins The oven beeps halfway through defrosting ...

Page 9: ... water when cooking 250 g rice and add 750 ml water for 375 g rice Close lid of steam cooker After cooking remove moisture in the cavity by using kitchen paper 2 Peeled Potatoes 100 150 g 200 250 g 300 350 g 400 450 g 500 550 g 2 3 min Weigh the potatoes after peeling washing and cutting into similar size Put them into the steam cooker Add 15 30 ml 1 2 tablespoons water when steaming 100 350 g add...

Page 10: ...store two different setting Storing the Setting Using the settings First place the food in the centre of the turntable and close the door Press the Deodorization button after you have finished cleaning you will hear four beeps 1 Press the button 2 Select the standing time by turning the dial knob 3 Press the button Result Standing time starts When it has finished 1 The oven beeps four times 2 The ...

Page 11: ...ons at the same time Result The following indication is displayed The oven will not beep each time you press a button 2 To switch the beeper back on press the and buttons again at the same time Result The following indication is displayed The oven operates with the beeper on again 1 Press the and buttons at the same time Result The oven is locked no functions can be selected The display shows L 2 ...

Page 12: ...lystyrene cups containers Paper bags or newspaper Recycled paper or metal trims Can be used to warm food Overheating may cause the polystyrene to melt May catch fire May cause arcing Glassware Oven to table ware Fine glassware Glass jars Can be used unless decorated with a metal trim Can be used to warm foods or liquids Delicate glass may break or crack if heated suddenly Must remove the lid Suita...

Page 13: ...he dishwasher safe plate whenever necessary DO NOT spill water in the vents NEVER use any abrasive products or chemical solvents Take particular care when cleaning the door seals to ensure that no particles Accumulate Prevent the door from closing correctly Storing and Repairing Your Microwave Oven A few simple precautions should be taken when storing or having your microwave oven serviced The ove...

Page 14: ... that the MW87Y ovens of Samsung comply with the undermentioned technological parameters Note Model MW87Y Power source 230V 50 Hz Power consumption Microwave 1250 W Output power 100 W 850 W IEC 705 Operating frequency 2450 MHz Magnetron OM75P 31 Cooling method Cooling fan motor Dimensions W x H x D Outside Oven cavity 489 x 275 x 374 mm 330 x 211 x 329 mm Volume 23 liter Weight Net 13 5 kg approx ...

Page 15: ...15 EN Note t _ loTWZ _ j luU GGw GX GG SGm GX SGYWW_GG aY Gwt ...

Page 16: ...t _ loTWZ _ j luU GGw GX GG SGm GX SGYWW_GG aY Gwt ...

Reviews: