background image

ENGLISH-13

0

3

 ADV

ANCED

 FUNC

TION

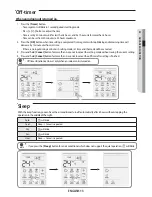
Off-timer

When an indoor unit is turned on,

1. Press 

the 

[ Timer ] 

button.


- Time segment will blink in 1 second period in setting mode.


- Press 

[ + ]/[ - ]

 button to adjust the time.  


- Time is set by 30 minutes unit for less than 3 hours, and by 1 hour unit for more than 3 hours.


- Time can be set from 30 minutes to 24 hours maximum.

2. Press 

the 

[ OK ]

 button when time setting is completed. Time segment will stop blinking and remaining time will 

decrease by 1 minute unit from set time.


- If there is no input during 3 minutes in setting mode, set time and the mode will be canceled.

3.  Press and hold 

[ Cancel ]

 button for more than 3 seconds to cancel the setting mode without saving the current setting.

4.  Press and hold 

[ Cancel ]

 button for more than 3 seconds to cancel the off timer after setting is finished.

t

Off timer function can be set only when an indoor unit is turned on.

NOTE

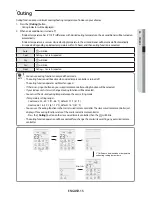
Sleep

With the sleep function, you can have the air conditioner turn off automatically after 6 hours without stopping the 
operation in the middle of the night.

Auto

 will blink.

Cool

Sleep 

p

 Cancel is repeated.

Dry

 will blink.

Fan

 will blink.

Heat

Sleep 

p

 Cancel is repeated.

t

If you press the 

[ Sleep ]

 button for an air conditioner which does not support the quiet operation,


will blink.

NOTE

Summary of Contents for MWR-SH10N

Page 1: ...controller MWR SH10N Air Conditioner user manual imagine the possibilities Thank you for purchasing this Samsung product This manual is made with 100 recycled paper DB68 05566A 00 EN ES FR IT PT DE EL NL PL HU RU AR ...

Page 2: ...he end of their working life To prevent possible harm to the environment or human health from uncontrolled waste disposal please separate these items from other types of waste and recycle them responsibly to promote the sustainable reuse of material resources Household users should contact either the retailer where they purchased this product or their local government office for details of where a...

Page 3: ...esult in electric shock fire explosion problems with the product or injury You must connect the product with rated power upon installation fFailing to do so may result in problems with the product electric shock or fire Do not install this appliance near a heater inflammable material Do not install this appliance in a humid oily or dusty location in a location exposed to direct sunlight and water ...

Page 4: ...he air conditioner and power and then contact the service center Continuing to use the device in this state can cause electric shock fire or damage to the product Do not attempt to repair disassemble or modify the appliance yourself fFailing to do so may result in electric shock fire problems with the product or injury FOR OPERATION CAUTION Do not allow water to enter the product fThis may result ...

Page 5: ...nce can be used by children aged from 8 years and above and persons with reduced physical sensory or mental capabilities or lack of experience and knowledge if they have been given supervision or instruction concerning use of the appliance in a safe way and understand the hazards involved Children shall not play with the appliance Cleaning and user maintenance shall not be made by children without...

Page 6: ...ler IR receiver hidden Display Buttons t In case of duct type indoor unit you can use wireless remote controller using IR receiver of this wired remote controller without Display and receiver kit You can set this function in the user setting mode NOTE ...

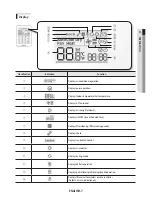
Page 7: ...lays AC fan speed Displays air swing Up Down Displays ON OFF time scheduled time Displays filter cleaning filter cleaning period Displays check Displays centralized control Displays virus doctor Displays outing mode Displays defrost operation Displays partial locking all locking invaild operation Displays IR receiver for wireless remote controller Default disuse indication on ...

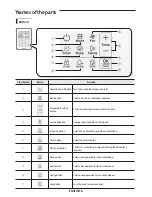
Page 8: ... button Change the air conditioner s fan speed Air swing button Select the air flow direction of the air conditioner Timer button Select the timer function OK Cancel button Confirm or cancel by pressing and holding the button for 3 seconds Sleep button Select sleep operation for the air conditioner Quiet button Select quiet operation for the air conditioner Outing button Select outing operation fo...

Page 9: ...hat you can feel refreshed during rainy days Fan This operation produces breeze just like a powerful fan so that you can enjoy a refreshing breeze Heat This function produces warm breeze so that you can use it in the fall or winter t Immediately after starting the heating operation the air conditioner system may stop producing any breeze at all for a while to avoid generating cold breeze t Defrost...

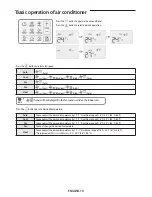
Page 10: ...on the indoor unit NOTE Press the button to set a desired temperature Auto You can adjust the desired temperature by 1 C 1 F within a range of 18 C 30 C 65 F 86 F Cool You can adjust the desired temperature by 1 C 1 F within a range of 18 C 30 C 65 F 86 F Dry You can adjust the desired temperature by 1 C 1 F within a range of 18 C 30 C 65 F 86 F Fan You can t change the desired temperature Heat Yo...

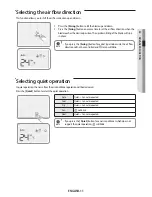
Page 11: ...ace t If you press the Swing button for a duct type indoor unit the air flow direction will not be controlled and lamp will blink NOTE Selecting quiet operation In quiet operation the noise from the air conditioner operation will be decreased Press the Quiet button to select the quiet operation Auto Quiet p Cancel is repeated Cool Quiet p Cancel is repeated Dry Quiet p Cancel is repeated Fan will ...

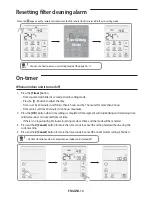
Page 12: ...than 3 hours and by 1 hour unit for more than 3 hours Time can be set from 30 minutes to 24 hours maximum 2 Press the OK button when time setting is completed Time segment will stop blinking and remaining time will decrease by 1 minute unit from set time If there is no input during 3 minutes in setting mode set time and the mode will be canceled 3 Press and hold Cancel button for more than 3 secon...

Page 13: ...ing mode set time and the mode will be canceled 3 Press and hold Cancel button for more than 3 seconds to cancel the setting mode without saving the current setting 4 Press and hold Cancel button for more than 3 seconds to cancel the off timer after setting is finished t Off timer function can be set only when an indoor unit is turned on NOTE Sleep With the sleep function you can have the air cond...

Page 14: ...s and hold the button for more than 3 seconds again this function will be canceled Virus doctor Eliminate dangerous airborne contaminants and allergens as well as bacteria and virus You can set or cancel the virus doctor function in the user setting mode If the virus doctor function is not supported will blink when you set the virus doctor function t You can see how to access user setting mode at ...

Page 15: ...will be active when wired remote controller is turned off t The outing function operates with low fan speed t If there is any input button on your wired remote controller outing function will be canceled t If your indoor unit s status is changed outing function will be canceled t You can set the desired outing temperature on the user setting mode Temperature setting range Cool mode 25 30 C 77 86 F...

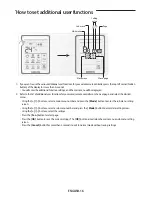
Page 16: ...itional user functions for your wired remote controller on the next page and select the desired menu Using the buttons select a main menu number and press the Mode button to enter the sub menu setting screen Using the buttons select a sub menu number and press the Mode button to enter data setting screen Using the buttons select the settings Press the Fan button to select page Press the OK button ...

Page 17: ...motecontroller 4 Operation Mode Partial Button Lock Lock of operation mode button 0 Unlock 1 Lock 0 01 Wiredremotecontroller Hide of auto mode 0 Unlock 1 Lock 0 02 Wiredremotecontroller Hide of cool mode 0 Unlock 1 Lock 0 03 Wiredremotecontroller Hide of dry mode 0 Unlock 1 Lock 0 04 Wiredremotecontroller Hide of fan mode 0 Unlock 1 Lock 0 05 Wiredremotecontroller Hide of heat mode 0 Unlock 1 Lock...

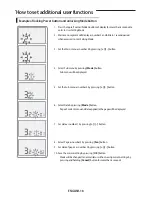
Page 18: ...ssing button 4 Select Sub menu by pressing Mode button Sub menu will be displayed 5 Set the Sub menu as number 2 by pressing button 6 Select Data by pressing Mode button Page of current menu and data applied to the page will be displayed 7 Set data as number 1 by pressing button 8 Select Page as number 2 by pressing Fan button 9 Set data of page 2 as number 0 by pressing button 10 Save the current...

Page 19: ......

Page 20: ......

Reviews: