background image

Installing the appliance

of the screws.There are one set of screw holes in each 

corner of the hob(H). 

Slightly tighten a screw(C) through the bracket(B) so 

that the bracket is attached to the hob, but so that you 

can still adjust the position .

ti

 r

e

w

o

y

lt

n

e

g


n

e

h

d

n

a

 r

e

v

o


k

c

a

b


b

o

h


e

h

n

r

u

y

ll

u

f

e

r

a

C


.

2

into the aperture hole that you have cut out.

a


o

t

n

s

t

e

k

c

a

r

b


e

h

t

s

u

j

d

a

 ,

b

o

h


e

h

f

o


h

t

a

e

n

r

e

d

n

u


e

h

n

O


.

3

position that is suitable for your worktop. 

Then fully tighten the screws(C) to secure the hob into 

position.

(A) SEALING STRIP

(C) SCREW

(B) BRACKET

H

H

H

H

appliance upside down and place it on a 

cushioned mat. 

supervision devices are not damaged in this 

operation.

2.  Apply the sponge provided around the

edge of the appliance.

r

o

 t

n

e

g

a


g

n

il

a

e

s


e

h

n

p

a

g


a


e

v

a

e

t

o

n


o

D


.

3

overlap the thickness.

Sponge

Bottom view

(Stainless steel model)        (Glass model)

The thickness of the sponge in stainless model is 1.5mm 

The thickness of the sponge in glass model is 3.0mm 

(A)The width of the sponge is 10mm 

(B)The width of the sponge is 20mm 

(A)

(B)

23 _Installa

ti

on Of Appliance

(B)

(A)

Summary of Contents for NA64H3000AK

Page 1: ...k you for pu rchasing this Samsung product To receive more complete service pleaseregister your product at www samsung com register NA64H3031AK NA64H3040AS NA64H3010AK NA64H3030AS NA64H3000AK NA64H3010AS NA64H3030BK NA64H3110AS NA64H3041BS NA64H3031BS NA64H3010BS NA64H3110BS ...

Page 2: ...ons please contact the Samsung customer care centre The manufacturer shall not be responsible for any damages to persons or property caused by incorrect installation or use of the appliance appliance be considered necessary or useful also in the interests of the user without jeopardising the main functional and safety features of the products themselves The appliance is designed for a domestic env...

Page 3: ...e Installation Of Appliance Contents 3 4 4 5 6 7 9 10 12 16 21 22 22 23 24 25 26 27 29 31 Safety instructions Installation Child and people safety During use Cleaning and service Safety and energy saving advice Engineers technical data Burner features Positioning Installing the appliance Gas connection Gas conversion Electrical connection ...

Page 4: ...Warnings Warnings Grease cranes produced at the factory to meet the requirement of all life hob 3_ImportantWarnings Important Warnings may ...

Page 5: ...ight Do not switch on off any electrical appliance and do not touch any electric plug Do not use a telephone 1 Stop using the product and close the middle valve 2 Open the window to ventilate 3 Contact our service centre by using a phone outside c i l r a g n e t t o r f o l l e m s k a e l s a g e h t l l e m s n a c u o y t a h t o s n a t p a c r e m s n i a t n o c s a g l e u f e h T or egg e...

Page 6: ...touch any parts or the appliance connection cord is in perfect condition Otherwise contact the dealer before installing the appliance room it is located in whilst in use control and do not attempt to re ignite the burner for at least one minute The use of a gas cooking appliance results in the production of heat and moisture in the room in which it is installed Ensure that the kitchen is well vent...

Page 7: ...n it is in use Children should be kept away until it has cooled from using the appliance safety without supervision or instruction by a responsible person to ensure that they can use the appliance safety Warning Caution Safety Warnings SafetyWarnings_6 ...

Page 8: ...ntilation device mechanical the appliance become hot when they are in use take all due precautions Never leave the appliance unattended when cooking contact with water Do not operate this appliance with wet hands similar as the ends could touch the not be used on the appliance as they can cause an accident by tipping or spillage comes Burner panel is not designed to operate from an external timer ...

Page 9: ...a hot burner adjacent burners foods can cause hot fat to bubble up and over the sides of the pan aerosols may be affected by heat and should not stored above or below the appliance position when not in use Caution Do not use a tea towel or similar materials in place of a pot holder completely Do not use a tea towel or similar materials in place of a pot holder If the surface is made of glass crack...

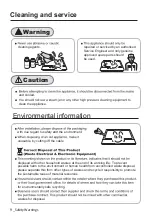
Page 10: ...vironment or human health from uncontrolled waste disposal please separate this from other types of wastes and recycle it responsibly to promote the sustainable reuse of material resources for environmentally safe recycling wastes for disposal cleaning agents Warning and cooled clean the appliance repaired or serviced by an authorised Service Engineer and only genuine approved spare parts should b...

Page 11: ...120mm 100mm 120mm NO YES lid half off one side them that they increase the temperature in this area and may cause damage the trivet support as serious damage to the appliance may result 4 6 is cooktop recommended of the burner Safety Warnings SafetyWarnings_10 simultaneously on Do not touch the top plate and trivet whilst in use for a certain period after use ...

Page 12: ...for triple crown burner WOK PAN SUPPORT is mainly used for rapid burner NA64H3010AK The manufacturer declines all responsibility if this additional wok pan support is not used or are used incorrectly Do not use other pan support for triple burner 11_SafetyWarnings Usage of wok pan support NA64H303 NA64H304 ...

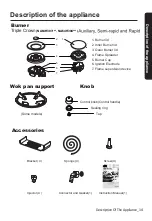
Page 13: ...for left lower burner 6 control knob for upper left burner 7 control knob for upper right burner 8 control knob forlow right burner 9 pan support upper left cast iron 10 pan support left lower cast iron 11 pan support upper right cast iron 12 pan support low right cast iron 13 triple burner 14 pan support left upper enamel 15 pan support left lower enamel 16 pan support right upper enamel 17 pan s...

Page 14: ...er 4 auxiliary burner 5 control knob for left burner 6 control knob for lower burner 7 control knob for upper burner 8 control knob for right burner 9 pan support left cast iron 10 pan support right cast iron 11 pan support middle cast iron 12 triple burner 13 pan support left enamel 14 pan support right enamel 15 pan support middle enamel Description of components ...

Page 15: ...Injector Instruction Manual 1 4 4 4 Connector and Gasket 1 Description of the appliance Descrip onOfTheAppliance_14 Accessories NA64H303 NA64H304 User Installation Manual ENGLISH Gas cooktop imaginethe possibilities Thank you for pu rchasing this Samsung product To receive more complete service pleaseregister your product at www samsung com register NA64H3031AK NA64H3040AS NA64H3010AK NA64H3030AS ...

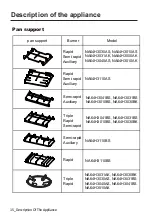
Page 16: ... Semi rapid Auxiliary NA64H3041BS NA64H3031BS NA64H3010BS NA64H3030BK NA64H3041BS NA64H3031BS NA64H3010BS NA64H3030BK Semi rapid Auxiliary NA64H3110BS Rapid Triple Rapid Semi rapid NA64H3110BS NA64H3030AS NA64H3010AS NA64H3031AK NA64H3000AK NA64H3040AS NA64H3010AK Rapid Triple NA64H3031AK NA64H3030BK NA64H3030AS NA64H3031BS NA64H3040AS NA64H3041BS NA64H3010AK ...

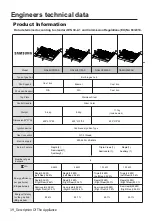
Page 17: ...00 5 98 20 Include wok Black Color N A 220 240V 50 60Hz Rapid 1 Semi rapid 2 Auxiliary 1 Qn Energy efficiency per gas burner Energy efficiency for the gas hob Type of gas hob Built in gas hob Product Information Number of gas burners 4 EE gas burner EE gas hob Data determined according to standard EN 30 2 1 and Commission Regulations EU No 66 2014 Rapid 3 3KW Semi rapid 2 0KW Right Rear 55 9 Semi ...

Page 18: ...nnection Electric supply Burner Feature 600 5 98 600 520 98 Triple Crown 1 Semi rapid 2 Auxiliary 1 Qn 15 4kg 16 5kg Include wok Include wok 8 8kW 8 8kW Cast Iron Black Black Color 20 Type of gas hob Built in gas hob Energy efficiency per gas burner Energy efficiency for the gas hob Triple 3 8KW Left Rear 53 2 Semi rapid 2 0KW Right Rear 55 9 Semi rapid 2 0KW Right Front 56 1 Triple 3 8KW Left 53 ...

Page 19: ...mel Cast Iron Cast Iron N A N A Silver Color Stainless Steel 10 3kg 11 8kg Triple Crown 1 Rapid 1 Semi rapid 1 Auxiliary 1 Rapid 2 Semi rapid 1 Auxiliary 1 10 10 10 9 6kW 9 6kW 10 1kW 10 3kW Energy efficiency per gas burner Energy efficiency for the gas bob Type of gas hob Built in gas hob Rapid 3 3KW Right 56 6 Triple 3 8KW Left 53 6 Triple 4 0KW Left 53 8 Rapid 3 3KW Left 55 6 Number of gas burn...

Page 20: ...1 1kg Triple Crown 1 Rapid 1 Semi rapid 1 Auxiliary 1 Rapid 2 Semi rapid 1 Auxiliary 1 10 10 9 6kW 9 6kW 10 1kW 10 3kW Energy efficiency per gas burner Energy efficiency for the gas bob Type of gas hob Built in gas hob Triple 4 0KW Left Rear 5 3 6 Rapid 3 3KW Right Rear 5 5 3 Semi rapid 2 0KW Right Front Number of gas burners 5 6 3 5 5 4 5 5 1 5 5 1 5 5 1 4 EE gas burner EE gas hob 220 240V 50 60H...

Page 21: ...pans for the amount of food For small quantities use pots and pans that are adapted to the amount of food For example if you are preparing only 350 g of broccoli use small cookware diameter of bottom approx 15 cm Use pots and pans made of heat conducting materials steel or enamelled cast iron pans and pots will heat up more quickly and consume less energy than glass or ceramic cookware for example...

Page 22: ... 00 0 65 1 00 0 41 Nominal flow rates g h 380 185 361 185 314 73 271 73 190 62 91 39 Injector make 1 100mm Nominal heat input kW Hs 4 00 1 95 3 80 1 95 3 30 0 81 3 00 0 81 2 00 0 65 1 00 0 41 Nominal flow rates g h 475 230 450 230 390 90 340 90 235 77 113 48 Injector make 1 100mm Nominal heat input kW Hs 4 00 1 95 3 80 1 95 3 30 0 81 3 00 0 81 2 00 0 65 1 00 0 41 Nominal flow r tes 443 216 421 216...

Page 23: ... m m 0 600 is not mandatory for application An oven must have forced ventilation to install a hob above it Check the dimensions of the oven in the installation manual The cut out size must obey the indication c t o t position _ Installa onOfAppliance_22 480 490m m Remove the hooks that are basically assembled on bottom plate when installing the gas cooktop in the 560x480mm cut out 50m m 50m m Posi...

Page 24: ... position that is suitable for your worktop Then fully tighten the screws C to secure the hob into position A SEALING STRIP C SCREW B BRACKET H H H H appliance upside down and place it on a cushioned mat supervision devices are not damaged in this operation 2 Apply the sponge provided around the edge of the appliance r o t n e g a g n i l a e s e h t n i p a g a e v a e l t o n o D 3 overlap the t...

Page 25: ... the three following connection option For the user s safety we advise the connection to be made 2meters Fig A with two clamps One on the connector and the other on the pressure connector and the hob s elbow Fig B s Connector Clamp You should check the local installation regulation regarding the permitted the use of certain type of flexible gas tube Installation Of Appliance Installa onOfAppliance...

Page 26: ...pposite direction to adjust the minimum level Finally check the flame does not go out when quickly turning the tap from the maximum position to the minimum position Install the control handles on the taps 25_Installa onOfAppliance G20 20mbar 220 240V 50 60Hz Pmax 1W G20 20mbar t a C B G r a b m 7 3 1 3 G r a b m 9 2 0 3 G II 2H3 Qn G20 G30 G31 S N Model 0359CO1395 0359 18 Built in Gas Hob Do not c...

Page 27: ...wn Live E Switch 1 Switch 2 Switch 3 Switch 4 AC INPUT N L IGNITION When the power cord is damaged it must be replaced by the manufacturer to produce customer service agent or similarly qualified personnel Installation Of Appliance InstallationOfAppliance_26 ...

Page 28: ...How to use the appliance Preparation 1 2 Circle gas off Ignition position Control handle control handle 27_HowToUseTheAppliance Turn on ...

Page 29: ...How to use the appliance 3 failure safety HowToUseTheAppliance_28 Turn off How to use the appliance ...

Page 30: ...se of the high temperatures Each time the appliance is used these parts should be cleaned with a product that is suitable for stainless steel Metal Brush Detergent M Soft cloth Neutral Detergent Nylon Brush wrung out completely 29_CleaningAndMaintenance Dishwahser Top plate Pan support Control handles ...

Page 31: ...tenance into their respective recesses from the top plate cloth and wipe dry with a clean cloth blocked 4 5 1 2 3 4 1 2 3 4 5 6 7 washing up liquid detergent or Cleaning And Maintenance CleaningAndMaintenance_30 Burners ...

Page 32: ...clogged Different gas is used Check the gas used Unstable Flame correctly Gas Smell Repairs should be performed by a licensed technician only Improper repair may result in considerable danger to you and others If your cooktop needs repair contact a SAMSUNG Service Centre or your dealer Wipe alien substance with a dry cloth one minute one minute centre Gas leakage Stop using the product and close t...

Page 33: ... 0 88 555 55 55 KAZAKHSTAN 8 10 800 500 55 500 GSM 7799 VIP care 7700 UZBEKISTAN 00 800 500 55 500 GSM 7799 KYRGYZSTAN 00 800 500 55 500 GSM 9977 TAJIKISTAN 8 10 800 500 55 500 GSM 8888 MONGOLIA 1800 25 55 BELARUS 810 800 500 55 500 MOLDOVA 0 800 614 40 UKRAINE 0 800 502 000 www samsung com ua support Ukrainian www samsung com ua_ru support Russian QUESTIONS OR COMMENTS I www samsung com fr suppor...

Reviews: