background image

Removing User Accounts

1


Click 

Start > Control Panel > User 

Accounts and Family Safety > User 

Accounts

.

2


Click 

Manage Another Account

.

3


Click on the user account to be 

deleted.

4


Click 

Delete the Account

 in the 

Make changes to user’s account 

menu.

5

  A window appears asking whether 

you want to save the desktop, 

documents, favorites, music files, 

pictures and video folders as new 

folders on the Desktop before 

deleting the account.

If you click 

Delete files

, the account 

and all files belonging to the account 

are deleted.
If you click 

Keep files

, only the 

account is deleted and the files 

belonging to the user are saved on 

the Desktop.

Switching User Accounts

1

  Click 

Start

 (

) on the taskbar and 

select 

Switch User

.

2

  If you click on another username in 

the start screen, you can login with 

that user account.

■ If there is only one 

administrator account

 for the 

computer, you cannot delete the 

administrator account

.

■ You can only delete another 

account when you are logged in 

as an administrator.

86

Summary of Contents for NP-Q1U - Q1U XP - A110 800 MHz

Page 1: ... Start 4 Contents 7 Safety Precautions 8 Proper Posture During Computer Use 18 Important Safety Information 20 Replacement Parts and Accessories 22 Regulatory Compliance Statements 24 WEEE SYMBOL INFORMATION 33 Overview 34 Turning the Computer On and Off 42 ...

Page 2: ... an external display is connected A Touch Screen and Touch Sensor buttons optional have been adopted allowing convenient input with your fingers A Keypad has been adopted to easily enter characters A convenient mouse function Mouse Joystick Mouse Button applied Powerful Multimedia Functions Various Multimedia Programs Such as Play AVStation etc Dual camera for photographing and video recording Opti...

Page 3: ...unction Compact Light Weight Design for Portability Polished Design A mere 690g 1 52lb Without optional items High Gloss Front Panel Optional Accessories for Additional Convenience USB Data Cable Enabling Data Exchange with another PC USB External ODD Optical Disk Drive Ultra Slim USB External Keyboard Power Bank to Extend Usage Time ...

Page 4: ...to use the functions and how to use the program Utilizating the User Guide Be sure to read the Safety Precautions before using the computer For basic usage of the computer refer to the additionally supplied Getting Started Guide Refer to the User Guide for the procedures to use the computer Using the Index of the User Guide you can easily find any information you are looking for Using the Glossary ...

Page 5: ...ns marked with this symbol may cause slight injury to yourself or damage your property Text Notations Icon Notation Description Before You Start Content included in this section includes information required before using a function Caution Content included in this section includes information required about the function Note Content included in this section includes helpful information to use the ...

Page 6: ...Windows Vista as well as any unauthorized copy of Windows Vista Example When trying to install Windows Vista Home Premium when Windows Vista Home Basic is already installed Other operating systems Windows 98 Windows ME Windows 2000 Windows 2003 server UNIXand LINUX other Windows Vista versions etc other than the operating system already installed on this computer are not supported If a problem occ...

Page 7: ...ess Network 99 Using the Easy Network Manager 102 Bluetooth 106 Chapter 5 Using Applications Introducing Programs 113 Origami Experience 116 CyberLink PowerDVD 118 Samsung Update Plus 120 Play AVStation 122 AVStation Now 136 Play Camera 138 OmniPass Fingerprint Identification software 141 Chapter 6 Settings BIOS Setup 148 Setting a Boot Password 153 Changing the Boot Priority 156 Battery 157 Chapte...

Page 8: ...ere is a danger of suffocation Keep a distance of 15cm or more between the computer and the wall and do not place any objects between them This may increase the internal temperature of the computer and may cause an injury Do not install the computer on a slant or a place prone to vibrations or avoid using the computer in that location for a long time This increases the risk that a malfunction or d...

Page 9: ...ly into the power outlet and AC adapter Failing to do so may cause fire hazard Do not unplug the power cord out by pulling the cable only If the cord is damaged it may cause electric shock Do not bend the power cord excessively or do not place a heavy object over the power cord It is especially important to keep the power cord out of reach of infants and pets If the cord is damaged it may cause ele...

Page 10: ...nnect the power cord and contact the service center Damage to the device within the computer may cause electric shock or fire hazard Usage Related Disconnect all cables connected to the computer before cleaning it If you are using a notebook computer remove the battery There is a danger of electric shock or damage to the product Do not connect a phone line connected to a digital phone to the modem ...

Page 11: ...place any container filled with water or chemicals over or near the computer If water or chemicals enter the computer this may cause fire or electric shock If the computer is broken or dropped disconnect the power cord and contact a service center for a safety check Using a broken computer may cause electric shock or fire hazard Avoid direct sunlight when the computer is in an air tight location such...

Page 12: ...disconnect all cables before disassembling the computer If there is a modem disconnect the phone line If you are using a notebook computer make sure to remove the battery Failing to do so may cause electric shock Custody and Movement Related Follow the instructions for the relevant location e g airplane hospital etc when using a wireless communication device wireless LAN Bluetooth etc ...

Page 13: ...er Dispose of worn out batteries properly There is a danger of fire or explosion The battery disposal method may differ depending on your country and region Dispose of the used battery in an appropriate way Do not throw or disassemble the battery and do not put it into water This may cause an injury fire or explosion Use only a battery authorized by Samsung Electronics Failing to do so may cause an ...

Page 14: ... only after checking if the notebook computer is turned off The temperature may rise and it may cause overheating and deformation of the product Do not press the Eject Button while the Floppy Disk CD ROM drive is in operation You might lose data and the disk might be suddenly ejected and could cause an injury Take care not to drop the product while using it This may cause personal injury or loss o...

Page 15: ... emergency disk eject method only when the Optical Disk Drive is stopped There is a danger of injury Do not place your face close to the Optical Disk Drive tray when it is operating There is a danger of injury due to an abrupt ejection Check CDs for cracks and damage prior to use It may damage the disc and cause disorder of device and injury of user Take care when touching the product or parts The...

Page 16: ...r off and separate all connected cables first The product might be damaged or users may trip over the cables For long periods of not using the notebook computer discharge the battery and preserve as it is detached The battery will be preserved at its best condition Keep the Stylus Pen out of reach of children hildren may injure themselves by swallowing it or damaging their eyes Use a computer clean...

Page 17: ...ay be lost when the computer is turned off or reset by a power failure while the hard disk drive is operating The data may be lost and irrecoverable due to a computer virus infection The data may be lost if the power is turned off while running a program Moving or causing an impact to the computer while the hard disk drive is operating may cause files to be corrupted or bad sectors on the hard disk...

Page 18: ...ser s needs Since this is commonly applied to Samsung Computers some figures may differ from actual ones Proper Posture Do not use the computer on your lap or close to your skin for a long time There is a danger of burns due to the high temperature of the computer To use the computer while talking over the telephone use the ear microphone phone When using the computer while holding a phone over you...

Page 19: ...start the volume at a low level and increase it slowly while listening to the sound It is not recommended using headphones for long periods of time Use Time Break Time Take a break for 10 minutes or more after a 50 minute period when working for more than one hour Illumination Do not use the computer in dark locations The illumination level for computer use must be as bright so for reading a book ...

Page 20: ...d on the rating label Ensure that the electrical outlet you are using to power your equipment is easily accessible in case of a fire or short circuit If your computer has a voltage selector switch make sure that the switch is in the proper position for your area Openings in the computer case are provided for ventilation Do not block or cover these openings Make sure you provide adequate space at le...

Page 21: ...ll power cables remove the battery and modem cables from the wall outlets before cleaning the system Unplug the system from the wall outlet and refer servicing to qualified personnel if The power cord or plug is damaged Liquid has been spilled into the system The system does not operate properly when the operating instructions are followed The system was dropped or the casing is damaged The system ...

Page 22: ...product in areas classified as hazardous Such areas include patient care areas of medical and dental facilities oxygen rich environments or industrial areas The socket outlet shall be installed near the equipment and shall be easily accessible Do not unplug the power cord out by pulling the cable only Connect and Disconnect the AC adapter The power cord set wall plug cable and AC adapter plug you r...

Page 23: ...acceptable accredited agency responsible for evaluation in the country where the power cord set will be used The power cord set must have a minimum current capacity of 7 A and a nominal voltage rating of 125 or 250 volts AC as required by each country s power system The appliance coupler must meet the mechanical configuration of an EN 60 320 IEC 320 Standard Sheet C7 connector for matching with app...

Page 24: ...ease contact your local Radio Approval agency for requirements Wireless devices are closely regulated and use may not be allowed The RF field strength of the wireless device or devices that may be embedded in your notebook are well below all international RF exposure limits as known at this time Because the wireless devices which may be embedded into your notebook emit less energy than is allowed i...

Page 25: ...icable authority for authorization prior to use or turning on the wireless device Every country has different restrictions on the use of wireless devices Since your system is equipped with a wireless device when traveling between countries with your system check with the local Radio Approval authorities prior to any move or trip for any restrictions on the use of a wireless device in the destinati...

Page 26: ...e near unshielded blasting caps or in an explosive environment unless the device has been modified to be qualified for such use United States of America Use On Aircraft Caution Regulations of the FCC and FAA prohibit airborne operation of radio frequency wireless devices because their signals could interfere with critical aircraft instruments Other Wireless Devices Safety Notices for Other Devices i...

Page 27: ...y find the following booklet helpful Something About Interference This is available at FCC local regional offices Our company is not responsible for any radio or television interference caused by unauthorized modifications of this equipment or the substitution or attachment of connecting cables and equipment other than those specified by our company The correction will be the responsibility of the use...

Page 28: ...etermined by total RENs contact the local telephone company to determine the maximum REN for the calling area If the terminal equipment causes harm to the telephone network the Telephone Company will notify you in advance that temporary discontinuance of service may be required But if advance notice is not practical the telephone company will notify the customer as soon as possible Also you will b...

Page 29: ...achine refer to your communications software user manual European Union CE Marking and Compliance Notices Products intended for sale within the European Union are marked with the Conformité Européene CE Marking which indicates compliance with the applicable Directives and European standards and amendments identified below This equipment also carries the Class 2 identifier The following information i...

Page 30: ...ower output of the wireless device or devices that may be embedded in you notebook is well below the RF exposure limits as set by the European Commission through the R TTE directive See 802 11b and 802 11g restrictions for specific countries or regions within countries under the heading European Economic Area Restrictions below Translated Statements of Compliance English This product follows the pr...

Page 31: ...nd are not allowed to be operated in countries or regions other than those of designated use As a user of these products you are responsible for ensuring that the products are used only in the countries or regions for which they were intended and for verifying that they are configured with the correct selection of frequency and channel for the country or region of use Any deviation from permissible...

Page 32: ...C Such marking is indicative that this equipment meets or exceeds the following technical standards CTR 21 Attachment requirements for pan European approval for connection to the analogue Public Switched Telephone Networks PSTNs of TE excluding TE supporting voice telephony services in which network addressing if provided is by means of Dual Tone Multi Frequency DTMF signaling Although this equipm...

Page 33: ...ontact either the retailer where they purchased this product or their local government office for details of where and how they can take this item for environmentally safe recycling Business users should contact their supplier and check the terms and conditions of the purchase contract This product should not be mixed with other commercial wastes for disposal This Perchlorate warning applies only t...

Page 34: ...ays the computer screen Status Indicators Shows the computer operating status p 35 Speaker Generates sound from the computer Keypad Using the Keypad users can enter letters or numbers directly Avoid dropping water on the keypad Touch Sensor Buttons You can configure functions by lightly touching it with your finger p 36 Speaker Enter Button Press this button to run a selection It performs the role o...

Page 35: ... battery status Green When the battery is completely charged or is not installed Amber When the battery is being charged Blink When the HOLD switch is lifted up or a button is pressed in the HOLD Lock status Off When the computer is running on battery power without an AC power supply HDD This is lit when the hard disk drive is accessed Mouse Press the MOUSE button above Mouse Joystick If the Mouse...

Page 36: ...pending on your computer model MENU If you touch this button the MENU program will be launched The menu program provides a menu with the computer s frequently used functions You can conveniently configure the functions VOL VOL You can adjust the volume UDF If you touch this button the Easy Button Manager appears in which you can configure the User Defined Button function ...

Page 37: ...o not press them using excessive force Take care as excessive force may damage the sensor of the Touch Sensor Buttons Do not press the buttons with a sharp object such as a Stylus Pen or ballpoint pen as this may damage them When you need to press a Touch Sensor Button press the relevant Touch Sensor Button precisely using your finger taking care not to touch another Touch Sensor Button The Touch S...

Page 38: ...thout a Camera and Touch Sensor buttons Launches the MENU program Headphone Jack You can connect headphones using this jack Vents Emits heat generated inside the computer Multi Card Slot You can connect SD or MMC cards using this slot USB Port You can connect USB devices such as a USB keyboard mouse USB ODD Optical Disk Drive etc using this port Avoid blocking the vents as this may overheat the co...

Page 39: ...t Power IN Jack The AC adapter which supplies power for the computer is connected here Windows Security Button Pressing this button is the same as pressing the Ctrl Alt Del keys on the keyboard Press with the Stylus Pen LAN Port You can connect a LAN cable using this port Stylus Pen Stylus Slot Using this pen you can enter information on the touch screen You can keep the Stylus Pen in the Stylus S...

Page 40: ...con appears and the computer is Locked and you will not be able to use any function Slide the switch to the mid position to release the lock Then you can use the computer normally If you slide the switch down to the end and hold it for 1 to 2 seconds when the computer is in the HOLD state the computer will enter Hibernation mode To cancel Sleep mode slide the switch downward to the end Hand Strap ...

Page 41: ...h The battery latch is used to separate or fix the battery p 157 Battery A lithium Ion rechargeable battery that supplies power for the computer p 157 Vents Emits heat generated inside the computer Avoid blocking the vents as this may overheat the computer Hand Strap Hole Connecting this hole and the hole of left side with hand strap allow you to fix hand Hand Strap Hole z ...

Page 42: ...ide the power switch downwards again the computer wakes up from Sleep mode If you have changed the power options of the Power button to Shutdown in the Control Panel sliding the power switch downwards will shutdown the computer p 88 When running the computer on battery power the LCD brightness is dimmed automatically to save battery power For the models with Touch Sensor buttons press the MENU but...

Page 43: ...use the computer to enter Sleep mode To shut down the computer by clicking this icon refer to the descriptions for Setting up Start menu power button of the Control Panel p 88 If the computer does not shutdown due to a system error slide the power switch down and hold it for more than 4 seconds to forcefully turn it off When turning the computer on again after it was turned off by sliding the powe...

Page 44: ...Chapter 2 Using the computer Stylus Pen 45 Entering Text 48 Using the Buttons 54 Multi Card Slot 61 Connecting a Monitor 64 Adjusting the Volume 68 ...

Page 45: ...for a long time Taking the Stylus Pen Out Learning Tablet PC Operations Click Start All Programs Tablet PC to learn how to operate a Tablet PC using a Stylus Pen p 73 Operate the touch screen LCD with a Stylus Pen or your finger Sharp objects may scratch or damage the LCD surface Take the Stylus Pen out to the right When finishing using the pen return it to the Stylus Slot ...

Page 46: ... over a point of the screen a circle is drawn around the pointer If you remove the pen when the circle is completely drawn the pop up menu appears Method 2 In addition if you press on the screen with the Pen the Screen Mouse appears for a moment If you click the right button of the Screen Mouse it performs the role of the right button of an external type mouse Drag Drag Tap an item and drag it wit...

Page 47: ...of the General tab select a screen direction and click Calibrate 3 Tap the Crosshair displayed on the screen with the Stylus Pen whenever it appears on the screen To cancel a calibration press the stylus pen against the screen and hold it for more than 3 seconds A pop up menu will appear Select Cancel from the pop up menu 4 If you have pressed all the Crosshairs the Digitizer Calibration Tools win...

Page 48: ...he Backspace key on a keyboard If you press this key you can erase the last characters on the screen Shift Space This key performs the role of the space key Character Numeric Key You can directly enter characters numbers to the screen by pressing this key Num Lock If you press the Num Lock key and then a first line key a digit is entered If you press the Num Lock key again the numeric key mode is c...

Page 49: ...epad Notepad is launched 2 If you tap over the Notepad with the Stylus Pen appears with the cursor 3 If you tap with the Stylus Pen the Tablet PC Input Panel appears Close Writing Pad Character Pad On Screen Keyboard Help Provides information on how to use the Tablet PC Input Panel Tools This function may not be supported depending on the languages Alternatively press the Tablet PC Input Panel hid...

Page 50: ...Entering text using the Character Pad You can write a letter in each cell of the Character Pad with the Stylus Pen 1 In the Tablet PC Input Panel tap the Character Pad icon 2 Write a letter in the cell of the Character Pad with the Stylus Pen and wait a moment The written letter is converted into the corresponding computer character Insert Tap the Insert button to enter a converted letter Modifyin...

Page 51: ...n Keyboard displays a standard keyboard on the screen so that you can enter a letter by pressing the corresponding key on the screen 1 In the Tablet PC Input Panel tap the On Screen Keyboard icon 2 Tap a character key with the Stylus Pen to enter the character ...

Page 52: ...a key on the screen with your thumbs while holding both of the lower corners of the computer with your hands Execution Method 1 If you press the DIAL KEY part below the Mouse Joystick the Dialkeys appear If you press it again the Dialkeys disappear Execution Method 2 Select Start All Programs Microsoft Origami Experience Pack DialKeys The Dialkeys appear at both ends of the lower screen Enter char...

Page 53: ...urrent window up Entering a Number If you tap the 123 key shown in the figure on the left pane of Dialkeys the 123 key turns blue and you can enter a number After you enter a number it returns to text input mode If you tap the 123 twice it turns red and you can enter multiple numbers continuously When you have finished entering numbers tap the 123 once again to cancel number input mode Exiting Dialk...

Page 54: ...ENU program appears The MENU Button MENU Program The MENU Program provides shortcuts to frequently used functions on the computer You can easily change the settings Press the MENU button again or press a point on the screen to hide the MENU Program MENU button For models with the Touch Sensor button only MENU button For models without the Touch Sensor button only ...

Page 55: ...acklit On Off If you press Off the LCD screen is turned off To turn it on again press down on the LCD screen once Rotation Whenever you press this button the screen rotates clockwise or counterclockwise by 90 degrees When rotating the screen a part of the screen image may not be displayed in some software programs Sound On Off Press this item to turn the volume on or off Etiquette Mode On Off Turn...

Page 56: ...e MOUSE Mouse button L R buttons Mouse Joystick Moving the Cursor Place your left hand thumb on the Mouse Joystick and move it in the direction you want to move the cursor Click Double Click When the Mouse icon is lit press the L button once for the click select operation and press the button twice for the double click operation Right Click When the Mouse icon is lit press the R button once for th...

Page 57: ...ick icon is lit you can use the Mouse Joystick as a joystick If you press the DIAL KEY button below the Mouse Joystick the Dialkeys appear on the screen You can enter characters using your thumbs via the Dialkeys If you press the DIAL KEY again the Dialkeys disappear For more information on using the Dialkeys refer to p 52 ...

Page 58: ... a basic group and the Internet group is set by default when purchasing the computer However you cannot change the settings for the basic group Internet Group Setting Status Button Function Description MouseScrollUP Scrolls up in a window as a mouse scroll Forward Moves forward in Internet or Windows Explorer to display the next page MouseScrollDown Scrolls down in a window as with a mouse scroll ...

Page 59: ...ly press the UDF Touch Sensor button if there are Touch Sensor buttons 2 In the Main screen click Add 3 Enter a name in the Group Name field of the Tablet PC Input Panel For example enter Test For information on how to use the Tablet PC Input Panel refer to the descriptions for Entering Text p 49 4 After selecting the button select the Key Combination Function Key Combination Function You can set a...

Page 60: ...t in the list click the Search button and select a program 2 1 3 7 You can view the settings for each button in the Main screen Select a group from the Group Name and click the OK button The user buttons perform the roles set in the selected group To use the functions of the added group or another group Launch Easy Button Manager select a group from the Group Name of the main screen and click OK T...

Page 61: ...onveniently exchange data with digital devices such as digital cameras digital camcorders MP3 players etc A multi card slot is optional and is provided for some models only Users have to purchase storage cards according to their needs While the multi card slot enables users to use memory cards as data storage it does not support a copyright protection function Remove and keep the cards in a separa...

Page 62: ...te data You cannot use an unformatted card If the card is not formatted format the card first referring to the Formattung a Card section p 63 To use a Mini SD or RS MMC card These cards cannot be inserted into the slot because they are too small You can use the cards by inserting the cards into the corresponding card adapter and then inserting the adapter into the multi card slot Removing a Card 1 ...

Page 63: ...rd 1 Select Start Computer 2 Right click over the card drive and select Format from the pop up menu 3 If you click Start formatting will begin To use a card to exchange data with a digital device such as a digital camera formatting the card in the digital device is recommended Some digital devices may fail to recognize a card formatted on a computer In this case you have to format the card in the ...

Page 64: ...rnal monitor are described below When using an external monitor or playing a game using the Mouse Joystick or an external mouse is convenient You have to purchase the monitor connection cable additionally The monitor port color may differ from the actual one Connecting a Monitor Open the cover on the right side and connect a monitor to the Monitor Port ...

Page 65: ...he LCD CRT button the computer screen is output to LCD CRT LCD CRT Clone LCD CRT Dual View mode in this sequence LCD You can view the computer screen through the LCD only CRT You can view the computer screen on an external monitor LCD CRT Clone When selecting this mode you can view the same screen on both the LCD and the external monitor LCD CRT Dual View When selecting this mode you can view a sc...

Page 66: ...aphics Options and Output To from the pop up menu 3 Select a display mode from among the available Display Modes 1 4 in the Graphics Options menu The terms and the screen figures in the manual may differ from actual ones 1 To View through a Notebook Computer LCD Only 3 To View through the LCD External Monitor Clone Mode 4 To View through the LCD External Monitor Extended Mode 2 To View through the ...

Page 67: ...ntation Clone Mode Select the Intel R Dual Display Clone When selecting this mode you can view the same screen on both the LCD and the external monitor 4 When giving a presentation Extended Mode Dual View Select the Extended Desktop When selecting this mode you can view a screen spanning over the LCD and the external monitor and you can set different resolutions for each display device ...

Page 68: ...bar and slide the volume control bar to adjust the volume Mute Alternatively right click over the Volume icon and select Open Volume Mixer to adjust the volume Using the Sound Recorder The procedures to record sound using the Windows Recorder are described below 1 Right click over the Volume icon on the taskbar and select Recording Device 2 Check if the microphone is set as the default recording d...

Page 69: ... 1 Right click over the Volume icon in the Taskbar and select Playback Device P 2 Select Speaker in the Playback tab and click Properties 3 Select the SRS tab in the Speaker Properties window z Select a mode select the x Enable checkbox on the left and click OK Then you can listen to sound through the selected SRS effect z x WOW HD Music Select to listen to music TruSurround XT Movie Video Select ...

Page 70: ...en shots used in this chapter may differ from actual screens depending on the Windows Vista version and model Using Microsoft Windows Vista About Microsoft Windows Vista 71 Windows Vista Screen Layout 74 Control Panel 83 ...

Page 71: ...ails you can view more detailed information 1 Description Window 2 Windows Vista Demo If you click Start Welcome Center Show all 7 items Windows Vista Demo you can watch the Windows Vista introduction movie About Microsoft Windows Vista Microsoft Windows Vista hereafter Windows is a computer operating system Since you have to learn how to use it in order to use the computer efficiently and effectiv...

Page 72: ...he Windows operation system You can learn tasks and tools necessary to use the computer Security and Maintenance You can view help on computer protection and security Windows Online Help If your computer is connected to the Internet you can view the necessary information online Table of Contents The help pages are arranged by subject so that users can easily find the relevant information Troublesho...

Page 73: ...t handed or right handed option Click Start Control Panel Hardware and Sound Tablet PC Settings Tablet PC Setting Information For the efficient use of a Tablet PC You can use the computer more efficiently in a short time by learning how to use your fingers and the Stylus Pen Click Start All Programs Tablet PC and then click Tablet PC Touching Training or Tablet PC Pen Training 73 ...

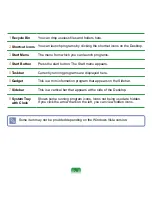
Page 74: ...area on the computer It consists of a large workspace and a taskbar at the bottom as shown in the figure below The screen layout may differ depending on the computer model and the operation system version 1 Recycle Bin 2 Shortcut Icons 3 Start Menu 6 Gadget 7 Sidebar 4 Start Button 5 Taskbar 8 System Tray with Clock 74 ...

Page 75: ...tart menu appears 5 Taskbar Currently running programs are displayed here 6 Gadget This is a mini information program that appears on the Sidebar 7 Sidebar This is a vertical bar that appears at the side of the Desktop 8 System Tray with Clock Shows some running program icons Icons not being used are hidden If you click the arrow mark on the left you can view hidden icons Some item may not be prov...

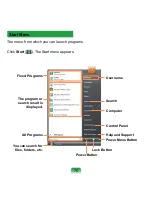
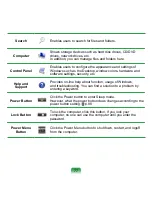
Page 76: ...ograms Click Start The Start menu appears Fixed Programs The program or search result is displayed All Programs You can search for files folders etc User name Search Computer Control Panel Help and Support Power Menu Button Lock Button Power Button 76 ...

Page 77: ...security etc Help and Support Provides on line help about function usage of Windows and troubleshooting You can find a solution to a problem by entering a keyword Power Button Click the Power button to enter Sleep mode However what the power button does changes according to the power button setting p 88 Lock Button To lock the computer click this button If you lock your computer no one can use the ...

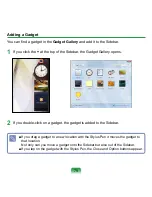
Page 78: ... frequently used tools You can download various Gadgets from the Internet other than the default Gadget Sidebar Gadget Structure To use the Sidebar Gadget click Start All Programs Accessories Windows Sidebar to launch it To always display the Sidebar right click over the Sidebar and select Properties and then select the Sidebar is always on top of Screen option in the Arrangement field Sidebar Gadg...

Page 79: ...t Gallery opens 2 If you double click on a gadget the gadget is added to the Sidebar If you drag a gadget to a new location with the Stylus Pen it moves the gadget to that location Not only can you move a gadget onto the Sidebar but also out of the Sidebar If you tap on the gadget with the Stylus Pen the Close and Option buttons appear 79 ...

Page 80: ...r Even if you close the Sidebar the Sidebar continues running in the System Tray in the clock area though it is not displayed on the Desktop To close the Sidebar right click over the Sidebar on the Desktop and select Close Sidebar To open the Sidebar again right click on the Sidebar icon in the System Tray with the clock on the taskbar and select Open 80 ...

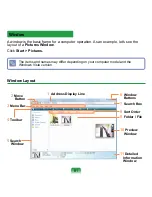
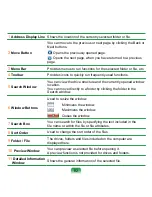
Page 81: ...ow Click Start Pictures The items and names may differ depending on your computer model and the Windows Vista version Window Layout 1 Address Display Line 2 Move Button 3 Menu Bar 4 Toolbar 5 Search Window 6 Window Buttons 7 Search Box 9 Folder File 10 Preview Window 11 Detailed Information Window 8 Sort Order 81 ...

Page 82: ...rently opened window location You can move directly to a folder by clicking the folder in the Search window 6 Window Buttons Used to resize the window Minimizes the window Maximizes the window Closes the window 7 Search Box You can search for files by specifying the text included in the file name or within the file or file attributes 8 Sort Order Used to change the sort order of the files 9 Folder File...

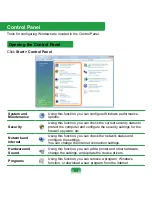
Page 83: ...us to protect the computer and configure the security settings for the firewall spyware etc Network and Internet Using this function you can check the network status and configure the settings You can change the Internet connection settings Hardware and Sound Using this function you can add a printer and other hardware change the settings and update the device drivers Programs Using this function you...

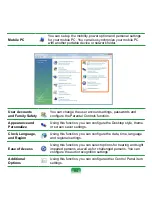
Page 84: ...gure the date time language and regional settings Ease of Access Using this function you can select options for hearing and sight impaired persons as well as for challenged persons You can configure the audio recognition settings Additional Options Using this function you can configure other Control Panel item settings Mobile PC You can set up the mobility power option and personal settings for your...

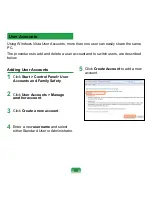
Page 85: ... a user account and to switch users are described below Adding User Accounts 1 Click Start Control Panel User Accounts and Family Safety 2 Click User Accounts Manage another account 3 Click Create a new account 4 Enter a new username and select either Standard User or Administrator 5 Click Create Account to add a new account 85 ...

Page 86: ...esktop before deleting the account If you click Delete files the account and all files belonging to the account are deleted If you click Keep files only the account is deleted and the files belonging to the user are saved on the Desktop Switching User Accounts 1 Click Start on the taskbar and select Switch User 2 If you click on another username in the start screen you can login with that user account...

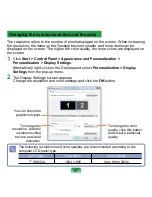
Page 87: ...ktop and select Personalization Display Settings from the pop up menu 2 The Display Settings screen appears Change the resolution and color settings and click the OK button The following resolutions and color qualities are recommended according to the computer LCD panel type LCD Type Resolution Color Quality 7 WSVGA 1024 x 600 Very High 32bit Changing the screen resolution and the color To change ...

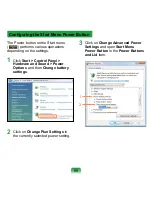
Page 88: ...ontrol Panel Hardware and Sound Power Options and then Change battery settings 2 Click on Change Plan Settings in the currently selected power setting 3 Click on Change Advanced Power Settings and open Start Menu Power Button in the Power Buttons and Lid item 1 2 Configuring the Start Menu Power Button 88 ...

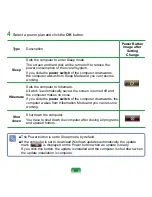
Page 89: ...omatically saved the screen is turned off and the computer makes no noise If you slide the power switch of the computer downwards the computer wakes from Hibernation Mode and you can resume working Shut down Shut down the computer You have to shut down the computer after closing all programs and opened folders The Power button is set to Sleep mode by default If the computer is set to download Wind...

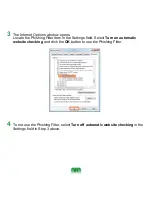
Page 90: ... card numbers passwords other account numbers etc through emails or websites The Phishing Filter protects users from these phishing attempts If the current page is judged to be a suspicious website the Phishing Filter displays a warning message with an alarm when the Phishing Filter is enabled In addition if a page that the user is currently trying to open is registered as a known Phishing website...

Page 91: ...e Phishing Filter item in the Settings field Select Turn on automatic website checking and click the OK button to use the Phishing Filter 4 To not use the Phishing Filter select Turn off automatic website checking in the Settings field in Step 3 above ...

Page 92: ...ed the settings click OK to finish Configuring Parental Controls 1 Click Start Control Panel User Accounts and Family Safety Parental Controls 2 Select a user to configure the Parental Controls for The User Controls window for that user opens 3 Click Parental Controls Use and configure the necessary settings in the Windows Settings at the bottom If you click OK the Parental Controls setting is complet...

Page 93: ...the User Controls window referring to the descriptions of Parental Controls 2 Set Activity Reporting to On 3 To view the Activity Report click on View Activity Report on the right of the User Controls window 4 If you click the View Activity Report the following window opens displaying a computer operating summary 93 ...

Page 94: ... etc according to your requirements Configurable items may differ depending on the installed Windows Vista version or programs If the Easy Network Manager program is installed you can see Easy Network Manager window p 102 If you turn off Wireless Networking in the Mobility Center it will not affect the Wireless LAN LED and the MENU program If you turn off the Wireless LAN in the MENU program the Wi...

Page 95: ...Using the Network Wired Network 96 Wireless Network 99 Using the Easy Network Manager 102 Bluetooth 106 Chapter 4 ...

Page 96: ...er 3 Click Manage Network Connections from the left pane 4 Right click over the Local Area Connection and select Properties Wired Network A wired network is a network environment used for a company network or broadband internet connection at home You can also configure the network settings using the Easy Network Manager p 102 ...

Page 97: ... the following IP address and set the IP address manually 7 When you have completed the settings click the OK button The network settings have been completed The LAN device driver may differ depending on your LAN device model To add a network component click Install in the screen shown in the figure above You can add clients services and protocols When not using DHCP ask your network administrator ...

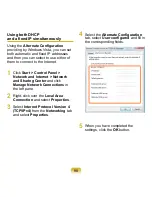
Page 98: ...k Start Control Panel Network and Internet Network and Sharing Center and click Manage Network Connections in the left pane 2 Right click over the Local Area Connection and select Properties 3 Select Internet Protocol Version 4 TCP IPv4 from the Networking tab and select Properties 4 Select the Alternate Configuration tab select User configured and fill in the corresponding fields 5 When you have comp...

Page 99: ... LAN is turned on the Wireless LAN LED is lit Wireless LAN Connections Wireless network connections can be classified into 3 categories and this manual describes the connection procedures for connecting through an Access Point AP Access Point AP You can connect to the Internet or another computer on the network through an AP What is an Access Point AP An AP is a network device that bridges wired an...

Page 100: ...the taskbar and click Connect to the Network 2 Select an AP to connect to and click Connect If there is a configured network key for the AP to connect to the Enter Network Key window appears Enter the network key in the window and then click the Connect button Ask your network administrator for the network key if necessary 3 When Connected to the AP is displayed click the Close button You can acces...

Page 101: ...101 Checking the network connection status If you move the pointer over the Network Connections icon of the Taskbar you can view the connection status ...

Page 102: ...ures each time regardless of your location You can diagnose the network status Network Settings This section describes the procedures to connect to the Internet by setting up a network The setting up procedures include procedures to add a printer to the network 1 To use a wired LAN connect the LAN cable to the LAN port To use the wireless LAN you have to turn the wireless LAN on first To turn it on...

Page 103: ...s option automatic IP setting 7 Click Add Printer and set up a printer according to the wizard When the printer has been added click the Refresh button select the newly added printer and then click the Finish button To not add a printer click the Finish button 8 When the network settings are complete the Do you want to move to the newly added location now message appears Click the No button An ico...

Page 104: ...ng location from the Saved Locations window and then click Move 3 If the Internet connection is a wired LAN you can immediately load the settings for the new location and the corresponding network connection information is displayed in the Current Location Information window If the Internet connection is a wireless LAN you have to select an AP as follows Right click over the Network connection ico...

Page 105: ...rk 1 Launch Easy Network Manager 2 Select Management and Diagnose Status from the menu 3 The Network Connections window appears Click Start to start the network diagnosis 4 When the diagnosis is complete a device with a problem is marked by an exclamation mark icon with a description of the problem at the bottom of the window ...

Page 106: ...data with Bluetooth devices such as a cell phone PDA another notebook computer etc Bluetooth Function Bluetooth Bluetooth is wireless communications technology that allows access to nearby devices such as another computer cell phone printer keyboard mouse etc without a cable connection Using Bluetooth you can exchange files connect to the Internet and construct a private network The Bluetooth suppo...

Page 107: ...g on the device 1 To connect to another device via Bluetooth double click the Bluetooth icon on the Taskbar For more information about using the Bluetooth function refer to the online help for the Bluetooth Device Or click Control Panel Network and Internet Bluetooth Devices Electronic Business Card Vcard Exchange You can exchange business cards with Bluetooth devices such as a cell phone PDA anot...

Page 108: ...f the Add Bluetooth Device Wizard screen appears select the My device is set up and ready to be found and click the Next button 4 When the search is complete all available Bluetooth devices are listed Select the Headset from the list and click the Next button ...

Page 109: ...up the Bluetooth Pairing Mode refer to the Headset Manual 5 Enter the PIN in the device PIN field and click the Next button For pairing a PIN is required Since a PIN is provided by the headset manufacturer refer to the corresponding manual 6 If the Add Bluetooth Device Wizard window appears click Finish 7 The headset is connected and you can now use the Bluetooth headset normally ...

Page 110: ...d the file to and click the Next button in the Select Bluetooth Device window 3 Select a computer to which the file is transmitted and click the OK button 4 Enter a PIN in the Bluetooth PIN Code field and click the Next button The Bluetooth PIN Code is a password used for connecting two Bluetooth devices The user just enters the same PIN Code E g same numbers on both Bluetooth devices to make the con...

Page 111: ...ronic business card exchange FAX transmission reception sound related functions and serial port functions Using the network connection or file transmission function multiple Bluetooth devices can be connected However since connecting to multiple devices may slow down the data rate or make the connection unstable connecting to one device at a time is recommended The Bluetooth function of a Bluetooth...

Page 112: ...sing Applications Introducing Programs 113 Origami Experience 116 CyberLink PowerDVD 118 Samsung Update Plus 120 Play AVStation 122 AVStation Now 136 Play Camera 138 OmniPass Fingerprint Identification software 141 ...

Page 113: ...are after learning about the basic use of the software For detailed information refer to the help section of the corresponding software Every software program may not be provided or the version may differ depending on your computer model In addition the screen capture images may differ from actual ones depending on the computer model and software version ...

Page 114: ...d with some models Play Camera Optional This software enables taking pictures and video recording by using the cameras on the front and back of the computer p 138 Management Functions Samsung Update Plus Optional Samsung Update Plus is a software function that examines and updates the Samsung software and drivers installed on your Samsung computer to the most recent versions p 120 Easy Network Man...

Page 115: ...encrypt a file all using your fingerprint p 141 Troubleshooting Functions SAMSUNG Magic Doctor Optional SAMSUNG Magic Doctor is troubleshooting software provided by Samsung Computer for system diagnosis and restoring the system The system diagnosis function enables users to diagnose system problems without assistance from others Samsung Recovery Solution II Optional Using this program you can restor...

Page 116: ...nch Origami Experience click Start All Programs Microsoft Origami Experience Pack Origami Experience Category Home Switch Windows Minimize Window Close Window Battery Charge Status Wireless LAN Status Play Control Button Volume Clock It is optional and is not supplied with some models The terms and the screen figures in the manual may differ from actual ones ...

Page 117: ...117 For example the procedures to launch the Calculator are described below Launch Origami Experience Click Programs More Programs Calculator z x c ...

Page 118: ...Link DVD Suite Power DVD CyberLink PowerDVD 4 Then click the Play icon in the control panel of CyberLink PowerDVD to play the DVD title Play Undock Player Panel The CyberLink PowerDVD program can only be used when you have purchased an CD DVD drive and you have installed the program It is optional and is not supplied with some models CyberLink PowerDVD Optional CyberLink PowerDVD is a DVD player p...

Page 119: ... inserts a DVD title into the drive for the first time Whenever a DVD title is inserted with a region code different from that of the DVD drive the region code of the DVD drive is automatically changed to the region code of the DVD title However changing the region code of a DVD drive is limited to 5 changes After that the region code is permanently fixed to the last region code If you need to chang...

Page 120: ...date Plus Optional Samsung Update Plus is software that examines and updates the Samsung software and drivers installed on your Samsung computer to the latest version To update the software and drivers 1 Click Start All Programs Samsung Samsung Update Plus Samsung Update Plus If this is the first time you are running the program a window will appear asking you if you agree to the agreement in the w...

Page 121: ...elect Install for an update item that must be installed separately a message appears informing you of this Follow the instruction message to correctly install it Automatic update items display By default your computer is configured to automatically search for updates If there is a new update available this is displayed in the notification area Click the balloon help icon in the notification area Here...

Page 122: ...am This section describes the basic usage of Play AVStation Launching and Screen Layouts The screens used in this manual may differ from actual screens according to the program version For detailed usage refer to the program help TV Station is only available for systems supporting a TV function This computer is not supported To play an audio CD or DVD you have to connect an external ODD Use the de...

Page 123: ... image and also view the photographs in a SlideShow Launch Play AVStation and click on Movie on the Station Bar Mini Mode View Movie List and Thumbnail Window Play Control Buttons Volume Control Play Highlight Button Capture Button EDS Button Enhanced Digital Sound Setting Create Highlight Chapter Button EDI Button Enhanced Digital Image Setting Movie Library ...

Page 124: ...e EDI button at the bottom of the TV or Movie Station Some TV tuner and graphics cards are not supported by EDI What is EDS Enhanced Digital Sound EDS Enhanced Digital Sound is sound quality enhancement technology devel oped by Samsung Electronics You can listen to clearer sound if you enable the EDS function when playing music or movie on Play AVStation To enable the EDS function click the EDS bu...

Page 125: ...ayed and click Open The selected file is automatically registered to the Library and played Playing a Video File in Full Screen 1 Double click on the current playback screen 2 The movie is played in full screen In full screen to view the movie at the default size double click on the current playback screen again Capturing the Video Screen Click on Capture Current Screen below the You can view captu...

Page 126: ...e described below You can add files or folders As an example the procedures to add folders are described below 1 Select Menu File Add to Library Folder 2 Select a target folder and select Video Files option in the Target File Type field 3 The movie files found in the selected folder are added to the Library The movie files used in Play AVStation are automatically added to the Library ...

Page 127: ...tandards depending on the target video Therefore the result of the function may differ from the user s intention 1 Select a movie and click Make Highlight Chapter at the bottom of the window 2 Select the movie type Sports News Other A Highlight Chapter is created 3 To watch a highlight double click a file made and click the Highlight icon at the bottom right of the current movie file Highlight On Of...

Page 128: ...8 Launch Play AVStation and click Music on the Station Bar Music Station Playlist Window Music Search Volume Control Music Library Music Type Repeat Setting Random Play Setting EQ EDS Play Control Buttons ...

Page 129: ...ct an external type ODD 1 Insert an audio CD into the CD DVD drive 2 If the AutoPlay window appears select Play audio CD using Samsung PLAY AVStation 3 The CD is played If a CD is already inserted in the CD DVD drive select CD in the Audio CD folder of the Library and double click the title The CD is played ...

Page 130: ...ck is registered to the Library and played Playing a Music File If a music file is registered to the Music Library you can easily play the music file For the procedures to register tracks to the Library refer to p 131 1 Move to Music Station and double click on All Music 2 Double click a music file The file is added to the playlist and played ...

Page 131: ...elow You can add files folders As an example the procedures to add a folder are described below 1 Select Menu File Add to Library Folder 2 Select a target folder and select the Audio File option in the Target File Type 3 The music files found in the selected folder are added to the Library The music files are registered The tracks played in Play AVStation are automatically added to the Library ...

Page 132: ...132 Launch Play AVStation and click on Photo on the Station Bar Photo Station Photo Library Photo List and Thumbnail Window Batch Edit Button SlideShow Button View and Edit Button ...

Page 133: ...splayed in the Preview screen Press the left and right arrow keys to navigate through the images Left and Right Arrows Zoom Control Edit Image Slide Show 3 Click on To The list Screen to return to the list Viewing an image not registered to the Library Click Menu File Open File select an image file to view and click Open The selected image file is regis tered to the Library and displayed in the Prev...

Page 134: ... at the bottom right to switch to the Preview screen 4 If the Preview screen appears click the Edit button at the bottom left If the image editor screen appears edit the image using the Edit tools at the bottom of the window Click to switch to the Preview screen Click to save the edited image Edit Tools Image Editor Window Click on Original View to edit the image comparing it to the original 5 You...

Page 135: ... The procedures to add image files saved on the computer to the Library are described below You can add files and folders As an example the procedures to add folders are described below 1 Select Menu File Add to Library Folder 2 Select a target folder and select the Image File option in the Target File Type field The image files found in the selected folder are added to the Library ...

Page 136: ...edia program so that you can use the corresponding function Click on a menu to run the corresponding program For more detailed usage of each program refer to the online help of each program AVStation Now menus may differ depending on your computer model and some functions are optional and may not be supported by your computer In addition if a required program is removed or not installed the corres...

Page 137: ... launched and you can play a music file or audio CD Movie Play AVStation is launched and you can play a movie or DVD title Photo Play AVStation is launched and you can view photographs or image files individually or in a SlideShow ...

Page 138: ...number in this manual is subject to change and the screen figures and terminologies may differ from the actual ones For more detailed usage procedures refer to the program Help Precautions when Taking a Picture Do not take a picture or record video of a person without that person s consent Do not take a picture or record video where photographing is prohibited Do not take a picture or record video ...

Page 139: ...ront Camera Select to use the front camera Rear Camera Select to use the rear camera Capture Screen Still Picture Takes a picture Record Records video To stop a video recording press the Stop button Recording will stop 3 Press the Open Folder button to view pictures or recorded videos You can view a photo by double clicking it Since you cannot view recorded video files using the Play Camera please ...

Page 140: ...and device settings the save folder etc The Play Camera supports up to 1280 x 1024 pixels Photographs are taken with the resolution selected but the photographs displayed on screen are only 640 x 480 pixels due to restrictions of the screen size Video files recorded by the Play Camera are saved with a 320 x 240 pixels resolution Since you cannot view recorded video files using the Play Camera please...

Page 141: ...scribed in this manual is subject to change and some functions may not be provided due to restrictions in the program This model does not support the function which turns the computer on via a fingerprint For more detailed information on the usage procedures refer to the Help section in the OmniPass program Fingerprint Identification Integrated Password Authentication Signing Up You have to register...

Page 142: ...m New Password field Click Create Password A password has been created 4 To register a fingerprint click on AuthenTec Fingerprint Device and then click the Next button 5 The fingerprint registration begins Select the finger to be registered and click the Next button 6 Register the fingerprint by placing your finger over the fingerprint identification sensor and placing it down slowly Repeat this at least ...

Page 143: ...lp section 11 Click Finish Registering information for using the fingerprint identification and integrated password authentication functions has been completed 1 If you turn the computer on after completing the user information registration step the Logon Authentication window appears To use the fingerprint identification function In the Logon Authentication window select AuthenTec Fingerprint Driver ...

Page 144: ...thentication is complete you can logon to Windows You can encrypt folders and files so that only specified users can open or modify them The procedures to encrypt files are described below This function is applied to some models only 1 Select Start All Programs Softex OmniPass Control Center File Protection 2 Select a folder or file to be encrypted and click Encrypt To decrypt encrypted folders and fil...

Page 145: ...rypted and select OmniPass Encrypt File s from the pop up menu The selected folder or file will be encrypted Logging into Internet Sites You can easily login to frequently used Internet sites using the fingerprint identification or password authentication functions instead of entering your user ID and password As an example the procedures for logging into the Hotmail site are described below The foll...

Page 146: ...stered websites using your fingerprint or password z When opening a registered site the Access Authentication window appears x Select AuthenTec Fingerprint Device place your finger over the fingerprint identification sensor and push it down slowly once Alternatively select Integrated Password Authentication and enter the login password c If the fingerprint identification or password authentication is co...

Page 147: ...Chapter 6 Settings BIOS Setup 148 Setting a Boot Password 153 Changing the Boot Priority 156 Battery 157 ...

Page 148: ... BIOS Setup enables you to configure your computer hardware according to your needs Use the BIOS setup to define a boot password change the booting priority or add a new device Since incorrect settings may cause your system to malfunction or crash take care when configuring the BIOS The functions of the BIOS setup are subject to change for product function enhancement purposes The BIOS Setup menus an...

Page 149: ...149 3 After a moment the BIOS setup screen appears The items in the BIOS setup may differ depending on the product Setup Menu Setup Items Help Help for the selected item appears automatically ...

Page 150: ...ronment settings Advanced Used to configure advanced functions on your computer around devices and chipsets Security Used to configure security functions including passwords Boot Used to set the boot priority and other boot options Exit Used to exit the Setup either saving the changes or not ...

Page 151: ...tion L Button F1 Key If you press the L button Help appears If you press it again Help disappears Mouse Joystick Up Down Keys If you push the Mouse Joystick up or down you can move up or down the item list Mouse Joystick Left Right Keys If you push the Mouse Joystick left or right you can move to another menu F5 Key F6 Key Press the F5 F6 buttons to change the value of an item Esc Key Press the bu...

Page 152: ...tup Default from the setup menu F10 Key To save the changes press the F10 key on the external keyboard If an external keyboard is not connected select Exit Exit Saving Changes from the setup menu Exiting the System Setup 1 Move to Exit Menu Exit Saving Changes by using the Mouse Joystick and press the Enter button 2 Select Yes and press the Enter button The System Setup is closed and Windows is st...

Page 153: ...m press Enter Setting a Boot Password When setting a password you have to enter a password to use the computer or enter the BIOS Setup By configuring a password you can restrict system access to authorized users only and protect data and files saved on the computer Do not lose or forget your password If you have forgotten your password contact a Samsung service center In this case a service fee will...

Page 154: ... The supervisor password has been set The supervisor password is required to turn the computer on or to enter System Setup Setting a User Password Users can start the system with a user password but cannot enter the System Setup By doing this you can prevent other users from entering Setup Before configuring a user password a supervisor password must have been configured Deactivating the supervisor ...

Page 155: ...word in the Set Supervisor Password item press Enter 2 In the Enter Current Password item enter the current password and press Enter 3 Leave the Enter New Password item field empty and press Enter 4 Leave the Confirm New Password field empty and press Enter 5 In the Setup Notice window press Enter The password is deactivated ...

Page 156: ...e to Exit Exit Saving Changes by using the Mouse Joystick and press the Enter button The changes are saved and Setup is closed Changing the Boot Priority The default boot priority of your computer is the CD ROM first then a removable device and then the hard disk drive in this order You can change the booting priority using the Boot menu of the System Setup As an example the procedures to change th...

Page 157: ...ter Carefully read and follow the precautions printed on the battery before using the battery Precautions Use only chargers specified in the User Guide Never heat the battery pack put it near or in a fire or use at a temperature higher than 60 C as this may cause fire Never cause a short circuit between the battery pack terminals or disassemble the battery pack Carefully read and follow the precautio...

Page 158: ...aining Battery Charge You can view the battery charge status by completing the following procedures Viewing through the MENU button Press the MENU button and press on Battery 3 To reinstall the battery align the battery to the outside of the computer and insert the battery Lift the battery latch up to the Lock position and put the Stand down Lock When you are unable to insert the battery check if ...

Page 159: ...y charged battery When the remaining battery charge is under 3 the computer automatically saves the current work and turns off Battery Usage Time Information A battery is an expendable supply so when using it over a long time the capacity battery life is shortened If the battery life is reduced to under half of its initial time we recommend purchasing a new battery For long periods of not using th...

Page 160: ...LCD brightness is decreased and you can extend the battery usage time Using Easy Battery Manager Easy Battery Manager is a power management program that enables using the battery power efficiently You can select an optimized power mode according to your requirements 1 Click Start Control Panel Hardware and Sound Power Options Alternatively right click the power measuring device icon in the notificat...

Page 161: ...performance Therefore the battery usage time may be reduced in this mode 161 Using the Easy Battery Manager power options To use the Easy Battery Manager power options after reinstalling Windows you have to install the Easy Battery Manager manually using the system software media Since power options in the Easy Battery Manager aim at maximizing the battery usage time programs requiring high perfor...

Page 162: ... function and then recharging it again 1 Disconnect the AC power adapter after turning off the computer 2 Turn the computer on again When the SAMSUNG logo appears press the R button to enter Setup 3 Using the arrow keys select Smart Battery Calibration in the Boot menu and press Enter 4 Highlight Yes in the Battery Calibration Confirmation window and press Enter The Battery Calibration function is ...

Page 163: ...ge Contents and the Program Guide 164 Connecting and Setting Up Media Center 165 Using Media Center 169 Windows Media Center is provided for some versions of Windows Vista only Therefore this chapter is for models with Windows Media Center only ...

Page 164: ...d connect the devices you can more easily use the various Media Center features About the Program Guide An Electronic Program Guide EPG is provided by the EPG provider and the contents of the EPG may differ from the actual TV program depending on programming changes by the EPG provider or broadcast station About Package Contents and the Program Guide You can use the Media Center TV function only w...

Page 165: ...stance External Type Remote Control Sensor To use Media Center using a remote control you have to install the remote control sensor on the computer When purchasing a remote control purchase an external type remote control sensor at the same time Connect the external type remote control sensor to the USB port of the computer and turn the sensor so that it faces the remote control External Type Remo...

Page 166: ...to the USB port of the computer Connecting to the Internet To view the TV Guide or to move to Media Center sites in Media Center you have to connect to the Internet Connect the network LAN cable to the LAN port of the computer If the computer is not connected to the Internet you cannot use the TV Guide Channel Information and the Online Spotlight functions Connecting the TV antenna To use the Medi...

Page 167: ...he installation option Express Setup enables you to use the basic functions of Media Center when clicking OK However you cannot use TV and Internet related functions using Express Setup Custom Setup allows you to configure all settings including TV and Internet settings If you click OK the Setup Wizard starts To setup the TV or Internet after an Express Setup select Tasks Settings General Windows M...

Page 168: ...ternet you cannot setup and use the TV Guide Channel Information 5 When the Media Center setup is complete click Finish Now you can use the Media Center Changing the Media Center settings You can change the Media Center settings after completing the Setup Wizard according to the procedures below 1 Select Settings General Windows Media Center Setup in the Media Center start screen 2 Select Run Setu...

Page 169: ...size Move to the Next Menu Item Play Control Buttons Using Media Center The descriptions of the Media Center start screen and basic functions will be given below If you selected Run Setup Later in the Media Center start screen or did not complete the Setup Wizard the Setup Wizard screen appears when launching Media Center If you complete the setup the Media Center start screen appears ...

Page 170: ...the Media Center library In addition you can also view files not registered to the library by registering them as well as viewing files on a removable disk Registering to the Library The procedures to register files to the library are described below 1 Launch Media Center and select Pictures Videos Picture Library or Video Library When you run it for the first time an Add window may appear In this cas...

Page 171: ...o Library Viewing Pictures and Images The procedures to view pictures and images registered to the library are described below Picture and image files are saved in the Computer Local Disk C Users User Accounts Picture Folder or Computer Local Disk C Users Public Public Pictures folder 1 Launch Media Center and select Pictures Videos 2 Select Picture Library When you run it for the first time the Set...

Page 172: ...registered folder are displayed in a random order Viewing Videos The procedures to view videos registered to the library are described below Video files are saved in the Computer Local Disk C Users User Accounts Video Folder or Computer Local Disk C Users Public Public Video folder 1 Launch Media Center and select Pictures Videos 2 Select Video Library When you run it for the first time the Setup Li...

Page 173: ... removable media with picture image or video files Removable media refers to a CD DVD USB flash memory memory card etc To view pictures saved on a digital camera connect the digital camera and the computer using a USB cable 3 After a while a window notifying you that new media has been found appears Select View Pictures or View Videos 4 If the file list appears select a file 5 View the picture or vide...

Page 174: ...drive to open the CD tray and insert an audio CD The tracks on the CD are played automatically Ripping an Audio CD 1 Launch Media Center 2 Insert an audio CD into the CD ROM drive and play the CD 3 Select Copy CD at the bottom left of the Music Player window When running the Rip CD function for the first time the Ripping Options appear Configure the ripping options according to the instructions on t...

Page 175: ...ia Player The ripped tracks are copied to Start Music of the Desktop as album files To change the folder to save the ripped tracks to launch Windows Media Player and right click over the top taskbar and select More Options Rip Music Rip music to this location from the pop up menu Playing Ripped Tracks 1 Launch Media Center and select Music 2 If you select Music Library the album list appears includ...

Page 176: ...ing the album artist genre or song at the top If you select Playlist All Music all registered music files are listed 3 Select the music files to be added to the playlist and click Add to Queue in the left pane 4 The mark starts blinking at the bottom left of the Media Player window and disappears the selected music files are added to the queue Media Player Window 5 Select the Media Player window at t...

Page 177: ...Media Center Music Library Playlist select a playlist and click Play If a music file appears in the Media Center even after the file has been deleted If you deleted a music file you must also manually delete the file from the Media Center playlist Deleting a playlist from Media Center Select Media Center Music Library Playlist select a saved playlist and click Delete Then the selected playlist is dele...

Page 178: ...You can view the TV program guide You can watch or record live TV programs and reserve a recording Play DVD The DVD title appears Search You can search for a program by the title keyword or genre What is a TV Program Guide EPG An Electronic Program Guide EPG is a TV program guide You can select a program and view detailed information on that program or set a recording The guide information is upda...

Page 179: ...starting Media Center the Auto Play selection window appears Select Play DVD Video using Media Center and click OK 3 After a moment the DVD menu is displayed It the DVD menu is not automatically displayed select Play DVD in the start screen 4 Select Watch Movie or Play from the DVD menu The DVD title is played If you move the mouse the Play Control buttons appear Using the Play Control buttons you...

Page 180: ...r You can enjoy all kinds of multimedia content such as movies news sports etc over the Internet To use Online Media your computer must be connected to the Internet For problems encountered while using Online Media contact the corresponding online service provider Online Media content services are not the responsibility of the computer manufacturer ...

Page 181: ...sing McAfee SecurityCenter 185 Reinstalling Software 186 Reinstalling Windows Vista 188 Samsung Recovery Solution II 192 Q A 202 Intel Media Sharing Software Information 218 Product Specifications 219 Glossary 223 Index 226 Contact SAMSUNG WORLD WIDE 227 ...

Page 182: ... function to check system connections and diagnose problems affecting to system operation and solve it 1 Click Start All Programs Samsung Samsung Magic Doctor Samsung Magic Doctor 2 Click on Diagnose the System to start diagnosing the system 3 When the system diagnosis is completed the diagnostic result appears If problems are found click the Cure button to correct the problem Samsung Magic Doctor...

Page 183: ...ecurityCenter regularly Connect to the Internet and click the Update icon to update This function is applied to some models only When McAfee SecurityCenter is run for the first time the Registration screen appears Register according to the instructions on the screen You have to register the software to protect the PC with the latest security information If you cannot find McAfee Security Center icon...

Page 184: ...d in with an administrator account you have to enter an administrator password in the User Account Control window 3 The System Software Media will launch Select an installation option to start the installation When software is not working properly it is recommended removing the software using the Add or Remove Programs of the Control Panel and reinstalling the software using the System Software Me...

Page 185: ...ect this option you can select the programs to be installed You can conveniently use this option when you need to install an individual driver or program that is causing a problem Installing Software As an example the installation procedures for the Standard Installation options are described below 1 Select Standard Installation in the System Software Media main screen 2 If the Start Standard Inst...

Page 186: ...n the computer will fail to recognize the USB keyboard To reinstall Windows when Windows does not boot refer to p 188 The User Guide describes procedures on the basis of Windows Vista Home Premium Reinstalling Windows may delete data files and programs saved on the hard disk drive Make sure to backup all important data Samsung Electronics shall not be held liable for any loss of data Reinstalling i...

Page 187: ...informing you that the files and folders will be moved to the Windows old folder Click the OK button 6 The Windows installation continues The computer will restart 3 times during the installation If the Press any key to boot from CD or DVD message appears after a restart do not press any button 7 The Windows user registration screen appears Select the username and photo and tap the Next button 8 En...

Page 188: ...p with the System Recovery Media and from there you can reinstall Windows Connect the external type ODD and USB keyboard before turning the computer on If you connect a USB keyboard during the installation the computer will fail to recognize the USB keyboard 1 Insert the System Recovery Media into the DVD drive and restart the computer 2 If the Press any key to boot from CD or DVD message appears ...

Page 189: ...install the operating system to select the partition of the disk drive and then tap the Next button If you click Drive Options Advanced you can delete format create or expand a partition Click on a function and proceed according to the instructions on the screen When previous Windows installation files are in the selected partition a message appears informing you that the files and folders will be m...

Page 190: ...function even if no restoration point was saved A Complete Restore will delete all data on drive C Therefore make sure to backup your data to another storage device before restoring it to the initial status Backup Factory Status Backup This function saves the factory status image of drive C as a compressed image in a secure area The factory status is automatically backed up after the computer is p...

Page 191: ...a corrupted error message appears This happens when Windows files are corrupted In this case use the Basic Restore function of Restore If the problem continues even after a Basic Restore is performed use the Complete Restore function The boot time increases the system crashes and errors occur frequently In this case use the Basic Restore function of Restore If the problem continues even after a Bas...

Page 192: ...ister Windows according to the instructions on the screen the computer will be restarted c The Partitioning hard disk drive function is automatically launched When the computer is restarted the partition disk screen appears for the efficient use of disk space The partition disk function is only available when turning the computer on for the first time and will not be available thereafter Once you ha...

Page 193: ... work properly The backup function provides Factory Status Backup and User Backup functions Therefore there are 2 backup images available Factory Status Backup and User Backup for the restoration function Factory Status Backup If you turn your computer on for the first time the Factory Status Backup function is performed after registering Windows Backup Function This function saves the factory stat...

Page 194: ...ives C and D Adjust the partition size using the slide bar and click the Next button Once you have completed the partitions you cannot resize the partitions Therefore partition the disk carefully 4 When the partitioning is complete the Factory Status Backup is performed to backup the factory status of drive C to a secure place This backup image is used for the Complete Restore function that restor...

Page 195: ...F4 or F7 key when the boot screen SAMSUNG logo appears If you press the key multiple times the Windows Boot Manager screen may appear In this case press Enter After a while the computer boots up in Restoration mode displaying the SAMSUNG Recovery Solution II screen 2 If the initial menu screen appears click Backup A description of the backup will be displayed on the screen 3 Enter a brief descript...

Page 196: ...a previous stable condition using Samsung Recovery Solution II Samsung Recovery Solution II provides Basic Restore and Complete Restore functions What is Basic Restore This function restores major Windows files without touching the user configuration and data when a problem occurs with the computer What is Complete Restore This function restores your computer using the Factory Status Backup or User ...

Page 197: ...the boot screen SAMSUNG logo appears If you press the key multiple times the Windows Boot Manager screen may appear In this case press Enter After a while the computer boots up in Restoration mode displaying the SAMSUNG Recovery Solution II screen If the Samsung Recovery Solution II program is launched for the first time after purchasing the computer the license agreement screen appears before star...

Page 198: ...restarted in restoration mode The first time the computer boots up after a Complete Restore has been performed the boot speed may slow down due to the system optimization process Available restoration points for the Complete Restore function In the Complete Restoration function you can select either Factory Status Backup or User Backup If you have not created a User Backup you cannot select User Ba...

Page 199: ...am only the program is removed leaving the restoration area on the disk unchanged Therefore you can use the Backup Restore and Install functions by pressing the F4 or F7 key while booting up even after the Samsung Recovery Solution II program is removed 1 Click Start Control Panel Add or Remove Programs 2 Select Samsung Recovery Solution II and click the Change Remove button Then the Samsung Recov...

Page 200: ...turbs Media Player playing a movie or video clip after the screen saver is activated while Media Player is playing A Go to Library More Options Player unselect Allow screen saver during playback in the Media Player QIn the following cases the screen blinks or displays noise for a short time Click the Graphics Related tab Change Resolution Change Display Device Remove the AC Adapter Restart the Sys...

Page 201: ...esktop select Personal Settings Display Settings Y set the resolution to 800 x 600 pixels and then try again QThe shortcut icons are not displayed on the screen even if I press the shortcut key A The shortcut icons only appear when the Easy Display Manager program is installed QI have connected a monitor or projector to the computer but the colors on the monitor are abnormally displayed A Check if...

Page 202: ...ce to bring the computer out of standby then click OK Restart the system If the system is activated from Sleep mode when there is no received signal use the system after disabling the Wake On LAN function When turning the power off when Wake On LAN is disabled the LAN LED may continue to be lit Connecting a wired LAN while using a wireless LAN may not activate the Wake On LAN function Set the Wire...

Page 203: ...omputer exits Sleep hibernation mode a message appears informing you of a connection to a 10Mbps 100Mbps wired LAN A When the computer exits standby hibernate mode restoring the network takes about 3 seconds When the network is restored it operates at 100Mbps 1Gbps ...

Page 204: ...lamation mark on the network icon by clicking Start Control Panel System and Maintenance Device Manager Network Adapter QThe signal strength is excellent but I cannot connect to the network Even if the signal strength is excellent the network connection may not operate properly if the TCP IP properties are not properly configured or the network key encryption key is incorrect A Check that the TCP I...

Page 205: ...fter checking the network key settings encryption key of related AP When the Wireless Network status is Connected but the internet is not enabled The computer is connected to AP but the AP or the network connected with the AP may have a problem When a message of No wireless Adapter found appear or a icon for Wireless Network is not found in the Mobility Center The wireless device is set to Disable...

Page 206: ...erating normally by connecting the wired network cable which has been connected to the AP to your computer A6 Check the network key settings encryption key again When automatic code conversion a passphrase function has been selected and data communication is not functioning even with a normal wireless connection it is recommended entering the network key encryption key manually A7 Check the AP set...

Page 207: ...e computer to computer Ad Hoc network should be configured so that their IP addresses are within the same subnet range If the TCP IP Settings are configured to DHCP the address is automatically configured to an address within the subnet IP range This will take about 2 3 minutes If the IP address is configured to a static IP in the TCP IP properties select Use the following IP address in the TCP IP pro...

Page 208: ...ss simultaneously To use either the wireless or the wired network in turn with the same IP address you have to Disable whichever network device will not be used in the network connection of the Control Panel QThe wireless LAN does not work properly when there is a device operating on an adjacent frequency in the vicinity of the product A1 Channel interference may occur when a wireless video transc...

Page 209: ...am x Select Notepad from the program list c Edit the file as follows Example N Magic Sens N CHARSET KS_C_5601 Magic Sens For Korean add CHARSET KS_C_5601 For Chinese Simplified CHS add CHARSET gb2312 For Chinese Traditional CHT add CHARSET Big5 A2 Perform Send business card immediately in the Address Book of Microsoft Outlook or select Transmission by Outlook business card selection and you will be ...

Page 210: ... been made In this case to resolve the problem complete the procedures below Double click the Bluetooth icon in the notification area of the Taskbar select the Audio tab and check the connectivity of the Bluetooth Hands Free Audio Device that corresponds to the headset in the Connected Device List If it is not connected right click over the device and select Connect Right click the Speaker icon in ...

Page 211: ... for games and some 3D applications due to the system properties when the display device changes pressing the MENU button and the button to the right of the LCD CRT button while a program is running may cause the program to exit or cause the screen to be displayed abnormally Double click the Bluetooth icon in the notification area of the Taskbar select the Audio tab and check the connectivity of th...

Page 212: ...Potter and the Chamber of Secrets etc may not display the picture properly when the screen resolution is set to 1024x768 and the color quality is set to 32 bit For these games set the screen resolution to 1024x768 and the color quality to 16 bit QThe game is not displayed smoothly on the screen A For 3D games the texture data for the 3D screen display is saved to the system memory If there is insu...

Page 213: ... This is just a difference from the calculation method and the capacity of the hard disk drive is the same as the specifications If your computer model is supplied with a fingerprint identification or system diagnosis program the hard disk drive capacity may be displayed smaller then it should be because the programs use some of the hard drive capacity Since Samsung Recovery Solution II is installed ...

Page 214: ...LD status When pressing a button or switch in the HOLD status the Charge LED blinks for a moment Slide the HOLD switch downwards and try again A2 If the computer is running on battery power check the battery charge status QI have pressed the F4 button several times while the computer is booting up in order to use Samsung Recovery Solution II but Windows Boot Manager suddenly appears instead A This...

Page 215: ...er if you do not have an administrator account you have to enter the administrator password in the User Controls window and then click Allow or OK If no administrator password is set you can click Allow or OK without entering a password Q How can I install the program A You can additionally purchase and install the following devices for UMPC See the Installing Programs section of the Getting Start...

Page 216: ... insert a new one if necessary QThe Touch Sensor Buttons do not work A1 Try to press a Touch Sensor Button with your finger and not with your finger tip so that a broader surface of your finger makes contact with the button A2 The UDF button only works when the Easy Button Manager program icon is registered to the Taskbar notification area When you cannot find the icon in the Taskbar select Start All P...

Page 217: ... Intel Viiv system For detailed information about the Intel Viiv system visit the Intel website http www intel com This function is only supported for some models Running Intel Media Sharing Software If you are running the Intel Media Sharing Software for the first time the Select a server message appears If you do not have a Media Sharing Server or a Viiv System at home select Offline Otherwise con...

Page 218: ...ry 512MB 1GB MAX 1GB Memory type DDR2 SODIMM Main Chipset Intel 945GU Hard Disk Drive 1 8 HDD 40 60 80GB Graphics Intel Graphic Media Accelerator 945 Sound Chipset HD Audio ALC262 Codec Network Wired LAN Broadcom BCM4401E 10 100 PCI Ethernet Controller Wireless LAN 802 11BG Bluetooth 2 0 EDR Multi Card Slot SD Card MMC Ports USB 2 0 x 2 Video Monitor Out Port Headphone Jack Wired LAN Port DC in Ja...

Page 219: ...Specifications Sleep Mode 726mW Receive Mode 1 353W Transmission Mode 2 046W Power 3 3V Network Specifications Compatibility IEEE 802 11b IEEE 802 11g Operating System Microsoft Windows XP Vista Media Access Protocol MAC CSMA CA Collision Avoidance with Acknowledgement ACK Security Wired Equivalent Privacy support WEP 64bit 128bit WPA This device supports the Wireless LAN Security Specifications WPA ...

Page 220: ... Device Transceiver Standard Output Power MAX 10 mW Modulation Scheme 11b mode DSSS CCK 11g mode OFDM Data Rate Mbps 11b mode 11 5 5 2 1 11g mode 54 48 36 24 18 12 9 6 Antenna Type Built in Antenna The data rate may differ from the real data transmission rate 11g mode is only supported when the device is connected to an IEEE 802 11g device e g Access Point supporting IEEE 802 11g ...

Page 221: ... owners Use of this copyright protection technology must be authorized by Macrovision Corporation and is intended for home and other limited viewing uses only unless otherwise authorized by Macrovision Corporation Reverse engineering or disassembly is prohibited About the Product Capacity Representation Standard The capacity of the storage device HDD SSD of the manufacturer is calculated assuming ...

Page 222: ...s You can add or remove hardware or update a device driver using the Device Manager Direct X An application interface developed to enable Windows application programs to access hardware devices at a very high speed Since the operating speed of graphics memory and sound cards must be very fast to provide high quality video and sound for games Direct X enables faster control and interaction between ...

Page 223: ...P IP as the default protocol LCD Liquid Crystal Display There are Passive Matrix and Active Matrix LCD types This computer uses the Active Matrix type LCD called a TFT LCD Since an LCD is implemented by transistors instead of a cathode ray tube unlike a CRT its size can be slim And because it does not blink it reduces eye strain Network A group of computers and devices such as printers and scanner...

Page 224: ...off the data in memory will be lost System File System Files refer to files that are read and used by the Windows operating system In general system files must not be deleted or moved USB Universal Serial Bus This refers to a serial interface standard developed to replace the conventional interface standards such as Serial and PS 2 While USB 1 1 supports 12Mbps 12 million bits per second USB 2 0 sup...

Page 225: ...4 E Entering Text 48 H Help 72 M Multi Media 114 N Network 95 Network Status Diagnosis 105 P Password 153 Playing Music 128 Play AVStation 122 Product Specifications 218 Program 113 R Recorder 68 Remaining Battery Charge 158 Resolution Color 87 S Safety Precautions 8 Samsung Update Plus 120 SlideShow 133 Status Indicators 35 Stylus Pen 45 U User Accounts Switch User 85 V Video Play 125 Volume Contr...

Page 226: ...msung com hk MALAYSIA 1800 88 9999 www samsung com my SINGAPORE 1800 SAMSUNG 7267864 www samsung com sg FRANCE Comment contacter Samsung dans le monde Si vous avez des suggestions ou des questions concernant les produits Samsung veuillez contacter le Service Consommateurs Samsung Customer Care Center TEL Web Site FRANCE 0825 08 3260 www samsung com fr GERMANY Kontakt zu Samsung Falls Sie Fragen od...

Page 227: ...o Clienti Customer Care Center TEL Web Site ITALY 199 153 153 www samsung com it RUSSIA UKRAINE Связывайтесь с SAMSUNG по всему миру Если у вас есть предложения или вопросы по продуктам Samsung связывайтесь с информационным центром Samsung Customer Care Center TEL Web Site RUSSIA 8 800 200 0400 www samsung ru UKRAINE 8 800 502 0000 www samsung com ur CHINA Customer Care Center TEL Web Site CHINA 8...

Reviews: