background image

ߣࢋƊΧʪʀ̈ѣʀɇϩ̈ͱ͝ϑ

10

This document can not be used without Samsung’s authorization.

ߣࣗߤAͱ͝ϩθͱ̷ťɇ͝ʪ̷ࣗĮЭʪ͝

01

02

03

04

05

06

07

08

09 10 11

12

13

14

01

Oven modes

Activates each oven modes (Bake or Broil).

02 Keep Warm

Keep Cooked food warm at lower temperayures between 150

߶

F and 200

߶

F (66

߶˜ɇ͝ʒՔՎ߶˜ظ׵

03 Bread Proof

Activates the Bread Proof function.

04 Self Clean

Burn off fod residuse in the oven at very high temperatures.

05 Smart Control

Activates the Easy connection.

06 Timer

Acivates or deactivates the timer.

07

Cook Time

Set the cooking time.

08 Delay Start

Set the oven to start at a certain time.

09 Oven Light

Turn on/ Turn off the oven light.

10

〈 / 〉 

(Up/Down)

Use to set the times, or temperatures.

11

Clock

Set the clock time.

12

Lock

Press and hold for 3 second to lock the control panel and the door to prevent accidents.

13

OFF/CLEAR

Cancel the current operation but not the timer.

14

START/SET

Start a function or set the time.

Summary of Contents for NX60T8111S

Page 1: ...GAS RANGES CONTENTS GASRANGES 1 Precaution ߣࢋ ƊΧʪʀ ѣʀɇϩ ͱ ϑ ߤࢋ U ϑɇϑϑʪ ɵ ц ɇ ʒ ŵʪɇϑϑʪ ɵ ц ߥࢋ ƟθͱЇɵ ʪϑ ͱͱϩ ߦࢋ Ǯ θ U ɇ θɇ ߧࢋ ťA9 U ɇ θɇ ϑ MODELSAND MODELCODES NX60T8111S ...

Page 2: ... COOKTOP 20 3 4 Step D OVEN DOOR 21 3 5 Step E SIDE PANEL 23 3 6 Step F ASSY COOKTOP BURNER 24 3 7 Step G ASSY DRAWER 26 3 8 MAIN PCB ASSEMBLY 27 3 9 SPARK MODULE 28 3 10 PCB 29 3 11 HOLDER PCB GLASS 30 3 12 ELECTRODE 31 3 13 BURNER CUP 32 3 14 GAS ORIFICE NOZZLE Single Burner 33 3 15 Valve Cooktop 34 3 16 Switch Ignition 36 3 17 Assy Motor 37 3 18 Assy DoorLatch 39 3 19 Switch DoorPlunger 40 3 20...

Page 3: ... 1 Failure Display Codes 54 4 2 Control parts 70 4 3 Cooktop parts 73 4 4 Oven parts 79 ߦࢋ Ǯ θ U ɇ θɇ 85 5 1 Wiring Diagram 85 5 2 Main PCB 86 5 3 Assy Display 87 ߧࢋ ťA9 U ɇ θɇ ϑ 88 6 1 Figure of PCB and Display 88 6 2 Explanation of Touch Keypad 91 6 3 Explanation of NX60T8111 Main PCB parts 92 6 4 Explanation of NX60T8111 Display PCB parts 94 ...

Page 4: ...as and electrical supplies to the appliance should be turned off and ordisconnected when the range is being serviced orrepaired WARNING To avoid risk of death or severe personal injury from electrical shock disconnect power before working on servicing the appliance Ɵͱ ɇЭͱ ʒ θ ϑ ͱ ʒʪɇϩ ࡡ ϑʪЭʪθʪ Χʪθϑͱ ɇ Їθцࡡ ͱθ ΧθͱΧʪθϩц ʒɇ ɇ ʪ θͱ ѣθʪ ͱθ ʪуΧ ͱϑ ͱ ࡡ ϩЇθ ͱ ϩ ʪ ɇϑ supply before working on servicing the ...

Page 5: ...r surfaces of an oven become hot enough to cause burns During and after use ʒͱ ͱϩ ϩͱЇʀ ͱθ ʪϩ ʀ ͱϩ ͱθ ͱϩ ʪθ Ѥɇ ɇɵ ʪ materials contact burners heating element grates or interior surfaces of oven until they ɇЭʪ ɇʒ ϑЇ ѣʀ ʪ ϩ ϩ ʪ ϩͱ ʀͱͱ ࢋ Įϩ ʪθ ϑЇθ ɇʀʪϑ of the appliance may become hot enough to cause burns Among these surfaces are oven vent openings and surfaces near these openings oven doors and windo...

Page 6: ...quipped with ͱ ʪ ͱθ ͱθʪ ϑЇθ ɇʀʪ ɵЇθ ʪθϑ ͱ ʒ ʪθʪ ϩ ϑ іʪϑࢋ Ɗʪ ʪʀϩ Їϩʪ ϑ ϑ ɇЭ Ѥɇϩ ɵͱϩϩͱ ϑ ɇθ ʪ ʪ ͱЇ ϩͱ ʀͱЭʪθ ϩ ʪ ϑЇθ ɇʀʪ ɵЇθ ʪθ Ѥɇ ʪϑࢋ Ɵ ʪ Їϑʪ ͱ Ї ʒʪθϑ іʪʒ Їϩʪ ϑ ϑ и ʪуΧͱϑʪ ɇ Χͱθϩ ͱ ͱ ϩ ʪ ϑЇθ ɇʀʪ ɵЇθ ʪθ Ѥɇ ʪϑ ϩͱ ʒ θʪʀϩ ʀͱ ϩɇʀϩ ɇ ʒ ɇц θʪϑЇ ϩ ϩ ͱ ͱ clothing Proper relationship of utensil to burnerwill ɇ ϑͱ ΧθͱЭʪ ʪ ѣʀ ʪ ʀцࢋ NeverLeave Surface Burners Unattended at High Heat Settings ࣔ 9ͱ ͱЭʪθϑ ʀͱЇ ʒ ϩʪ ...

Page 7: ...beeps sound ϩ ʪ ͱЭʪ ϑ ɇ Ї ʀϩ ͱ ϩ ʪ ϑʪ ࣗʀ ʪɇ ͱʒʪࢋ Turn off or disconnect appliance from electrical and gas supplies and have the appliance serviced by a licensed technician Use Care When Opening Doorࣔ øʪϩ ͱϩ ɇ θ ͱθ ϑϩʪɇ escape before you remove or replace food in the oven Do Not Heat Unopened Food Containers Buildup of pressure may cause container to burst and result in injury Keep Oven Vent Ducts ...

Page 8: ...ߣࢋ ƊΧʪʀ ѣʀɇϩ ͱ ϑ 8 This document can not be used without Samsung s authorization ߣࢋ ƊΧʪʀ ѣʀɇϩ ͱ ϑ ߣࣗߢ Ęʪи ΧΧʪɇθɇ ʀʪ Uʪϑ Ǯ ѣ Touch Control Biggest Capacity Self cleaning system Convection cooking Griddle ...

Page 9: ...sung s authorization ߣࣗߣ ĮЭʪ ʪɇϩЇθʪϑ 01 Surface burners 02 Oven vents 03 Control panel 04 Surface burnerknobs 5 pcs 05 Removable oven door 06 Storage drawer 07 Broil oven burner 08 Oven light 09 Oven rack system 10 Bake oven burner 06 05 02 09 10 08 07 01 03 04 ...

Page 10: ...urn off fod residuse in the oven at very high temperatures 05 Smart Control Activates the Easy connection 06 Timer Acivates ordeactivates the timer 07 Cook Time Set the cooking time 08 DelayStart Set the oven to start at a certain time 09 Oven Light Turn on Turn off the oven light 10 Up Down Use to set the times ortemperatures 11 Clock Set the clock time 12 Lock Press and hold for3 second to lock ...

Page 11: ... ɇϑ θɇ ʪ ʀͱͱ ϩͱΧ ɇϑ ѣЭʪ ɇϑ ɵЇθ ʪθϑࢋ ʀͱͱ ϩͱΧ ɵЇθ ʪθϑ ɇθʪ ͱΧʪ ࣗΧͱθϩ ʒʪϑ ϩͱ ΧθͱЭ ʒʪ цͱЇ easy assembly and accurate and dependable operation Ɵ ʪ ʒ ʪθʪ ϩ ɵЇθ ʪθ ϑ іʪϑ ʪ ϑЇθʪ цͱЇ ɇЭʪ the proper heat source forthe desired cooking job The ߦࡡߡߡߡ 9ƟƸ ɵЇθ ʪθ ΧθͱЭ ʒʪϑ Χθʪʀ ϑʪ ʀͱͱ Χʪθ ͱθ ɇ ʀʪ ͱθ ʒʪ ʀɇϩʪ ͱͱʒϑ and foods that require low heat for long cooking times The 5 000 BTU burner ɇ ͱиϑ ϩ ʪ øĮ ϑʪϩϩ ϩͱ ɵʪ Їϑʪ...

Page 12: ... Control Type Glass Touch Ľ Display Color Ice Blue Display Language EN Control Language EN Cleaning Self Clean O 2 3 5 hrs Steam Clean Coating Anti FingerCoating O Cooktop Grate Edge to Edge BurnerSpec Numberof Burners 5 TTLPower 58 5K BTU Left Front 16K Single Single Valve Left Rear 9 5K Single Single Valve Right Front 17K Single Single Valve Right Rear 5K Single Single Valve Center 9 5K Oval Sin...

Page 13: ...ߨߦঐ Broil Low High High Convection Bake Convection Roast Special Function Keep Warm 175 F 80 C Bread Proof 100 F 40 C Dehydrate AirFry Favorite Cook App Oven Control Feature Touch Control Oven Start Set O Oven Off O Cook Time O TimerOff 3sec O Delay Start O Temp Probe X Clock O Clear O NumberPad १ࢥ३ Light On Off O Child Lock 3sec O Smart Control O Touch to wake up ...

Page 14: ... Sound On Off O Wi Fi On Off O Demo Mode O Sabbath O Time12Hr 24Hr O Manual Language EN Virtual Flame On Off Induction Oven Door DoorDesign 1 STSS Layers DoorScreen Print Smog Automatic Safety DoorLock O Removable Oven Door O Soft Close Drawer Type Storage Cavity Size cu ft 1 0 DrawerRail Handle None DividerStorage Connectivity Wi Fi O Voice Control Embedded X Voice Control 3rd Party O Bixby Alexa...

Page 15: ...n Embedded Griddle Wok Grate Anti Tip Device 1 Wing X Power Input Power 120V 60Hz Circuit Breaker 40A Dimension Net Size W x H x D inch mm W29 15 16in X D26 3 8in X H36 1 16 36 11 16in W761mm X D669 2mm X H915 35 932 4mm Shipping Size W x H x D inch mm 331 16 x 41 3 4 x 30 5 16 inch 839 8 x1060 45 x 769 9 mm Cavity Size W x H x D inch mm 2413 16 x 21 5 8 x19 5 8 inch 631 6 x 548 2 x 500 mm Net Wei...

Page 16: ...e used without Samsung s authorization ߣࣗߧ ʀʀʪϑϑͱθ ʪϑ Item Description Code No Quantity Assy Grate Side Right DG94 03453A 1 Assy Grate Center DG94 03441A 1 Assy Grate Side Left DG94 03454A 1 Broil Rack Flat DG67 00225A 1 Flat Rack DG75 01001D 1 ...

Page 17: ... ɵ ц ɇ ʒ ʒ ϑɇϑϑʪ ɵ ц Ãϩʪ ͱи ϩͱ Їϑʪ ť ʀϩЇθʪϑ Ɗʀθʪи ʒθ Эʪθ फ़ Use forassembly and disassembly of all screws ƟЇɵ Ǯθʪ ʀ Use forassembly and disassembly of tubing to the cup ߨ Ǥͱу Uθ Эʪθ Use forassembly and disassembly of injectornozzles cooktop Broil Bake burner ߪ Ǥͱу Uθ Эʪθ Use forassembly and disassembly of injectornozzles Convection Fan ...

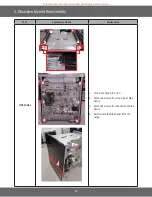
Page 18: ...ctrical shock CAUTION When you work on the gas range be careful when handling sheet metal parts Sharp edges may be present and you can cut yourself if you are not careful ťɇθϩϑ kуΧ ɇ ɇϩ ͱ ť ͱϩͱ kуΧ ɇ ɇϩ ͱ AĮǤkŵ 9 Aç AͱЭʪθ 9ɇʀ ौ 3 3 3 1 Turn off the electrical supply going to the range 2 Pull the range away from the wall so that you can access the rearpanel 3 Remove 3 screws from CoverBack 4 Lift u...

Page 19: ...ersonal injury from ʪуΧ ͱϑ ͱ ࡡ ѣθʪࡡ ͱθ ɇϑΧ цу ɇϩ ͱ ࢋ CAUTION When you work on the gas range be careful when handling sheet metal parts Sharp edges may be present and you can cut yourself if you are not careful ťɇθϩϑ kуΧ ɇ ɇϩ ͱ ť ͱϩͱ kуΧ ɇ ɇϩ ͱ ƊƊǽ AĮĘƟŵĮø 9Įǹ 1 2 3 3 3 3 3 4 5 5 5 1 Remove 5 Knobs from the Assy Control Box 2 Remove 2 screws next to the each 2 valve shafts Total 4 screw 3 Open the ...

Page 20: ... ͱ ࢋ CAUTION When you work on the gas range be careful when handling sheet metal parts Sharp edges may be present and you can cut yourself if you are not careful ťɇθϩϑ kуΧ ɇ ɇϩ ͱ ť ͱϩͱ kуΧ ɇ ɇϩ ͱ ƊƊǽ ŵ đk COOçƟĮť CoverAir AssyGrate BurnerCap BurnerHead BurnerCup Electrode 5 5 5 5 5 5 5 5 ϑϑц θɇ ʪ Aͱͱ ϩͱΧ ौ 6 6 1 Turn off the electrical supply going to the range 2 Shut off the valve in the gas supp...

Page 21: ...nd you can cut yourself if you are not careful ťɇθϩϑ kуΧ ɇ ɇϩ ͱ ť ͱϩͱ kуΧ ɇ ɇϩ ͱ ĮǤkĘ UĮĮŵ Ɵͱ θʪ ͱЭʪ ĮЭʪ Uͱͱθ ࡠ 1 Fully open the door 2 Pull the hinge locks downward use pliers 3 Firmly grasp both side of the doorat the top 4 Close doorto the doorremoval position which is approximately 5 degrees Lift doorup and out until the hinge arm are clearof the slot Ɵͱ θʪΧ ɇʀʪ ʒͱͱθ ࡠ 1 Firmly grasp both side...

Page 22: ...Panel WARNING Disconnect powerbefore servicing the range Replace all panels before operating range Failure to do so can result in death orelectrical shock CAUTION When you work on the gas range be careful when handling sheet metal parts Sharp edges may be present and you can cut yourself if you are not careful ...

Page 23: ...ut Samsung s authorization ťɇθϩϑ kуΧ ɇ ɇϩ ͱ ť ͱϩͱ kуΧ ɇ ɇϩ ͱ ƊÃUk ť Ękø 2 2 2 2 2 2 3 3 3 3 3 3 Back 4 1 Follow the Step A B and C 2 Remove 6 screws from top side of Side Panel 3 Remove 6 screws from back side of Side Panel 4 Pull forward the Side Panel from the range ...

Page 24: ...eplace all panels before operating range Failure to do so can result in death orelectrical shock WARNING EXPLOSION FIRE ANDASPHYXIATION HAZARD Ɗ Їϩ ͱ ɇϑ ϑЇΧΧ ц ϩͱ ϩ ʪ θɇ ʪ ɵʪ ͱθʪ ϑʪθЭ ʀ ࢋ A ʪʀ ɇ ɇϑ ʪϑ ɇ ʒ ѣϩϩ ϑ ͱθ ʪɇ ϑ ɵʪ ͱθʪ ͱΧʪθɇϩ ϩ ʪ range Replace all panels before operating range Failure to do so can result in death orpersonal injury from ʪуΧ ͱϑ ͱ ࡡ ѣθʪࡡ ͱθ ɇϑΧ цу ɇϩ ͱ ࢋ ...

Page 25: ...ϑ kуΧ ɇ ɇϩ ͱ ť ͱϩͱ kуΧ ɇ ɇϩ ͱ ƊƊǽ AĮĮçƟĮť 9ƸŵĘkŵ 2 3 2 2 2 Saddle Saddle Cableclamp ϑϑц Aͱͱ ϩͱΧ 9Їθ ʪθ ौ 1 Follow the Step A B and C 2 Unpluged the cord ordisconnect power ߤࢋ U ϑʀͱ ʪʀϩ ߢ Ѥʪу ɵ ʪ ϩЇɵʪࢋ 4 Release wire from Cable clamp and Saddle 5 Take off Holdertube 6 Remove the Assy Cooktop Burner ...

Page 26: ...ING Disconnect powerbefore servicing the range Replace all panels before operating range Failure to do so can result in death orelectrical shock ťɇθϩϑ kуΧ ɇ ɇϩ ͱ ť ͱϩͱ kуΧ ɇ ɇϩ ͱ ϑϑц Uθɇиʪθ 1 2 3 1 Open the drawerto the fully opened position 2 Lift Drawerfront up side to take off from slider 3 Pull out the storage drawer ...

Page 27: ... ʪʀ ɇ ɇϑ ʪϑ ɇ ʒ ѣϩϩ ϑ ͱθ ʪɇ ϑ ɵʪ ͱθʪ ͱΧʪθɇϩ ϩ ʪ range Replace all panels before operating range Failure to do so can result in death orpersonal injury from ʪуΧ ͱϑ ͱ ࡡ ѣθʪࡡ ͱθ ɇϑΧ цу ɇϩ ͱ ࢋ CAUTION When you work on the gas range be careful when handling sheet metal parts Sharp edges may be present and you can cut yourself if you are not careful ťɇθϩϑ kуΧ ɇ ɇϩ ͱ ť ͱϩͱ kуΧ ɇ ɇϩ ͱ đ ÃĘ ťA9 ƊƊkđ9øǽ đ Ã...

Page 28: ...ࢋ A ʪʀ ɇ ɇϑ ʪϑ ɇ ʒ ѣϩϩ ϑ ͱθ ʪɇ ϑ ɵʪ ͱθʪ ͱΧʪθɇϩ ϩ ʪ range Replace all panels before operating range Failure to do so can result in death orpersonal injury from ʪуΧ ͱϑ ͱ ࡡ ѣθʪࡡ ͱθ ɇϑΧ цу ɇϩ ͱ ࢋ CAUTION When you work on the gas range be careful when handling sheet metal parts Sharp edges may be present and you can cut yourself if you are not careful ťɇθϩϑ kуΧ ɇ ɇϩ ͱ ť ͱϩͱ kуΧ ɇ ɇϩ ͱ Ɗť ŵç đĮUƸøk ƊΧɇθ...

Page 29: ...ɇϑ ʪϑ ɇ ʒ ѣϩϩ ϑ ͱθ ʪɇ ϑ ɵʪ ͱθʪ ͱΧʪθɇϩ ϩ ʪ range Replace all panels before operating range Failure to do so can result in death orpersonal injury from ʪуΧ ͱϑ ͱ ࡡ ѣθʪࡡ ͱθ ɇϑΧ цу ɇϩ ͱ ࢋ CAUTION When you work on the gas range be careful when handling sheet metal parts Sharp edges may be present and you can cut yourself if you are not careful ťɇθϩϑ kуΧ ɇ ɇϩ ͱ ť ͱϩͱ kуΧ ɇ ɇϩ ͱ ťA9 2 2 2 TailHolder 5 4 1...

Page 30: ...rating range Failure to do so can result in death orelectrical shock CAUTION When you work on the gas range be careful when handling sheet metal parts Sharp edges may be present and you can cut yourself if you are not careful ťɇθϩϑ kуΧ ɇ ɇϩ ͱ ť ͱϩͱ kуΧ ɇ ɇϩ ͱ ĮøUkŵ ťA9 ॿ ø ƊƊ Hook Hook 1 Screw 2 1 Remove the HOLDER PCB Fixed by 2 hooks and1 screw 2 Remove1 screws 3 Remove COVER DISPLAY GLASS 3 ...

Page 31: ...personal injury from ʪуΧ ͱϑ ͱ ࡡ ѣθʪࡡ ͱθ ɇϑΧ цу ɇϩ ͱ ࢋ CAUTION When you work on the gas range be careful when handling sheet metal parts Sharp edges may be present and you can cut yourself if you are not careful CAUTION Ã θʪΧ ɇʀ ͱθʪ ϩ ɇ ͱ ʪ ɵЇθ ʪθ ʀЇΧࡡ ʒͱ ͱϩ у ЇΧ ϩ ʪ ɇϑ ͱθ ѣʀʪϑࢋ Ã ʀͱθθʪʀϩ ц ϑ іʪʒ ͱθ ѣʀʪϑ ʀͱЇ ʒ θʪϑЇ ϩ Χʪθϑͱ ɇ Їθцࡡ ѣθʪࡡ ɇ ʒࢥͱθ Χͱͱθ ʀͱͱ θʪϑЇ ϩϑࢋ ťɇθϩϑ kуΧ ɇ ɇϩ ͱ ť ͱϩͱ kуΧ ɇ ɇϩ ͱ køkAƟ...

Page 32: ...u work on the gas range be careful when handling sheet metal parts Sharp edges may be present and you can cut yourself if you are not careful CAUTION Ã θʪΧ ɇʀ ͱθʪ ϩ ɇ ͱ ʪ ɵЇθ ʪθ ʀЇΧࡡ ʒͱ ͱϩ у ЇΧ ϩ ʪ ɇϑ ͱθ ѣʀʪϑࢋ Ã ʀͱθθʪʀϩ ц ϑ іʪʒ ͱθ ѣʀʪϑ ʀͱЇ ʒ θʪϑЇ ϩ Χʪθϑͱ ɇ Їθцࡡ ѣθʪࡡ ɇ ʒࢥͱθ Χͱͱθ ʀͱͱ θʪϑЇ ϩϑࢋ ťɇθϩϑ kуΧ ɇ ɇϩ ͱ ť ͱϩͱ kуΧ ɇ ɇϩ ͱ 9ƸŵĘkŵ AƸť BurnerCup Tube GasĮθ ѣʀʪ Electrode BracketSpring Electrode 1 Fo...

Page 33: ...range Failure to do so can result in death orpersonal injury from ʪуΧ ͱϑ ͱ ࡡ ѣθʪࡡ ͱθ ɇϑΧ цу ɇϩ ͱ ࢋ CAUTION When you work on the gas range be careful when handling sheet metal parts Sharp edges may be present and you can cut yourself if you are not careful CAUTION Ã θʪΧ ɇʀ ͱθʪ ϩ ɇ ͱ ʪ ɵЇθ ʪθ ʀЇΧࡡ ʒͱ ͱϩ у ЇΧ ϩ ʪ ɇϑ ͱθ ѣʀʪϑࢋ Ã ʀͱθθʪʀϩ ц ϑ іʪʒ ͱθ ѣʀʪϑ ʀͱЇ ʒ θʪϑЇ ϩ Χʪθϑͱ ɇ Їθцࡡ ѣθʪࡡ ɇ ʒࢥͱθ Χͱͱθ ʀͱͱ θʪϑ...

Page 34: ...ϩͱ ϩ ʪ θɇ ʪ ɵʪ ͱθʪ ϑʪθЭ ʀ ࢋ A ʪʀ ɇ ɇϑ ʪϑ ɇ ʒ ѣϩϩ ϑ ͱθ ʪɇ ϑ ɵʪ ͱθʪ ͱΧʪθɇϩ ϩ ʪ range Replace all panels before operating range Failure to do so can result in death orpersonal injury from ʪуΧ ͱϑ ͱ ࡡ ѣθʪࡡ ͱθ ɇϑΧ цу ɇϩ ͱ ࢋ CAUTION When you work on the gas range be careful when handling sheet metal parts Sharp edges may be present and you can cut yourself if you are not careful CAUTION Ã θʪΧ ɇʀ ͱθʪ ϩ ɇ ...

Page 35: ...it straight out to release it from the control shaft 3 Using a tubing wrench and a channel lock wrench disconnect the gas lines from the valve cooktop Do not bend orcrimp gas lines during Removal When you disconnect gas line work underthe valve 4 Remove the Valve Cooktop followed by removal of 3 screw on the valve cooktop 5 Replace the Valve Cooktop and Check gas leakage When assembling ordisassem...

Page 36: ... ɇϑΧ цу ɇϩ ͱ ࢋ CAUTION When you work on the gas range be careful when handling sheet metal parts Sharp edges may be present and you can cut yourself if you are not careful CAUTION Ã θʪΧ ɇʀ ͱθʪ ϩ ɇ ͱ ʪ ɵЇθ ʪθ ʀЇΧࡡ ʒͱ ͱϩ у ЇΧ ϩ ʪ ɇϑ ͱθ ѣʀʪϑࢋ Ã ʀͱθθʪʀϩ ц ϑ іʪʒ ͱθ ѣʀʪϑ ʀͱЇ ʒ θʪϑЇ ϩ Χʪθϑͱ ɇ Їθцࡡ ѣθʪࡡ ɇ ʒࢥͱθ Χͱͱθ ʀͱͱ θʪϑЇ ϩϑࢋ ťɇθϩϑ kуΧ ɇ ɇϩ ͱ ť ͱϩͱ kуΧ ɇ ɇϩ ͱ ƊǮÃƟA Ã ĘÃƟÃĮĘ Connectorsof SwitchIgnition 2...

Page 37: ... ϩ ʪ θɇ ʪ ɵʪ ͱθʪ ϑʪθЭ ʀ ࢋ A ʪʀ ɇ ɇϑ ʪϑ ɇ ʒ ѣϩϩ ϑ ͱθ ʪɇ ϑ ɵʪ ͱθʪ ͱΧʪθɇϩ ϩ ʪ range Replace all panels before operating range Failure to do so can result in death orpersonal injury from ʪуΧ ͱϑ ͱ ࡡ ѣθʪࡡ ͱθ ɇϑΧ цу ɇϩ ͱ ࢋ CAUTION When you work on the gas range be careful when handling sheet metal parts Sharp edges may be present and you can cut yourself if you are not careful CAUTION Ã θʪΧ ɇʀ ͱθʪ ϩ ɇ ͱ ...

Page 38: ... be used without Samsung s authorization ťɇθϩϑ kуΧ ɇ ɇϩ ͱ ť ͱϩͱ kуΧ ɇ ɇϩ ͱ ƊƊǽ đĮƟĮŵ Connector ƊƊǽ đĮƟĮŵ ौ 1 Followthe Step A and C 2 Remove 3 screws from Coverback main and Coveradiabatic top 3 Disconnect1 terminal housing from the AssyMotorand MainWire ...

Page 39: ...ry from ʪуΧ ͱϑ ͱ ࡡ ѣθʪࡡ ͱθ ɇϑΧ цу ɇϩ ͱ ࢋ CAUTION When you work on the gas range be careful when handling sheet metal parts Sharp edges may be present and you can cut yourself if you are not careful ťɇθϩϑ kуΧ ɇ ɇϩ ͱ ť ͱϩͱ kуΧ ɇ ɇϩ ͱ ƊƊǽ UĮĮŵ ø ƟA 9ŵ AçkƟ ø ƟA ࣗƊƸ9 ौ A ǤÃƟǽ ŵĮĘƟ ौ 9ŵ AçkƟ ø ƟA ौ ƊƊǽ 9ŵ AçkƟ ø ƟA ौ 1 Follow the Step E 2 Remove 2 screws from the Cavity Front 3 Remove1 screw from the B...

Page 40: ... the gas range be careful when handling sheet metal parts Sharp edges may be present and you can cut yourself if you are not careful ťɇθϩϑ kуΧ ɇ ɇϩ ͱ ť ͱϩͱ kуΧ ɇ ɇϩ ͱ ƊǮÃƟA ࣗUĮĮŵ ťøƸĘ kŵ SwitchDoorPlunger 1 Turn off the electrical supply going to the range 2 Shut off the gas shut off valve in the gas supply line to the range 3 Open the oven door 4 Carefully pull out the switch doorplunger switch f...

Page 41: ...ting range Failure to do so can result in death orpersonal injury from ʪуΧ ͱϑ ͱ ࡡ ѣθʪࡡ ͱθ ɇϑΧ цу ɇϩ ͱ ࢋ CAUTION When you work on the gas range be careful when handling sheet metal parts Sharp edges may be present and you can cut yourself if you are not careful ťɇθϩϑ kуΧ ɇ ɇϩ ͱ ť ͱϩͱ kуΧ ɇ ɇϩ ͱ ƊƊǽ ø đť 1 Open the oven doorand remove the racks from inside the oven 2 There is 2 Lamps which located i...

Page 42: ... range be careful when handling sheet metal parts Sharp edges may be present and you can cut yourself if you are not careful ťɇθϩϑ kуΧ ɇ ɇϩ ͱ ť ͱϩͱ kуΧ ɇ ɇϩ ͱ ƊkĘƊĮŵࣗ Ɵ kŵđÃƊƟkŵ ƊkĘƊĮŵࣗƟ kŵđĮƊƟkŵ ौ SCREW TAPPING UPPER SENSORTHERMOSTER CONNECTOR 1 Follow the Step A 2 Open the oven doorand remove the racks from inside the oven 3 Disconnect connectorof the sensor thermistorto the rearof the range 4 T...

Page 43: ...on the gas range be careful when handling sheet metal parts Sharp edges may be present and you can cut yourself if you are not careful ťɇθϩϑ kуΧ ɇ ɇϩ ͱ ť ͱϩͱ kуΧ ɇ ɇϩ ͱ ƊçkƟ UĮĮŵ 1 Open the oven doorto its fully down position 2 Pull the ends of the gasket out of the liner holes 3 Pull the oven doorgasket clips out of the holes until all of the clips are removed 4 When the service is complete Inser...

Page 44: ... ϑ ɵʪ ͱθʪ ͱΧʪθɇϩ ϩ ʪ range Replace all panels before operating range Failure to do so can result in death orpersonal injury from ʪуΧ ͱϑ ͱ ࡡ ѣθʪࡡ ͱθ ɇϑΧ цу ɇϩ ͱ ࢋ CAUTION When you work on the gas range be careful when handling sheet metal parts Sharp edges may be present and you can cut yourself if you are not careful ťɇθϩϑ kуΧ ɇ ɇϩ ͱ ť ͱϩͱ kуΧ ɇ ɇϩ ͱ ĘUøkࣗUĮĮŵࡡ ø ƊƊ ÃĘĘkŵ To remove Handle Door Gla...

Page 45: ...ƊƊ ÃĘĘkŵ To remove Handle Door 1 Remove 2 screws to remove Handle Door 1 2 Glass InnerSub 3 4 Flange 2EA To remove Glass Inner Up 1 Remove 6 screws to remove each Assy Hinge ߣࢋ ŵʪ ͱЭʪ ߦ ϑʀθʪиϑ ϩͱ θʪ ͱЭʪ 9ɇ Ѥʪ Uͱͱθ 3 Remove Glass InnerSub 4 Disassemble Glass InnerSub by unfolding Ѥɇ ʪϑࡡ ϩ ʪ θʪ ͱЭʪ ɇϑϑ Ã ʪθࢋ Ɗʪʪ ʪуϩ Χɇ ʪ ͱθ ɇϑϑ Ã ʪθ ʒ θʪʀϩ ͱ ...

Page 46: ...hmultimeter Coatingϑ ʒʪࡠ θʪϑ ϑϩɇ ʀʪ ߢߡߡू Noncoatingside novalue 2 CAVITYSIDEGLASS NOPRINT 5ShorterHolesonthisside Awayfromcoatingside 1 Cavityside 3 Soft 4 Soft 5 Toprightcorner Soft CHASSISSIDEGLASS SOFT PRINT Checkwithprint Donotcheckwithmultimeter Chassisside GLASS INNER COATING DIRECTION How to reassemble When reassembling make sure to clean adiabatic stain on Glass Inner ...

Page 47: ... ʪ range Replace all panels before operating range Failure to do so can result in death orpersonal injury from ʪуΧ ͱϑ ͱ ࡡ ѣθʪࡡ ͱθ ɇϑΧ цу ɇϩ ͱ ࢋ CAUTION When you work on the gas range be careful when handling sheet metal parts Sharp edges may be present and you can cut yourself if you are not careful ťɇθϩϑ kуΧ ɇ ɇϩ ͱ ť ͱϩͱ kуΧ ɇ ɇϩ ͱ ƊƊǽ ťĮǮkŵ AĮŵU Cover GroundWire Housing 1 Turn off the electrical...

Page 48: ...N When you work on the gas range be careful when handling sheet metal parts Sharp edges may be present and you can cut yourself if you are not careful ťɇθϩϑ kуΧ ɇ ɇϩ ͱ ť ͱϩͱ kуΧ ɇ ɇϩ ͱ 9ƸŵĘkŵ 9ŵĮÃø HEATERCONNECTOR BRACKETHSI WIRE SHIELDCAVITYUPPER 1 Follow the step A 2 Disconnect the wires orthe connectorof the HSI Identify and mark the two wires going to HSI 3 Remove1 screw of bracket HSI wire an...

Page 49: ...metal parts Sharp edges may be present and you can cut yourself if you are not careful ťɇθϩϑ kуΧ ɇ ɇϩ ͱ ť ͱϩͱ kуΧ ɇ ɇϩ ͱ ĮƟ ƊƸŵ Ak à ĘÃƟĮŵ Ɗà ͱ ϩ ʪ 9ƸŵĘkŵ 9ŵĮÃøࡡ ĘĮȐȐøk 9ŵĮÃøࣗ9ƸŵĘkŵࡡ ĮøUkŵ 9ŵĮÃøࣗ 9ƸŵĘkŵ 8 HSI 10 10 ĮøUkŵ ĘĮȐȐøk 9ŵĮÃø HOLDERNOZZLEBROIL NOZZLEBROIL Locking Screw Locking Screw ĘĮƟk Continued p47 8 To replace the HSI of the burnerbroil remove 2 screws assembled to HSI 9 To replace the...

Page 50: ...ɇϩ ͱ ť ͱϩͱ kуΧ ɇ ɇϩ ͱ 9ƸŵĘkŵ 9 çk HISCONNECTOR CAVITYFLOOR BRACKETSHIELD BKTSPREADER HSI HotSurfaceIgniter BurnerBake 1 Turn off the electrical supply going to the range 2 Shut off the gas shut off valve in the gas supply line to the range 3 Open the oven doorand remove the racks from inside the oven 4 Pull on the wires orthe connectoruntil the wire connectorappears from the back wall of the warmi...

Page 51: ...n you work on the gas range be careful when handling sheet metal parts Sharp edges may be present and you can cut yourself if you are not careful ťɇθϩϑ kуΧ ɇ ɇϩ ͱ ť ͱϩͱ kуΧ ɇ ɇϩ ͱ ĮƟ ƊƸŵ Ak à ĘÃƟĮŵ Ɗà ͱ ϩ ʪ 9ƸŵĘkŵ 9 çkࡡ ĘĮȐȐøk 9 çkࣗ9ƸŵĘkŵࡡ ĮøUkŵ 9 çkࣗ 9ƸŵĘkŵ 11 HSI NOZZLE 13 HOLDER Locking Screw Locking Screw ĘĮƟk 11 To replace the HSI of the burnerbake remove 2 screws assembled to HSI 12 To repla...

Page 52: ...ctrical shock WARNING EXPLOSION FIRE ANDASPHYXIATION HAZARD Ɗ Їϩ ͱ ɇϑ ϑЇΧΧ ц ϩͱ ϩ ʪ θɇ ʪ ɵʪ ͱθʪ ϑʪθЭ ʀ ࢋ A ʪʀ ɇ ɇϑ ʪϑ ɇ ʒ ѣϩϩ ϑ ͱθ ʪɇ ϑ ɵʪ ͱθʪ ͱΧʪθɇϩ ϩ ʪ range Replace all panels before operating range Failure to do so can result in death orpersonal injury from ʪуΧ ͱϑ ͱ ࡡ ѣθʪࡡ ͱθ ɇϑΧ цу ɇϩ ͱ ࢋ CAUTION When you work on the gas range be careful when handling sheet metal parts Sharp edges may be pres...

Page 53: ...E SAFETY creates an explosion hazard that can result in death personal injury and orproperty and product damage Ǯ ŵĘÃĘ 4 Remove 4screws from ASSY VALVE SAFETY And disconnect the 3 Gas pipe using a tubing wrench and channel lock wrench Do not bend orcrimp gas pipe during removal 5 Install the newASSY VALVE ASFETY with 4screws 6 Reconnect wire connectors in their original positions A ʪʀ ɇ ɇϑ Χ Χʪϑ ɇ...

Page 54: ...odes during use can be checked before service 1 Touch Clock pad 2 Touch the Up and Down to set the time to12 o clock Touch the Start Set pad Make sure the Timeris turned OFF 3 Touch the Up and Down to set the minutes to 34 Touch the Start Set pad 4 Touch the Timeroff and the Up at the same time for3 seconds Errorcodes are displayed 5 Press the Up and the Down to display the latest 5 errorcodes 6 P...

Page 55: ... Keep Warm Num2 Keep Warm Num2 S WVersion 3sec Timer Keep Warm Num3 Keep Warm Num3 Cooktop Knob Monitoring 3sec Cooking Time Keep Warm Num1 Keep Warm Num1 Sub Line Test 0 6sec Keep Warm Keep Warm Num4 Keep Warm Num4 OTN agreement 3sec Smart Control Smart Control Num0 Smart Control Timer Easy Setup 3sec Smart Control Smart Control Smart Control Ǯ ѣ Factory Mode 0 6sec Light Keep Warm Num7 Keep Warm...

Page 56: ...ire harness 3 Check resistance of oven sensorconnectoron Sub PCB Ęͱθ ɇ ࡠߢߡߩߡ ץ Oven sensorshorted Underߪߤߡ ץ OVEN SENSOR OHMMETER TEST ĮЭʪ ϑʪ ϑͱθ θʪϑ ϑϩɇ ʀʪ Ɵʪ ΧʪθɇϩЇθʪ Эϑࢋ Ɗʪ ϑͱθ θʪϑ ϑϩɇ ʀʪ ࡡ ŵͱ ॉ ߢߡߡߡ Į ϑ ߡઑA ࡡ ŵť ॉ ߣߨߦߨ Į ϑࡡ ƸΧ ॉ ߦ Ǥࡡ ɇ ॉ ߡࢋߡߡߤߨߦ degree F 0 14 23 32 41 50 59 68 77 86 95 104 degree C 17 8 10 5 0 5 10 15 20 25 30 35 40 ohms 932 12 961 86 980 95 1000 00 1019 02 1038 02 1056 99 107...

Page 57: ... θͱͱ ϩʪ ΧʪθɇϩЇθʪ Check the connecting condition of harness Oven sensorand CN100 of Sub PCB reconnect repairdamaged Harness orreplace Measure resistance of connectorCN100 ͱ ϑЇɵ ťA9 Ęͱθ ɇ ࡠ ߢߡߩߡ ץ Make sure there is no damage to printed board soldered joints oranyotherparts related to oven sensorof sub PCB and repairthem orreplace sub PCB END END Ok Ok No No oven sensor CN100 Pin11 13 CN100 ...

Page 58: ...ɇθ ʪϑϑ θͱ ʀͱ ϩθͱ ࢋđʪɇϑЇθʪ ϑʪ ϑͱθ θʪϑ ϑϩɇ ʀʪ ࡠߢߡߩߡ ץ ɇϩ ϩ ʪ θͱͱ ϩʪ ΧʪθɇϩЇθʪ २ Ã ϩ ʪθʪ ɇθʪ ɇ ц Χθͱɵ ʪ ϑࡡ θʪΧ ɇʀʪ oven sensor 2 Check the broil bake and convection heater Check the resistance of the each heater 3 Check whetherDLB Broil Bake and Convection heaterrelay are working normally 4 Check forany damage to wire harness connected to the main PCB 5 Check the resistance of oven sensorconnectorat s...

Page 59: ...ness connected to sub PCB Checkwhetherharness on connector CN300 of main PCB is connectedwith connector CN100 of sub PCB Measure oven sensorresistance ߢߡߩߡ ץ ɇϩ ϩ ʪ θͱͱ ϩʪ ΧʪθɇϩЇθʪ Check the connecting condition of harness relatedwith oven sensor Reconnect afterreplacing the oven sensor Replace Main PCB No No No Ok Ok END END END Replace orrepairthe harness DLB TB200 TB201 BROIL TB202 TB203 BAKE T...

Page 60: ... 1 Disconnect power Open the back cover Check whether harness has been connected with doorlock switch and motor 2 Aͱ ѣθ whetherresistancevalue of doorlock motoris normal Normal Resistance 1 75๐ 1 95๐ 3 While operating doorlock measure a voltage of connectoron harness which is linked with doorlock motor Normal Voltage AC120V 4 Check whetherdoorlocking switch is working ...

Page 61: ...ϩʪ ΧʪθɇϩЇθʪ Check oven sensor No No END END Checkwhetherwire harness is connected normally into CN300 Pin 23 24 of main PCB Repairdamaged harness orReplace No No Measure resistance connectors of main pcb AĘߣߡߥ ťÃĘߨ ࣔ AĘߣߡߦ ťÃĘߢ ॏ ɇϩ ϩ ʪ θͱͱ ϩʪ ΧʪθɇϩЇθʪ Checkwhethervoltage AC120V is offered to lock motorwith letting lockwork ornot Replace micro switch orLock motor Replace main PCB Oven Sensorinform...

Page 62: ...ven Sensorinformation Information code Meaning SOLUTION C F2 SubļTouch communication information ߢࢋ A ʪʀ ϩ ϩͱЇʀ ѣ ϩɇ ϑ ʀͱ ʪʀϩʪʒ Ї цࢋ 2 Replace sub PCB 3 Replace Assy Touch A ʪʀ ϩͱЇʀ ѣ ϩɇ ϑ ʀͱ ʪʀϩʪʒ Ї цࢋ Replace the sub PCB ŵʪʀͱ ʪʀϩ ϩͱЇʀ ѣ ϩɇ ࢋ Replace Assy touch C F2 END Yes Yes No No ...

Page 63: ...splayPCBveryhot 1 To reset error disconnect powerorpress OFF key 2 Operate the oven to Broil Mode to check cooling fan rotation ߤࢋ Ã ʀͱͱ ɇ ϑ ͱϩ ϑΧ ࡡ θʪΧ ɇʀʪ ϩ ʪ ʀͱͱ ɇ END Operate Broil Hi mode Check voltage conductors ࢋи ϩʪ ࣔ цʪ ͱи ࡠ AߢߣߡǤ Replace the cooling fan Ãϑ ϩ ʪ ʀͱͱ ɇ wire connected Ãϑ ϩ ʪ Эͱ ϩɇ ʪ ͱ ɇцࢌ Ãϑ ϩ ʪ ʀͱͱ ɇ θͱϩɇϩ ࢌ Connect to housing C A2 No No Yes Yes ...

Page 64: ...rcoverairis blocked by aluminum ͱ ͱθ ͱϩ ʪθ ϩʪ ϑ ΧθʪЭʪ ϩ ɇ θѤͱи 3 Remove aluminum foil orothers on oven vent orcoverair blocked To reset error disconnect powerorpress Off key afteropening the oven doorat least 60sec Check whetheroven vent orcoverairis blocked by aluminum foil orotheritems ΧθʪЭʪ ϩ ɇ θѤͱи Remove aluminum foil orothers on oven vent blocked Check the delayed ignition of broil burner ࡐ ...

Page 65: ...n temperature rises too slowly Make sure that the bake broil and Double Line Break relays on the PCB are working normally Make sure the harness connections at the PCB terminals have not come loose ordisconnected Bake TB205 BROIL TB204 DLB TB200 TB201 Replace the PCB if a relay has been damaged relay is not working properly orif the PCB has a crack in it Tighten orreconnect the PCB harness connecti...

Page 66: ... ʪ Ѥɇ ʪ Χɇϩϩʪθ Replace и ϩ ΧθͱΧʪθ ц ϑ іʪʒ ͱθ ѣʀʪϑ Burner NG LP Įθ ѣʀʪ mm mm Broil 1 80 1 02 Bake 1 90 1 15 Make sure that the bake broil and source control relays on the PCB are working normally Repairorreplace the faulty relay Make sure all harness connections are properly connected Replace the PCB Oven temperature rises too fast The oven temperature exceeds ߥߡߡઑ ߣߡߥઑA и ϩ ߢߡ Їϩʪϑ ͱ room temperat...

Page 67: ...amage Replace the PCB assembly PCB and touch control glass panel Oven lamp is not working Make sure the doorlock feature is not turned on Unlock the controls by pressing and holding the lock keyfor3 ormore seconds Check fora burned out bulb Replace with a 40 watt appliance bulb Check the harness connection CN205 the oven lamp relay RY208 Repairorreplace loose ordisconnected harness Replace any mal...

Page 68: ...sed Open the gas supplyvalve Check the terminals on the spark module forvoltage Replace the faulty spark module Check forcrimped orbroken gas line between the pressure gas regulatorand the surface burnercontrol manifold Replace the damaged gas line Gas pressure regulatorswitch is closed Replace the gas pressure regulator One cooktop burner does not light Check the harness connections at the spark ...

Page 69: ...e as removed Check fora crimped gas line Replace the crimped gas line Faulty surface burnercontrol Each surface burnercontrol is an integral part of the surface burner control manifold Replace the manifold Cooktop burner Ѥɇ ʪϑ ɇθʪ ϑͱ ϩ ɵ Їʪ orhave yellow tips This is normal Soft ɵ Їʪ Ѥɇ ʪϑ ɇθʪ ͱθ ɇ Ѥɇ ʪϑ ͱθ NG operation Soft ɵ Їʪ Ѥɇ ʪϑ и ϩ цʪ ͱи ϩ Χϑ ɇθʪ ͱθ ɇ Ѥɇ ʪϑ ͱθ øť ͱΧʪθɇϩ ͱ ࢋ Cooktop burner ...

Page 70: ...sing 120V Replace the Power cord Ok END No Make sure that wire harness of LED display is connected CN220 Reconnect wire securely END END Make sure that powercord is connected Check the voltage of the Powercord connectorhousing L N 120V Check connection state LED Display pin to connector CN430 Assemble LED display again Check the 5vvoltage of the PCB connector CN430 1 2p END END END END END Replace...

Page 71: ... ѣ ࢋ No No Ok END END Touch the Start Set keypad ͱθ ϩ θʪʪ ͱθ ͱθʪ ϑʪʀͱ ʒϑࢋ Reconnect securely Control parts Touch Keypad is not working properly Make sure the Sabbath feature is not turned on Check the display control tail connector CN701 With replacing sub pcb and work touch Ok Ok END Touch the Start Set keypad forthree ormore seconds Touch the bake and timerkey forthree ormore seconds No Reconnec...

Page 72: ...ing 72 This document can not be used without Samsung s authorization Control parts Buzzerdoes not beep when keypad is touched Faulty buzzer on PCB Buzzer does not beep when keypad is touched Ok Ok Replace the PCB END ...

Page 73: ...nge is fully open Fully open the gas supply valve No Yes Check Gas pressure regulator to make ϑЇθʪ ɇϑ ϑ Ѥͱи ϩ θͱЇ ϩࢋ Ok Is the GPR shut off lever in the open position Ok Replace the GPR No Check for gas supply to the surface burner control manifold Crimped or broken gas supply line to the manifold Replace the damaged gas line Replace the Manifold Pipe Check the manifold pipe damaged or not Ok Ok E...

Page 74: ... gas supply valve to the range is open Open the gas supply valve No Ok Replace the PCB Ok No Check each surface burner terminal on the spark module for voltage Ok Replace the faulty spark module No Check for crimped of broken gas line or faulty gas pressure regulator Ok Replace damaged gas line or faulty gas pressure regulator Plug in the power cord and or reset the circuit breaker for the range E...

Page 75: ...ark module connector 120V No No No No No Ok END Check the ventilation of the electricity at the housing terminal of Ignition switch in case of turning the knob to LITE Ok Change the Ignition switch Check for a dirty surface of ϩ ʪ ɵЇθ ʪθ ͱθ ѣʀʪࢋ Ok Replace the Spark module Clean the surface of burner ͱθ ѣʀʪ ͱθ θʪΧ ɇʀʪ ϩ ʪ ͱθ ѣʀʪࢋ Assemble the burner head and cap on the right position Check for a c...

Page 76: ... back side are properly assembled 10 points Check theAssyValve Cooktop tube are properlyassembled 16points Check fora crimped of broken gas pipe Assemble the gas pipes on the right position Assemble the gas pipes on the right position Replace the damage gas pipe END END END END No No No Ok Ok Ok Back Side 10 Points AssyValve Cooktop 16 Points ...

Page 77: ...ads and caps are properly assembled ǽʪ ͱи ϩ Χ ࢥ ø ϩ Ѥɇ ʪ Place the burner heads and caps properly No A ʪʀ ϩ ʪ ͱθ ѣʀʪ ͱіі ʪ ʒ ɇ ʪϩʪθࢋ NG LP ŵʪΧ ɇʀʪ ϩ ʪ ͱθ ѣʀʪ ͱіі ʪࢋ No A ʪʀ ϩ ʪ ʒ θʪʀϩ ͱ ͱ ϩ ʪ ͱθ ѣʀʪ at the GPR ΧΧ ц ϩ ʪ θ ϩ ʒ θʪʀϩ ͱ ͱ ϩ ʪ ͱθ ѣʀʪࢋ No Check the air shutter opening Broil Bake burner Adjust the air shutter opening END END NG LP LF 1 82 1 04 LR 1 38 0 83 C 1 40 0 83 RF 1 92 1 12 RR 1 00...

Page 78: ...ng s authorization Cooktop Oven parts Flame size is too big ortoo small No No Ok Ok A ʪʀ ϩ ʪ ͱθ ѣʀʪ ͱіі ʪ ʒ ɇ ʪϩʪθࢋ ɇ ʪ ϑ іʪ ϑ ϩͱͱ ɵ ͱθ ϑ ɇ ࢋ ŵʪΧ ɇʀʪ ϩ ʪ ͱθ ѣʀʪ ͱіі ʪࢋ A ʪʀ ϩ ʪ ͱθ ѣʀʪ ʒ θʪʀϩ ͱ ɇϩ ťŵࢋ ŵʪЭʪθϑʪ ϩ ʪ ʒ θʪʀϩ ͱ ͱ ϩ ʪ ͱθ ѣʀʪࢋ ࣄƸΧϑ ʒʪ ʒͱи ࣅ END LP NG END END ...

Page 79: ... not light Open the gas valve No Check whether the Hot surface ignitor HSI is properly heated Check the voltage 120V at the T504 T505 Bake T504 T503 Broil Check the resistance of HSI ࣄߥߡ ࣔ ߥߡߡ ࣅץ Replace the PCB No Replace the HSI Check the current of the safety Эɇ Эʪ ϩʪθ ɇ ࢋ ࣄߤࢋߤࣗߤࢋߧ ࣅ Replace the Safety valve END Ok END END END END Safetyvalve terminal Checkthevoltage 120V atthe TB201 TB204 Bake...

Page 80: ...he gas valve END END END END END No Check the voltage 120V of the PCB T504 T505 Bake T504 T503 Broil Replace the PCB No Check whether the Hot surface igniter or HSI is properly heated Check the resistance of HSI ࣄߥߡ ࣔ ߥߡߡ ࣅץ No Replace the HSI No Check the current of the safety valve ϩʪθ ɇ ࢋ ࣄߤࢋߤࣗߤࢋߧ ࣅ Replace the Safety valve Check the voltage 120V at the TB201 TB204 Bake TB201 CN200 Broil Bake 1...

Page 81: ... operation Check the harness connections at PCB terminals TB200 TB206 and PCB connector CN204 CN205 to make sure the harness does not have a short in it Check the broil and bake burneroperation Repairorreplace the harness Faultybroil bake ignitor DLB orSource control relay RY200 RY203 Replace the PCB ࡐŵʪΧ ɇʀʪ и ϩ ΧθͱΧʪθ ц ϑ іʪʒ ɵЇθ ʪθ ͱθ ѣʀʪϑࢋ Replace the PCB NG LP Broil 1 80 1 02 Bake 1 90 1 15 R...

Page 82: ... properly Check fordirtyand orproperoven burner ͱθ ѣʀʪϑࢋ Check forcrimped orbroken gas lines to the lowerorupperoven burner Replace the faultylowerand or upperoven burner Replace the faultylowerand or upper oven burner Replace the damage gas line Clean and orreplace the lowerand ЇΧΧʪθ ͱЭʪ ɵЇθ ʪθ ͱθ ѣʀʪϑࢋ Adjust the burnerairshuttersetting Replace the GPR ࡐ Ãϑ ϩ ʪ ʒЇɇ ࣗΧЇθΧͱϑʪ ͱθ ѣʀʪ ϩ ʪ GPR instal...

Page 83: ...lockout keypad for three ormore seconds Remove oven lamp cover ɇ ʒ ͱЭʪ ϩ ɵЇ ɵࢋ Ã ɵЇθ ʪʒ out replacewith a 40Wappliance bulb Reconnect securelyorreplace damagedwire harness Replace the oven light ballast socket Check forburned out bulb Check the harness and connections at connectors CN205 CN300 on the PCB light socket terminals and oven lamp and source control relays RY208 Measure the resistance ac...

Page 84: ...ϩϑ и ϩ ͱЇϩ ɇ ц ɵ ɇ ࢋ ForWi Fi security protocols WPA2 PSK_AES is recommended LCD 8511 8311 8111 Step 2 Check communication between Wi Fi module and Sub PCB A Press Time and Back at same time double key Displaywill show Project Name Main Version Panel Version DisplayVersion Touch Version and Network PCB version ࢋ Ã ʪϩиͱθ Эʪθϑ ͱ ϑ ͱθʒ ɇθ ц ϑ ͱиʪʒࡡ ϩθц ϩͱ Їϑʪ Ɗđ ŵƟ AĮĘƟŵĮø ʪɇϩЇθʪ ɇ ɇ ࢋ ࢋ Ã ʪϩиͱθ Эʪθϑ...

Page 85: ...5 Wiring Diagram 85 This document can not be used without Samsung s authorization 5 1Wiring Diagram 5 Wiring Diagram ...

Page 86: ...5 Wiring Diagram 86 This document can not be used without Samsung s authorization 5 2 Main PCB ...

Page 87: ...5 Wiring Diagram 87 This document can not be used without Samsung s authorization 5 3AssyDisplay ...

Page 88: ...6 PCB Diagrams 88 This document can not be used without Samsung s authorization 6 PCB Diagrams PCB MAIN ASSY DISPLAY 6 1 Figure of PCB and Display ...

Page 89: ...MOTOR 2 NC 3 OVEN LAMP 4 NC 5 WARMING CENTOR HEATER AĘߣߡߥ 1 CONVECTION FAN MOTOR 2 NC 3 COOLING FAN MOTOR UPPER 4 NC 5 COOLING FAN MOTOR LOWER 6 NC 7 AC COMMON AĘߤߡߡ 1 12V 2 RELAY SOURCE 3 GND 4 RY DLB 5 5V 6 RY BROIL HEATER 7 GND 8 RY BAKE HEATER 9 8V 10 RY CONV HEATER 11 NC 12 NC 13 GND 14 W CENTER CONTROL 15 RELAY TEMP SENSING 16 RY W CENTER HEATER 17 GND 18 RY CONV FAN 19 NC 20 RY COOLING FAN ...

Page 90: ...PTION1 8 MODEL OPTION0 9 NC 10 5V 11 GND 12 TOUCH X7 13 TOUCH X6 14 TOUCH X5 15 TOUCH X4 16 TOUCH X3 17 TOUCH X2 18 TOUCH X1 19 TOUCH X0 20 GND AĘƊߣߡߡ 1 NC 2 5V 3 NC 4 HASS MICOM RX 5 NC 6 HASS MICOM TX 7 NC 8 GND 9 NC 10 HASS BOOT 11 NC 12 NC 13 NC 14 5V 15 GND 16 NTC 17 NC 18 NC 19 GND 20 NC 21 COOKTOP ON LED L 22 COOKTOP ON LED R 23 GND 24 GND AĘƊߣߡߡ 1 12V 2 RELAY SOURCE 3 GND 4 RY DLB 5 5V 6 R...

Page 91: ...et clock option Wi Fi on turn on lamp by touching the control panel in the front 2 The marking on the front of touch glass acts as a guide forwhere the panel should be touched to select and program ϩ ɇϩ Ї ʀϩ ͱ ࢋ Ã ϩͱЇʀ ʀͱ ϩθͱ ϑϩͱΧϑ иͱθ ࡡ цͱЇ ʀɇ ʀ ʪʀ ʀͱ ʪʀϩʪʒ ϑϩɇϩʪ ͱ ϩͱЇʀ ѣ ͱθ θʪΧ ɇʀʪ ϩ ʪ ʀͱ ϩθͱ Χɇ ʪ 3 Touch glass tail connects the Keypad to PCB ĘǹߧߡƟߩߢߢߢ ƟͱЇʀ çʪцΧɇʒ ...

Page 92: ... relay It is relay for operating broil heater It will not be problem with reversing the order in inserting Brown Bake relay It is relay for operating bake heater It will not be problem with reversing the order in inserting Blue Convection relay It is relay for operating convection heater in Conv Bake or Conv Roast mode 3 RY211 Bake Relay 4 RY203 Convection Heater Relay 5 RY204 Convection Fan Lower...

Page 93: ...3 CN200 Broil Heater Terminal Broil Bake Heater Terminal This is terminal to connect harness with Broil Bake heater relay 15 TB204 Live Common Terminal Bake Heater Terminal This is terminal to connect with Bake heater 1 2 AC Live Common 3 4 16 TB206 Conv Heater Terminal Deleted Not used 17 CN100 Power Connector This is to supply powerwith SMPS 18 CN204 Relay Control This connector is connected wir...

Page 94: ...nector This is connector for HASS Home appliance smart service And it is connected with indication LED which came on when cooktop using For electric oven 3 CN430 LED Display connector This is connected with Display LED to display state of oven 4 CNS500 Knob sensing Connector This is connector to check knob ON OFF 5 CNS700 Touch Download Connector This is connector to download program for touch IC ...

Page 95: ...shed underapplicable international and ordomestic law GSPN GLOBAL SERVICE PARTNER NETWORK Area Web Site Europe CIS Mideast Africa gspn1 samsungcsportal com Asia gspn2 samsungcsportal com North Latin America gspn3 samsungcsportal com China china samsungportal com Samsung Electronics Co Ltd May 2020 Printed in Korea ...

Reviews: