background image

26  English

W

arr
anty and servic

e

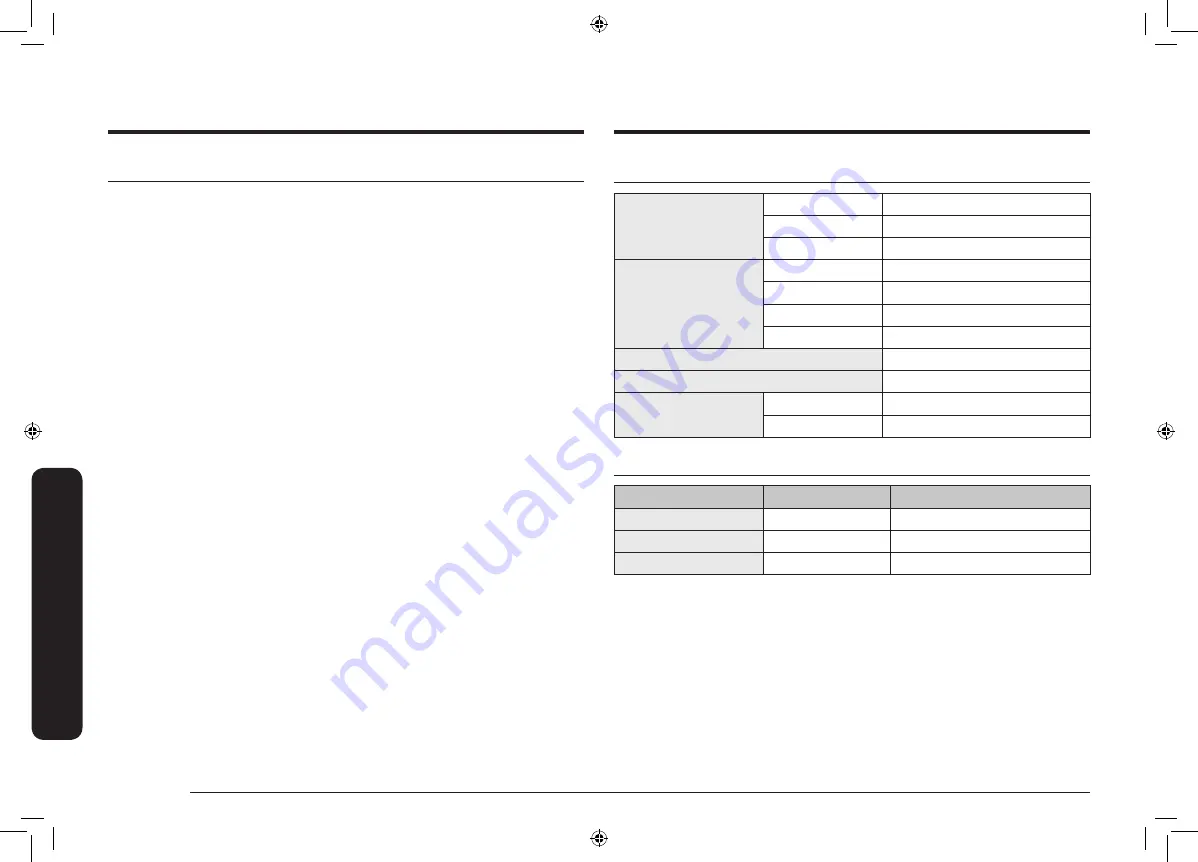
Technical data

Technical data

Appliance dimensions

Width

600 mm

Depth

520 mm

Height

56 mm

Worktop cut - out 
dimensions

Width

560 mm

Depth

490 mm

Height

72 mm

Corner radius

3 mm

Connection voltage

220 - 240 V ~ 50 / 60 Hz

Maximum connected load power

7.2 kW

Weight

Net

12.3 kg

Gross

15.1 kg

Cooking zones

Position

Diameter

Power

Right Front

210 mm

2200 W / Boost 3200 W

Right Rear

145 mm

1400 W / Boost 2000 W

Dual Power

280 mm

3600 W / Boost 5000 W

Service

Before calling for assistance or service, please check the section “Troubleshooting”. 
If you still need help, follow the instructions below.

Is it a technical fault?

If so, please contact your customer service centre.
Always prepare in advance for the discussion. This will ease the process of 
diagnosing the problem and also make it easier to decide if a customer service 
visit is necessary.
Please take note of the following information.

• 

What form does the problem take?

• 

Under what circumstances does the problem occur?

When calling, please know the model and serial number of your appliance. This 
information is provided on the rating plate as follows:

• 

Model description

• 

S/N code (15 digits)

We recommend that you record the information here for easy reference.

• 

Model: 

• 

Serial number:

When do you incur costs even during the warranty period?
• 

If you could have remedied the problem yourself by applying one of the 
solutions provided in the section “Troubleshooting”.

• 

If the customer service technician has to make several service calls because he 
was not provided with all of the relevant information before his visit and as a 
result, for example, has to make additional trips for parts. Preparing for your 
phone call as described above will save you the cost of these trips.

NZ63K5727BK_EF_DG68-00796A-00_EN.indd   26

3/2/2016   1:56:59 PM

Summary of Contents for NZ63K5727BK

Page 1: ...Induction Hob User manual NZ63K5727BK NZ63K5727BK_EF_DG68 00796A 00_EN indd 1 3 2 2016 1 56 52 PM ...

Page 2: ...15 Cookware for induction cooking zones 15 Suitability test 15 Size of pans 16 Operating noises 16 Using suitable cookware 16 Using the touch control sensors 17 Switching the appliance on 17 Select cooking zone and heat setting 17 Switching the appliance off 18 Quick stop 18 Using the child safety lock 18 Timer Count down 19 Timer Count up 20 Using keep warm 20 Power boost control 20 Power managem...

Page 3: ...turers we also believe it is our responsibility to familiarize you with the following safety instructions WARNING This appliance is not intended for use by persons including children with reduced physical sensory or mental capabilities or lack of experience and knowledge unless they have been given supervision or instruction concerning use of the appliance by a person responsible for their safety ...

Page 4: ...can cause accidents The temperature of accessible surfaces may be high when the appliance is operating Keep the appliance and its cord out of reach of children less than 8 years WARNING Accessible parts may become hot during use Young children should be kept away A steam cleaner is not to be used to clean the product Metallic objects such as knives forks spoons and lids should not be placed on the...

Page 5: ...ing foods in fat or oil for example when cooking chips Turn the cooking zones off after use CAUTION Be sure the appliance is properly installed and grounded by a qualified technician The appliance should be serviced only by qualified service personnel Repairs carried out by unqualified individuals may cause injury or serious malfunction If your appliance is in need of repair contact your local ser...

Page 6: ...sposal sites is available from your local refuse department or council Always keep the control panels clean and dry Never place combustible items on the hob it may cause fire There is the risk of burns from the appliance if used carelessly Cables from electrical appliances must not touch the hot surface of the hob or hot cookware Do not use the hob to dry clothes Users with Pacemakers and Active H...

Page 7: ...table artificial resin or mixed adhesive Ensure that the seal is correctly seated against the work surface without any gaps Additional silicon sealant must not be applied this would make removal more difficult when servicing The hob must be pressed out from below when removed A board can be installed underneath the hob The ventilation gap between the worktop and front of the unit underneath it mus...

Page 8: ...heating element voltage is AC 230 V The appliance also works perfectly on networks with AC 220 V or AC 240 V The hob is to be connected to the mains using a device that allows the appliance to be disconnected from the mains at all poles with a contact opening width of at least 3 mm eg automatic line protecting cut out earth leakage trips or fuse WARNING The cable connections must be made in accord...

Page 9: ...n 50 mm Installing into the countertop A A Serial number NOTE Make a note of the serial number on the appliance rating label prior to installation This number will be required in the case of requests for service and is no longer accessible after installation as it is on the original rating plate on the underside of the appliance NOTE Pay special attention to the minimum space and clearance require...

Page 10: ... Min 20 mm 02 Min 2 mm 03 Min 20 mm 06 07 08 04 02 05 01 03 No Explanation Size 01 Distance between wall and Induction Min 40 mm 02 Size of depth of Induction 520 mm 03 Distance between Induction and end of table Min 40 mm 04 Distance between glass and case burner 25 mm 05 Distance between glass and case burner 15 mm 06 Distance between wall and case burner Min 60 mm 07 Size of depth of case burne...

Page 11: ... 04 02 03 01 01 Induction dual power zone 3600 W with Power Boost 5000 W 02 Induction cooking zone 1400 W with Power Boost 2000 W 03 Induction cooking zone 2200 W with Power Boost 3200 W 04 Control Panel NZ63K5727BK_EF_DG68 00796A 00_EN indd 11 3 2 2016 1 56 54 PM ...

Page 12: ...ware s temperature Greater speed in cooking and frying As the pan is heated directly and not the glass the efficiency is greater than in other systems because no heat is lost Most of the energy absorbed is transformed into heat Control panel 01 02 02 03 04 05 06 07 09 08 02 01 On Off control sensor 02 Indicators for heat settings and residual heat 03 Cooking zone sensor 04 Keep warm sensor 05 Time...

Page 13: ...rated using touch control sensors Easy cleaning The flat ceramic glass cooktop provides easy cleaning On Off sensor The On Off control sensor provides the appliance with a separate mains switch Touching this sensor switches the power supply on or off completely Control and function indicators Digital displays and indicator lights provide information about settings and activated functions as well a...

Page 14: ...n the temperatures on any of the cooking zones were to exceed the safety levels should this happen then the cooking zone will automatically reduce to a lower power level When you have finished using the hob the cooling fan will continue to run until the hob s electronics has cooled down And the cooling fan switched itself off depending upon the temperature of the electronics Other reasons why a co...

Page 15: ...e for induction cooking zones The induction hob can only be turned on when cookware with a magnetic base is placed on one of the cooking zones You can use the following suitable cookware Cookware material Cookware material Suitable Steel Enamelled steel Yes Cast iron Yes Stainless steel If appropriately labelled by the manufacturer Aluminium Copper Brass No Glass Ceramic Porcelain No NOTE Cookware...

Page 16: ...he pots and pans to cover completely Switch the cooking zones off before the end of the cooking time to use the residual heat for keeping foods warm or for thawing Size of pans Induction cooking zones adapt automatically to the size of the bottom of the cookware up to a certain limit However the magnetic part of the bottom of the cookware must have a minimum diameter depending upon the size of the...

Page 17: ...anel with the tip of your pointed finger until the relevant displays illuminate or go out or until the desired function is activated Ensure that you are touching only one sensor panel when operating the appliance If your finger is too flat on the panel an adjacent sensor may be actuated as well Switching the appliance on The appliance is switched on using the On Off control sensor Touch the On Off...

Page 18: ...hing the child safety lock off touch the Lock control sensor again for 3 seconds An acoustic signal will sound as confirmation NOTE Regardless of power on off child lock is activated NOTE You can use Lock control during cooking In this case To turn off the burner you should operate lock off or Power OFF Switching the appliance off To completely switch off the appliance use the On Off control senso...

Page 19: ...old any of the or control sensors until the desired value is reached Timer Count down Using the timer as a safety shutoff If a specific time is set for a cooking zone the cooking zone will shut itself off once this period of time has elapsed This function can be used for multiple cooking zones simultaneously Setting the safety shutoff The cooking zone s for which you want to apply the safety shuto...

Page 20: ...hob For example It is impossible to output max power on Flex zone rear and Flex zone front at the same time Timer Count up For the count up timer to be used the appliance must be switched on but all the cooking zones must be not use timer as a safety shutoff 1 Touch the Timer control sensor will appear in the timer display 2 The count up timer function becomes active and the display numbers increa...

Page 21: ... 3 is paired cooking zone The indicator for this cooking zone alternates for some seconds between the set heat setting and the maximum possible heat setting After then the indicator changes from the set heat setting to maximum possible heat setting Pause The Pause function simultaneously switches all cooking zones that are switched on to the low power setting and then back to the heat setting that...

Page 22: ...settings according to specific cookware and foods Cleaning and care Hob WARNING Cleaning agents must not come into contact with a heated ceramic glass surface All cleaning agents must be removed with adequate amounts of clean water after cleaning because they can have a caustic effect when the surface becomes hot Do not use any aggressive cleaners such as grill or oven sprays scouring pads or abra...

Page 23: ...allowed to cool warm it up again for cleaning NOTE Scratches or dark blemishes on the ceramic glass surface caused for example by a pan with sharp edges cannot be removed However they do not impair the function of the hob Stubborn soiling 1 To remove food that has boiled over and stubborn splashes use a glass scraper 2 Place the glass scraper at an angle to the ceramic glass surface 3 Remove soili...

Page 24: ...vice FAQs and troubleshooting A fault may result from a minor information that you can correct yourself with the help of the following instructions Do not attempt any further repairs if the following instructions do not help in each specific case WARNING Repairs to the appliance are to be performed only by a qualified service technician Improperly effected repairs may result in considerable risk t...

Page 25: ...as cooled down or elapsed max time 10 minutes the cooling fan will be turned off If you request a service call because of an information made in operating the appliance the visit from the customer service technician may incur a charge even during the warranty period Information code Possible cause Solution C0 Check the Auto Cook sensor Restart the appliance using the Power button If the problem co...

Page 26: ... make it easier to decide if a customer service visit is necessary Please take note of the following information What form does the problem take Under what circumstances does the problem occur When calling please know the model and serial number of your appliance This information is provided on the rating plate as follows Model description S N code 15 digits We recommend that you record the inform...

Page 27: ...cm 21 0 cm 14 5 cm Energy consumption per cooking zone or area EC electric cooking Ø 21 0 cm 183 1 Wh kg Ø 14 5 cm 191 5 Wh kg Ø 28 0 cm 189 4 Wh kg Energy consumption for the hob EC electric hob 188 1 Wh kg Data determined according to standard EN 60350 2 and Commission Regulations EU No 66 2014 Energy saving tips Always position pots and pans before switching on the cooking zone Dirty cooking zo...

Page 28: ...k max 0 60 Anruf www samsung com de support ITALIA 800 SAMSUNG 800 7267864 www samsung com it support CYPRUS 8009 4000 only from landline toll free www samsung com gr support GREECE 80111 SAMSUNG 80111 726 7864 only from land line 30 210 6897691 from mobile and land line LUXEMBURG 261 03 710 www samsung com be_fr support NETHERLANDS 0900 SAMSUNG 0900 7267864 0 10 Min www samsung com nl support NOR...

Reviews: