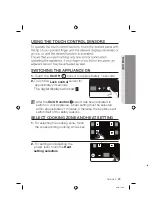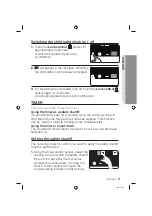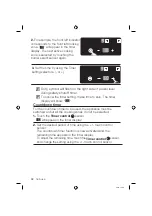
POWER BOOST
CONTROL
The power boost function makes additional power available to
the each cooking zones. (example : bring a large volume of water
to the boil)
The power boost function is activated for maximum 5 minutes for
each cooking zones.
After these times, the cooking zones automatically return to power
level
In certain circumstances, the Power boost function may be
deactivated automatically to protect the internal electronic
components of the hob.
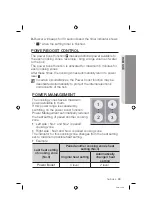
POWER MANAGEMENT
The cooking zones have a maximum
power available to them.
If this power range is exceeded by
switching on the power boost function ,
Power Management automatically reduced
the heat setting of paired another cooking
zone.
•
Left side : No.1 and No.2 is paired
cooking zone
•
Right side : No.3 and No.4 is paired cooking zone
The indicator for this cooking zone changes from the heat setting
set to maximum possible heat setting.
•
Example
Last heat setting
of cooking zone
(No.3)
Paired another cooking zone’s heat
changed heat
setting
Power Boost
6 level
2 level
3.
hob use _
33
HOB USE
Original heat setting
Automatically
setting (No.4)
Buzzer will beeps for 30 seconds and the timer indicator shows
2016-12-20
.
d
e
h
s
i
n
fi
s
i
r
e
m
it
g
n
it
t
e
s
e
h
t
n
e
h
w
"
--
--
"
Summary of Contents for NZ64M3NM1BB
Page 1: ...ENGLISH NZ64M3NM1BB PN 16166000A20347 ...
Page 2: ...2_ using this manual WARNING CAUTION CAUTION 2016 12 20 ...
Page 3: ...safety instructions _3 safety instructions WARNING 2016 12 20 ...
Page 4: ...WARNING 4_ safety instructions ...
Page 6: ...6_ safety instructions 2016 12 20 ...
Page 7: ...WARNING safety instructions _7 safeTy INsTruCTIoNs 2016 12 20 ...
Page 8: ...WARNING 8_ safety instructions 2016 12 20 ...
Page 9: ...safety instructions _9 safeTy INsTruCTIoNs 2016 12 20 ...
Page 10: ...over without warning 10_ safety instructions 2016 12 20 ...
Page 11: ...Caution signs for using CAUTION safety instructions _11 safeTy INsTruCTIoNs 2016 12 20 ...
Page 12: ...the lid Model which has lid only 12_ safety instructions 2016 12 20 ...
Page 16: ...Safety instructions for the installer WARNING 16_ installing the hob 2016 12 20 ...
Page 20: ...Install the two brackets Put into the hole 490 4 1 20_ installing the hob 2016 12 20 ...
Page 28: ...U Energy saving tips Right Wrong 28_ hob use 2016 12 20 ...
Page 42: ...note 2016 12 20 ...
Page 43: ...note 2016 12 20 ...
Page 45: ...NZ64M3NM1BB FRANÇAIS ...
Page 46: ......
Page 47: ......
Page 48: ......
Page 49: ......
Page 50: ......
Page 51: ......
Page 52: ......
Page 53: ......
Page 54: ......
Page 55: ......
Page 56: ......
Page 57: ......
Page 58: ......
Page 59: ......
Page 60: ......
Page 61: ......
Page 62: ......
Page 63: ......
Page 64: ......
Page 65: ...1 3 4 5 2 2 2 0 m m 2 2 0 m m 1 4 0 m m 1 4 0 m m ...
Page 66: ......
Page 67: ......
Page 68: ......
Page 69: ......
Page 70: ......
Page 71: ......
Page 72: ......
Page 73: ......
Page 74: ......
Page 75: ......
Page 76: ......
Page 77: ......
Page 79: ......
Page 81: ......
Page 82: ......
Page 83: ......
Page 84: ......
Page 86: ......
Page 87: ......
Page 89: ...NZ64M3NM1BB ...
Page 90: ...2 ...
Page 91: ...3 ...
Page 92: ...4 ...
Page 93: ...5 ...
Page 94: ...6 ...
Page 95: ...7 ...
Page 96: ...8 ...
Page 97: ...9 ...
Page 98: ...10 ...
Page 99: ...11 ...
Page 100: ...12 ...
Page 101: ...13 ...
Page 102: ...14 ...
Page 103: ...15 ...
Page 104: ...16 ...
Page 105: ...17 ...
Page 106: ...18 ...
Page 107: ...19 ...
Page 108: ...20 ...
Page 109: ...21 1 3 4 5 2 2 2 0 m m 2 2 0 m m 1 4 0 m m 1 4 0 m m ...
Page 110: ...22 ...
Page 111: ...23 ...
Page 112: ...24 ...
Page 113: ...25 ...
Page 114: ...26 ...
Page 115: ...27 ...
Page 116: ...28 ...
Page 117: ...29 ...
Page 118: ...30 ...
Page 119: ...31 ...
Page 120: ...32 ...
Page 121: ...33 ...
Page 122: ...34 ...
Page 123: ...35 ...
Page 124: ...36 ...
Page 125: ...37 ...
Page 126: ...38 ...
Page 127: ...39 ...
Page 128: ...40 ...
Page 129: ...220 240 V 400V 50 60 Hz 41 NZ64M3NM1BB NZ64M3NM1BB ...
Page 130: ......
Page 131: ......
Page 152: ...20 instalarea plitei 490 4 1 Montați cele două suporturi Fixati in zona decupata ...
Page 174: ...Notă ...
Page 175: ...Notă ...
Page 196: ...20 монтаж на индукционен плот 490 4 1 Закрепете двете скоби Поставете в отвора ...
Page 218: ...забележка ...
Page 219: ...забележка ...
Page 221: ...NZ64M3NM1BB ...
Page 222: ...2 ...
Page 223: ...3 ...
Page 224: ...4 Moze to ...
Page 225: ...5 albo lekarza ...
Page 226: ...6 ...
Page 227: ...7 Urządzenie zamontuj na równym twardy podłożu o wystarczającej nośności ...
Page 228: ...8 ...
Page 229: ...9 ...
Page 230: ...10 ...
Page 231: ...11 ...
Page 232: ...12 ...
Page 233: ...13 ...
Page 234: ...14 ...
Page 235: ...15 ...
Page 236: ...16 ...
Page 237: ...17 ...
Page 238: ...18 ...
Page 239: ...19 ...
Page 240: ...20 ...
Page 241: ...21 1 3 4 5 2 2 2 0 m m 2 2 0 m m 1 4 0 m m 1 4 0 m m ...
Page 242: ...22 ...
Page 243: ...23 ...
Page 244: ...24 Jeśli ...
Page 245: ...25 ...
Page 246: ...26 ...
Page 247: ...27 ...
Page 248: ...28 ...
Page 249: ...29 ...
Page 250: ...30 ...
Page 251: ...31 ...
Page 253: ...33 Funkcja Booster ...
Page 254: ...34 ...
Page 255: ...35 ...
Page 256: ...36 ostrzeżenie ostrzeżenie ...
Page 257: ...37 ...
Page 258: ...38 ostrzeżenie ...
Page 259: ...39 ...
Page 260: ...40 ...
Page 261: ...Waga 220 240 V 400V 50 60 Hz 6 41 NZ64M3NM1BB ...
Page 262: ......
Page 263: ......

