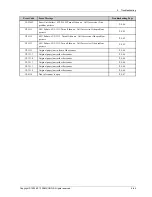
background image

4. Troubleshooting

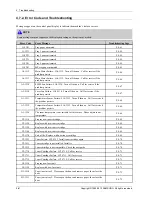
4.7.2.1. 11–2Txx (Paper Mismatch error)

► Error Code

11-2T01

11-2T11

11-2T21

11-2T31

11-2T41

11-2T61

► Error message

Tray paper mismatch

Tray 1 paper mismatch

Tray 2 paper mismatch

Tray 3 paper mismatch

Tray 4 paper mismatch

MP tray paper mismatch

► Symptom

Paper in tray is not matched to the machine paper setting.

► Troubleshooting method

1) Check and change the paper setting of the corresponding tray properly.

4-65

Copyright© 1995-2013 SAMSUNG. All rights reserved.

Summary of Contents for ProXpress M4080 Series

Page 1: ...SERVICEMANUAL Mono Laser MFP Contents 1 Precautions 2 Product Specifications and Description 3 Disassembly and Reassembly 4 Troubleshooting 5 System Diagram 6 Reference Information Refer to the service manual in the GSPN see the rear cover for more information ...

Page 2: ...opy specification 2 6 2 2 5 Fax specification 2 7 2 2 6 Paper Handling specification 2 8 2 2 7 Software and Solution 2 10 2 2 8 Supplies 2 11 2 2 9 Maintenance Part 2 11 2 2 10 Option 2 12 2 3 System Configuration 2 13 2 4 Feeding System 2 17 2 4 1 Feeding System Overview 2 17 2 4 2 Cassette 2 20 2 4 3 Pick Up Unit 2 21 2 4 4 MPF Multi Purpose Feeder Unit 2 21 2 5 Image Creation 2 22 2 5 1 Printin...

Page 3: ...arts 3 1 3 1 1 Precautions when assembling and disassembling 3 1 3 1 2 Precautions when handling PBA 3 1 3 1 3 Releasing Plastic Latches 3 2 3 2 Replacing the maintenance part 3 3 3 2 1 Fuser Unit 3 3 3 2 2 Transfer Roller 3 5 3 2 3 Separation Roller 3 6 3 2 4 Pick up Roller and Forward Roller 3 7 3 2 5 SCF Separation Roller 3 8 3 2 6 SCF Pick up Roller and Forward Roller 3 9 3 3 Replacing the mai...

Page 4: ...LEDs 4 4 4 3 Updating Firmware 4 6 4 3 1 Updating from the Printer Control Panel 4 6 4 3 2 Updating from the Network 4 7 4 4 Clearing Jams 4 10 4 4 1 Clearing paper jams 4 10 4 4 2 Clearing original document jams 4 27 4 5 Useful management tools 4 31 4 5 1 SyncThru Web Service 4 31 4 5 2 Samsung Easy Printer Manager 4 36 4 6 Service Mode 4 38 4 6 1 Entering Exiting Service Mode 4 38 4 6 2 Service ...

Page 5: ...r error 4 94 4 7 2 8 U2 xxxx type LSU error code 4 95 4 7 2 9 U3 xxxx DSDF error 4 96 4 7 3 Image quality problem 4 98 4 7 4 Other errors 4 112 5 System Diagram 5 1 5 1 Block Diagram 5 1 5 2 Connection Diagram 5 2 6 Reference Information 6 1 6 1 Tool for Troubleshooting 6 1 6 2 Glossary 6 2 6 3 The Sample Pattern for the Test 6 8 6 4 Model Name and Code 6 9 6 5 Document Revision List 6 10 Copyrigh...

Page 6: ...equirements of DHHS 21 CFR chapter 1 Subchapter J for Class I 1 laser products and elsewhere is certified as a Class I laser product conforming to the requirements of IEC 60825 1 Class I laser products are not considered to be hazardous The laser system and printer are designed so there is never any human access to laser radiation above a Class I level during normal operation user maintenance or p...

Page 7: ...product this can cause electric shock Do not allow paper clips pins or other foreign objects to fall into the product these could cause a short circuit leading to an electric shock or fire hazard 5 Never touch the plugs on either end of the power cable with wet hands this can cause electric shock When servicing the product remove the power plug from the wall socket 6 Use caution when inserting or ...

Page 8: ...ition the machine near a humidifier or in front of an air conditioner Moisture and dust built up inside the machine can lead to overheating and cause a fire or cause parts to rust 11 Do not position the product in direct sunlight This will cause the temperature inside the product to rise possibly leading to the product failing to work properly and in extreme conditions could lead to a fire 12 Do n...

Page 9: ...ns 1 Replace parts carefully and always use Samsung parts Take care to note the exact location of parts and also cable routing before dismantling any part of the machine Ensure all parts and cables are replaced correctly Please carry out the following procedures before dismantling the product or replacing any parts 2 Ensure that power is disconnected before servicing or replacing any electrical pa...

Page 10: ...n get harm 3 When you move the printer use safe lifting and handling techniques This printer is heavy Use the lifting handles located on each side of the machine Back injury could be caused if you do not lift carefully 4 Ensure the printer is installed safely Ensure the printer is installed on a level surface capable of supporting its weight Failure to do so could cause the printer to tip or fall ...

Page 11: ...n the vicinity of the assembly 3 Use only a grounded tip soldering iron to solder or desolder ESDs 4 Use only an anti static solder removal device Some solder removal devices not classified as anti static can generate electrical charges sufficient to damage ESDs 5 Do not use Freon propelled chemicals When sprayed these can generate electrical charges sufficient to damage ESDs 6 Do not remove a rep...

Page 12: ... ppm in Letter 2 Processor Dual Core 1GHz 3 Memory Std Max 1 GB 2 GB 4 320 GB HDD 5 Dual Scan Document Feeder DSDF 6 Interfaces High Speed USB 2 0 10 100 1000 Base TX Ethernet 7 inch Touch LCD 7 Toner cartridge yield Initial 6 000 pages Standard 10 000 pages High yield 20 000 pages 2 1 Copyright 1995 2013 SAMSUNG All rights reserved ...

Page 13: ...79 GB USB Device Hi Speed USB 2 0 USB Host Hi Speed USB 2 0 USB EDI Yes Wired LAN Std Ethernet 10 100 1000 Base TX Wireless LAN Option IEEE 802 11b g n NFC Option Active Interface RJ11 Connector Yes From Sleep Less than 30 sec Warmup Time Power Off Less than 45 sec Operating 10 to 30 C 50 to 86 F Temperature Storage 20 to 40 C 4 to 104 F Operating 20 to 80 RH Humidity Storage 10 to 90 RH Print Mod...

Page 14: ...ifications and Description Item Specification Recommended Monthly Printing Volume AMPV 1 500 14 000 pages Reliability Service Max Monthly Print Volume 120 000 pages 2 3 Copyright 1995 2013 SAMSUNG All rights reserved ...

Page 15: ...64bit 2012 Server 64bit 2012 Server R2 64bit Linux Red Hat Enterprise Linux 5 6 7 Fedora 13 14 15 16 17 18 19 20 21 openSUSE 11 3 11 4 12 1 12 2 12 3 13 1 13 2 Ubuntu 10 04 10 10 11 04 11 10 12 04 12 10 13 04 13 10 14 04 14 10 SUSE Linux Enterprise Desktop 11 12 Debian 6 7 Mint 13 14 15 16 17 UNIX Sun Solaris 9 10 11 x86 SPARC HP UX 11 0 11i v1 11i v2 11i v3 PA RISC Itanium IBM AIX 5 1 5 2 5 3 5 4...

Page 16: ...or Compatibility Windows TWAIN WIA Scan method Color CIS Module File Formats TIFF S TIFF M JPEG S PDF M PDF Optical DSDF Up to 600 x 600 dpi Optical Platen Up to 600 x 600 dpi Enhanced DSDF Up to 4 800 x 4 800 dpi Resolution Enhanced Platen Up to 4 800 x 4 800 dpi Scan Destinations HDD Shared Folder USB Email Communication Protocol SMTP MIME Base 64 ADF Max 216 mm x 356 mm 8 5 x 14 Scan Size Plate...

Page 17: ...i Optical Printing up to 600 x 600 x 4 bit DSDF 25 400 Reduce Enlarge Platen 25 400 Reduction 25 50 70 A4 A5 78 Legal Letter 81 B5 A5 86 A4 B5 Preset Enlargement 104 Executive Letter 141 A5 A4 150 200 400 Darkness Control 11 Levels Contrast Control 11 Levels Multi Copy 1 9999 Duplex Copy Built in Copy Original Type Text Text Photo Photo Copy Features N Up ID Card Copy Poster Copy Clone Copy Bookle...

Page 18: ...Std 203 x 98 dpi Fine 203 x 196 dpi Resolution Mono S Fine 300 x 300 dpi Compression Method MH MR MMR JBIG Fax Memory Standard Max HDD Shared 50MB Handset No On hook Dial Yes Search Yes Address Book 1 Touch Dial No Speed Dial 500 locations TAD I F Yes Tone Pulse Yes Pause Yes Auto Redial Yes Last Number Redial Yes Distinctive Ring Yes Caller ID Yes External Phone Interface Yes Fax Forward to E Mai...

Page 19: ...Weight 60 to 163 g m 16 43 lb Thin Paper 60 69 g m Plain Paper 70 90 g m Thick Paper 91 105 g m Bond Paper 105 120 g m Cardstock 106 163 g m Standard Cassette Tray Sensing H W Install Detect Yes Paper Empty Yes Paper low level detect Yes Paper Type Detect No Paper Size Detect Yes Capacity Plain Paper 100 sheets 75g m Envelope 10 sheets Media sizes Min 76 2 mm x 127 mm 3 x 5 Max 216 mm x 356 mm 8 5...

Page 20: ...Sensing H W Install Detect Yes Paper Empty Yes Paper low level detect Yes Paper Type Detect No Paper Size Detect Yes Capacity 50 Sheets Duplex Document Scanning Yes DSDF Document Size Width 105 216 mm 4 1 8 5 Length 148 356 mm 5 8 14 Document Weight 60 120 g m 14 32 lb Sensor D CIS ADF Auto Detected Size N A Capacity Face Down 250 sheets Output Stacking Output Full sensing Yes Max Size 216 x 356 m...

Page 21: ...P Google Cloud Print Yes Mobile Printing AirPrint Yes Device Management SyncThru Output Management CounThru Document Management and Distribution SmarThruWorkFlow Security SecuThru Solution Mobility Any Authentication Local Yes Authentication Network Yes Kerberos SMB LDAP IP Address Filtering IPv4 Filtering IPv6 Filtering MAC Filtering HDD Overwrite Standard N A HDD Overwrite Max Overwrites N A Sec...

Page 22: ...mended that these maintenance parts at specific intervals be replaced as instructed Item Part Code Life Pick up Forward roller for Tray1 JC93 00540B 200 000 pages Separation roller for Tray1 JC93 00540B 100 000 pages MP Pick up Forward roller JC90 01540A 100 000 pages MP Separation roller JC73 00328A 100 000 pages Transfer roller JC66 02842A 100 000 pages Fuser Unit JC91 01023A 110V JC91 01024A 22...

Page 23: ...n Option List Item Model Remark Optional trays Tray2 Tray3 Tray4 SL SCF4000 550 Sheets Plain paper 75g m 20 lb bond Stand SL DSK065S Memory module SL MEM001 2 GB Wireless NFC kit SL NWE001X Wireless NFC Copyright 1995 2013 SAMSUNG All rights reserved 2 12 ...

Page 24: ...al memory and optional tray 8 Front cover 9 Tray 1 10 Optional tray 11 Paper level indicator 12 Push release of multi purpose tray 13 Multi purpose tray 14 USB memory port 15 Output support tray 16 Output tray 17 Scanner lid 18 Scanner glass 19 Paper width guides on a multipurpose tray 20 Multi purpose support tray 21 Toner cartridge Open this cover to install the optional memory and optional tray...

Page 25: ...andle 4 Power receptacle 5 Power switch 6 USB port 7 Network port 8 EDI port for card reader 9 Telephone line socket LINE 10 Extension telephone socket EXT 11 Duplex unit Open this cover to install the optional wireless NFC kit required for the wireless NFC features Copyright 1995 2013 SAMSUNG All rights reserved 2 14 ...

Page 26: ... Scan Document Feeder DSDF 2 Platen Unit 3 Exit Unit 4 LSU 5 Fuser Unit 6 Cassette Tray 1 7 Optional tray SCF 2nd 3th 4th 8 Pick up roller Separation roller Forward roller 9 MP tray 10 Toner Cartridge 11 OPE Unit 2 15 Copyright 1995 2013 SAMSUNG All rights reserved ...

Page 27: ...2 Product Specifications and Description 4 Paper Path Copyright 1995 2013 SAMSUNG All rights reserved 2 16 ...

Page 28: ...system picks up a paper from the cassette or MP tray and transports it to the machine inside It mainly consists of the cassette pick up forward separation roller feed roller registration roller transfer roller unit exit unit duplex unit and drive unit 2 17 Copyright 1995 2013 SAMSUNG All rights reserved ...

Page 29: ...lers 6 Tray 2 pick up forward separation rollers 7 Tray 3 pick up forward separation rollers 8 Tray 4 pick up forward separation rollers No Description 9 MP Tray pick up forward separation rollers 10 Tray 1 feed roller 11 Tray 2 feed roller 12 Tray 3 feed roller 13 Tray 4 feed roller 14 Registration sensor 15 Registration roller 16 Transfer roller Copyright 1995 2013 SAMSUNG All rights reserved 2 ...

Page 30: ...oller the load of the torque limiter of the reverse roller is heavier than the frictional force between the sheets As a result the reverse roller is stopped and the lower paper does not advance any further Feed roller This roller transports the paper sent from the forward reverse roller to the registration roller Registration roller This roller aligns the leading edge of the paper and transports t...

Page 31: ...r separation Reverse roller type 3 Capacity 550 Sheets 80 g m paper standard 4 Paper Plain paper A6 Statement A5 Executive B5 A4 Letter Folio Oficio Legal Auto detect A5 Executive B5 A4 Letter Folio Legal Oficio 8 Types Special Paper Envelope Label Cardstock 5 Weight plain paper 60 163 g m 6 Plate knock up lift type Lift Motor Up Limit Sensor Copyright 1995 2013 SAMSUNG All rights reserved 2 20 ...

Page 32: ...that a single sheet of paper is moved to the paper path and the paper is moved as far as the registration roller by the work of the vertical path roller 2 4 4 MPF Multi Purpose Feeder Unit The MPF Unit allows feeding of specialty media stock envelopes and custom size paper Specification 1 Tray capacity 100 sheets 80 g m standard paper 2 Media Size Max 8 5 14 215 9 x 355 67 mm Min 3 5 76 2 x 127 mm...

Page 33: ...rface of the OPC drum The negatively charged toners are attracted to the latent image due to the electric field The toner real image on the OPC drum are moved to the paper by the positive bias applied to the transfer roller 1 OPC drum charge The charge roller gives the OPC drum a negative charge 2 Laser exposure Light produced by a laser diode LD hits the charged OPC drum through the lens and mirr...

Page 34: ... as Dot Count method After the image is moved to transfer roller the remaining toner on the OPC drum is removed by the cleaning blade The CRUM chip in toner cartridge stores information like a serial number count Development The toner is supplied to the Agitator Toner 1 by the Agitator Toner2 and moves from the supply roller to deve roller After the supplied toner on deve roller exits from the Dr ...

Page 35: ...istance 7 KΩ 180 Rated B value R25 85 3370K 3 The Rated B value is calculated from the zero power resistance measured at 25 and 85 3 Heat roller The heat roller transfers the heat from the lamp to apply heat on to the paper The surface of a heat roller is coated with Teflon so toner does not stick to the surface 4 Pressure roller A pressure roller mounted under a heat roller is made of a silicon r...

Page 36: ...hat changes laser beam path Also LD PBA is located to the front of the LSU for interface The PD sensor located in LD PBA detects the scanning start line and generates the horizontal sync signal Hsync The picture below shows the main components for LSU NOTE The LSU is the optical precision device Please handle it carefully and do not remove the cover 1 LD PBA 2 P Mirror Motor 3 F Lens 4 Reflection ...

Page 37: ...red to OPC D The polygon motor speed is controlled by the main CPU The LD unit generating the laser beam has the dual beam laser diode with 780nm wavelength It is controlled by the LD drive IC Item Specification LD Unit Laser Diode Dual Beam Driving IC for Dual LD P Motor speed 28 587 rpm Process Speed 242 04 mm sec H W interface LD Harness 14 Pin FFC P Motor Harness 5 Pin FFC Copyright 1995 2013 ...

Page 38: ...drive motors No Motor Motor type Qty Function BLDC Motor 1 OPC driving E Clutch 1 Regi Shaft driving 1 DRIVE MAIN E Clutch 1 MP Pick Up Shaft driving 2 CST LIFT PM STEP Motor 1 Pick Up driving 3 DRIVE FUSER PM STEP Motor 1 Fuser and Exit driving 4 DUPLEX PM STEP Motor 1 Duplex driving 2 27 Copyright 1995 2013 SAMSUNG All rights reserved ...

Page 39: ...2 Product Specifications and Description 2 8 2 Main Drive Unit Front View Rear View Information Part Code JC93 00923A DRIVE MAIN Copyright 1995 2013 SAMSUNG All rights reserved 2 28 ...

Page 40: ...ower Train Simplex Duplex Forward Reverse Driving by STEP motor Step motor Gear Gear Gear Gear Gear Gear Gear Exit Roller 3 driving Step motor Gear Gear Gear Gear Gear Gear Gear Gear Exit Roller 2 driving Step motor Gear Hub Clutch Gear Fuser pressure driving 2 29 Copyright 1995 2013 SAMSUNG All rights reserved ...

Page 41: ... Information Part Code JC93 01231A DRIVE CST LIFT Power Train Pick Up Forward rotation Cassette Lifting Reverse rotation Step motor Gear Gear Pick Up driving Step motor Gear Gear Gear Gear Gear Cassette Lifting driving Copyright 1995 2013 SAMSUNG All rights reserved 2 30 ...

Page 42: ... function of the CIS sensor is to change from the optical image data to the electrical analog signal The analog signal is converted to the digital signal and then the image process executes to make a image This machine uses the digitalized CIS for scan processing This machine supports the dual scanning by using a platen CIS and a document feeder CIS 2 31 Copyright 1995 2013 SAMSUNG All rights rese...

Page 43: ...aper from the input tray to the DSDF inside and separates the paper 3 Reverse roller system This machine uses the reverse roller system for the paper separation of the document feeder The features of this system are the high yield high reliability lower noise in comparison to the pad system 4 ADF Platen CIS This machine supports the dual scanning by using a platen CIS and a document feeder CIS 5 P...

Page 44: ...G EEPRO M M 24256 32KB NAND FLAS H SCAN I F FUSE R AD C PW M CON T DC I S DC I S 24V 5V 512M B NA ND 256M B DD R3 3CH DCD C 1 1V 1 2V 3 3V SAT A 2 5 320G HDD BLDC M T Pi ckUp St ep M T FuserSt ep M T Dupl ex St ep M T SM PS FAN M AI N FAN RegiCl ut ch M P Cl ut ch Regi FEED EXI T BI N_FULL M P EM PTY PAPER_ EM PTY Paper _LI M I T SCA N_HO M E DSDF P PO SI TION DSDF P G AP P_SI ZE SC F 2 SC F 3 A10...

Page 45: ...2 Product Specifications and Description Circuit Board Locations The following diagrams show the locations of the printer circuit boards Copyright 1995 2013 SAMSUNG All rights reserved 2 34 ...

Page 46: ...e main board is connected to the HDD by SATA2 and to the SCF by UART Main Board Connection Information Connection 1 LSU Interface 2 Outbin Full Sensor 3 OPE Power Interface 4 CRUM 5 FAX Interface 6 DCIS_Platen Interface 7 DCIS_ADF Interface 8 SCAN Motor Sensor 9 DSDF Motor Sensor 10 EDI 11 Giga RJ45 12 USB Device 13 Fuser Thermistor 14 SCF 15 Paper Size Sensor 16 Exit Sensor 17 Duplex Motor Sensor...

Page 47: ...2 Product Specifications and Description 28 OPE USB HOST Information Part Code JC92 02808A Part Name PBA MAIN Copyright 1995 2013 SAMSUNG All rights reserved 2 36 ...

Page 48: ...screen panel for user interface 1 OPE PBA Information Part Code JC92 02809A Part Name PBA OPE Connection 1 USB HOST 2 UART1 Debug 3 Touch Pad Interface 4 LCD Interface 5 Key Interface 6 Main Power Interface 7 Main USB Interface 2 LCD 2 37 Copyright 1995 2013 SAMSUNG All rights reserved ...

Page 49: ...2 Product Specifications and Description Information Part Code JC98 04026A Part Name ETC LCD Connection 1 Touch Pad Interface 2 LCD Interface Copyright 1995 2013 SAMSUNG All rights reserved 2 38 ...

Page 50: ...int data from the USB and Network port scanned images copy data fax data and printable video data etc The SO DIMM PBA includes the following features 1GB capacity 2GB optional NOTE Only this memory can be installed to the main board A wise use memory can not be installed 2 10 4 CRUM PBA The CRUM PBA includes CRU memory for toner cartridge life cycle counting 2 39 Copyright 1995 2013 SAMSUNG All ri...

Page 51: ...is controlled by the main board and has two connectors connectors one for the telephone line connection and the other for an external phone connection Information Part Code JC92 02569A PBA name PBA LIU Connection 1 Fax Joint Interface Connector 2 Tel Line Interface Connector 3 External Phone Interface Connector Copyright 1995 2013 SAMSUNG All rights reserved 2 40 ...

Page 52: ... a controller S3F443FX motor drive IC for controlling the feeding timing with the main board Information Part Code JC92 02754A PBA Name PBA SCF Connection 1 BLDC motor 2 Main solenoid 3 Paper size sensor 4 Interface lower 5 Interface upper 6 Regi solenoid 7 Paper empty sensor 8 Elevator motor 9 Paper low sensor 2 41 Copyright 1995 2013 SAMSUNG All rights reserved ...

Page 53: ...C Optional Board SL NWE001X Information PBA NFC Part Code JC92 02788A PBA HUB JOINT Part Code JC92 02787A PBA WNPC Part Code JC92 02767A Connection 1 NFC Interface 2 External USB connection 3 USB HUB Copyright 1995 2013 SAMSUNG All rights reserved 2 42 ...

Page 54: ...t It has safety protection modes for over current and overload Specification General Input Output Voltage 1 Input AC 110V 93 5V 137V 10A AC 220V 187V 275V 6 3A 2 Output DC 5V 4 0A DC 24V 6 0A 3 Output Power DC 5V 20W DC 24V 144W FDB 850W Information 110V 220V Part Code JC44 00222B JC44 00223B Part Name SMPS V1 SMPS V2 Connection 1 Input_AC 2 Output_AC to Fuser 3 Output_DC to Main PBA 4 Control Sig...

Page 55: ...C Output For Fuser SMPS DC Output Connector CON3 PIN ASSIGN PIN NAME Description 1 5V1 5 1V Power 2 GND Power Ground 3 24V1 24V Power 4 GND Power Ground 5 24V2 24V Power 6 GND Power Ground 7 24V3 24V Power SMPS Signal Connector2 CON4 PIN ASSIGN PIN NAME Description 1 GND Ground 2 24V_ON OFF 24V ON OFF 3 Relay on Fuser Relay 4 24VS Photo Triac Bias 5 Fuser on Fuser on Copyright 1995 2013 SAMSUNG Al...

Page 56: ...197A Part Name HVPS Connection 1 SUPPLY 2 DR BLADE 3 THV 4 DEVE DC 5 OPC 6 MHV 7 HVPS INPUT CN1 Connection HVPS Input HVPS INPUT CN1 Description PIN NAME PIN ASSIGN Input Voltage 3 3VS 1 Input Voltage 3 3V 2 DGND DGND 3 DGND DGND 4 PWM signal PWM_FUSER_BIAS 5 PWM signal PWM_MHV 6 PWM signal PWM_DEVE_DC 7 PWM signal PWN_THV 8 nEN signal nTHV_EN 9 2 45 Copyright 1995 2013 SAMSUNG All rights reserved...

Page 57: ...PIN NAME PIN ASSIGN Output voltage THV_READ 10 DGND DGND 11 Input Voltage 24VS 12 Specification 1 Input Voltage DC 24V 3 3V 2 Output Voltage MHV 1240V DEVE DC 338V BLADE 389V SUPPLY 489V THV 1315V THV 1000V FUSER 240V Copyright 1995 2013 SAMSUNG All rights reserved 2 46 ...

Page 58: ...OTO INTERRUPTER PICK UP 0604 001393 S3 PHOTO INTERRUPTER PICK UP 0604 001393 S4 PHOTO INTERRUPTER FRAME MIDDLE 0604 001393 S5 PHOTO INTERRUPTER FRAME MIDDLE 0604 001393 S6 PHOTO INTERRUPTER FRAME MIDDLE 0604 001393 S7 PHOTO INTERRUPTER FRAME EXIT 0604 001393 S8 THERMISTOR NTC ASSY FRAME 1404 001417 2 47 Copyright 1995 2013 SAMSUNG All rights reserved ...

Page 59: ...9 THERMOSTAT FUSER 4712 001091 S10 THERMISTOR NTC FUSER 1404 001640 S11 PHOTO INTERRUPTER SCANNER 0604 001415 S12 PHOTO INTERRUPTER DSDF S13 PHOTO INTERRUPTER DSDF S14 PHOTO INTERRUPTER DSDF S15 PHOTO INTERRUPTER DSDF Copyright 1995 2013 SAMSUNG All rights reserved 2 48 ...

Page 60: ...motor JC31 00075D M2 Lift Pickup motor JC93 00336A M3 Exit Fuser motor JC93 00812A M4 Duplex motor JC93 00336A M5 Scan motor JC93 00316A M6 DSDF pickup motor M7 DSDF feed motor C1 Registration clutch JC47 00035C C2 MP pickup clutch JC47 00035C 2 49 Copyright 1995 2013 SAMSUNG All rights reserved ...

Page 61: ...2 Product Specifications and Description 3 Fan Ref Description Part Code F1 Main Fan JC31 00161A F2 SMPS Fan JC31 00152B Copyright 1995 2013 SAMSUNG All rights reserved 2 50 ...

Page 62: ...r unit malfunction 3 1 2 Precautions when handling PBA Static electricity can damage a PBA always used approved anti static precautions when handling or storing a PBA Precautions when moving and storing PBA 1 Please keep PBA in a conductive case anti static bag or wrapped in aluminum foil 2 Do not store a PBA where it is exposed to direct sunlight Precautions when replacing PBA 1 Disconnect power ...

Page 63: ...tches Many of the parts are held in place with plastic latches The latches break easily release them carefully To remove such parts press the hook end of the latch away from the part to which it is latched Copyright 1995 2013 SAMSUNG All rights reserved 3 2 ...

Page 64: ...ea is cool before performing any maintenance 1 Turn the machine off 2 Remove the duplex unit 3 Lift up the left side of the rear cover to release it from the holder Then remove the rear cover 4 Push down on both fuser levers 5 Push down on both green points of the FRAME REAR 6 Release the FRAME REAR while pushing it to the left 3 3 Copyright 1995 2013 SAMSUNG All rights reserved ...

Page 65: ...3 Disassembly and Reassembly 7 Remove 6 screws Remove the HOLDER EXIT SENSOR Then release the fuser unit Copyright 1995 2013 SAMSUNG All rights reserved 3 4 ...

Page 66: ...3 2 2 Transfer Roller 1 Open the front cover Remove the toner cartridge 2 Remove the transfer roller holder while pushing its hooks to the middle Then release the transfer roller 3 5 Copyright 1995 2013 SAMSUNG All rights reserved ...

Page 67: ...assembly and Reassembly 3 2 3 Separation Roller 1 Remove the cassette 2 Open the separation roller cover 3 Lift small tap then remove the separation roller Copyright 1995 2013 SAMSUNG All rights reserved 3 6 ...

Page 68: ...3 Disassembly and Reassembly 3 2 4 Pick up Roller and Forward Roller 1 Remove the cassette 2 Lift small tap then remove the pick up and forward roller 3 7 Copyright 1995 2013 SAMSUNG All rights reserved ...

Page 69: ...mbly and Reassembly 3 2 5 SCF Separation Roller 1 Remove the SCF cassette 2 Open the separation roller cover 3 Lift small tap then remove the separation roller Copyright 1995 2013 SAMSUNG All rights reserved 3 8 ...

Page 70: ...Disassembly and Reassembly 3 2 6 SCF Pick up Roller and Forward Roller 1 Remove the cassette 2 Lift small tap then remove the pick up and forward roller 3 9 Copyright 1995 2013 SAMSUNG All rights reserved ...

Page 71: ...y 3 3 Replacing the main SVC part 3 3 1 Right Cover 1 Open the front cover Remove 2 screws 2 Remove 2 screws from the rear 3 Remove the right cover by releasing the side hooks Copyright 1995 2013 SAMSUNG All rights reserved 3 10 ...

Page 72: ...bly and Reassembly 3 3 2 Left Cover 1 Open the front cover Remove 2 screws 2 Remove 2 screws from the rear 3 Remove the right cover by releasing the side hooks 3 11 Copyright 1995 2013 SAMSUNG All rights reserved ...

Page 73: ...bly and Reassembly 3 3 3 Rear Cover 1 Remove the duplex unit 2 Lift up the left side of the rear cover to release it from the holder Then remove the rear cover Copyright 1995 2013 SAMSUNG All rights reserved 3 12 ...

Page 74: ...bly and Reassembly 3 3 4 Main Board 1 Remove the right cover Refer to 3 3 1 2 Unplug all harness on the main board Remove 5 screws Then release the main board 3 13 Copyright 1995 2013 SAMSUNG All rights reserved ...

Page 75: ...assembly 3 3 5 HDD 1 Remove the right cover Refer to 3 3 1 2 Unplug HDD cables Remove 3 screws Then release the guide with HDD 3 Release the HDD after removing 4 screws Copyright 1995 2013 SAMSUNG All rights reserved 3 14 ...

Page 76: ... the right cover Refer to 3 3 1 2 Remove the HDD Refer to 3 3 5 3 Remove 1 screw and unplug the fan connector 4 Remove the FRAME DUCT MAIN 5 Remove 5 screws Unplug the harness Then release the HVPS board 3 15 Copyright 1995 2013 SAMSUNG All rights reserved ...

Page 77: ...er to 3 3 1 2 Release the harness from the holder of the SMPS cover Remove 3 screws and unplug the fan connector Then release the SMPS cover 3 Unplug the harness on the SMPS board Remove 4 screws Then release the SMPS board Copyright 1995 2013 SAMSUNG All rights reserved 3 16 ...

Page 78: ...r Refer to 3 3 1 2 Release the harness from the holder of the SMPS cover Remove 3 screws and unplug the fan connector Then release the SMPS cover 3 Unplug the motor connector Remove 2 screws Then release the duplex motor 3 17 Copyright 1995 2013 SAMSUNG All rights reserved ...

Page 79: ...bly and Reassembly 3 3 9 Fuser Drive Unit 1 Remove the left cover Refer to 3 3 2 2 Unplug the motor connector Remove 3 screws Then release the Fuser Drive Unit Copyright 1995 2013 SAMSUNG All rights reserved 3 18 ...

Page 80: ...ve the left cover Refer to 3 3 2 2 Release the harness from the guide Remove 2 screws Then release the harness guide 3 Unplug the motor and clutch connectors Remove 7 screws Then release the main drive unit 3 19 Copyright 1995 2013 SAMSUNG All rights reserved ...

Page 81: ...y and Reassembly 3 3 11 CST Lifting Drive Unit 1 Remove the left cover Refer to 3 3 2 2 Unplug the motor Remove 3 screws Then release the CST Lifting Drive Unit Copyright 1995 2013 SAMSUNG All rights reserved 3 20 ...

Page 82: ...or 1 Remove the right cover Refer to 3 3 1 2 Remove the cassette 3 Unplug the sensor connector Then release the hook while pushing it to the middle 4 Remove the paper size sensor on the opposite side 3 21 Copyright 1995 2013 SAMSUNG All rights reserved ...

Page 83: ...p and release the OPE cover 3 Remove 6 screws 4 Unplug the OPE cable and release the OPE Unit 5 Unplug the flat cable Remove 4 screws Then release the OPE PBA NOTE When unplugging the flat cable be careful not to damage it Copyright 1995 2013 SAMSUNG All rights reserved 3 22 ...

Page 84: ...3 3 13 3 Remove 3 screw caps and 3 screws 4 Remove 7 screws Then release the OPE bottom cover 5 Unplug the DSDF Scanner harness from the main board 6 Remove 2 screws from the rear side 7 Lift up the rear of the scanner unit slightly then release the whole scanner unit 3 23 Copyright 1995 2013 SAMSUNG All rights reserved ...

Page 85: ... 3 15 DSDF Unit 1 Remove the scanner unit Refer to 3 3 14 2 Release the harness from the bottom of the platen unit 3 Remove the Cover Connector 4 Lift up and release the DSDF unit Copyright 1995 2013 SAMSUNG All rights reserved 3 24 ...

Page 86: ...ly 3 3 16 Fax Board 1 Remove the Scanner Unit Refer to 3 3 14 2 Remove 3 screws Then release the COVER MIDDLE R 3 Unplug the harness Remove 3 screws Then release the fax board 3 25 Copyright 1995 2013 SAMSUNG All rights reserved ...

Page 87: ...fer to 3 3 14 2 Remove 3 screws Then release the COVER MIDDLE R 3 Remove 4 screws Then release the COVER MIDDLE L 4 Remove 2 screws from the front side 5 Remove 6 screws from the top side 6 Lift up and release the middle cover Copyright 1995 2013 SAMSUNG All rights reserved 3 26 ...

Page 88: ...Reassembly 3 3 18 LSU 1 Remove the right cover Refer to 3 3 1 2 Remove the middle cover Refer to 3 3 17 3 Unplug the LSU harness 4 Remove 4 screws Then release the LSU 3 27 Copyright 1995 2013 SAMSUNG All rights reserved ...

Page 89: ...move the right cover Refer to 3 3 1 2 Remove the rear cover Refer to 3 3 3 3 Remove the middle cover Refer to 3 3 17 4 Remove the Exit Gear 5 Remove 2 screws 6 Remove 4 screws 7 Remove the Exit Unit Copyright 1995 2013 SAMSUNG All rights reserved 3 28 ...

Page 90: ...mbly and Reassembly 3 3 20 Bin Full Sensor 1 Remove the Exit Unit Refer to 3 3 19 2 Remove 3 screws Then remove the FRAME BINFULL 3 Remove the Bin Full sensor 3 29 Copyright 1995 2013 SAMSUNG All rights reserved ...

Page 91: ...move the right cover Refer to 3 3 1 2 Release the linker between MP TRAY and COVER MP 3 Remove the MP TRAY 4 Remove the COVER MP 5 Remove the COVER FRONT 6 Remove 2 screws Then release the bracket Copyright 1995 2013 SAMSUNG All rights reserved 3 30 ...

Page 92: ...3 Disassembly and Reassembly 7 Pull down on both green point of the MP Unit 8 Unplug the MP connector 9 Remove the MP Unit 3 31 Copyright 1995 2013 SAMSUNG All rights reserved ...

Page 93: ...isassembly and Reassembly 3 3 22 MP Roller 1 Open the front cover 2 Remove the MP roller cover 3 Release the MP roller Assy while pushing it to the left Copyright 1995 2013 SAMSUNG All rights reserved 3 32 ...

Page 94: ...3 1 PBA SCF 1 Remove the SCF cassette 2 Remove 3 screws 3 Remove the Cover Dummy Front 4 Remove 2 screws Then remove the Cover Right 5 Remove 7 screws Then remove the Frame Dummy Right 6 Remove 3 screws Then release the PBA SCF 3 33 Copyright 1995 2013 SAMSUNG All rights reserved ...

Page 95: ...he SCF cassette 2 Remove 3 screws 3 Remove the Cover Dummy Front 4 Remove 2 screws Then remove the Cover Right 5 Remove 7 screws Then remove the Frame Dummy Right 6 Remove 4 screws Then release the Lift Unit Copyright 1995 2013 SAMSUNG All rights reserved 3 34 ...

Page 96: ...y Front 4 Remove 2 screws Then remove the Cover Right 5 Remove 7 screws Then remove the Frame Dummy Right 6 Remove 2 E RINGs and 2 BUSHs Remove 2 screws And then remove the bracket 7 Open the harness clamp Unplug the clutch connector And then release the clutch 3 35 Copyright 1995 2013 SAMSUNG All rights reserved ...

Page 97: ...he SCF cassette 2 Remove 3 screws 3 Remove the Cover Dummy Front 4 Remove 2 screws Then remove the Cover Right 5 Remove 7 screws Then remove the Frame Dummy Right 6 Remove 4 screws Then release the Drive Unit Copyright 1995 2013 SAMSUNG All rights reserved 3 36 ...

Page 98: ...ne is powered on and you can use it To turn the machine off press and hole this button for at least 3 seconds Press Yes when the confirmation window appears 7 Clear Deletes characters in the edit area 8 Interrupt Stops a job in operation for urgent copying 9 Stop Stops an operation at any time The pop up window appears on the screen showing the current job that the user can stop or resume 10 Start...

Page 99: ...Enters the Shared Folder menu Scan to Email Enters the Scan to Email menu Scan to Server Enters the Scan to Server menu Scan to PC Enters the Scan to PC menu Scan to Shared Folder Enters the Scan to Shared Folder menu Quick Copy Enters the Quick Copy menu ID Copy Enters the ID Copy menu USB Enters the USB menu When a USB memory device is inserted into the USB memory port on your machine USB is act...

Page 100: ...ing When you press the Eco button the machine turns eco mode on or off If the eco mode is on you can see the eco image on some features Some options in the features are not available to use in the eco mode NOTE Only administrators have permission for Eco Setting in Machine Setup If the machine requests a password for eco mode you need to enter the password The Eco button is activated only for Copy...

Page 101: ...e is printing data On The toner cartridge life is totally empty Remove the old toner cartridge and install a new one A paper jam has occurred The door is open Close the door There is no paper in the tray Load paper in the tray The machine has stopped due to a major error Check the display message Orange Blinking A minor error has occurred and the machine is waiting for the error to be cleared Chec...

Page 102: ...escription Blue On The machine is on line and can be used The machine is in power save mode When data is received or any screen is pressed it switches to on line automatically 4 5 Copyright 1995 2013 SAMSUNG All rights reserved ...

Page 103: ...the proper operation of this printer Follow all of the instructions carefully 1 Download the firmware file from the Global Service Partner Network GSPN or Technical Support Portal TSP website 2 Unzip the firmware file to a folder on your PC 3 Copy the firmware file hds or par to a USB flash drive 4 Plug the USB flash drive into the USB port 5 Press the button on control panel in this order Setting...

Page 104: ...e from the Global Service Partner Network GSPN or Technical Support Portal TSP website 2 Access a web browser such as Internet Explorer from Windows Enter the machine IP address of your printer http xxx xxx xxx xxx in the address field and press the Enter key or click Go Login as Admin in Sync Thru Web Service NOTE Login using the Administrator ID and Password established during initial machine se...

Page 105: ...loading the f w file on MFP validation information will appear Check the Overwrite check box if you want to force the firmware update even if the firmware version to be installed is lower or same with the currently installed firmware in the device Press OK to start the firmware upgrade Copyright 1995 2013 SAMSUNG All rights reserved 4 8 ...

Page 106: ...4 Troubleshooting 7 The firmware update will start 8 Once the installation is complete the machine power off and power on automatically 4 9 Copyright 1995 2013 SAMSUNG All rights reserved ...

Page 107: ... avoid tearing the paper pull the jammed paper out slowly and gently In tray1 1 Pull out tray1 2 Remove the jammed paper by gently pulling it straight out 3 Insert tray 1 back into the machine until it snaps into place Copyright 1995 2013 SAMSUNG All rights reserved 4 10 ...

Page 108: ...4 Troubleshooting If you do not see the paper in this area stop and go to next step 4 Open the front cover 5 Remove the toner cartridge 4 11 Copyright 1995 2013 SAMSUNG All rights reserved ...

Page 109: ...4 Troubleshooting 6 Open the MP Jam guide 7 Remove the jammed paper Then close the MP Jam guide 8 Install the toner cartridge Copyright 1995 2013 SAMSUNG All rights reserved 4 12 ...

Page 110: ...4 Troubleshooting 9 Close the front cover 4 13 Copyright 1995 2013 SAMSUNG All rights reserved ...

Page 111: ...NOTE The procedure is same for all optional trays 1 Pull out optional tray 2 2 Remove the jammed paper from the machine 3 Insert tray 2 back into the machine until it snaps into place Copyright 1995 2013 SAMSUNG All rights reserved 4 14 ...

Page 112: ...4 Troubleshooting If you do not see the paper in this area stop and go to next step 4 Pull out tray2 5 Pull the paper straight up and out 4 15 Copyright 1995 2013 SAMSUNG All rights reserved ...

Page 113: ...oting 6 Insert the tray2 back into the machine If you do not see the paper in this area stop and go to next step 7 Open the rear cover 8 Remove the jammed paper Copyright 1995 2013 SAMSUNG All rights reserved 4 16 ...

Page 114: ...Close the rear cover In the multi purpose or manual feeder tray 1 If the paper is not feeding properly pull the paper out of the machine 2 Open and close the front cover 4 17 Copyright 1995 2013 SAMSUNG All rights reserved ...

Page 115: ... machine cool before removing paper from the Fuser Unit area Failure to take care when removing paper from this area may cause injury 1 Open the front cover 2 Pull the toner cartridge out 3 Remove the jammed paper by gently pulling it straight out Copyright 1995 2013 SAMSUNG All rights reserved 4 18 ...

Page 116: ...4 Troubleshooting 4 Open the MP Jam guide 5 Remove the jammed paper Then close the MP Jam guide 6 Install the toner cartridge 7 Close the front cover 4 19 Copyright 1995 2013 SAMSUNG All rights reserved ...

Page 117: ...4 Troubleshooting If you do not see the paper in this area stop and go to next step 8 Open the rear cover 9 Remove the jammed paper Copyright 1995 2013 SAMSUNG All rights reserved 4 20 ...

Page 118: ...fuser area is hot Take care when removing paper from the machine 1 Remove the jammed paper by gently pulling it straight out If you do not see the paper in this area stop and go to next step 2 Open the rear cover 4 21 Copyright 1995 2013 SAMSUNG All rights reserved ...

Page 119: ...med paper by gently pulling it straight out 4 Close the rear cover If you do not see the paper in this area stop and go to next step 5 Open the rear cover 6 Pull down the fuser levers Copyright 1995 2013 SAMSUNG All rights reserved 4 22 ...

Page 120: ...ser jam guide 8 Remove the jammed paper gently by pulling it straight out CAUTION Be careful when servicing this area as the Fuser Unit is extremely hot 9 Close the fuser jam guide 4 23 Copyright 1995 2013 SAMSUNG All rights reserved ...

Page 121: ...bleshooting 10 Pull up the fuser levers 11 Close the rear cover In the duplex unit area 1 Remove the rear bottom dummy cover Then pull out the duplex unit Copyright 1995 2013 SAMSUNG All rights reserved 4 24 ...

Page 122: ...4 Troubleshooting 2 Open the duplex jam guide 3 Remove the jammed paper 4 Close the duplex jam guide 5 Lock the duplex jam guide 4 25 Copyright 1995 2013 SAMSUNG All rights reserved ...

Page 123: ...4 Troubleshooting 6 Remove the jammed paper 7 Install the duplex unit 8 Install the rear bottom dummy cover Copyright 1995 2013 SAMSUNG All rights reserved 4 26 ...

Page 124: ...nal document jams Original paper jam in front of scanner 1 Open the document feeder cover 2 Gently remove the original carefully from the document feeder 3 Close the document feeder cover 4 27 Copyright 1995 2013 SAMSUNG All rights reserved ...

Page 125: ... of scanner 1 Open the document feeder cover 2 Gently remove the original carefully from the document feeder 3 Close the document feeder cover If you see no paper in this area go to next step Copyright 1995 2013 SAMSUNG All rights reserved 4 28 ...

Page 126: ...eshooting 4 Open the document feeder 5 Grasp the misfeed original and remove the paper from the feed area by carefully pulling it 6 Close the document feeder 4 29 Copyright 1995 2013 SAMSUNG All rights reserved ...

Page 127: ...ooting Original paper jam in exit area of scanner 1 Lift up the stacker 2 Gently remove the original carefully from the document feeder 3 Pull down the stacker Copyright 1995 2013 SAMSUNG All rights reserved 4 30 ...

Page 128: ...t up other network parameters Change the printer preference Set the email notifications advising of the machine s status Get support for using the machine Upgrade machine firmware Required web browser You need one of the following web browsers to use SyncThru Web Service Internet Explorer 6 0 or higher Chrome 4 0 or higher FireFox 3 0 or higher Safari 3 0 or higher Connecting to SyncThru Web Servi...

Page 129: ...erts in the machine Use this information to troubleshoot machine errors Supplies You can check the supplies information For toner cartridges and imaging units supplies status is displayed with a visual graph showing you the amount of each supply left Page counts are also available which can help you predict when to change the supplies This feature is also available from the machine Usage Counters ...

Page 130: ... the machine sends a notification to the administrator via email You can set whether to use this feature or not You can also select which alerts to receive and when Network Settings You can set up the network environment to use your machine as a network machine You can also set the settings from the machine General You can set general machine information to use in the network and set ethernet sett...

Page 131: ...iltering as well as manage filtering rules 802 1x You can enable disable 802 1x Security as well as manage filtering rules External Authentication Server Set the servers for authentication User Access Control You can restrict users from accessing the machine or application You can also give specific permission for user to only use certain feature of the machine For example you can allow user A to ...

Page 132: ...tions license If you add an application you need to activate the license of the installed application Some applications may not have a license Backup Restore You can backup the machine s configurations and restore the configuration when there is a problem with the machine The saved backed up files can also be used to configure other machines Contact Information You can view contact information Lin...

Page 133: ...Available for Windows and Mac OS users only For Windows Internet Explorer 6 0 or higher is the minimum requirement for Samsung Easy Printer Manager Understanding Samsung Easy Printer Manager To open the program For Windows Select Start Programs or All Programs Samsung Printers Samsung Easy Printer Manager For Mac The Samsung Easy Printer Manager interface is comprised of various basic sections as ...

Page 134: ...when alerts will be received Email Alert Provides options relating to receiving alerts via email Alert History Provides a history of device and toner related alerts 3 Application information Includes links for changing to the refresh preference setting help and about 4 Printer information This area gives you general information about your machine You can check information such as the machine s mod...

Page 135: ...Level 3 Level 4 General Customer Replacement Unit Toner Transfer Fuser Roller Supply Status Field Replacement Unit ADF Roller Software Version Power On Hours Low Power Hours Service Hours Power Save Hours Fault Log Print Reports RTF Format XML Format Information Export Reports PDF Format b Maintenance Counts Tab Level 1 Level 2 Level 3 Level 4 Fault Count Pick up Jam Feed Jam Duplex Jam Print Jam ...

Page 136: ...t Manual Adjustment Diagnostics Adjustment ADF Adjustment Manual Adjustment d Service Functions Level 1 Level 2 Level 3 Level 4 Main Memory Clear Device Configuration Data Clear Temporary Spool Data Clear User Saved Data Log Clear All Saved Data Clear Hard Disk Check Hard Disk Maintenance HDD Encryption Enable Telnet Enable OSGI Enable Samba Enable SSH Port Enable ADB Debug Log Off Job Status Deta...

Page 137: ... Level 3 Level 4 ALL Back up User Data Management Restore Clear System Cache Enhanced Security Off On Hibernation Off On CREATE NEW IMAGE Enable Paper Low Warning Message Disable SFE Copyright 1995 2013 SAMSUNG All rights reserved 4 40 ...

Page 138: ...s It indicates the hours of system power on since the first booting of the system Low Power Hours It indicates the hours of system low power on since the first booting of the system Power Save Hours It indicates the hours of system power save since the first booting of the system Information Fault Log This menu displays faults occurred while the system was operating Pressing clear button will clea...

Page 139: ...umber of occurrences Maintenance Counts Jam Count This menu displays the jam Counts of the system Users can select one jam group which indicates the location of jams and press OK to see a detailed jam location along with the occurrence of the jam Maintenance Counts Part Replacement Count This menu displays the replacement Counts for the system parts Users can select one part group and press OK to ...

Page 140: ...BLDC Motor is On Off 100 0010 Main BLDC Motor Ready Detect if Main BLDC Motor runs at normal speed 100 0120 Exit Motor Forward Fast Exit Motor Forward Fast On Off 100 0131 Exit Motor Backward Exit Motor Forward Backward On Off 100 0140 Duplex Motor Forward Duplex Motor Forward On Off 100 0200 T1 Elevating Motor T1 Elevate Motor On Off 100 0260 SMPS Fan Run Start Stop SMPS Fan run 100 0270 SMPS Fan...

Page 141: ... tray3 is high or low 102 0180 T3 Size3 sensor Detects whether auto size3 sensor of tray3 is high or low 102 0190 T3 Stack Height Sensor Detects if paper in tray3 is elevated to the sensor 102 0210 Tray4 Home Position Detect when tray4 is closed 102 0220 T4 Paper Empty Sensor Detect when paper is in tray4 102 0230 T4 Size1 sensor Detects whether auto size1 sensor of tray4 is high or low 102 0240 T...

Page 142: ... Write This menu changes a configuration value for fax firmware Code NVM Name NVM Description Default Range 20 200 Pause Dial Time Pause Time value 1000ms Country Value 0 200 20 210 Dial Pulse M B ratio 33 66 40 60 Country Value 0 OPTION_DP_33 1 OPTION_DP_40 2 OPTION_DP_37 3 OPTION_DP_50 20 220 Auto Dial Start Pause Time Pause time before auto dialing second 1 0 10 20 300 Ring On Time Ring On Time...

Page 143: ... to allow redials Country Value 0 OPTION_OFF 1 OPTION_ON 20 560 TCF Duration Adjust TCF duration ms 1500 1000 3000 20 700 Line Monitor Setting Audio Line Monitor Off On Comm Off Always Off On Always On Comm On util fax connection 11 0 OPTION_T30_SPK_OFF 1 OPTION_T30_SPK_ON_1 2 OPTION_T30_SPK_ON_2 3 OPTION_T30_SPK_ON_3 4 OPTION_T30_SPK_ON_4 5 OPTION_T30_SPK_ON_5 6 OPTION_T30_SPK_ON_6 7 OPTION_T30_S...

Page 144: ...30 Auto Dial Timeout Adjust Auto Dial Timeout second Country Value 30 150 20 930 Caller ID This option is needed to guide Caller ID off for user environment Country Value 0 OPTION_OFF 1 OPTION_ON Diagnostics Fax Diagnostics Fax Test Routines This menu performs test routines for the fax machine Code NVM Name NVM Description State Displayed 20 012 Sngl Tone 1100Hz Ln1 Emits single tone 1100Hz on lin...

Page 145: ... Off 20 047 V 17 12000 bps Line1 Emits V 17 12000 bps Line1 On Off 20 048 V 17 14400 bps Line1 Emits V 17 14400 bps Line1 On Off 20 049 V 34 2400 bps Line1 Emits V 34 2400 bps Line1 On Off 20 050 V 34 4800 bps Line1 Emits V 34 4800 bps Line1 On Off 20 051 V 34 7200 bps Line1 Emits V 34 7200 bps Line1 On Off 20 052 V 34 9600 bps Line1 Emits V 34 9600 bps Line1 On Off 20 053 V 34 12000 bps Line1 Emi...

Page 146: ... Scanner Platen Motor Backward Start Stop 06 0040 Scanner Platen Home Position Sensor High Low 05 0040 Document Detect Sensor High Low 05 0070 Document Scan Read Sensor1 High Low 05 0110 Document Motor Forward Start Stop 05 0111 Document Motor Backward Start Stop 05 0130 Document Pickup Motor Forward Start Stop 05 0131 Document Pickup Motor Backward Start Stop 4 49 Copyright 1995 2013 SAMSUNG All ...

Page 147: ...value is needed press Print Last Shade Report For ADF DSDF Unit 1 Load the shading sheet on the DSDF tray 2 Enter SVC mdoe Select the following menu Diagnostics Scanner Diagnostics Shading Test Shade and Print Report ADF When the previous shading value is needed press Print Last Shade Report ADF 3 Check if RESULTS on the sheet is OK NOTE When executing DSDF shading use only exclusive shading sheet...

Page 148: ...OK button to save changes Simplex Leading Edge Simplex Side Edge Duplex Leading Edge Duplex Side Edge NOTE Adjustment must be done for each tray tray1 tray2 tray3 tray4 MP It is recommended not to choose ALL for tray selection It is always better to adjust for a particular tray at each time Adjustment range 5 0 mm 3 Print out the test pattern and check if the image is moved as you want If not repe...

Page 149: ...or the adjustment 3 The Procedure for copy adjustment is almost same as Print Adjustment NOTE Adjustment must be done for each tray tray1 tray2 tray3 tray4 MP It is recommended not to choose ALL for tray selection It is always better to adjust for a particular tray at each time Adjustment range 5 0 mm 1 Select a tray required adjustment 2 Change the adjustment value with then press OK button to sa...

Page 150: ... button 3 Change the adjustment value with arrow button 4 Image Position a b If the current value is smaller than the specification press Otherwise press 5 Magnification c If the current value is smaller than the specification press Otherwise press 6 Press the OK button to apply the new value to the system 7 Scan the Scanner A S Chart and send it to a PC Scanning must be occur from the scan glass ...

Page 151: ... button 3 Change the adjustment value with arrow button 4 Image Position a b If the current value is smaller than the specification press Otherwise press 5 Magnification c If the current value is smaller than the specification press Otherwise press 6 Press the OK button to apply the new value to the system 7 Scan the Scanner A S Chart and send it to a PC Scanning must be occur from the DSDF 8 To c...

Page 152: ...rely Hard Disk Check This function checks a bad sector in the hard disk If a bad sector is found the system will display an error message and send an email notification to the system administrator Service Functions Port This function enables disables remote connections to the system via telnet OSGI command shell and SMB samba protocol This function can be used when there is a problem that requires...

Page 153: ... 6 Press Capture Log button 7 Once it is completed the message will be displayed Then restore the debug log level to JOB STATUS NOTE If the system log size become considerably huge it will take longer time to copy to the plugged memory 8 Check is the Log file is created in the USB memory Service Functions Network Packet Capture 1 Capture Packets Start button a Start to capture network packet betwe...

Page 154: ...nly System Binary in HDD User data is not deleted USB This can format the HDD using USB stick All data except the stored in MSOK will be deleted Network This can format the HDD using network All data except the stored in MSOK will be deleted b HDD Repair This can restore the internal system by checking the HDD error This is for HDD recovery itself and irrelevant to the user data in device 3 When p...

Page 155: ... system initialization NOTE If the system initialization is not executed enter the svc mode and execute Full memory clear If not the machine may not work normally 9 Execute the firmware update using the one ROM FW file after system initialization This work is a must for all FW module level Service Functions TR Control Mode This menu is to correct transfer related problems This function can be used...

Page 156: ...in tray 009 PJL readback response is changed with HPOS 1 Add CR LF to EOJ response 2 No EOJ job but EOJ response occurs 3 Device uses Job name instead of EOJ name 010 Maximum value of Power save time is increased as 240 min 012 If the device is in jam status all print jobs except secure or stored jobs are deleted automatically 013 The device ignores the USB memory stick and detects only card reade...

Page 157: ...etailed description of the problem from the customer Power On Red LED on Error message is displayed OPE LED Green OK Print test page Printing quality is nomal Refer to Solution of Image Problem See the troubleshooting for error code END No Power Power Module error Main PBA OPE LED ON Copyright 1995 2013 SAMSUNG All rights reserved 4 60 ...

Page 158: ...em persists P 4 68 A3 3312 Temperature Sensor Failure A3 3312 Turn off then on Call for service if the problem persists P 4 68 A3 3320 The room temperature is not suitable for this set use Please adjust room temperature P 4 68 C2 1110 Prepare new toner cartridge P 4 69 C2 1120 Replace with new toner cartridge P 4 69 C2 1150 Replace with new toner cartridge P 4 69 C2 1160 Replace with new toner car...

Page 159: ... H1 1410 Paper jam in tray 4 Please open the door and remove paper then close the door P 4 78 H1 1411 Paper jam in tray 4 Please open the door and remove paper then close the door P 4 78 H1 1420 Tray 4 door is open Close it P 4 78 H1 1422 Tray 4 cassette is pulled out Insert it properly P 4 79 H1 1434 Tray Failure H1 1434 Check tray connection turn off then on Call for service if the problem persi...

Page 160: ...heck it P 4 92 S6 3128 802 1x authentication failed Please contact the system administrator P 4 92 S7 2110 Fuser Unit Failure S7 2110 Turn off then on Call for service if the problem persists P 4 93 U1 2112 Fuser Unit Failure U1 2112 Turn off then on Call for service if the problem persists P 4 94 U1 2132 Fuser Unit Failure U1 2132 Turn off then on Call for service if the problem persists P 4 94 U...

Page 161: ...oblem persists P 4 95 U2 1113 LSU Failure U2 1113 Turn off then on Call for service if the problem persists P 4 95 U3 3113 Original paper jam in front of the scanner P 4 96 U3 3313 Original paper jam inside the scanner P 4 96 U3 3314 Original paper jam inside the scanner P 4 96 U3 3413 Original paper jam inside the scanner P 4 96 U3 3513 Original paper jam inside the scanner P 4 96 U3 3514 Origina...

Page 162: ...per mismatch Tray 1 paper mismatch Tray 2 paper mismatch Tray 3 paper mismatch Tray 4 paper mismatch MP tray paper mismatch Symptom Paper in tray is not matched to the machine paper setting Troubleshooting method 1 Check and change the paper setting of the corresponding tray properly 4 65 Copyright 1995 2013 SAMSUNG All rights reserved ...

Page 163: ...ine off then on If the error persists check the following 2 Remove the side cover 3 Check the connection between the main motor and main board 4 If the connection is OK enter SVC mode Execute the motor test Diagnostics Engine Diagnostics Engine Test Routines a If the motor is not operational i Check the motor signal 3 3V If the signal is abnormal replace the main board ii Check the power 24V If th...

Page 164: ...correctly 3 If the connection is OK Enter SVC mode and execute fan test Diagnostics Engine Diagnostics Engine Test Routines 4 If the fan is not operational measure the fan power a If 24V power is generated replace the defective fan SMPS fan JC31 00152B Main fan JC31 00161A b If 24V power is not generated Measure the 24V power on the SMPS board If the SMPS board is defective replace it If the SMPS ...

Page 165: ...sts The room temperature is not suitable for this set use Please adjust room temperature Symptom Outer temperature sensor is defective Troubleshooting method 1 Turn the machine off then on 2 Check if the machine is installed in proper environment 3 Check the harness connection between main board and temperature sensor Reconnect the sensor harness 4 If the problem persists replace the main board Co...

Page 166: ...ide the cartridge 4 Reinstall the toner cartridge 5 Close the front cover 6 Prepare new toner cartridge because it will be exhausted soon Error Code C2 1120 C2 1150 C2 1160 C2 1170 Error message Replace with new toner cartridge End of life Replace with new toner cartridge Symptom Toner cartridge is at the end of its life Troubleshooting method 1 Open the front cover 2 Remove the toner cartridge 3 ...

Page 167: ...nal or replace the toner cartridge 5 Check if the CRUM harness is connected correctly Reconnect it 6 If the harness is defective replace it 7 Turn the machine off then on Try to test the machine Error Code C2 1512 Error message Toner cartridge is not compatible Check users guide Symptom Toner cartridge is not compatible Troubleshooting method 1 Open the front cover Remove the toner cartridge 2 Che...

Page 168: ...n Clean the contact terminal 4 Check if the CRUM harness is connected correctly Reconnect it 5 If the harness is defective replace it 6 If the problem persists replace the toner cartridge with new one Error Code C6 1110 Error message Prepare new fuser unit Symptom Fuser unit life will be expired soon Troubleshooting method 1 Prepare new fuser unit Error Code C6 1120 Error message Replace with new ...

Page 169: ...n out 4 Check if the Empty Pick up Regi Act sensor of the tray2 is working properly 5 Check the connection between the motor clutch and the SCF board Reconnect the harness 6 If the problem persists after checking No 1 5 replace the SCF board Error Code H1 1220 Error message Tray 2 door is open Close it Symptom Tray 2 door is open Troubleshooting method 1 Check if the tray2 door is closed If not cl...

Page 170: ...r is normal replace the SCF board Error Code H1 1230 Error message Error H1 1230 Tray Failure H1 1230 Check tray 2 connection turn off then on Call for service if the problem persists Symptom Connection between the main machine and the SCF unit is abnormal Troubleshooting method 1 Check the harness connection between the main machine and the SCF unit Reconnect the harness 2 If the problem persists...

Page 171: ... contaminated If so clean it b If the paper empty sensor is defective replace it c If the empty actuator is defective replace it Error Code H1 1253 Error message Error H1 1253 Tray Failure H1 1253 Pull tray 2 out and insert it Call for service if the problem persists Symptom The paper is not fed from tray2 Troubleshooting method 1 Check if the cassette detection sensor cable is connected correctly...

Page 172: ... Empty Pick up Regi Act sensor of the tray3 is working properly 5 Check the connection between the motor clutch and the SCF board Reconnect the harness 6 If the problem persists after checking No 1 5 replace the SCF board Error Code H1 1320 Error message Tray 3 door is open Close it Symptom Tray 3 door is open Troubleshooting method 1 Check if the tray3 door is closed If not close it 2 If the prob...

Page 173: ...r is normal replace the SCF board Error Code H1 1332 Error message Error H1 1332 Tray Failure H1 1332 Check tray 3 connection turn off then on Call for service if the problem persists Symptom Connection between the main machine and the SCF unit is abnormal Troubleshooting method 1 Check the harness connection between the main machine and the SCF unit Reconnect the harness 2 If the problem persists...

Page 174: ... contaminated If so clean it b If the paper empty sensor is defective replace it c If the empty actuator is defective replace it Error Code H1 1353 Error message Error H1 1353 Tray Failure H1 1353 Pull tray 3 out and insert it Call for service if the problem persists Symptom The paper is not fed from tray3 Troubleshooting method 1 Check if the cassette detection sensor cable is connected correctly...

Page 175: ... Empty Pick up Regi Act sensor of the tray4 is working properly 5 Check the connection between the motor clutch and the SCF board Reconnect the harness 6 If the problem persists after checking No 1 5 replace the SCF board Error Code H1 1420 Error message Tray 4 door is open Close it Symptom Tray 4 door is open Troubleshooting method 1 Check if the tray4 door is closed If not close it 2 If the prob...

Page 176: ...r is normal replace the SCF board Error Code H1 1434 Error message Error H1 1434 Tray Failure H1 1434 Check tray 4 connection turn off then on Call for service if the problem persists Symptom Connection between the main machine and the SCF unit is abnormal Troubleshooting method 1 Check the harness connection between the main machine and the SCF unit Reconnect the harness 2 If the problem persists...

Page 177: ...taminated If so clean it b If the paper empty sensor is defective replace it c If the empty actuator is defective replace it Error Code H1 1453 Error message Error H1 1453 Tray Failure H1 1453 Pull tray 4 out and insert it Call for service if the problem persists Symptom The paper is not fed from tray4 Troubleshooting method 1 Check if the cassette detection sensor cable is connected correctly Unp...

Page 178: ...there is any obstacles in the paper path 3 Check the connection between the pick up sensor and the main board Reconnect the sensor harness 4 Check if the pick up forward separation rollers are contaminated or worn out If necessary replace the defective roller 5 Check the connection between the pick up motor and the main board Reconnect the motor harness 6 If the pick up motor is defective replace ...

Page 179: ...MP clutch harness is connected correctly Reconnect the harness 5 If the MP clutch is defective replace it 6 If the problem persists replace the MP Unit Error Code M1 3122 Error message Tray 1 cassette Out Tray 1 cassette is pulled out Insert it properly Symptom Tray 1 cassette is pulled out Troubleshooting method 1 Remove and reinstall the tray 1 cassette 2 Check if the cassette detection sensor h...

Page 180: ...s are contaminated or worn out If necessary replace the defective roller 2 Remove the side cover 3 Check the connection between the pick up motor and the main board Reconnect the motor harness 4 If the pick up motor is defective replace the pick up motor or pick up drive unit 5 Check the connection between the pick up sensor and the main board Reconnect the sensor harness 6 If the pick up sensor i...

Page 181: ...ectly Reconnect it 4 If the empty sensor is defective replace it Check if the connector is connected properly Error Code M1 5612 Error message Paper is empty in MP tray Load paper Symptom There is no paper in the MP tray or Manual Feeder Actuator Paper Empty or photo sensor is defective Troubleshooting method 1 Load the paper in the tray1 If the problem persists check the followings after turning ...

Page 182: ...e replace it 5 Check if the feed roller is contaminated or worn out If yes replace it 6 Check the main drive unit operation If necessary replace the main drive unit Error Code M2 2210 M2 2310 Error message Jam inside of duplex Jam bottom of duplex Symptom A paper jam was detected in the bottom of duplex Troubleshooting method 1 Remove the jammed paper 2 Remove the contamination or obstacles in the...

Page 183: ...ck if there is any obstacles or contamination in the paper path If yes clean or remove it 3 Check the connection between the exit fuser drive unit and the main board Reconnect the motor harness 4 If the exit fuser drive unit operation is abnormal replace it 5 If the paper is jammed in the exit unit continually replace the exit unit 6 If the paper is jammed in the fuser unit continually replace the...

Page 184: ...t the output tray has got full or the bin full sensor is defective Troubleshooting method 1 Remove the paper on the output tray 2 If the problem persists check the followings 3 Check if the Bin full Sensor connector is connected properly Reconnect it or replace the Bin full sensor 4 87 Copyright 1995 2013 SAMSUNG All rights reserved ...

Page 185: ...n off then on Call for service if the problem persists Symptom Communication error between the main board and fax board has occurred Troubleshooting method 1 Turn the machine off then on 2 If the problem persists check the followings 3 Check if the connection between the main board and fax board 4 If the problem persists replace the fax board 5 If the problem persists replace the main board Error ...

Page 186: ...S2 3310 Warm up status S2 3311 Ready status S2 3312 Printing status S2 3313 Power Save status S2 3314 Error status S2 3315 Recovery status S2 3316 Wait status S2 3317 EDC mode status S2 3318 Low power status S2 331C Temperature in machine is overheated S2 331D Temperature in fuser is overheated S2 3321 Toner is supplying When these errors display wait until the message will be disappeared or turn ...

Page 187: ...fective Troubleshooting method 1 Check if the front door is closed correctly 2 Check if the rear door is closed correctly 3 Check if the connection between the main board and HVPS board is correct 4 Check if the cover open switch on HVPS board is operated properly If it is defective replace the HVPS board Copyright 1995 2013 SAMSUNG All rights reserved 4 90 ...

Page 188: ... or replace the cable 3 If the CIS is defective replace it 4 Check if there is any defective part in the scanner unit Gear Belt Motor etc 5 If the problem persists replace the main board Error Code S4 2111 S4 2112 Error message Fax Memory is almost full Print or remove received fax Job Fax memory is full Print or remove received fax Job Symptom The fax memory is almost full Troubleshooting method ...

Page 189: ...hecking the ping test Troubleshooting method Change the machine s IP address Set up the IP address in this order Network TCP IP IPv4 STATIC In case of DHCP or Bootp reboot the machine to receive a new IP address Error Code S6 3128 Error message 802 1x authentication failed Please contact the system administrator Symptom The confirmation was requested for wired port the server has rejected The conf...

Page 190: ...Is the error message is disappeared 2 If the problem persists turn the machine off and remove the fuser unit a Check if the fuser connector is connected properly b Check if the input voltage is normal c Check if the thermistor is twisted or contaminated and is in contact with the Heat Roller 3 After confirming continuity in the fuser connector and the problem still exists order an SMPS and Fuser U...

Page 191: ...e error message is disappeared 2 If the problem persists turn the machine off and remove the fuser unit a Check if the fuser connector is connected properly b Check if the input voltage is normal c Check if the thermistor is twisted or contaminated and is in contact with the Heat Roller 3 After confirming continuity in the fuser connector and the problem still exists order an SMPS and Fuser Unit a...

Page 192: ...tor operation sound 2 If there is no sound remove the right cover Check if the LSU harness is connected on the main board properly 3 If it is OK remove the top cover Check if the LSU harness is connected on LSU board properly 4 Check if the LSU harness is defective 5 Reconnect the LSU harness and then execute the LSU motor test again 6 If the problem persists replace the LSU 7 If the problem persi...

Page 193: ...if the pick up motor operates normally 2 Open the DSDF cover Check if the paper jam is occurred 3 Remove the jammed paper 4 Check if there are any obstacles or contamination on the paper path Remove it 5 If the problem persists check the followings a Separate the DSDF Unit b Check the sensor connection If the connection is OK replace the sensor 6 Push the white bar Check if it returns in original ...

Page 194: ...d 1 Close the DSDF cover properly 2 If this error occurs continually check the following a Check the DSDF cover open sensor and its harness If there is a defective part replace it b If both of them are normal check the Cover Open Rib If it is broken replace the Cover Open 4 97 Copyright 1995 2013 SAMSUNG All rights reserved ...

Page 195: ...ust be eliminated The first step is to generate prints using printable pages embedded in the printer on laser paper The paper should be from an unopened ream that has been acclimated to room temperature and you should ensure that genuine Samsung Toner is installed in the printer How to analysis the defect image TIP According to the part remain life cause can vary Check the part remain life Check t...

Page 196: ...by toner residue debris etc Clean the paper path The toner cartridge is defective Replace the toner cartridge The transfer roller is contaminated or worn out Replace the transfer roller The pressure roller or heat roller in fuser unit defective 1 Turn the machine off 2 Remove and replace the fuser unit 3 Turn the machine on WARNING Do not touch the fuser unit while it is hot 4 99 Copyright 1995 20...

Page 197: ...residue debris etc Clean the paper path The toner cartridge is defective Replace the toner cartridge The transfer roller is contaminated or worn out Replace the transfer roller The LSU window is contaminated 1 Clean the LSU window 2 Replace the LSU The connection between the LSU and main board is defective 1 Disconnect and reconnect the harness 2 Replace the harness Copyright 1995 2013 SAMSUNG All...

Page 198: ...is contaminated 1 Clean the LSU window The pressure roller or heat roller in fuser unit defective 1 Turn the machine off 2 Remove and replace the fuser unit 3 Turn the machine on WARNING Do not touch the fuser unit while it is hot HVPS terminal is contaminated Clean the contaminated terminal The output from the HVPS is abnormal Replace the HVPS board NOTE Roller Period for Horizontal Problem Rolle...

Page 199: ... in the toner cartridge may be contaminated with foreign matter or paper particles Replace the toner cartridge The transfer roller is contaminated or worn out Replace the transfer roller The pressure roller or heat roller in fuser unit defective 1 Turn the machine off 2 Remove and replace the fuser unit 3 Turn the machine on WARNING Do not touch the fuser unit while it is hot Copyright 1995 2013 S...

Page 200: ...r cartridge life is expired Replace the toner cartridge The surface of transfer roller is contaminated or worn out Replace the transfer roller HVPS terminal is contaminated Clean the contaminated terminal The output from the HVPS is abnormal Replace the HVPS board 4 103 Copyright 1995 2013 SAMSUNG All rights reserved ...

Page 201: ...n The charging roller in the toner cartridge is defective Replace the toner cartridge The HVPS contact terminal is contaminated Clean the HVPS contact terminal The output from the HVPS is abnormal Replace the HVPS board The LSU is defective Replace the LSU Copyright 1995 2013 SAMSUNG All rights reserved 4 104 ...

Page 202: ...ansfer roller is not even The springs are damaged The transfer roller is improperly installed 1 Remove the transfer roller Assy 2 Check if the transfer roller Assy has any wrong part 3 Replace the transfer roller Assy The toner level is not even on the toner cartridge roller due to the bad blade Replace the toner cartridge 4 105 Copyright 1995 2013 SAMSUNG All rights reserved ...

Page 203: ...area of the printing Probable Cause Solution Does recycle paper be used Use the proper papers The life of the toner cartridge has been expired Replace the toner cartridge The output from the HVPS is abnormal Replace the HVPS board Copyright 1995 2013 SAMSUNG All rights reserved 4 106 ...

Page 204: ...rtridge The transfer roller is contaminated or worn out Replace the transfer roller The pressure roller or heat roller in fuser unit defective 1 Turn the machine off 2 Remove and replace the fuser unit 3 Turn the machine on WARNING Do not touch the fuser unit while it is hot The HVPS contact terminal is contaminated Clean the HVPS contact terminal The output from the HVPS is abnormal Replace the H...

Page 205: ...transfer roller is contaminated or worn out Replace the transfer roller The pressure roller or heat roller in fuser unit defective 1 Turn the machine off 2 Remove and replace the fuser unit 3 Turn the machine on WARNING Do not touch the fuser unit while it is hot Copyright 1995 2013 SAMSUNG All rights reserved 4 108 ...

Page 206: ... transfer roller is contaminated or worn out Replace the transfer roller The LSU window is contaminated 1 Clean the LSU window 2 Replace the LSU The connection between the LSU and main board is defective 1 Disconnect and reconnect the harness 2 Replace the harness The connection between the main board and HVPS board is bad Reconnect the harness If the main board or HVPS board is defective replace ...

Page 207: ...or test The developer circulation in the toner cartridge is bad 1 Shake the toner cartridge 2 3 times from right to left Reinstall the toner cartridge Print 10 sample pages for test 2 If the problem persists replace the toner cartridge The contact between toner cartridge and transfer roller is bad Check if the toner cartridge and transfer roller are installed properly Copyright 1995 2013 SAMSUNG A...

Page 208: ...nit is not installed properly 1 Turn the machine off 2 Remove and reinstall the fuser unit 3 Turn the machine on The fuser connection is bad Check the connection between the fuser unit and main board The fuser unit defective 1 Turn the machine off 2 Remove and replace the fuser unit 3 Turn the machine on WARNING Do not touch the fuser unit while it is hot 4 111 Copyright 1995 2013 SAMSUNG All righ...

Page 209: ... up motor Pick up Forward Retard roller is worn out or contaminated Clean or replace the defective roller 2 No Power Description When system power is turned on LED and LCD on the operator panel do not come on Check and cause Solution The connection between main board and OPE board is bad Reconnect or replace the harness SMPS output is abnormal Replace the SMPS board Copyright 1995 2013 SAMSUNG All...

Page 210: ... 3P2863A VCLK USB CLK M CLK STE P A 4984 X 3 USB HU B USB Di r ect STE P MO TO R GP I O M T STEP DEBU G EEPRO M M 24256 32KB NAND FLAS H SCAN I F FUSE R AD C PW M CON T DC I S DC I S 24V 5V 512M B NA ND 256M B DD R3 3CH DCD C 1 1V 1 2V 3 3V SAT A 2 5 320G HDD BLDC M T Pi ckUp St ep M T FuserSt ep M T Dupl ex St ep M T SM PS FAN M AI N FAN RegiCl ut ch M P Cl ut ch Regi FEED EXI T BI N_FULL M P EM ...

Page 211: ...CIS_PL ATEN 1 2 3 4 5 6 7 8 9 10 11 12 13 14 15 16 17 18 N C O PT_nCM DREQ N C N C GN D GN D GN D GN D GN D 24V3 24V3 24V3 5V 5V 5V O PT_nRESET O PT_RXD O PT_TXD CRU M SCF 1 24 23 22 21 20 19 18 17 16 15 14 13 12 11 10 9 8 7 6 5 4 3 2 1 20 19 18 17 16 15 14 13 12 11 10 9 8 7 6 5 4 3 2 1 DR04010SL24ZI 4010M24S NDF HTS543232A7A384 M Q 01ABF032 4 3 2 1 2 1 CLU TCH 2 1 CLUTCH JC91 01024A SS 5GL1111D A...

Page 212: ...e and easy troubleshooting as described in this service manual DVM Digital Volt Meter Standard Indicates more than 3 digits Cleaning Equipments Standard An IPA Isopropyl Alcohol dry wipe tissue or a gentle neutral detergent and lint free cloth Driver Standard type type M3 long M3 short M2 long M2 short Vacuum Cleaner Tweezers Standard For general home use small type Spring Hook Standard For genera...

Page 213: ...ting systems running on them The BOOTP servers assign the IP address from a pool of addresses to each client BOOTP enables diskless workstation computers to obtain an IP address prior to loading any advanced operating system CCD Charge Coupled Device CCD is a hardware which enables the scan job CCD Locking mechanism is also used to hold the CCD module to prevent any damage when you move the machin...

Page 214: ...f external behavior which is in contrast to simulation which concerns an abstract model of the system being simulated often considering its internal state Ethernet Ethernet is a frame based computer networking technology for local area networks LANs It defines wiring and signaling for the physical layer and frame formats and protocols for the media access control MAC data link layer of the OSI mod...

Page 215: ...t produces world wide industrial and commercial standards ITU T The International Telecommunication Union is an international organization established to standardize and regulate international radio and telecommunications Its main tasks include standardization allocation of the radio spectrum and organizing interconnection arrangements between different countries to allow international phone calls...

Page 216: ...come an industry standard Originally developed for early inkjet printers PCL has been released in varying levels for thermal dot matrix printer and laser printers PDF Portable Document Format PDF is a proprietary file format developed by Adobe Systems for representing two dimensional documents in a device independent and resolution independent format PostScript PS PostScript PS is a page descripti...

Page 217: ...N compliant program a scan can be initiated from within the program It is an image capture API for Microsoft Windows and Apple Macintosh operating systems UNC Path Uniform Naming Convention UNC is a standard way to access network shares in Window NT and other Microsoft products The format of a UNC path is servername sharename Additional directory URL Uniform Resource Locator URL is the global addr...

Page 218: ...nection easily without a computer XPS XML Paper Specification XPS is a specification for a Page Description Language PDL and a new document format which has benefits for portable document and electronic document developed by Microsoft It is an XML based specification based on a new print path and a vector based device independent document format 6 7 Copyright 1995 2013 SAMSUNG All rights reserved ...

Page 219: ...ference Information 6 3 The Sample Pattern for the Test The life of the toner cartridge and the printing speed are measured using the pattern shown below Copyright 1995 2013 SAMSUNG All rights reserved 6 8 ...

Page 220: ...name by Segment Xpress ProXpress MultiXpress 2 Model code Information Basic Structure SL Function Information Function N Network W Wireless Network D Duplex Printing R Reverse Type ADF F Fax X XOA eXtensible Open Architecture H Handset A Auto Document Feeder 6 9 Copyright 1995 2013 SAMSUNG All rights reserved ...

Page 221: ...6 Reference Information 6 5 Document Revision List Version Date Page Description 1 00 22 Jun 2015 Release Copyright 1995 2013 SAMSUNG All rights reserved 6 10 ...

Page 222: ...apan https gspn2 samsungcsportal com N America S America https gspn3 samsungcsportal com This Service Manual is a property of Samsung Electronics Co Ltd Any unauthorized use of Manual can be punished under applicable International and or domestic law 2013 Samsung Electronics Co Ltd All rights reserved Printed in Korea Code No ...

Reviews: