background image

English - 

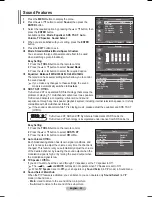
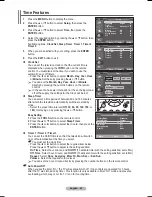
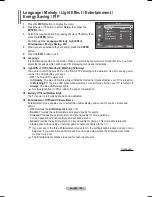
Language / Melody / Light Effect / Entertainment /  

Energy Saving / PIP

1

  Press the 

MENU

 button to display the menu.

  Press the ▲ or ▼ button to select 

Setup

, then press the 

ENTER

 button.

  Select the required option by pressing the ▲ or ▼ button, then 

press the 

ENTER

 button.


Available options: 

Language

Melody

Light Effect

Entertainment

Energy Saving

PIP

4

  When you are satisfied with your setting, press the 

ENTER


button.

5

  Press the 

EXIT

 button to exit.

 

Language

It is variable depending on the model. When you start using the television for the first time, you must 

select the language which will be used for displaying menus and indications.

 

Light Effect

:

 Off/In Standby/In Watching TV/Always

You can turn on/off the blue LED on the front of TV according to the situation. Use it for saving power 

or when the LED dazzles your eyes.

− 

Off

: The blue LED is always off.

− 

In Standby

: The blue LED lights while in Standby mode and it turns off when your TV is turned on. 

− 

In Watching TV

: The blue LED lights when watching TV and it turns off when your TV is turned off.

− 

Always

: The blue LED always lights.

➢ 

Set the Light Effect to Off to reduce the power consumption.

 

Melody

Off/Low/Medium/High

The TV power on/off melody sound can be adjusted.

 

Entertainment

Off/Sports/Cinema/Game 

Entertainment mode enables you to select the optimal display and sound for sports, cinema and 

games.

− 

Off

: Switches the 

Entertainment

 function off.

− 

Sports

: Provides the optimal picture and sound quality for sports.

− 

Cinema

: Provides the optimal picture and sound quality for movie watching. 

You can experience a richer picture and enhanced sound.

− 

Game

: Provides the optimal picture and sound quality for games. This mode accelerates the 

playing speed when using an external game console connected to the TV.

➢ 

If you set any of the three Entertainment modes to On, the settings will be locked and can not be 

adjusted. If you want to make Picture and Sound mode adjustments, the Entertainment mode 

must be turned off.

➢ 

The Entertainment settings are saved for each input source.

Continued...


Move 

 Enter 

 Return

Plug & Play  


Language   

:


English 

Time 


Light Effect  

: In Watching TV 

Wall-Mount Adjustment     

Melody 


:


Off


Entertainment 

:


Off


Energy Saving 

:


Off


PIP 


Setup

T V

BN68-01423EF-00Eng.indb   26

2008-04-14   오후 6:36:53

Summary of Contents for PS42A410

Page 1: ... 55 www samsung ru UKRAINE 8 800 502 0000 www samsung com Благодарим за приобретение продукта компании Samsung Для получения более полного обслуживания зарегистрируйте свое устройство по адресу www samsung com global register удивительные возможности Плазменный телевизор руководство пользователя Модель Серийный номер BN68 01423E 01 PS42A410 PS50A410 BN68 01423E 00 Rus indd 2 3 2008 04 08 ÀÈÄ 8 44 ...

Page 2: ...ls which require sophisticated technology to produce However there may be few bright or dark pixels on the screen These pixels will have no impact on the performance of the product Avoid operating the TV at temperatures below 5 C 41 F A still image displayed too long may cause permanent damage to the PDP Panel Watching the PDP TV in 4 3 format for a long period of time may leave traces of borders ...

Page 3: ...e Amplifier 17 Picture Control Changing the Picture Standard 18 Customizing the Picture Settings 18 Configuring Detailed Settings on the Picture 19 Picture Options 20 Resetting the Picture Settings to the Factory Defaults 22 Sound Control Sound Features 23 Selecting the Sound Mode depending on the model 24 Connecting Headphones Sold separately 24 Function Description Time Features 25 Language Melo...

Page 4: ...s Audio Cables PC Cable Scart Cable PC Audio Cable HDMI Cable HDMI DVI Cable Ferrite Core Power Cord S Video The ferrite cores are used to shield the cables from interference When connecting a cable open the ferrite core and clip it around the cable near the plug Using the Stand Base Two or more people should carry the PDP Never lay the PDP on the floor because of possible damage to the screen Alw...

Page 5: ... 4 C P Press to change channels In the on screen menu use the C P buttons as you would use the and buttons on the remote control 5 ENTER In the on screen menu use this button as you would use the ENTER button on the remote control 6 POWER Press to turn the TV on and off Power Indicator Blinks and turns off when the power is on and lights up in stand by mode Remote Control Sensor Aim the remote con...

Page 6: ...r external devices such as VCR DVD video game device or video disc players Input Output Specification Connector Input Output Video Audio L R RGB Video Audio L R EXT 1 Only TV output is available EXT 2 Output you can choose 5 Connecting external Audio Devices Connect RCA audio signals from the TV to an external source such as Audio equipment 6 SERVICE Connector for service Connect the serial jack b...

Page 7: ...tection coding feature installed and supports multi channel digital audio DVI IN HDMI2 AUDIO R L DVI audio outputs for external devices 8 ANT IN 75Ω Coaxial connector for Aerial Cable Network Supported modes for HDMI DVI and Component 480i 480p 576i 576p 720p 1080i HDMI DVI 50Hz X X X O O O HDMI DVI 60Hz X O X X O O Component O O O O O O The product colour and shape may vary depending on the model...

Page 8: ... selection Previous channel Next channel Previous channel Returns to the previous menu Exit the on screen menu Displays the main on screen menu Picture size selection Selects the HDMI mode directly a Picture effect selection Refer to page 18 Teletext Functions Refer to page 30 2 Exit from the teletext display depending on the model 7 Teletext size 9 Teletext reveal 0 Fastext topic selection Telete...

Page 9: ...ess the POWER button on the remote control to switch the television on The programme that you were watching last is re selected automatically If you have not yet stored any channels no clear picture appears Refer to Storing Channels Automatically on page 13 or Storing Channels Manually on page 14 If the television is initially powered on several basic customer settings proceed automatically Refer ...

Page 10: ...nnected status of the antenna is displayed The default selection is Home Use We recommend setting the TV to Home Use mode for the best picture in your home environment Store Demo mode is only intended for use in retail environments If the unit is accidentally set to Store Demo mode and you want to return to Home Use Standard Press the Volume button When the volume OSD is displayed press and hold t...

Page 11: ...essage Enjoy your viewing is displayed When you have finished press the ENTER button Even if the ENTER button is not pressed the message will automatically disappear after several seconds If you want to reset this feature 1 Press the MENU button to display the menu 2 Press the or button to select Setup then press the ENTER button 3 Press the ENTER button again to select Plug Play The message Start...

Page 12: ...u can also watch HDMI mode simply by pressing the HDMI button on the remote control Using the TOOLS Button You can use the TOOLS button to select your frequently used functions quickly and easily The Tools menu changes depending on which external input mode you are viewing 1 Press the TOOLS button The Tools menu will appear 2 Press the or button to select a menu then press the ENTER button 3 Press...

Page 13: ...u do not wish to watch 1 Press the MENU button to display the menu 2 Press the or button to select Channel then press the ENTER button 3 Press the ENTER button again The available countries are listed 4 Select your country by pressing the or button then press the ENTER button 5 Press the or button to select Auto Store then press the ENTER button 6 Press the ENTER button again to start the search T...

Page 14: ...the or button to select C Air channel or S Cable channel Press the button then press the or button to select the required number You can also select the channel number directly by pressing the numeric buttons 0 9 If there is abnormal sound or no sound re select the sound standard required Search When you do not know the channel numbers Press the or button to start the search The tuner scans the fr...

Page 15: ...table programmes by muting out video and audio 6 Press the or button to select Child Lock then press the ENTER button 7 Select On by pressing the or button then press the ENTER button 8 Press the or button to select Channel List then press the ENTER button 9 Move to the field by pressing the buttons select a channel to be locked and press the ENTER button If you press the ENTER button again the sy...

Page 16: ...on is broadcast These names can be changed allowing you to assign new names 1 Press the MENU button to display the menu 2 Press the or button to select Channel then press the ENTER button 3 Press the or button to select Name then press the ENTER button 4 Press the or button to select the channel to be assigned to a new name then press the ENTER button 5 Press the or button to select a letter a num...

Page 17: ...button Press the ENTER button 5 Press the EXIT button to exit Fine Tune P 1 0 Adjust Save Return Reset P 1 Mono Picture Standard Sound Custom SRS TS XT Off Move Enter Return Country United Kingdom Auto Store Manual Store Channel Manager Sort Name Fine Tune LNA Off Channel T V LNA Low Noise Amplifier This function is very useful in the situation that the TV is used in weak signal LNA amplifies the ...

Page 18: ...ct Picture 3 Press the ENTER button again to select Mode 4 Select the required mode by pressing the or button then press the ENTER button Available modes Dynamic Standard Movie The settings values may vary depending on the input source 5 Press the EXIT button to exit Choose Dynamic for viewing the TV during the day or when there is bright light in the room Choose Standard for general TV watching m...

Page 19: ...rence see Customizing the Colour Space Customizing the Colour Space Colour Red Green Blue Yellow Cyan Magenta Adjusts the Colour range to suit your preference Colour is available when Colour Space is set to Custom Press the or button to select Red Green Blue Yellow Cyan or Magenta Press the ENTER button Red Green Blue In Colour you can adjust the RGB values for the selected colour Press the or but...

Page 20: ... up down left and right Reset Press the or button to select Reset then press the ENTER button You can initialize the setting With the HDMI Just Scan picture size depending on the AV devices the screen may be cut off or a specific colour appears on the screen For an HDMI 1080p connection of 24 25 30 50 and 60 Hz and for a Component 1080p connection of 50 and 60Hz only the input source is supported ...

Page 21: ...black level low contrast low color etc is encountered by the HDMI input for RGB limited range 16 to 235 This function is active only when the externel input connects to HDMI RGB signals Blue Only Mode Off On This function is for AV device measurement experts This function displays the blue signal only by removing the red and green signals from the video signal so as to provide a Blue Filter effect...

Page 22: ... to 4 3 it darkens the left and right sides Light When you set the screen ratio to 4 3 it brightens the left and right sides To remove after images on the screen use either White or Scrolling function Although both of the two functions remove after images on the screen Scrolling is more effective The after image removal function has to be executed for a long time approximately 1 hour to effectivel...

Page 23: ... Press the TOOLS button on the remote control 2 Press the or button to select SRS TS XT 3 Press the or button to select Off or On Auto Volume Off On Each broadcasting station has its own signal conditions and so it is not easy to adjust the volume every time the channel is changed This feature lets you automatically adjust the volume of the desired channel by lowering the sound output when the mod...

Page 24: ...dard audio Mono Normal use Bilingual or DUAL I II Dual I Dual II Stereo Stereo Mono Forced mono If the receiving conditions deteriorate listening will be easier if the mode is set to Mono If the stereo signal is weak and automatic switching occurs switch to Mono Connecting Headphones Sold separately You can connect a set of headphones to your set if you wish to watch a TV programme without disturb...

Page 25: ...or button to select Sleep Timer 3 Press the or button to select the minute then press the ENTER button Timer 1 Timer 2 Timer 3 You can set the On Off timers so that the television will switch on or off automatically at the time you select You must set the clock first Press the or button to select the required item below Press the or button to adjust to the setting satisfied On Time Select hour min...

Page 26: ...tching TV and it turns off when your TV is turned off Always The blue LED always lights Set the Light Effect to Off to reduce the power consumption Melody Off Low Medium High The TV power on off melody sound can be adjusted Entertainment Off Sports Cinema Game Entertainment mode enables you to select the optimal display and sound for sports cinema and games Off Switches the Entertainment function ...

Page 27: ...ot be selected Programme You can select a channel of the sub picture only when the Source is set to TV Move Enter Return PIP On Source TV Size Position Programme P 1 PIP T V Setting up Your PC Software Based on Windows XP The Windows display settings for a typical computer are shown below But the actual screens on your PC will probably be different depending upon your particular version of Windows...

Page 28: ...000 60 317 72 188 75 000 60 004 70 069 75 029 60 015 25 175 31 500 31 500 40 000 50 000 49 500 65 000 75 000 78 750 85 500 HDMI DVI Input Mode Resolution Horizontal Frequency kHz Vertical Frequency Hz Pixel Clock Frequency MHz Sync Polarity H V PS42A410 PS50A410 VESA 640 x 480 800 x 600 1024 x 768 1360 x 768 31 469 37 879 48 363 47 712 59 940 60 317 60 004 60 015 25 175 40 000 65 000 85 500 When u...

Page 29: ...adjust the frequency as best as possible coarse and Fine tune again After the noise has been reduced re adjust the picture so that it is aligned on the center of screen 1 Press the or button to select Coarse or Fine then press the ENTER button 2 Press the or button to adjust the screen quality vertical stripes may appear or the picture may be blurry Press the ENTER button Position Adjust the PC s ...

Page 30: ...loured buttons Press one of them corresponding to the required The page is displayed with other coloured information that can be selected in the same way To display the previous or next page press the corresponding coloured button 5 teletext on mix Press to activate teletext mode after selecting the channel providing the teletext service Press it twice to overlap the teletext with the current broa...

Page 31: ...rent page number or search indications Date and time Text Status information FASTEXT information Teletext information is often divided between several pages displayed in sequence which can be accessed by Entering the page number Selecting a title in a list Selecting a coloured heading FASTEXT system Press the TV button to exit from the teletext display ...

Page 32: ...han the standard dimension as they may cause damage to the inside of the TV set For wall mounts that do not comply with the VESA standard screw specifications the length of the screws may differ depending on their specifications Do not use screws that do not comply with the VESA standard screw specifications Do not use fasten the screws too strongly this may damage the product or cause the product...

Page 33: ...fault setting 3 Press the blue button Press the and buttons to select a save mode from either Position1 Position2 or Position3 in order to save the current position To not save the current position press the RETURN button When selecting a save mode you cannot use the Color buttons 4 Press the ENTER button to save When Position1 is selected the message Current position saved as Position1 is display...

Page 34: ...of Entering the menu 2 Pressing a Color Red Green Yellow button moves the auto wall mount to the saved position You can move the wall mount to one of the 3 pre set positions by pressing the Red Position 1 Green Position 2 or Yellow Position 3 buttons If you adjust the positon after moving to a pre set position the position display will disappear For installation refer to the Installation Manual pr...

Page 35: ...et Blurred or snowy picture distorted sound Check the direction location and connections of your aerial This interference often occurs due to the use of an indoor aerial Remote control malfunctions Replace the remote control batteries Clean the upper edge of the remote control transmission window Check that the and ends of the batteries are inserted correctly Check that the batteries are drained S...

Page 36: ...th stand 1055 x 700 x 95 mm 1055 x 760 x 316 mm 1231 x 770 x 95 mm 1231 x 822 x 316 mm Weight Body With stand 28 Kg 32 Kg 34 Kg 37 Kg Environmental Considerations Operating Temperature Operating Humidity Storage Temperature Storage Humidity 10 C to 40 C 50 F to 104 F 10 to 80 non condensing 20 C to 45 C 4 F to 113 F 5 to 95 non condensing This device is a Class B digital apparatus Design and speci...

Page 37: ...This page is intentionally left blank ...

Page 38: ...or human health from uncontrolled waste disposal please separate this from other types of wastes and recycle it responsibly to promote the sustainable reuse of material resources Household users should contact either the retailer where they purchased this product or their local government office for details of where and how they can take this item for environmentally safe recycling Business users ...

Page 39: ...Эти отдельные пикселы не влияют на качество работы изделия Не рекомендуется эксплуатировать телевизор при температуре ниже 5 C 41 F Длительное отображение неподвижного изображения может стать причиной непоправимого повреждения плазменного экрана При длительном просмотре на телевизоре с ПД программ в формате 4 3 справа слева и в центральной части экрана могут появляться следы границ изображения что...

Page 40: ...ого сигнала 17 Управление изображением Изменение стандарта изображения 18 Настройка параметров изображения 18 Настройка параметров детализации изображения 19 Параметры изображения 20 Восстановление для параметров изображения заводских настроек по умолчанию 22 Управление звуком Свойства звука 23 Выбор режима звука в зависимости от модели 24 Подключение наушников приобретаются отдельно 24 Описание ф...

Page 41: ...ели Кабель для компьютера Кабель Scart Аудиокабель для компьютера Кабель HDMI Кабель HDMI DVI Ферритовый сердечник кабель питания кабель S Video Ферритовые сердечники используются для обеспечения защиты кабелей от помех При подключении кабеля откройте ферритовый сердечник и закрепите его вокруг кабеля вблизи разъема Использование подставки ПД должны переносить два или более человека Нельзя класть ...

Page 42: ...м меню используйте кнопки C P которые выполняют те же функции что и кнопки и на пульте дистанционного управления 5 ENTER Эта кнопка в экранном меню выполняет те же функции что и кнопка ENTER на пульте дистанционного управления 6 Кнопка питания Используется для включения и выключения питания Индикатор питания Мигает и отключается при включенном питании и загорается в режиме ожидания Датчик приема с...

Page 43: ...ода ПК 4 EXT 1 EXT 2 Входные и выходные разъемы для внешних устройств таких как видеомагнитофон DVD проигрыватель игровая приставка или проигрыватели видеодисков Характеристики входных выходных разъемов Разъем Вход Выход ВидеоЗвук Л П Audio L R RGB Видео аудио Л П Внешний 1 EXT 1 Доступентольковыход телевизионногосигнала илисигналаDTV Внешний 2 EXT 2 Выходной сигнал который можно выбрать 5 Подключ...

Page 44: ...tal Copy Protection а также поддерживает многоканальные цифровые аудиосигналы DVI IN HDMI2 AUDIO R L DVI и аудиовыходы для подключения внешних устройств 8 ANT IN 75Ω Разъем для коаксиального кабеля антенной кабельной сети Поддерживаемые режимы для HDMI DVI и Компонентный 480i 480p 576i 576p 720p 1080i HDMI DVI 50 Гц X X X O O O HDMI DVI 60 Гц X O X X O O Компонентный O O O O O O Цвет и форма устро...

Page 45: ...ла Предыдущий канал Следующий канал Предыдущий канал Возврат к предыдущему меню Выход из экранного меню Отображение главного экранного меню Выбор размера изображения Непосредственный выбор режима HDMI a Выбор эффекта изображения см стр 18 Функции телетекста см стр 30 2 Выход из экрана телетекста в зависимости от модели 7 Размер телетекста 9 Открытие телетекста 0 Выбор темы Fastext Отображение стра...

Page 46: ...жмите кнопку питание вкл выкл на передней панели телевизора или кнопку POWER на пульте ДУ Автоматически выбирается программа которая просматривалась последней Если на данный момент сохраненных каналов еще нет то на экране не появится четкое изображение См раздел Автоматическое сохранение каналов на стр 13 или Сохранение каналов вручную на стр 14 При первом включении телевизора автоматически восста...

Page 47: ...соединения антенны Значение по умолчанию Домашний Рекомендуется перевести телевизор в режим Дом чтобы обеспечит наилучшее изображение в Домашний условиях Режим Демонстрация предназначен только для точек розничной торговли Если для устройства случайно выбран режим Демонстрация и нужно вернуться в режим Домашний стандартный нажмите кнопку громкости При отображении экранного меню громкости нажмите и ...

Page 48: ...ите кнопку ENTER для подтверждения настройки Появится сообщение Приятного просмотра После завершения ввода нажмите кнопку ENTER Даже если кнопка ENTER не будет нажата сообщение автоматически исчезнет через несколько секунд Plug Play Перем Настр Вxод 01 01 2008 00 00 Установка часов Месяц Число Год Часов Минут OK Приятного просмотра Перем Вxод Возврат Plug Play Язык Русский Время Эффект освещения Р...

Page 49: ... канала Можно также выбрать режим HDMI простым нажатием кнопки HDMI на пульте дистанционного управления Использование кнопки TOOLS С помощью кнопки TOOLS можно быстро и без труда выбрать часто используемые функции Меню Инструменты изменяется в зависимости от того какой режим входящего внешнего сигнала используется при просмотре 1 Нажмите кнопку TOOLS Отобразится меню Инструменты 2 Нажмите кнопку и...

Page 50: ...жные 1 Нажмите кнопку MENU для отображения меню 2 С помощью кнопки или выберите пункт Канал и нажмите кнопку ENTER 3 Нажмите кнопку ENTER еще раз Появится список доступных стран 4 Выберите нужную страну с помощью кнопки или затем нажмите кнопку ENTER 5 С помощью кнопки или выберите пункт Автонастройка и нажмите кнопку ENTER 6 Снова нажмите кнопку ENTER чтобы начать поиск Поиск закончится автоматич...

Page 51: ...ерите C Канал с антенны или S Кабельный канал Нажмите кнопку затем нажмите кнопку или для выбора нужного номера Можно также установить номер канала непосредственно используя кнопки с цифрами 0 9 Если слышен странный звук или звук не слышен вообще еще раз выберите стандарт звука Поиск если номера каналов не известны Чтобы начать поиск нажмите кнопку или Тюнер будет сканировать диапазон частот пока ...

Page 52: ...ством отключение звука или изображения 6 Нажмите кнопку или чтобы выбрать пункт Замок затем нажмите кнопку ENTER 7 Выберите значение Вкл с помощью кнопки или затем нажмите кнопку ENTER 8 С помощью кнопки или выберите пункт Список каналов и нажмите кнопку ENTER 9 Перейдите к полю нажимая кнопки выберите канал который необходимо заблокировать и нажмите кнопку ENTER Если нажать кнопку ENTER еще раз з...

Page 53: ...вания можно изменять присваивая каналам новые названия 1 Нажмите кнопку MENU для отображения меню 2 С помощью кнопки или выберите пункт Канал и нажмите кнопку ENTER 3 С помощью кнопки или выберите пункт Название и нажмите кнопку ENTER 4 Нажимая кнопку или выберите канал которому нужно присвоить новое название затем нажмите кнопку ENTER 5 Нажимайте кнопку или чтобы выбрать букву номер или символ по...

Page 54: ... кнопки или Нажмите кнопку ENTER 5 Нажмите кнопку EXIT для выхода P 1 Моно Изображение Стандартный Звук Польз SRS TS XT Выкл Точная настройка P 1 0 Настр Сохранить Возврат Сброс УСС усилитель слабого сигнала Эта функция очень полезна в тех случаях когда телевизором принимается слабый сигнал УСС усиливает телевизионный сигнал в областях со слабым приемом усилитель слабого сигнала усиливает входящий...

Page 55: ...ь пункт Изображение 3 Снова нажмите кнопку ENTER чтобы выбрать пункт Режим 4 Выберите нужный режим с помощью кнопки или и нажмите кнопку ENTER Доступные режимы Динамический Стандартный Кино 5 Выберите нужный параметр с помощью кнопки или затем нажмите кнопку ENTER 6 По завершении выполнения настроек нажмите кнопку ENTER 7 Нажмите кнопку EXIT для выхода Свет ячейки Контраст Яркость Четкость Цвет То...

Page 56: ...интервала Цвет Красный Кр Зеленый Синий Желтый Голубой Пурпурный Настройка цветового диапазона в соответствии со своими предпочтениями Меню Цвет доступно когда для параметра Цветовой интервал установлено значение Польз Нажмите кнопку или и выберите Красный Кр Зеленый Синий Желтый Голубой или Пурпурный Нажмите кнопку ENTER Красный Кр Зеленый Синий в меню Цвет можно отрегулировать значения RGB для в...

Page 57: ...ерх вниз влево или вправо Сброс нажмите кнопку или для выбора параметра Сброс затем нажмите кнопку ENTER Для настройки можно установить исходное значение В зависимости от размера изображения при приеме сигнала HDMI и использовании функции Точное отображ а также от аудиоустройств экран может быть обрезан или на нем могут отображаться специфические цвета Для соединения HDMI 1080p частотой 24 25 30 5...

Page 58: ...енасыщенные цвета и т п при вводе сигналов HDMI для ограниченного диапазона RGB 16 235 Эта функция активна только если источник внешнего сигнала подключается к разъему HDMI сигналы RGB Только синий экран Выкл Вкл Эта функция предназначена для специалистов по настройкеAV устройств При использовании этой функции отображается сигнал синего цвета только благодаря исключению сигналов красного и зеленог...

Page 59: ...одаря настройке баланса белого по левому и правому краю Темный при установке формата экрана 4 3 левый и правый края экрана затемняются Светлый при установке формата экрана 4 3 левый и правый края экрана осветляются Для устранения остаточных изображений с экрана воспользуйтесь функцией Белый или Прокрутка Несмотря на то что удаление остаточных изображений с экрана осуществляют обе функции функция П...

Page 60: ...гия TruSurround XT использована по лицензии корпорации SRS Labs Inc Простая настройка 1 Нажмите кнопку TOOLS на пульте дистанционного управления 2 Нажмите кнопку или для выбора функции SRS TS XT 3 Нажмите кнопку или для выбора значения Выкл или Вкл Громкоговоритель ТВ Динамик ТВ Выкл Вкл Звук транслируемый разными телевизионными станциями имеет различные характеристики По этой причине при каждом п...

Page 61: ...левещание стандартный звук Моно Обычное использование Двуязычный или Dual I II Dual I Dual II Стерео Стерео Моно Принудительное моно При слабом приеме сигнала рекомендуется установить режим Моно Если стереосигнал слишком слабый и происходит автоматическое переключение режимов выберите режим Моно Подключение наушников приобретаются отдельно Если при просмотре телепрограмм вы не хотите мешать другим...

Page 62: ... или чтобы выбрать минуты затем нажмите кнопку ENTER Таймер 1 Таймер 2 Таймер 3 Можно настроить таймер включения выключения так чтобы телевизор автоматически включался или выключался в определенное время Сначала необходимо установить часы Нажмите кнопку или для выбора необходимого элемента Нажмите кнопку или чтобы настроить необходимые параметры Время вкл задайте часы минуты и Вкл Выкл Чтобы актив...

Page 63: ...Установите для параметра Light Effect значение Выкл для снижения потребления энергии Мелодия Выкл Низкий Средний Высокий Можно настроить звук мелодии включения выключения питания телевизора Развлечения Выкл Спорт Кино Игра Режим развлечений позволяет выбирать оптимальное отображение и звук для просмотра спортивных передач кино и игр Выкл выключение функции Развлечения Спорт обеспечивается оптималь...

Page 64: ...ме Double Двойной параметр Позиция выбрать невозможно Программа Канал дополнительного изображения можно выбрать только в том случае если для параметра Источник установлено значение ТВ Перем Вход Возврат PIP Вкл Источник TB Размер Позиция Программа P 1 PIP T V Инструменты Режим изображения Стандартный Режим звука Польз Таймер сна Выкл SRS TS XT Выкл Экон энергии Выкл Двойной I II Моно Перем Настр В...

Page 65: ...015 25 175 31 500 31 500 40 000 50 000 49 500 65 000 75 000 78 750 85 500 HDMI DVI Вход Режим Разрешение Частота строк Кгц Частота кадров Гц Частота синхронизации пикселов Мгц Полярность синхронизации H V PS42A410 PS50A410 VESA 640 x 480 800 x 600 1024 x 768 1360 x 768 31 469 37 879 48 363 47 712 59 940 60 317 60 004 60 015 25 175 40 000 65 000 85 500 При использовании кабеля HDMI DVI необходимо в...

Page 66: ...омощью функции точной настройки настройте частоты как можно лучше в режиме Грубо а затем повторите точную настройку После того как уровень помех был снижен настройте изображение таким образом чтобы оно располагалось по центру экрана 1 С помощью кнопки или выберите тип настройки Грубо или Точно затем нажмите кнопку ENTER 2 Чтобы настроить качество экрана используйте кнопку или могут появиться верти...

Page 67: ...угим цветом выделена информация которую тоже можно выбрать аналогичным образом Для отображения предыдущей или следующей страницы нажмите соответствующую цветную кнопку 5 отображение телетекста совмещение Используется для активации режима телетекста после выбора канала который предлагает услугу телетекста Нажмите кнопку дважды чтобы наложить телетекст на изображение на телеэкране 6 сохранение Испол...

Page 68: ...ы или результаты поиска Дата и время Текст Информация о состоянии Информация FASTEXT Информация телетекста часто распределяется на несколько страниц которые отображаются в последовательном порядке Чтобы открыть эти страницы введите номер страницы выберите название страницы из списка выберите цветное заглавие система FASTEXT Нажмите кнопку TV для выхода из режима телетекста ...

Page 69: ... привести к повреждению внутренних элементов телевизора Длина винтов для настенного монтажа не соответствующих требованиям стандарта VESA может отличаться в зависимости от их технических характеристик Не используйте винты не соответствующие стандарту VESA Не закрепляйте винты слишком сильно поскольку это может привести к повреждению продукта или быть причиной его падения что может повлечь за собой...

Page 70: ...ой когда на экране телевизора отображается экранное меню появится экран настройки Для сброса нажмите кнопку INFO Нажмите кнопку или для выбора Да затем нажмите кнопку ENTER Для положения будет восстановлено значение по умолчанию 3 Нажмите синюю кнопку Нажмите кнопку или для выбора режима сохранения Положение 1 Положение 2 или Положение 3 чтобы сохранить текущее положение Чтобы не сохранять текущее...

Page 71: ...й кнопки красной зеленой желтой автоматическое настенное крепление перемещается в сохраненное положение Настенное крепление можно переместить в одно из 3 предварительно заданных положений путем нажатия следующих кнопок красная кнопка Положение 1 зеленая кнопка Положение 2 и желтая кнопка Положение 3 При выполнении регулировки после перемещения в предварительно заданное положение индикация положени...

Page 72: ...зображение искаженный звук Проверьте направление размещение и соединение антенны Помехи часто возникают вследствие использования комнатной антенны Неправильная работа пульта дистанционного управления Замените батареи в пульте дистанционного управления Очистите окно прохождения сигнала пульта дистанционного управления верхний край пульта Проверьте правильно ли установлены полюсы и батарей Проверьте...

Page 73: ...1055 x 760 x 316 mm 1231 x 770 x 95 mm 1231 x 822 x 316 mm Вес Корпус с подставкой 28 кг 32 кг 34 кг 37 кг Условия окружающей среды Рабочая температура Относительная влажность при работе Температура хранения Влажность при хранении от 10 C до 40 C от 50 F до 104 F 10 80 без конденсации от 20 C до 45 C от 4 F до 113 F 5 95 без конденсации Данное устройство является цифровым устройством класса В Конс...

Page 74: ...Зта страница намереннo oставлена пустoй ...

Reviews: