background image

English - 7

Plug & Play (Initial Setup)

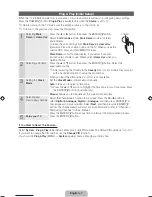
When the TV is initially powered on, a sequence of on-screen prompts will assist in configuring basic settings. 
Press the 

POWER

P

 button. 

Plug & Play

 is available only when the 

Source

 is set to TV.


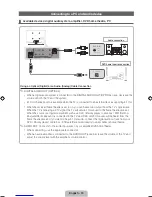
Before turning on the TV, make sure the antenna cable is connected (p. 6).


To return to the previous step, press the Red button.

1

Selecting 

Store 

Demo

 or 

Home Use

Press the 

 or 

 button, then press the 

ENTER

E

 button.

Select the 

Home Use

 mode. 

Store Demo

 mode is for retail 

environments.
To return the unit’s settings from 

Store Demo

 to 

Home Use


(standard): Press the volume button on the TV. When you see the 
volume OSD, press and hold 

MENU

 for 5 sec.

Store Demo

 is only for shop display. If you select it, several 

functions are not able to use. Please select 

Home Use

 when you 

watch at home.

2

Selecting a Country

Press the 

 or 

 button, then press the 

ENTER

E

 button. Select the 

appropriate country.


After selecting the Country in the 

Country

 menu, some models may proceed 

with an additional option to setup the pin number.

When you input the PIN number, “0-0-0-0” is not available.

3

Setting the 

Clock 

Mode

Set the 

Clock Mode

 automatically or manually.

Auto

: Allows you to select a time zone.


Press the 

 or 

 button to highlight the time zone for your local area. Press 

the 

ENTER

E

 button. (Australia only)

Manual

: Allows you to manually set the current date and time.

4

Selecting and 
memorising channels

Select the channel search option to memorise. Press the 

l

 or 

r

 button to 

select 

Digital & Analogue

Digital

 or 

Analogue

, and then press 

ENTER

E

. A 

check appears on your selection. Select 

Next

, and then press the 

ENTER

E


button. The channel search will start. For more information, refer to “Channel 


Memorising Channels” in the e-Manual.
Press the 

ENTER

E

 button at any time to interrupt the memorisation process.

5

Enjoy your TV. 

Press the 

ENTER

E

 button.

If You Want to Reset This Feature...

Select 

System

 - 

Plug & Play

 (Initial Setup). Enter your 4 digit PIN number. The default PIN number is “0-0-0-0.” 

If you want to change the PIN number, use the 

Change PIN

 function.

You should do 

Plug & Play

 (

MENU


System

) again at home although you did in shop.

P

POWER

[PD450-XY]BN68-03493A.indb   7

2011-01-27   오전 12:04:07


Summary of Contents for PS43D451

Page 1: ...msung com NEW ZEALAND 0800 SAMSUNG 0800 726 786 www samsung com CHINA 400 810 5858 010 6475 1880 www samsung com HONG KONG 852 3698 4698 www samsung com hk www samsung com hk_en INDIA 3030 8282 1800 110011 1800 3000 8282 1800 266 8282 www samsung com INDONESIA 0800 112 8888 021 5699 7777 www samsung com JAPAN 0120 327 527 www samsung com MALAYSIA 1800 88 9999 www samsung com PHILIPPINES 1 800 10 S...

Page 2: ...pixels will have no impact on the performance of the product Avoid operating the TV at temperatures below 41 F 5 C A still image displayed too long may cause permanent damage to the PDP Panel Watching the Plasma TV in 4 3 format for a long period of time may leave traces of borders displayed on the left right and centre of the screen caused by the difference of light emission on the screen Playing...

Page 3: ... distance between the ferrite core and the end of the cord inserted in the TV 8 inches B Maximum distance between the ferrite core and the other end of the cord inserted in the AC outlet 3 4 inch Power Cord 51 inch model Ferrite Core 2EA Ferrite Core 1EA Ferrite Core for Power Cord The ferrite cores are used to shield the cables from interference When connecting a cable open the ferrite core and c...

Page 4: ...emote control MENU Displays an on screen menu the OSD on screen display of your TV s features y Adjusts the volume In the OSD use the y buttons as you would use the and buttons on the remote control z Changes the channels In the OSD use the z buttons as you would use the and buttons on the remote control P Power Turns the TV on or off Standby mode Do not leave your TV in standby mode for long peri...

Page 5: ...item value Exits the menu Have direct access to channels Adjusts the volume Alternately select Teletext ON Double Mix or OFF Opens the OSD Quickly select frequently used functions Displays the Content Home which includes Watch TV My Downloads and Source Returns to the previous menu These buttons are for the Channel Manager My Downloads menu etc Use these buttons in My Downloads and Anynet HDMI CEC...

Page 6: ... to make your input source selection easier When connecting a PC to the HDMI IN 1 DVI port with HDMI cable you should set the TV to PC mode under Edit Name When connecting a PC to the HDMI IN 1 DVI port with HDMI to DVI cable you should set the TV to DVI PC mode under Edit Name When connecting an AV devices to the HDMI IN 1 DVI port with HDMI to DVI cable you should set the TV to DVI Devices mode ...

Page 7: ...models may proceed with an additional option to setup the pin number When you input the PIN number 0 0 0 0 is not available 3 Setting the Clock Mode Set the Clock Mode automatically or manually Auto Allows you to select a time zone Press the or button to highlight the time zone for your local area Press the ENTERE button Australia only Manual Allows you to manually set the current date and time 4 ...

Page 8: ...DVI HDMI DVI to HDMI cable or DVI HDMI DVI to HDMI adapter The PC DVI IN jack is required for audio x x The picture may not display normally if at all or the audio may not work if an external device that uses an older version of HDMI mode is connected to the TV If such a problem occurs ask the manufacturer of the external device about the HDMI version and if out of date request an upgrade x x Be s...

Page 9: ...o AV IN the color of the AV IN Y VIDEO jack green will not match the video cable yellow To obtain the best picture quality the Component connection is recommended over the A V connection AUDIO OUT R AUDIO L VIDEO OUT AUDIO OUT R AUDIO L PR PB G COMPONENT OUT Component connection AV connection ...

Page 10: ...ll send 5 1 CH sound to the home theatre receiver When the source is a digital component such as a DVD Blu ray player cable box STB Set Top Box satellite receiver and is connected to the TV via HDMI only 2 CH audio will be heard from the home theatre receiver If you want to hear 5 1 CH audio connect the digital audio out jack from your DVD Blu ray player cable box STB satellite receiver directly t...

Page 11: ... x 624 35 000 49 726 66 667 74 551 30 240 57 284 VESA DMT 640 x 480 640 x 480 640 x 480 800 x 600 800 x 600 800 x 600 1024 x 768 1024 x 768 1024 x 768 1360 x 768 31 469 37 500 37 861 37 879 46 875 48 077 48 363 56 476 60 023 47 712 59 940 75 000 72 809 60 317 75 000 72 188 60 004 70 069 75 029 60 015 25 175 31 500 31 500 40 000 49 500 50 000 65 000 75 000 78 750 85 500 NOTE x x For HDMI DVI cable ...

Page 12: ... screen E Enter Select a category or sub menu e Exit Exit the e Manual E MANUAL Try Now E MANUAL Basic Features Changing the Preset Picture Mode Adjusting Picture Settings Changing the Picture Size Changing the Picture Options Setting up the TV with Your PC Index E Enter e Exit Changing the Preset Picture Mode Picture Mode t Select your preferred picture type Dynamic Suitable for a bright room Sta...

Page 13: ... button Operation Buttons a Red Try Now Displays the corresponding menu s b Green Home Moves to the e Manual home screen Yellow Zoom Magnifies a screen Blue Index Displays index screen L Page Moves to previous or next page a Try Now b Home Zoom Index L Page e Exit Basic Features Changing the Preset Picture Mode 1 1 Changing the Preset Picture Mode O O MENUm Picture Picture Mode ENTERE Picture Mode...

Page 14: ...bly are provided x x Do not use screws that do not comply with the VESA standard screw specifications x x Do not use screws that are longer than the standard dimension or do not comply with the VESA standard screw specifications Screws that are too long may cause damage to the inside of the TV set x x For wall mounts that do not comply with the VESA standard screw specifications the length of the ...

Page 15: ...vices are powered on Be sure to select the TV s correct source by pressing the SOURCE button on the remote control The remote control does not work Replace the remote control batteries with the poles in the right direction Clean the sensor s transmission window on the remote Try pointing the remote directly at the TV from 5 6 feet away The cable set top box remote control doesn t turn the TV on or...

Page 16: ... again Screws may not be supplied with the product In this case please purchase the screws of the following specifications 3 Connect the clamps fixed onto the TV and the clamps fixed onto the wall with a strong cable and then tie the string tightly NOTE x x Install the TV near to the wall so that it does not fall backwards x x It is safe to connect the string so that the clamps fixed on the wall a...

Page 17: ...1 PS51D450 PS51D451 Screen Size 43 inches 51 inches Sound Output 10 W X 2 Dimensions WxDxH Body With stand 1011 8 X 56 0 X 622 4mm 1011 8 X 250 X 698 7mm 1187 8 X 56 0 X 706 6mm 1187 8 X 250 0 X 782 9mm Weight Without Stand With Stand 16 0 kg 19 0 kg 22 5 kg 25 5 kg Display Resolution 1024 X 768 1360 X 768 Design and specifications are subject to change without prior notice For information about p...

Reviews: