background image

2-1

2. Product specifications

2. Product Specifications

2-1. Product Information

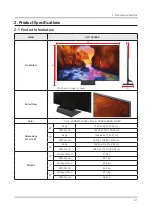
Model

QA**Q90RAK

Front View

W

* W : Width   H : High   D : Depth

H

D

Detail View

Color

Front : CARBON SILVER / Stand : DARK CARBON SILVER

Dimensions

(W x H x D)

65"

Body

145.01 x 83.12 x 3.99 cm

With Stand

145.01 x 92.10 x 28.53 cm

75"

Body

167.58 x 96.17 x 3.99 cm

With Stand

167.58 x 105.35 x 31.76 cm

82"

Body

183.54 x 105.51 x 4.33 cm

With Stand

183.54 x 114.70 x 36.52 cm

Weight

65"

Without Stand

27.8 kg

With Stand

34.7 kg

75"

Without Stand

42.4 kg

With Stand

52.4 kg

82"

Without Stand

53.0 kg

With Stand

66.1 kg

Summary of Contents for QA65Q90RAK

Page 1: ...RVICE Manual QLED TV Contents 1 Precautions 2 Product specifications 3 Disassembly and Reassembly 4 Troubleshooting 5 Wiring Diagram QA82Q90RAK Project QRQ90B Chassis QWD90 Model QA65Q90RAK QA75Q90RAK QA82Q90RAK ...

Page 2: ...15 2 4 2 Quick Guides 2 22 2 4 3 The Samsung Smart Remote 2 31 2 4 4 Using the TV Controller 2 33 2 4 5 RearView One Connect 2 34 2 5 Supported subtitles 2 35 3 Disassembly and Reassemble 3 1 3 1 TV Disassembly 3 1 3 2 One Connect Disassembly 3 11 4 Troubleshooting 4 1 4 1 Function Control Operation Test 4 1 4 2 Power 4 2 4 2 1 TV POWER STANDBY 4 2 4 2 2 TV POWER ON SEQUENCE 4 5 4 2 3 One Connect ...

Page 3: ...ments 4 37 4 10 1 Entering Factory Mode 4 37 4 10 2 Detail Factory Option 4 38 4 10 3 Factory Data 4 41 4 11 RS 232C 4 51 4 12 AV Control Tabe 4 52 4 13 Updating the TV s Software 4 59 5 Wiring Diagram 5 1 5 1 Wiring Diagram 5 1 5 2 Connector 5 8 5 2 1 Main Board 5 8 5 2 2 LD SMPS Board 5 12 5 2 3 Main Board_One Connect 5 16 5 2 4 SMPS Board_One Connect 5 18 ...

Page 4: ...Manual is a property of Samsung Electronics Co Ltd Any unauthorized use of Manual can be punished underapplicable International and ordomestic law 2019 Samsung Electronics Co Ltd All rights reserved Printed in Korea ...

Page 5: ...Exploded Views and Parts List 1 Exploded View Part List Exploded View Copyright 1995 2019 SAMSUNG All rights reserved 1 ...

Page 6: ... 2 M0014 BN94 14716A ASSY PCB MAIN 65Q90RA XV BN94 14008S SA 1 5 2 BN96 45641C ASSY SPEAKER P FRONT TV SPK Q90B 6ohm 10 SA 1 6 2 BN96 48728A ASSY BOARD P FUNCTION TACT Y19 Q90 Funct SA 1 7 2 BN59 01314A NETWORK WLAN CLIENT WCP730M 78 3x29 3x7 SA 1 8 2 R001A BN96 49062A ASSY COVER P REAR 65QRQ90B PC ABS ED20 SA 1 9 2 BN96 49069A ASSY STAND P COVER NECK 65QRQ90B PP GF40 SA 1 10 2 BN96 49070A ASSY ST...

Page 7: ...Exploded Views and Parts List 2 ONE CONNECT Exploded View Part List ONE CONNECT Exploded View Copyright 1995 2019 SAMSUNG All rights reserved 3 ...

Page 8: ... TP00 SA 1 2 2 OC SMPS BN44 00935B DC VSS POWER BOARD P300NQB_NSM AC DC 360 SA 1 3 2 BN63 17541A INSULATOR SMPS 65QNQ9FA PC BLACK L126 9 SNA 1 4 2 BN63 17538A SHIELD OC TOP 65QNQ9FA EGI SECC T0 8 SA 1 5 2 BN94 14012E ASSY PCB OC QRQ85E SA 1 6 2 BN96 48511B ASSY COVER P OC BOTTOM 65QRQ90B PC ABS G SA 1 4 Copyright 1995 2019 SAMSUNG All rights reserved ...

Page 9: ... 1 SNA 1 R001A BN90 10951G ASSY COVER REAR QRQ90B 1 SNA 2 R001A BN96 49062A ASSY COVER P REAR 65QRQ90B PC ABS ED20 1 SA 3 R001 BN63 17995A COVER REAR 65QRQ90B PC ABS ED20 V 1 BK0 1 SNA 4 0103 010818 RESIN PC ABS CM20G BK00749 BLACK BK0007 4638 SNA 4 BN68 05603E LABEL RESIN ART W8 L50 UL LABEL COVER R 1 SNA 3 BN68 09728A LABEL STICKER WARNING 55QRQ90B PET T0 05 1 SNA 1 BN91 21121D ASSY ONE CONNECT ...

Page 10: ...5V 940 2 SA 4 0903 002242 IC MICROCONTROLLER UEI1704 QFN 20P 4x4x0 1 SA 4 0904 002882 IC USC GL852G OHY38 QFN 28P 5x5mm 12MHz 2 SA 4 1006 001595 IC DRIVER RECEIVER UT3221G P16 R TSSOP 1 1 SA 4 1203 009193 IC DC DC CONVERTER SYD113IADC TSOT23 6 6 5 SA 4 1203 009194 IC DC DC CONVERTER SYD104IADC TSOT23 6 6 3 SA 4 1204 003777 IC DECODER SDP1805 FCBGA 490P 21x21x1 54 1 SA 4 1205 005519 IC SWITCH ET201...

Page 11: ...254 C CER CHIP 10nF 10 16V X7R TP 1005 T0 5 1 SA 4 AD480 2203 000359 C CER CHIP 0 15nF 5 50V C0G TP 1005 T0 3 SA 4 AD480 2203 000438 C CER CHIP 1nF 10 50V X7R TP 1005 5 SA 4 AD480 2203 000585 C CER CHIP 0 22nF 10 50V X7R TP 1005 1 SA 4 AD480 2203 000627 C CER CHIP 0 022nF 5 50V C0G TP 1005 8 SA 4 AD480 2203 001412 C CER CHIP 0 03nF 5 50V C0G TP 1005 3 SNA 4 AD480 2203 006048 C CER CHIP 100nF 10 10...

Page 12: ...1 15817A BRACKET OC EMI 65QNQ9FA STS T0 3 NATURAL 1 SNA 3 BN61 15818A BRACKET OC EMI CLIP 65QNQ9FA STS T0 3 NA 2 SNA 3 BN62 00850A HEAT SINK PS 65QNQ9FA A1050 T1 5 W120 L3 1 SNA 3 BN63 16151A SHEET PROTECTION COVER 40K6200 PO T0 068 0 SNA 3 BN63 17487A COVER OC TOP 65QNQ9FA PC V 1 TP0116 ONE 1 SNA 4 0103 011270 RESIN PC NH3022PN3 3354M Violet TP0116 V 345 SNA 3 BN63 17540A INSULATOR SMPS 65QNQ9FA ...

Page 13: ... SNA 4 0404 001404 DIODE SCHOTTKY BAT721C 40V 200mA SOT 23 1 SA 4 0404 001640 DIODE SCHOTTKY SS1060HEWS 60V 1000mA SOD 2 SA 4 0404 001881 DIODE SCHOTTKY SS3040 HE 40V 3000mA SOD 2 SA 4 0404 001953 DIODE SCHOTTKY MBRA340F HAF 40V 3000mA S 3 SA 4 0404 001976 DIODE SCHOTTKY SV540 40V 5000mA TO 277 T 1 SA 4 0406 001718 DIODE TVS SMF36A 40V 44 2V 3 8MAV 1 25VP 2 SA 4 0406 001786 DIODE TVS PJEC5V0V6TM 5...

Page 14: ...0W TP 1608 1 SA 4 2007 007107 R CHIP 100Kohm 1 1 16W TP 1005 T0 35 34 SA 4 2007 007131 R CHIP 13Kohm 1 1 16W TP 1005 T0 35 3 SA 4 2007 007139 R CHIP 47Kohm 1 1 16W TP 1005 T0 35 2 SA 4 2007 007310 R CHIP 8 2Kohm 1 1 16W TP 1005 T0 35 5 SA 4 2007 007313 R CHIP 6 8Kohm 1 1 16W TP 1005 T0 35 12 SA 4 2007 007316 R CHIP 3 3Kohm 1 1 16W TP 1005 T0 35 5 SNA 4 2007 007520 R CHIP 20ohm 1 1 10W TP 1608 13 S...

Page 15: ... TP 1608 75 SA 4 AD480 2203 007269 C CER CHIP 22000nF 20 10V X5R TP 2012 2 25 SA 4 AD480 2203 007306 C CER CHIP 10000nF 10 25V X5R TP 2012 T 33 SNA 4 AD480 2203 007393 C CER CHIP 4700nF 10 10V X5R TP 1005 T0 47 SNA 4 AD480 2203 007423 C CER CHIP 10000nF 10 35V X7R TP 3216 4 SA 4 AD480 2203 007425 C CER CHIP 2200nF 10 25V X5R TP 1608 1 SNA 4 AD480 2203 007795 C CER CHIP 10000nF 20 10V X5R TP 1005 T...

Page 16: ...NA 3 BN97 15873A ASSY MICOM 65A1QU9TR 65inch SDC Q90 Q85 1 SNA 4 BN46 00999A S W MICOM 65A1QU9TR Muse M OC Q90 Q85 1 SNA 3 M0131 GK63 00069A GASKET EMI EMI Shielding Al T1 W5 L28 GR 2 SNA 1 BN92 24855H ASSY LABEL QRQ90B 1 SNA 2 BN68 08409B LABEL RATING QTV WW PP T0 161 W150 L48 T 1 SNA 2 BN68 09403A LABEL ENERGY QA65Q90RAKXXV VIET NAM PET 1 SNA 2 BN68 09497A LEAFLET QUICK SETUP GUIDE Q90R OTHERS W...

Page 17: ...00319B TAPE SINGLE FACE OPP T0 05 W75 L800M CLE 2 SNA 2 BN69 11504A WRAP VINYL LDPE T0 018 W500 L10000 Trans 8 SNA 2 BN69 17053Q PACKING ANGLE ALL PAPER T3 W1800 L50 YEL 0 SNA 2 BN69 18700A CUSHION SET SIDE 65QRQ90B EPS 16 7g l WH 1 SNA 3 BN81 01918A A S RESIN EPS SG 302 0 SNA 2 BN69 18971A CUSHION SET FRONT 65QRQ70D EPS 16 7g l W 1 SNA 2 BN96 45139B ASSY PACKING P PAD 65Q7F PP EPE WITH WAR 2 SNA ...

Page 18: ...CH1 94 SA 4 BN61 15555A FRAME CHASSIS REAR BOTTOM 65QNQ9FA PC GF 1 SNA 5 0103 011284 RESIN PC LS 3104G FW9931 White WT0134 V 220 SNA 4 BN61 15556A FRAME CHASSIS REAR LEFT RIGHT 65QNQ9FA P 2 SNA 4 BN63 17676B INSULATOR LED PCB 65Q9F_VE PET WHITE L13 1 SNA 4 BN95 05699A ASSY LED BAR 19Y_65Q90 LED PLATE 1 SNA 5 BN97 15840A ASSY SMD BIN 19Y_65Q90 10 SNA 6 0202 001608 SOLDER WIRE FLUX LFC7 107 D0 8 99 ...

Page 19: ...PET B 1 SNA 5 BN63 17636A INSULATOR SOURCE PCB RIGHT 65QNQ9FA PET 1 SNA 5 CC04 BN64 04018E CHASSIS REAR 65QRQ90B EGI SECC T0 8 NA 1 SNA 6 BN01 00549A STEEL 65NU7100 EGI SECC L1495 0 8mm 880m 1 SNA 6 CB20 BN61 11982C BRACKET WALL 65QNQ7FC CR SPCC BLACK M8 L 4 SNA 6 CB20 BN61 15737A BRACKET WALL 65QNQ9FA CR SPCC T1 2 NATUR 4 SNA 5 T0527 BN68 00513A LABEL E PASS ALL MODEL WW YUPO W50 L15 W 1 SNA 5 BN...

Page 20: ... BN96 48029A ASSY CHASSIS FRONT P 65QRQ90B Al Carbon 1 SNA 3 6001 002912 SCREW MACHINE CH M3 L3 ZPC BLK SWRCH1 2 SA 3 BN02 00074F TAPE SINGLE FACE 65QRQ80C PET T0 05 W10 4 SNA 3 BN02 00486A TAPE DOUBLE FACE PU FOAM T0 5 W3 2 L33M 3 SA 3 BN02 00595A TAPE SINGLE FACE 65QRQ80C PET T0 2 W3 L2 3 SNA 3 BN60 01539E SPACER FOAM PU FOAM L12 5 BLACK T0 5 W11 2 SNA 3 BN60 01612B SPACER CONDUCTIVE 65QNQ7FC CO...

Page 21: ... CARBON SILVER Dimensions W x H x D 65 Body 145 01 x 83 12 x 3 99 cm With Stand 145 01 x 92 10 x 28 53 cm 75 Body 167 58 x 96 17 x 3 99 cm With Stand 167 58 x105 35 x 31 76 cm 82 Body 183 54 x105 51 x 4 33 cm With Stand 183 54 x114 70 x 36 52 cm Weight 65 Without Stand 27 8 kg With Stand 34 7 kg 75 Without Stand 42 4 kg With Stand 52 4 kg 82 Without Stand 53 0 kg With Stand 66 1 kg ...

Page 22: ...lity Index 4000 HDR High Dynamic Range Quantum HDR16x HDR10 Yes Contrast Direct Full Array16x HLG Hybrid Log Gamma Yes Color ColorVolume100 by Quantum Dot Viewing Angle Ultra Viewing Angle Micro Dimming Ultimate UHD Dimming Local Dimming Direct Full Array Elite Auto Depth Enhancer N A Contrast Enhancer Yes Auto Motion Plus Yes Film Mode Yes Natural Mode Support Yes Audio Dolby Digital Plus Yes DTS...

Page 23: ...rgence TV to Mobile Mirroring Yes Mobile to TV Mirroring DLNA Yes 360 Video Player Yes 360 Camera Support Yes Bluetooth Low Energy Yes WiFi Direct Yes TV Sound to Mobile Yes Sound Mirroring Yes Localization S Share N A Auto Data Backup N A Dongle Compatibility 3G LTE WiFi N A Analog Clean View Yes Senior Mode N A Triple Protection Yes Clean View N A Family TV 2 0 N A Local Cinema Mode N A Tuner Br...

Page 24: ...and Color DARK CARBON SILVER Swivel Left Right N A Additional Feature Intelligent Mode Yes AI Upscale Yes Art Mode The Frame N A Motion Detection The Frame N A Ambient Mode Yes Ambient Mode Brightness Color Sensor Yes Accessibility Learn menu screen AU English Mandarin Chinese Korean Singpore France Itally Germany Spain SeeColors Negative colors Grayscale Voice guide AU English Mandarin Chinese Ko...

Page 25: ...ture N A BT HID Built in Yes USB HID Support Yes Teletext TTX Yes Time Shift Yes V Chip N A IPv6 Support Yes MBR Support Yes Ultra Clean View N A Eco Feature Eco Sensor Yes Energy Efficiency Class 5 Power Power Supply AC100 240V 50 60Hz Power Consumption Max 255 W Power Consumption Stand by N A Power Consumption Energy Saving Mode N A Power Consumption Typical N A Peak Luminance Ratio N A Yearly P...

Page 26: ...rVolume100 by Quantum Dot Viewing Angle Ultra Viewing Angle Micro Dimming Ultimate UHD Dimming Local Dimming Direct Full Array Elite Auto Depth Enhancer N A Contrast Enhancer Yes Auto Motion Plus Yes Film Mode Yes Natural Mode Support Yes Audio Dolby Digital Plus Yes DTS Codec N A Dialog Enhancement Yes Audio Pre selection Descriptor N A Sound Output RMS 60W Speaker Type 4 2CH Woofer Yes Multiroom...

Page 27: ...und Mirroring Yes Localization S Share N A Auto Data Backup N A Dongle Compatibility 3G LTE WiFi N A Analog Clean View Yes Senior Mode N A Triple Protection Yes Clean View N A Family TV 2 0 N A Local Cinema Mode N A Tuner Broadcasting Digital Broadcasting DVB T2 VN DVB T2C Analog Tuner Yes 2 Tuner N A CI Common Interface N A Data Broadcasting HbbTV1 5 SG TV Key Yes Connectivity HDMI 4 USB 3 Compon...

Page 28: ...n The Frame N A Ambient Mode Yes Ambient Mode Brightness Color Sensor Yes Accessibility Learn menu screen UK English Singpore France Spain SeeColors Negative colors Grayscale Voice guide UK English Mandarin Chinese Korean Singpore France Itally Germany Spain Enlarge High contrast Learn TV Remote UK English Singpore France Spain Multi output Audio Key Repeat Delay Digital Clean View Yes Auto Channe...

Page 29: ...p N A IPv6 Support Yes MBR Support Yes Ultra Clean View N A Eco Feature Eco Sensor Yes Energy Efficiency Class 5 Power Power Supply AC100 240V 50 60Hz Power Consumption Max 300 W Power Consumption Stand by N A Power Consumption Energy Saving Mode N A Power Consumption Typical N A Peak Luminance Ratio N A Yearly Power Consumption EU standard N A ...

Page 30: ...orVolume100 by Quantum Dot Viewing Angle Ultra Viewing Angle Micro Dimming Ultimate UHD Dimming Local Dimming Direct Full Array Elite Auto Depth Enhancer N A Contrast Enhancer Yes Auto Motion Plus Yes Film Mode Yes Natural Mode Support Yes Audio Dolby Digital Plus Yes DTS Codec N A Dialog Enhancement Yes Audio Pre selection Descriptor N A Sound Output RMS 60W Speaker Type 4 2CH Woofer Yes Multiroo...

Page 31: ...iFi Direct Yes TV Sound to Mobile Yes Sound Mirroring Yes Localization S Share N A Auto Data Backup N A Dongle Compatibility 3G LTE WiFi N A Analog Clean View Yes Senior Mode N A Triple Protection Yes Clean View N A Family TV 2 0 N A Local Cinema Mode N A Tuner Broadcasting Digital Broadcasting DVB T2 VN DVB T2C Analog Tuner Yes 2 Tuner N A CI Common Interface N A Data Broadcasting HbbTV1 5 SG TV ...

Page 32: ... Yes Art Mode The Frame N A Motion Detection The Frame N A Ambient Mode Yes Ambient Mode Brightness Color Sensor Yes Accessibility Learn menu screen UK English Singpore France Spain SeeColors Negative colors Grayscale Voice guide UK English Mandarin Chinese Korean Singpore France Itally Germany Spain Enlarge High contrast Learn TV Remote UK English Singpore France Spain Multi output Audio Key Repe...

Page 33: ...X Yes Time Shift Yes V Chip N A IPv6 Support Yes MBR Support Yes Ultra Clean View N A Eco Feature Eco Sensor Yes Energy Efficiency Class 5 Power Power Supply AC100 240V 50 60Hz Power Consumption Max 435 W Power Consumption Stand by N A Power Consumption Energy Saving Mode N A Power Consumption Typical N A Peak Luminance Ratio N A Yearly Power Consumption EU standard N A ...

Page 34: ... site Product Code No Product Code No One Invisible Connection BN39 02470A 65 BN39 02470A 75 BN39 02436B 82 One Connect BN91 21121D 65 BN90 10951H 75 BN91 21171G 82 HOLDER CABLE BN61 14021A Power Cable 3903 001118 65 3903 001118 75 3903 001110 82 Samsung Smart Remote BN59 01311F Batteries AAA x 2 4301 000103 User Manual BN68 09544F RUBBER FOOT BN96 49199A Warranty Card Regulatory Guide Not availab...

Page 35: ...ourvolume to a full100 giving you realistic colours in dark or bright scene Quantum HDR16X Quantum HDR16X offers a magnified range of brightness that expresses every scene as precisely as real life with deep contrasts and vivid and natural colours The range of Quantum HDR claims luminance based on internal testing standards and is subject to change according to viewing environment or specific cond...

Page 36: ...accordingly It can even adjust the sound to match the TV content such as clearing a dialogue in news programs and highlighting a singer s voice over the background concert See the biggerpicture Everything gets very real on a bigger screen You ll experience every goal feel every explosion and be right in the middle of the action You ve never been closer than this ...

Page 37: ...ync technology reduces input lag with less tearing and stuttering VRR Variable Refresh Rate lets a gaming source optimal video frame by each scene Game enhancer To beat the competition you have to have full control Dynamic Black Equalizer gives you bettervisibility in the dark and uses detailed scene analysis to optimize image quality It even enhances the sound so you can immerse yourself in the g...

Page 38: ...d is one Smart service and GUI Graphic User Interface mayvary by model and region Some features and functions provided by connected devices may not be supported or limited to use Universal Guide Search less enjoy more QLED s Universal Guide helps you find yourfavorite content quickly and easily It learns what you like and curates everything in one place Content services mayvary by regions and are ...

Page 39: ... your lifestyle with easy settings and plenty of choices Décor Set your screen with an interactive background that matches your room décor perfectly Info You can display info like the time and date on a beautiful background My album Display all yourfavorite photos from your mobile device It s your own personal gallery Artworks Lovers of art will also enjoy beautiful pieces from well known photogra...

Page 40: ...languages The content within the screen are simulated images and are for demonstration purposes only SmartThings A truly intelligent home tailored to your life With Samsung SmartThings built right in QLED can connect you with your IoT devices and sensors You can turn on the lights check what s in the fridge and even control the robot vacuum cleaner Samsung SmartThings compatible devices mayvary by...

Page 41: ...r brands like Amazon s Echo or Google Home without any extra connectors Amazon Alexa and all related logos are trademarks of Amazon com Inc or its affiliates Google and related marks and logos are trademarks of Google LLC Some features and functions provided by connected devices may not be supported or limited to use Turn on TV feature support mayvary by model ...

Page 42: ...st time the Samsung Smart Remote pairs to the TV automatically If the Samsung Smart Remote does not pair to the TV automatically point it at the front of the TV and then press and hold the and buttons simultaneously for 3 seconds or more The images buttons and functions of the Samsung Smart Remote may differwith the model or geographical area For more information about the Samsung Smart Remote tha...

Page 43: ...s on the screen when it is time to broadcast a scheduled programme orwhen an event occurs on a registered device 2 Settings When the focus is moved to Settings a list of quick settings icons appears above the top of the menu You can quickly set frequently used functions by clicking the icons 3 Source You can select an external device connected to the TV 4 Search You can search for channels program...

Page 44: ...turns on in Ambient Mode If you use a remote control other than the Samsung Smart Remote there may be restrictions to entering Ambient mode Because this function is a QLED TV specific function it may not be supported depending on the model 7 Universal Guide Universal Guide is an app that allows you to search for and enjoyvarious content such as TV shows dramas and movies in one place Universal Gui...

Page 45: ...en the TV is turned off the TV turns on in Ambient Mode If you use a remote control other than the Samsung Smart Remote there may be restrictions to entering Ambient Mode Ambient Mode browserscreen NOTE The image on your TV may differfrom the image above depending on the model and geographical area When you press the or button in Ambient Mode the Ambient Mode browser screen appears at the bottom o...

Page 46: ... to select content with a sensible and beautiful design Info Allows you to select essential real time information such as weather and news This function may not be supported depending on the geographical area Photo Allows you to set a photo stored in your mobile device or Samsung Cloud as the wallpaper of the Ambient Mode screen To import photos from your mobile device or Samsung Cloud use the Sma...

Page 47: ...age on your TV may differfrom the image above depending on the model and geographical area 1 Sources You can select an external device connected to the TV 2 Channels Press the button to add a broadcast channel You can move or remove added broadcast channels 3 e Manual Displays the e Manual guide 4 Settings Displays the main on screen menu 5 Terrestrial Cable Satellite or Service Provider Choose th...

Page 48: ...ixby and the Bixby icon at the bottom of the TV screen is activated in Listen mode and a beep sounds Speak what you want If Bixby does not respond to yourvoice turn on the Voice Wake up function and then try again Explore Now Settings Voice Wake up Talking with Bixby using buttons You can also make a conversation with Bixby using the Samsung Smart Remote buttons Press and hold the button on your S...

Page 49: ... and other apps will not change Bixby only supports some languages and the supported functions may differ depending on the geographical area Voice response You can change Bixby s voice This function may not be supported depending on the selected Bixby s language Voice Wake up When you turn on the function Bixbywill respond to yourvoice This function may not be supported depending on the model or g...

Page 50: ...the voice commands that let you use Bixby in various situations Use the directional buttons to move to the desired command and then press the Select button You can operate the TVwith various voice commands 5 View Tutorial The popup window on using Bixby appears ...

Page 51: ... function is terminated When pressed while you are watching a programme the previous channel appears Play pause When pressed the playback controls appear Using these controls you can control the media content that is playing Smart Hub Returns to the Home Screen VOL Volume Move the button up or down to adjust the volume To mute the sound press the button When pressed for1 second or more the Accessi...

Page 52: ...ou turn on the TV for the first time the Samsung Smart Remote pairs to the TV automatically If the Samsung Smart Remote does not pair to the TV automatically point it at the remote control sensor of the TV and then press and hold the buttons labelled and as shown in the figure on the left simultaneously for 3 seconds or more Installing batteries into the Samsung Smart Remote 1 1 2 2 1 Press the bu...

Page 53: ...to move the focus to the item and then press the diatelystarts the Initial Setup Followthe instructions displayed on uityourviewing environment municateswith mobile devices ices forAndroid 6 0 orhigherand iOS10 orhigher gs app the mobile device must have been connectedviaWi Fi omaticallyon the SmartThings app ofyourmobile device proceed sing Add Device on the dashboard of the SmartThings app Vinst...

Page 54: ...2 34 2 Product specifications 2 4 5 RearView One Connect The TV turns off when the One Invisible Connection cable is disconnected and turns on when it is connected ...

Page 55: ...E TT Text xml Video formats with subtitles Name Format Xsub AVI SubStation Alpha MKV Advanced SubStation Alpha MKV SubRip MKV VobSub MKV MPEG 4 Timed text MP4 TTML in smooth streaming MP4 SMPTE TT Text MP4 SMPTE TT PNG MP4 Supported image formats and resolutions File extension Format Resolution jpg jpeg JPEG 15360 x 8640 png PNG 4096 x 4096 bmp BMP 4096 x 4096 mpo MPO 15360 x 8640 The MPO format i...

Page 56: ...tibility ratings If the Index Table is has an error the Seek Jump function will not work When playing video over a network connection the video may not play smoothly because of data transmission speeds Some USB digital camera devices may not be compatible with the TV HEVC codec is only available in MKV MP4 TS containers The MVC codec is supported partly Video decoders H 264 UHD is supported up to ...

Page 57: ...Cabinet Stand screws 10 12kgf A strength of Torque can be changed depending on the situation 3 1 TV Disassembly Description Screws Picture Description 1 Carefully position the TV so that the screen is facing downwards Make sure to place the TV upon a soft cushion or any material that will prevent damage to the screen 2 Lower the TV onto the floor upright in its stand Remove 4 Stand screws to the b...

Page 58: ...h bottom locking tab to release Now Insert the Open Jig completely into the bottom left corner tab then move up the left side to release cover Insert Open Jig into bottom right corner tab and continue following cover release directions 1 2 3 Open Jigs BN81 14946B Jig Direction 2 Jig Direction 1 Jig Direction 3 Locking tabs locations Gently lift up the Rear Cover beginning at the top to release all...

Page 59: ... Locking Top 12 point Locking Bottom 8 point Locking Center 3 Point Locking 75 inches L 8 point Locking R 8 point Locking Top 14 point Locking Bottom 8 point Locking Center 2 Point Locking 82 inches L 9 point Locking R 9 point Locking Top 16 point Locking Bottom 12 point Locking Center 5 Point Locking 1 2 1 2 ...

Page 60: ...cription Screws Picture Description 6 Remove the ASSY COVER P REAR 65 inches 75 inches 82 inches 7 Remove the ASSY SPEAKER P FRONT ASSY SPEAKER P FRONT Cable Assy SPK to Panel Hole 4 Points ASSY SPEAKER P FRONT Cable ASSY SPEAKER P FRONT ...

Page 61: ...LEAD CONNECTOR SUB ASSY Disassemble WiFI LEAD CONNECTOR SUB ASSY NETWORK WLAN CLIENT 9 Remove the ASSY BOARD P FUNCTION TACT ASSY BOARD P FUNCTION TACT Cable Screws 6001 003042 SCREW MACHINE M3 x L10 ZPC BLK DECO C H FRONT ASSY BOARD P FUNCTION TACT Cable ASSY BOARD P FUNCTION TACT Disassemble Function IR ...

Page 62: ...move the ASSY PCB MAIN BOARD Gently lift up Top Right corner to release the lock Use both hands to hold the board and slide to the right to release the board NOTE When installing the ASSY PCB MAIN BOARD verify the board is properly positioned in all 4 mounting slots 2 Slide to the right to release the board 2 Mounting slots 4EA 1 Lift up Locking Fixing Hole 12 Remove the LD SMPS A B Board LD SMPS ...

Page 63: ...Remove the powerand OC One Connect 1 cables connected to the TV panel then use the discharge tool to discharge powerfrom each board 65 Measurement point Discharging LD SMPS A LD SMPS B Measurement point 75 Measurement point Discharging LD SMPS A LD SMPS B Measurement point ...

Page 64: ... LEAD CONNECTOR POWER LD SMPS A LD SMPS B LEAD CONNECTOR DIMMING LD SMPS A LD SMPS B FFC Cables LD SMPS B LD SMPS A Gently lift the 3 Right edge to unlock the LD SMPS B board 1 Locking Fixing Hole Remove the board by holding it with both hands and sliding it to the Left 2 LD SMPS B 65 75 Locking Fixing Hole 1 Fixing Hole 1 Locking 2 Slide to the Left to release the board LD SMPS B ...

Page 65: ...lift the 4 Left edge to unlock the LD SMPSA board 1 locking Fixing Hole Locking Fixing Hole Remove the board by holding it with both hands and sliding it to the Right 2 LD SMPS A 65 75 Locking Fixing Hole 1 Fixing Hole LD SMPS A 2 Slide to the Right to release the board 1 Locking LD SMPS A 82 Locking Fixing Hole 1 Fixing Hole LD SMPS A 2 Slide to the Right to release the board 1 Locking ...

Page 66: ...3 10 3 Disassembly and Reassemble Description Screws Picture Description 13 Completed the disassembly NOTE Reassembly procedures are in the reverse order of disassembly procedures ...

Page 67: ...000282 SCREW TAPTYPE M3 x L8 ZPC BLK C BOTTOM C TOP 2 Use the Open Tool to unlock each corner Open Jigs Use Open Jig Tool or a similar Tool BN81 14946B 3 Turn One Connect Box upright and Remove Top Cover WARNING Before Removing SMPS Board You have to discharge the SMPS by using service JIG If LED ON 9 9 LED OFF discharge is completed A S DISCHARGE JIG BN81 12884A ...

Page 68: ...emove the 5 screws at each marked screw location on the board Screws 6003 000283 SCREW TAPTYPE M3 x L8 ZPC WHT SMPS S TOP 6 Lift off the black Insulator Sheet taped to the plate assembly at PULL marked location Be careful not to tear it 7 Remove the 2 screws on the plate Assembly then remove the assembly Screws 6003 000283 SCREW TAPTYPE M3 x L8 ZPC WHT S TOP C BOTTOM ...

Page 69: ...Screws Picture Description 8 Remove the 4 screws on the One Connect Board Screws 6003 000283 SCREW TAPTYPE M3 x L8 ZPC WHT MAIN BOARD C BOTTOM 9 Completed the disassembly NOTE Reassembly procedures are in the reverse order of disassembly procedures ...

Page 70: ...OK replace Function Assy If Missing check Main Assy Function Cable If 4 LED is ON Check 9 9 5 Switch Operation Test Chart foroperation command changes P CMD Signal DC Voltage 6 Center Key1 1 8V to 0 Vdc 7 Left Key 2 1 8V to 0 9Vdc 7 Right Key 2 1 8V to1 3Vdc 7 Up Key 2 1 8V to 0 Vdc 7 Down Key 2 1 8V to 0 5Vdc 5 Switch Operation Test Chart If wrong or no change suspect a stuck switch which can hol...

Page 71: ...4 2 Power 4 2 1 TV POWER STANDBY 65 inches LD SMPS A CN9003A CNM803A Main Connector POWER CNM803B 75 inches LD SMPS A CN9003A CNM803A Main Connector POWER CNM803B 4 2 4 Troubleshooting ...

Page 72: ...D 24 Fault 25 5 5V 26 N C CN9003A LD SMPS A Connector 1 GND 2 SEAMLESS 3 GND 4 SCL_LED 5 BLU_ON OFF 6 TEST_SD 7 SDA_LED 8 GND 9 TEST_LD 10 VSYNC_IN 11 SERIAL_STT 12 SERIAL_UHR 13 SERIAL_ DATA 14 GND 15 GND 16 CONTACT CNM803B LD SMPS A Connector 1 5V 2 N C 3 GND 4 Fault 5 N C 6 N C 7 PS_ON 8 POWER_LOW 9 N C 10 GND 11 VAMP 12 B13V 13 VAMP 14 B13V 15 VAMP 16 B13V 17 GND 18 GND 19 N C 20 N C 21 B350V ...

Page 73: ...eck A13V on Cable orat TV Board 9 9 If A13 is now OK Standby is now On Replace Defective SMPS If A13 is still missing Check One Connect Operation One Connect Cable 9 9 Perform One Connect Power Supply Stand Alone Test If OK Replace defective One Connect Cable or TV Main Board If A13 was OK on 4 LD SMPSA Check TV Main Board supplyvoltages to Function Control 9 9 If missing replace TV Main Board Che...

Page 74: ...VAMP 12 B13V 13 VAMP 14 B13V 15 VAMP 16 B13V 17 A13V 18 GND 19 PS_ON 20 POWER_LOW 21 N C 22 N C 23 GND 24 Fault 25 5 5V 26 N C PowerOn 65 inches LD SMPS B CN9003B LD SMPS A Connector CN9003B LD SMPS A Connector 1 GND 2 CONTACT 3 SERIAL_DATA 4 GND 5 SERIAL_STT 6 SERIAL_UHR 7 TEST_LD 8 VSYNC_IN 9 SDA_LED 10 GND 11 BLU_ON OFF 12 TEST_SD 13 GND 14 SCL_LED 15 GND 16 SEAMLESS Backlight 4 5 4 Troubleshoo...

Page 75: ...13 VAMP 14 B13V 15 VAMP 16 B13V 17 A13V 18 GND 19 PS_ON 20 POWER_LOW 21 N C 22 N C 23 GND 24 Fault 25 5 5V 26 N C PowerOn 75 inches LD SMPS B CN9003B LD SMPS A Connector CN9003B LD SMPS A Connector 1 GND 2 CONTACT 3 SERIAL_DATA 4 GND 5 SERIAL_STT 6 SERIAL_UHR 7 TEST_LD 8 VSYNC_IN 9 SDA_LED 10 GND 11 BLU_ON OFF 12 TEST_SD 13 GND 14 SCL_LED 15 GND 16 SEAMLESS Backlight 4 6 4 Troubleshooting ...

Page 76: ...13 VAMP 14 B13V 15 VAMP 16 B13V 17 A13V 18 GND 19 PS_ON 20 POWER_LOW 21 N C 22 N C 23 GND 24 Fault 25 5 5V 26 N C PowerOn 82 inches LD SMPS B CN9003B LD SMPS A Connector CN9003B LD SMPS A Connector 1 GND 2 CONTACT 3 SERIAL_DATA 4 GND 5 SERIAL_STT 6 SERIAL_UHR 7 TEST_LD 8 VSYNC_IN 9 SDA_LED 10 GND 11 BLU_ON OFF 12 TEST_SD 13 GND 14 SCL_LED 15 GND 16 SEAMLESS Backlight 4 7 4 Troubleshooting ...

Page 77: ...t Box If B350 A13V are OK 4 Check 9 9 B13V Switched Supplies for 12 8Vdc at pins 12 14 16 Check 9 9 Vamp Audio amp supplies for 18Vdc at pins 11 13 15 If no B13V orVamp voltages 5 Check Resistance on 9 9 LD SMPSA FUSE afterfirst removing CNM803A If fuse is open Replace LD SMPS A If wrong B13V orVamp Voltages 6 Check Replace 9 9 LD SMPSA Check TV Main Board If defective can load down SMPS 9 9 Backl...

Page 78: ...12 8Vdc on pins 7 8 9 10 Press TV PowerOn by Remote Control orTV Function Assy 2 Check 9 9 PS_ON pin 3 0 2Vdc when off changes to 3 3Vdc on NOTE Will stay On for short time when powered off If PS_ON Error won t change ormissing voltages 3 Check OCB Cable Connection to the TV 9 9 Should hear OCB relay activate with cable connection If PS_ON is OK 4 Check 9 9 B350 forapprox 346Vdc at pins 15 16 is a...

Page 79: ...ol across leads of each large Capacitors to remove its charge 2 Discharge Tool Remove Connector 3 CNM803 to activate OCB PowerSupplywhen AC line is applied Connect TV Backlight Test Cable 4 Check A13V for12 8Vdc on pins 7 8 9 10 at on test cable at OCB connector IMPORTANT For Safety NEVER Test CNM803 exposed connector pins without test cable connected Check 9 9 B350 forapprox 346Vdc at pins 15 16 ...

Page 80: ...gh 3 Check 9 9 A13V for12 8Vdc at board locations Labeled A11 8Vand GND See the picture below GND 13Vdc Check 9 9 B350 forapprox 360Vdc at board test wire locations Labeled B332V and BGND See the picture below 350Vdc GND 350Vdc 4 11 4 Troubleshooting ...

Page 81: ...upply Start BL Supply B350Vdc A13V Supply Optical PWR Connector ONE CONNECT CNM803A 1 B GND 2 B GND 3 N C 4 N C 5 B350V 6 B350V 7 N C 8 N C 9 GND 10 GND 11 VAMP 12 B13V 13 VAMP 14 B13V 15 VAMP 16 B13V 17 A13V 18 GND 19 PS_ON 20 POWER_LOW 21 N C 22 N C 23 GND 24 Fault 25 5 5V 26 N C CN1102_SPI DIMMING 1 GND 2 GND 3 PWM_DIMMING_OUT12_SDATA 4 GND 5 PWM_DIMMING_OUT11_SSTT 6 PWM_DIMMING_OUT10_SCLK 7 N ...

Page 82: ...onnector ONE CONNECT CNM803A 1 B GND 2 B GND 3 N C 4 N C 5 B350V 6 B350V 7 N C 8 N C 9 GND 10 GND 11 VAMP 12 B13V 13 VAMP 14 B13V 15 VAMP 16 B13V 17 A13V 18 GND 19 PS_ON 20 POWER_LOW 21 N C 22 N C 23 GND 24 Fault 25 5 5V 26 N C CN1102_SPI DIMMING 1 GND 2 GND 3 PWM_DIMMING_OUT12_SDATA 4 GND 5 PWM_DIMMING_OUT11_SSTT 6 PWM_DIMMING_OUT10_SCLK 7 N C 8 PWM_DIMMING_OUT9_VSYNC 9 OVD_ONOFF_LD_SDA_I2C 10 GN...

Page 83: ... 20 POWER_LOW 21 N C 22 N C 23 GND 24 Fault 25 5 5V 26 N C CN9003B LD SMPS A Connector 1 GND 2 CONTACT 3 SERIAL_DATA 4 GND 5 SERIAL_STT 6 SERIAL_UHR 7 TEST_LD 8 VSYNC_IN 9 SDA_LED 10 GND 11 BLU_ON OFF 12 TEST_SD 13 GND 14 SCL_LED 15 GND 16 SEAMLESS Backlight CN9003B LD SMPS A Connector CNM803A MAIN Connector 35Vdc LED Supply LD SMPS B VAMP B13V 35Vdc LED Supply LD SMPS A 35Vdc 65 4 14 4 Troublesho...

Page 84: ...N but Panel Section s are OFF ornot Changing level 2 Check correct model One Connect Box 9 9 If wrong model replace OCB can create miss backlight operation If correct model continue SMPS Panel Operation test SMPS PANEL OPERATION TEST 3 Check 9 9 Backlight Supply at each highlighted Capacitoron both LD SMPS A B Boards All should measure the same approx 35Vdc 65 TV If any missing orwrong voltage tur...

Page 85: ...4 13 N C B350V 16 15 B350V N C 18 17 N C B_GND 20 19 B_GND A13V B350V Backlight Test Cable CNM803 CNM803 ONE CONNECTBOX Remove AC Powerto the OCB Remove Cover follow Disassembly Procedure 1 Connect Discharge Tool across leads of each large Capacitors to remove its charge 2 Discharge Tool Remove Connector 3 CNM803 Connect TV 4 Backlight Test Cable to Supply 350Vdc 13Vdc directly to the TV Panel 4 1...

Page 86: ...ol across leads of each large Capacitors to remove its charge 2 Discharge Tool Remove Connector 3 CNM803A on LD SMPS A Board Remove 4 CN9003A on LD SMPS B Board Backlight Control Connect TV side Backlight Test Cable to 5 CNM803A Apply One Connect AC Powerand verify Backlight On 6 4 17 4 Troubleshooting ...

Page 87: ...ction Cable Video Operation If No Video Check connection status of One Connect Cable 9 9 Reconnect One Connect Cable both side TV and OCL 9 9 If NG Replace One Connect Box Cable defective 9 9 TV MAIN defective 9 9 4 18 4 Troubleshooting ...

Page 88: ...Test1 Mute 1 4 7 Mute Video Operation Generated on Main CPU Section If OK Source Input Cables 9 9 Otherinputs 9 9 If Noisy Pre ScalerPatterns 9 9 US Post Patterns 9 9 Pre FRC Pattern 9 9 PRE FRC Main Section PRE FRC Factory Mode Video Operation Generated at Pre FRC in TV Main Board If OK Check Replace defective TV Main Board 9 9 If Noisy Post FRC Pattern 9 9 4 19 4 Troubleshooting ...

Page 89: ...efective TV Main Board 9 9 If Noisy Mute 9 9 3 6 9 Mute T CON Section Mute 3 6 9 Mute May not be available for Larger models over 70 inches Video Operation Generated at T CON Section in TV Main T CON If OK 1 Check Replace defective TV Main T CON Board 9 9 If Noisy 2 Main T CON Board 9 9 Panel 9 9 4 20 4 Troubleshooting ...

Page 90: ...lines video distortion etc to help If noise is only on one half of screen check swap panel cables Verify Defective Panel Cables TV Main T CON Board or Panel If NoVideo Back Lights are OK on 2 If sound is OK check Panel13Vdc supplies to Panel 9 9 If No sound replace TV Main Board 9 9 4 21 4 Troubleshooting ...

Page 91: ...RC T CON 1 ScalerPattern US Post Pattern 2 FRC Pre Test Pattern 3 FRC Post Test Pattern 4 SoC TCON Test Pattern Factory Mode Verify 1 ScalerPattern and US Post Pattern Verify 2 FRC Pre Test Pattern Verify 3 FRC Post Test Pattern Verify 4 SoC TCON Test Pattern 4 22 4 Troubleshooting ...

Page 92: ...9 9 Optical Digital Out Errors Red light from Optical Digital Out 9 9 If missing replace One Connect Mini One Connect TV Main Board No HDMI Audio Source HDMI Cable One Connect Mini Connectors 9 9 Swap with other HDMI Inputs Sources Perform EDID Write in Factory Mode Can restore missing HDMI Audio Bulletins and Latest firmware on TV 9 9 If not restored replace One Connect Check Audio Format PCM Dol...

Page 93: ...typasscode Check 9 9 Wi Fi signal strength at TV use WiFi AnalyzerorsimilarApp Try another source Hot spot or Test Router Check 9 9 related Bulletins Check 9 9 FactoryMode SVC Info WiFi ErrorCount replace module forhigh errorcounts Routerto Network Failure Check 9 9 Network Status Check Network Status TV Router Internet Instruct the customer the TV has proper connection to the router and is likely...

Page 94: ... still fails DNS Test with setting to Auto Mode 9 9 If it fails both Manual Auto problem is ISP orRouter ISP Blocking If it Fails Internet Service Provideris Active 9 9 With DNS setting at 8888 9 9 With Hot Spot 9 9 Samsung ServerTest If it Fails Network Status 9 9 If OK Reset Smart Hub 9 9 Terms of Agreement are accepted 9 9 Samsung Apps If it Fails Reset 9 9 Smart Hub Samsung Apps load correctly...

Page 95: ...he TV s Main Board If ESN number is missing NF do not replace the Main Board Reset TV Clock and check for correct Time Date Netflix relies on correct settings Reset Smart Hub Reset Apps In Factory Mode ForStreaming Issues Go to TVWeb Browser Go to speedof me testmy net Check Speed 9 9 forat least 5 Mbps HD streaming 25 Mbps 4K Streaming Check Latency 9 9 forless than 50ms 4 26 4 Troubleshooting ...

Page 96: ... BTWIFI_NRESET 3 3 Vdc 3 3 Vdc Wired MAC Address xx xx xx xx xx xx Wireless MAC Address xx xx xx xx xx xx Bluetooth Address xx xx xx xx xx xx Contact Samsung Missing orError Replace 9 9 Main Board Go to Menu Support Contact Samsung Wireless MAC Address 9 9 Bluetooth Address 9 9 If Bluetooth Address or Wireless MAC Address are missing or errors exist BT Wi Fi ConnectorVoltages 9 9 If Voltages are O...

Page 97: ...mple Model QA82Q90RAKXXV Type Check Panel label located in the back chassis of panel and choose same Type code from the list Home Updates Exit 55A1QU7QN 55L1QU7QN 75L1QU7QN 55A1QU8XN 55L1QU7QN 55A1QU7QN 65A1QU9TR 65L1MU9TN 65L1QU9TR 65L1QU7QN 65A1QU8XN 65L1QU8XN 55A6AU0NN 82A1QU9TR 82A1QU9TR Type list in the Factory Menu Panel Label CY TR082FLLV1V H XX 2018 01 XX 82A1QU9TR XX 2019 0X XX 82A1QU9TR ...

Page 98: ...ith remote to entersettings 8 NOTE When installing the ASSY PCB MAIN BOARD verify the board is properly positioned in all 4 mounting slots Home Updates Exit Set Writing Type Writing Type digits exceeded Writing Type Success Factory Reset Type 82A1QU9TR Writing Type Local Set ED_VIET SW Model QRQ90 Model Code QA82Q90RAKXXV TUNER Ch Table NONE MRTOption Production Option EngineerOption Home Updates ...

Page 99: ...T QNQ75C URU8000F QRQ80C QRQ70D QNQ9F QNQ8FB QNQ7F URU7000JJ QRQ900Z URU7100H QRQ90B QRQ90 SW Model list in the Factory Menu Home Updates Exit Factory Reset Type 82A1QU9TR Writing Type Local Set ED_VIET SW Model QRQ90 Model Code QA82Q90RAKXXV TUNER Ch Table NONE MRTOption Production Option EngineerOption SW Model in Label Rating XXXX QRQ90 4 30 4 Troubleshooting ...

Page 100: ...f Option Byte Table info 6 Press soft poweroff with remote to entersettings 7 Home Updates Exit Set Model Code Wrong Model Code Entry Home Updates Exit Factory Reset Type 82A1QU9TR Writing Type Local Set ED_VIET SW Model QRQ90 Model Code QA82Q90RAKXXV1 QA82Q90RAKXXV Model Code digits exceeded Information The box is full You can t enter any more text OK Factory Reset Type 82A1QU9TR Writing Type Loc...

Page 101: ...t Select Factory Reset Factory Reset Type 82A1QU9TR Writing Type Local Set ED_VIET SW Model QRQ90 Model Code QA82Q90RAKXXV TUNER Ch Table NONE SVC Info ER Count Important to check for errors Resets to 0 with Factory Reset Check before resetting TV 9 9 SVC Test Patterns Use to check troubleshoot videos errors Control EDID Use to Reset HDMI Operational Errors Setting Option Bytes EnterFactory Mode w...

Page 102: ...uccess 9 9 Model 9 9 T CON 9 9 Dimming 9 9 FRC 9 9 Sub Micom 9 9 Tizen Platform info 9 9 BTVersion 9 9 E Manual 9 9 BlasterVersion 9 9 E Pop Version 9 9 EDID Success Status 9 9 HDCP Success Status 9 9 Wireless MAC Success 9 9 WiFi Version 9 9 Factory Data Version 9 9 EERC Version 9 9 Date of Purchase 9 9 Initial set up date Resets with Factory Reset CO Status O Operational 9 9 Testing Items 9 9 4 ...

Page 103: ...fy 2 FRC Pre Test Pattern Verify 3 FRC Post Test Pattern Verify 4 SoC TCON Test Pattern ScalerPattern OFF US Post Pattern OFF FRC Pre Pattern 0 FRC Post Pattern 0 SOC TCON Pattern 0 SOC TCON Pattern Level 255 FRC OSD Pre Pattern 0 FRC OSD Post Pattern 0 FRC2 Pre Pattern 0 FRC2 Post Pattern 0 SOC TCON2 Pattern 0 SOC TCON2 Pattern Level 255 SOC TCON3 Pattern 0 SOC TCON3 Pattern Level 255 4 34 4 Trou...

Page 104: ...SVC Info ER Count WD Count Watch Dog Hardware related issue AR Count Auto Reset software i e Apps related important ErrorCount 9 9 Status Screen Verify each item listed 4 35 4 Troubleshooting ...

Page 105: ...C WB Advanced EDID Sub Option Hotel Option Shop Option Asia Option Sound Select EDID OFF to ON 3 RightArrow Key EDID ON OFF ON Select EDID WRITE ALL 4 EnterKey EDID WRITE ALL Success Wait to Success 5 RightArrow Key EDID WRITE ALL Wait Confirm EDID WRITE ALL Success 6 Menu Key EDID WRITE ALL Success 4 36 4 Troubleshooting ...

Page 106: ...sequence With ConsumerRemote IR Remote Remote Button 9 9 NTSC POWER OFF MUTE 1 8 2 POWER ON PAL POWER OFF INFO MENU MUTE POWER ON With Factory Remote INFO FACTORY The following screen appears 2 Please refer to Detail Factory Option page for details Detail Factory Option Option 82A1QU9TR ED_VIET QA82 4 37 4 Troubleshooting ...

Page 107: ...ndor HANSOE Code Spec Type Code Spec Code Spec BN95 05487A CY TR065FLAV1V H 65L1QU9TR BN44 00980C L65S9NRA_RHS BN44 00980D L65S9NRB_RHS MAIN Assy One Connetor ASSY CHASSIS ASSY PCB MAIN Assy One Connetor ASSY PCB OC BN91 20682N BN94 14008N BN91 21121D BN94 14012E Factory Option Local Set BOM Model Front Color S W Model ED_VIET 90RA Q F RQ90 OC 65 QRQ90 PBA Factory Option Panel Type Local Set S W M...

Page 108: ...5A1QU9TR BN44 00980E L75S9NRA_RHS BN44 00980F L75S9NRB_RHS MAIN Assy One Connetor ASSY CHASSIS ASSY PCB MAIN Assy One Connetor ASSY PCB OC BN91 21386A BN94 14717A BN91 21121D BN94 14012E Factory Option Local Set BOM Model Front Color S W Model ED_VIET 90RA Q F RQ90 OC 75 QRQ90 PBA Factory Option Panel Type Local Set S W Model BOM Model 75L1QU9TR AD_AU2 QRQ90 Follow S W Model 4 39 4 Troubleshooting...

Page 109: ...82A1QU9TR BN44 00981A L82S9NA_RHS BN44 00981B L82S9NB_RHS MAIN Assy One Connetor ASSY CHASSIS ASSY PCB MAIN Assy One Connetor ASSY PCB OC BN91 20787H BN94 14077H BN91 21171G BN94 14012E Factory Option Local Set BOM Model Front Color S W Model ED_VIET 90RA Q F RQ90 OC 82 QRQ90 PBA Factory Option Panel Type Local Set S W Model BOM Model 82A1QU9TR AD_AU2 QRQ90 Follow S W Model 4 40 4 Troubleshooting ...

Page 110: ...E MRTOption EngineerOption Control Factory Menu Name Data Range EDID EDID ON OFF OFF EDID WRITE ALL EDID WRITE HDMI EDID WRITE PC HDMI EDID Ver HDMI EDID Port Sub Option RS 232 Jack UART RS 232 mode setting EXT Link Support ON Serial Log On Off OFF Watchdog OFF FRC Monitoring OFF Checksum 0x0000 Fast Boot In Production OFF USB Serial OFF ECO IC TYPE NOT_DETECT COLOR IC TYPE RISF315 Info Link Serve...

Page 111: ...Support ON Browser preloading Support FULL EXT IR Boot Support ON APP BOOTING SUPPORT ON Cloudscan Always Upload OFF STB Power Sync Support ON OOM Panic Burst Interval 60 OOM Panic Burst Number 8 APP Boot Support after Reset 1 Long press Power off Reset OFF Perf Mode 0 Inhouse App upgrader OFF Hotel Option Hospitality Mode OFF Power On Menu OSD Operation Music Mode External Source Eco Solution Clo...

Page 112: ...e of stereo signal If Pilot level is greather than High threshold value recognize Stereo signal Pilot Level Low 0x20h The Low threshold value of stereo signal If Pilot level is less than Low threshold value recognize Mono signal Amp Volume 0xc4h Amp Scale 0x3dh Amp EQ Check Sum 0x0000BEEE Subwoofer Support 3 Woofer Type 0 WooferVolume 0xc7h Woofer Scale 0x3dh Woofer Check sum 0x0000F167 PEQ Inx 88...

Page 113: ...CL Serdes SSC ON OFF ON OCL Serdes SSC Value 0 TCON B USIT SSC ON OFF 2 TCON B USIT SSC Period 0 TCON B USIT SSC Modulation 0 RF Mute Time 600ms TunerMargin 3 FRC FRC FDISPLAY ON OFF OFF PC Mode ON OFF OFF FRC VX1 RX EQ SETTING OFF FRC VX1 TX Pre_emphasis setting 0 Netflix OSD Threshold 179 TCON TCON_TEMP READ 52 TEMP LAST 6000 DCC VERSION 0 TCON Demura Bypass OFF TCON FDisplay OFF Panel Code1 Pan...

Page 114: ...k KILL OFF CES Option OFF CES Convergence Option OFF CES ATSC 3_0 OFF CES OOBE MVPD SUPPORT OFF BTDUT OFF BTEU DUT BTThroughput Failure Reproduce Module ON 21_9 L DETECT STABLE TIME 7 L DETECT UNSTABLE TIME 3 L DETECT USB SUPPORT 0 DB Download MRT Option Dump Failure Sub Option Dump Failure Engineer Option Dump Failure Picture Data Dump Failure VCONF Dump Failure Read Eco SensorData 0 No Signal Po...

Page 115: ... 0ms HDMI NFST UNMUTE TIME 500ms HdmiRx EQ 0 HDMI TMDS ERR DET 1 Auto EQ sweep READY VMD OPT 0 DVB CI TS Clock delay TC 0 TS Clock delay S 0 CI Control Buf ON ON TS Clock delay CPU 2 EW Diagnosis Failure Test Pattern Scaler Pattern OFF US Post Pattern OFF FRC Pre Pattern 0 FRC Post Pattern 0 SOC TCON Pattern 0 SOC TCON Pattern Level 255 FRC OSD Pre Pattern 0 FRC OSD Post Pattern 0 FRC2 Pre Pattern...

Page 116: ... Program SUBMICOM JP USB UPGRADE BT UPGRADE BT FREEPAIRING Function Upgrade FRC3D FW UPGRADE FRC3D SRP UPGRADE FRC3D LD UPGRADE FRC2 3D FW UPGRADE Camera Upgade Upgarde Camera module There is upgrade program in Main Image Mic Upgrade Upgarde MIC in Camera module There is upgrade program in Main Image Jump UPGRADE IR Blaster Upgrade Pic Data USB Update Eco Data USB Update SC ADK Upgrade OtherSettin...

Page 117: ...0 V APP OFF SWI OFF KantS Cutoff PEQ 0 Restart No 0 SVC Panel ORIGINAL S N Serial number Writing S N ADC WB Factory Menu Name Data Range ADC AV Calibaration Comp Calibration PC Calibration HDMI Calibration ADC Result 1st_Y_GH 255 1st_Y_GL 246 1st_Cb_BH 1st_Cb_BL 1st_Cr_RH 1st_Cr_RL 2nd_R_L 129 2nd_G_L 129 2nd_B_L 129 2nd_R_H 109 2nd_G_H 109 2nd_B_H 109 4 48 4 Troubleshooting ...

Page 118: ...28 WB_W2_B_Offset 128 WB_W2_R_Gain 157 WB_W2_B_Gain 93 WB_N_R_Offset 128 WB_N_B_Offset 128 WB_N_R_Gain 146 WB_N_B_Gain 145 MGA MGA On Off OFF R1_Gain G1_Gain B1_Gain R2_Gain G2_Gain B2_Gain R3_Gain G3_Gain B3_Gain R4_Gain G4_Gain B4_Gain R5_Gain G5_Gain B5_Gain R6_Gain G6_Gain B6_Gain R7_Gain G7_Gain B7_Gain 4 49 4 Troubleshooting ...

Page 119: ...ain B10_Gain SPI White Balance SPI White Balance On Off SPI R Offset SPI G Offset SPI B Offset SPI R Gain SPI G Gain SPI B Gain SPI N Rgain SPI N Bgain SPI N Roffset SPI N Boffset SPI W2 Rgain SPI W2 Bgain SPI W2 Roffset SPI W2 Boffset SPI MGA WB Data to SPI 0 Advanced 4 50 4 Troubleshooting ...

Page 120: ...Control None Description of RS232C Pin Name Full Name Pin Name Full Name Pin Name Full Name 1 CD Carrier Detect 4 DTR Data Terminal Ready 7 RTS Request To Send 2 RxD Received Data 5 GND Signal Ground 8 CTS Clear To Send 3 TxD Transmitted Data 6 DSR Data Set Ready 9 RI Ring Indicator 4 51 4 Troubleshooting ...

Page 121: ... TV 0x0a 0x00 0x00 0x00 AV AV1 0x01 0x00 AV2 0x01 AV3 0x02 S Video S Video1 0x02 0x00 S Video2 0x01 S Video3 0x02 Component Component1 0x03 0x00 Component2 0x01 Component3 0x02 PC PC1 0x04 0x00 PC2 0x01 PC3 0x02 HDMI HDMI1 0x05 0x00 HDMI2 0x01 HDMI3 0x02 HDMI4 0x03 DVI DVI1 0x06 0x00 DVI2 0x01 DVI3 0x02 RVU RVU 0x07 0x00 PICTURE Mode Dynamic Entertain 0x0b 0x00 0x00 0x00 Standard 0x01 Movie 0x02 N...

Page 122: ...3 Gamma 3 3 0x03 3 3 RGB Only Mode Off 0x05 0x00 Red 0x01 Green 0x02 Blue 0x03 Color Space Auto 0x06 0x00 Native 0x01 Custom 0x02 White Balance R Offset LCD 0x07 50 50 White Balance G Offset LCD 0x08 50 50 White Balance B Offset LCD 0x09 50 50 White Balance R Gain LCD 0x0a 50 50 White Balance G Gain LCD 0x0b 50 50 White Balance B Gain LCD 0x0c 50 50 White Balance Reset LCD 0x0d 0x00 Flesh Tone 15 ...

Page 123: ... 0x01 Cinema 0x02 Ticker 0x03 10p White Balance Off 0x07 0x16 0x00 On 0x07 0x16 0x01 Interval 0x07 0x17 1 10 Red 0x07 0x18 50 50 Green 0x07 0x19 50 50 Blue 0x07 0x1a 1 10 Reset 0x00 0x1b 0x00 Picture Option Color Tone Cool 0x0a 0x00 0x00 Standard 0x01 Warm1 0x02 Warm2 0x03 Digital Noise Filter Off 0x02 0x00 Low 0x01 Medium 0x02 High 0x03 Auto 0x04 Auto Visualization 0x05 MPEG Noise Filter Off 0x03...

Page 124: ...0x01 HDMI2 UHD Color Mode Off 0x05 0x00 On 0x01 HDMI3 UHD Color Mode Off 0x06 0x00 On 0x01 HDMI4 UHD Color Mode Off 0x07 0x00 On 0x01 Analog Clean View On 0x08 0x00 Screen Adjustment Picture Size 16 9 0x0b 0x0a 0x01 0x00 Zoom1 0x01 Zoom2 0x02 Wide Fit 0x03 4 3 0x04 Screen Fit 0x05 Smart View I 0x06 Smart View II 0x07 Auto Wide 0x08 Wide Zoom 0x09 Zoom 0x0a Fit to Screen Off 0x0b 0x00 0x00 Zoom Zoo...

Page 125: ...1 3D View Point 0x02 5 5 Depth 0x03 1 10 3D Auto View Off 0x05 0x00 Message Notice 0x01 On 0x02 Auto1 0x03 Auto2 0x04 3D Light Control Low 0x06 0x00 High 0x01 L R Change L to R 0x07 0x00 R to L 0x01 3D Perspective 0x08 value Optimize 0x09 value Factory SVB Expert N D Adj On 0x0b 0x0d 0x00 0x00 Off 0x01 Fix 0x02 Apply Picture Mode All Sources 0x0f 0x00 0x00 0x00 Current Source 0x01 Pip PIP Off 0x0b...

Page 126: ... HD Off 0x02 0x00 0x00 Virtual Surrond On 0x01 SRS TruDialog Off 0x03 0x00 0x00 Dialog Clarify On 0x01 Preferred Language English 0x04 0x00 0x00 Spanish 0x01 French 0x02 Korean 0x03 Japanese 0x04 Multi Track Sound Mono 0x05 0x00 0x00 Stereo 0x01 SAP 0x02 Auto Volume Off 0x06 0x00 0x00 Normal 0x01 Night 0x02 SpeakerSelect TV Speaker 0x07 0x00 0x00 External Speaker 0x01 Audio Out 0x01 Sound Select M...

Page 127: ...x01 Get Status Power On Off 0xf0 0x00 0x00 0x00 Volume 0 100 0xf0 0x01 0x00 0x00 Mute On Off 0xf0 0x02 0x00 0x00 Channel Number 0xf0 0x03 0x00 0x00 Source TV AV HDMI 0xf0 0x04 0x00 0x00 Picture Size 0xf0 0x05 0x00 0x00 3D On Off 0xf0 0x06 0x00 0x00 Picture Mode 0xf0 0x07 0x00 0x00 Sound Mode 0xf0 0x08 0x00 0x00 Referfor Table KEY Value Up 96 0x60 Down 97 0x61 Left 101 0x65 Right 98 0x62 Menu 26 0x...

Page 128: ...the USB device to the TV to update To update using a USB device download the update package from Samsung com to your computer Then save the update package in the USB device s top level folder Otherwise the TVwill not be able to locate the update package Updating the TV automatically Settings Support Software Update Auto Update If the TV is connected to the Internet you can have the TV update its s...

Page 129: ...iring Diagram 65 75 inches_Wiring Diagram TV Board CN201 CN1403 SPEAKERR ACN01 CN1300 CN1501 CN200 ONECONNECT CN1102_SPI LD SMPS A Func on LOGO LD SMPS B CN1301_UT SPEAKERL BT WIFI CNM803A CNM803A CN9003B CN9003A CN9003A CNM803B 65 inches_inner ...

Page 130: ...5 2 5 Wiring Diagram 75 inches_inner ...

Page 131: ...MPS B CN1301_UT SPEAKERL BT WIFI CNM803A CNM803A CN9003B CN9003A CN9003A CNM803B 1 2 4 5 3 3 6 7 8 Cable Infomation Part Name Connection Part Spec Code No 1 LEAD CONNECTOR POWER Main LD SMPS A 26P L300 65 BN39 02403D 26P L400 75 BN39 02403C 2 LEAD CONNECTOR DIMMING Main LD SMPS B 16P 300mm 65 BN39 02309C 16P 400mm 75 BN39 02309J 3 FFC CABLE Main Source 96P L115 65 BN96 46132A 96P L150 75 BN96 4613...

Page 132: ...L125 65 BN39 02463A 10P L150 75 BN39 02463B 6 LEAD CONNECTOR DIMMING LD SMPS A LD SMPS B 16P L800 65 BN39 02397A 16P L900 75 BN39 02397B 7 LEAD CONNECTOR POWER LD SMPS A LD SMPS B 26P L750 65 BN39 02405B 26P L850 75 BN39 02405C 8 LEAD CONNECTOR POWER OC Main OC Power 26P L125 65 BN39 02437A 75 BN39 02437A ...

Page 133: ...01 CN1403 SPEAKERR ACN01 CN1300 CN1501 CN200 ONECONNECT CN1102_SPI LD SMPS A Func on LOGO LD SMPS B CN1301_UT SPEAKERL BT WIFI CN9001 CN9002 CN9003 CN9003A CN9003A CN9003B CNM803A CNM803A CNM803B CN9003 CN9004 CN9005 CN9005 CN9004 CN9002 CN9001 82 inches_inner ...

Page 134: ...003A CN9003A CN9003B CNM803A CNM803A CNM803B CN9003 CN9004 CN9005 CN9005 CN9004 CN9002 CN9001 1 2 4 5 3 3 6 7 8 Cable Infomation Part Name Connection Part Spec Code No 1 LEAD CONNECTOR POWER Main LD SMPS A 26P L400 82 BN39 02403C 2 LEAD CONNECTOR DIMMING Main LD SMPS B 16P 400mm 82 BN39 02309J 3 FFC CABLE Main Source 96P L180 82 BN96 46132C 4 LEAD CONNECTOR SUB ASSY Main WiFi 10P L250 82 BN39 0246...

Page 135: ...5 LEAD CONNECTOR SUB ASSY Main FUNCTION 10P 190mm 82 AH39 01232D 6 LEAD CONNECTOR POWER LD SMPS A LD SMPS B 26P L750 82 BN39 02405D 7 LEAD CONNECTOR ETC LD SMPS A LD SMPS B 16P L1200 82 BN39 02332B 8 LEAD CONNECTOR POWER OC Main OC Power 26P L125 82 BN39 02438A ...

Page 136: ...W 9 A13V_PW 10 GND 11 B18VS_PW 12 B13V_PW 13 B18VS_PW 14 B13V_PW 15 B18VS_PW 16 B13V_PW 17 N C 18 GND 19 N C 20 N C 21 B350V_PW 22 B350V_PW 23 N C 24 N C 25 350V_DGND 26 350V_DGND 2 CN1501 FUNCTION IR 1 IR 2 IR_GND 3 A3 3V_PW 4 SENSOR_SCL_I2C 5 SENSOR_SDA_I2C 6 KEY_INPUT1 7 KEY_INPUT2 8 LED_STB_OUT 9 IR_OUT_1 10 IR_OUT_2 3 ACN01 AMP 1 TWT_R 2 TWT_R 3 MID_R 4 MID_R 5 WF_R 6 WF_R 7 TWT_L 8 TWT_L 9 M...

Page 137: ..._I2C 15 GND 16 PWM_DIMMING_OUT8_ SEAMLESS CN200 OC CONNECTOR 1 GND 2 SERDES_RX_L1 3 SERDES_RX_L1 4 GND 5 SERDES_TX_L1 6 SERDES_TX_L1 7 GND 8 OCL_M_RXCLK _HDMI 9 OCL_M_RXCLK _HDMI 10 GND 11 OCL_M_RX0 _HDMI 12 OCL_M_RX0 _HDMI 13 GND 14 OCL_M_RX1 _HDMI 15 OCL_M_RX1 _HDMI 16 GND 17 OCL_M_RX2 _HDMI 18 OCL_M_RX2 _HDMI 19 S0 20 S1 21 ACT 22 CABLE_DETECT 23 A3 3V_PW 24 IMON 25 SIGNAL_DETECT 26 B3 3V_PW 27...

Page 138: ...F_MON 11 VGHD_30V_PW 35 TX_CH0_B _USIT 59 TX_CH4_B _USIT 83 PORTNUM 12 CKV1_GOA 36 TX_CH0_B _USIT 60 TX_CH4_B _USIT 84 VCCA_1 9V_PW 13 CKV2_GOA 37 DGND 61 DGND 85 VCCB_1 8V_PW 14 CKV3_GOA 38 TX_CH1_A _USIT 62 TX_CH5_A _USIT 86 LL_CELL 15 CKV4_GOA 39 TX_CH1_A _USIT 63 TX_CH5_A _USIT 87 LH_CELL 16 CKVB1_GOA 40 DGND 64 DGND 88 HAVDD_8 5V_PW 17 CKVB2_GOA 41 TX_CH1_B _USIT 65 TX_CH5_B _USIT 89 UL_CELL ...

Page 139: ...CKV2_GOA 11 LL_CELL 35 TX_CH10_A _USIT 59 TX_CH14_A _USIT 83 CKV1_GOA 12 VCCB_1 8V_PW 36 TX_CH10_A _USIT 60 TX_CH14_A _USIT 84 NC 13 VCCA_1 9V_PW 37 DGND 61 DGND 85 VOFF_ 11V_PW 14 PI_DSF_MON 38 TX_CH10_B _USIT 62 TX_CH14_B _USIT 86 VSS_OUT2_CELL 15 PORTNUM 39 TX_CH10_B _USIT 63 TX_CH14_B _USIT 87 NC 16 DGND 40 DGND 64 DGND 88 VCOM3_CELL 17 NC 41 TX_CH11_A _USIT 65 TX_CH15_A _USIT 89 FB_VCOM3_CELL...

Page 140: ...nches LD SMPS A 1 CNM803A 2 CN9003A 3 CNM803B 4 CN9002 4 CN9001 4 CN9003 4 CN9005 4 CN9004 To LD SMPS Board To Main Board 65 inches LD SMPS B To Main Board 1 CNM803A 3 CN9003B 2 CN9003A 4 CN9004 4 CN9005 4 CN9003 4 CN9001 4 CN9002 To LD SMPS Board ...

Page 141: ...MPS A 1 CNM803A 2 CN9003A 3 CNM803B 4 CN9002 4 CN9001 4 CN9003 4 CN9005 4 CN9004 To LD SMPS Board To Main Board 75 inches LD SMPS B To Main Board 1 CNM803A 3 CN9003B 2 CN9003A 4 CN9004 4 CN9005 4 CN9003 4 CN9001 4 CN9002 To LD SMPS Board ...

Page 142: ...MPS A 2 CN9003A 3 CNM803B 4 CN9002 4 CN9003 4 CN9001 4 CN9005 4 CN9004 1 CNM803A To Main Board To LD SMPS Board 82 inches LD SMPS B 1 CNM803A 4 CN9002 4 CN9001 4 CN9003 4 CN9004 4 CN9005 2 CN9003A To Main Board 3 CN9003B To LD SMPS Board ...

Page 143: ... 12 B13V 13 VAMP 14 B13V 15 VAMP 16 B13V 17 GND 18 GND 19 N C 20 N C 21 B350V 22 B350V 23 N C 24 N C 25 B GND 26 B GND 3 CN9003B LD SMPS B 1 GND 2 CONTACT 3 SERIAL_DATA 4 GND 5 SERIAL_STT 6 SERIAL_UHR 7 TEST_LD 8 VSYNC_IN 9 SDA_LED 10 GND 11 BLU_ON OFF 12 TEST_SD 13 GND 14 SCL_LED 15 GND 16 SEAMLESS 4 CN9001 CN9002 CN9003 CN9004 CN9005 1 GND 2 N C 3 4 5 6 7 8 9 10 11 12 13 14 15 N C 16 GND 17 GND ...

Page 144: ...X_RX_TP 5 N C 6 N C 7 GND 5 OP700 OPTICAL 1 SPDIF_OUT 2 B5V_PW 3 GND 4 IDENT_SPDIF 5 GND 6 CN602_LAN LAN 1 EPHY_TXP 2 LAN_DGND 3 EPHY_TXN 4 EPHY_RXP 5 LAN_DGND 6 EPHY_RXN 7 N C 8 LAN_DGND 7 CN801_H1 HDMI1_STB 1 HDMI1_RX2 _HDMI 2 GND 3 HDMI1_RX2 _HDMI 4 HDMI1_RX1 _HDMI 5 GND 6 HDMI1_RX1 _HDMI 7 HDMI1_RX0 _HDMI 8 GND 9 HDMI1_RX0 _HDMI 10 HDMI1_RXC _HDMI 11 GND 12 HDMI1_RXC _HDMI 13 CEC 14 N C 15 HDM...

Page 145: ...A0 3 HDMI_TMDS_DATA0 4 GND 5 HDMI_TMDS_DATA1 6 HDMI_TMDS_DATA1 7 GND 8 HDMI_TMDS_DATA2 9 HDMI_TMDS_DATA2 10 GND 11 SERDES_TX_L1 12 SERDES_TX_L1 13 GND 14 SERDES_RX_L1 15 SERDES_RX_L1 16 B350V_PW 17 GND 18 HDMI_TMDS_CLK 19 HDMI_TMDS_CLK 20 B5V_PW 21 CABLE_DETECT 22 A3 3V_PW 23 ACT 24 SIGNAL_DETECT 25 IMON 26 A13V_PW 27 B350V_GND 28 B350V_GND 29 B350V_GND 30 B350V_PW 31 B350V_PW 12 CN221 POWER 1 B35...

Page 146: ...ne Connect 65 75 inches CNM803 POWER One Connect SMPS Board Pin Map CNM803 POWER 1 IR_SMPS 2 FAIL COUNT 3 PS_ON 4 POWER_LOW 5 GND 6 GND 7 A13V 8 A13V 9 A13V 10 A13V 11 GND 12 GND 13 N C 14 N C 15 B350V 16 B350V 17 N C 18 N C 19 B_GND 20 B_GND ...

Page 147: ...WER One Connect SMPS Board Pin Map CNM803 POWER 1 F13V 2 IR 3 F13V 4 PS ON OFF 5 GND 6 GND 7 A13V 8 A13V 9 A13V 10 A13V 11 GND 12 GND 13 N C 14 N C 15 B350V 16 B350V 17 N C 18 N C 19 B350V 20 B350V 21 N C 22 N C 23 BGND 24 BGND 25 BGND 26 BGND ...

Reviews: