background image

English

7

Installation

Installation Instructions

We recommend that a qualified technician install the range hood.  It is 

the 

installer’s responsibility to ensure the range hood complies with the instal

-

lation clearances specified for the product.


It is recommended that the vent system be installed before the hood is  

 installed. 


If possible, disconnect and move freestanding or slide-in ranges from  


cabinet openings to provide easier access to the rear wall. 


Before making cutouts, make sure there is proper clearance within the  


ceiling or wall for the exhaust vent. 


Confirm that all installation parts have been removed from the  


shipping carton. 

1. 

Turn off the power at the circuit breaker panel or fuse box.

2. 

Determine which venting method to use: roof or wall exhaust. 


NOTE

: This hood is factory set to vent through the top air exit. 

3. 

Select a flat surface for assembling the range hood. 


Place a covering over that surface.

Venting Methods

Outside Top exhaust

Vertical Duct Ø 10

″ (25.4 cm)

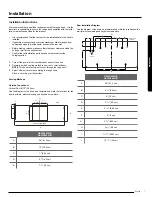
Use the diagram or the hood as a template and mark the locations for the 
door ductwork, electrical wiring and keyhole screw slots. 

A

D

C

CL

B

E

FRONT OF THE HOOD

1

4

(13.3 cm)

WALL

1

4

(13.3 cm)


3

4

” (19 mm)

10 

1

2

” 

(26.6 cm)

NK36R9600CS

NK36R9600CM

A

36″ (91.2 cm)

B

12″ (30.5 cm)

C

1″ (2.54 cm)

D

5

8

″ (6.5 cm)

E

1

2

″ (19 cm)


Rear Installation Diagram

Use the diagram or the hood as a template and mark the locations on the

wall for electrical wiring and keyhole screws slots.  


Ø 

1”

2.5 cm

B

B

A

C

C

CL

D

D

E

E

F

G

H

I

TOP OF THE 

HOOD

J

NK36R9600CS

NK36R9600CM

A

36″ (91.2 cm)

B

7

8

″ (25 cm)

C

4″ (10  cm)

D

11

16

″ (9.3 cm)

E

 3 

7

16

″ (8.69 cm)

F

2” (5 cm)

G

3

6

16

″ (8.55 cm)

H

3

13

16

″ (9.6 cm)

I

11

9

16

″ (29.32 cm)

J

12 

10

16

″ (32 cm)

Installation 
Summary of Contents for R9600 Series

Page 1: ...Range Hood Hotte de la cuisine Campana de cocina Installation Instructions Guide Guide d instructions d installation Guía de Instrucciones para Instalación NK36R9600CS AA NK36R9600CM AA LIB0148500 ...

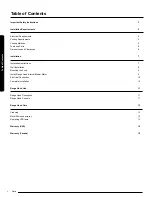
Page 2: ...lation 7 Installation Instructions 7 Wall Installation 8 Mounting the hood 9 Install Range Hood Internal Blower Motor 9 Electrical Connection 10 Complete Installation 10 Range Hood Use 11 Range Hood Description 11 Range Hood Controls 11 Range Hood Care 13 Cleaning 13 Metal filters and drip tay 13 Replacing LED lamp 13 Warranty USA 14 Warranty Canada 15 Table of Contents Table of Contents ...

Page 3: ...rence in a residential installation This equipment generates uses and can radiate radio frequency energy and if not installed and used in accordance with the instructions may cause harmful interference to radio communications However there is no guarantee that interference will not occur in a particular installation If this equipment does cause harmful interference to radio or television reception...

Page 4: ...RNING TO REDUCE THE RISK OF FIRE USE ONLY METAL DUCTWORK WARNING TO REDUCE THE RISK OF A RANGE TOP GREASE FIRE Never leave surface units unattended at high settings Boilovers cause smoking and greasy spillovers that may ignite Heat oils slowly on low or medium settings Always turn the hood ON when cooking at high heat or when flambeing food i e Crepes Suzette Cherries Jubilee Peppercorn Beef Flamb...

Page 5: ...outdoors Do not terminate the vent system in an attic or other enclosed area Do not use a 4 10 2 cm laundry type wall cap Use metal vent only Rigid metal vent is recommended Plastic or metal foil vent is not recommended The length of the vent system and the number of elbows should be kept to a minimum to provide efficient performance For the most efficient and quiet operation Use no more than thre...

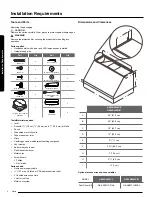
Page 6: ...Level Drill with 1 3 0 cm 1 8 3 0 mm and 5 8 15 8 mm drill bits Pencil Wire stripper or utility knife Tape measure or ruler Pliers Caulking gun and weatherproof caulking compound Vent clamps Saber or keyshole saw Flat blade screwdriver Metal snips Screwdrivers Phillips Flat blade Parts needed Home power supply cable 12 7 mm UL listed or CSA approved strain relief 3 UL listed wire connectors 1 wall...

Page 7: ...se roof or wall exhaust NOTE This hood is factory set to vent through the top air exit 3 Select a flat surface for assembling the range hood Place a covering over that surface Venting Methods Outside Top exhaust Vertical Duct Ø 10 25 4 cm Use the diagram or the hood as a template and mark the locations for the door ductwork electrical wiring and keyhole screw slots A D C CL B E FRONT OF THE HOOD 5...

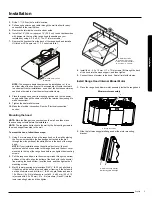
Page 8: ... of the hood by loosening the 2 screws from the inside 7 Line the top of the wood support up with the wood support location line on the wall and then center it on the center line 8 Locate the marks for the studs and then draw two vertical lines on the wood support marking where the studs intersect with the wood support 9 Mark the center of each line remove the wood support from the wall and then d...

Page 9: ...nge hood on the wall by placing the 2 screws mounted in the wood support attached to the wall through the wide portion of the slotted holes in the back of the range hood NOTE If your installation uses the optional duct cover the vent system needs to be connected to the range hood and the duct cover mounted to the top of the range hood before you tighten the mounting screws 2 Pull the range hood do...

Page 10: ...o the National Electrical Code and local codes and ordinances in 1 2 conduit from the service panel to the junction box A F E D C B A White wires B Black wires C UL listed wire connector D Green or bare and yellow green ground wire E Homepower supply cable F UL listed or CSA approved 1 2 strain relief WARNING ELECTRICALLY GROUND THE BLOWER CONNECT THE GROUND WIRE TO THE GREEN AND YELLOW GROUND WIR...

Page 11: ...peed buttons Low Medium High or Boost This will disable the Auto Heat Sensing feature To re enable Auto Heat Sensing feature press the Auto button If there is minimal heat produced from the cooktop even when the cooktop is off or not connected via Bluetooth the hood will operate at low speed until heat is no longer sensed by the hood The Auto Heat Sensing feature does not require the hood to be co...

Page 12: ...ain While the hood and cooktop are connected the hood fan will automatically turn on when you turn on the cooktop The hood fan will also turn off automatically when you turn off the cooktop You will also be able to control the hood with the Smart Things app as described above Note that the hood fan speed will turn on at Auto speed if the Auto button was last enabled Low speed if the Auto button wa...

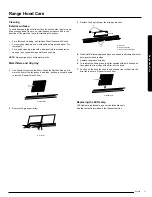
Page 13: ...andles pull to ward the front of the range hood and then pull down on rear handle to remove Repeat for each filter A A Baffle filter 2 Remove the grease drip tray A A Drip tray Range Hood Care 3 Remove the drip tray from the drip tray bracket C B A A Drip tray B Drip tray bracket C Drip tray bracket screws 4 Wash metal filters and grease trays as needed in a dishwasher or hot detergent solution to...

Page 14: ...ystems utilities services parts supplies accessories applications installations repairs external wiring or connectors not supplied or authorized by SAMSUNG which damage this product or result in service problems incorrect electrical line voltage fluctuations and surges customer adjustments and failure to follow operating instructions cleaning maintenance and environmental instruc tions that are co...

Page 15: ...allations repairs external wiring or connectors not supplied or authorized by SAMSUNG which damage this product or result in service problems incorrect electrical line voltage fluctuations and surges customer adjustments and failure to follow operating instructions cleaning maintenance and environmental instruc tions that are covered and prescribed in the instruction book problems caused by pest i...

Page 16: ...tallation de la Hotte 21 Instructions d installation 21 Installation sur le mur 22 Montage de la hotte 23 Installation du moteur interne de la hotte 23 Utilisation de la hotte 24 Conexion Électrique 24 Achever l ínstallation 24 Description de la hotte 25 Commandes de la hotte 25 Entretien de la hotte 27 Nettoyage 27 Filtres meétalliques et plateaux d egouttement 27 Remplacement de la Lampe à DEL 2...

Page 17: ...s de Sécurité DECLARATION DE LA FCC Cet équipement a été testé et jugé conforme aux limites pour un appareil numérique de classe B en vertu de la partie 15 des règles de la FCC Ces limites sont conçues pour fournir une protection raisonnable contre les néfastes interférences dans une installation résidentielle Cet équipement génère utilise et peut émettre de l énergie de radio fréquence et si il n...

Page 18: ...RISQUE D INCENDIE UTILISER UNIQUEMENT DES CONDUITS MÉTALLIQUES AVERTISSEMENT POUR MINIMISER LE RISQUE D UN FEU DE GRAISSE SUR LA CUI SINIÈRE Ne jamais laisser un élément de surface fonctionner à puissance de chauffage maximale sans surveillance Un renversement débordement de matière graisseuse pourrait provoquer une inflammation et la génération de fumée Utiliser une puissance de chauffage moyenne...

Page 19: ...l air à l extérieur Ne pas terminer le circuit d évacuation dans un grenier ou dans un autre espace fermé Ne pas utiliser une bouche de décharge murale de 4 10 2 cm normalement utilisée pour un équipement de buanderie Utiliser uniquement des conduits métalliques Des conduits en métal rigide sont recommandés Ne pas utiliser de conduit de plastique ou en aluminium La longueur du circuit d évacuation...

Page 20: ...m drill bits Crayon Pince à dénuder ou couteau utilitaire Mètre ruban ou règle Pince Pistolet à calfeutrage et composé de calfeutrage résistant aux intempéries Brides de conduit Scie sauteuse ou scie à guichet Tournevis à lame plate Cisaille de ferblantier Tournevis Phillips Pozidrive et tournevis Torx 20 Pièces nécessaires Câble d alimentation électrique du domicile Serre câble de 1 2 12 7 mm hom...

Page 21: ...otte est configurée pour expulser l air par la sortie supérieure 3 Sélectionner une surface plane pour l assemblage de la hotte Placer le matériau de protection sur cette surface Methodes d evacuation Évacuation extérieure Vertical Conduit de Ø 10 25 4 cm Utiliser le schéma ou la hotte comme patron et indiquer sur l armoire l emplacement des conduits des fils électriques et les fentes réglables po...

Page 22: ...tage de la hotte E Knockout pour le trous de câblage 8 Retirez le support en bois à l arrière de la hotte en desserrant les 2 vis de l intérieur 9 Alignez le haut du support en bois avec la ligne d emplacement du support en bois sur le mur puis centrez le sur la ligne centrale 10 Repérez les marques pour les poteaux puis tracez deux lignes verticales sur le repère du support en bois à l intersecti...

Page 23: ...ations extrêmement excentrées il peut être nécessaire de couper une extrémité du connecteur de gaine pour dégager le serre câble électrique 8 Placez la hotte près de sa position de montage et faites passer le câble d alimentation par le serre câble dans la boîte à bornes suffisamment pour établir la connexion 9 Serrer les vis du serre câble 10 Faites le raccordement électrique Voir la section Bran...

Page 24: ...nt au code national de l électricité et aux codes et ordonnances locaux dans un conduit de 1 2 allant du panneau de service à la boîte de jonction A F E D C B A Conducteurs blancs B Conducteurs noirs C Connecteurs de fils homologation UL D Conducteurs verts ou nus ou vertjaune de liaison à la terre E Câble d alimentation électrique du domicile F Serre câble homologa tion UL ou CSA ADVERTISSEMENT R...

Page 25: ...Auto pour activer la fonction de détection automatique de chaleur Lorsque la fonction Auto est activée la vitesse du ventilateur augmente à mesure que la table de cuisson la chaleur augmente et diminue à mesure que la chaleur de la table de cuisson diminue Pour désactiver la détection automatique de la chaleur appuyez sur l un des boutons de vitesse du capot Faible moyenne élevée ou forte Cela dés...

Page 26: ...z et maintenez pendant 3 secondes la touche Bluetooth de la hotte 2 La connexion Bluetooth sera déconnectée J La Connection automatique La fonction de connexion automatique vous permet de connecter rapide ment la hotte via Bluetooth avec une table de cuisson Samsung compat ible une fois que la hotte et la table de cuisson aient été synchronisées Pour activer la fonction appuyez sur le bouton Auto ...

Page 27: ...e Répéter pour chaque filtre A A Filtre à graisse 3 Retirer le plateau d égouttement à graiss A A Plateau d égouttement 4 Placez le support du plateau d égouttement à l aide des vis fournies C B A A Plateau d égouttement B Support du plateau d égouttement C Vis du support du plateau d égouttement 5 Laver les filtre métalliques et les plateaux à graisse selon le besoin au lave vaisselle ou avec une...

Page 28: ...e utilisation des produits équipements systèmes ser vices publics services pièces fournitures accessoires applica tions installations réparations câblage externe ou connecteurs non fournis ou autorisés par SAMSUNG qui endommagent ce produit ou peut entraîner des problèmes d utilisation incorrecte tension de la ligne électrique les fluctuations et les surtensions ajustement fait par les clients et ...

Page 29: ...ces pièces fournitures accessoires applica tions installations réparations câblage externe ou connecteurs non fournis ou autorisés par SAMSUNG qui endommagent ce produit ou peut entraîner des problèmes d utilisation incorrecte tension de la ligne électrique les fluctuations et les surtensions ajustement fait par les clients et le non respect des instruc tions d utilisation le nettoyage l entretien...

Page 30: ...l producto 34 Instalación de la campana 35 Instructions de instalación 35 Instalación en la pared 36 Montaje de la campana 37 Instale el motor interno de la campana 37 Uso de la campana 38 Conexión eléctrica 38 Complete la instalación 39 Descripción de la campana 39 Controles de la campana 39 Mantenimiento 41 Limpieza 41 Filtros metálicos y graseras 41 Remplazo de làmparas LED 41 Garantía USA 42 G...

Page 31: ...ón razonable contra las interferencias perjudiciales en una instalación residencial Este equipo genera utiliza y puede irradiar energía de radio frecuencia y si no se instala y utiliza siguiendo las instrucciones puede causar interferencias perjudiciales a las comunicaciones de radio Sin embargo no se puede garantizar que la interferencia no ocurrirá en una instalación en particular En el caso de ...

Page 32: ...UCIR EL RIESGO DE INCENDIO PROVOCADO POR GRASA EN LA SUPERFICIE DE LA ESTUFA Nunca deje las unidades de superficie sin vigilancia cuando estén en ajustes altos La cocción puede causar humo o reboses de grasa que pueden prender fuego Caliente el aceite a fuego lento o medio Siempre ENCIENDA la campana cuando cocine con calor alto o cuando flamee alimentos por ejemplo crepes Suzette cerezas Jubileo ...

Page 33: ...s y ordenanzas locales Requisitos de Ventilación El sistema de ventilación debe terminar en el exterior No dirija la salida del sistema de ventilación hacia el desván u otra área cerrada No utilice una cubierta de pared de tipo para lavandería de 4 10 2 cm Utilice ducto de escape de metal únicamente Se recomienda un ducto de escape de metal rígido No se recomienda ducto de escape de plástico u hoj...

Page 34: ...de1 3 0 cm 1 8 3 0 mm y 5 8 15 8 mm Lápiz Pelacables o cuchillo de uso general Cinta de medir o regla Pinzas Pistola para galafateo y masilla para calafateo a prueba de agua Abrazaderas para ducto de ventilación Sierra de vaivén o sierra caladora Destornillador de hoja plana Tiijeras de hojalatero Destornillador Phillips y Torx 20 Piezas necesarias Cable de suministro eléctrico doméstico Protector...

Page 35: ...TA Esta campana está configurada para expulsar el aire por la salida superior 3 Seleccione una superficie plana para ensamblar la campana para cocina Cubra dicha superficie Métodos de ventilación Ducto vertical de Ø 10 25 4 cm Use el diagrama o la campana como plantilla y marque las ubicaciones del ducto cableado y tornillos de instalación en la cara inferior del gabinete o techo A D C CL B E FREN...

Page 36: ... de la campana E Knockout 8 Retire el soporte de madera de la parte posterior de la campana aflojando los 2 tornillos del interior 9 Alinee la parte superior del soporte de madera con la línea de ubicación del soporte de madera en la pared y luego céntrela en la línea central 10 Localice las marcas de los montantes y luego dibuje dos líneas verticales en la marca de soporte de madera donde los mon...

Page 37: ...je en el soporte de madera montado en la pared 1 Con 2 ó más personas cuelgue la campana extractora en la pared colocando los orificios ranurados en la campana extractora sobre los 2 tornillos montados en el soporte de madera montado en la pared NOTA Si su instalación utiliza la cubierta del conducto opcional el sistema de ventilación debe conectarse a la campana y la cubierta del conducto montada...

Page 38: ...ación F Sujeta cable de apro bado por UL o CSA ADVERTENCIA CONECTE EL MOTOR A TIERRA CONECTE EL CABLE DE TIERRA AL CABLE VERDE Y AMARILLO DE CONEXIÓN A TIERRA EN LA CAJA DE TERMINALES NO SEGUIR ESTAS INSTRUCCIONES PUEDE OCASIONAR LA MUERTE O CHOQUE ELÉCTRICO Conecte el alambre verde o desnudo de puesta a tierra del suministro de energía doméstico al alambre amarillo verde de puesta a tierra D en l...

Page 39: ...d baja C Velocidad Baja MED Presione el botón MED y la campana será activada en la velocidad media D Velocidad Alta HIGH Presione el botón HIGH y la campana será activada en la velocidad alta E Aumentar Velocidad BOOST Presione el botón BOOST y la campana será activada en la velocidad Máxima por 10 minutos Después de 10 minutos la velocidad descenderá a alta F Monitor del Temporizador Muestra la c...

Page 40: ...aratos hayan sido pareados Para encender la función presione el botón de Auto Conectividad Para apagar la función y desconectar la campana y la parrilla presione nuevamente el botón de Auto Conectividad Mientras la campana y la parrilla estén conectadas el motor de la cam pana se encenderá automáticamente cuando usted encienda la parrilla La campana también se apagará automáticamente cuando usted ...

Page 41: ...iltros 2 Sujete las manijas de los filtros jale hacia el frente de la campana y empuje hacia abajo para retirarlo Repita el proceso para cada filtro A A Filtro de grasa 3 Remueva las graseras A A Grasera 4 Coloque el soporte de graseras usando los tornillos incluidos C B A A Grasera B Soporte de grasera C Tornillos para soporte 5 Lave los filtros metálicos y las graseras en lavaplatos o con soluci...

Page 42: ... equipo sistemas servicios partes insumos acceso rios aplicaciones instalaciones reparos cableado externo o conectores no suministrados o autorizados por SAMSUNG los cuáles dañen este producto o causen problemas de servicio voltaje de línea eléctrica incorrecta fluctuaciones y sobreten siones ajustes del cliente y falla al seguir las instrucciones de operación limpieza mantenimiento e instruccione...

Page 43: ...eparos cableado externo o conectores no suministrados o autorizados por SAMSUNG los cuáles dañen este producto o causen problemas de servicio voltaje de línea eléctrica incorrecta fluctuaciones y sobretensio nes ajustes del cliente y falla al seguir las instrucciones de oper ación limpieza mantenimiento e instrucciones ambientales que sean cubiertas y prescritas en el libro de instrucciones prob l...

Page 44: ...LIB0148500 Printed in Mexico 02 19 ...

Reviews: