background image

English 35

Oper

ating y

our R

efrig
er

at

or

4. 

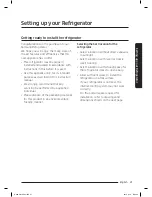
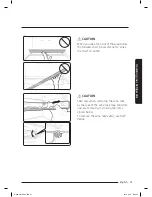
Tilt the shelf down onto the rear 
supports and then push into place.

  To prevent the shelf from striking the 

door or the door bins, use caution 
when removing the shelf.

•   Make sure the shelf is resting on 

every support.

•  Make sure every hook of the shelf 

locks into the correct support.

Cold-air outlet

 CAUTION

If the topmost shelf is positioned below 
the cold-air outlet, food on that shelf may 
freeze.

DA68-03174Z-00.indb   35

2015. 6. 19.   �� 2:23

Summary of Contents for RB12J SERIES

Page 1: ...Refrigerator User manual SEA Free Standing Appliance RB12J DA68 03174Z 00 indb 1 2015 6 19 2 22 ...

Page 2: ...HEF Mode 29 Cooling Off Mode 29 Parts and features 30 Features of the freezer compartment 32 Removing the interior parts 34 Replacing the led lamp 38 Reversing the door optional 39 Reversing the door 40 Troubleshooting 51 Kitchen Fit Installation 53 Installation Kit 53 Refrigerator Dimensions 54 Detail Dimensions 55 Installation 56 Pair Installation 60 Installation Kit 60 Dimensions 61 Installatio...

Page 3: ...g instructions cover various models the characteristics of your refrigerator may differ slightly from the refrigerator described in this manual If you have any question contact us at 1 800 SAMSUNG or find help and information online at www samsung com R600a or R134a is used as a refrigerant Check the compressor label on the rear of the appliance or the rating label inside the fridge to see which r...

Page 4: ...ay result in minor personal injury or property damage NOTE Do NOT attempt Do NOT disassemble Do NOT touch Follow directions carefully Unplug the power plug from the wall socket Make sure the machine is grounded to prevent electric shock Call the contact center for help These warning signs are here to prevent injury to you and others Please follow them carefully After reading this section keep it i...

Page 5: ...erheated wires If the wall socket is loose do not insert the power plug There is a risk of electric shock of fire Do not use a power cord that has cracks or abrasion damage along its length or at either end Do not bend the power cord excessively or place heavy objects on it Do not pull or excessively bend the power cord Do not twist or tie the power cord Do not hook the power cord over a metal obj...

Page 6: ...d insulation of electrical parts may cause an electric shock or fire Connect the power plug in the proper position with the cord hanging down If you connect the power plug upside down the wire can get cut off and cause a fire or electric shock Make sure that the power plug is not crushed or damaged by the back of the refrigerator When moving the refrigerator be careful not to roll over or damage t...

Page 7: ...e This may result in an electric shock fire problems with the product or injury Remove all the protective plastic film on the refrigerator before you initially plug it in Children should be supervised to ensure that they do not play with the snap rings used for door adjustment or the water tube clips There is risk of death by suffocation if a child swallows a snap ring or water tube clip Keep the ...

Page 8: ...lectric shock If it is necessary to use an extension cord use only a 3 wire extension cord that has a 3 blade grounding plug and insert it into a 3 slot receptacle that will accept the plug on the appliance The marked rating of the extension cord should be AC 115 120 V 10 A or more If a grounding adapter is used make sure the receptacle box is fully grounded Plug the power plug into the wall socke...

Page 9: ...g structure clear of obstructions Allow the refrigerator to stand for 2 hours after you ve installed it and turned it on before loading it with food We strongly recommend you have a qualified technician or service company install the refrigerator Failing to do so may result in an electric shock fire explosion problems with the product or injury Overloading a door with food may unbalance the refrig...

Page 10: ...frigerator If spilled there is a risk of fire or electric shock Do not keep volatile or flammable objects or substances benzene thinner propane gas alcohol ether LP gas and other such products in the refrigerator This refrigerator is for storing food only This may result in fire or explosion Children should be supervised to ensure that they do not play with the refrigerator Keep fingers out of pin...

Page 11: ...ll the refrigerator with food When you open the door an item may fall out and cause personal injury or material damage If you detect a gas leak avoid any naked flames or potential sources of ignition and air the room in which the appliance is standing for several minutes Do not spray volatile material such as insecticide onto the surface of the appliance As well as being harmful to humans it may a...

Page 12: ...s metal objects etc on the appliance This may result in an electric shock fire problems with the product or injury Do not put a container filled with water on the appliance If spilled there is a risk of fire or electric shock Do not use mechanical devices or any other means to accelerate the defrosting process other than those recommended by the manufacturer Do not damage the refrigerant circuit N...

Page 13: ...e only the LED Lamps provided by the manufacturer or its service agents Do not let children hang on the door A serious injury may occur Do not let children go inside the refrigerator They could become trapped Bottles should be stored tightly together so that they do not fall out This product is intended only for the storage of food in a domestic environment Never put fingers or other objects into ...

Page 14: ... charge the full cost of parts and labor Do not use any fuse such as cooper steel wire etc other than a standard fuse If your refrigerator needs to be repaired or reinstalled contact your nearest service center Failing to do so may result in an electric shock fire problems with the product or injury If the interior or exterior LED lamp has gone out contact your nearest service center DA68 03174Z 0...

Page 15: ...o not disassemble the Lamp Covers and LED lamps yourself Contact a Samsung service center Plug the power plug into the wall socket firmly Do not use a damaged power plug damaged power cord or loose wall socket This may result in an electric shock or fire Do not put a container filled with water on the appliance If spilled there is a risk of fire or electric shock Never stare directly at the UV LED...

Page 16: ...ates of frozen goods There is no need to disconnect the refrigerator from the power supply if you will be away for less than three weeks However if you will be away for more than three weeks remove all the food and the ice in the ice bucket unplug the refrigerator close the water valve wipe excess moisture from the inside walls and leave the doors open to prevent odors and mold Do not place carbon...

Page 17: ... the water valve wipe excess moisture from the inside walls and leave the doors open to prevent odors and mold If the refrigerator is flooded by water pull out the power plug and contact a Samsung Electronics service center Do not strike or apply excessive force to any glass surface Broken glass may result in a personal injury and or property damage Fill the water tank and ice cube trays with pota...

Page 18: ...ompressor area of the refrigerator or any area that has electrical connections unplug the power plug and contact your nearest service center Failing to do so may result in an electric shock or fire Use a clean dry cloth to remove any foreign matter or dust from the power plug blades Do not use a wet or damp cloth when cleaning the plug Otherwise there is a risk of fire or electric shock Do not cle...

Page 19: ...nner Ensure that none of the pipes on the back of the refrigerator are damaged prior to disposal R600a or R134a is used as a refrigerant Check the compressor label on the rear of the appliance or the rating label inside the fridge to see which refrigerant is used for your refrigerator If this refrigerator contains flammable gas Refrigerant R600a contact your local authority regarding safe disposal...

Page 20: ...p all packaging materials well out of the reach of children as packaging materials can be dangerous to children If a child places a bag over his or her head the child could suffocate Additional tips for proper usage NOTE Do not re freeze frozen food that has thawed completely DA68 03174Z 00 indb 20 2015 6 19 2 22 ...

Page 21: ...gly recommend that any servicing be performed by a qualified individual Please dispose of the packaging material for this product in an environmentally friendly manner Selecting the best location for the refrigerator Select a location without direct exposure to sunlight Select a location with level or nearly level flooring Select a location with enough space for the refrigerator doors to open easi...

Page 22: ... mm B A Measurements reflect the design dimensions The actual dimensions of your refrigerator may differ slightly CAUTION When installing the refrigerator servicing the refrigerator or cleaning behind the refrigerator be sure to pull it straight out When done be sure to push it straight back in Also make sure your floor can support the fully loaded weight of the refrigerator Otherwise the refriger...

Page 23: ...mage the floor Moving the refrigerator after installation may damage the floor Levelling the refrigerator Case 1 Case 2 If the front of the refrigerator is slightly higher than the rear the door can be opened and closed more easily When installing the refrigerator make sure both legs contact the floor for secure installation Case 1 The appliance tilts down to the left Turn the left adjusting leg i...

Page 24: ...center 1 Confirm the refrigerator in an appropriate location with reasonable clearance between the wall and the refrigerator Refer to installation instructions in this manual 2 Once the refrigerator is plugged in make sure the interior light comes on when you open the doors 3 Set the temperature control to the coldest temperature and wait for an hour The freezer should get slightly chilled and the...

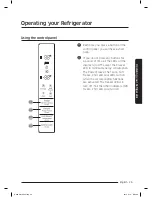
Page 25: ...you do not press any buttons for a period of time all the LEDs on the display turn Off except the Freezer LED to minimum energy consumption The Power Freeze Chef Lock Soft Freeze Chill and Cool LEDs turn on when the corresponding functions are activated The freezer LED will turn off if all the other indicators Soft Freeze Chill and Cool turn on DA68 03174Z 00 indb 25 2015 6 19 2 22 ...

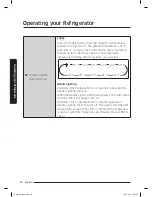
Page 26: ...the temperature you selected 37 F 36 F 35 F 39 F 34 F 40 F 42 F 44 F 43 F 41 F 38 F Handle Lighting Hold down the Fridge button for 3 seconds to activate the Handle Lighting function When the Handle Lighting function activates the Light under the fridge door will always turn on Hold down the Fridge button for 3 seconds again and Handle Lighting function turns off The Light is ON when the freezer d...

Page 27: ...he Power Freeze indicator lights and the Freezer indicator remains unchanged Power Freeze will remain active for 50 hours and then turn off automatically if you do not turn it off manually When the Power Freeze process is complete the Power freeze indicator switches off and the freezer switches back to the previous temperature setting Note that when you use this function energy consumption will in...

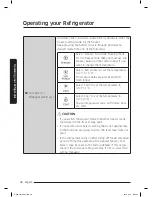
Page 28: ...is feature helps keep meat and fish fresh longer Select Chill to set the temperature to 30 F 1 C Select Cool to set the temperature to 35 F 2 C You can keep water juice soft drinks beer etc cold CAUTION If you switch the current mode to another freezer mode food stored in the freezer may spoil If you select a Cool Select setting that is not appropriate to the food you are going to store the food m...

Page 29: ...by retailers when they are displaying refrigerators on the shop floor In Cooling Off mode the refrigerator s fan motor and lights work normally but the compressors do not run and the refrigerator and freezer do not get cold To activate Cooling Off mode hold down the Freezer button and the Cool Select button simultaneously for 6 seconds When the upper and lower temperature indicators blink press th...

Page 30: ...4 CHEF BOX Optional 5 Door bin 6 FREEZER DRAWER 1 2 Some of the feature such as the CHEF BOX 1 may not be included in your refrigerator depending on the model Fruit and vegetables can freeze in the optional CHEF BOX To freeze large quantities of food quickly use the very bottom drawer 2 of the freezer where food freezes particularly quickly DA68 03174Z 00 indb 30 2015 6 19 2 22 ...

Page 31: ...he foldable shelf be careful not to strike the shelf It can fall CAUTION Take care when removing the wine rack as the rear of the wine rack may fall while you are removing it striking the items stored below To remove the wine rack safely use both hands DA68 03174Z 00 indb 31 2015 6 19 2 22 ...

Page 32: ...apping 4 Label the wrapping with the contents and date The following products are not suitable for wrapping food Wrapping paper greaseproof paper cellophane refuse bags and used shopping bags The following products are suitable for wrapping food Plastic film polyethylene blown film aluminium foil and freezer tins The following products are suitable for sealing the wrapped food Rubber bands plastic...

Page 33: ...food in newspaper or place in a cool bag and take home At home immediately place deep frozen food in the freezer compartment Consume the frozen food before the use by date expires Thawing frozen food Depending on the type of food and application select one of the following options At room temperature In the refrigerator In an electric oven with without fan assisted hot air In a microwave oven Do n...

Page 34: ...ake sure the side labeled Front faces the front of the refrigerator Shelves Foldable Shelf Optional 1 To move a shelf to another level hold it with both hands and lift to release it from the rear supports Then pull it halfway to the front a 2 In an area a between the supports tilt the front side of the shelf by more than 45 as shown 3 Check the target shelf level and pull the shelf up to the front...

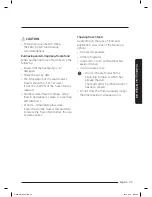
Page 35: ...striking the door or the door bins use caution when removing the shelf Make sure the shelf is resting on every support Make sure every hook of the shelf locks into the correct support Cold air outlet CAUTION If the topmost shelf is positioned below the cold air outlet food on that shelf may freeze DA68 03174Z 00 indb 35 2015 6 19 2 23 ...

Page 36: ... in the bottom door bin can fall over Do not store an open vegetable oil container in the fridge bin The oil will harden To prevent hardening store the oil in a cool place Vegetable oils soybean oil olive oil sesame oil etc CHEF BOX Optional To open Grasp the front handle and pull the CHEF BOX To remove from the fridge Grasp the side handles and take out the CHEF BOX DA68 03174Z 00 indb 36 2015 6 ...

Page 37: ... be put directly into the oven CAUTION If you put the Chef Pan into the CHEF BOX food on the Chef Pan could freeze Before putting the Chef Pan in the oven remove the cover The Chef Pan is not suitable for use in a microwave oven Be careful not to drop the cover tray Drawers Pull the drawers out fully then lift up slightly to remove If the drawers get stuck on the door remove the shelves first and ...

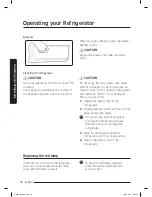
Page 38: ...lean the refrigerator with benzene thinner or car detergent There is a risk of fire 1 Unplug the power cord of the refrigerator 2 Slightly dampen a soft lint free cloth or paper towel with water Do not use any kind of detergent to clean the refrigerator because that can discolor or damage the refrigerator 3 Wipe the inside and outside of refrigerator until it is clean and dry 4 Plug in the power c...

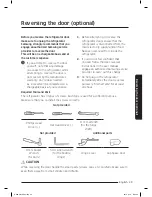
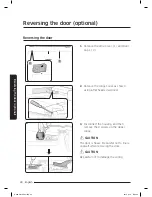
Page 39: ... supply and all food has been removed from inside the refrigerator 2 If you do not feel confident that you can follow the door reversal instructions in the user manual engage an authorized Samsung service provider to carry out this change 3 Do not plug in the refrigerator immediately after the door reversal process is finished Wait for at least one hour Required Tools and Parts The refrigerator ha...

Page 40: ...and Door Cap L 2 2 Remove the Hinge Cover as shown using a flat head screwdriver 3 Disconnect the housing and then remove the 2 screws on the Upper Hinge CAUTION The door is heavy Be careful not to injure yourself when removing the door CAUTION Be careful not to damage the wiring DA68 03174Z 00 indb 40 2015 6 19 2 23 ...

Page 41: ...e door optional 4 Remove the fridge door from the Middle hinge by carefully lifting the door straight up CAUTION The door is heavy Be careful not to injure yourself when removing the door DA68 03174Z 00 indb 41 2015 6 19 2 23 ...

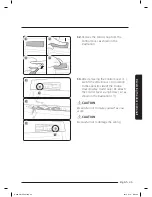
Page 42: ...y carefully lifting the door straight up CAUTION The door is heavy Be careful not to injure yourself when removing the door Switch the Position of the Cap CAUTION Be careful not to scratch the door or Cap when disassembling the Cap 1 2 7 Lay the refrigerator down carefully Remove the Leg 1 and the Low Hinge 2 DA68 03174Z 00 indb 42 2015 6 19 2 23 ...

Page 43: ...e Stopper 3 4 Change the position of the Grommet 5 Remove the screw on the opposite side 6 Assembly the Stopper on the opposite side 7 8 Change the position of the Stopper and assembly 9 Install the screw on the opposite side 9 Switch the position of Cap screw CAUTION Be careful not to injure yourself while you work DA68 03174Z 00 indb 43 2015 6 19 2 23 ...

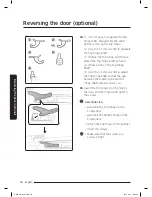
Page 44: ... Hinge Fridge Door with Upper Hinge Assy Make sure that the screws are screwed tight CAUTION Be careful not to injure yourself while you work 1 11 Switch the position of the Bottom hinge and Leg Right Left Assemble the Low Hinge after putting the Freezer Door on the middle hinge Disassemble the Auto Close Guide and the Shaft hinge 1 Assemble the Shaft hinge and the the Auto Close Guide as shown in...

Page 45: ... After removing the Control Cover 1 switch the Wire Door s 2 direction to the opposite side of the Fridge Door Display model only Re attach the Control Cover using Screw A as shown in the illustration 3 CAUTION Be careful not to injure yourself as you work CAUTION Be careful not to damage the wiring DA68 03174Z 00 indb 45 2015 6 19 2 23 ...

Page 46: ...by hand 4 Draw a line on the Top Hinge Shaft 5 Use the 11 mm wrench to adjust the Top Hinge Shaft so that the gap between the marking line and the Hinge Shaft exceeds 4 mm 4 15 Insert the Top Hinge into the hole in the door and then insert and tighten the screws Assemble step Assemble the Top hinge on the Fridge door Assemble the Middle hinge on the Fridge door Attach the Top Hinge to the Cabinet ...

Page 47: ...r 2 Insert the wire into the Hinge Cover Make sure the white band on the wire is secured to the Hinge Cover hook 3 Fold the fixer as shown in the illustration below so the wiring does not disassemble 17 Insert the wiring between ribs of the Hinge Cover as shown in the illustration CAUTION Be careful not to damage the wiring DA68 03174Z 00 indb 47 2015 6 19 2 23 ...

Page 48: ...English Reversing the door optional Reversing the door optional 1 2 3 18 Assemble the Hinge Cover shown in the illustration CAUTION Be careful not to damage the wiring DA68 03174Z 00 indb 48 2015 6 19 2 23 ...

Page 49: ...part on back side 20 Insert the Wire Door Cover on the top of Fridge door and then push it to attach completely Check the position of the wiring It should be located on the back side of Wire Door Cover CAUTION Be careful not to damage the wiring DA68 03174Z 00 indb 49 2015 6 19 2 23 ...

Page 50: ...50 English Reversing the door optional Reversing the door optional 21 Attach the Control Cap DA68 03174Z 00 indb 50 2015 6 19 2 23 ...

Page 51: ...mperature too low Did you store food with a high water content in the coldest part of the fridge There are unusual noises Check if the appliance is installed on a stable and even floor Is the back of the appliance too close to the wall Have any foreign objects fallen behind or under the appliance Is the noise coming from the compressor in the appliance A ticking sound occurs when the various acces...

Page 52: ... 2 3 hours and then circulate air inside the refrigerator There is a layer of frost on the refrigerator walls Are the air outlet vents blocked by food stored inside the refrigerator Space the food out as much as possible to improve ventilation If the freezer drawer is not completely closed or is blocked humidity from outside may enter and cause severe frost to form Condensation forms on the inside...

Page 53: ... Kitchen Fit Installation Installation Kit 2 3 4 1 No Part Name Part Code Quantity PC 1 GUIDE DA61 10557A 2 2 SHEET B DA63 08121A 3 3 ASSY COVER BASKET DA97 15853A 2 4 SEAL CUTT FOAM PE DA62 01136X 4 DA68 03174Z 00 indb 53 2015 6 19 2 23 ...

Page 54: ...Energy Efficiency Hole 2 x 15 3 4 50 x 400 mm 1 3 16 30 mm 1 3 16 30 mm 2 50 mm 3 8 10 mm 7 7 8 200 mm 8 3 4 220 mm Side holes When the product is installed with cabinet it is recommended to install refrigerator with clearance and the holes of cabinet as described above A reduced size of side holes will not restrict the function of appliance but it will make the refrigerator consume more energy th...

Page 55: ...mm 3 8 10 0 mm Gap 1 16 1 0 mm 75 7 8 1927 mm 75 1 2 1917 mm 75 7 8 1927 mm 75 1 2 1917 mm 75 6 8 1926 mm 76 1 4 1937 mm 75 6 8 1926 mm 76 1 4 1937 mm Gap 3 8 10 0 mm 3 8 10 0 mm Turn the front leg clockwise by 3 8 9 0 mm 8 turns DA68 03174Z 00 indb 55 2015 6 19 2 23 ...

Page 56: ...en inserting the refrigerator into the cabinet or opening the door because your fingers may be caught Do not let the product stand on the power cable when installing into the cabinet Damaged cables may cause a fire or electric shock After placing the refrigerator plug the power cable into the wall socket The guides included in the installation Kit are used for fitting the cabinet Do not use for ot...

Page 57: ...en Fit Installation 1 Turn the adjusters clockwise to loosen the leg by 0 35 9 0 mm 8 turns 360 360 2 Put the provided Foam PE in 4 places on the rear of the refrigerator as shown DA68 03174Z 00 indb 57 2015 6 19 2 23 ...

Page 58: ...igerator with the left wall of the cabinet and then turn the right edge of the refrigerator to the right wall of the cabinet as shown 4 Insert the refrigerator into the cabinet so that the bottom of the refrigerator is in line with the bottom of the cabinet DA68 03174Z 00 indb 58 2015 6 19 2 23 ...

Page 59: ...e legs clockwise to level If the upper part of the product tilts back Turn the legs counter clockwise to level 6 Insert the provided ㄱ shaped accessory on either side of the refrigerator between the cabinet and the refrigerator as shown to fill the gap You can use the provided SHEET B to fill the gap against either side wall DA68 03174Z 00 indb 59 2015 6 19 2 23 ...

Page 60: ...tallation Kit No Part Name Part Code Quantity PC 1 FOAM PE DA62 01138X 1 2 FIXER LOCKER DA61 10679A 1 3 SCREW 6002 000613 2 4 REINF LEG BOTTOM DA61 10671A 1 5 FIXER DA61 10672A 1 Pair Installation DA68 03174Z 00 indb 60 2015 6 19 2 23 ...

Page 61: ...English 61 Pair Installation Dimensions 47 1 4 1200 mm 54 1 2 1382 mm 100 21 1 8 535 mm 44 7 8 1139 mm 47 3 4 1212 mm 75 6 8 1926 mm DA68 03174Z 00 indb 61 2015 6 19 2 23 ...

Page 62: ...ners of the refrigerators and adjust the leveling feet to level the refrigerators Guide line 2 Attach the FOAM PE to the top right corner of the left installed refrigerator as shown Guide line Follow the guide line on the rear of the rrefrigerator and attach top to bottom 3 Connect and tighten the top sides of two refrigerators using the provided Fixer Locker and screws 4 See Kitchen Fit Installat...

Page 63: ...the bottom of the refrigerator 1 2 Guide line 6 Insert the FIXER between the two refrigerators Use a flat head screwdriver to make a gap in the cover 1 and then insert the FIXER 2 Insert up to the guide line as shown in the illustration on the left DA68 03174Z 00 indb 63 2015 6 19 2 23 ...

Page 64: ...arranty period specified above All replaced parts and products become the property of Samsung and must be returned to Samsung Replacement parts and products assume the remaining original warranty or ninety 90 days whichever is longer In home service will be provided during the warranty labor period subject to availability within the contiguous United States In home service is not available in all ...

Page 65: ...S CAUSED BY THE USE MISUSE OR INABILITY TO USE THIS PRODUCT REGARDLESS OF THE LEGAL THEORY ON WHICH THE CLAIM IS BASED AND EVEN IF SAMSUNG HAS BEEN ADVISED OF THE POSSIBILITY OF SUCH DAMAGES NOR SHALL RECOVERY OF ANY KIND AGAINST SAMSUNG BE GREATER IN AMOUNT THAN THE PURCHASE PRICE OF THE PRODUCT SOLD BY SAMSUNG AND CAUSING THE ALLEGED DAMAGE WITHOUT LIMITING THE FOREGOING PURCHASER ASSUMES ALL RI...

Page 66: ...ea by using the contact information at the back of this warranty All warranty repairs or part replacements must be performed by a SECA Authorized Service Center To find the nearest SECA Service Center call 1 800 SAMSUNG 7267864 or visit our web site at www samsung com ca Obligation to the Original Owner The original dated sales receipt must be retained by the customer and is the only acceptable pr...

Page 67: ...d for any unit found with a missing or altered serial number This warranty is valid only on products purchased and used in the Canada Samsung Electronics Canada Inc 2050 Derry Road West Mississauga Ontario L5N 0B9 Canada Customer Care Center 1 800 SAMSUNG 726 7864 Customer Care Center Fax 1 866 436 4617 If you have any questions or comments relating to Samsung products please contact the SAMSUNG c...

Page 68: ...ISIT US ONLINE AT U S A 1 800 SAMSUNG 726 7864 www samsung com us support CANADA 1 800 SAMSUNG 726 7864 www samsung com ca support English www samsung com ca_fr support French Scan the QR code or visit www samsung com spsn to view our helpful How to Videos and Live Shows Requires reader to be installed on your smartphone DA68 03174Z 00 indb 68 2015 6 19 2 23 ...

Reviews: