background image

English 

61

Maintenance

Handling and care

Ice bucket (applicable models only)

If you do not dispense ice for an extended period, ice may form clumps inside the bucket. 
If this happens, remove and empty the ice bucket.

CAUTION

•  To prevent injury, make sure to clean up any ice or water that has fallen on the floor.
•  To prevent accidents or injury, do not let children play with the water dispenser or the 

ice maker.

•  Use only the provided ice bucket. Third-party ice buckets may cause a system failure.

NOTE

•  The water pressure required for ice making is between 30-125 psi (206-861 kPa).
•  Noise from the ice maker as it produces ice during the ice making process is normal.

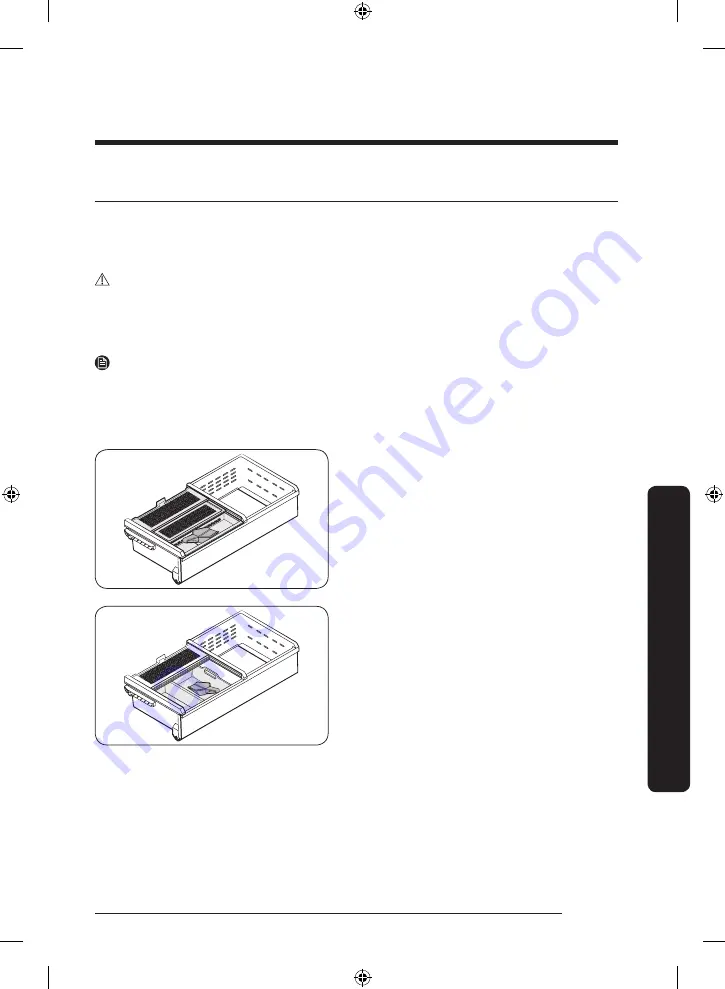
Where to keep the scoop

Keep the scoop inside the scoop tray.

You can also store the scoop inside the ice 
bucket. In this case, sit the handle of the 
scoop against the side wall of the bucket 
for easy access.

Maint

enanc

e

Untitled-14   61

2022-12-23     3:07:35

Summary of Contents for RF24 Series

Page 1: ...Refrigerator User manual RF24 RF30 Free Standing Appliance Untitled 14 1 2022 12 23 3 07 24...

Page 2: ...about the WEEE 26 Installation 27 Refrigerator at a glance 28 Step by step installation 31 Operations 45 Control panel 45 Setting the desired temperature or function 47 Turning on or off the AutoFill...

Page 3: ...refrigerator may differ slightly from those described in this manual and not all warning signs may be applicable If you have any questions or concerns contact your nearest service center or find help...

Page 4: ...ion To avoid contamination of food please respect the following instructions Opening the door for long periods can cause a significant increase of the temperature in the compartments of the appliance...

Page 5: ...owing safety symbols WARNING Hazards or unsafe practices that may result in severe personal injury property damage and or death CAUTION Hazards or unsafe practices that may result in severe personal i...

Page 6: ...f obstruction Do not use mechanical devices or any other means to accelerate the defrosting process other than those recommended by the manufacturer Do not damage the refrigerant circuit Do not use el...

Page 7: ...similarly qualified persons in order to avoid a hazard The socket must be easily accessible so that the appliance can be quickly disconnected from the supply in an emergency It must be outside the are...

Page 8: ...Not to block any vents or grilles is recommended for energy efficiency Allow warm food to cool down before placing it in the appliance Put frozen food in the refrigerator to thaw You can then use the...

Page 9: ...nments farm houses and by clients in hotels motels and other residential type environments bed and breakfast type environments catering and similar non retail applications Severe warning signs for tra...

Page 10: ...stallation warnings WARNING Do not install the refrigerator in a damp location or place where it may come in contact with water Deteriorated insulation on electrical parts may cause an electric shock...

Page 11: ...ush the power cord into the space behind the appliance When moving the refrigerator be careful not to roll over or damage the power cord This may result in an electric shock or fire Never unplug your...

Page 12: ...acking materials on his or her head Do not install this appliance in a humid oily or dusty location in a location exposed to direct sunlight and water rain drops Deteriorated insulation of electrical...

Page 13: ...an cause severe electric shock Never use gas pipes telephone lines or other potential lightning attractors as an electrical ground You must ground the refrigerator to prevent any power leakages or ele...

Page 14: ...gerator Failing to do so may result in an electric shock fire explosion problems with the product or injury Critical usage warnings WARNING Do not insert the power plug into a wall socket with wet han...

Page 15: ...e supervised to ensure that they do not play with the appliance Keep fingers out of pinch point areas Clearances between the doors and cabinet are necessarily small Be careful when you open the doors...

Page 16: ...se them to slip Do not leave the doors of the refrigerator open while the refrigerator is unattended and do not let children enter inside the refrigerator Do not allow babies or children go inside the...

Page 17: ...d on top of the appliance or place objects such as laundry lighted candles lighted cigarettes dishes chemicals metal objects etc on the appliance This may result in an electric shock fire problems wit...

Page 18: ...ial damage Do not attempt to repair disassemble or modify the refrigerator yourself Do not use any fuse such as cooper steel wire etc other than a standard fuse If your refrigerator needs to be repair...

Page 19: ...ching out moisture and changing the integrity of the product Do not thaw meat at room temperature Safety will depend on whether the raw product was handled properly Do not place glass bottles or carbo...

Page 20: ...rs before putting it into the refrigerator Please observe maximum storage times and expiration dates of frozen goods There is no need to disconnect the refrigerator from the power supply if you will b...

Page 21: ...t for at least five minutes before plugging it back in When the refrigerator got wet by water pull out the power plug and contact your Samsung Electronics service center Do not strike or apply excessi...

Page 22: ...oil etc Cleaning cautions CAUTION Do not spray water directly on the inside or outside the refrigerator There is a risk of fire or electric shock Do not use a hair dryer to dry the inside of the refri...

Page 23: ...enance unplug the appliance from the wall socket Failing to do so may result in an electric shock or fire Use a clean sponge or soft cloth and a mild detergent in warm water to clean the refrigerator...

Page 24: ...roduct When disposing of this refrigerator remove the door door seals and door latch so that small children or animals cannot become trapped inside Children should be supervised to ensure that they do...

Page 25: ...o warm in the frozen food compartment if sited for an extended period of time in a location where ambient air temperatures are constantly below the temperatures for which the appliance is designed In...

Page 26: ...te and recycle them responsibly to promote the sustainable reuse of material resources Household users should contact either the retailer where they purchased this product or their local government of...

Page 27: ...RNING Use the refrigerator only for its intended purpose as described in this manual Any servicing must be performed by a qualified technician Dispose of the product packaging material in compliance w...

Page 28: ...at a glance The actual refrigerator and provided component parts of your refrigerator may differ from the illustrations in this manual depending on the model and the country Type A 01 02 03 09 06 05...

Page 29: ...cher A Fridge B Beverage Center Applicable models only Dispenser models only 02 Water dispenser 03 Fridge door bin 04 Fridge shelf 05 Quick Space shelf 06 Crisper Fridge Drawers 07 Control panel 08 Wa...

Page 30: ...on the vertical hinged section If you close a door forcefully the other door may open If the internal or external LED lamp is out of order contact a local Samsung service center Door bins Your refrig...

Page 31: ...e range The refrigerator is designed to operate normally in the temperature range specified by its class rating Class Symbol Ambient Temperature range C IEC 62552 ISO 15502 ISO 8561 Extended Temperate...

Page 32: ...B 908 mm C 1749 mm D 1778 mm 01 02 02 04 03 05 07 08 06 Model RF24BB6 RF30BB6 01 more than 50 mm recommended 02 125 03 1485 mm 04 289 mm 05 610 mm 748 mm 06 54 mm 07 1093 mm 1231 mm 08 1131 mm 1353 mm...

Page 33: ...ace you install the refrigerator on must support a fully loaded refrigerator To protect the floor put a large piece of cardboard along the path to the refrigerator s final installation location Once t...

Page 34: ...remove the doors go to page 40 to continue the installation procedure WARNING Unplug the power cord of the refrigerator before removing the doors Tools required not provided Phillips screwdriver Flat...

Page 35: ...may fall and cause physical injury Make sure the refrigerator is off before disconnecting the connectors 3 Disconnect the water tube from the coupler on the left door as shown This step does not appl...

Page 36: ...ve the hinge 7 Gently pull up the door vertically to remove Do not apply excessive force to the door The door may fall causing physical injury 8 Lay the door down on a flat surface 9 Repeat steps 1 8...

Page 37: ...he hole on the bottom of the door 2 Put the top hinge into position on the top of the refrigerator and then insert the hinge shaft into the top hole of the door Make sure the wires from the door pass...

Page 38: ...clips out of children s reach 7 Repeat steps 1 5 for the other door Step 5 does not apply to the models without the Showcase door 8 Attach the top cover with the front side first and then press down...

Page 39: ...to remove 2 Then pull up to remove the lower basket from the rail assembly 3 Press down the hooks to unlock the rail assembly 4 While holding the upper area of the freezer drawer front slide the draw...

Page 40: ...n a flat solid floor Not leveling the refrigerator can cause damage to the refrigerator or physical injury Leveling must be performed with the refrigerator empty Make sure no food items are inside the...

Page 41: ...between the doors and then lift up and hold the door with the lower height A B 2 Insert a suitable sized snap ring A between the door grommet B and the hinge as shown CAUTION Insert only one snap rin...

Page 42: ...lity for the water line installation If water leaks occur contact the installer of the water line To connect the cold water pipe to the water filtering hose CAUTION Make sure the water filtering hose...

Page 43: ...ere are no leaks dispense about a 3 liters of water before actually using the refrigerator to remove impurities inside the water filtering system NOTE If you have to relocate the refrigerator after co...

Page 44: ...ed and the motor should be running smoothly 4 Wait until the refrigerator reaches the set temperature Now the refrigerator is ready for use STEP 8 Final check When installation is complete confirm tha...

Page 45: ...Wi Fi icon flashes we recommend connecting your refrigerator with the SmartThings app You can control and monitor your refrigerator on the SmartThings app For more information see the SmartThings sec...

Page 46: ...the filter later For more information see the Resetting or dismissing the water filter replacement alarm section on page 49 07 Buttons When the display is off tap any button to wake up the display Tap...

Page 47: ...6 C 15 C Power Freeze speeds up the freezing process at maximum fan speed The freezer keeps running at full speed for 50 hours and then returns to the previous temperature To freeze large amounts of f...

Page 48: ...AutoFill Pitcher in fridge 1 Tap any button or to wake up the display This step may not apply to some models 2 Tap until the AutoFill Pitcher indicator blinks 3 Tap or to turn on or off the AutoFill...

Page 49: ...The water filter replacement icon blinks to alert the user that it is time to replace the water filter You can replace the water filter immediately and reset the water filter replacement alarm or dis...

Page 50: ...or 10 seconds The display shows the status of Wi Fi for 5 seconds as shown in the figure WI Fi On Wi Fi Off NOTE When you setup the Wi Fi to connect the refrigerator to the SmartThings app Wi Fi On Of...

Page 51: ...n further updates on the app or the function in the app may stop due to usability and security reasons even if updates are currently supported on your OS Recommended encryption systems include WPA TKI...

Page 52: ...available devices tap Supported Devices select the device type Refrigerator and then select the specific device model Follow the instructions in the app to set up your device Once setup is complete y...

Page 53: ...rent settings Fridge temperature You can set the desired temperature of the fridge Freezer temperature You can set the desired temperature of the freezer AutoFill Pitcher You can turn the AutoFill Pit...

Page 54: ...autofill pitcher drink cold or purified water press handle B to open the Beverage Center Water pitcher AutoFill Pitcher applicable models only Cold purified water is always ready in the AutoFill Pitch...

Page 55: ...the control panel Open the Beverage Center door Type A or the left door of the fridge Type B and then mount the water pitcher onto the holder Push it straight in as shown in the figure CAUTION Make s...

Page 56: ...water pitcher holder To prevent the water pitcher from spilling over or leaking make sure the infuser holder is properly inserted NOTE If the front side specifically marked area of the water pitcher...

Page 57: ...cal Samsung service center NOTE You must clean the water pitcher after you have consumed the infused water You must also clean the water pitcher if you have not used it for a long time or left the ful...

Page 58: ...ter from spilling out If you do not use the water dispenser for 2 3 days the dispensed water may have an abnormal smell or taste This is not a system failure Discard the first 1 2 glasses of water Wat...

Page 59: ...e making and to keep the ice bucket full of ice For first time use Let the ice maker make ice for 1 2 days Discard the first 1 2 buckets of ice to remove impurities in the water supply system Diagnosi...

Page 60: ...enter Do not put food in the ice bucket The frozen food may damage the ice maker especially when you open or close the door When the refrigerator recovers power after a power failure the ice bucket ma...

Page 61: ...ren play with the water dispenser or the ice maker Use only the provided ice bucket Third party ice buckets may cause a system failure NOTE The water pressure required for ice making is between 30 125...

Page 62: ...slightly twisting the infuser pull it out of the sealed mouth 4 Clean the infuser with neutral agents and running water Rinse and dry well 5 Reassemble the AutoFill Pitcher in the reverse order of dis...

Page 63: ...e of the shelves differs by model Top shelf 1 Lift the rear side of the shelf with one hand and then pull it out 2 Tilt the shelf vertically as shown in the figure 3 Carefully pull out the shelf as sh...

Page 64: ...ridge room can be dented To reinsert hold the shelf at an angle so the front is higher than the back and then insert the top hook into the top shelf notch Then lower the shelf and insert the bottom sh...

Page 65: ...pace shelf before removing the Vegetable shelf 1 Pull the shelf out 2 Press the front of the shelf to lift the rear side of it 3 Hold the rear side of the shelf and tilt it vertically 4 Carefully pull...

Page 66: ...ON Do not remove a bin that is filled with food Empty the bin beforehand Use caution when opening the door if the bottom bin contains larger bottles which may fall over Do not allow children to play w...

Page 67: ...to pull out To reinsert put the basket onto the rail assembly rear side first CAUTION Do not twist the basket when removing or reinserting the basket The basket can be scratched To prevent physical in...

Page 68: ...ug the power cord 2 Use a moistened soft lint free cloth or paper towel to clean the refrigerator s interior and exterior 3 When done use a dry cloth or paper towel to dry well 4 Plug in the power cor...

Page 69: ...anel cover Electric shock may occur Replacement Water filter WARNING Do not use third party water filters Use only Samsung provided or approved filters Unapproved filters may leak and damage the refri...

Page 70: ...eset indicator turns off 9 When you are done replacing the filter open the water valve and run water through the dispenser for about 7 minutes This is to remove impurities and air from the water line...

Page 71: ...com on the web LED Lamps To replace the lamps of the refrigerator contact a local Samsung service center WARNING The lamps are not user serviceable Do not attempt to replace a lamp yourself This can...

Page 72: ...ce Not enough clearance between refrigerator and nearby walls or cabinets Make sure there is a gap of at least 5 cm between the refrigerator back and sides and any nearby walls or cabinets The refrige...

Page 73: ...gasket Condensation Symptom Possible causes Solution Condensation forms on the interior walls If door is left open moisture enters the refrigerator Remove the moisture and do not leave a door open fo...

Page 74: ...er is off Turn on the ice maker Ice does not dispense Ice may jam if the ice dispenser is not used for a long time approx 3 weeks If you won t be using the refrigerator for a long time empty the ice b...

Page 75: ...rectly Check if the water line stop valve is closed A third party water filter was installed Use only Samsung provided or approved filters Unapproved filters may leak and damage the refrigerator The R...

Page 76: ...charged to the user These sounds are normal When starting or ending an operation the refrigerator may make sounds similar to a car engine ignition As the operation stabilizes the sounds will decrease...

Page 77: ...refrigerator temperature increases or decreases plastic parts contract and expand creating knocking noises These noises occur during the defrosting cycle or when electronic parts are working Cracking...

Page 78: ...ablished yet In this case use the SmartThings app to connect and register your refrigerator to the access point AP of your house Could not log into the app You must log into your Samsung account to us...

Page 79: ...software included in this product contains open source software The following URL http opensource samsung com opensource SMART_TP1_0 seq 0 leads to open source license information as related to this p...

Page 80: ...msung com latin_en support English HONDURAS 800 2791 9111 www samsung com latin support Spanish www samsung com latin_en support English JAMAICA 1 800 SAMSUNG 726 7864 www samsung com latin_en support...

Page 81: ...Refrigerador Manual del usuario RF24 RF30 Electrodom stico independiente Untitled 1 1 2022 12 28 2 11 00...

Page 82: ...nes adicionales para el uso adecuado 29 Instrucciones acerca de WEEE 30 Instalaci n 31 Descripci n breve del refrigerador 32 Instalaci n paso a paso 35 Funcionamiento 49 Panel de control 49 Configurar...

Page 83: ...e de las descritas en este manual y es posible que no se apliquen todas las se ales de advertencia Si tiene alguna consulta o inquietud deber contactar al centro de servicios m s cercano u obtener ayu...

Page 84: ...producto y ventile la habitaci n inmediatamente No seguir esta recomendaci n puede causar riesgos de incendio o explosi n Para evitar la contaminaci n de los alimentos siga las instrucciones a continu...

Page 85: ...macenar o fabricar helados y fabricar cubos de hielo Los compartimentos de una dos y tres estrellas no son apropiados para congelar alimentos frescos Si el refrigerador queda vac o por largos per odos...

Page 86: ...n causar graves lesiones personales da os a la propiedad y o incluso la muerte PRECAUCI N Riesgos o pr cticas inseguras que pueden causar lesiones personales leves y o da os materiales NOTA Informaci...

Page 87: ...tico Llenar nicamente con agua potable Con ctelo solamente a un suministro de agua potable Mantenga las aberturas de ventilaci n del gabinete o estructura incorporada del electrodom stico libres de ob...

Page 88: ...ecibido instrucciones sobre el uso seguro del electrodom stico y comprenden los posibles riesgos No deje que los ni os jueguen con el electrodom stico Los ni os no deben efectuar tareas de limpieza ni...

Page 89: ...si 206 861 kPa Para un uso m s eficiente de la energ a conserve todos los accesorios internos como cestas cajones estantes en la misma posici n en que los suministr el fabricante Para obtener la mejor...

Page 90: ...r a de la necesaria Aseg rese de que haya suficiente salida de aire en la base y en la pared posterior del refrigerador No cubra las rejillas de ventilaci n Cuando realice la instalaci n deje un espac...

Page 91: ...as o de posibles fuentes de inflamaci n y ventile durante varios minutos el ambiente en el que se encuentra la unidad El electrodom stico contiene una peque a cantidad de refrigerante de isobutano R 6...

Page 92: ...e individual cuyo voltaje nominal coincida con el que se especifica en la placa de voltaje del refrigerador As se obtiene el mejor desempe o y se evita la sobrecarga de los circuitos del cableado de l...

Page 93: ...ncendio o una descarga el ctrica No utilice aerosoles cerca del refrigerador Esto podr a causar una explosi n o un incendio No instale este electrodom stico cerca de calefactores o materiales inflamab...

Page 94: ...ce existe el riesgo de que se produzca un incendio No se pare sobre el electrodom stico ni le coloque objetos encima tales como ropa velas o cigarrillos encendidos platos productos qu micos objetos me...

Page 95: ...e estar conectado a tierra para evitar cualquier fuga de energ a o descarga el ctrica provocada por fugas de corriente del refrigerador Esto podr a causar descargas el ctricas incendios explosiones o...

Page 96: ...s de la instalaci n y el encendido Recomendamos que el refrigerador sea instalado por un t cnico calificado o una compa a de servicios No seguir esta recomendaci n puede causar descargas el ctricas in...

Page 97: ...rica No almacene sustancias u objetos vol tiles o inflamables benceno solvente gas propano alcohol ter gas LP ni cualquier otro producto de este tipo en el refrigerador Este refrigerador se debe utili...

Page 98: ...controles estrictos de temperatura En caso de sentir olor a f rmacos o a humo desconecte el enchufe de inmediato y comun quese con el centro de servicio de Samsung Electronics Si el refrigerador tiene...

Page 99: ...brica de hielo Esto puede provocar lesiones personales o da os materiales No utilice ni coloque cerca o dentro del refrigerador ninguna sustancia sensible a la temperatura tales como pulverizadores i...

Page 100: ...e el estante al rev s El tope del estante no funcionar Si el estante de vidrio se cae puede causar lesiones personales Aleje los dedos de los puntos de agarre Los espacios entre las puertas y el gabin...

Page 101: ...causar una descarga el ctrica un incendio problemas con el producto o lesiones En caso de sentir olor a quemado o a humo en el refrigerador desench felo de inmediato y comun quese con el centro de se...

Page 102: ...una manera adecuada No coloque botellas de vidrio ni bebidas carbonatadas en el congelador El recipiente puede congelarse y romperse y esto puede ocasionar lesiones Utilice solamente la f brica de hie...

Page 103: ...es necesario desenchufar el refrigerador si se ausentar menos de tres semanas Sin embargo si se ausentar durante m s de tres semanas debe retirar todos los alimentos y el hielo de la cubeta desenchuf...

Page 104: ...abiertas De lo contrario pueden aparecer olores y moho Si se desconecta el refrigerador del suministro de energ a espere al menos cinco minutos antes de volver a enchufarlo Si el refrigerador se moja...

Page 105: ...ase de aceite es mejor almacenarlo en un lugar fresco y a la sombra como un armario o alacena Ejemplos de aceite vegetal aceite de oliva de ma z de semilla de uva etc Precauciones para la limpieza PRE...

Page 106: ...produzca un incendio o una descarga el ctrica No limpie el refrigerador rociando agua directamente sobre l No utilice benceno solvente Clorox ni cloruro para limpiarlo Pueden da ar la superficie del r...

Page 107: ...iadores que contengan petr leo en las superficies externas puertas y paneles piezas de pl stico revestimientos de puertas e interiores y juntas Pueden rayar o da ar el material No limpie con agua cali...

Page 108: ...as inflamable Refrigerante R 600a comun quese con las autoridades locales para desechar este producto en forma segura Cuando deseche este refrigerador retire los sellos y bisagras de las puertas de ma...

Page 109: ...la puerta la menor cantidad de veces posible Si el corte de energ a dura m s de 24 horas deber retirar y desechar toda la comida congelada El refrigerador podr a no funcionar de manera uniforme el co...

Page 110: ...osibles da os al ambiente o a la salud debido al desecho sin control de los desperdicios deber n separase esos elementos de otro tipo de desperdicios y reciclarlos en forma responsable a fin de promov...

Page 111: ...frigerador solamente para su uso previsto como se describe en este manual Todas las reparaciones deben estar a cargo de un t cnico calificado Descarte el material de empaque del producto de acuerdo co...

Page 112: ...n Descripci n breve del refrigerador El refrigerador y los componentes provistos pueden diferir de las ilustraciones en este manual seg n el modelo y el pa s Tipo A 01 02 03 09 06 05 07 04 10 08 B A...
Page 113: ...elos correspondientes Solo para los modelos con dispensador 02 Dispensador de agua 03 Compartimiento de la puerta del refrigerador 04 Estante del refrigerador 05 Estante espacio r pido 06 Caj n para v...

Page 114: ...veces puede aparecer humedad en esta secci n de la bisagra vertical Si cierra una puerta por la fuerza la otra puerta puede abrirse Si la l mpara LED interna o externa no funcionan comun quese con un...

Page 115: ...43 C Rango de temperatura efectiva El refrigerador est dise ado para funcionar normalmente dentro del rango especificado en su calificaci n de clase Clase S mbolo Rango de temperatura ambiente C IEC 6...

Page 116: ...30BB6 A 730 mm 868 mm B 908 mm C 1749 mm D 1778 mm 01 02 02 04 03 05 07 08 06 Modelo RF24BB6 RF30BB6 01 se recomienda m s de 50 mm 02 125 03 1485 mm 04 289 mm 05 610 mm 748 mm 06 54 mm 07 1093 mm 1231...

Page 117: ...sobre la que se instalar el refrigerador debe soportar un refrigerador completamente cargado A fin de proteger el piso coloque un trozo de cart n por el recorrido del refrigerador hasta su ubicaci n f...

Page 118: ...continuar con el procedimiento de instalaci n ADVERTENCIA Desenchufe el cable de alimentaci n del refrigerador antes de retirar las puertas Herramientas necesarias no provistas Destornillador Phillip...

Page 119: ...rese de que el refrigerador est apagado antes de desconectar los conectores 3 Desconecte el tubo de agua del acoplador en la puerta izquierda como se muestra Este paso no se aplica a los modelos sin...

Page 120: ...retirar la bisagra 7 Levante suavemente la puerta en sentido vertical para retirarla No use fuerza excesiva La puerta puede caerse y provocarle lesiones 8 Coloque la puerta en una superficie plana 9 R...

Page 121: ...ior de la puerta 2 Coloque la bisagra superior en su posici n en la parte de arriba del refrigerador y luego inserte el eje de la bisagra en el orificio superior de la puerta Aseg rese de que los cabl...

Page 122: ...del alcance de los ni os 7 Repita los pasos 1 a 5 para la otra puerta El paso 5 no aplica a los modelos sin puerta del panel 8 Coloque la cubierta superior con el lado frontal primero y luego presion...

Page 123: ...ara retirarla 2 Luego levante la cesta inferior para retirarla del conjunto de riel 3 Presione los ganchos para desbloquear el conjunto de riel 4 Mientras sostiene la parte superior del frente del caj...

Page 124: ...nivelar el refrigerador puede provocar da os al refrigerador o lesiones personales La nivelaci n debe realizarse con el refrigerador vac o Aseg rese de que no haya alimentos dentro del refrigerador P...

Page 125: ...luego eleve y sostenga la puerta m s baja A B 2 Inserte un anillo el stico A del tama o adecuado entre el anillo de caucho B de la puerta y la bisagra como se ilustra PRECAUCI N Inserte solo un anillo...

Page 126: ...la tuber a de agua En caso de fugas de agua comun quese con el instalador de la tuber a Para conectar la tuber a de agua fr a a la manguera de filtrado de agua PRECAUCI N Aseg rese de que la manguera...

Page 127: ...gas dispense unos 3 litros de agua antes de usar el refrigerador a fin de eliminar las impurezas del sistema de filtrado NOTA Si debe reubicar el refrigerador despu s de conectar la tuber a de agua as...

Page 128: ...funcionar adecuadamente 4 Espere a que el refrigerador llegue a la temperatura configurada Ahora el refrigerador estar listo para usar PASO 8 Verificaci n final Una vez finalizada la instalaci n conf...

Page 129: ...al o la temperatura deseada del congelador indica que la funci n Congelaci n r pida est encendida 03 Indicador de conexi n de red Este icono indica que el refrigerador est conectado a una red Si el ic...

Page 130: ...de hielo Off Desactivada Para habilitar la fabricaci n de hielo primero deber encender la f brica de hielo 06 Indicador del filtro de agua Indica que es necesario reemplazar el filtro de agua Cuando v...

Page 131: ...C 19 C 18 C 17 C 16 C 15 C Congelaci n r pida acelera el proceso de congelaci n con la velocidad m xima del ventilador El congelador funciona a m xima velocidad durante 50 horas antes de volver a la t...

Page 132: ...r el visor Este paso puede no aplicarse a algunos modelos 2 Presione hasta que el indicador de AutoFill Pitcher Llenado autom tico de la jarra parpadee 3 Presione o para activar o desactivar la funci...

Page 133: ...eemplazo del filtro de agua parpadea para avisar al usuario que es momento de cambiar el filtro Puede reemplazar el filtro de agua de inmediato y restablecer la alarma de reemplazo o puede descartar l...

Page 134: ...el visor se muestra el estado de Wi Fi durante 5 segundos como se ve en la figura Wi Fi encendido Wi Fi apagado NOTA Al configurar el Wi Fi para conectar el refrigerador a la aplicaci n SmartThings se...

Page 135: ...ber actualizaciones de la aplicaci n o de la funci n de la aplicaci n por motivos de seguridad o facilidad de uso incluso si en la actualidad su sistema operativo admite las actualizaciones Los sistem...

Page 136: ...d Devices Dispositivos admitidos seleccione el tipo de dispositivo Refrigerador y luego el modelo del dispositivo espec fico Siga las instrucciones de la aplicaci n para configurar el dispositivo Una...

Page 137: ...raci n actual Temperatura del refrigerador Puede configurar la temperatura deseada del refrigerador Temperatura del congelador Puede configurar la temperatura deseada del congelador Llenado autom tico...

Page 138: ...la jarra y beber agua fr a o purificada presione la manija B para abrir el centro de bebidas Jarra de agua Llenado autom tico de la jarra solo para los modelos correspondientes Siempre hay agua fr a...

Page 139: ...a jarra en el panel de control Abra la puerta del centro de bebidas tipo A o la puerta izquierda del refrigerador tipo B y luego inserte la jarra de agua en el soporte Emp jela en l nea recta como se...

Page 140: ...aje bien en el soporte Para evitar que la jarra se desborde o tenga fugas aseg rese de que el soporte del infusor est bien colocado NOTA Si la parte delantera rea marcada espec ficamente de la jarra d...

Page 141: ...Comun quese con el centro de servicio local de Samsung NOTA Debe limpiar la jarra despu s de consumir el agua infusionada Tambi n debe limpiar la jarra si no la ha usado por mucho tiempo o si la ha d...

Page 142: ...dispensador para evitar que el agua se derrame Si no utiliza el dispensador de agua durante 2 o 3 d as el agua dispensada puede presentar un sabor u olor extra o No se trata de una falla del sistema...

Page 143: ...o y para mantener la cubeta de hielo llena Para utilizarla por primera vez Deje que la f brica de hielo funcione durante 1 o 2 d as Descarte la primera y segunda cubeta de hielo para eliminar las impu...

Page 144: ...mentos en la cubeta de hielo Los alimentos congelados pueden da ar la f brica de hielo en especial al abrir o cerrar la puerta Cuando el refrigerador recupera el suministro el ctrico despu s de un cor...

Page 145: ...uen con el dispensador de agua ni la f brica de hielo Utilice nicamente la cubeta de hielo provista Las cubetas de hielo de terceros pueden provocar una falla del sistema NOTA La presi n de agua neces...

Page 146: ...e el infusor de la boca sellada gir ndolo ligeramente 4 Limpie el infusor con agentes neutros y corriente de agua Enjuague y seque bien 5 Vuelva a ensamblar Llenado autom tico de la jarra en el orden...

Page 147: ...eg n el modelo Estante superior 1 Levante la parte trasera del estante con una mano y jale hacia afuera para extraerlo 2 Incline el estante en sentido vertical como se muestra en la figura 3 Extraiga...

Page 148: ...arse Para insertarlo nuevamente sostenga el estante en ngulo de modo que la parte frontal est m s elevada que la trasera y luego inserte el gancho superior en la muesca superior del estante Luego baje...

Page 149: ...ntes de extraer el estante para vegetales 1 Extraiga el estante 2 Presione el frente del estante para levantar la parte trasera 3 Sostenga la parte trasera del estante e incl nelo en sentido vertical...

Page 150: ...ue encaje bien PRECAUCI N No retire un compartimiento lleno de alimentos Antes vac e el compartimiento Tenga cuidado al abrir la puerta si el compartimiento inferior contiene botellas grandes que podr...

Page 151: ...inferior hacia arriba para retirarla Para volver a colocarla inserte primero la parte posterior de la cesta en el conjunto de riel PRECAUCI N No gire la cesta al retirarla o colocarla Se puede rayar...

Page 152: ...2 Utilice un pa o h medo que no deje pelusa o una toalla de papel para limpiar el interior y el exterior del refrigerador 3 Al terminar utilice un pa o seco o toalla de papel para secarlo bien 4 Ench...

Page 153: ...odr a producirse una descarga el ctrica Reemplazo Filtro de agua ADVERTENCIA No utilice filtros de agua de terceros Utilice nicamente filtros provistos o aprobados por Samsung Los filtros no aprobados...

Page 154: ...as agujas del reloj para trabarlo en su posici n 7 Cierre la cubierta del cartucho del filtro 8 Presione Water Filter Reset Restablecer filtro de agua en el panel de control para restablecer el filtro...

Page 155: ...con un plomero profesional Pedir un filtro nuevo Para comprar un nuevo filtro de agua comun quese con un centro de servicios Samsung local o visite www samsungparts com en Internet L mparas de LED Pa...

Page 156: ...de calor No hay espacio suficiente entre el refrigerador y las paredes y gabinetes cercanos Aseg rese de que haya un espacio m nimo de 5 cm entre la parte posterior y los lados del refrigerador y las...

Page 157: ...mento bloquee la puerta Limpie las juntas de la puerta Condensaci n S ntoma Causas posibles Soluci n Se forma condensaci n en las paredes internas Si se deja la puerta abierta entra humedad en el refr...

Page 158: ...de hielo No se dispensa hielo El hielo puede atascarse si el dispensador no se utiliza durante un periodo prolongado aprox 3 semanas Si no utilizar el refrigerador por un periodo prolongado vac e la...

Page 159: ...tuber a de agua no est cerrada Se instal un filtro de agua de terceros Utilice nicamente filtros provistos o aprobados por Samsung Los filtros no aprobados pueden provocar p rdidas y da os al refriger...

Page 160: ...go del usuario Estos ruidos son normales Cuando se inicia o finaliza una operaci n el refrigerador puede emitir unos sonidos similares al encendido del motor de un auto Cuando la operaci n se estabili...

Page 161: ...l refrigerador aumenta o disminuye las partes pl sticas se contraen y se expanden y producen ruidos de golpeteo Dichos ruidos se producen durante el ciclo de descongelaci n o cuando las piezas electr...

Page 162: ...se ha establecido a n la conexi n de red En este caso use la aplicaci n SmartThings para conectarse y registrar el refrigerador en el punto de acceso PA de su casa No se puede iniciar una sesi n en la...

Page 163: ...software included in this product contains open source software The following URL http opensource samsung com opensource SMART_TP1_0 seq 0 leads to open source license information as related to this p...

Page 164: ...t Spanish www samsung com latin_en support English HONDURAS 800 2791 9111 www samsung com latin support Spanish www samsung com latin_en support English JAMAICA 1 800 SAMSUNG 726 7864 www samsung com...

Reviews: