background image

setting up 

_11

01


SETTING

 UP

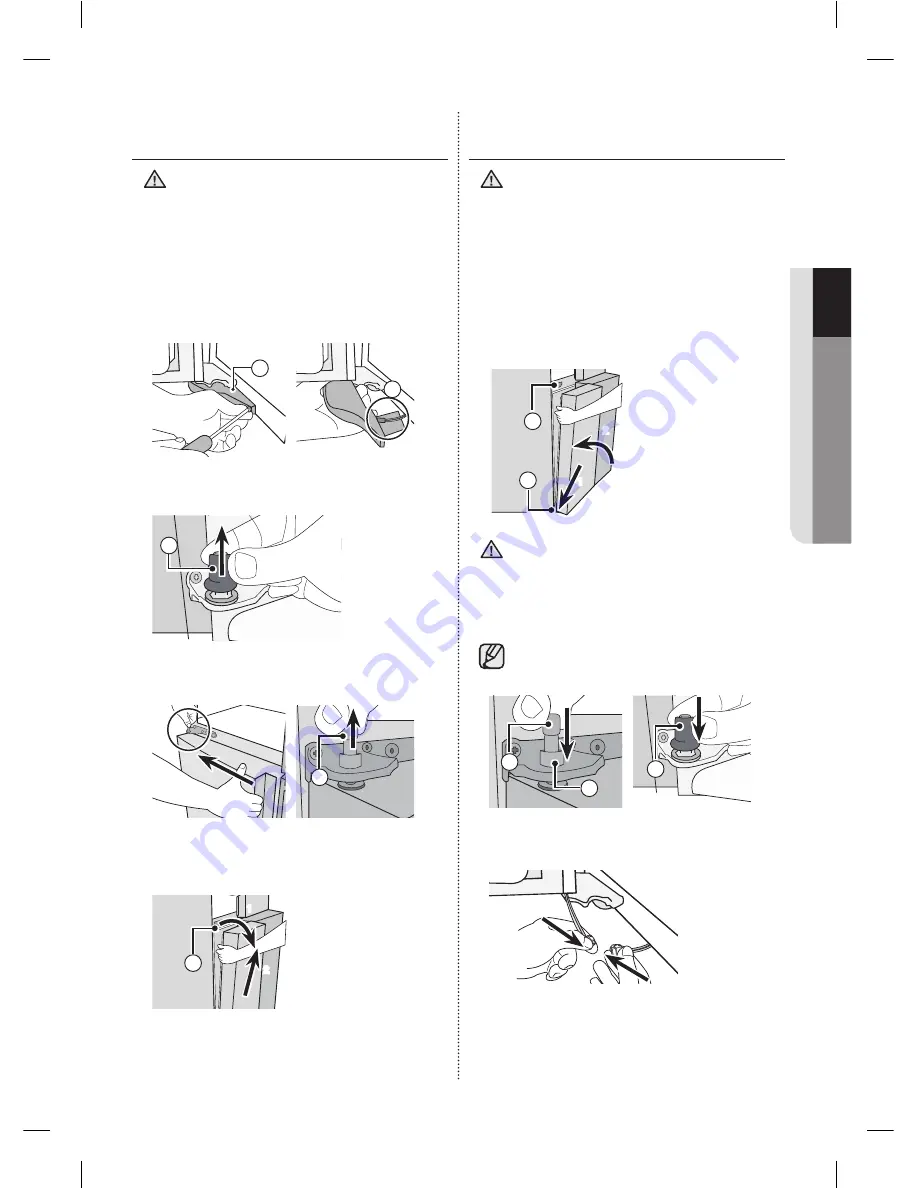
DISASSEMBLE THE FREEZER 
DOORS

•  Be sure to remove the Fridge Door 

before removing the Freezer Door.

•  Be careful with the wires attached to 

the bottom of the Freezer Door while 
disassembling.

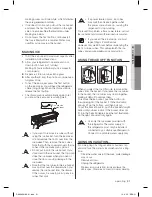
1. 

With the door open, remove the screw holding 
the cover (A) of the Adjustable Leg at the 
bottom of the door with a Phillips (+) 
Screwdriver, and then disassemble the 
Connector (B).

2. 

Lift up and remove the Mid Hinge Cap (C) on 
the Door Hinge above the Freezer Door. 

3. 

While pushing the door in the direction of the 
arrow, lift up the Mid Hinge Shaft (D). 

4. 

Being careful that the door does not touch the 
Mid Hinge (E), tilt the Door forward a little, and 
then lift it up to remove. 

CAUTION

A

B

C

D

1

2

E

RE-ATTACHING THE 
REFRIGERATOR DOORS

•  Be sure to re-attach the Freezer Door 

before re-attaching the Fridge Door.

•  Before re-attaching, make sure that all 

the wire connectors at the bottom of the 
Freezer Door are connected.

How to Re-attach the Freezer Door


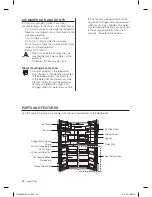
1. 

Insert the door into the lower hinge (A) in the 
direction of (1) and then push the door in the 
direction of (2). Take care not to scratch the 
door with the Mid-Hinge (B).  

•  Be careful not to damage the wires on 

the bottom of the door. Avoid stepping 
on them, etc.


2. 

Insert the Hinge Shaft (C) into the Mid Hinge 
Hole (D) and put on the Hinge Cap (E).

When assembling the Hinge Shaft and the 
Hinge Cap, be sure to assemble them in 
the correct direction. 


3. 

With the door open, join the connectors on the 
bottom of the door. 


- Be careful not to step on or damage the 

connectors.

CAUTION

1

2

A

B

CAUTION

C

D

E

DA68-02918A-01.indb   11

13. 4. 25.   �� 2:30

Summary of Contents for RF32FMQDBSR

Page 1: ...manual imagine the possibilities Thank you for purchasing a Samsung product To receive a more complete service please register your product at www samsung com register Free Standing Appliance DA68 029...

Page 2: ...he creation of a flammable gasair mixture if a leak in the refrigerating circuit occurs you must site this appliance in a room that is large enough to allow the refrigerant to dissipate For this refri...

Page 3: ...ehind the appliance When moving the refrigerator be careful not to roll over or damage the power cord This may result in an electric shock or fire Do not use aerosols near the refrigerator Aerosols us...

Page 4: ...or service the refrigerator Failing to do so may result in an electric shock fire explosion problems with the product or injury WARNING CRITICAL USAGE WARNINGS Do not touch the power plug with wet ha...

Page 5: ...let children hang on the door Serious injury can occur Risk of child entrapment Do not let children go inside the refrigerator Bottles should be stored tightly together so that they do not fall out Th...

Page 6: ...th a plastic bag the refrigerator can be over cooled If this cooling period lasts too long the water filter may break and cause water leakage Use only the ice maker provided with the refrigerator The...

Page 7: ...ould be supervised to ensure that they do not play with or enter the appliance If trapped inside a child may get hurt or suffocate to death Please dispose of the packaging material for this product in...

Page 8: ...he refrigerator to thaw You can then use the low temperatures of the frozen products to cool food in the refrigerator Do not keep the door of the appliance open for too long when putting food in or ta...

Page 9: ...llow clearance to the right left back and top when installing This will help reduce power consumption and keep your energy bills lower Do not install the refrigerator in locations where the temperatur...

Page 10: ...ignment Wasting energy due to improper door seal DISASSEMBLE THE REFRIGERATOR DOORS 1 With the door closed remove the 3 screws holding the Top Cover A with a Phillips Screwdriver and then remove the T...

Page 11: ...N A B C D 1 2 E RE ATTACHING THE REFRIGERATOR DOORS Be sure to re attach the Freezer Door before re attaching the Fridge Door Before re attaching make sure that all the wire connectors at the bottom o...

Page 12: ...ler F Connect the connector G on the left door and the connector H on the right door Red Clip 6 35mm G E H F 6 Attach the front of the Top Cover and then press down on its back until it lies flat Re a...

Page 13: ...lower than the other Check if the Refrigerator is level before adjusting the door Adjust the door height difference by inserting a Snap Ring 1 as shown between the door and the hinge You can use the...

Page 14: ...required If the refrigerator is installed in an area with low water pressure below 20 psi you can install a booster pump to compensate for the low pressure After you have connected the water line make...

Page 15: ...leak free connection You can test the water line quickly using a paper cup Under normal conditions the water dispenser can fill a 5 75 oz 170 cc cup in about 10 seconds COMPLETING THE SET UP Now that...

Page 16: ...ed temperature You can set the temperature between 8 F and 5 F between 23 C and 15 C Touch and hold this button for 3 seconds to decrease the time needed to freeze products in the Freezer This can be...

Page 17: ...s 3 seconds to unlock 7 Ice Type Press the Ice Type button to change the ice type Each time you press the Ice Type button the cubed and crushed ice modes alternate and the Cubed or Crushed ice icon li...

Page 18: ...when you pull it To prevent overflow empty the water filter tray 3 and dry around the filter case 2 3 Insert the new filter into the filter case 4 4 Push the filter in and then turn it clockwise unti...

Page 19: ...button repeatedly until the desired temperature is shown in the temperature display The temperature will change by 1 F or 1 C with each press See below Fahrenheit 0 F 1 F 2 F 3 F 4 F 5 F 6 F 7 F 8 F...

Page 20: ...DISPENSER Push the appropriate ice type button to select what you want dispensed Using the ice lever 1 Push the Ice lever dispenser 1 gently with your glass Ice will be released from the dispenser You...

Page 21: ...you remove the ice bucket from the drawer If this occurs be sure to pick up any ice cubes that spill CAUTION CAUTION CAUTION If a power failure occurs ice cubes may melt then freeze together when the...

Page 22: ...h a core alkaline water filter In the filtering process the pressure of the water that has flowed out of the filter has increased and the water has become saturated with oxygen and nitrogen When this...

Page 23: ...rinks together Take out the divider when storing carton size milks or drinks REMOVING THE REFRIGERATOR ACCESSORIES 1 Door Bins Compartment To remove Simply lift the bin up and pull straight out To rel...

Page 24: ...scolor or damage the refrigerator 3 Wipe the inside and outside of refrigerator until it is clean and dry 4 Plug the power cord of the refrigerator back in CHANGING THE INTERIOR LIGHTS Freezer Fridge...

Page 25: ...erator door ajar Condensation can occur when you leave the door open for a long time The Ice Maker is not producing ice Did you wait for 12 hours after installing the water supply line before making i...

Page 26: ...age or exterior finish accidents abuse neglect fire water lightning or other acts of nature use of products equipment systems utilities services parts supplies accessories applications installations r...

Page 27: ...rchase It must be presented to a SECA Authorized Service Center at the time service is requested before warranty services are rendered On all carry in models transportation to and from the Authorized...

Page 28: ...07660 CANADA 1 800 SAMSUNG 726 7864 www samsung com ca English www samsung com ca_fr French Samsung Electronics Canada Inc Customer Service 55 Standish Court Mississauga Ontario L5R 4B2 Canada Scan t...

Page 29: ...tion un monde de possibilit s Merci d avoir choisi un produit Samsung Afin de b n ficier d un service plus complet veuillez enregistrer votre produit l adresse www samsung com register Appareil amovib...

Page 30: ...la cr ation d un m lange gaz air inflammable si lorsqu une fuite se produit dans le circuit frigorifique vous devez placer cet appareil dans une pi ce suffisamment vaste pour permettre la dissipation...

Page 31: ...tion n ins rez pas le cordon d alimentation entre des objets ou n enfoncez pas le cordon d alimentation dans l espace situ derri re l appareil Lorsque vous d placez le r frig rateur assurez vous qu il...

Page 32: ...de cordon d alimentation endommag ou de prise murale mal fix e Un choc lectrique ou un incendie pourraient en r sulter Si le cordon d alimentation est endommag demandez son remplacement imm diat par...

Page 33: ...s les portes du r frig rateur ouvertes lorsque l appareil n est pas sous surveillance afin d viter qu un enfant ne se glisse l int rieur de l appareil Ne laissez pas les jeunes enfants s approcher du...

Page 34: ...spectez les dur es de cong lation et les dates de p remption associ es aux aliments surgel s Il n est pas n cessaire de d brancher le r frig rateur lorsque vous vous absentez moins de trois semaines C...

Page 35: ...roubles de la reproduction Cet appareil peut entra ner une faible exposition certaines des substances num r es y compris le benz ne le formald hyde et le monoxyde de carbone AVERTISSEMENT AVERTISSEMEN...

Page 36: ...e conforme aux normes ISO Cependant si vous souhaitez viter toute augmentation excessive de la temp rature des aliments surgel s pendant le d givrage de l appareil emballez les dans plusieurs couches...

Page 37: ...A 35 po 908 mm Largeur B 35 po 908 mm Hauteur C 71 po 1 822 mm Hauteur totale D 72 7 8 po 1 850 mm Laissez un espace suffisant tout autour de l appareil au moment de son installation Ceci contribuera...

Page 38: ...in d viter l humidit suite une fuite d air un alignement irr gulier des portes une perte d nergie en raison d une jointure de porte non herm tique D MONTAGE DES PORTES DU R FRIG RATEUR AVERTISSEMENT 1...

Page 39: ...R FRIG RATEUR Veillez remettre en place la porte du cong lateur avant celle du r frig rateur Avant de commencer la r installation assurez vous que tous les connecteurs de c bles situ s en bas de la po...

Page 40: ...nt sur le coupleur F Branchez le C B B connecteur G sur la porte gauche et le connecteur H sur la porte droite Bride rouge 6 35 mm G E H F 6 Fixez l avant de la plaque sup rieure puis appuyez sur sa p...

Page 41: ...es est plus basse que l autre V rifiez si le r frig rateur est de niveau avant de r gler la porte R glez la diff rence de hauteur de la porte en ins rant un circlip 1 comme illustr entre la porte et l...

Page 42: ...l eau est faible inf rieure 20 psi vous pouvez installer une pompe de surpression pour compenser la faible pression Apr s avoir raccord le tuyau d eau assurez vous que le r servoir d eau l int rieur...

Page 43: ...cordement s r et tanche Vous pouvez rapidement tester l alimentation en eau l aide d un gobelet Dans des conditions normales le distributeur d eau remplit un gobelet de 5 75 oz 170 cm3 en environ 10 s...

Page 44: ...r Power Freeze Cong lateur App pdt 3 s pour act cong rapide Appuyez sur ce bouton pour r gler la temp rature souhait e du cong lateur Vous pouvez r gler la temp rature entre 8 F et 5 F entre 23 C et 1...

Page 45: ...ce pil e Appuyez sur le bouton Ice Type Type de glace pour changer de type de glace chaque pression sur le bouton Ice Type le mode alterne entre gla ons et glace pil e et l ic ne correspondante Cubed...

Page 46: ...r cepteur du filtre eau 3 et essuyez le pourtour du logement du filtre 2 3 Ins rez le filtre neuf dans le logement 4 AVERTISSEMENT 4 Poussez le filtre et tournez le dans le sens des aiguilles d une m...

Page 47: ...2 F 3 F 4 F 5 F 6 F 7 F 8 F 5 F 4 F 3 F 2 F 1 F 0 F Celsius 18 C 19 C 20 C 21 C 22 C 23 C 15 C 16 C 17 C 18 C L indicateur de temp rature du cong lateur ou du r frig rateur clignote lorsque la temp r...

Page 48: ...DISTRIBUTEUR D EAU FROIDE Appuyez sur le bouton correspondant au type de glace que vous d sirez Utilisation du levier distributeur de glace 1 Poussez doucement le levier distributeur de glace 1 avec...

Page 49: ...vous rangez des aliments dans le bac glace ces aliments peuvent ATTENTION ATTENTION heurter et endommager la machine gla ons lorsque vous ouvrez ou fermez la porte Notez que les gla ons contenus dans...

Page 50: ...nettoyer Au moment de l insertion du bac glace assurez vous que ce dernier soit bien centr afin d viter qu il ne reste bloqu Ph nom ne d eau trouble Toute l eau fournie au r frig rateur passe travers...

Page 51: ...e condiments et des boissons en cannettes Retirez le s parateur lorsque vous rangez des briques de lait ou des boissons en bouteilles RETRAIT DES ACCESSOIRES DU R FRIG RATEUR 1 Compartiment des bacs d...

Page 52: ...g rateur car cela pourrait le d colorer ou l endommager 3 Essuyez l int rieur et l ext rieur du r frig rateur jusqu ce qu il soit propre et sec 4 Rebranchez le cordon d alimentation du r frig rateur R...

Page 53: ...ur e prolong e La machine gla ons ne produit pas de gla ons Avez vous attendu 12 heures apr s l installation du tuyau d adduction d eau avant de fabriquer des gla ons Le tuyau d adduction d eau est il...

Page 54: ...nserv en tant que preuve d achat Il doit tre pr sent au Centre de service agr avant qu un service de garantie ne soit effectu Pour tous les mod les portatifs le client est responsable du transport au...

Page 55: ...Notes DA68 02918A 01 indb 27 13 4 25 2 31...

Page 56: ...www samsung com Samsung Electronics America Inc 85 Challenger Road Ridgefield Park NJ 07660 CANADA 1 800 SAMSUNG 726 7864 www samsung com ca anglais www samsung com ca_fr fran ais Samsung Electronics...

Page 57: ...l usuario Imagine las posibilidades Gracias por adquirir un producto Samsung Para recibir un servicio m s completo registre su producto en www samsung com register Electrodom stico independiente DA68...

Page 58: ...evitar la creaci n de una mezcla de gas aire inflamable en caso de una p rdida en el circuito del refrigerante debe instalar este refrigerador en un lugar lo suficientemente grande para permitir que...

Page 59: ...objeto met lico no coloque sobre l ning n objeto pesado no lo coloque entre objetos ni lo empuje hacia el espacio que hay detr s del electrodom stico Al mover el refrigerador tenga cuidado de no enros...

Page 60: ...un incendio Si el cable de alimentaci n est da ado solicite su reemplazo inmediato al fabricante o al agente de servicios El fusible del refrigerador solo debe ser reemplazado por un t cnico calificad...

Page 61: ...r sofocaci n debido al encierro o lesiones personales No se siente en la puerta del congelador La puerta puede romperse y causar lesiones Para prevenir que los ni os se queden encerrados en el refrige...

Page 62: ...las fechas de vencimiento de los alimentos congelados No es necesario desenchufar el refrigerador si se ausentar menos de tres semanas Sin embargo si se ausentar durante m s de tres semanas retire to...

Page 63: ...mon xido de carbono ADVERTENCIA ADVERTENCIAS MUY IMPORTANTES PARA LA ELIMINACI N PELIGRO Riesgo de que los ni os se queden encerrados Antes de desechar su antiguo refrigerador o congelador Retire las...

Page 64: ...s congelados mientras descongela el electrodom stico envuelva los alimentos congelados con varias capas de papel de peri dico Cualquier aumento en la temperatura del alimento congelado durante el desc...

Page 65: ...B 35 908 mm Altura C 71 1822 mm Altura total D 72 7 8 1850 mm Cuando realice la instalaci n deje un espacio libre a la derecha izquierda atr s y arriba del refrigerador Esto ayudar a reducir tanto el...

Page 66: ...cajones correctamente para evitar Humedad por fuga de aire Alineaci n incorrecta de la puerta P rdida de energ a a causa de una puerta mal cerrada DESARMADO DE LAS PUERTAS DEL REFRIGERADOR 1 Con la pu...

Page 67: ...1 2 E C MO VOLVER A COLOCAR LAS PUERTAS DEL REFRIGERADOR Debe rearmar la puerta del congelador antes de rearmar la puerta del refrigerador Antes de proceder al ensamble aseg rese de que todos los con...

Page 68: ...coplador F Conecte el conector G de la puerta izquierda y el conector H de la puerta derecha Grapa roja 6 35mm G E H F 6 Coloque el frontal de la cubierta superior y presione la parte posterior hasta...

Page 69: ...UERTA Si una de las puertas est m s baja que la otra Compruebe que el refrigerador est nivelado antes de ajustar la puerta Ajuste la diferencia de altura de las puertas insertando un anillo el stico 1...

Page 70: ...ta una presi n de agua de 20 125 psi 138 862 kPa Si el refrigerador se instala en una zona de presi n de agua baja inferior a los 20 psi puede instalar una bomba cebadora para compensar la baja presi...

Page 71: ...a asegurarse de que la conexi n sea perfecta y libre de p rdidas Puede probar r pidamente la tuber a del agua con un vaso de papel En condiciones normales el dispensador de agua puede llenar un vaso d...

Page 72: ...seg para Poder de congelaci n Presione este bot n para ajustar el congelador a la temperatura deseada Puede establecer la temperatura entre 8 F y 5 F entre 23 C y 15 C Mantenga presionado este bot n...

Page 73: ...oquear 7 Ice Type Tipo de hielo Pulse el bot n Ice Type Tipo de hielo para cambiar el tipo de hielo Cada vez que pulsa el bot n Ice Type Tipo de hielo los modos de hielo en cubos o triturado alternan...

Page 74: ...agua 3 y seque alrededor del compartimento del filtro 2 ADVERTENCIA 3 Inserte el nuevo filtro en el compartimento 4 4 Presione el filtro y luego g relo en el sentido de las agujas del reloj hasta que...

Page 75: ...vez que presione el bot n la temperatura cambiar 1 F o 1 C Vea a continuaci n Fahrenheit 0 F 1 F 2 F 3 F 4 F 5 F 6 F 7 F 8 F 5 F 4 F 3 F 2 F 1 F 0 F Cent grados 18 C 19 C 20 C 21 C 22 C 23 C 15 C 16 C...

Page 76: ...ro de servicio de Samsung Electronics USO DEL DISPENSADOR DE AGUA FR A Presione el bot n del tipo de hielo adecuado para seleccionar lo que desea Uso de la palanca de hielo 1 Empuje la palanca del dis...

Page 77: ...de hielo pueden derramarse sobre el caj n PRECAUCI N No ponga alimentos en la cubeta de hielo Si almacena alimentos en la cubeta de hielo estos pueden golpear la f brica de hielo al abrir o cerrar la...

Page 78: ...rese de que est bien centrada De lo contrario se podr a trabar El fen meno de turbidez del agua El agua que ingresa al refrigerador circula a trav s de un filtro principal para agua alcalina En el pro...

Page 79: ...s de cart n de leche o bebidas REMOCI N DE LOS ACCESORIOS DEL REFRIGERADOR 1 Compartimentos de las puertas Para retirarlos simplemente levante el compartimento y jale hacia afuera Para volver a coloca...

Page 80: ...olorar o da ar el refrigerador 3 Seque el interior y el exterior del refrigerador hasta que est limpio y seco 4 Vuelva a conectar el cable de alimentaci n del refrigerador CAMBIO DE LAS L MPARAS INTER...

Page 81: ...ando deja la puerta abierta por mucho tiempo La f brica de hielo no funciona Esper 12 horas despu s de haber instalado la tuber a de suministro de agua antes de hacer hielo Est conectado el suministro...

Page 82: ...ble Samsung podr a escoger a nuestra entera discreci n proporcionar transporte a nuestra elecci n hasta y desde el Centro de Servicio autorizado Samsung De lo contrario el transporte hasta y desde el...

Page 83: ...ES INTRANSFERIBLE Y CONSTITUYE SU RECURSO EXCLUSIVO Ciertos estados no permiten limitaciones en cuanto a la vigencia de una garant a impl cita o la exclusi n o limitaci n de da os accidentales o indi...

Page 84: ...com Samsung Electronics America Inc 85 Challenger Road Ridgefield Park NJ 07660 CANADA 1 800 SAMSUNG 726 7864 www samsung com ca English www samsung com ca_fr French Samsung Electronics Canada Inc Cu...

Reviews: