background image

Operating


_25

02 
o

PER

atin
G

Please wait 1 second before removing the cup after dispensing water to prevent spills. Do not pull out

the lever dispenser after taking out ice or water. It comes back automatically. Ice is made in cubes.

When you select “Crushed”, the ice maker grinds the ice cubes into crushed ice.

Water clouding phenomenon

All water provided to refrigerators flows through the core filter which is an alkaline water filter. In this 

process, the pressure in the water that has flowed out of the filter gets increased, and oxygen and 

nitrogen become saturated. When this water flows out in the air, the pressure plummets and the oxygen 

and nitrogen get supersaturated so that they turn into gas bubbles. The water could look misty due to 

these oxygen bubbles. The water may temporarily look misty or cloudy due to these oxygen bubbles. 

After a few seconds, the water will look clear.

If you use all the ice at once, steps 3 and above 4 must be repeated 

(before dispensing the first 4 to 6 ice cubes, you need to wait 8 hours). 

This will replenish the ice cubes and ensure maximum ice production.

Caution

•    

In case ice doesn’t come out, pull out the ice bucket and press the test 

button located on the right side of ice maker.

•    

Do not press the test button continuously when the tray is filled with ice or 

water. Water may overflow or ice jamming may occur.

•    

Normal Use

         To fill the ice bucket to maximum capacity after installation, make sure to do 

the following steps.

   1.   Allow your refrigerator to operate and cool down for 24 hours

        (or 1 full day).

   2.  Waiting 24 hours will allow your ice maker to cool properly.

   3.  Dispense 4 to 6 ice cubes into the glass.

   4.  After 8 and 16 hours, dispense a full glass of ice.

using the water dispenser

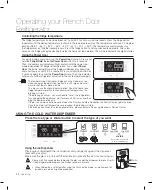
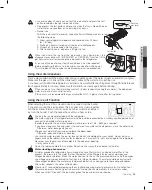
Place a glass underneath the water outlet and push gently against the water dispenser lever with your glass. 

Make sure the glass is in line with the dispenser to prevent the water from splashing out.
If you have just installed the refrigerator or installed a new water filter,Flush 3 gallons through filter before use 

(flush approximately 6 minutes). Make sure that water flows clearly again before drinking.

Test button

Check the 

water level

Caution

When you do not use the water dispenser for 2~3 days (especially during the summer), the dispensed 

water may have a funny smell or taste.

If this occurs, we recommend that you discard the first 1~2 glasses for better tasting water.

using the ice off Function 

When selecting the Ice Off mode, remove all ice cubes from the bucket.

If you are not using the ice dispenser, the ice cubes may clump together.

Pull the lock lever forward to throw away ice cubes or remove clumped 

ice from the bucket. Push the bucket back until you hear a click.

Caution

Use only the ice maker provided with the refrigerator.

The water supply to this refrigerator must only be installed/connected by a suitably qualified person and

connect to a potable water supply only.

In order to operate the ice maker properly, water pressure of 138 ~ 862Kpa is required.
If you have a long vacation or business trip and won’t use water or ice dispensers, close the water valve.

-. Otherwise, water leakage may occur.
Wipe excess moisture from inside and leave the doors open.

-. Otherwise, odor and mold may develop.

Use running water to clean the ice tray bucket, do not use detergent or your hands. Do not put your 

fingers or any other object in the chutes or blades, as it may result in injury or damage to the refrigerator.

Never put your finger or any other objects in the dispenser opening.

- It may cause injury.

Do not try to disassemble the ice maker. Do not wash or spray the ice bucket with water.

When  you  dump  the  ice  from  the  ice  bucket,  you  should  press  the 

dispenser lever once with ‘ICE CUBED’ or ‘CRUSHED’ function ON to 

get new ice faster after replacing the ice bucket in the refrigerator.

Caution

Summary of Contents for RFG298AABP

Page 1: ...efrigerator user manual imagine the possibilities Thank you for purchasing this Samsung product To receive more complete service please register your product at www samsung com register RFG298 English...

Page 2: ...lose The Secure Auto Close feature will automatically close a door that is slightly open Compact Ice Maker The Ice maker can dispense cubed or crushed ice Digital Display and Temperature Control Water...

Page 3: ...TION Hazards or unsafe practices that may result in minor personal injury or property damage Do NOT attempt Do NOT disassemble Do NOT touch Follow directions carefully Unplug the power plug from the w...

Page 4: ...ated in accordance with the manual before it is used Connect the power plug in proper position with the cord hanging down If you connect the power plug upside down the wire can get cut off and cause a...

Page 5: ...igerator The storage of benzene thinner alcohol ether LP gas and other such products may cause explosions Do not store pharmaceuticals products scientific materials or temperature sensitive products i...

Page 6: ...g it into the refrigerator Fill water tank ice tray water cubes only with potable water CAUTION SIGNS for CLEANING Do not directly spray water inside or outside the refrigerator There is a risk of fir...

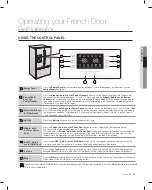
Page 7: ...water dispenser line 19 Installing the water line 21 Using the control panel 22 Using the digital display 23 Controlling the temperature 24 Using the cold water dispenser 26 Parts and features 27 Sto...

Page 8: ...final location by measuring doorways both width and height thresholds ceilings stairways etc The following chart details the exact height and depth of Samsung French Door Refrigerator Model Depth A Wi...

Page 9: ...d below Water filter Hex wrench Compression fitting Compression nut Fastener Disassemble the refrigerator doors 1 With the door opened remove the cap top table 1 with a flat blade screwdriver and clos...

Page 10: ...rench 12 10 5 Remove the screw 10 attached to the lower left and right door hinges with a philips screwdriver Remove the 2 hex head bolts 11 attached to the lower left and right door hinges with an al...

Page 11: ...5 Lift up the freezer door from the rails 2 Remove the tilting pocket 1 by pulling both support guards 2 upward at the same time 3 Take out the lower basket 3 by lifting the basket up from the rail sy...

Page 12: ...in the bottom of the door over the door hinge 12 Be careful not to miss the hinge cap because it can be easily taken off 12 Setting up your French Door Refrigerator Assemble the refrigerator doors 1 R...

Page 13: ...enser CAUTION 3 3 4 5 4 Connect the dispenser door tube 5 and then insert a clip on the coupler with pulling tube Connect the connector 4 on the left side door and two connectors 3 at each side of the...

Page 14: ...t the upper drawer Slot Slot 3 Tighten 4 hex head bolts completely with a socket wrench 10mm Slot Slot 4 Insert the lower basket 6 into the rail system 6 Remove 2 pieces of tape 9 attached to the side...

Page 15: ...t blade screwdriver into a notch on the left control lever and turn it counterclockwise to level the door Turning it clockwise to lower the refrigerator and counterclockwise to raise it For the left s...

Page 16: ...the freezer drawer 1 then you can see the lower hinge 2 2 Insert the supplied allen wrench 3 16 3 into the shaft 4 of the lower hinge 3 Please adjust the height by turning the hex wrench 3 clockwise o...

Page 17: ...sen the door 2 Loosen the controller screw 3 with a Phillips screwdriver 3 Find the best level to align the door slope After adjustment tighten the controller screw 3 and then philips screws Freezer D...

Page 18: ...side the refrigerator is properly filled To do this press the water dispenser lever until the water runs from the water outlet Water line installation kits are available at extra cost from your dealer...

Page 19: ...ip the compression nut not supplied and ferrule not supplied on copper tubing not supplied as shown If you are using plastic tubing insert the molded end Bulb of the plastic tubing into the compressio...

Page 20: ...tween 35 and 120 psi 241 and 827 kPa If a reverse osmosis water filtration system is connected to your cold water supply the water pressure to the reverse osmosis system needs to be a minimum of 40 to...

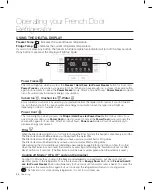
Page 21: ...for Filter Reset Press the Lighting button to turn on the Dispenser LED lamp 4 Lighting Press the Fridge hold 3 sec for Power Cool button to set the fridge to your desired temperature You can set the...

Page 22: ...indicator will be Blue when you initially insert the water filter The filter indicator will be Light Pink when you have used your water filter for 270 gallons The filter indicator will be Red when yo...

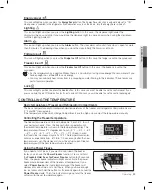
Page 23: ...ezer Ice off This icon will light up when you press the Freezer Ice Off button In this case the freezer ice will not be produced As this refrigerator has a dual Ice Maker there is a possibility of usi...

Page 24: ...en you open the doors too frequently or if a large amount of warm or hot food is placed inside This may cause the digital display to blink Once the freezer and fridge temperature return to their norma...

Page 25: ...lever with your glass Make sure the glass is in line with the dispenser to prevent the water from splashing out If you have just installed the refrigerator or installed a new water filter Flush 3 gall...

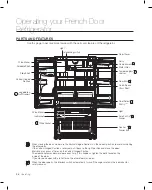
Page 26: ...Quick Space Glass Shelf When closing the door make sure the Vertical Hinged Section is in the correct position to avoid scratching the other door If the Vertical Hinged Section is reversed put it bac...

Page 27: ...ol the level of humidity for items that must keep the enough moisture Keep vegetables and fruits separate when possible 4 VEGETABLE FRUIT DRAWERS Storing Food in the Freezer Drawer Can be used to stor...

Page 28: ...often the door is opened Temperature You can select your pantry temperature from among Fresh 38 F Chilled mode 34 F and Deli mode 41 F modes Fruits and vegetables may be damaged under the Chilled set...

Page 29: ...ull straight out To relocate Slide it in above the desired location and push down until it stops Dust removal method Remove the guard and wash in water Do not adjust a bin full of foods CAUTION Injury...

Page 30: ...s shown in the illustration The refrigerator doors ensure that the doors close all the way and are securely sealed When the refrigerator door is only partially open it will automatically close But the...

Page 31: ...zontal and slide the Drawer 3 in 3 4 1 2 2 1 4 Freezer Drawer To remove the freezer drawer Pull the freezer drawer out fully Tilt up the rear of the bin and lift it out to remove To relocate the freez...

Page 32: ...ot recommended Cream Dips opened 1 week Not recommended Yogurt 10 14 Days Not recommended Check date code Keep covered Frozen Yogurt n a 2 Months EGGS Eggs uncooked 3 4 Weeks Not recommended Check dat...

Page 33: ...6 12 Months Bacon 1 2 weeks 1 2 Months Sausage 1 2 Days 1 2 Months Steak 2 4 Days 6 9 Months Poultry 1 day 12 Months Lunch meat 3 5 Days 1 month Cooked Meat 2 3 Days 2 3 Months Check date code for us...

Page 34: ...loth Do not use benzene thinner or Clorox for cleaning They may damage the surface of the appliance and may cause a fire Printed letters on the display may be erased if the stainless cleaner is applie...

Page 35: ...rigerator To keep cords and exposed parts free of dust and dirt accumulation Vacuum the rear side of the appliance once or twice a year Do not remove the back cover 1 You could suffer an electric shoc...

Page 36: ...s Make sure that water flows clearly again before drinking Be sure to flush the dispenser thoroughly otherwise water may drip from the dispenser This means that there is still air in the line Do NOT u...

Page 37: ...ation can occur when you leave the door open for a long time If a sound that hit something is heard from inside the refrigerator It is normal The sound comes due to ice cubes rubbing in the bucket per...

Page 38: ...ge Influent Concentration NSF Specified Influent Challenge Concentration Units apply to each row Average Reduction Average Product Water Concentration Max Permissible Product Water Concentration NSF R...

Page 39: ...Water Filter Certification _39 04 Water Filter Certification Water Filter Certification...

Page 40: ...period subject to availability within the contiguous United States In home service is not available in all areas To receive in home service the product must be unobstructed and accessible from floor...

Page 41: ...RICE OF THE PRODUCT SOLD BY SAMSUNG AND CAUSING THE ALLEGED DAMAGE WITHOUT LIMITING THE FOREGOING PURCHASER ASSUMES ALL RISK AND LIABILITY FOR LOSS DAMAGE OR INJURY TO PURCHASER AND PURCHASER S PROPER...

Page 42: ...Y CALL OR VISIT US ONLINE AT WRITE U S 800 SAMSUNG 800 726 7864 www samsung com Samsung Electronics America Inc 85 Challenger Road Ridgefield Park NJ 07660 CANADA 800 SAMSUNG 800 726 7864 www samsung...

Reviews: