background image

SIDE BY SIDE
REFRIGERATOR

RS253BA**

RS255BA**

RS257BA**

OWNER’S  MANUAL AND INSTALLATION

DA68-01468B  REV(0.0)

CONTENTS

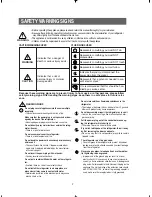
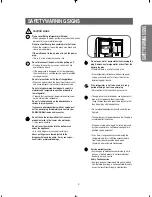
SAFETY WARNING SIGNS

...............................................................2

OPERATING INSTRUCTIONS

........................................................4

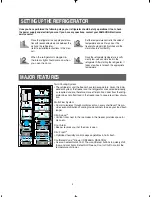
SETTING UP THE  REFRIGERATOR.........................................................4
MAJOR FEATURES .....................................................................................4
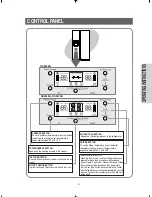
CONTROL PANEL........................................................................................5
DIGITAL  PANEL...........................................................................................6
TEMPERATURE CONTROL .......................................................................7
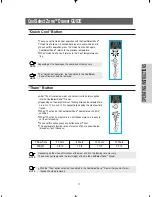
ICE and COLD WATER DISPENSER .........................................................7
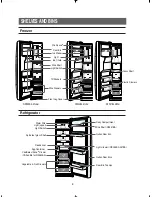
SHELVES and BINS.....................................................................................8
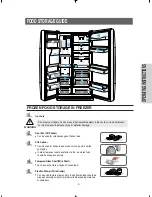
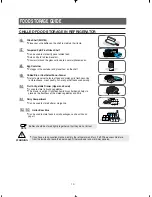
FOOD STORAGE GUIDE ...........................................................................9
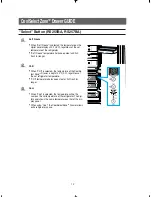
CoolSelect Zone

TM

Drawer GUIDE.............................................................11

REMOVING THE FREEZER ACCESSORIES..........................................13
REMOVING THE REFRIGERATOR ACCESSORIES..............................13
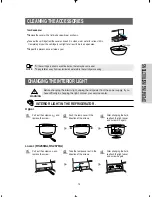
CLEANING THE ACCESSORIES .............................................................14
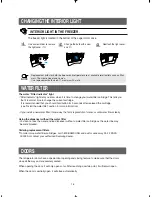
CHANGING THE INTERIOR LIGHT .........................................................15
WATER FILTER ..........................................................................................16
DOORS.......................................................................................................16

INSTALLATION INSTRUCTIONS

................................................17

INSTALLATION OF THE REFRIGERATOR  .............................................17
REMOVING THE REFRIGERATOR DOORS ...........................................18
REATTACHING THE REFRIGERATOR DOORS......................................21
LEVELING THE REFRIGERATOR............................................................24
ADJUSTING THE CLEARANCE BETWEEN THE DOORS ....................25
CHECKING THE WATER DISPENSER LINE...........................................26
INSTALLING THE WATER DISPENSER LINE .........................................26
TROUBLESHOOTING ...............................................................................29

In the CANADA.for questions about features, 

operation/performance, parts, accesories or service, call:

1-800-726-7864 (1-800-SAMSUNG)

www.samsung.ca

Write the model and serial number here:

Model #

Serial #

Find these numbers on a label of the 

refrigerator’s cabinet on the left hand-side wall.

Register your product at www.samsung.com/global/register

DA68-01468B(EN)  

2006.5.8 10:35AM  

페이지1

Summary of Contents for RS257BAWW

Page 1: ...TERIOR LIGHT 15 WATER FILTER 16 DOORS 16 INSTALLATION INSTRUCTIONS 17 INSTALLATION OF THE REFRIGERATOR 17 REMOVING THE REFRIGERATOR DOORS 18 REATTACHING THE REFRIGERATOR DOORS 21 LEVELING THE REFRIGER...

Page 2: ...cal parts may cause electric shock or fire Pull the power plug out of the socket before chang ing the refrigerator s interior light Otherwise there is a risk of electric shock If you wish to dispose o...

Page 3: ...when cleaning the plug Remove any foreign matter or dust from the power plug pins Otherwise there is a risk of causing a fire If the refrigerator is disconnected from the power supply you should wait...

Page 4: ...uick Cool Thaw and Select buttons to quickly chill thaw and cool items Select Soft Freeze Cool or Chill to control the temperature of drawer SETTING UPTHE REFRIGERATOR Once you have performed the foll...

Page 5: ...en 8 F and 14 F POWER COOL BUTTON Speeds up the cooling process in the refrigerator FRIDGE BUTTON To set the fridge temperature press the button repeatedly to change the set temperature in sequence be...

Page 6: ...s button to return the freezer to its set temperature If you need much ice you can get ice faster Press the button again to cancel the Power Freeze mode If you use this function energy consumption wil...

Page 7: ...8 F and 14 F Press the Freezer button repeatedly until the desired set temperature is shown in the temperature display The temperature display changes in sequence between 8 F and 14 F When the displa...

Page 8: ...rawers Front Leg Cover Tilt Pockets Freezer RS253BA Model Egg Container Light upper Water Filter Spill proof glass Shelf Dairy Compartment Wine Shelf RS257BA Gallon Door Bin Lights lower RS255BA 257BA...

Page 9: ...tration to the ice stored food should be wrapped securely Tempered Glass Shelf Wire Shelf Can be used to store all types of frozen food Plastics Drawer Wire Drawer Can be used to store meat and dry fo...

Page 10: ...fish or any other foods used quickly Fruit Vegetable Drawer Upper and Lower Is used to store fruits and vegetables This drawer is airtight Optimized humidity control design helps to preserve the fresh...

Page 11: ...nd 12 hrs sequentially keeping the meat partially frozen When Thaw ends the CoolSelect ZoneTM displayreturns to chill condition When Thaw ends meats are in a half frozen state so it is easy to cut the...

Page 12: ...or longer Chill When Chill is selected the temperature of the CoolSe lect ZoneTM Drawer is kept at 30 F 1o C regardless of the set refrigerator temperature Chill temperature helps keep meat or fish fr...

Page 13: ...ck in its original position and tighten the three screws NOTE REMOVINGTHE REFRIGERATOR ACCESSORIES Spill Proof Glass Shelf Pull the shelf out as far as it will go Then lift it up and gently remove it...

Page 14: ...keep drainage grid dry do not touch ice and water dispenser Interior Clean the accessories with a mild detergent then wipe out with a dry cloth After washing the accessories make sure that they are d...

Page 15: ...w cap and remove the screw Take the lamp cover out in the direction of the arrows After changing the bulb reattach the light cover and screw it again Twin Deodorizer Remove the cover with a flat blade...

Page 16: ...the water filter section for more information If you install a new water filter throw away the first six glassfuls of water or until water flows clearly Using the dispenser without the water filter Yo...

Page 17: ...upply line can be damaged See Separating the water supply line from the refrigerator on the next page Dimension inch Width Capacity Cu Ft Model RS253BA RS255BA RS257BA 25 2 without Hinge Case Height w...

Page 18: ...ling the water tube away Open the freezer and refrigerator doors and then take off the front leg cover by turning the three screws counter clockwise a a FRONT LEG COVER SCREW Removing the Front Leg Co...

Page 19: ...he upper hinge along the arrow Be careful when removing the door to ensure that it does not fall on you 3 Remove the door from the lower hinge by carefully lifting the door 4 Remove the lower hinge fr...

Page 20: ...fting the lower hinge the direction of the arrow 1 With the door closed remove the upper hinge cover using a screwdriver 2 Remove hinge screws and ground screw counter clockwise and take off the upper...

Page 21: ...e door into the hole in the lower hinge and pulling the hose down 3 Insert the upper hinge shaft into the hole After levelling between the upper hinge hole and the hole of the cabinet Reattach hinge s...

Page 22: ...over the lower hinge 3 Insert the upper hinge shaft into the hole After levelling between the upper hinge hole and the hole of the cabinet Reattach hinge screws and gound screw in the clockwise direc...

Page 23: ...front face of coupler insert the water line in the coupler 2 Tighten the screw on the clamp a a Put on the front leg cover by turning the three screws clockwise as shown in the figure Reattaching the...

Page 24: ...2 Freezer door is higher than that of the refrigerator Insert a flat blade screwdriver into a slot of the control lever turn it clockwise and level the refrigerator Do not make small adjustments with...

Page 25: ...y be released 2 Please adjust the height difference between the doors by turning the bolt clockwise or counter clockwise When you turn clockwise the door goes up WRENCH Adjustment part NUT BOLT Adjust...

Page 26: ...y filled initially Push the water dispenser lever until the water runs from the outlet NOTE Water line installation kit is available at extra cost from your dealer The refrigerator manufacturer recomm...

Page 27: ...ion Install the water filter NOTE 1 Slip the compression nut through the provided plastic tubing 2 Tighten the compression nut onto 1 4 comprression fitting Connect the water line to the refrigerator...

Page 28: ...lter Check the amount of water supplied to the ice tray CHECK THE WATER LEVEL Feeler Arm TEST BUTTON TOO HIGH OPTIMUM LEVEL 1 Lift up and pull out the ice maker bucket in the freezer ICE MAKER TOO LOW...

Page 29: ...d or expanded The front corners and sides of the cabinet are hot condensation occurs Anti condensators are installed in the front corners of the refrigerator to prevent condensation Condensation can o...

Page 30: ...30 MEMO...

Page 31: ...31 MEMO...

Page 32: ...IO L5R 4B2 CANADA TEL 905 542 3535 FAX 905 542 3835 1 800 SAMSUNG 7267864 www samsung com ca To obtain service please call our toll free CAMCO CUSTOMER SERVICE number at 1 800 361 3400 If further help...

Reviews: