background image

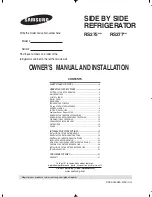
OWNER’S  MANUAL AND INSTALLATION

DA99-01506A  REV(0.0)

CONTENTS

SAFETY WARNING SIGNS

...............................................................2

OPERATING INSTRUCTIONS

........................................................4

SETTING UP THE  REFRIGERATOR.........................................................4
MAJOR FEATURES .....................................................................................4
CONTROL PANEL........................................................................................5
DIGITAL  PANEL...........................................................................................6
DEMO MODE ...............................................................................................6
TEMPERATURE CONTROL .......................................................................7
ICE and COLD WATER DISPENSER .........................................................7
SHELVES and BINS.....................................................................................8
FOOD STORAGE GUIDE ...........................................................................9
CoolSelect Zone

TM

Drawer GUIDE.............................................................11

REMOVING THE FREEZER ACCESSORIES..........................................13
REMOVING THE REFRIGERATOR ACCESSORIES..............................13
CLEANING THE ACCESSORIES .............................................................14
CHANGING THE INTERIOR LIGHT .........................................................15
WATER FILTER ..........................................................................................16
DOORS.......................................................................................................16

INSTALLATION INSTRUCTIONS

................................................17

INSTALLATION OF THE REFRIGERATOR  .............................................17
REMOVING THE REFRIGERATOR DOORS ...........................................18
REATTACHING THE REFRIGERATOR DOORS......................................21
LEVELING THE REFRIGERATOR............................................................24
ADJUSTING THE CLEARANCE BETWEEN THE DOORS ....................25
CHECKING THE WATER DISPENSER LINE...........................................26
INSTALLATION OF THE WATER DISPENSER LINE...............................27
TROUBLESHOOTING ...............................................................................30

CONSUMER SUPPORT

....................................................................31

WARRANTY ...............................................................................................31

In the U.S. for questions about features, 

operation/performance, parts, accesories or service, call:

1-800-726-7864 (1-800-SAMSUNG)

www.samsung.com

Write the model and serial number here:

Model #

Serial #

Find these numbers on a label of the 

refrigerator’s cabinet on the left hand-side wall.

Register your product at www.samsung.com/global/register

SIDE BY SIDE
REFRIGERATOR

RS275**

RS277**

DA99-01506A(EN)-0.0  

2008.3.17 3:14 PM  

페이지1    in

Summary of Contents for RS275ACBPXAA

Page 1: ...STRUCTIONS 17 INSTALLATION OF THE REFRIGERATOR 17 REMOVING THE REFRIGERATOR DOORS 18 REATTACHING THE REFRIGERATOR DOORS 21 LEVELING THE REFRIGERATOR 24 ADJUSTING THE CLEARANCE BETWEEN THE DOORS 25 CHE...

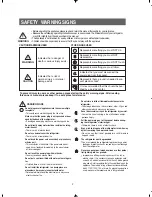
Page 2: ...ause electric shock or fire Pull the power plug out of the socket before chang ing the refrigerator s interior light Otherwise there is a risk of electric shock If you wish to dispose of the refrigera...

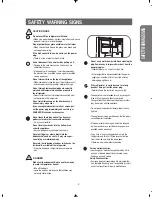
Page 3: ...e plug Remove any foreign matter or dust from the power plug pins Otherwise there is a risk of causing a fire If the refrigerator is disconnected from the power supply you should wait for at least fiv...

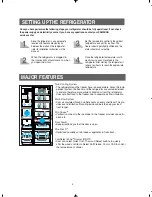
Page 4: ...Cool Thaw and Select buttons to quickly chill thaw and cool items Select Soft Freeze Cool or Chill to control the temperature of drawer SETTING UPTHE REFRIGERATOR Once you have performed the following...

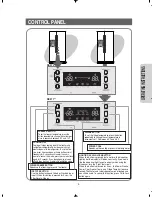
Page 5: ...ing the dispenser turn the Light feature off When this button is pressed for 3 sec the Power Freeze Power Cool Freezer Temp and Fridge Temp buttons are locked The Water and Ice dispensers are not lock...

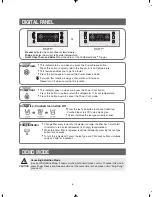
Page 6: ...his function energy consumption will increase Please turn off when not using this function Power Freeze Press the Ice Type button to choose Cubed Ice Crushed Ice or Ice Off to stop making ice Lit icon...

Page 7: ...digital display will stop blinking when the freezer and refrigerator return to normal temperature WARNING If the temperature control does not reset the temp unplug the refrigerator wait 9 min then plu...

Page 8: ...r Bin for RS275 Tilt Pocket for RS277 Freezer Egg Container Foldable Shelf RS277 Light upper Water Filter Compartment Spill proof glass Shelf Dairy Compartment Wine Shelf RS277 Gallon Door Bin Lights...

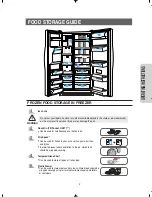
Page 9: ...nt odor penetration to the ice stored food should be wrapped securely Tempered Glass Shelf Can be used to store all types of frozen food Plastic Drawer Can be used to store meats and dry foods Stored...

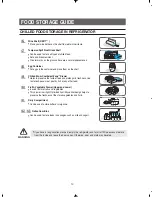
Page 10: ...e the taste of food and prolongs its freshness Use to store cheese meat poultry fish or any other food Fruit Vegetable Drawer Upper and Lower Is used to store fruits and vegetables This drawer is airt...

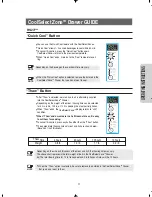
Page 11: ...ness of the meat and fish the thawing time may vary The above chart represents the total weight of food in the CoolSelect ZoneTM Drawer Ex The total thawing time for 1 3 lb frozen beef and 0 8 lb froz...

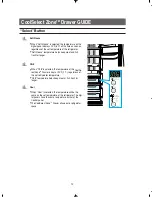
Page 12: ...fish fresh for longer Chill When Chill is selected the temperature of the CoolSe lect ZoneTM Drawer is kept at 30 F 1o C regardless of the set refrigerator temperature Chill temperature helps keep me...

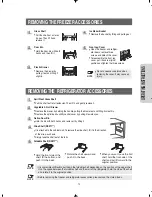
Page 13: ...wer by holding the handle pulling the drawer out and lifting it smoothly Remove the optimized humidity control cover by pulling it towards you Gallon Door Bin Hold the bin with both hands and remove i...

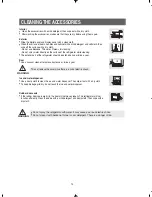
Page 14: ...ouch the ice and water dispenser Interior Clean the accessories with a mild detergent then wipe out with a dry cloth After washing the accessories make sure that they are dry before using them again E...

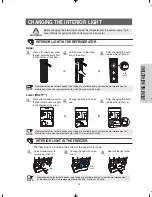
Page 15: ...zer and fridge are available from your local home improvement or electronics store Use replacement bulb size E17 maximum 30 watts NOTE Upper Lower RS277 After changing the bulb replace the light cover...

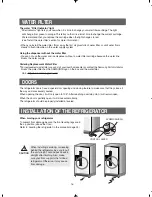
Page 16: ...home center or contact the Samsung Parts distributor blocks the water filter has the SAMSUNG logo on the box and the water filter Link http www samsungparts com When moving your refrigerator To preven...

Page 17: ...llow clearance to the right left back and the top when installing the refrigerator This has the advantage of reducing power consumption Do not install the refrigerator where the temperature will go be...

Page 18: ...tube away Removing the Front Leg Cover Separating the Water Supply Line from the Refrigerator Do not cut the water tube Separate it from the coupler NOTE Open the freezer and refrigerator doors and t...

Page 19: ...e in the direction of the arrow Be careful when removing the door to ensure that it does not fall on you 3 Remove the door from the lower hinge by carefully lifting the door 4 Remove the lower hinge f...

Page 20: ...ket by lifting the lower hinge 1 With the door closed remove the upper hinge cover using a screwdriver 2 Remove the hinge screws and the ground screw counter clockwise and take off the upper hinge in...

Page 21: ...hole in the lower hinge and pulling the hose down 3 Insert the upper hinge shaft into the hole After leveling between the upper hinge hole and the hole of the cabinet Put the hinge screws and the gro...

Page 22: ...e 3 Insert the upper hinge shaft into the hole After aligning the upper hinge hole with the hole of the cabinet put the hinge screws and the ground screw back by turning the screws in the clockwise di...

Page 23: ...re Reattaching the Water Supply Line Reattaching the Front Leg Cover Tube must be fully inserted to the marked line to avoid leaks NOTE Push the A collar to the B body and hold While pressing the fron...

Page 24: ...t a flat blade screwdriver into a slot of the control lever turn it clockwise and level the refrigerator Do not make small adjustments with the control lever Please refer to the next page DIFFERENCE O...

Page 25: ...ay be released 2 Please adjust the height difference between the doors by turning the bolt clockwise or counter clockwise When you turn clockwise the door goes up WRENCH Adjustment part NUT BOLT Adjus...

Page 26: ...rea with low water pressure below 20psi you should install a booster pump to compensate 4 Ensure the water storage tank inside the refrigerator is properly filled initially Push the water dis penser l...

Page 27: ...ns carefully to minimise the risk of expensive water damage TAP COUPLER A The water line must be connect ed to the cold water pipe If it is connected to the hot water pipe it may cause the puri fier t...

Page 28: ...put it back in place when you don t need to use the filter NOTE SEPARATION OF RED CAP STICKER MONTH INDICATION COMPRESSOR COVER OF REFRIGERATOR Remove the compressor cover of the refrigerator Connect...

Page 29: ...his problem occurs contact a service person to check the amount of water supplied 3 In case ice doesn t come out pull out the ice bucket and press test button located on the bottom of ice maker ICE MA...

Page 30: ...d The front corners and sides of the cabinet are hot condensation occurs Anti condensators are installed in the front corners of the refrigerator to prevent condensation Condensation can occur when yo...

Page 31: ...cosmetic damage or exterior finish accidents abuse neglect fire water lightning or other acts of nature use of products equipment systems utilities services parts supplies accessories applications in...

Page 32: ...ions or comments relating to Samsung products please contact the SAMSUNG customer care centre Samsung Electronics America Inc 105 Challenger Road Ridgefield Park NJ 07660 0511 1 800 SAMSUNG 1 800 726...

Reviews: