background image

02 OPERA

TING

English - 33

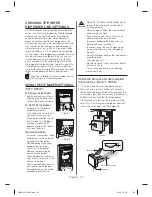
3.   Next, remove the fi xed cap by turning it counter 

clockwise.

4.   Remove the new fi lter’s protective cap and 

remove the old fi lter.

5.   Position and insert the new fi lter into the fi lter 

housing. Slowly turn the water fi lter clockwise 
90º to align with the indication mark on the cover, 
locking the fi lter in position. Make sure that the 
indicator is lined up with the “lock” position. Do 
not over tighten.

For Exterior model

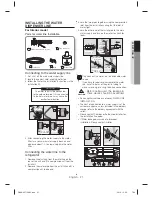
1. Shut off water supply.
2. Note the Flow direction on the fi lter.
3.  Insert water supply tube into the inlet side of the 

fi lter until the tube stop.

4.  After inserting tube, put together the clip strongly.   

The Clip fi x the tube.

5.  Turn on the water and check for leaks. If leaks 

occur, repeat step 1,2,3,4. If leaks persist, 
discontinue use and call your supporting dealer.

6.    Once you have completed this process, hold the 

Ice Type button

 for 3 seconds to reset the fi lter 

schedule.

7.    Lastly, Dispense 1 L of water through water 

dispenser and throw away. Make sure that water 
fl ows clearly again before drinking.

A newly installed water fi lter cartridge may 
cause water to briefl y spurt from the water 
dispenser. This is due to air getting into the line. 
It should pose no problem to operation.

Ordering replacement fi lters

To order more water fi lter cartridges, contact your 
authorized Samsung dealer.

- Internal  Filter - HAFIN2/EXP
- External Filter - HAFEX/EXP

1

2

3

4

5

Align the 
indication 
mark with 
lock position

Cover fi lter

Sticker
(month 

indicator)

WATER SUPPLY

INLET SIDE

PERMEAT

FLOW DIRECTION

Note :


You must also ensure 
that the cut is square 
and not at any sort 
of angle as this could 
cause a leak

DA68-02710A-05.indd   33

DA68-02710A-05.indd   33

2013. 12. 26.   

 7:29

2013. 12. 26.   

 7:29

Summary of Contents for RS7 Series

Page 1: ...Thank you for purchasing a Samsung product To receive a more complete service please register your product at www samsung com register Free Standing Appliance RS7 RS54H RS57H DA68 02710A 05 indd 1 DA6...

Page 2: ...nce by a person responsible for their safety Warnings and Important Safety Instructions in this manual do not cover all possible conditions and situations that may occur It is your responsibility to u...

Page 3: ...is grounded to prevent electric shock Call the contact center for help Note These warning signs are here to prevent injury to you and others Please follow them carefully After reading this section kee...

Page 4: ...of damage If in doubt consult your dealer The room where the refrigerator will be sited must WARNING be 1 m in size for every 8 g of R600a refrigerant inside the appliance The amount of refrigerant in...

Page 5: ...proper use of the ground plug can result in electric shock If the power cord is that matched the rating plate This provides the best performance and also prevents overloading house wiring circuits whi...

Page 6: ...the appliance When you open or close the door the articles may fall and cause personal injury and or material damage Do not put items lled with water on the refrigerator If spilled there is a risk of...

Page 7: ...g bad odors This may result in electric shock or re Do not touch the inside walls of the freezer or products stored in the freezer with wet hands This may cause frostbite Do not use mechanical devices...

Page 8: ...pped with LED Lamp do not disassemble Lamp Cover and LED Lamp by yourself Please contact your service agents If any dust or water is in refrigerator pull out power plug and contact your Samsung Electr...

Page 9: ...ntroduced food for freezing near to already food Please observe maximum storage times and expiry dates of frozen goods Fill water tank ice tray water cubes only with potable water Use only the ice mak...

Page 10: ...liance are damaged prior to disposal R600a or R134a is used as a refrigerant Check the compressor label on the rear of the appliance or the rating label inside the refrigerator to see which refrigeran...

Page 11: ...roduct in an environmentally friendly manner ADDITIONAL TIPS FOR PROPER USAGE In the event of a power failure call the local of ce of your Electricity Company and ask how long it is going to last Most...

Page 12: ...ing Energy Tips Install the appliance in a cool dry room with adequate ventilation Ensure that it is not exposed to direct sunlight and never put it near a direct source of heat radiator for example N...

Page 13: ...ight left back and top when installing This will help reduce power consumption and keep your energy bills lower For the most ef cient use of energy please keep the all inner ttings such as baskets dra...

Page 14: ...efer to drawing and dimension as below Please ensure that appliance can be moved freely in the event of maintenance service Spacer gray block installation For better performance please certainly x the...

Page 15: ...tor in the manual at page 19 To protect the nish of the ooring place the protection sheet such as packing carton under the refrigerator When installing servicing or cleaning behind the refrigerator be...

Page 16: ...h the water tubing and wire harness on the door Place doors on a protected surface to prevent scratching or damage 1 With the Freezer door closed remove the upper hinge cover 1 using a screwdriver and...

Page 17: ...tay it is time to put the doors back on Reattaching the Freezer Door 1 Replace the freezer door by inserting the water line 1 back into the lower corner of the door and then into the hole on the lower...

Page 18: ...the screw Reattaching the Water Supply Line 1 Insert the water line 2 into the coupler 1 2 The Water Line must be fully Inserted to the center of transparent coupler to prevent water leakage from the...

Page 19: ...help review the previous section on levelling the refrigerator In the process for adjusting both the doors is the same Open the doors and adjust them one at a time as follows 1 Unscrew the nut 1 from...

Page 20: ...ounds you hear when the ice maker dumps ice into the bucket are part of normal operation Not dispensing ice for long periods may cause ice clumps in the ice bucket Remove the remaining ice and empty t...

Page 21: ...to a drinkable water source If you have to repair or disassemble the water line cut off 6 5 mm of the plastic tubing to make sure you get a snug leak free connection Before being used the leakage in...

Page 22: ...e appropriate place after measuring the distance between the puri er and the cold water tap WARRANTY INFORMATION This water line installation is not covered by the refrigerator or ice maker manufactur...

Page 23: ...leakage If any repeat the connection Reattach the compressor cover of the refrigerator Secure the water line Using clip A x the water line to the wall the back of refrigerator When the water line is s...

Page 24: ...e Vacation button When you select vacation button for fridge compartment off display LED of Vacation will be on It is strongly requested to remove foods in the fresh food compartment and do not leave...

Page 25: ...F Five seconds after the new temperature is set the display will again show the actual current freezer temperature However this number will change as the Freezer adjusts to the new temperature When yo...

Page 26: ...or any other unsuitable objects in the chute or ice maker bucket It may result in personal injury or material damage Never put nger or any other objects in the dispenser opening It may cause injury Us...

Page 27: ...G English 27 RS757 RS756 RS77 RS54H 1 1 2 2 3 3 4 4 5 5 6 6 7 7 8 8 9 9 10 10 11 11 12 12 2 2 3 3 4 4 5 5 6 6 7 7 8 8 9 9 10 10 11 11 DA68 02710A 05 indd 27 DA68 02710A 05 indd 27 2013 12 26 7 29 2013...

Page 28: ...English 28 RS772 RS752 RS57H 2 2 3 3 4 4 5 5 6 6 7 7 9 9 10 10 11 11 DA68 02710A 05 indd 28 DA68 02710A 05 indd 28 2013 12 26 7 29 2013 12 26 7 29...

Page 29: ...est place to keep eggs Place the Egg Tray on the shelf for easy access 8 Beverage Station Optional Can be used to store the frequently used items such as canned beverages and snacks and allows access...

Page 30: ...ain CoolSelect ZoneTM returns to the previous temperature When Quick Cool ends it returns to the Cool temperature setting Thaw Drips loss and quality deterioration of meats reduces the freshness of fo...

Page 31: ...lay panel The CoolSelect ZoneTM Drawer allows extra refrigerator space Depending on the beverages the cool down time may vary For Quick Cool option food stored in the CoolSelect ZoneTM Drawer should b...

Page 32: ...service engineer to replace it CHANGING THE WATER FILTER To reduce risk of water damage to your property DO NOT use generic brands of water lers in your SAMSUNG Refrigerator USE ONLY SAMSUNG BRAND WAT...

Page 33: ...discontinue use and call your supporting dealer 6 Once you have completed this process hold the Ice Type button for 3 seconds to reset the lter schedule 7 Lastly Dispense 1 L of water through water di...

Page 34: ...lled in the front corners of the refrigerator to prevent condensation Is the refrigerator door ajar Condensation can occur when you leave the door open for a long time Ice is not dispensing Did you wa...

Page 35: ...memo DA68 02710A 05 indd 35 DA68 02710A 05 indd 35 2013 12 26 7 29 2013 12 26 7 29...

Page 36: ...er where they purchased this product or their local government of ce for details of where and how they can take these items for environmentally safe recycling Business users should contact their suppl...

Reviews: