background image

safety information 


_5

cAuTION SIGNS 
FOR clEANING ANd 
MAINTENANcE

•  Do not directly spray water inside or 

outside the refrigerator.

- There is a risk of fire or electric shock.

•  Do not spray inflammable gas near the 

refrigerator.

- There is a risk of explosion or fire.

•  Do not spray cleaning products directly on the 

display.

- Printed letters on the display may come off.

•  

Remove any foreign matter or dust from the 

power plug pins. But do not use a wet or damp 

cloth when cleaning the plug, remove any foreign 
material or dust from the power plug pins.

-  Otherwise there is a risk of fire or electric shock.

•  Never put fingers or other objects into the 

dispenser hole and ice chute.

-  It may cause personal injury or material damage.

•  Unplug the refrigerator before cleaning and 

performing maintenance.

SEvERE WARNING SIGNS 
FOR dISpOSAl

• Ensure that none of the pipes on the 

back of the appliance are damaged prior to 

disposal.

•  R600a or R134a is used as a refrigerant. 

Check the compressor label on the rear of 
the appliance or the rating label inside the 
refrigerator to see which refrigerant is used for 

your refrigerator. When this product contains 

flammable gas (Refrigerant R600a), contact your 
local authority in regard to safe disposal of this 
product. Cyclopentane is used as a insulation 
blowing gas. The gases in insulation material 
require special disposal procedure. Please 
contact your local authorities in regard to the 
environmentally safe disposal of this product. 
Ensure that none of the pipes on the back of the 
appliances are damaged prior to disposal. The 
pipes shall be broke in the open space.

•  If the appliance contains iso-butane refrigerant 

(R600a), a natural gas with high environmental 
compatibility that is, however, also combustible. 

When transporting and installing the appliance, 

care should be taken to ensure that no parts of 
the refrigerating circuit are damaged.

•  When disposing of this product or other 

refrigerators, remove the door/door seals, door 
latch so that small children or animals cannot 
become trapped inside. Leave the shelves in 
place so that children may not easily climb 
inside. Children should be supervised to ensure 
that they do not play with the old appliance.

•  

Please  dispose of the packaging material for this 
product in an environmentally friendly manner.

ADDITIONAL TIPS FOR PROPER 

USAGE

•  In the event of a power failure, call the local office 

of your Electricity Company and ask how long it is 
going to last.

-  Most power failures that are corrected within 

an hour or two will not affect your refrigerator 
temperatures. However, you should minimize the 
number of door openings while the power is off.

-  Should the power failure last more than 24 hours, 

remove all frozen food.

•  If keys are provided with the refrigerator, the 

keys should be kept out of the reach of children 
and not in vicinity of the appliance.

•  The appliance might not operate consistently 

(possibility of temperature becoming too warm 
in refrigerator) when sited for an extended period 
of time below the cold end of the range of 
temperature for which the refrigerating appliance 
is designed.

•  Do not store food which spoils easily at low 

temperature, such as bananas, melons.

•  Your appliance is frost free, which means there 

is no need to manually defrost your appliance, 
as this will be carried out automatically.

•  Temperature rising during the defrost can 

comply with ISO requirement. But if you want 

to prevent an undue rise in the temperature of 
the frozen food while defrosting the appliance, 
please wrap the frozen food in several layers of 
newspaper.

•  Any increase in temperature of frozen food 

during defrosting can shorten its storage life.

cAuTION

WARNING

DA99-02318A(0.5).indd   5

2011.5.31   5:1:15 PM

DA99-02318A(0.5).indd   5

2011.5.31   5:11:24 PM

Summary of Contents for RSH5SBBP

Page 1: ...ne the possibilities Thank you for purchasing a Samsung product To receive a more complete service please register your product at www samsung com register English Free Standing Appliance This manual is made with 100 recycled paper ...

Page 2: ... NOT attempt Do NOT disassemble Do NOT touch Follow directions carefully Unplug the power plug from the wall socket Make sure the machine is grounded to prevent electric shock Call the contact center for help Note These warning signs are here to prevent injury to you and others Please follow them carefully After reading this section keep it in a safe place for future reference cE Notice This produ...

Page 3: ... that the plug is accessible after installation The refrigerator must be grounded You must ground the refrigerator to prevent any power leakages or electric shocks caused by current leakage from the refrigerator Never use gas pipes telephone lines or other potential lightening rods as ground Improper use of the ground plug can result in electric shock If the power cord is damaged have it replaced ...

Page 4: ...cture clear of obstruction If you experience difficulty when changing the light contact service agents If the products equipped with LED Lamp do not disassemble Lamp Cover and LED Lamp by yourself Please contact your service agents If any dust or water is in refrigerator pull out power plug and contact your Samsung Electronics service center There is a risk of fire cAuTION SIGNS FOR uSING To get b...

Page 5: ...o combustible When transporting and installing the appliance care should be taken to ensure that no parts of the refrigerating circuit are damaged When disposing of this product or other refrigerators remove the door door seals door latch so that small children or animals cannot become trapped inside Leave the shelves in place so that children may not easily climb inside Children should be supervi...

Page 6: ...he refrigerator to thaw You can then use the low temperatures of the frozen products to cool food in the refrigerator Do not keep the door of the appliance open for too long when putting food in or taking food out The shorter time for which the door is open the less ice will form in the freezer Clean the rear of the refrigerator regularly Dust increases energy consumption Do not set temperature co...

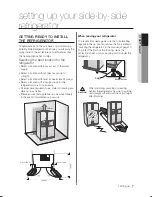
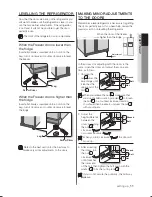
Page 7: ...ct a location with enough space for the refrigerator doors to open easily Overall space required in use Refer to drawing and dimension as below Please ensure that appliance can be moved freely in the event of maintenance service When moving your refrigerator To prevent floor damage be sure the front levelling legs are in the up position above the floor Refer to Levelling the refrigerator in the ma...

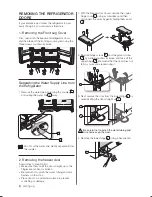
Page 8: ...irst Make sure that you lift the door straight up so the hinges are not bent or broken Be careful not to pinch the water tubing and wire harness on the door Place doors on a protected surface to prevent scratching or damage 1 With the Freezer door closed remove the upper hinge cover 1 using a screwdriver and then disconnect the wires by gently pulling them apart 2 2 Remove hinge screws 3 and the g...

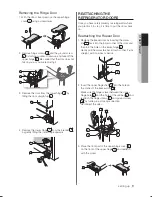
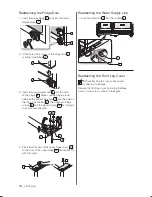
Page 9: ...tor where you plan for it to stay it is time to put the doors back on Reattaching the Freezer Door 1 Replace the freezer door by inserting the water line 1 back into the lower corner of the door and then into the hole on the lower hinge 2 Gently pull the water line back down so that it runs straight with no kinks or bends 2 Insert the upper hinge shaft 3 into the hole on the corner of the freezer ...

Page 10: ...on the top of the cabinet 8 Then reattach hinge screws 9 and the ground screw 10 by turning it in a clock wise direction 4 Place the front part of the upper hinge cover 11 on the front of the upper hinge 12 and reattach it with the screw Reattaching the Water Supply Line 1 Insert the water line 1 into the coupler 2 Reattaching the Front Leg Cover Before attaching the cover check water connector fo...

Page 11: ...tting the doors perfectly even If you need help review the previous section on levelling the refrigerator In the process for adjusting both the doors is the same Open the doors and adjust them one at a time as follows 1 Unscrew the nut 1 from the lower hinge until it reaches the upper end of the bolt 2 When you release the nut 1 make sure that you use the Allen wrench provided 3 to loosen the bolt...

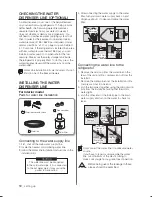
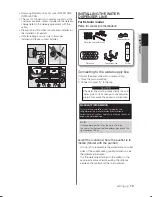
Page 12: ...drinking water line 3 follow the Water line Installation Instructions in the installation kit 4 After connecting the water supply to the water filter turn your main water supply back on and dispense about 1l to clear and prime the water filter Connecting the water line to the refrigerator 1 Remove the dust cap from the water line on the rear of the unit and fit a compression nut from the install k...

Page 13: ...tall Model with the purifier If you wish to reassemble the water inlet and outlet sides of the purifier during purifier installation see the reference illustration Cut the water line attached to the purifier to the appropriate place after measuring the distance between the purifier and the cold water tap Water line fixer and screws Pipe connector Water line Purifier lock clip Purifier CAUTION The ...

Page 14: ...out through the line check whether the tap is open Leave the tap open until clean water is running out and any residual matter that built up during manufacturing has been removed Attach the purifier lock clip Hold the purifier lock clip in the appropriate position under the sink for example and fix it tightly into place where to screw Secure the purifier in position Fix the purifier in position as...

Page 15: ...ly system and remove air from the lines 3 Additional flushing may be required in some households 4 Open the refrigerator door and make sure there are no water leaks coming from the water filter A newly installed water filter cartridge may cause water to briefly spurt from the water dispenser This is due to air getting into the line It should pose no problem to operation Check the amount of water s...

Page 16: ... press the Vacation button When you select vacation button for fridge compartment off display LED of Vacation will be on It is strongly requested to remove foods in the fresh food compartment and do not leave the door open when you select Vacation function CHILD LOCK FUNCTION By pressing the Vacation button and the Fridge button simultaneously for 3 seconds all buttons will be locked The Water dis...

Page 17: ...just like the Freezer process Press the Fridge button to set your desired temperature After a few seconds the Fridge will begin tracking towards the newly set temperature This will be reflected in the digital display The temperature of the freezer or the refrigerator may rise from opening the doors too frequently or if a large amount of warm or hot food is placed in either side This may cause the ...

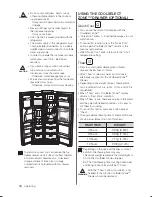
Page 18: ...lows 1 3 canned beverages to cool within 60 min To cancel this function press the Quick Cool button again CoolSelect ZoneTM returns to the previous temperature When Quick Cool ends it returns to the Cool temperature setting Thaw Drips loss and quality deterioration of meats reduces the freshness of foods After Thaw is selected warm and cold air is alternately supplied into the CoolSelect ZoneTM Dr...

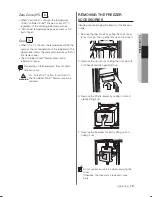
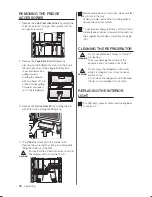
Page 19: ... Depending on the beverages the cool down time may vary For Quick Cool option food stored in the CoolSelect ZoneTM Drawer should be removed REMOvING ThE FREEZER AccESSORIES Cleaning and rearranging the interior of the freezer is simple 1 Remove the Glass shelf by pulling the shelf out as far as it will go Then gently lift it up and remove it 2 Remove the door bin by holding the door bin with both ...

Page 20: ...ently lifting the shelf out of the tabs Ensure that the Z Shelf is fitted as shown in the diagram and not upside down Before removing any accessories make sure that no food is in the way When possible remove the food altogether to reduce the risk of accidents To get the best energy efficiency of this product please leave all selves drawers and baskets on their original position like as illustratio...

Page 21: ...bout every 6 months 3 Next remove the fixed cap by turning it counter clockwise 4 Remove the new filter s protective cap and remove the old filter 5 Position and insert the new filter into the filter housing Slowly turn the water filter clockwise 90º to align with the indication mark on the cover locking the filter in position Make sure that the indicator is lined up with the lock position Do not ...

Page 22: ...at is normal as anti condensators are installed in the front corners of the refrigerator to prevent condensation Is the refrigerator door ajar Condensation can occur when you leave the door open for a long time Ice is not dispensing Did you wait for 12 hours after installation of the water supply line before making ice Is the water line connected and the shut off valve open Did you manually stop t...

Page 23: ...memo ...
Page 24: ...10 SAMSUNG 726 7864 www samsung com ph SINGAPORE 1800 SAMSUNG 726 7864 www samsung com SOUTh AFRICA 0860 SAMSUNG 726 7864 www samsung com U K 0330 SAMSUNG 726 7864 www samsung com VIETNAM 1 800 588 889 www samsung com Correct Disposal of This Product Waste Electrical Electronic Equipment Applicable in the European Union and other European countries with separate col lection systems This marking on...

Reviews: